F40i - Sprejemnik Mooer - Brezplačna navodila za uporabo
Brezplačno poiščite navodila za napravo F40i Mooer v formatu PDF.

Vprašanja uporabnikov o F40i Mooer
0 vprašanje o tej napravi. Odgovorite na tiste, ki jih poznate, ali zastavite svoje.
Zastavite novo vprašanje o tej napravi
Prenesite navodila za vaš Sprejemnik v formatu PDF brezplačno! Poiščite svoja navodila F40i - Mooer in vzemite svojo elektronsko napravo nazaj v roke. Na tej strani so objavljeni vsi dokumenti, potrebni za uporabo vaše naprave. F40i znamke Mooer.
NAVODILA ZA UPORABO F40i Mooer
MOOER
F40i & F40i Li
INTELLIGENT AMP
User Manual
Table of Contents
Precautions----01-03
Product Features----04-05
Panel Overview----06-09
Device Connection----10- 11
Quick Start 12-24
Power On----12
The Interface 13-19
Panel Buttons and Knobs Description----20-24
Function Operations----25-40
Preset Switching----26
Bluetooth Function 27
Wireless Footswitch----28-33
Tuner Function----34-38
Drum Machine Function----39-40
MOOER iAMP Application----41-72
Device Connect----42-43
Home Page Settings----44
User Interface----45-46
Preset Editing----47-50
Bottom Status Bar Controls----51
Mooer AI----52
MIC/INST Input Settings----53-55
Tone Library----56
Mixer----57
Menu Sidebar Operations----58
Login Operation----59-60
Preset Upload----61
Tone Cloud Entry----62
Settings----63-66
Tools----67-72
MOOER STUDIO FOR Future Series----73-76
Effect Description----77-91
Technical Specifications----92-94
Common Troubleshooting----95
Precautions
Please read carefully before use
To prevent serious injury or even death caused by electric shock, short circuits, damage, fire, or other hazards, always follow these essential safety instructions.
These precautions include but are not limited to the situations described below. Please review all content before operating the device:
Power Adapter
- Use the original DC 19.5 V 3.5A center-positive power adapter to charge the device.
- The factory adapter is specifically designed for MOOER electronic products—do not use it for other purposes.
- Only use power adapters that meet the manufacturer's specifications and have been approved by relevant authorities and local regulatory standards (such as UL, CSA, VDE, CCC).
● Always use the rated voltage specified for the product. - Do not use the power adapter in humid environments.
- Regularly inspect the adapter plug and cable for damage. Clean dust and debris from the plug to avoid poor contact that may damage the device.
- Unplug the power adapter from the outlet during long periods of inactivity or during thunderstorms.
Battery
- Do not power on or charge the device when it is wet. Moisture may cause short circuits leading to electric shock, malfunction, or fire hazards.
- Only charge the device using the designated charger to avoid electrical leakage, overheating, malfunction, or explosion.
- Charge only within the recommended temperature range. High temperatures may cause leakage, overheating, damage, or explosion.
- To prevent accidents, do not charge the device near flammable or explosive materials. Ensure that the power outlet is easily accessible so charging can be stopped immediately if a problem occurs.
- If you notice an unusual smell, abnormal sounds, or irregular behavior during charging or discharging, stop charging immediately and contact customer service for inspection and repair.
- Do not attempt to disassemble or replace the battery yourself. Improper handling can cause malfunction, chemical burns, or explosion. Contact customer service for repair.
- If battery leakage occurs, avoid contact with skin or eyes. If contact happens and discomfort occurs, seek medical attention immediately.
- To prevent fire or explosion, do not disassemble, crush, incinerate, or submerge the battery. Do not continue using a swollen battery.
- Do not use or store the battery in high-temperature environments. Do not use the battery after it has been submerged in water.
Electrical Interference
Keep the device away from radios and televisions during use to prevent interference.
Cleaning
To clean the device, use a dry or slightly damp soft cloth.
Do not use abrasive cleansers, alcohol, paint thinners, wax, solvents, chemical detergents, or any harsh cleaning agents.
Operation
Avoid using excessive force on switches or controls.
Do not allow paper scraps, metal objects, or other debris to fall inside the unit.
Do not drop the device or subject it to strong impact or excessive pressure.
Product Features
● MOOER iAMP 2.0 Processing Engine delivers authentic, professional-grade tone at the core.
- Powered by MOOER AI, transforming the amp into your personal tone creator—effortlessly unlock new sounds and fresh inspiration.
- Dual-channel input with two fully independent effect chains, allowing simultaneous connection of two instruments.
- Versatile compatibility with microphones, electric guitars, acoustic guitars, and bass—built for any playing scenario.
● 40W stereo output with dual 4" high-fidelity speakers, providing powerful, room-filling sound.
- DPE Dynamic Space Enhancement Technology adds depth and dimension for an immersive, wide-stage listening experience.
● Factory-loaded with 55 MNRS amp models and 69 effect types, covering everything from classic essentials to modern tones.
● Headphone and line outputs for silent practice or integration with external PA systems.
- 60-second phrase looper with drum machine sync, ideal for songwriting, practice, and spontaneous creativity.
- 60 drum patterns + 10 metronome types for engaging, dynamic practice sessions.
- Bluetooth 5.0 high-fidelity audio, perfect for backing tracks or use as a premium Bluetooth speaker.
- USB-C REC (OTG) recording, enabling high-quality audio+video capture directly to your mobile device for instant social-media sharing.
- Dedicated iAMP App provides deep editing, cloud preset management, and seamless sound switching.
● Supports the MNRS cloud tone library, giving you access to a massive collection of amp captures and user presets.
● Compatible with MOOER wireless footswitches, delivering expanded hands-free control. - Optional battery-powered (Li) version, freeing you from power outlets for true portable performance.
● 1.28" circular touchscreen for clear, intuitive control at a glance.
● Built-in tuner with one-touch access to keep your instrument perfectly in tune.
Panel Overview
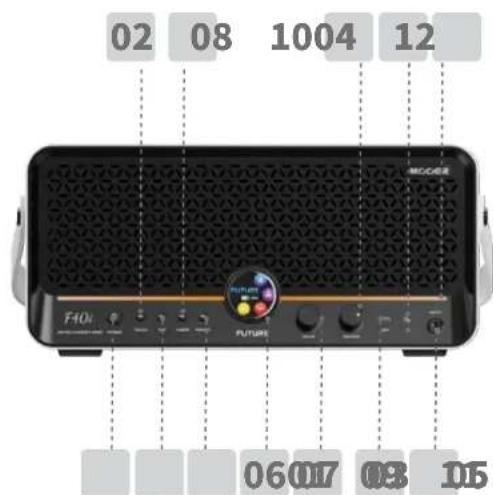
01 Power Button
Illuminated power button. Press and hold to power the unit on or off.
02 TOOLS Button
Clickable button used to enter or exit the Tools menu.
03 TAP Button
Press to tap in tempo. The LED flashes in sync with the current BPM during normal operation.
04 TUNER Button
Press to enter or exit the tuner screen.
05 PRESET Button
Press to cycle through the four presets within the current bank.
06 Display Screen
Shows all operational information and visual feedback for the device.
07 VALUE Encoder
Rotate or press to switch presets, adjust drum machine parameters, and access various functions.
08 MASTER Knob
Adjusts the overall output volume.
9 REC (USB Type-C Port)
Used for OTG data transmission and mobile device recording.
Note: This port is designed for mobile recording. It does not replace a low-latency professional audio interface for DAW recording. On Windows DAWs, a third-party ASIO driver is required, and compatibility issues may occur.
10 3.5mm Headphone Output
Connect headphones for silent monitoring. When plugged in, the internal speakers are automatically muted.
11 INPUT
1/4" instrument input for connecting guitars or other instruments.
12 Ambient Lighting
Multi-color ambient light. When adjusting volume, it displays a progress-bar-style visual indication of parameter changes.
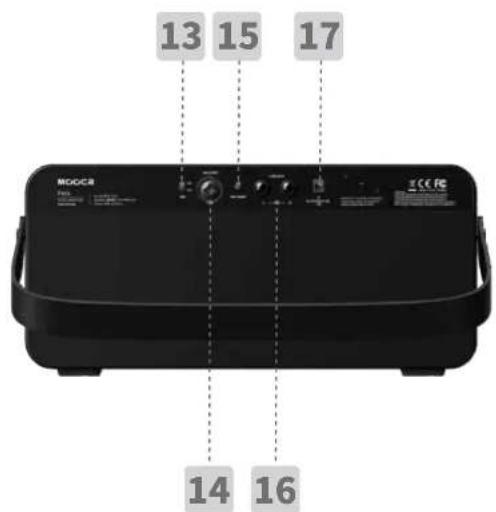
13 48V Phantom Power Switch
Toggle on when using a condenser microphone only.
14 MIC/INST Jack
Combo XLR input with preamp gain. Supports microphones, guitar, bass, or other instruments.
15 MIC GAIN
Adjust microphone gain. Slowly increase until you achieve a full, dynamic signal without distortion.
16 LINE OUT
1/4" output for connecting to monitor speakers or mixing consoles.
17 DC 19.5 V 3.5A Power Input
Connect the power adapter for operation or battery charging.
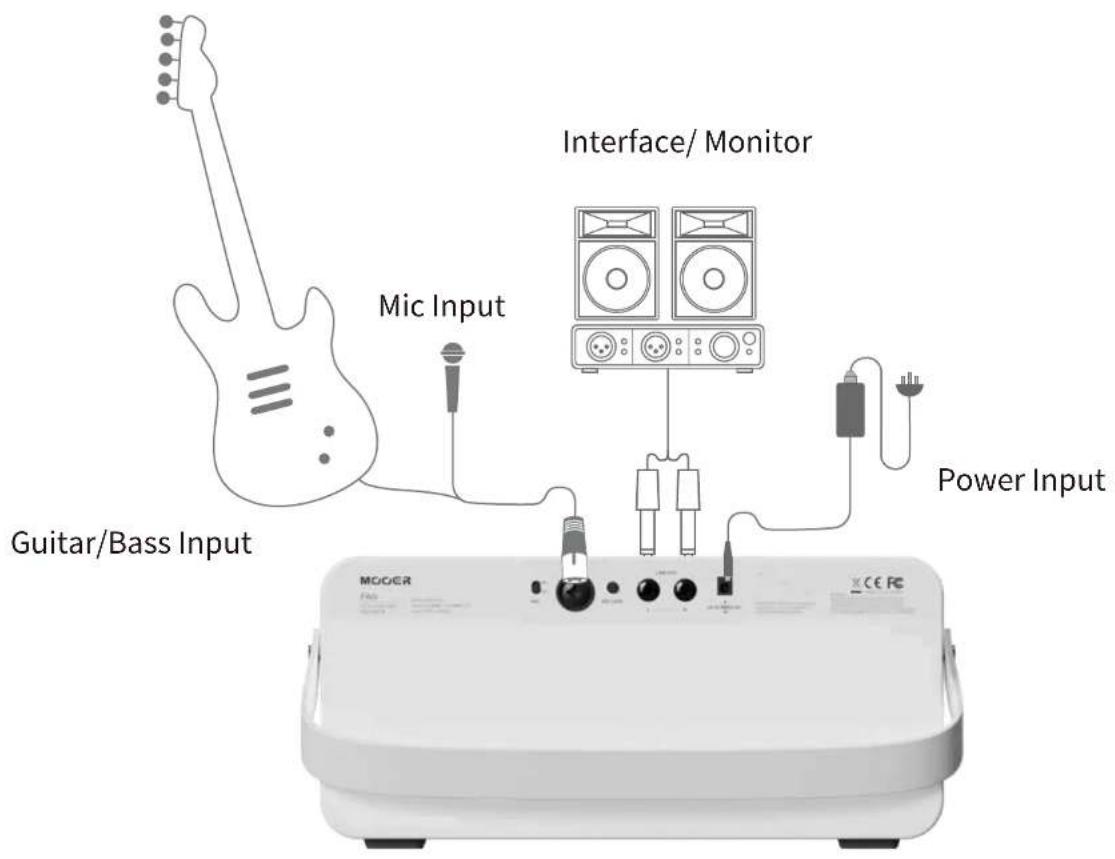
Device Connection
Note: When headphones are connected, the built-in speakers will automatically be muted.

Mobile Phone/ Tablet/ Computer
Quick Start
Power On
To prevent potential damage from sudden volume spikes, we recommend turning the MASTER knob all the way down before pressing and holding the power button to turn the device on.
Please note: The Li (battery) version can operate without being connected to external power.
The standard non-battery version must be connected to a power source to operate. To avoid power noise or possible short-circuit issues, always use the power adapter included in the package.
The Interface
Preset Main Interface

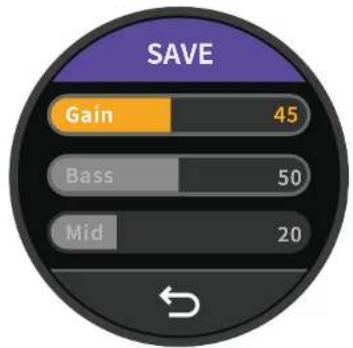
AMP Module Circular Screen Parameter Adjustment
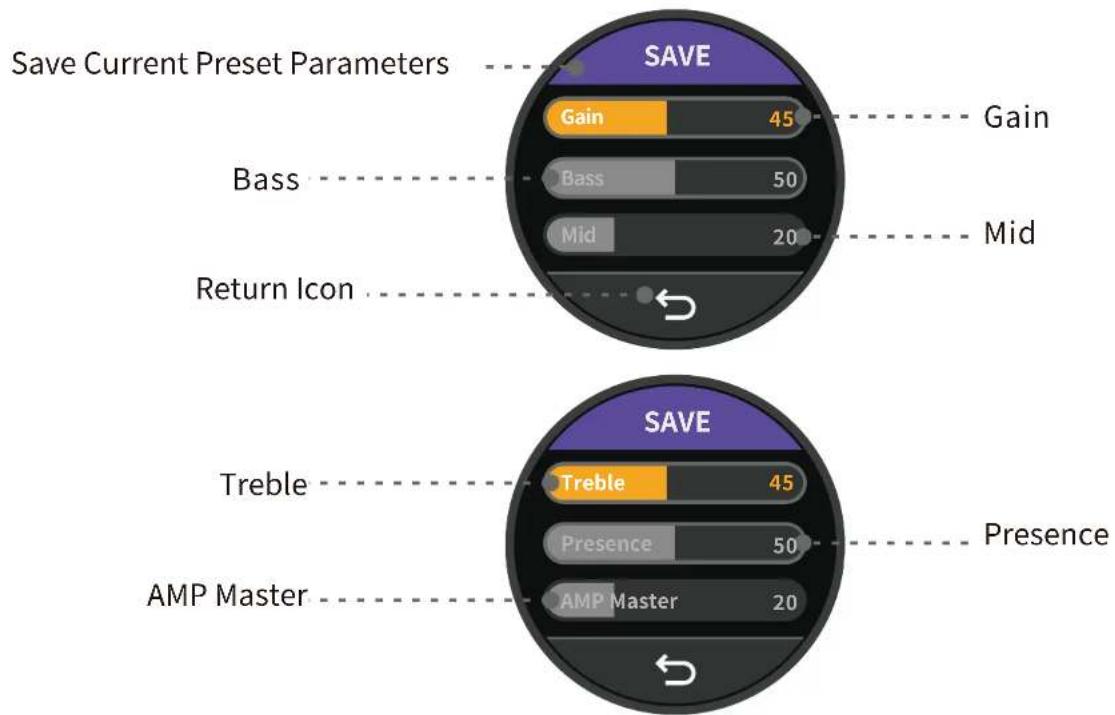
(1) Entering the Parameter Edit Screen:
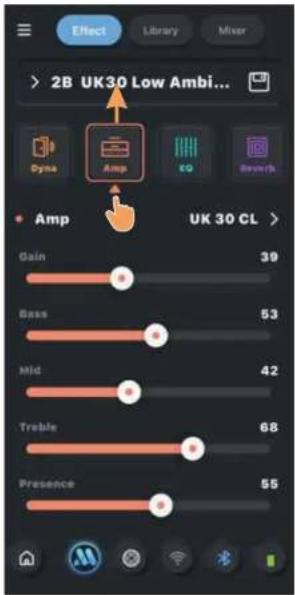
Tap the upper half of the preset name on the main screen to enter the AMP parameter edit page. Tap the lower half to enter TOOLS.
(2) For the active AMP module in the signal chain, six adjustable parameters are available: Gain, Bass, Mid, Treble, Presence, Volume.
(3) After entering the edit screen, tap a parameter name to select it, then rotate the VALUE encoder to adjust its value.
(4) Tap SAVE to store the preset, or tap the return icon to go back to the main screen.

bar
| Category | Value | | -------- | ----- | | Gain | 45 | | Bass | 50 | | Mid | 20 |AMP Module Interface
bar
| Feature | Value | | ------- | ----- | | Gain | 45 | | Bass | 50 | | Mid | 20 | | Return Icon | - | | Feature | Value | | --------- | ----- | | Save Current Preset Parameters | - | | Take Current Preset Parameters | - | | Take Current Preset Parameters | - | | Take Current Preset Parameters | - | | Take Current Preset Parameters | - | | Take Current Preset Parameters | - | | Take Current Preset Parameters | - | | Take Current Preset Parameters | - | | Take Current Preset Parameters | - | | Take Current Preset Parameters | - | | Take Current Preset Parameters | - | | Take Current Preset Parameters | - | | Take Time to Return Icon | - | | Take Time to Return Icon | - | | Take Time to Return Icon | - | | Take Time to Return Icon | - | | Take Time to Return Icon | - | | Take Time to Return Icon | - | | Take Time to Return Icon | - | | Take Time to Return Icon | - | | Take Time to Return Icon | - | | Take Time to Return Icon | - | | Take Time to Return Icon | - | | Take Time to Return Icon / Take Time to Return Icon | - | | Take Time to Return Icon / Take Time to Return Icon | - | | Take Time to Return Icon / Take Time to Return Icon | - | | Take Time to Return Icon / Take Time to Return Icon | - | | Take Time to Return Icon / Take Time to Return Icon | - | | Take Time to Return Icon / Take Time to Return Icon | - | | Take Time to Return Icon / Take Time to Return Icon | - | | Save Time to Retrole / Treble / Presence / AMP Master | 45 | | Take Time to Retrole / Treble / Presence / AMP Master | 50 | | Take Time to Retrole / Treble / Presence / AMP Master | 20 |Tools Interface
Drum Machine Interface
Tuner Interface
Pitch Information

Display
Back Icon
Lyrics Display Interface
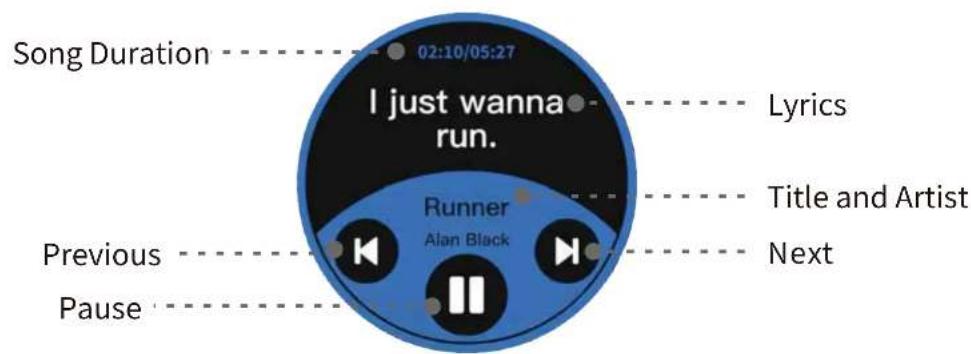
In the APP, go to Global Settings and find the Lyrics Display option. Turn this switch on. When you play music and remain inactive for 3 seconds, the F40i will automatically enter the Lyrics Display interface. In this interface, you can view real-time lyrics, the song's creator, total duration, and more. You can also control playback, including Pause/Play, Previous Track, and Next Track.
Panel Buttons and Knobs Description
Power Button
Press and hold this button to power the device on or off.
When powering off, a confirmation screen will appear on the display—tap "Yes" to shut down. (A short press will also bring up the shutdown confirmation screen. If you press and hold for 3 seconds, the device will automatically power off.)

Shutdown Confirmation Screen
TOOLS Button
Press this button from any screen to enter the TOOLS menu.
Press it again to exit the Tools interface and return to the main preset screen.

Tools Interface
TAP Button
This button is used for tap-tempo and is linked to the unit's BPM settings.
In all screens except the Drum Machine page, the TAP button LED flashes red to indicate the current BPM. The BPM is also converted into a 1/4-note Time value and applied to the Delay module.
In the Drum Machine page, the TAP button LED flashes blue to indicate BPM, and tapping the button will adjust the Drum Machine's BPM.
TUNER Button
Press this button from any screen to enter the TUNER page.
Press it again to exit the tuner and return to the main preset screen.

Tuner Interface
PRESET Button
Press this button from any screen to return to the main preset interface; this button functions as a "HOME" key.
When on the preset screen, pressing this button cycles through the four presets within the same bank. The button LED will display Blue, Yellow, Green, or Purple to represent presets A, B, C, and D respectively.
When any preset parameters are changed, the button LED will flash to indicate unsaved changes. Press and hold to save.

Preset Main Interface
VALUE Encoder
Use this encoder to switch presets, change drum machine types, and perform various navigation functions.
When a parameter is selected on the screen, you can use this encoder to adjust its value.
MASTER Knob
This knob adjusts the unit's main output volume.'
When turning this knob, the current volume level will be displayed temporarily on the screen, and the ambient light bar will also show the adjustment amount as a progress indicator.

Temporary Display Interface When Adjusting Main Volume
Function Operations
The previous section introduced the basic hardware and simple connection scenarios.
In the following pages, we ll show you how to unlock the full potential of the F40i Intelligent '
Amp and start your personalized musical journey.
Preset Switching
The F40i contains 20 preset banks, each with 4 presets, for a total of 80 presets. The F40i offers multiple ways to switch presets:
Method 1
On the main preset screen, rotate the VALUE encoder to quickly switch presets.
Method 2
Press the PRESET button on the front panel to cycle through the four presets within the current bank.
Method 3
Connect and use the MOOER F4 Wireless Footswitch to control preset switching. Press footswitches A, B, C, or D to select the four presets in the current bank. Press A & B together to move up one bank (increment). Press C & D together to move down one bank (decrement).
Method 4
Open the iAMP app on your mobile device. After connecting to the F40i, tap the preset dropdown menu to expand the list and select any preset.
Bluetooth Function
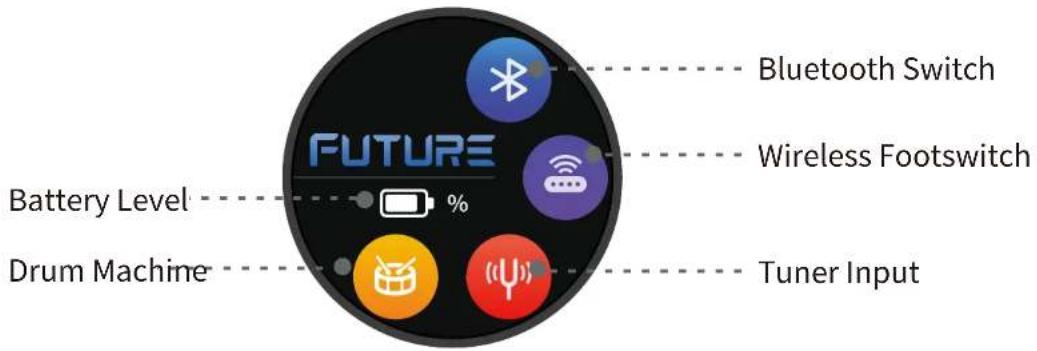
In the TOOLS menu, tap the Bluetooth icon to turn the F40i Bluetooth on or off.

After enabling Bluetooth on the F40i, it will appear as "F40i" in your phone's Bluetooth device list. Select it to connect, and you can play backing tracks from your phone while using the F40i as a Bluetooth speaker.
At the same time, with Bluetooth enabled, you can also connect the iAmp App to the F40i for detailed tone shaping and advanced control.
Wireless Footswitch
The F40i supports the MOOER F4 Wireless Footswitch (sold separately).
This footswitch allows you to control preset switching, the drum machine, the looper, and also provides Tap Tempo functionality.
For battery specifications and charging requirements, please refer to the F4 footswitch manual. The F40i can connect to only one wireless footswitch at a time.
Wireless Footswitch Pairing
In the TOOLS menu, tap the Wireless Footswitch icon. The F40i will enter pairing mode, and the icon will display a gradually increasing signal animation to indicate that it is searching. At this time, press and hold the A + C switches on the MOOER F4 wireless footswitch to enter its pairing mode.
When the icon turns purple, pairing is successful.
If the icon returns to gray, pairing has failed—please try again.

Wireless pedal pairing successful
In the iAmp APP, you can also tap the Wireless icon on the bottom toolbar of the main screen to put the F40i into wireless footswitch pairing mode.
After the initial pairing, the footswitch can continue to control the F40i even when the iAmp app is not active or not connected.
Preset Switching
No matter how you select a preset—whether through the F40i's touchscreen, the preset list 'in the iAmp app, or the A/B/C/D buttons on the wireless footswitch—the footswitch will always indicate the currently selected preset.
- Press the A/B/C/D buttons to switch between the four presets within the current bank. The active preset is shown by the corresponding LED above the footswitch button, and also displayed on the footswitch screen:
The number indicates the bank, and the letter represents the preset within that bank (for example, "3d"). For i mproved readability, presets A and C are shown as uppercase letters, while b and d appear in lowercase.
Banks 10 through 19 are represented with a dot after the number (for example, "0.d" = 10D or "9.A" = 19A).
Bank Switching
- Press A + B simultaneously to scroll down through preset banks.
- Press C + D simultaneously to scroll up through preset banks.
After selecting a bank, the preset indicator on the footswitch screen will begin flashing, but the preset is not yet active.
You must tap one of the four footswitch buttons to select a preset within the chosen bank.
Only then will the preset become active, and the flashing will stop.
Tap Tempo
- If the selected preset includes an enabled delay effect, you can tap that preset's footswitch button to enter Tap Tempo mode and control the delay time.
Note: Tap Tempo mode is indicated by a dot after the letter and number on the footswitch screen (for example, 3.C.). You can tap in tempo while the dot is displayed. If there is " " no input for 2.5 seconds, Tap Tempo mode exits automatically, the dot disappears, and the footswitch returns to preset switching mode.
- Tap the footswitch repeatedly at the desired tempo to adjust the delay time directly. The tap tempo rate must not exceed the maximum/minimum delay time supported by the selected effect.
● The footswitch LED will blink briefly to confirm each registered tap.
Drum Machine and Looper Control
The F40i includes a built-in 60-second looper, along with 60 drum patterns and 10 metronome types.
The looper and drum machine can operate simultaneously.
Enable/Disable Drum Machine and Looper Mode
- While in preset switching mode, press B + C simultaneously to enter Drum Machine & Looper mode.
- Press B + C again to return to preset mode.
Looper Control
In Drum Machine & Looper mode, footswitches A and B control the looper:
A: Record / Play / Overdub
Tap A to start recording. Tap A again to play the recorded track. Tap A again to begin overdubbing on top of the first layer, and so on.
During recording/overdubbing, the A LED blinks. During playback, the LED stays lit.
B: Stop / Hold to Clear
After recording or playback stops, the B LED lights.
When the loop is cleared, the LED turns off.
Drum Machine Control
In Drum Machine & Looper mode, footswitches C and D control the drum machine:
C: Tap Tempo
Tap footswitch C three times to set the drum machine tempo.
The C LED blinks to indicate the selected tempo.
The BPM value appears in the Drum Machine panel in the iAmp app.
D: Play / Stop
Starts or stops the drum machine.
Rhythm Selection
Press and hold footswitch C to enter Rhythm Selection mode.
The screen displays the currently selected rhythm number, and the C and D LEDs flash.
Press C or D to scroll through rhythms.
For rhythm names and numbers, refer to the iAmp app.
If there is no input for several seconds, Rhythm Selection mode will automatically exit.
Tuner Function
"GUFS FOUFSJOH UIF 500-4 JOUFSGBDF UBQ UIF UVOFS JDPO PO UIF TDSFFO PS QSFTT CVUUPO PO UIF QBOFM UP FOUFS UIF UVOFS JOUFSGBDF
*G ZPV BSF VTJOH UIF ' XJSFMFTT GPPUTXJUDI ZPV DBO BMTP QSFTT BOE IPME UIF BTTJHOFE UP UIF DVSSFOU QSFTFU UP BDDFTT UIF UVOFS
5IF ' J QSPWJEFT B SFGFSFODF QJUDI SBOHF PG )[NJ )[ XJUI UIF EFGBVMU TFI
*G ZPV OFFE UP DIBOHF UIF SFGFSFODF QJUDI QMFBTF VTF UIF J"NQ BQQ
%FUBJMFE TUFQT XJMM CF TIPXO JO UIF GPMMPXJOH TFDUJPO

After entering the TUNER interface, the function operations are as follows:
- Tap the Back icon to exit the Tuner screen and return to the TOOLS menu.
- When your pitch is in tune, the pitch meter will turn fully green, and the note letter will also illuminate in green.

When the pitch is accurate
When the pitch is slightly off, the pitch indicator bar will display yellow.

When the pitch is slightly off
When the pitch is noticeably off, the pitch indicator bar will display orange.

When the pitch is noticeably off
When the pitch is severely off, the pitch indicator bar will display red.

When the pitch is severely off
Drum Machine Function
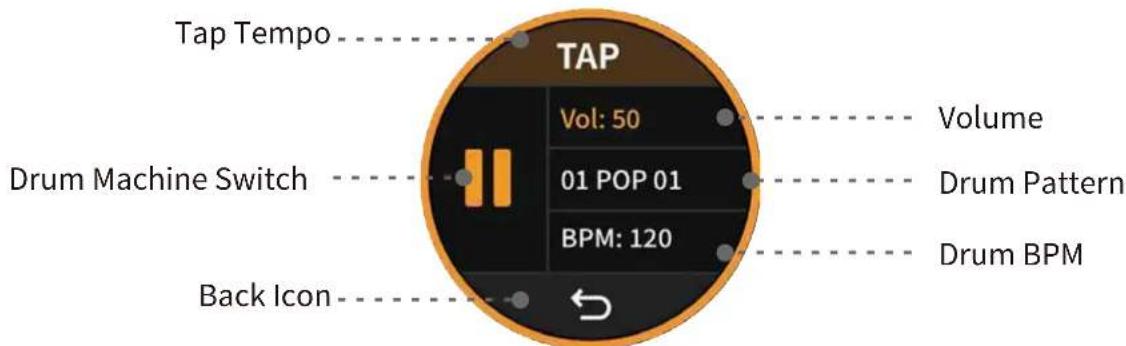
The F40i comes with 60 drum patterns covering a variety of styles, plus 10 metronome types. In the TOOLS menu, tap the Drum Machine icon to enter the Drum Machine interface.
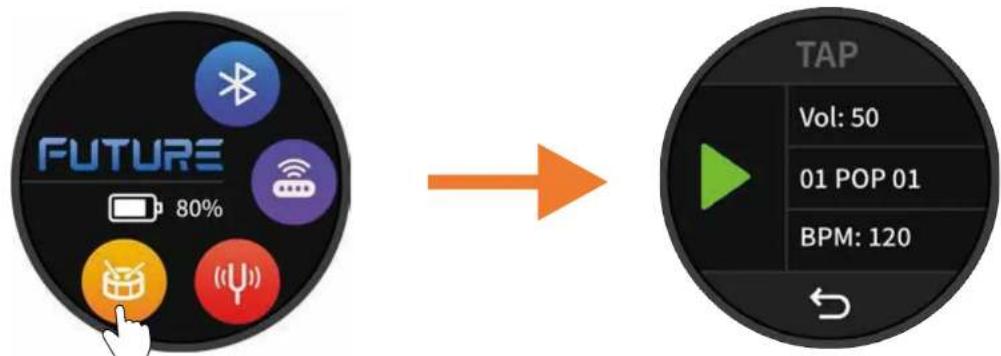
After entering the drum machine interface, the following operations are available:
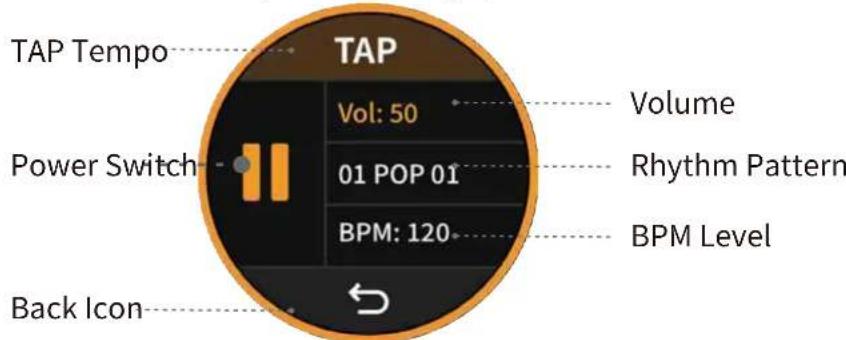
- Tap the Drum Machine switch to turn the drum machine on or off.
- Tap the TAP area to calculate the BPM based on your tap tempo.
- Tap the Volume area, then rotate the VALUE encoder to adjust the drum machine volume.
- Tap the Rhythm area, then rotate the VALUE encoder to select a drum pattern.
- Tap the BPM area, then rotate the VALUE encoder to adjust the drum machine BPM.
- Tap the Back icon to exit the Drum Machine screen and return to the TOOLS menu.
Note: For advanced drum machine features, such as LOOPER synchronization, please use the iAMP App.
MOOER iAMP Application
The following sections outline how to use the iAMP app with the F40i/F40i Li Intelligent Amp, including device connection, Home screen setup, preset editing, mixer configuration, user center, Tone Cloud, global settings, tools list, wireless footswitch, and more.
Device Connection
First, prepare a mobile device. You can download the iAMP app from the Apple App Store, Google Play Store, or the MOOER official website, then install it on your device.


Enable Bluetooth and Location Services on your mobile device.
Open the iAMP app and navigate to the Future tab. Tap Search Device, then locate F40i in the device list and tap Connect. Once the progress bar finishes and the connection is established, the F40i icon will switch from gray to full color. Tap the F40i icon again to enter the user interface.
Home Page Settings
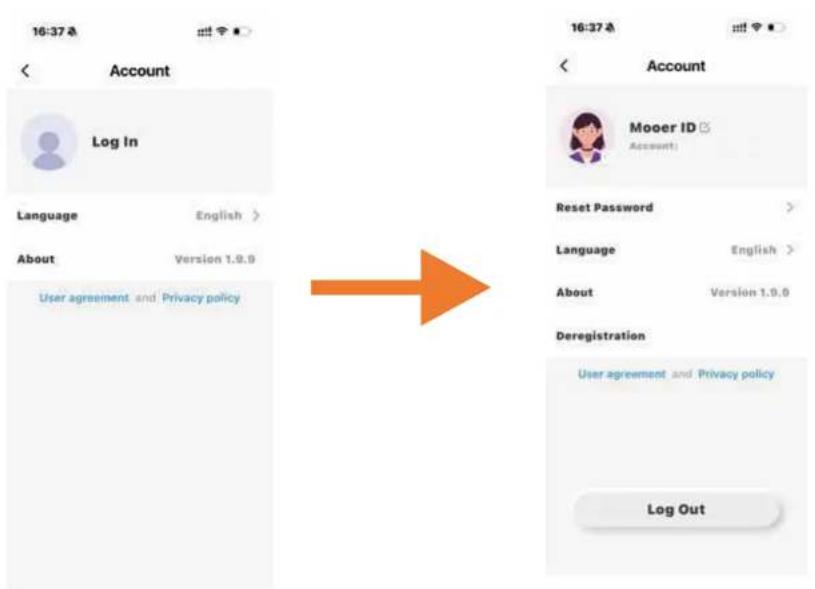
Tap the settings icon in the upper-right corner of the Home page to enter the Home Page Settings screen. Here, you can log in, switch languages, and view version information. After logging in, you can also change your password, log out, or sign out of your account.
User Interface
Once your device is connected, you will be taken directly to this User Interface. Here, you can perform most of the primary operations, including switching presets, adjusting parameters, changing algorithm models, and much more.
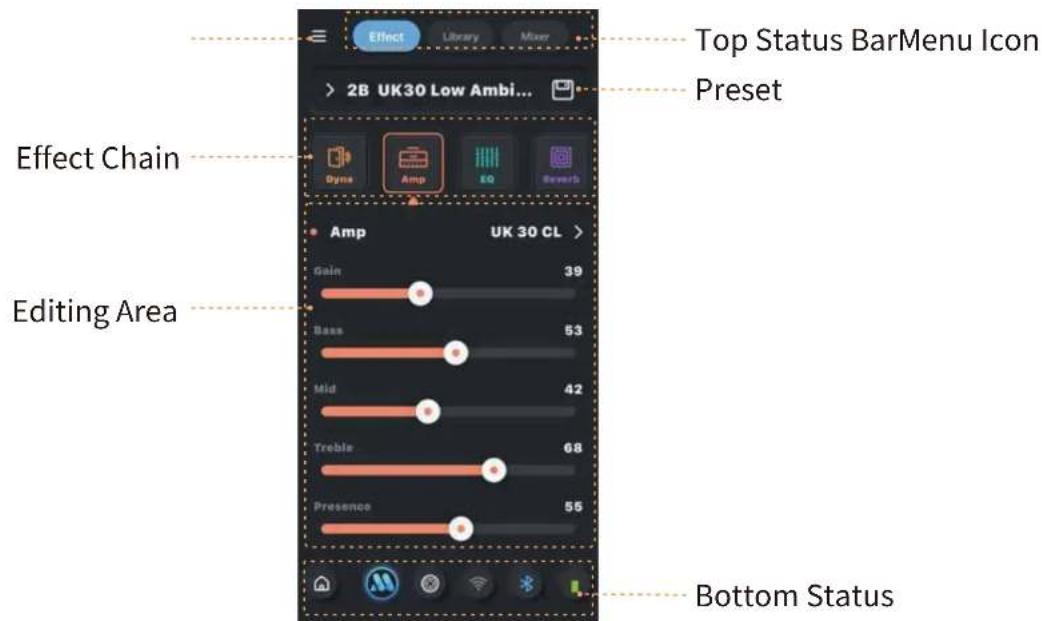
- Menu Icon
Tap the menu icon to expand the left sidebar. (More details will be covered later.)
- Top Status Bar
In the top status bar, you can tap the Effect Chain, Tone Library, or Mixer icons to jump directly into those sections.
- Preset Area
Tap the preset area to open the preset list. Tap the save icon on the right to open the save confirmation dialog.
• Effect Chain Area
In this area, you can add or delete effect modules, rearrange the effect order, and toggle modules on or off.
- Editing Area
This area displays all parameters of the currently selected module. You can switch effect models, adjust parameters, and more.
- Bottom Status Bar
From here you can return to Home Settings, access MOOER AI, open MIC/INST input settings, pair wireless footswitches, and toggle Bluetooth.
The battery icon on the far right appears only on the F40i Li (battery-powered version).
Preset Editing
F40i includes 80 onboard preset slots, plus an additional 6 tone categories with 30 tones available under the Tone Library in the top status bar.
But maybe none of them feel like your sound yet—or maybe you simply want to enjoy the creative process of building your own tone.
So let's begin your tone-crafting journey!
Remove an Effect Module
In the effect chain view, select the module you want to remove and drag it upward to delete it from the chain.
Add an Effect Module
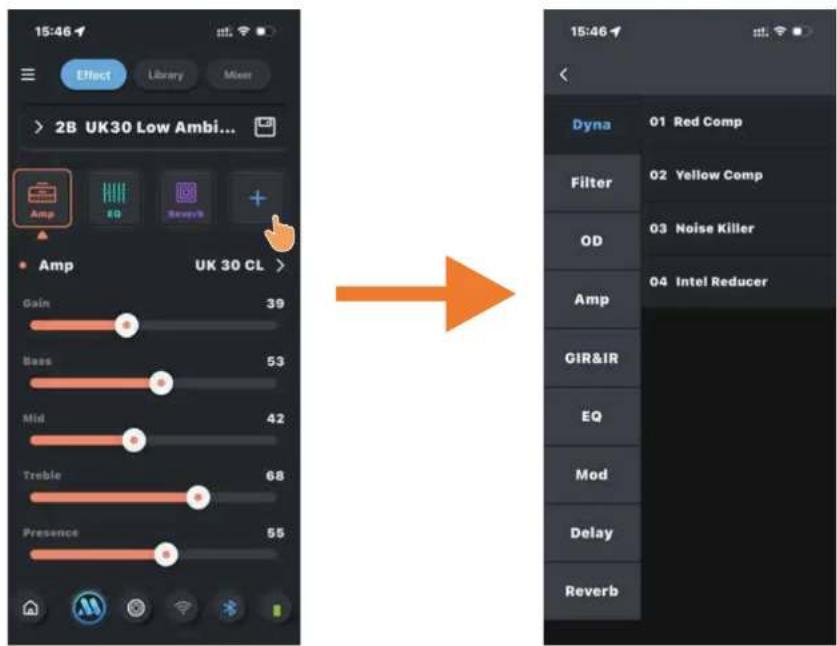
In the effect chain interface, tap the empty "+" icon to bring up the list of available effect models (the specific modules and their corresponding model lists will be provided later in the "Effect Description" section).
Switching Effect Models and Adjusting Parameters
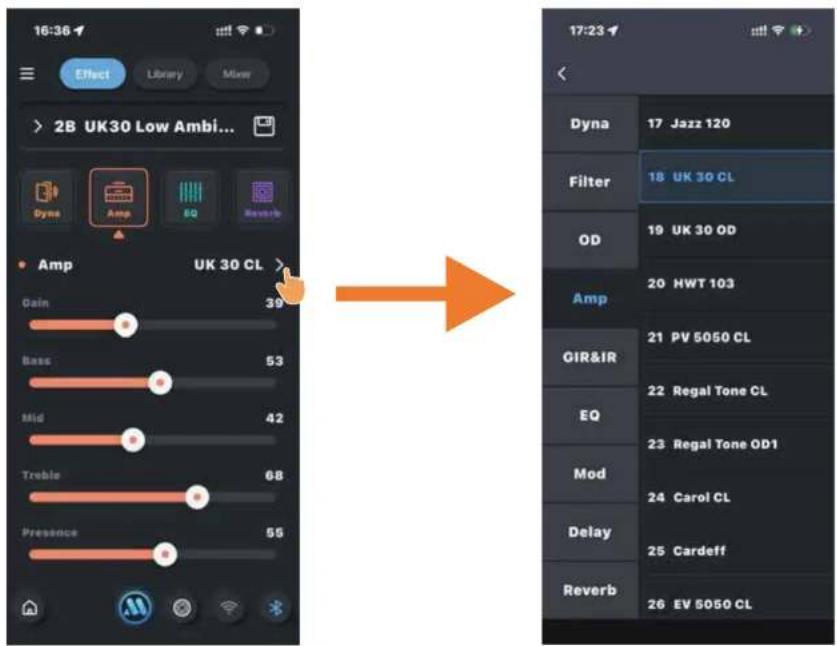
In the effect chain interface, tap the model-switch arrow to enter the model list, where you can replace the current effect model with the one you need. In the parameter area, select any parameter and drag the slider left or right to adjust its value.
Preset Saving
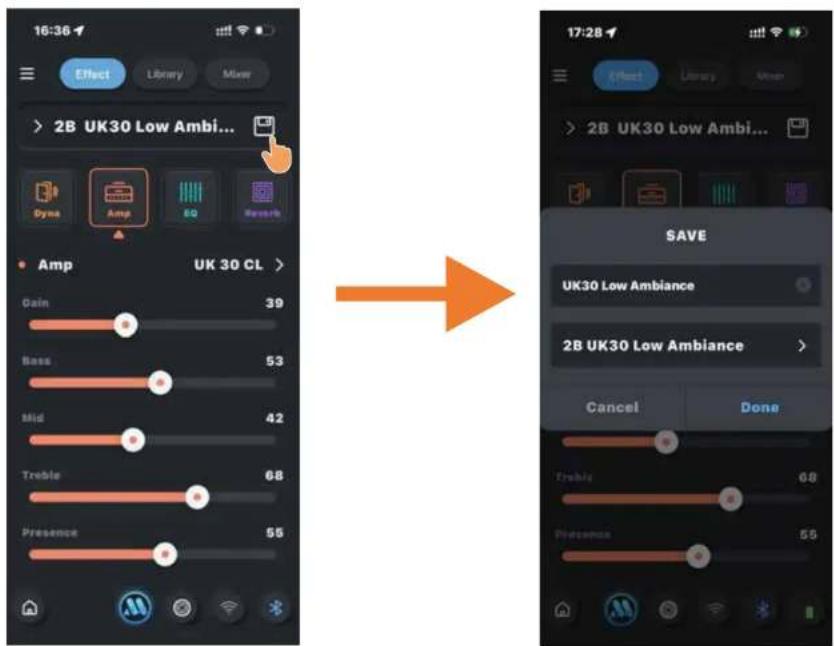
In the effect chain interface, tap the save icon to bring up a confirmation window. Here, you can rename the preset and choose its save location. Tap "Done" to complete the save process.
Bottom Status Bar Controls

natural_image
User interface icons including home, smart speaker, Wi-Fi, wireless signal, and battery (no text or symbols)Tap the "HOME" icon to return to the Home screen.
Tap the Mooer AI icon to access AI features.
Tap the XLR Combo Jack icon to enter the MIC/INST input settings page.
Tap the Wireless icon to put the F40i into wireless footswitch pairing mode.
Tap the Bluetooth icon to toggle Bluetooth on or off.
The Battery Indicator displays the current power level of the device.
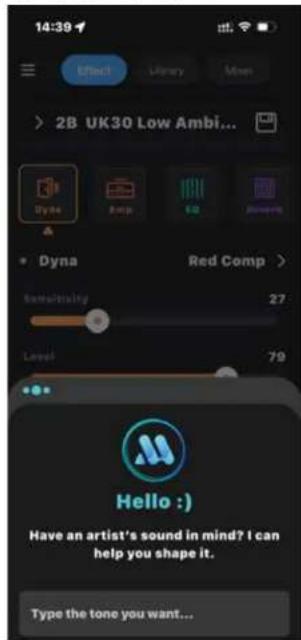
Mooer AI
The Mooer AI system can generate a complete tone effects chain based on the sound you're looking for. You can preview the results or download them directly into your local presets. For example, if you enter: "I want the Hotel California solo tone," the AI system will generate three tone effect chain options for you to choose from
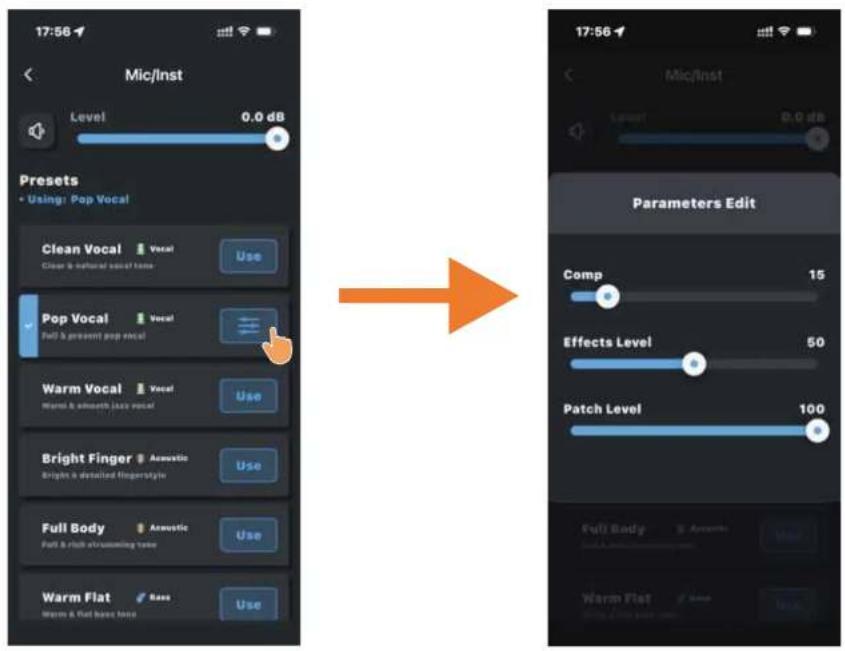
MIC/INST Input Settings
On the F40i Intelligent Amp, you're not limited to a standard 6.35 mm instrument input. On the rear panel, you'll also find a combo XLR input, allowing you to connect a microphone or other instruments. If you're using a condenser microphone, simply switch on the 48V phantom power toggle on the back of the unit to supply the required power for the mic. Below is an overview of the effect settings available for the combo XLR input:
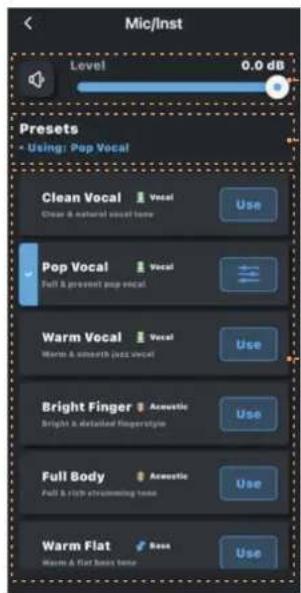
Volume Control Section Status Display Bar
Preset Selection Area
The upper Volume Control section lets you toggle the Mute switch.
You can also adjust the overall input level for this interface by sliding the Volume bar on the right.
The Status Display bar shows which preset is currently active.
Preset Selection Area
- There are three preset types available: Vocals, Acoustic Guitar, and Bass. Here, you can select the preset type corresponding to this input.
- All presets are displayed in a list format, showing the preset name, description, and type. Tap the Use icon on the right to apply a preset.
Once a preset is applied, the Use icon will change to a Settings icon. Tap it again to open the preset's parameter settings. (The specific parameter settings vary for each preset, so please adjust based on your actual desired effect and sound.)
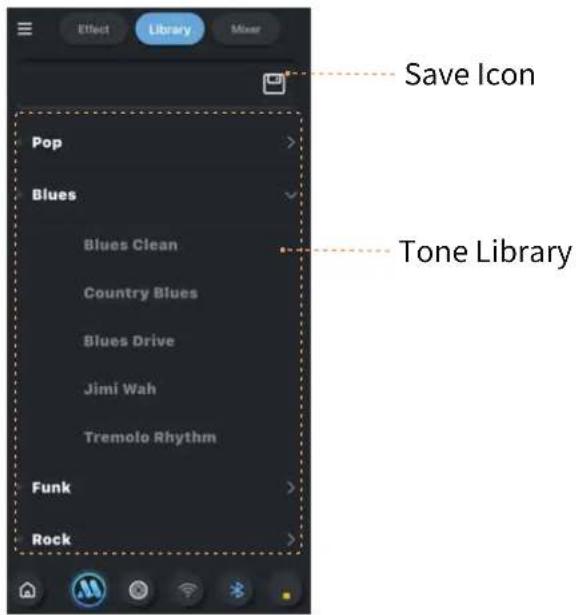
Tone Library
Tap the "Tone Library" icon in the top status bar to enter the Tone Library page. Inside the library, we have prepared 30 tones across 6 musical styles for you to choose from. Browse through the sound you like, and tap the Save icon at the bottom of the page to load that sound directly into your F40i Intelligent Amp.
Mixer
Tap the "Mixer" icon in the top status bar to enter the Mixer interface. Here, you can individually adjust the volume for the three input sources: Bluetooth, USB, and Instrument. You can also control the overall output level using the Master Volume slider.
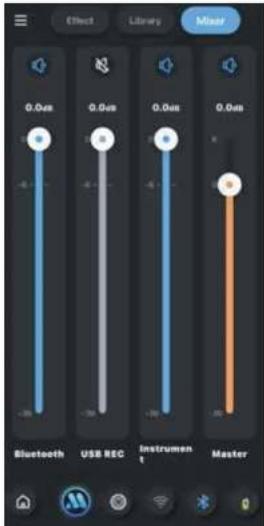
At the top of each adjustment strip, you can tap the icon to toggle the channel on or off. When a channel is muted, its volume slider will turn gray to indicate that the channel is currently silent.(Volume adjustment range: -36 dB to 0 dB, with -6 dB as the default setting.)
Menu Sidebar Operations
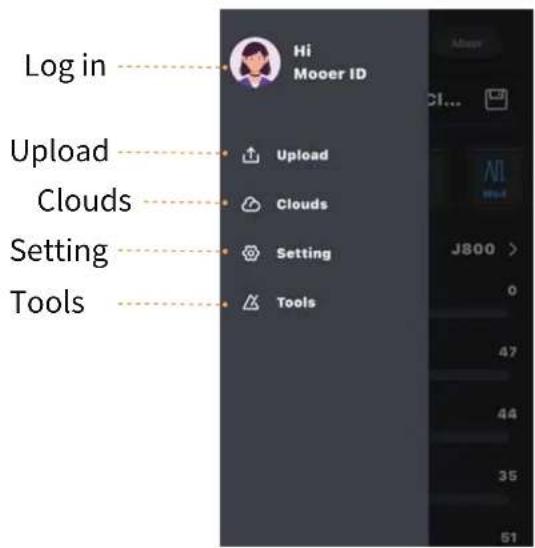
Login Operation
When you're not logged in, tap the login entry to bring up the login screen. Enter your account and password to sign in. (If you don't have an account or forgot your password, you can register or recover your password from this screen.)

When you're already logged in, tapping this login entry will show a list of the presets you've uploaded and downloaded.

flowchart
graph LR
    A["Hi\nMooer ID"] --> B["Account\nMooer ID\nDownloads\nWorks"]
Preset Upload
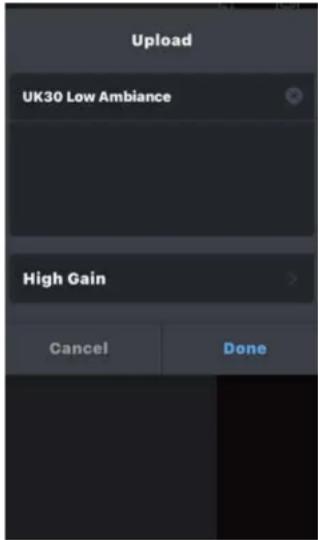
Tap the Upload icon in the menu sidebar to open the upload confirmation window. In this window, you can edit the preset name, preset description, and preset category. Tap Done to complete the upload. Your newly uploaded preset will appear in Tone Cloud (Please note: Uploading presets and accessing Tone Cloud require you to be logged in.)
Tone Cloud Entry
Tap the "Tone Cloud" icon in the menu sidebar to enter the Tone Cloud. In the next screen, you can choose between MNRS and PRESET.
After selecting one, you'll be taken to either the MNRS sample cloud list or the Preset cloud list.
Sample Cloud List
In the MNRS Sample Cloud list, you'll find a massive collection of GNR & GIR (amp head and cabinet sample) files. Browse the list, locate the sample you want, and tap the download icon on the right to load it into your F40i.
Downloaded GNR files will appear at the bottom of the Amp Head module list, and GIR files will appear inside the GIR & IR module list.
(The F40i supports loading up to ten GNR files and ten GIR & IR files. For details on importing IR files, please refer to the "MOOER Studio for F40i" section below.)
Preset Cloud List
In the Preset Cloud list, you can browse and download presets shared by other users. Tap "Clean," "Low Gain," or "High Gain" at the top to filter presets by category. The colored tag in front of each preset bar also indicates its type (Purple for Clean, Blue for Low Gain, Orange for High Gain).
Tap the headphone icon at the front of a preset bar to preview that cloud preset before downloading.
Settings
Tap the Setting icon in the sidebar to enter the settings page. The following section provides a detailed explanation of each setting.
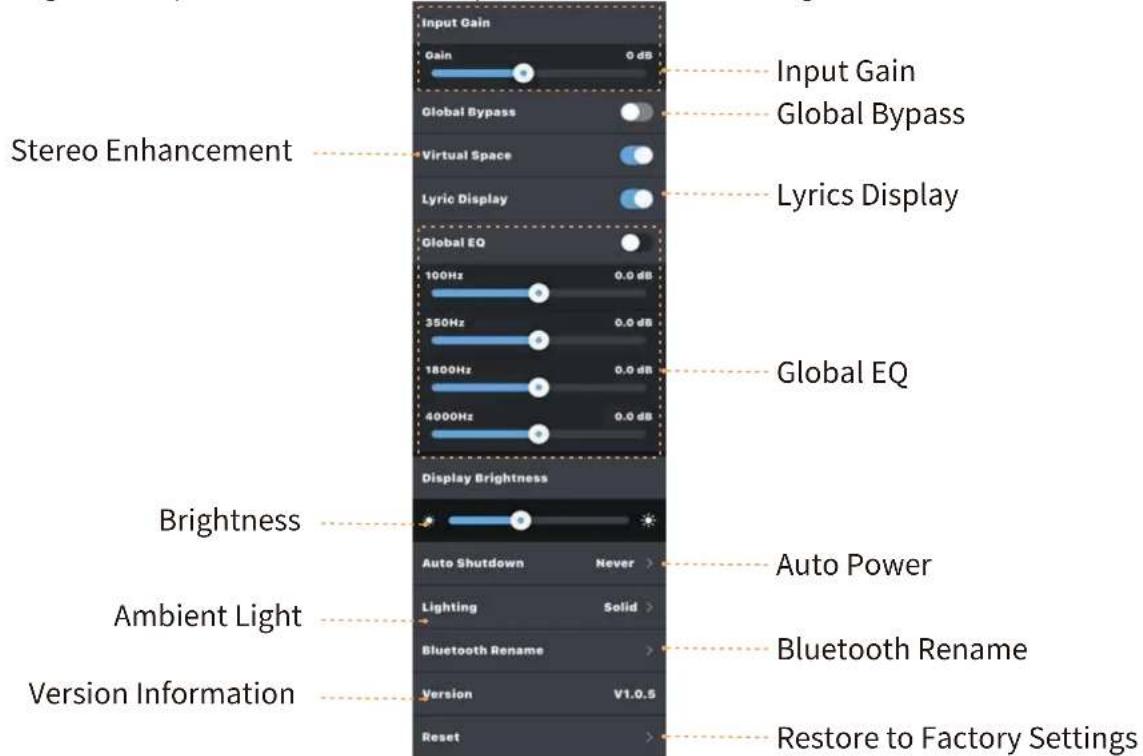
Input Gain
Adjust the gain level for the 6.35 mm instrument input. If you're using an instrument with a high-output signal, increasing negative gain can help reduce clipping. (The adjustment range is from -∞ to +6dB, with a default value of 0dB)
Global Bypass
When Global Bypass is enabled, the F40i functions as a pure effects platform. All internal tone models are bypassed, and a temporary "Global Bypass" notification will appear in the Effects Chain page.
Stereo Enhancement
The F40i features MOOER's latest stereo processing algorithm. Enable Stereo Enhancement to deliver a wider, more immersive sound field that makes the speaker output feel more spacious and enveloping.
Lyrics Display
When enabled, the F40i will enter the Lyrics Display page during Bluetooth music playback. In this view, you can check the song's lyrics and perform actions such as pause, previous/next track, etc.
Global EQ
Use this setting to adjust the four-band global EQ. These EQ adjustments are applied directly to the instrument output and operate independently from all presets.
Display Brightness
Adjust the brightness level of the F40i's circular display.
Auto Power-Off
The F40i features an energy-saving mode.
If the device remains idle (no input detected) for the duration set in this option, it will automatically power off to protect battery life.
Simply hold the power button again to restart.
(The default setting for this option is "Never").
Ambient Light
You can customize the ambient light strip on the F40i and the mesh ambient lighting on the F40i Li, including both color and lighting mode.
When "Off" is selected, the ambient light will turn off.
When "Static" is selected, the ambient light will stay on in the color you choose (only one color).
When "Signal Follow" is selected, the ambient lighting will respond directly to the output signal. The lights turn on when a signal is present and turn off when no signal is detected.
Bluetooth Renaming
By clicking on "Bluetooth Renaming," the Bluetooth naming interface will pop up. You can enter characters to customize the Bluetooth name of the device. Click "OK" to save the new name.
Version Information and Factory Reset
In the version information section, you can check the current firmware details of the device. In the factory reset section, clicking the "Factory Res et" area will pop up a reset confirmation box. After confirming again, the device will erase all current data and restore to factory settings.
Tools
Click Tools icon in the sidebar to enter the Tools interface. Within the Tools interface, you can switch between functions using the three icons at the top: Drum Kit, Tuner, and Looper.
Drum Kit
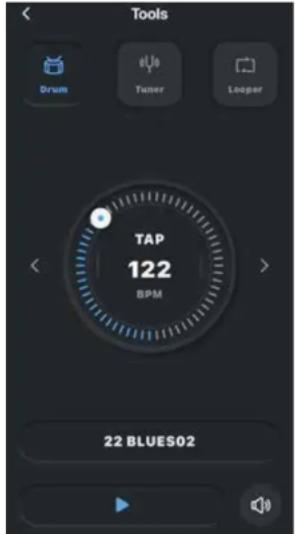
In the F40i, we provide 6 styles with a total of 60 drum kit rhythms, along with 10 commonly used metronome patterns. You can select any of these 70 rhythms from the drop-down list at the bottom.
The central Tap area allows you to set the tempo manually by tapping, and you can fine-tune the BPM using the left and right arrows.
Click the Play button at the bottom to turn the drum machine on or off, and click the Volume icon on the bottom right to adjust the drum machine volume.
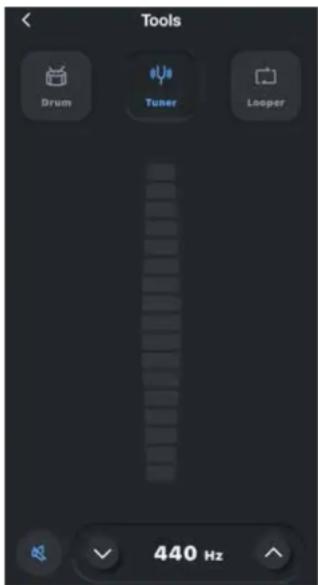
Tuner
When entering the tuner in the iAmp APP, the F40i will simultaneously enter Tuner mode. In the Tuner, you can use the indicator bar to check whether the pitch is in tune. The reference pitch adjustment area at the bottom allows you to set the reference pitch, ranging from 430 Hz to 445 Hz.
You can also select the tuner mode by clicking the mute icon, choosing between "Mute" or "
Bypass."
Looper
The F40i features a stereo looper with a total recording time of 480 seconds. You can access the looper by selecting Looper in the Tools section of the iAmp APP.
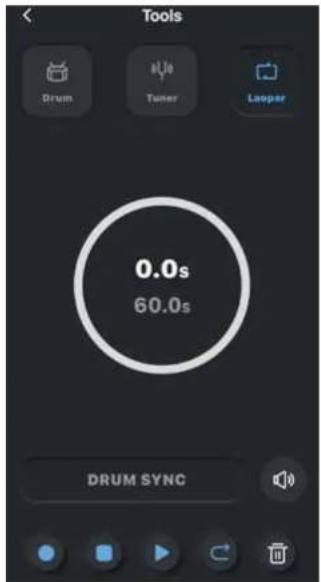
During recording, the central circular display will indicate the current recording time, while the outer ring of the circle show the current status of the loop recorder in color. Red indicates recording or overdubbing, and blue indicates playback.
Tap the ● icon to start recording or overdubbing. While recording/overdubbing, this icon will turn red to indicate the current status. (During the first recording when drum machine sync is not enabled, the looper will detect the input signal, and recording will only start once the input exceeds the set threshold.)
Tap the ☐ to pause during recording or playback. When paused, this icon will turn orange.
Tap the ▶ to start playback during recording or pause. When playing, this icon will turn green.
When the number of tracks is 2 or more, tap the icon to perform undo or redo operations. Undo will remove the last recorded track, while redo will restore a previously undone track. (When there are fewer than 2 tracks, this icon will be grayed out and unclickable.)
Tap the ☑ to erase all current recorded information.
Tap the 📋 to display the volume slider. Adjusting this slider will change the playback volume of the recorded track.
Drum Machine Sync and Alignment Rules
Tap the Drum Sync icon in the Looper interface to enable drum machine sync for the recording loop. Once enabled, tapping the Record icon will first play a one-bar count-in at the current drum machine BPM before recording begins. During recording, the audio will follow the drum machine and looper alignment rules, ensuring that your recordings stay perfectly in sync with the drum machine.
Alignment Rules
If the first recorded audio ends before the halfway point of the current bar, the audio in that bar will be discarded.
If the first recorded audio ends after the halfway point of the current bar, the bar will be completed before the recording stops.
MOOER STUDIO FOR Future Series
Visit the MOOER official website at mooeraudio.com, go to the Downloads, locate the F40i Download Section, find MOOER STUDIO FOR Future Series, and download it. Using the PC software, you can update the F40i firmware, import third-party IR files, and perform full device backup and restore.
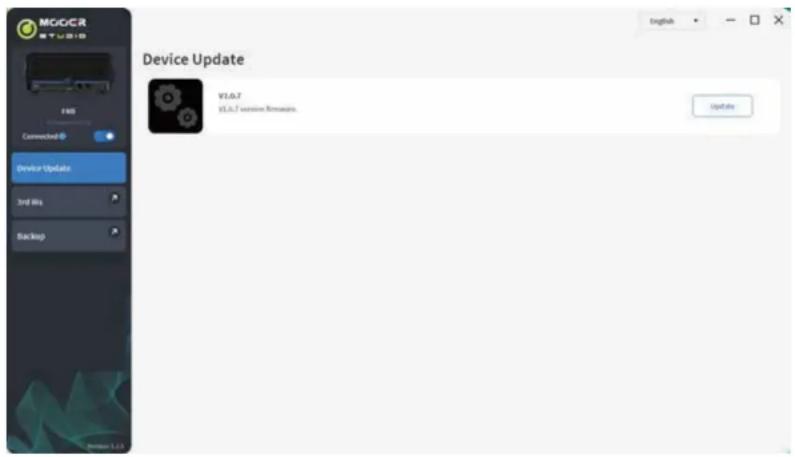
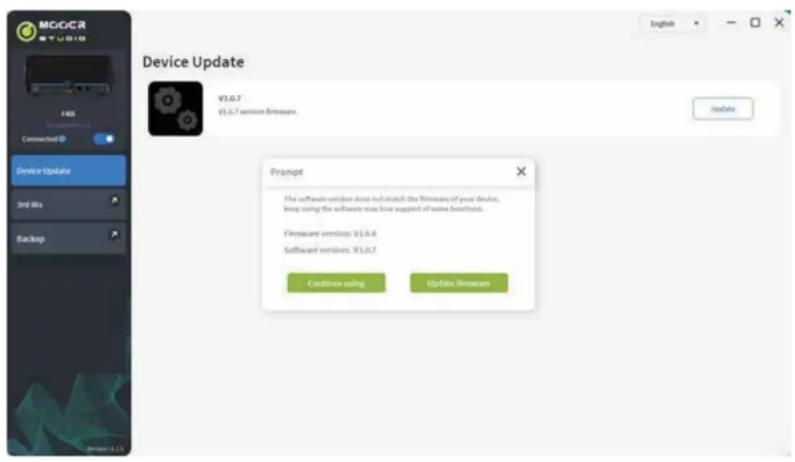
Firmware Update
Use the included USB cable to connect the F40i to your PC/MAC with the editor software. Open the editor software and click the Connect switch at the top left. If the current firmware version does not match the software version, an Update prompt will appear. Click Update Firmware and wait for the progress bar to complete to successfully update the F40i.
Note: During the firmware update, make sure the F40i is connected to a power source; otherwise, the update will fail (this includes the Li battery version)!
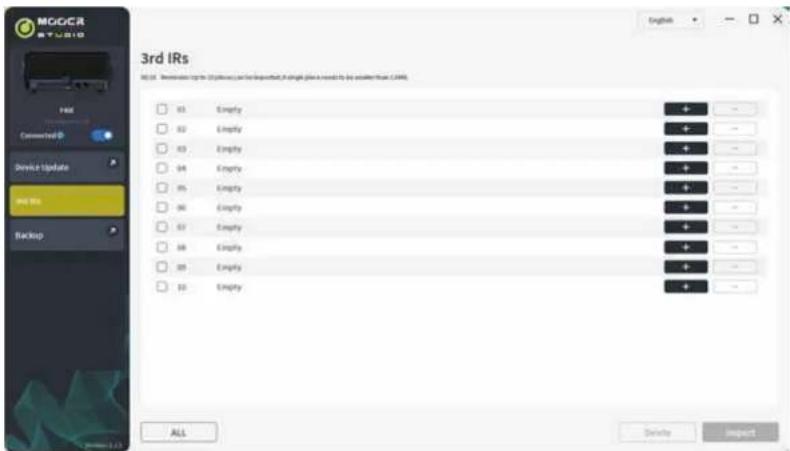
Importing Third-Party IR Files
After successfully connecting, click "Third-Party IRs" in the left sidebar of the editor software to enter the third-party IR management interface. Select the location where you want to import the file and click the "+" icon on the right of the location to import the IR file. Click the "-" icon on the right to delete any IR file loaded in that location.
Full Device Backup and Restore
Before performing a firmware update, it is recommended to back up your F40i to prevent loss of presets and settings. After successfully connecting, click "Backup" in the left sidebar of the editor software to enter the backup and restore interface. In this interface, click "Backup" on the right to create a backup file. In the file management area at the bottom, you can perform restore or delete operations.

Effect Description
| Dynamic | ||
| Serial NO. | Name | Tone Description |
| 1 | Red Comp | Dual-Parameter Adjustable Compressor |
| 2 | Yellow Comp | Based on the Mooer® YELLOW COMP compressor, it offers four adjustable parameters. |
| 3 | Noise Gate | Based on the Mooer® Micro Noise Killer.This unit quickly and effectively solves noise problems through simple threshold adjustment. |
| 4 | Intelligent Noise Gate | Unlike conventional noise gates, its principle separates the regular signal from the white noise, then eliminates the white noise. This reduces noise while maintaining the natural decay of the tail end. It is recommended to use this module before distortion effects or amp simulations. |
| Filter | ||
| Serial NO. | Name | Tone Description |
| 1 | Touch Wah | Dynamic response auto wah with an envelope filter. |
| 2 | Auto Wah | Analog wah with an automatic frequency sweep function. |
| 3 | Filter | Modulated filter effect. |
| Overdrive | ||
| Serial NO. | Name | Tone Description |
| 1 | MOOER® Pure Boost | Based on MOOER® Pure Boost |
| 2 | MOOER® Flex Boost | Based on MOOER® Flex Boost |
| 3 | B.K. Butler® Tubedrive | Based on B.K. Butler® Tube drive |
| 4 | IBANEZ® TS808 | Based on IBANEZ® TS808 overdrive |
| 5 | Klon® Centaur Gold | Based on Klon® Centaur Gold overdrive |
| 6 | Barber® Direct Drive | Based on Barber® Direct Drive overdrive |
| 7 | Paul Cochrane® Timmy OD | Based on Paul Cochrane® Timmy OD overdrive |
| 8 | Fulltone® Fulldrive 2 | Based on Fulltone® Fulldrive 2 overdrive |
| 9 | Xotic® BB Preamp | Based on Xotic® BB Preamp overdrive |
| 10 | Xotic® BB Plus | Based on Xot ic® BB Plus overdrive |
| 11 | ProCo® Rat | Based on ProCo® Rat distortion |
| 12 | MOOER® Grey Faze | Based on MOOER® Grey Faze fuzz |
| 13 | EHX® Big Muff | Based on EHX® Big Muff fuzz |
| 14 | Fulltone® GT-500 | Based on Fulltone® GT-500 distortion |
| 15 | Marshall® Shred Master | Based on Marshall® Shred Master distortion |
| 16 | Suhr® Riot | Based on Suhr® Riot distortion |
| 17 | BOSS® Metal Zone | Based on BOSS® Metal Zone distortion |
| 18 | Digitech® Metal Master | Based on Digitech® Metal Master distortion |
| 19 | Fulltone® OCD | Based on Fulltone® OCD distortion |
| 20 | NOBELS® ODR-1 | Based on NOBELS® ODR-1 overdrive |
| 21 | FRIEDMAN® BE-OD | Based on FRIEDMAN® BE -OD distortion |
| 22 | MOOER® Solo | Based on MOOER® Solo distortion |
| Preamp | ||
| Serial NO. | Name | Tone Description |
| 1 | Fender® 65 Deluxe Reverb | Based on Fender® 65 Deluxe Reverb preamp |
| 2 | Fender® 65 Twin Reverb | Based on Fender® 65 Twin Reverb preamp |
| 3 | Fender® 59 Bassman | Based on Fender® 59 Bassman preamp |
| 4 | Fender® Super Sonic | Based on Fender® Super Sonic preamp |
| 5 | Fender® Blues Deluxe Clean | Based on Fender® Blues Deluxe preamp |
| 6 | Fender® Blues Deluxe Overdrive | Based on Fender® Blues Deluxe preamp |
| 7 | ENGL® E650 Clean | Based on ENGL® E650 preamp |
| 8 | ENGL® Powerball E645 CL | Based on ENGL® Powerball E645 preamp |
| 9 | ENGL® Blackmore CL | Based on ENGL® Blac kmore preamp |
| 10 | MESA Boogie® MARK III CL | Based on MESA Boogie® MARK III preamp |
| 11 | MESA Boogie® MARK V CL | Based on MESA Boogie® MARK V preamp |
| 12 | MESA Boogie® Triple Rectifier CL | Based on MESA Boogie® Triple Rectifier preamp |
| 13 | Orange® Rockerverb CL | Based on Orange® Rockerverb preamp |
| 14 | DR.Z® Maz18 Jr | Based on DR.Z® Maz18 Jr preamp |
| 15 | DR.Z® Z-Wreck | Based on DR.Z® Z-Wreck preamp |
| 16 | Jet City® JCA100H CL | Based on Jet City® JCA100H preamp |
| 17 | Roland® JC-120 | Based on Roland® JC-120 preamp |
| 18 | VOX® AC30 CL | Based on VOX® AC30 preamp |
| 19 | VOX® AC30 OD | Based on VOX® AC30 preamp |
| 20 | Hiwatt® DR-103 | Based on Hiwatt® DR-103preamp |
| 21 | Peavey® 5150 | Based on Peavey® 5150 preamp |
| 22 | Tone King® Falcon CL | Based on Tone King® Falcon preamp |
| 23 | Tone King® Falcon OD | Based on Tone King® Falcon preamp |
| 24 | Two Rock® Coral CL | Based on Two Rock® Coral preamp |
| 25 | Two Rock® Cardiff | Based on Two Rock® Cardiff preamp |
| 26 | EVH® 5150 CL | Based on EVH® 5150 preamp |
| 27 | Blackstar® HT Stage 100 CL | Based on Blackstar® HT Stage 100 preamp |
| 28 | Diezel® Hagen CL | Based on Diezel® Hagen preamp |
| 29 | Koch® Powertone OD | Based on Koch® Powertone preamp |
| 30 | Marshall® JCM800 | Based on Marshall® JCM800 preamp |
| 31 | Marshall® JCM900 | Based on Marshall® JCM900 preamp |
| 32 | Marshall® Plexi 100 | Based on Marshall® Plexi 100 preamp |
| 33 | Engl® E650 DS | Based on Engl® E650 preamp |
| 34 | ENGL® Powerball E645 DS | Based on ENGL® Powerball E645preamp |
| 35 | ENGL® Blackmore DS | Based on ENGL® Blackmore preamp |
| 36 | MESA Boogie® MARK III DS | Based on MESA Boogie® MARK III preamp |
| 37 | MESA Boogie® MARK V DS | Based on MESA Boogie® MARK V preamp |
| 38 | MESA Boogie® Triple Rectifier DS | Based on MESA Boogie® Triple Rectifier preamp |
| 39 | Orange® Rockverb DS | Based on Orange® Rockverb preamp |
| 40 | Orange® AD30 | Based on Orange® AD30 preamp |
| 41 | Orange® OR50 | Based on Orange® OR50 preamp |
| 42 | Soldano® SLO-100 OD | Based on Soldano® SLO-100 preamp |
| 43 | Soldano® SLO-100 DS | Based on Soldano® SLO -100 preamp |
| 44 | Jet City® JCA100H OD | Based on Jet City® JCA100H preamp |
| 45 | Peavey® 5150 DS | Based on Peavey® 5150 preamp |
| 46 | Tone King® Falcon OD | Based on Tone King® Falcon preamp |
| 47 | Two Rock® Coral OD | Based on Two Rock® Coral preamp |
| 48 | EVH® 5150 DS | Based on EVH® 5150 preamp |
| 49 | Blackstar® HT Stage 100 DS | Based on Blackstar® HT Stage 100 preamp |
| 50 | Diezel® Hagen OD | Based on Diezel® Hagen preamp |
| 51 | Diezel® Hagen DS | Based on Diezel® Hagen preamp |
| 52 | Koch® Powertone DS | Based on Koch® Powertone preamp |
| 53 | Markbass® R500 | Based on Markbass® R500 preamp |
| 54 | Ampeg® SVT 4 Pro | Based on Ampeg® SVT 4 Pro preamp |
| 55 | Aguilar® DB750CL | Based on Aguilar® DB750 preamp |
| EQ | ||
| Serial NO. | Name | Tone Description |
| 1 | 5-Band Equalizer | 5-band equalizer effect for guitar. |
| 2 | Custom Equalizer | Provides a 3-band equalizer effect with customizable frequency points. |
| Modulation | ||
| Serial NO. | Name | Tone Description |
| 1 | Classic Phaser | Based on MOOER® Ninety Orange |
| 2 | Wave Phaser | Based on Square Wave Phaser Effect. |
| 3 | Classic Flanging | Based on MOOER® E-Lady |
| 4 | Jet Flanging | Based on MOOER® Jet Flanger |
| 5 | Tremolo | Based on MOOER® Trelicopter |
| 6 | Wave Tremolo | Based on square wave modulation for volume tremolo effects |
| 7 | Pitch Tremolo | Standard pitch modulation tremolo effect |
| 8 | Rotary | Simulates the classic rotary speaker sound |
| 9 | Ring Mod | A modulation effect that combine s signals to create metallic, bell-like tones |
| 10 | Harmonic Transposition | A transposition effect that supports multiple notes being played simultaneously |
| 11 | Analog Chorus | A classic, rich analog chorus sound |
| 12 | Triple Chorus | A chorus effect that applies three layers for a fuller sound |
| 13 | Lo-Fi | An effect that achieves a lo-fi tone by lowering the sampling rate |
| 14 | Slow Attack | An effect that can weaken or remove the initial attack sound |
| 15 | Panning | An effect that creates a distinctive stereo soundscape by moving the audio back and forth between the left and right channels. |
| 16 | Pitch Shift | Based on the original pitch with slight variations in pitch added for a distinctive effect. |
| 17 | Octave | An octave effect that adds lower or higher o ctave pitches based on the dry signal. |
| DELAY | ||
| Serial NO. | Name | Tone Description |
| 1 | Digital | A basic digital delay effect where each repetition of the signal is clearly repeated |
| 2 | Analog | Uses digital technology to recreate the warm and smooth characteristics of analog circuit delay |
| 3 | Echo | Reproduces the echo sound of a real space |
| 4 | Tape | Simulates the sound of classic tape delay |
| 5 | Modulated | Adds modulation effects to the delay sound |
| 6 | Reverse | Reverse playback delay effect |
| 7 | Ping Pong | Highly spatial left- right ping pong delay |
| 8 | Crystal Modulated | Increases the delay feedback by five octaves, creating a crystal-clear effect |
| 9 | Rainbow Modulated | Raises each feedback delay effect by a certain interval, forming a dreamy, rainbow-like gorgeous effect |
| 10 | Vintage | Includes some lo-fi delay effect in the delay sound, restoring a vintage tone |
| 11 | Slow Attack | Includes slow attack delay effect in the delay sound, giving your music endless space for imagination |
| 12 | Filtered | Includes a filter in the delay effect |
| REVERB | ||
| Serial NO. | Name | Tone Description |
| Room | Reproduces the reverb of a smaller space1 | |
| 2 | Hall | Reproduces the reverb of a larger space, with rich diffusion and a longer decay time |
| 3 | Plate | A bright metallic plate reverb effect |
| 4 | Spring | A retro spring reverb effect |
| 5 | Modulated | Adds chorus to the reverb effect for a more detailed sound |
| 6 | Starlight | A stunning reverb with Shimmer effect, creating a beautiful tone |
| 7 | Flanged | Adds a flanging effect to the reverb, making the sound more psychedelic |
| 8 | Reverse | Adds a reverse effect to the reverb, offering a completely different experience compared to traditional reverb |
| 9 | Distorted | Adds distortion to the reverb, resulting in an extremely unnatural reverb effect |
Note: The brand names and product names mentioned in this manual are the property of their respective companies and are used here solely for the purpose of describing the effect tones simulated by this product.
Technical Specifications
| Item | Description | |
| Effects | Number of Modules | 9 |
| Total Number of Models | 109 | |
| Preset Slots | 80 | |
| Impulse Response | ||
| Supported Format | .wav | |
| Sampling Rate | 44.1kHz | |
| Bit Depth | 32-bit | |
| Sample Length | 2048 samples | |
| Input | GUITAR IN | |
| Connector Type | 1 x 1/4" unbalanced mono input | |
| Input Impedance | 1Meg ohm | |
| Maximum Input Level | 10.18dBu | |
| Input | MIC/INST IN | |
| Connector Type | XLR combo jack | |
| Input Impedance | 15K ohm /1 Meg ohm | |
| Maximum Input Level | -3.8dBu/10.18dBu | |
| Output | OUTPUT | |
| Connector Type | 2 x 1/4" unbalanced mono outputs | |
| Output Impedance | 600ohm | |
| Maximum Output Level | 10.18dBu | |
| PHONES | ||
| Connector Type | 1 x 1/8" unbalanced stereo output | |
| Output Impedance | 4.8 ohm | |
| Maximum Output Level | 5.141dBu | |
| Output | USB | |
| Connector Type | TYPE-C | |
| USB AUDIO | USB2.0, 2-in/2-out, 44.1–192 kHz 24bit | |
| General | Power Supply | F40i: DC 19.5 V, 3.5A, center negativeF40i Li: DC 19.5 V, 3.5A, center negative |
| Battery (F40i Li) | 14.8V, 5200mAh, 76.96WhApproximately 6 hours of continuous use for music playback or performance (App Fader at 0dB, Ambient Light On, Screen Brightness at 50%, Master Volume Knob at 50%). | |
| Charging Time (F40i Li) | Approximately 2.5 hours(powered off, using the original adapter) | |
| Dimensions | 396mm*178mm*179mm (L × W × H) | |
| Weight | F40i: 3.6Kg | |
| F40i Li: 3.95Kg | ||
| Accessories | Power Adapter, USB Cable, Quick Start Guide, Handle Strap | |
Common Troubleshooting
1. Unable to Power On
● Make sure you're using the original power adapter.
- For the Li battery version, confirm the battery level is sufficient to start up, or connect the original power adapter and try powering on again.
- Press and hold the power button for more than 2 seconds.
2. No Sound After Powering On
- Check that the MASTER volume knob on the panel is turned up to an appropriate level.
- Open the iAmp APP and make sure the mixer's volume fader is set properly.
- Open the iAmp APP, go to Settings, and check that the Input Gain fader is set to a suitable level.
- Check all effect models in the signal chain to ensure any Volume parameters are adjusted correctly.
3. Excessive Background Noise
- Use high-quality shielded cables.
- Try changing your playing environment or time of use to rule out power-related interference.
- Move away from computer towers, motors, fans, or other electrical devices to avoid electromagnetic interference.


MOOER
www.mooeraudio.com

SHENZHEN MOOER AUDIO CO., LTD.
SF Unit B Jinghang Building, Liuxian 3rd Road,
Bao'an 71 District, Shenzhen, China. 518133
Tel: +86 0755 2163 6506
Made in China