PRIME P2 - Kitarjski ojačevalec Mooer - Brezplačna navodila za uporabo
Brezplačno poiščite navodila za napravo PRIME P2 Mooer v formatu PDF.

Vprašanja uporabnikov o PRIME P2 Mooer
0 vprašanje o tej napravi. Odgovorite na tiste, ki jih poznate, ali zastavite svoje.
Zastavite novo vprašanje o tej napravi
Prenesite navodila za vaš Kitarjski ojačevalec v formatu PDF brezplačno! Poiščite svoja navodila PRIME P2 - Mooer in vzemite svojo elektronsko napravo nazaj v roke. Na tej strani so objavljeni vsi dokumenti, potrebni za uporabo vaše naprave. PRIME P2 znamke Mooer.
NAVODILA ZA UPORABO PRIME P2 Mooer
MOOER
PRIME P2 INTELLIGENT PEDAL
Portable Touch Screen Multi-Effects Unit
Owner's Manual
CONTENT
PRECAUTIONS----01-02
FEATURES----03-04
LAYOUT----05-07
CONNECTIONS----08-10
INSTRUCTIONS---- ---- ---- ---- 11-21
MOOER PRIME APP----22-41
EFFECTPAGE/PRESETEDITING----25-34
P2 MENU----35-37
SETTING----38-41
TOOLS----38-41
MOOER STUDIO SOFTWARE----4-44
WIRELESS FOOTSWITCH----44-51
TONE----52-57
SPECIFICATIONS----58-59
PRECAUTIONS
Power supply
- Please use a power supply that meets UL, CSA, VDE or CCC standards.
- Please use a power supply that meets the manufacturer's power requirement.
- Please unplug the power supply when the device is turned no used or during a thunderstorm.
- Please do not expose a battery-powered device to heat or humid environments.
- Should peculiar smells or strange noises occur during charging, please stop charging immediately and contact the after-sales team for repair or replacement.
- In case of leaking liquid, do not let the liquid come in contact with your skin or eye. Should contact occur, we recommend contacting a doctor as soon as possible.
- To avoid fire or explosion, please do not disassemble the device to access its battery.
Storage and usage locations
To avoid deformation, discoloration or other serious damage, do not expose this device to any of the following conditions:
- direct sunlight
• extreme temperature or humidity
• high humidity or moisture
• excessively dusty or dirty locations
- magnetic fields
• strong vibrations or shocks
Cleaning
Clean only with a soft, dry cloth. If necessary, slightly moisten the cloth. Do not use abrasive cleaners, cleaning alcohol, paint thinners, wax, solvents, cleaning fluids, or chemical-impregnated wiping cloths.
Operation
- Please do not use excessive force to operate the control elements of the unit.
- Please do not drop the unit, and avoid heavy blows.
- Please do not modify the unit without authorization.
- Should repairs be required, please contact the MOOER support team for more information.
- Always turn the device and connected devices off before setting up connections to avoid malfunctions and unexpected damage.
Interference with other electronic devices
Radios and televisions placed nearby may experience interference with reception.
Operate this device at a suitable distance from radios and televisions.
Electromagnetic sources in your close environment, such as other electronic devices, WIFI routers etc., may cause interference noises in your P2.
FEATURES
- Eliminates the need to carry a large number of different pedals and their associated power supplies
- Easy configuration of an effects chain without complicated user interfaces
- Large 1.3" touch screen allows quick preset changes and access to the tuner directly on the device
- Based on MOOER's unique MNRS technology, allowing for high-quality digital amp models and effects in a small format
- 52 amp models created with MNRS technology + 10 GNR slots to store simulation files downloaded from the cloud or third-party files
- 25 cab sim models + 10 GIR slots to store simulation files downloaded from the cloud or third-party IR files
• 57 classic and experimental effect models
• Up to 80 presets in 20 banks - Drum machine with 56 groove varieties, can be synchronized with the Looper
• 4 metronome styles - Looper with a total capacity of 80 minutes (storage for 10 loops with 8 minutes each)
• Supports loading of 3 ^rd party IR files
• Supports Tone Cloud sound sharing
• Supports stereo output for stereo effects
- Stereo headphone output, support 3.5mm TRRS headphone
- Bluetooth audio playback in stereo for practice or jamming
- USB-C charging port also supports audio playback over USB and USB-OTG for live streaming and easy recording
- Can be controlled using MOOER F-series wireless footswitches
- Can be controlled from an external MIDI controller
- Integrated rechargeable battery with up to 5 hours of battery life
- Free mobile app for easy editing of sounds as well as saving, organizing and sharing presets
- MOOER Studio PC management software for backup and updates and loading 3rd IR
LAYOUT
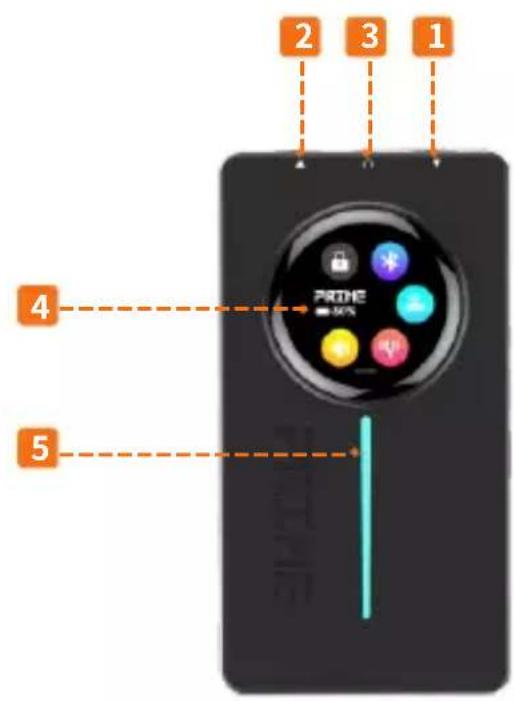
1 Input jack
6.35 mm (1/4") TS jack. Connect your instrument cable from your guitar here.
2 Output jack
6.35 mm (1/4") TRS jack. Use an instrument cable to connect to your amplifier. You can use a TRS ➞ 2 x TS splitter adapter to achieve stereo output.
3 HEADPHONE
3.5 mm (1/8") TRRS jack for headphone / headset connection. If used with a headset (headphones + microphone), the microphone input can be mixed in with the output signal.
4 Control interface touch screen
Shows the currently selected preset. Swipe to display volume controller, tuner, battery status, Bluetooth status and foot switch connection. When the P2 is turned off and connected to a power supply, the screen shows the battery charging status in percent.
5 LED indicator strip
The indicator strip flashes in different colors during boot-up and then lights up each time an input signal is detected.
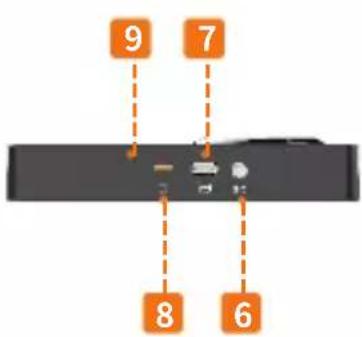
6 MIDI jack
3.5 mm (1/8") jack for connection to a MIDI controller.
7 USB-C charging port / OTG port
Use the supplied USB-C to USB-A cable to connect to a regular 5 V, 2.0 A USB-A power supply unit (e.g. mobile phone charger). Connect this port to a computer or mobile device (OTG adapter required) to play back or record audio
8 Power button
Long press for Power ON/OFF; short press to lock/unlock the touch screen.
9 Reset Switch
Should the P2 fail to react and this cannot be remedied by switching the unit off and on again with the Power button, you can use a paper-clip or a pin to press the reset button in this hole. This will force the device to turn off. It can then be re-started with the Power button.
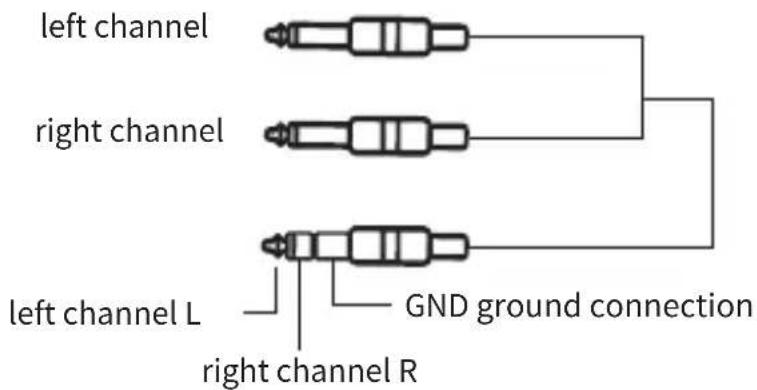
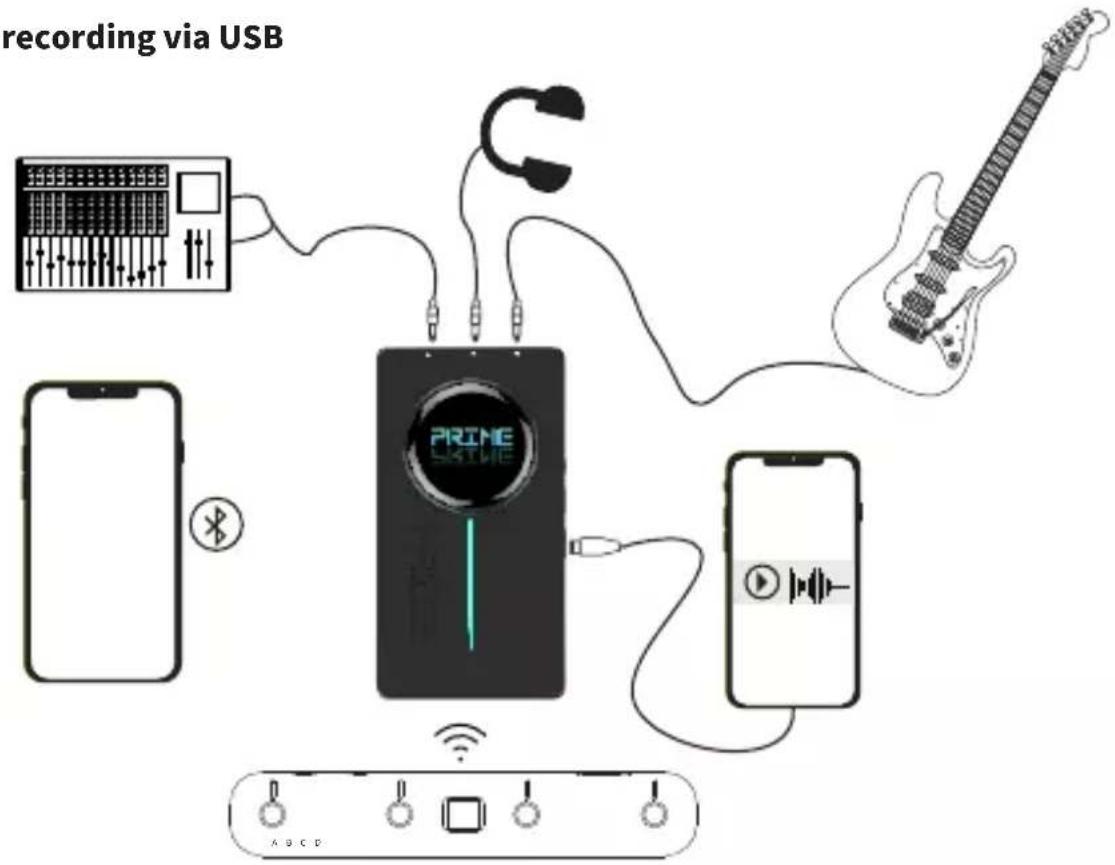
CONNECTIONS
Normal
Tipp for stereo output
P2 supports stereo output using a 1-in-2 (TRS
≥ 2 × TS) adapter cable.
Setup for OTG recording via USB
INSTRUCTIONS
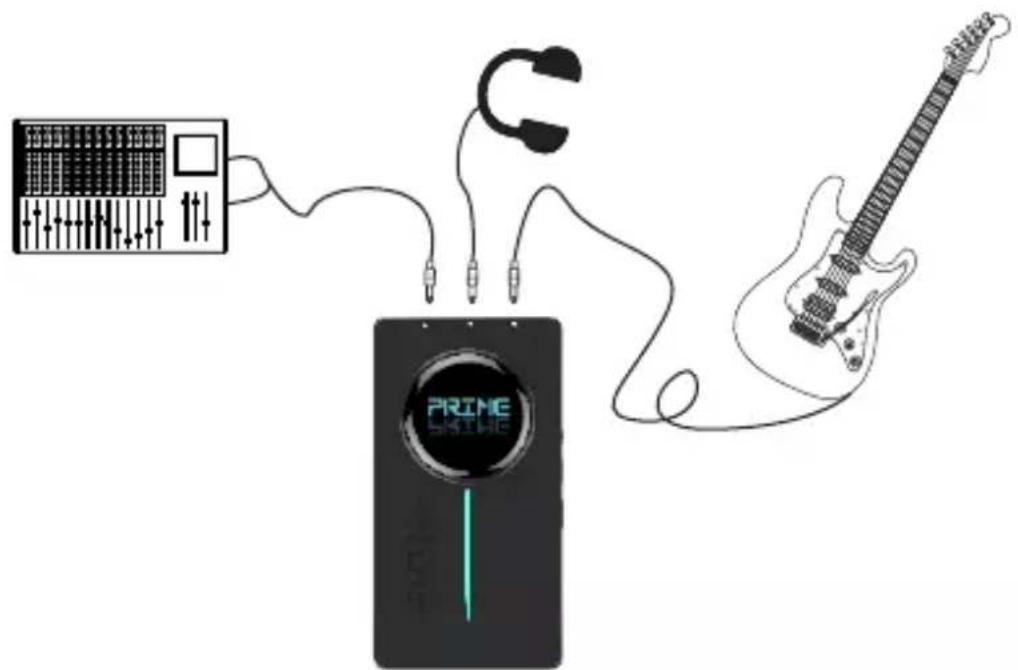
Connect your instrument and amp
The P2 can be wired like any other effect pedal.
Connect your guitar to the INPUT (1) of the P2 with an instrument cable; use another instrument cable to connect the OUTPUT (2) to your Amp or other effects.
You can put other effects before or after the P2. You may have to adjust the input gain of the P2 using the Prime App if you use high-gain pedals in front of the P2. See section Input Gain below.
Power on
Long press the Power button (8) for two seconds to activate the pedal. After a few seconds of powering up, the screen will show the currently selected preset number and b -ank as well as the name of the active preset.
Preset selection on the P2 touch screen
Tap on one of the letters A, B, C or D to select one of four presets in the currently selected bank. The active preset is indicated by a filled circle around the letter and by the name in
the middle of the screen.

Bank selection on the P2 touch screen
Tap the preset name in the middle of the screen to open the bank selection mode and tap on the right / left arrows to select one of 20 banks.
After selecting a bank, you need to tap one of the four preset letters, to actually activate the preset within the selected bank. If you do not select a preset within 3 seconds, the screen will switch back to the currently active preset.

P2 Tools screen
Swipe down on the touch screen to access the Tools screen.
(1) Tap the tuning fork to tune your guitar. Depending on a setting controlled by the PRIME App, the output may be muted for silent tuning. See section Tuner.
(2) Tap the speaker icon to open an output volume control bar.

(3) Tap the footswitch icon to connect / disconnect a wireless footswitch (footswitch must be in pairing mode to connect).
(4) Tap the Bluetooth icon to activate / deactivate the Bluetooth audio playback feature.
(5) The battery indicator shows the status of the P2 battery.
Bluetooth Playback
Tap the Bluetooth icon feature. As soon as a mobile device is paired with the P2, music from the mobile device can be played back through the output of the P2. Adjust the playback level with the volume control on your mobile device. You can also adjust the mix on the Mixer Page of the Prime App (see below).

Use this feature to jam along to backing tracks or for practicing.
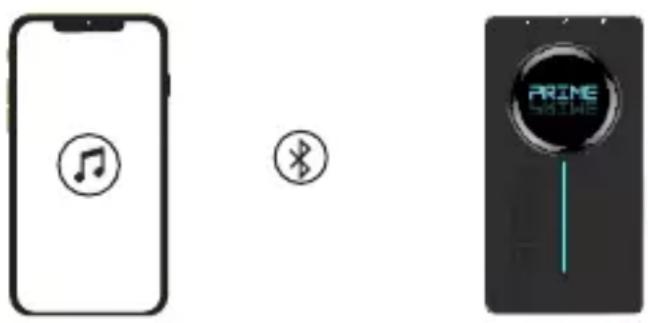
Pairing
Open the Bluetooth menu of your mobile device, search for a new device, select "Prime P2 Audio" and confirm the connection.
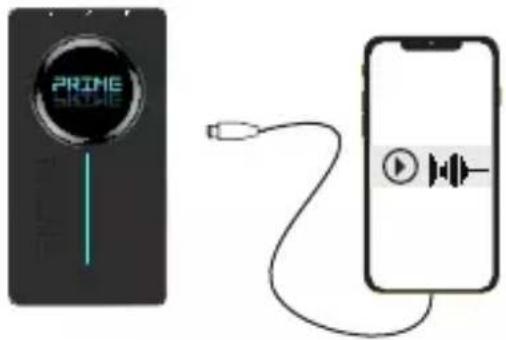
USB-Audio playback
When connected to a Smartphone, computer or tablet via a USB-cable plugged into to the USB-C port on the side, the P2 supports audio playback from the connected devices.
The audio signal will be mixed with your instrument signal and routed to the output of the P2 to allow you to jam along with your audio material. Use the volume controls of your mobile device / computer to control the volume of the audio material in the mix. You can also adjust the mix on the Mixer Page of the Prime App (see below).
For connection to a mobile device, an OTG cable / adapter may be required (to be purchased separately). You can use the included USB-C to USB-A cable for connecting to a computer equipped with a USB-A port.
USB OTG recording
When connected to a Smartphone, computer or tablet via a USB-cable plugged into to the USB-C port on the side, the P2 supports direct OTG (on-the-go) recording on the connected device.
For connection to a mobile device, an OTG cable / adapter may be required (to be purchased separately). You can use the included USB-C to USB-A cable for connecting to a computer.
Use audio recording applications on your computer / mobile device to record the signal from the P2. The OTG recording feature of the P2 is designed for easy and direct recording on a mobile platform.
Headphones / Headset
The P2 can be connected to headphones or a headset using the 3.5 mm (1/8") TRRS headphone port.
If used with headphones (TRS-jack) the headphones will receive a stereo signal representing the same mixed output that the 6.35 mm output jack puts out (mix of instrument input and audio-signal received over Bluetooth and/or USB).
If used with a headset (headphones + microphone, TRRS-jack), the headset will also receive the stereo output signal, but additionally, the input signal from the headset microphone can be mixed in with the output signal. This way, you can use the P2 to sing along to your playing or a backing track.
The P2 can be used to apply additional effects to the vocal channel. See section Mixer Page in the PRIME App for more information.
Screen Lock
The touch screen can be locked to prevent accidental setting changes. Short press the Power button to lock / unlock the touch screen. In lock mode, the screen shows the selected preset, but does not respond to touch input.
The screen also locks automatically after a time period that can be specified using the Auto-Lock setting in the PRIME App.

flowchart
graph LR
    A["1A Modern Hi Gain"] --> B["1A Modern Hi gain"]
    B --> A
Auto Shutdown
To save battery capacity, the P2 will automatically shut down when it is not in use (no input signal detected).
Long-press the power button on the P2 to re-start it. It will return to the last used preset.
The timeout for the Auto Shutdown can be adjusted in the PRIME App. See section Auto Shutdown for further instructions.
Charging
The P2 is equipped with a built-in rechargeable lithium-ion battery (3000 mAh). The device supports charging via cell phone charger (not included), a power bank or the USB-A port of a computer.
The Prime P2 can be used while it is being charged.
The power source must provide 5 VDC / 2 A (10 W). The charging time for a full charge is about 3 hours*. The P2 can run for about 6 hours* before it needs to be re-charged. (*Charging time and battery life are based on lab test data).
Notes:
- Please use a USB-C to USB-A/USB-C to USB-C cable for charging (included).
- The P2 is internally protected against over-charging, deep discharge, short circuit and over-current.
- If stored for more than 3 months after being fully charged, the P2 must be re-charged to maintain battery capacity.
Do not store a discharged P2 for more than 1 month without re-charging it. - After 300 cycles the battery reaches about 75% of its original capacity.
- Charge the battery at temperatures between 0^ C and 45^ C. Store the device at 25^ C ± 5^ C.
- The device may get warm during charging or regular use. This is normal and does not affect the functions. Please avoid using the device in high-temperature environments.
Footswitch control
The Prime P2 supports the MOOER F-series wireless footswitches (purchase separately). The footswitch can be used to control several functions of the P2 such as Preset and Bank selection, Tuner access, Drum Machine and Looper control or Tap-Tempo input.
Before using the wireless footswitch for the first time, it must be paired with the P2. Please see section WIRELESS FOOTSWITCH for further instructions.
MIDI Control
Preset switching, Looper and Drum Machine functions of the P2 can be controlled using CC commands from an external MIDI controller.
Use the included MIDI adapter cable (3.5 mm the MIDI jack on the side of the P2.
→PIN connector) to connect a controller to
See section MIDI Settings in the PRIME App for instructions about assigning MIDI commands to P2 functions.
natural_image
Diagram showing a device connected to a multi-pin terminal with switches (no text or symbols visible)MOOER PRIME APP
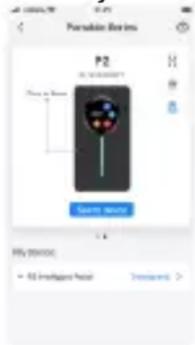
Users can download the MOOER PRIME App to edit preset patches, control effect parameters, store and recall up to 80 presets, download and share presets with other users in the MOOER Tone Cloud and activate and control tools like Tuner, Drum Machine, Metronome and Looper.

Download
Please download the MOOER Prime App from Google Play Store, Apple App Store or the official MOOER Download-Support website and install it on your mobile device.

Connection
Turn the P2 on by long pressing the Power button.
Activate Bluetooth and Location Services on your mobile device.
Your device will also need a good internet connection when you want to use the Tone Cloud upload/download features.
Open the Prime App, swipe to select "P2" on the Home screen, tap on "Search Device" and then tap on the device name below. Wait a few seconds until the connection is established and "Connected" is displayed. The image of the P2 is then shown in full color. Tap on the image of the P2 to open the user interface.
User interface
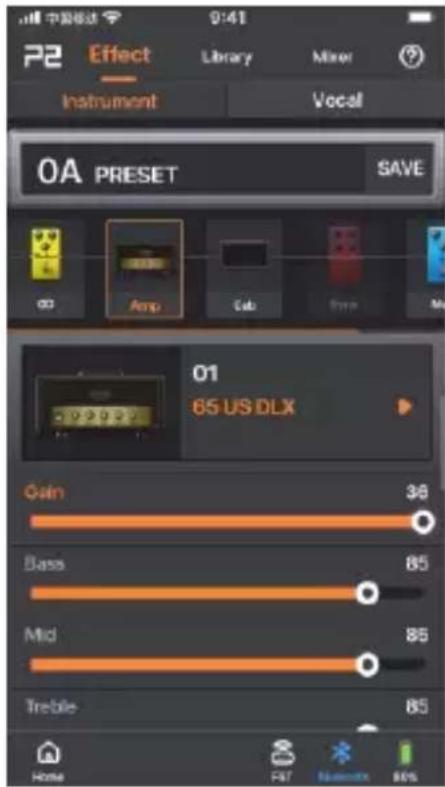
The top of each screen shows the following tabs:

(Menu), Effect, Library and Mixer
Symbols in the bottom part of the screen:

Home button to return to the home screen Footswitch button for connecting to a wireless footswitch. The icon is shown in blue color when a footswitch is connected and grey when not.

Bluetooth icon
Blue if Bluetooth connection is successful. If the Bluetooth icon is grey, the P2 unit is either off or out of range. Turn the P2 on or bring it closer to your mobile device and tap the Bluetooth button to re-establish the connection.

Battery status of your P2.
EFFECT PAGE / PRESET EDITING
Preset selection

- The P2 comes pre-configured with 80 sample presets that users can adapt to their own taste.
- The currently active preset is shown below the page tabs.
- Tap on the preset name to open the preset list and select another preset. The presets are listed according to their bank (0 - 19), their position within the bank (A - D) and their name (defined by user).
- The preset indicated in the App also changes when you switch presets on the touch screen of your P2 or when you use the optional wireless footswitch.
- If you want to switch presets after you have made changes to a p reset, you need to save the preset first by tapping the “SAVE” button behind the Preset name.
NOTE: If you do not save a preset before you switch to another preset, all changes will be discarded without warning.
Effect Chain
The next row shows the chain of effect modules.
The signal passes the modules from left to right.
The following module types are available:
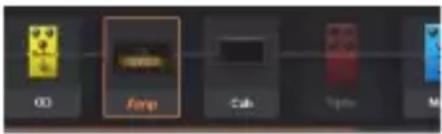
OD = 19 overdrive and distortion effects
Amp = 52 amplifier simulations + 10 GNR file slots downloaded from the cloud
Cab = 25 cabinet simulations + 10 GIR file slots downloaded from the cloud
Dyna = 4 dynamic effects (compressors, noise gates…)
Filter = 3 filter effects (Wah, Q-Filter…)
MOD = 14 modulation effects (Tremolo, Vibrato, Flanger, Phaser, Chorus, Pitch shift…)
DELAY = 9 delay and echo effects
REVERB = 6 reverb effects
EQ = 2 equalizer effects
- Modules shown dimmed are not active. Modules shown in normal color are active.
- Tap on a module once to select it (frame is shown around the module) and tap it again to activate or deactivate it.
- Slide the effect chain right or left to show more modules.
- Tap and hold a module and drag it left or right to change its position in the effect chain.
- Add a new module by tapping the "+ Add" module at the right end of the chain.
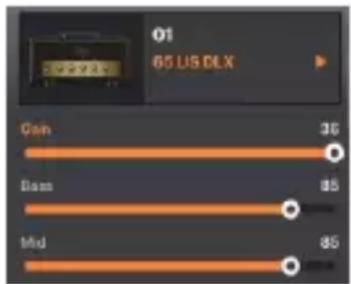
Effect selection and parameter adjustment
- Tap on a module to select it (frame is shown around the module).
- In the field below, tap on the name of the effect to open a list of effect types and individual effects.
- The available effects depend on the module type (e.g. selection of 52 amp types for the AMP module).
- The fields below the selected effect show typical parameters for this kind of effect. They can be adjusted by tapping and moving the sliders.
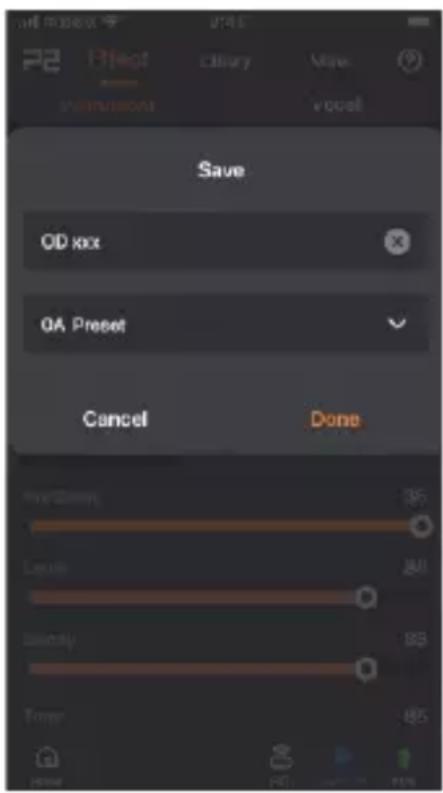
Saving a preset
- Tap the "SAVE" button behind the preset name to re-name and save the preset. You will be prompted to specify a name and a storage location.
- Edit the name to your liking. If you upload your preset to the cloud, it will be published under this name.
- Specify a storage slot.
The P2 provides 20 preset banks (0 through 19) with 4 slots each (A through D).
NOTE: The number (0 - 19) designates the bank number and the letter (A - D) determines the position of the preset within the bank.
NOTE: Saving a preset in a slot will overwrite any preset that is currently stored in this slot.
- Tap SAVE to save the preset or CANCEL to discard your changes.
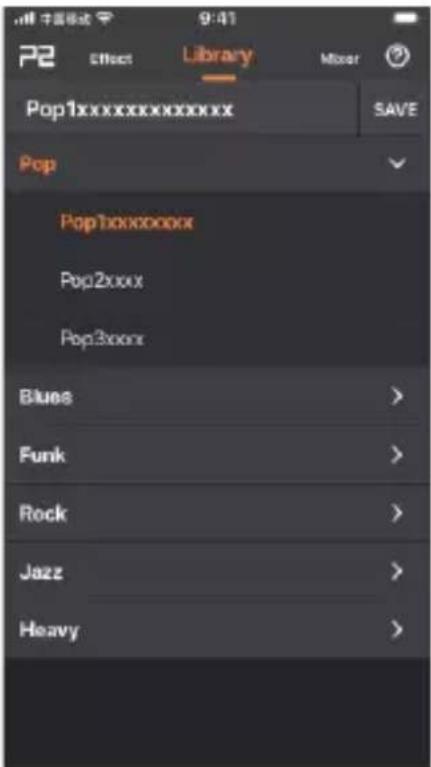
Library Page
This page shows a list of pre-configured sounds you can use as a basis for your own creations. The samples are grouped by style for easier identification.
Select a sound, play your instrument and listen to the effects. If you like what you hear, use the "SAVE" button to store the sound in a preset slot and then adjust it to your liking on the Effect page.
NOTE: Saving a preset in a slot will overwrite any preset currently stored in this slot.
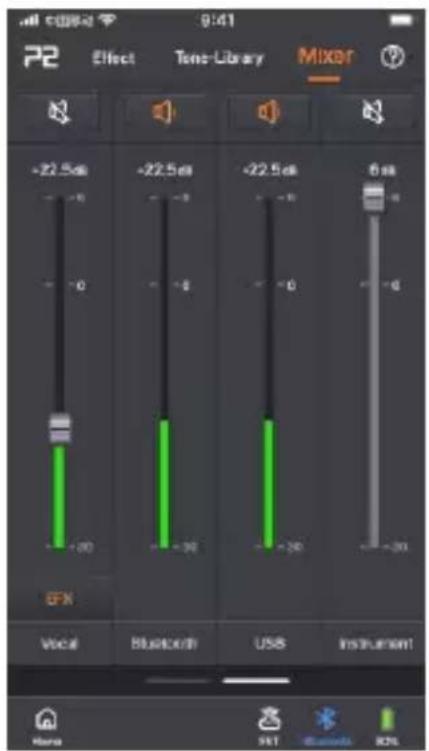
Mixer Page
This page shows a mixer with faders to adjust the output levels for different sources (Vocal, Bluetooth, USB, Instrument). Each channel can be individually muted using the 📄 buttons.
The Vocal channel controls the input from a headset microphone connected to the 3.5 mm TRRS headphone jack. The microphone signal is mixed in with the output signal. This channel is also equipped with an "EFX" button to access compressor, EQ and reverb effects that will only be applied to the microphone signal.
The USB Fader controls the output signal over USB OTG (not the incoming USB signa 1).
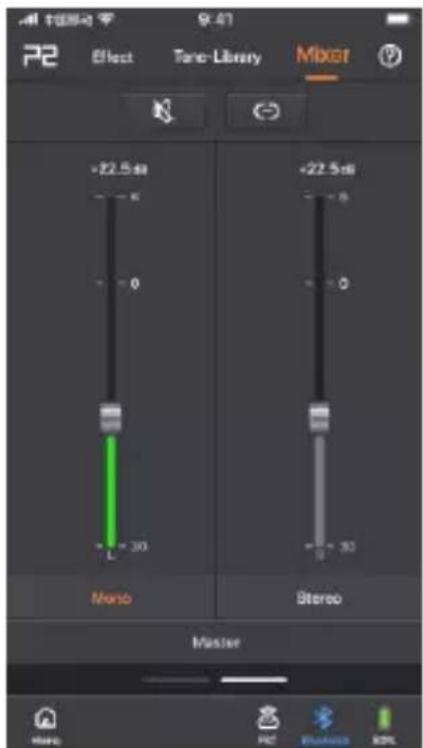
Swipe left to access Master volume faders. Use the Mono / Stereo buttons to select the output mode and the individual faders to control the Stereo panorama.

mutes the complete output.

links the L and R faders.
P2 MENU
Click to log in / Account info
Please register a MOOER account if you are using the PRIME App for the first time. As a registered user you can download shared presets from users worldwide or upload and share your own sounds with other users.

Registered users can also download MNRS GIR and GNR files from the cloud and use them in their P2 effect chains.

Your profile is shown after you have registered. You can tap your Profile info to open a list of your Downloads and Uploads.
You can log out by clicking on your user icon on the first page of the HOME screen.
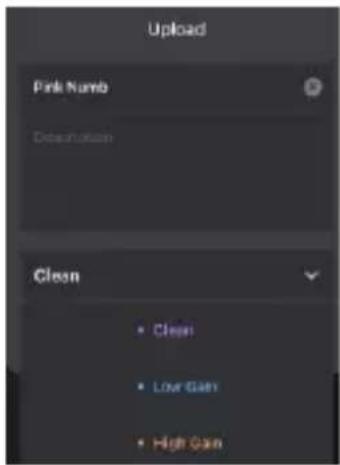
Upload
After registering, you can use this feature to upload your current preset to the cloud and share it with other users this way.
Name your preset, add a description and select a style. Then tap Done to upload or Cancel to return without uploading.
Once you have uploaded a preset, you can swipe left to remove the preset from the cloud using the trashcan icon.

Clouds
After registering, you can use this feature to explore presets that have been shared by other users.
Tap the headphone icon to test the preset or the download icon to download the preset into your P2. You will be prompted to specify a preset slot where the downloaded preset is stored.
NOTE: The downloaded preset will overwrite the preset currently stored in this slot!
After downloading a preset from the cloud you can modify its settings on the Effects page.

SETTING
Cabsim
This switch can be used to turn off all cabinet simulations with one click if you use third party speaker cabinets or simulations.
With Cabsim ON, you can set up a Cab module in any preset effect chain and save it's on/off status.
Cabism OFF deactivates all Cab modules in all presets. You can then manually activate a Cab module in a preset, but cabinet simulation will be turned off again, as soon as you switch to another preset.
Global EQ
Use this to activate and adjust global EQ settings that will be applied to the output signal, independent of any preset settings.

Input Gain
This setting adjusts the input gain for the P2. Use it, to attenuate clipping if you are using re-amplifying effects or an instrument with active electronics in front of the P2.
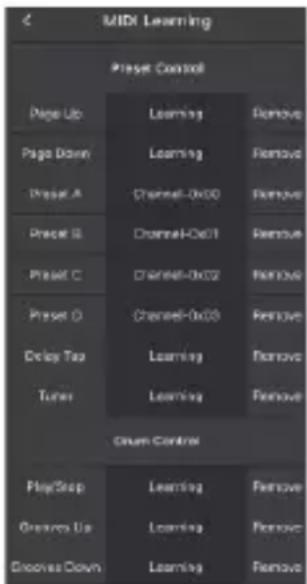
MIDI Settings
Use this section to assign MIDI CC commands received from an external controller to P2 functions for Preset Control, Drum Machine Control or Looper Control.
Connect a MIDI Controller, send the desired CC command and use the "Learning" button to assign the command to a function.
You can also remove MIDI command assignments in this section.
Version
This field shows the current version of the P2 firmware.
Reset
- This will reset your P2 and the App to factory settings!
- Please back up your presets to the cloud or your PC to prevent them from being deleted. You can later restore them from the cloud via MOOER Studio PC Software.
- All recorded loops will be deleted.
- Use the MOOER Studio software to backup your settings before performing a reset or update.
Display brightness
This setting controls the brightness of the touch screen display on the P2. Adjust the brightness to the lighting conditions at the venue.
Auto Shutdown
The P2 features power-saving mode.
If the pedal is idle (no input signal) for the time specified in this setting, it will automatically shut down in order to save battery life.
Long-press the Power button on the P2 to re-activate it.
Auto-Lock
Use this setting to automatically lock the touch screen on your P2 against accidental setting changes. The screen can be unlocked by short-pressing the Power button on the P2.
Bluetooth Rename
Use this setting to specify how your P2 is shown in the list of available Bluetooth devices on your Smartphone / tablet.
TOOLS
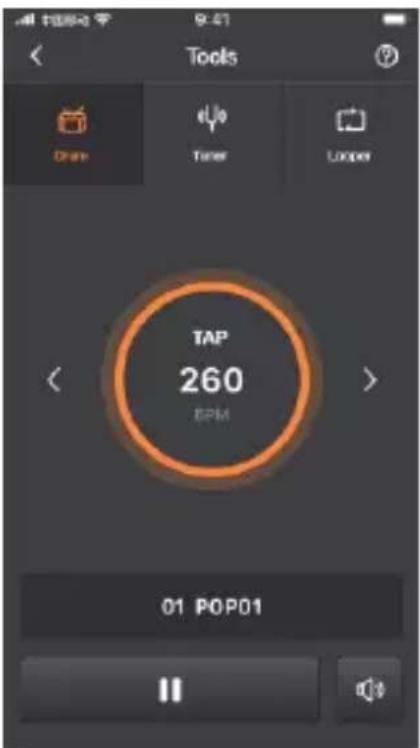
Drum Machine / Metronome
- Tap on the name of the drum pattern to select one of 56 different drum patterns.
- Select patterns 57 - 60 to access 4 different styles of metronomes.
- Adjust the volume with the speaker icon.
- Tap the TAP button several times to adjust the tempo. Use the left/right arrows for fine tuning.
- Tap the Play button to start / stop the Drum Machine.
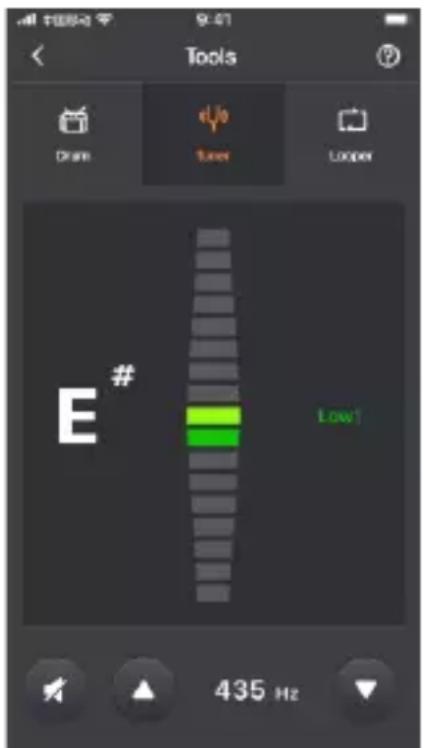
Tuner
- The tuner bar indicates whether your string is sharp or flat. Perfect tune is indicated by a green line in the center.
- The tuner automatically detects the string you are trying to tune.
- You can adjust the standard pitch A by tapping on the arrows next to the frequency readout (standard A is 440 Hz)
- Use the speaker button to enable / disable silent tuning. Silent tuning will also be enabled / disabled when you access the tuner feature from the P2 touch screen or the wireless footswitch
Looper
You can use the Looper to record loops of up to 8 minutes (480 seconds).

Adjusts the playback volume.

Starts a loop recording and starts overdub for the second layer of the loop.
NOTE: When you tap this button for the first time, the recording will not start before the first signal is detected at the input.

Stops the recording and plays the loop.

Stops recording or playback.

Clears (deletes) the recorded loop.
You can store up to 10 loops in "Song" slots.
After recording a loop, tap the and a song slot and confirm.

con, specify a name
You can recall stored loops by tapping on the field showing the loop name and selecting one of the 10 Song slots.
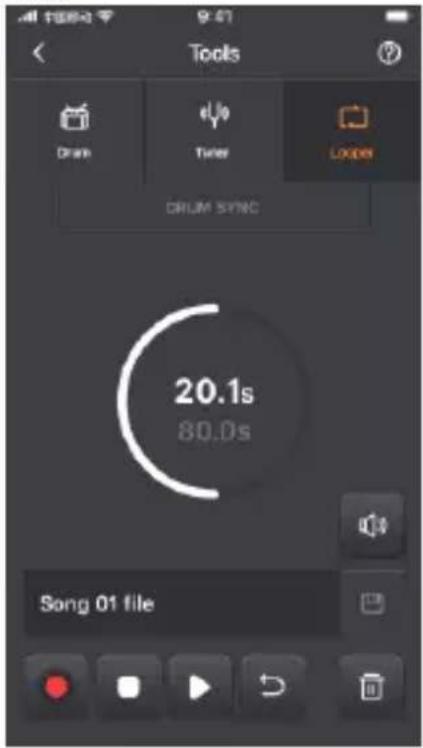
NOTE: Stored loops will be deleted when you reset to factory settings.
Drum Machine synchronization
The Looper can be synchronized with the Drum Machine.
If SYNC is active, the Drum Machine will start after a count-in when you start recording in the Looper.
To use the Sync feature
- Open the Drum screen, select a drum pattern and a tempo and start the Drum Machine.
Switch to the Looper screen and tap on

The Drum Machine will stop, and enter a standby-mode to wait for your loop recording.
- Tap to start recording the loop.
The Drum Machine will play one bar of count-in and then start the selected drum pattern.
- You can now use the other Looper controls as described above.
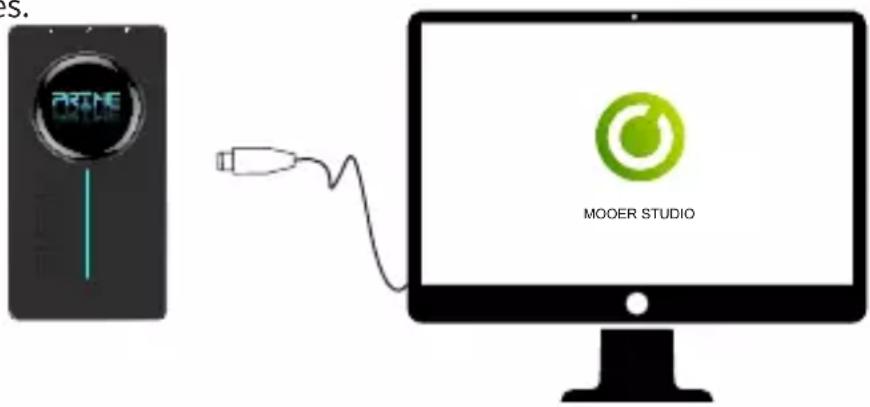
MOOER STUDIO SOFTWARE
Users can download the MOOER Studio Management Software from the official MOOER Download-Support Website and install it on their PC / laptop.
Use the USB-C to USB-A cable to connect your P2 to your computer and open the MOOER Studio software. Use the software to:
- update the firmware on your P2,
- create backups of your P2 settings and presets on your computer,
- restore backups to your P2,
• manage third-party IR files.
Firmware update
NOTE: Use the MOOER Studio software to backup your settings before performing an update.
- Press the side button for 12 - 15 seconds until the LED bar starts blinking.
- Connect the P2 to your PC using the included USB-C to USB-A cable.
- Open the MOOER Studio software and the update should start automatically.
You can also click "Device Update" in the software to initiate the update. - You can download the new App version from the Play Store / App Store.
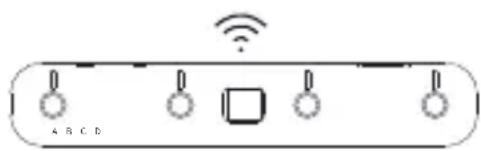
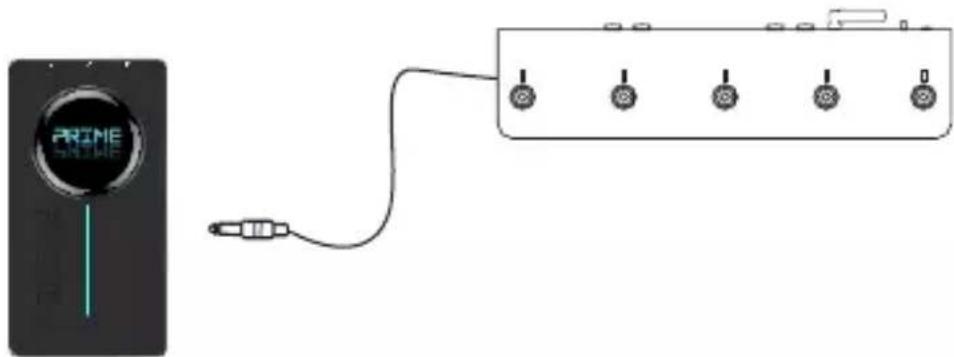
WIRELESS FOOTSWITCH
The Prime P2 supports MOOER F4 wireless footswitches (to be purchased separately). The footswitch allows users to control Preset Switching, Drum Machine, Looper and Tuner and it provides a Tap Tempo function.
Please consult the manual for the F4 footswitch for battery specs and charging requirements. The P2 can only be connected to one wireless footswitch at a time.
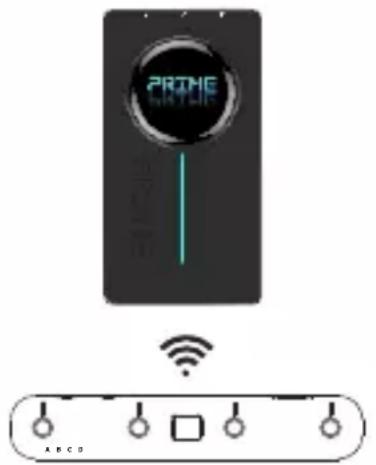
Pairing
- The footswitch must be paired with the P2 before you can use it for the first time.
- For pairing you can use the Prime App or the touch screen on the P2.
- Power the F4 footswitch on, press and hold footswitch A and C to enter pairing mode. The footswitch LEDs will start to blink.
- Tap the footswitch icon 📤 at the bottom of the Prime App page to start pairing. Alternatively you can swipe down on the P2 touch screen and tap on the footswitch icon in the Tools screen.
- After pairing is complete, the screen on the F4 footswitch will show the currently selected preset number and the LED stop blinking.
The footswitch icons in the app and on the P2 Tools screen will be shown in blue to indicate successful pairing.
NOTE: The footswitch only needs to be paired once (or after a reset) and will then automatically connect as soon as P2 and F4 footswitch are turned on and within range of each other.
After the initial pairing, the footswitch can be used to control the P2 even without the Prime App being active or connected.
Preset Switching
The Footswitch will always indicate the selected preset, regardless of whether it was selected using the touch screen on the P2, the preset selection list in the Prime App or the A/B/C/D buttons on the footswitch.
- Press the A/B/C/D buttons to switch between four preset patches in the current bank.
The active preset will be indicated by the respective LED above the footswitch and in the footswitch screen: the number indicates the bank and the letter indicates the preset within the bank (e.g. "3d"). For better readability, A and C are represented as capital letters; b and d as lower case letters.
Banks 10 through 19 are represented by a dot behind the number
(e.g. "0.d" = 10D or "9.A" = 19A)
Bank Switching
- Press switches A and B simultaneously to scroll up through the preset banks.
- Press switches C and D simultaneously to scroll down through the preset banks.
Once a bank is selected, the preset indication in the footswitch screen starts blinking, but the preset is not yet active. You need to tap one of the four footswitch buttons, to select a preset within the selected bank. Only then will the selected preset be activated and the footswitch indication stops blinking.
Tap Tempo
- If a Delay effect is active for the currently selected preset, you can tap the footswitch for the active preset once to activate the Tap-Tempo mode and control the delay time.
NOTE
The Tap-Tempo mode is indicated by a dots being shown behind the letters and numbers in the footswitch screen (e.g. "3.C."). You can adjust the tap tempo while the dots are shown. The tap tempo mode will be deactivated after 2.5 seconds without input, the dots disappear and the footswitch returns to preset switching mode.
- Tap the footswitch repeatedly in the desired tempo to directly adjust the delay time. The tap tempo may not exceed the max/min delay time for the selected effect.
- The footswitch LED will blink briefly to indicate the tapped tempo.
Tuner
- Long press any footswitch to enter the TUNER mode.
NOTE
The PRIME App (if active and connected) will also enter the TUNER Mode, but you can use the footswitch for tuning without the app.
If the screen on the P2 unit is not in "locked" mode, it will also show the tuner mode while tuning is activated on the footswitch.
- The left block of the footswitch screen shows the nearest note, while the right block indicates the pitch. Semi-notes are indicated by # (e.g. "A 0")
- The right block does not move if the string is in tune, it will rotate counterclockwise if the note is flat or clockwise if the note i s sharp.
- Tap any footswitch button once to exit the tuning mode and return to preset switching mode.
NOTE
Users can turn on/off silent tuning in the PRIME App.
Drummer & Looper Control
The P2 is equipped with a built-in 80-second Looper with storage slots for up to 10 songs and a Drum Machine with 56 grooves + 4 metronomes (grooves 57-60).
The Looper and the drum machine can work simultaneously.
Opening / closing Drummer & Looper mode
- In preset switching mode, press switches B and C simultaneously to enter the Drummer & Looper mode.
- The footswitch screen will show the blinking number of the currently selected Song slot for the Looper (e.g. "S1".)
- Press switches B and C simultaneously again to return to the preset mode.
Controlling the Looper
In Drummer & Looper mode, footswitches A and B are used for Looper control:
A: REC/PLAY/DUB
Tapping A will start the recording, tapping A again will play the recorded track, tapping A yet again will start an overdub recording over the first track layer and so on …
The A LED blinks during Record/Overdub and is continuously lit during Playback.
B: STOP / Hold to CLEAR
The B LED is lit when Recording/Playback is stopped and off, after the track was cleared.
Song-selection
Long press footswitch C to enter the Song selection mode.
Press footswitch A or B to scroll up/down be tween songs
The screen shows the currently selected Song (S1 = Song 1 / S0 = Song 10) and the A and B
LED are flashing.
The Song selection mode will be deactivated after a few seconds without input.
Controlling the Drum Machine
In Drummer & Looper mode, footswitches C and D are used for drum machine control.
C: Tap Tempo.
The beats-per-minute tempo for the drum machine can be adjusted using the tap tempo feature:
Tap button C at least 3 times to enter the desire tempo. The C LED will blink to indicate the selected tempo and the Drum Machine screen in the Prime App shows the selected BPM value.
D: Play/Stop. Starts/Stops the Drum Machine
Groove selection
Long-press footswitch C to enter the Groove selection mode.
The screen shows number of the currently selected Groove and both C and D LED are flashing.
Press switches C or D to scroll down/up between Grooves. Refer to the PRIME App for names and numbers of the grooves.
The Groove selection mode will be deactivated after a few seconds without input.
TONE
| OD | ||
| Num. | Name | Descriptions |
| 1 | Pure Boost | Based on Xotic RC Booster pedal |
| 2 | Flex Boost | Based on Xotic AC Booster pedal |
| 3 | Tube DR | Based on BK.Butler Tube Drivertube overdrive pedal |
| 4 | 808 | Based on Ibanez TS 808 overdrive pedal |
| 5 | Gold Clon | Based on Klon Centaur Gold overdrive pedal |
| 6 | D-Drive | Based on Barber Direct Drive overdrive pedal |
| 7 | Jimmy OD | Based on Paul Cochrane Timmy OD overdrive pedal |
| 8 | Full DR | Based on Fulltone Fulldrive 2 overdrive pedal |
| 9 | Beebee Pre | Based on Xotic BB Preamp overdrive pedal |
| 10 | Beebee+ | Based on Xotic BB Plus overdrive pedal |
| 11 | Black Rat | Based on Proco Rat distrotion pedal |
| 12 | Grey Faze | Based on Dunlop Fuzz Face fuzz pedal |
| 13 | Muffy | Based on EH Big Muff fuzz pedal |
| 14 | Full DS | Based on Fulltone GT500 distrotion pedal |
| 15 | Shred | Based on Marshall Shred Master distrotion pedal |
| 16 | Riet | Based on Suhr Riot distrotion pedal |
| 17 | MTL Zone | Based on Boss Natal Zone distrotion pedal |
| 18 | MTL Master | Based on Digital Metal Master distrotion pedal |
| 19 | Obsessive Dist | Based on Fulltone OCD distrotion pedal |
| AMP | ||
| Num. | Name | Descriptions |
| 1 | 65 US DLX | Based on Fender65 Deluxe Reverb preamp module |
| 2 | 65 US TW | Based on Fender65 Twin Reverb preamp module |
| 3 | 59 US Bass | Based on Fender59 Bassman preamp module |
| 4 | US Sonic | Based on Fender Super Sonic preamp module |
| 5 | US Blues CL | Based on Fender Blues Deluxe preamp module clean channel |
| 6 | US Blues OD | Based on Fender Blues Deluxe preamp module overdrive channel |
| 7 | E650 CL | Based on Engl E650 preamp module clean channel |
| 8 | Powerbell CL | Based on Engl E645 preamp module clean channel |
| 9 | Blacknight CL | Based on Engl E650 Blackmore signatur e preamp module clean channel |
| 10 | Mark III CL | Based on Mesa Boogie Mark III preamp module clean channel |
| 11 | Mark V CL | Based on Mesa Boogie Mark V preamp module clean channel |
| 12 | Tri Rec CL | Based on Mesa Boogie Triple Rectifier preamp module clean channel |
| 13 | Rockvrb CL | Based on Orange Rockverb preamp module clean channel |
| 14 | Dr Zee 18 JR | Based on Fender65 Deluxe Reverb preamp module |
| 15 | Dr Zee Reck | Based on Fender65 Twin Reverb preamp module |
| 16 | Jet 100H CL | Based on Fender59 Bassman preamp module |
| 17 | Jazz 120 | Based on Fender Super Sonic preamp module |
| 18 | UK 30 CL | Based on Fender Blues Deluxe preamp module clean channel |
| 19 | UK 30 OD | Based on Fender Blues Deluxe preamp module overdrive channel |
| 20 | HWT 103 | Based on Engl E650 preamp module clean channel |
| 21 | PV5050 CL | Based on Engl E645 pream p module clean channel |
| 22 | Regal Tone CL | Based on Engl E650 Blackmore signature preamp module clean channel |
| 23 | Regal Tone Od1 | Based on Mesa Boogie Mark III preamp module clean channel |
| 24 | Carol CL | Based on Mesa Boogie Mark V preamp module clean channel |
| 25 | Cardeff | Based on Mesa Boogie Triple Rectifier preamp module clean channel |
| 26 | EV 5050 CL | Based on Orange Rockverb preamp module clean channel |
| 27 | HT Club CL | Based on Blackstar HT Stage100 preamp module clean channel |
| 28 | Hugen CL | Based on Diezel Hagen preamp module clean channel |
| 29 | Koche OD | Based on Koch Powertone preamp module overdrive channel |
| 30 | J800 | Based on Marshall JCM800 preamp module |
| 31 | J900 | Based on Marshall JCM900 preamp module |
| 32 | PLX 100 | Based on Marshall Plexi 100 preamp module |
| 33 | E650 DS | Based on Engl E650 preamp module distrotion channel |
| 34 | Powerbell DS | Based on Engl E645 preamp module distrotion channel |
| 35 | Blacknight DS | Based on Engl 650 Blackmore signature preamp module distrotion channel |
| 36 | Mark III DS | Based on Mesa Boogie Mark III preamp module distrotion channel |
| 37 | Mark V DS | Based on Mesa Boogie Mark V preamp module distrotion cha nnel |
| 38 | Tri Rec DS | Based on Mesa Boogie Triple Rectifier preamp module distrotion channel |
| 39 | Rockvrb DS | Based on Orange Rockverb preamp module distrotion channel |
| 40 | Citrus 30 | Based on Orange AD30 preamp module |
| 41 | Citrus 50 | Based on Orange AD50 preamp module |
| 42 | Slow 100 CR | Based on Soldano SLO 100 preamp module Crunch channel |
| 43 | Slow 100 DS | Based on Soldano SLO100 preamp module distrotion channel |
| 44 | Jet 100H OD | Based on Jet City JCA100 H preamp module overdrive channel |
| 45 | PV 5050 DS | Based on Peavey 5150 preamp module distrotion channel |
| 46 | Regal Tone OD2 | Based on Tone King Falcon preamp moduleLead channel |
| 47 | Carol OD | Based on Two Rock Coral preamp module overdrive channel |
| 48 | EV 5050 DS | Based on EVH 5150 preamp module di strotion channel |
| 49 | HT Club DS | Based on Blackstar HT Stage 100 preamp module distrotion channel |
| 50 | Hugen OD | Based on Diezel Hagen preamp module overdrive channel |
| 51 | Hugen DS | Based on Diezel Hagen preamp module distrotion channel |
| 52 | Koche DS | Based on Koch Powertone preamp module distrotion channel |
| CAB | ||
| Num. | Name | Descriptions |
| 1 | Regal Tone 110 | Based on Tone King Falcon 110 cabinet |
| 2 | US DLX 112 | Based on Fender Deluxe Reverb 112 cabinet |
| 3 | Sonic 112 | Based on Fender Super Sonic 112 cabinet |
| 4 | Blues 112 | Based on Fender Blues Deluxe 112 cabinet |
| 5 | Mark 112 | Based on Mesa Boogie Mark 112 cabinet |
| 6 | Dr Zee 112 | Based on Dr Z Maz 112 cabinet |
| 7 | Cardeff 112 | Based on Two Rock 112 cabinet |
| 8 | US TW 212 | Based on Fender Twin Reverb 212 cabinet |
| 9 | Citrus 212 | Based on Orange PC 212 cabinet |
| 10 | Dr Zee 212 | Based on Dr Z Z-Wreck212 cabinet |
| 11 | Jazz 212 | Based on Roland JC120 212 cabinet |
| 12 | UK 212 | Based on Vox AC30 212 cabinet |
| 13 | Tow Stones 212 | Based on Two Rock 212 cabinet |
| 14 | US Bass 410 | Based on Fender Bassman 410 cabinet |
| 15 | 1960 412 | Based on Marshall 1960 A 412 cabinet |
| 16 | Eagle P412 | Based on Engl Pro XXL 412 cabinet |
| 17 | Eagle S412 | Based on Engl Vintage XXL 412 cabinet |
| 18 | Rec 412 | Based on Mesa Boogie Rectifier 412 cabinet |
| 19 | Citrus 412 | Based on Orange PC 412 cabinet |
| 20 | Slow 412 | Based on Soldano SLO 412 cabinet |
| 21 | HWT 412 | Based on Hiwatt AP 412 cabinet |
| 22 | PV 5050 412 | Based on Peavey 5150 412 cabinet |
| 23 | EV 5050 412 | Based on EVH 5150 412 cabinet |
| 24 | HT 412 | Based on Blacksta r HTV 412 cabinet |
| 25 | Diesel 412 | Based on Diezel Hagen 412 cabinet |
SPECIFICATIONS
Input: 6.35 mm (1/4") TS, 2 MΩ
Output: 6.35 mm (1/4") TRS, 100 Ω
Headphone: 3.5 mm (1/8"), 32 Ω
Screen:1.28" Touch Screen
USB: Type C for charging or OTG recording
Bluetooth version: 5.0
Bluetooth: Bluetooth audio playback and App control
Wireless control: 2.4G
Wireless footswitch: s upported
Battery capacity: 3 000 mAh
Battery life: 5 hours*
MIDI Port:3.5 mm (1/8")
Charging requirement: 5V _DC /2A (10 W)
Charging time:2 .5 hours for full charge*
Dimensions: 120 x 64 x 21 mm (LxWxH)
Weight: 1 52 g
Accessories: Quick-Start manual, USB-C to USB-A cable, 3.5 mm jack to 5-PIN MIDI-connector
*Charging time and battery life are based on lab test data. Disclaimer: Parameter updates will not be notified separately.
MOOER
www.mooeraudio.com
SHENZHEN MOOER AUDIO CO. LTD
6F, Unit D, Jinghang Building, Liuxian 3rd Road, Bao'an 71 District, Shenzhen, China. 518133 Made in China