VR43 - Ura SEIKO - Brezplačna navodila za uporabo
Brezplačno poiščite navodila za napravo VR43 SEIKO v formatu PDF.

Vprašanja uporabnikov o VR43 SEIKO
0 vprašanje o tej napravi. Odgovorite na tiste, ki jih poznate, ali zastavite svoje.
Zastavite novo vprašanje o tej napravi
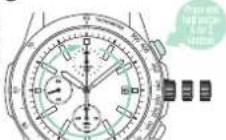
Prenesite navodila za vaš Ura v formatu PDF brezplačno! Poiščite svoja navodila VR43 - SEIKO in vzemite svojo elektronsko napravo nazaj v roke. Na tej strani so objavljeni vsi dokumenti, potrebni za uporabo vaše naprave. VR43 znamke SEIKO.
NAVODILA ZA UPORABO VR43 SEIKO
取扱説明書
INSTRUCTION
JCC06·V175C·
JV176·JVR4C·
F33
該当機種
V172·V174·V175·V176·VR42·VR43·
VS72 · VS75 · VS76
セイコーウオッチ株式会社
2206
弊社製品についての修理その他のご相談は、「お買い上げ店」で承っております。なお、ご不明の点は下記へお問い合わせください。
通話料無料 0120-612-911
お客様相談室
〒100-0005 東京都千代田区丸の内 3-1-1 国際ビル
〒550-0013 大阪市西区新町 1-4-24 大阪四7橋新町ビルディング
セイコーウオッチ株式会社
https://www.seikowatches.com/
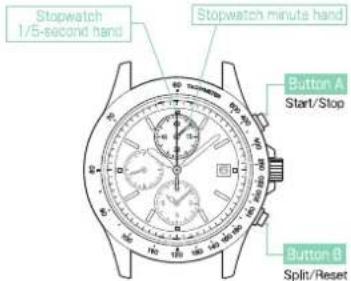
Features
- This solar watch is equipped with a stopwatch function.
- A solar cell under the dial converts any form of light into "electrical energy" to operate the watch.
※ "Chronograph" means a watch with a stopwatch function.
■ Stopwatch function
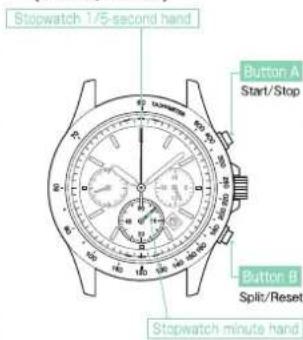
The stopwatch can measure up to 60 minutes in 1/5-second increments. After measuring 60 minutes, the stopwatch will automatically stop.
Alarm function
The single-time alarm can be set to sound only once at the set time. The alarm time can be set in one-minute increments to the time until 11 hours 59 minutes is reached.(Only available for V172, V174 and VS72)
Solar Charging Function
A solar cell underneath the dial converts any form of light into "electrical energy" to operate the watch. Once fully charged, for V172, V174, V175, V176, VS72, VS75 and VS76, the watch continues to run for approximately six months, for VR42 and VR43, the watch continues to run for approximately four months.
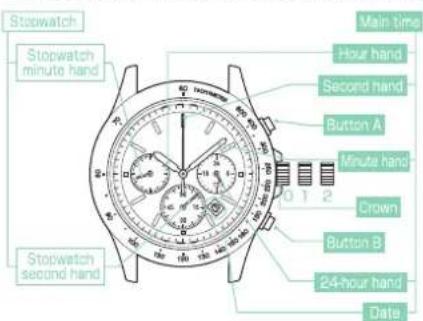
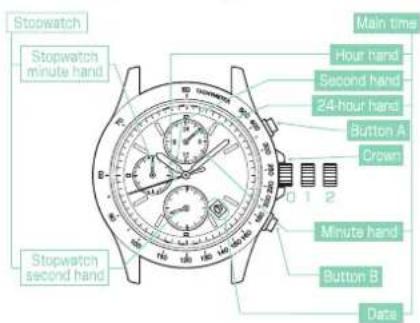
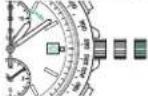
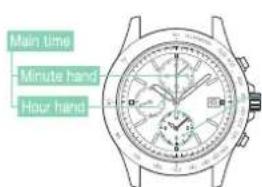
■ Names of the parts and functions
■V172 · VS72: Equipped with a stopwatch and alarm
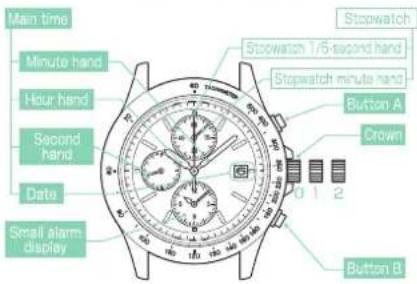
First click Date setting
Alarm time setting
Second click: Time setting
Preliminary position setting
of the stopwatch hands
Resetting the built-in IC
※ If your watch has a screw lock type crown,
wear the watch with the crown locked.
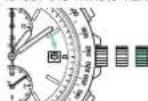
■V174: Equipped with a stopwatch, alarm and 24-hour hand
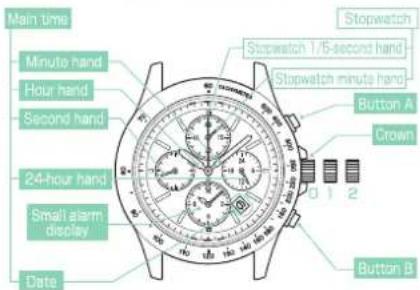
First click: Date setting
Alarm time setting
Second click: Time setting
Preliminary position setting
of the stopwatch hands
Resetting the built-in IC
If your watch has a screw lock type crown,
wear the watch with the crown locked.
■V175-VS75: Equipped with a stopwatch and 24-hour hand
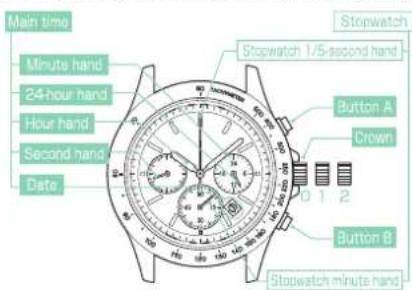
First click: Date setting
Alarm time setting
Second click: Time setting
Preliminary position setting
of the stopwatch hands
■ If your watch has a screw lock type crown,
wear the watch with the crown locked.
■V176 · VS76: Equipped with a stopwath
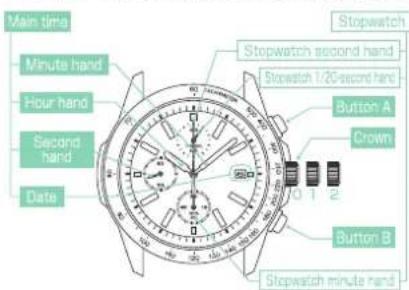
First click: Date setting
Second click: Time setting
Preliminary position setting
of the stopwatch hands
Resetting the built-in IC
※ If your watch has a screw lock type crown.
wear the watch with the crown locked.
■VR42: Equipped with a stopwatch and 24-hour hand
First click: Date setting
Second click: Time setting
Preliminary position setting
of the stopwatch hands
※ If your watch has a screw lock type crown.
wear the watch with the crown locked.
Crown
■VR43: Equipped with a stopwatch and 24-hour hand
First click: Date setting
Second click: Time setting
Preliminary position setting
of the stopwatch hands
※ If your watch has a screw lock type crown.
wear the watch with the crown locked.
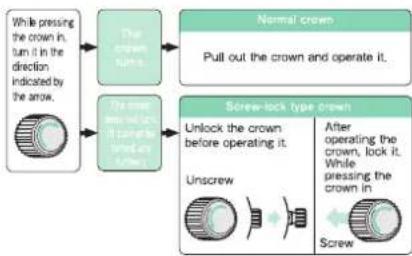
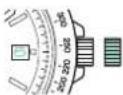
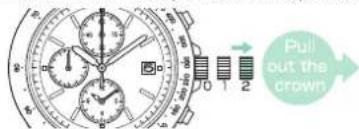
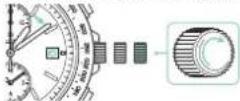
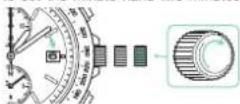
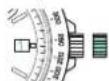
There are two types of crown, a normal crown and a screw-lock type crown.
Please check the type of the crown of your watch.
flowchart
graph TD
    A["While pressing the crown in, turn it in the direction indicated by the arrow."] --> B["The crown turns"]
    B --> C["Normal crown: Pull out the crown and operate it."]
    D["When the crown is not allowed if it comes into a ring"] --> E["Screw-lock type crown: Unlock the crown before operating it. Unscrew: After operating the crown, lock it. While pressing the crown in: Screw"]
※If your watch has a screw-lock type crown, the crown screws into the watch to prevent malfunction and increase water resistance.
※Be careful not to screw the crown in by force as it may damage the slots of the crown.
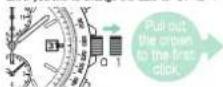
How to set the time and date
■ How to set the time and date
※ When setting the date only, refer to "Manual date adjustment at the end of the month".
① Check that the watch is operating.
Check that the second hand is moving at one-second intervals. If the second hand is moving at two-second intervals or the second hand has stopped, charge the watch by exposing the dial of the watch to light.
② Check that the watch hands are not displaying any time between 9 p.m. and 1 a.m.
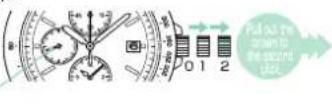
If the watch hands are displaying a time between 9 p.m. and 1 a.m., pull out the crown to the second click and turn it to advance the hands to set the time later than 1 a.m.
This procedure is required to ensure the proper engagement of the date driving wheel.
Each time the hour hand makes two full rotations by turning the crown, the date is adjusted one day. While turning the crown, the date changes at exactly midnight. When setting the hour hand, be sure that AM/PM is set correctly (For the models V174, V175, VR42, VR43 and VS75, the 24-hour hand can be used as an AM/PM indicator.)
③ Pull out the crown to the first click.
※ The watch con-
tinues operating.
※ If your watch has
a screw lock type
crown, unlock the
crown.

Turn the crown to set the date to the previous day's date.
V172 V174 V175 V176 VS72
VS75: clockwise
VR42. VR43: counter-clockwise
Ex. If you would like to
sel the date to "6."
first set it to "5"
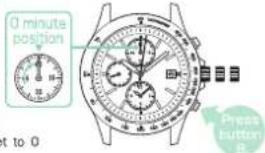
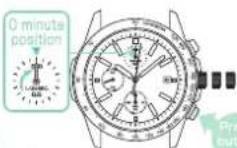
⑤ Pull out the crown to the second click when the second hand is at the 0 second position.
The second hand will stop at the 0 second position.
For advancing the hands clockwise, turn the crown
in the direction of the arrow mark to set the date to the desired day's date.
⑦ For advancing the hands clockwise, turn the crown in the direction of the arrow mark to set the main time.
When setting the time, be sure that AM/PM is set correctly. For models V174, V175, VR42, VR43 and VS75, the 24-hour hand can be used as an AM/PM indicator.
※ Set the minute hand a few minutes ahead of the correct time, and then advance it to the exact minute(s).
● If you own model V172, V174 or VS72:
It is recommended to set the minute hand two minutes
ahead of the cor-
rect time /proceed
to operation of the
to operation of the
procedure 8
● If you own model V175, V176, VR42 VR43,
VS75 and VS76 : Continue to procedure

⑥ For advancing the hands clockwise, turn the crown
in the direction of the arrow mark to set the date to the desired day's date.

⑦ For advancing the hands clockwise, turn the crown in the direction of the arrow mark to set the main time.
When setting the time, be sure that AM/PM is set correctly
For models V174, V175, VR42, VR43 and VS75, the 24-hour hand can be used as an AM/PM indicator.
Set the minute hand a few minutes ahead of the correct time, and then advance it to the exact minute(s).
● If you own model V172, V174 or VS72:
It is recommended to set the minute hand two minutes
ahead of the cor-
rect time (proceed
to operation of the
to operation of the
procedure 8

● If you own model V175, V176, VR42 VR43,
VS75 and VS76 : Continue to procedure ⑨
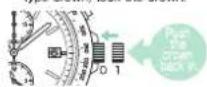
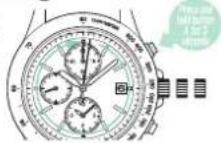
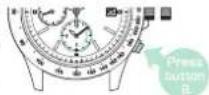
8 Press button B to set the alarm time to the same time as the main time (only for models V172, V174 and VS72).
If button B is kept pressed, the alarm hands advance quickly.
※Alarm time
can be set
on a 12-hour
basis
Small alarm
display
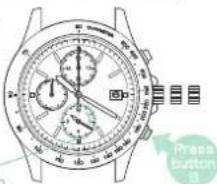
9 Push the crown back in to the normal position in accordance with a time signal. The alarm time setting is completed.
※ If your watch has a screw lock type crown, lock the crown.
■ Manual date adjustment at the end of the month
The watch automatically displays the date from "1" to "31." Adjust the date on the first day after a month that has less than 31 days: February, April, June, September and November.
※ When adjusting the date only, carry out this procedure.
① Make sure that the watch is operating.
Make sure that the second hand is moving at one-minute intervals. If the second hand is moving at two-second intervals, or it has stopped, charge the watch by exposing the dial to light.
② Make sure that the watch hands are not displaying any time between 9:00 a.m. and 1:00 a.m.
If the watch hands are displaying a time between 9 p.m. and 1 a.m., set the time according to the procedure of "How to set the time and date → page 78." or first change the time to the time outside this period, and then set the date and reset the correct time.
③ Pull out the crown to the first click.
※ The watch continues operating.
※ If your watch has a screw lock
type crown, unlock the crown.
Ex. If you like to change the date to "31" to "1"
Turn the crown to set the date.
※ V172, V174, V175, V176, VS72,
VS75: clockwise
VR42, VR43: counter-clockwise
⑤ Push the crown back in to the normal position.
If your watch has a screw lock
type crown, lock the crown.
■ Stopwatch function
The stopwatch can measure up to 60 minutes in 1/5-second increments. After measuring 60 minutes, the stopwatch hands will automatically stop at the 0 minute 0 second position.
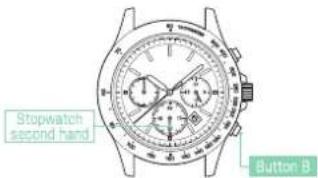
■ The names of the parts and functions of the stopwatch (V172, V174, VS72)
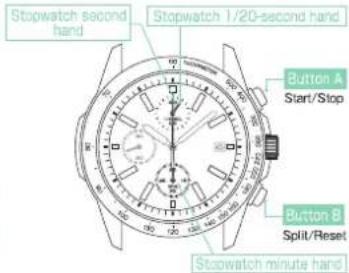
■ The names of the parts and functions of the stopwatch (V175, VS75)
The stopwatch can measure up to 60 minutes in 1/20-second increments. After measuring 60 minutes, the stopwatch hands will automatically stop at the 0 minute 0 second position.
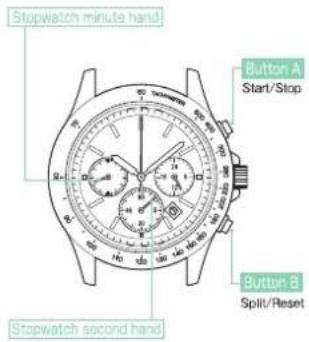
■ The names of the parts and functions of the stopwatch(V176, VS76)
• After the stopwatch is started, the stopwatch 1/20 second hand moves for about 1 minute and automatically stops at "0" position.
- When split time is measured or the measurement is stopped, it moves to indicate the elapsed 1/20 seconds.
- After split time is released or the measurement is restarted, it moves for about 1 minute and stops automatically.
- In the same manner, if the stopwatch is stopped and restarted repeatedly or split time is measured and released repeatedly, it will keep moving for maximum 2 minutes after the last operation.
VR42, VR43 can measure up 29minutes 59second in 1second increments. After measuring, the stopwatch will automatically stop.
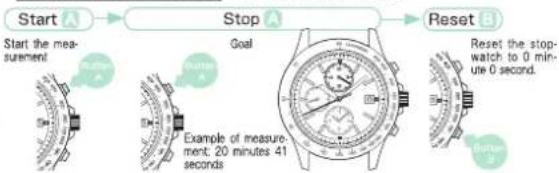
How to use the stopwatch
※ When the second hand is moving at two-second intervals, the stopwatch can not be operated. About energy
- Standard measurement Ex. 500 meters running
flowchart
graph LR
    A["Start the measurement"] --> B["Stop"]
    B --> C["Reset"]
    style A fill:#f9f,stroke:#333
    style B fill:#ccf,stroke:#333
    style C fill:#cfc,stroke:#333
- Accumulated elapsed time measurement
Ex. Measuring the time for a soccer match
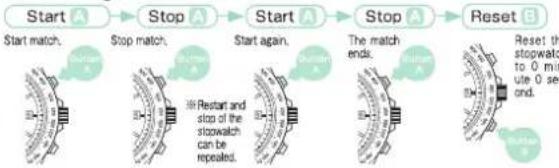
flowchart
graph LR
    A["Start"] --> B["Stop"]
    B --> C["Start"]
    C --> D["Stop"]
    D --> E["Reset"]

    A --> F["Start match."]
    B --> G["Stop match."]
    C --> H["Start again."]
    D --> I["The match ends."]

    F --> J["Reset the stopwatch to 0 min, ute 0 sec ond."]
    G --> K["* Restart and stop of the stopwatch can be repeated."]
    H --> L["* The stopwatch is repeated"]
    I --> M["* The stopwatch is repeated"]
- Split time (intermediate elapsed time) measurement
Ex. 5000 meter run
※ "Split time" is the time that has elapsed from the start of an activity to any given stage.
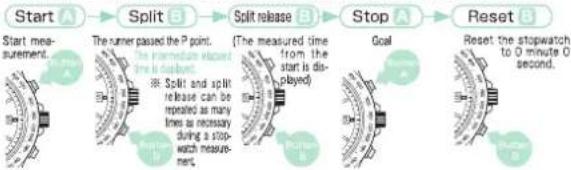
flowchart
graph LR
    A["Start"] --> B["Start measurement"]
    B --> C["Split"]
    C --> D["Split release"]
    D --> E["Stop"]
    E --> F["Reset"]

    subgraph Measurement
        G["The number passed the P point.<br>The immediate release time is displayed"]
        H["Split and split release can be repeated as many times as necessary during a stop-watch measurement"]
    end

    subgraph Detection
        I["(The measured time from the start is displayed)"]
        J["Goal"]
        K["Reset the stopwatch to 0 minute O second."]
    end
• Measurement of two competitors
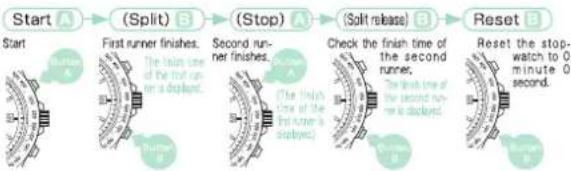
flowchart
graph LR
    A["Start"] --> B["Start"]
    B --> C["(Split) B"]
    C --> D["(Stop) A"]
    D --> E["(Solt release) B"]
    E --> F["Reset"]
    F --> G["Reset the stop-watch to 0 minute 0 second."]

    subgraph Start
        H["Start"] --> I["First runner finishes. The finish time of the first run is displayed."]
    end

    subgraph Split
        J["Start"] --> K["Second runner finishes. The finish time of the second run is displayed."]
    end

    subgraph Stop
        L["Start"] --> M["Check the finish time of the second run is displayed."]
    end

    subgraph Reset
        N["Reset"] --> O["Reset the stop-watch to 0 minute 0 second."]
    end
Adjusting the preliminary position of the stopwatch hands
If any of the stopwatch hands do not return to the 0 minute 0 second position when the stopwatch is reset, the preliminary hand position may be misaligned. The preliminary position of the stopwatch second and minute hands is 0 minute 0 second. The preliminary position may be misaligned due to the following reasons.
- In the case of a strong impact: Misalignment may occur when dropping or hitting the watch.
- In the case of a magnetic influence: Misalignment may occur when bringing the watch close to an object which generates magnetism.
※ If the preliminary position adjustment is carried out, the watch gains or loses time. After adjusting the preliminary hand position, make sure to reset the main time and alarm time.
V172·V174·V175·VS72·VS75
① Make sure that the watch is operating.
Make sure that the second hand is moving at one-minute intervals. If the second hand is moving at two-second intervals, or it has stopped, charge the watch by exposing the dial to the light.
② Pull out the crown to the second click.
The second hand will stop.
※ If your watch has a screw lock type crown, unlock the crown.

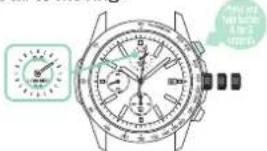
③ Press and hold button A (for 3 seconds) until the stop-watch minute hand starts moving.
The stopwatch minute hand moves one full rotation, and the watch enters the preliminary position adjustment mode of the stopwatch minute hand.
※ If you do not know which hand is the stopwatch minute hand, refer to Names of the parts and functions.
4 Press button B to reset the stopwatch minute hand to 0 minute.
One minute Advance Press button B once and then release it.
Continuous Advance When button B is kept pressed for two seconds or longer, the hand will start moving. When button B is released, the hand will stop.
※ If the stopwatch minute hand is reset to 0 minute, continue to procedure 5
⑤ Press and hold button A (for 3 seconds) until the stop-watch 1/5 second hand starts moving.
The stopwatch 1/5-second hand moves one full rotation, and the watch enters the preliminary position adjustment mode of the stopwatch 1/5-second hand.
6 Press button B to reset the stop-watch 1/5-second hand to 0 minute.
| One minute Advance | Press button B once and then release it. |
| Continuous Advance | When button B is kept pressed for two seconds or longer, the hand will start moving.When button B is released, the hand will stop. |
※ If the stopwatch 1/5-second hand is reset to 0 minute, continue to the procedure ⑦.
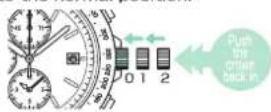
⑦ Push the crown back in to the normal position.
⑧ Set the main time and alarm time.
If the preliminary position adjustment is carried out, the main time and alarm time may gain or lose time. When the main time and alarm time are set, the operation is completed.
V176·VS76
① Make sure that the watch is operating.
Make sure that the second hand is moving at one-minute intervals. If the second hand is moving at two-second intervals, or it has stopped, charge the watch by exposing the dial to the light.
② Pull out the crown to the second click.
The second hand will stop.

※ If your watch has a screw lock type crown, unlock the crown.
A (for 3 seconds) until the stop-nd starts moving.
The stopwatch 1/20-second hand moves one full rotation, and the watch enters the preliminary position adjustment mode of the stopwatch 1/20-second hand.
※ If you do not know which hand is the stopwatch 1/20-second hand, refer to Names of the parts and functions.
④ Press button B to reset the stopwatch 1/20-second hand to 00.
1/20 second Advance Press button B once and then release it.
When button B is kept pressed for two seconds or longer, the hand will start moving.
When button B is released, the hand will stop.
※ If the stopwatch 1/20-second hand is reset to 00, continue to procedure 5
⑤ Press and hold button A (for 3 seconds) until the stop-watch second hand starts moving.
The stopwatch second hand moves one full rotation, and the watch enters the preliminary position adjustment mode of the stopwatch second hand.
6 Press button B to reset the stop-watch second hand to 0 second.
| One second Advance | Press button B once and then release it. |
| Continuous Advance | When button B is kept pressed for two seconds or longer, the hand will start moving.When button B is released, the hand will stop. |
※ If the stopwatch second hand is reset to 0 second, continue to the procedure ⑦.
⑦ Press and hold button A (for 3 seconds) until the stopwatch minute hand stars moving.
The stopwatch minute hand moves one full rotation, and the watch enters the preliminary position adjustment mod of the stopwatch minute hand.
⑧ Push button B to reset the stop-watch minute hand to 0 minute.
| One minute Advance | Press button B once and then release it. |
| Continuous Advance | When button B is kept pressed for two seconds or longer, the hand will start moving.When button B is released, the hand will stop. |
※ If the stopwatch minute hand is reset to 0 minute, continue to the procedure 9.
⑨ Set the main time.
If the preliminary position adjustment is carried out, the main time may gain or lose time. When the main time is set, the operation is completed.
10 Push the crown back in to the normal position.
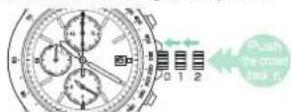
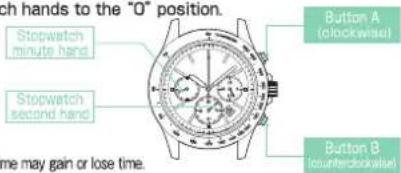
VR42·VR43
① Make sure that the watch is operating. Make sure that the second hand is moving at one-minute intervals. If the second hand is moving at two-second intervals, or it has stopped, charge the watch by exposing the dial to the light.
② Pull out the crown to the second click. The second hand will stop. ※ If your watch has a screw lock type crown, unlock the crown.
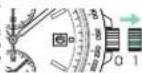
③ Press Button "A" or "B" to set the stopwatch hands to the "O" position.
Press A: to move the stopwatch hands clockwise. Press B: to move the stopwatch hands counterclockwise The stopwatch minute and second hand move quickly if Button "A" or "B" is kept pressed. The movements of the stopwatch minute and second hand are interlocked.
④ Set the main time
If the preliminary position adjustment is carried out, the main time may gain or lose time. When the main time is set, the operation is completed.
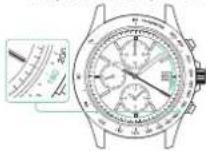
How to use the tachymeter
The numbers on the tachymeter scale can be read to determine how many seconds it takes to run 1 km or to measure the time required to complete 1 job.
• How to measure kilometers / hour
① Measure the time (within 1 minute) it takes to run 1 km.
2 Read the number on the tachymeter scale that the stop-watch second hand is pointing to. Ex. If it takes 45 seconds to run 1 km...80 km/h
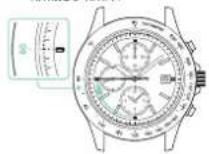
How to measure the hourly rate of operation
① Measure the time (within 1 minute) required to complete 1 job.
② Read the number on the tachymeter scale that the stop-watch second hand is pointing to. Ex. If it takes 20 seconds to complete one product...180 products/hour
How to use the alarm (V172·V174·VS72)
The single-time alarm can be set to sound only once at a designated time.
When the time of the main time reaches the designated alarm time, the alarm sounds. The alarm time can be set in one-minute increments within the coming 11 hours 59 minutes.
When the second hand is moving at two-second intervals, the alarm does not sound at the set alarm time. And alarm time cannot be set. About energy.

When the alarm time is set: the designated alarm time is displayed.
When the alarm time is not set: current time (same as the main time) is displayed.
■ How to set the alarm time
① Pull out the crown to the first click
※ The watch continues operating.
※ If your watch has a screw lock type
crown, unlock the crown. Crown.
② Press button B to set the alarm time. If button B is kept pressed, the alarm hands are fast forwarded.
■ the alarm hands advance more
than the desired alarm time, consti-
up pressing button B to advance the
hand to sell the desired alarm time.
■ E button: B is kept messed until the
slam hands point to the same time
as the main time, the alarm hands
stop and the alarm is disengaged.
③ Push the crown back in to the normal position.
※ If your watch has a screw lock
type crown, look the crown.


■ How to stop the alarm
• The alarm sounds for 20 seconds at the set alarm time.
• For stopping the sounding alarm, press button A or B.
※ While the stopwatch hands are moving, the alarm sounds differently than the normal alarm sound. This is not a malfunction.
※ When the alarm is sounding, if button A or B is pressed, the alarm stops sounding, but the stopwatch cannot be operated. After the alarm sound stops, the stopwatch can be operated.
■ How to disengage the set alarm time
- If you want to disengage the set alarm time, reset the alarm time to the same time as the main time.
■ Alarm sound test - To test the alarm sound, pull out the crown to the first click, and then long press button A (for about 4 seconds). The alarm sounds while the button A is kept pressed.
※ When you finish the sound test, push the crown back in to the 0 click position. If your watch has a screw lock type crown, lock the crown.
How to check the power reserve amount(VR42 · VR43)
① Make sure to check that the stopwatch measurement is stopped and reset.
② Press and hold Button B for 2 seconds and release.
Stopwatch second hand will stop at the 30 second position.
| The power reserve amount | High | Middle | Low |
| The position of stopwatch second hand | 45second position | 40second position | 35second position |
③ The stopwatch second hand displays the level of energy (For about 3 seconds)
※Note that the energy level may be displayed as a guide.
※If the second hand is moving at two-second intervals, charge the watch by exposing the dial to the light.
④ Stopwatch second hand outmatically will automatically return to the 0 position
About charging
■ How to charge the watch Expose the dial to light to charge the watch.
To ensure optimal performance of the watch, make sure that the watch is kept sufficiently charged at all time.
Under the following situations, the energy of the watch is likely to be depleted, resulting in stoppage of the watch.
- The watch is concealed under a sleeve.
- The watch is used or stored under conditions where it cannot be exposed to light for a long time.
※ When charging the watch, make sure that the watch is not heated to a high temperature. (For the operational temperature range, please refer to the ■Specifications table.)
※ When first using the watch or starting to use the watch after it has stopped because of the energy depletion, sufficiently change the watch referring to the table.
■ Standard charging time
For an approximate time required to charge the watch, refer to the table below.
| Environment/ lightsource(lux) | V172.V174.V175.V176 | VR42.VR43 | VS72.VS73.VS75 | ||||||
| A (min-utes) | B (hours) | C (hours) | A (min-utes) | B (hours) | C (hours) | A (min-utes) | B (hours) | C (hours) | |
| General offices/ Flourescent light (700) | 150 | 60 | — | 108 | 24 | — | 90 | 35 | — |
| 30w20cm / Flourescent light (3000) | 33 | 13 | 110 | 27 | 6 | 83 | 20 | 8 | 65 |
| Cloudy weather/ Sunlight (10000) | 9 | 3.5 | 30 | 8 | 2 | 25 | 6 | 2.5 | 18 |
| Fair weather/ Sunlight (100000) | 2 | 0.6 | 5 | 1 | 0.2 | 3 | 2 | 0.6 | 5 |
A: Time to charge 1 day of power
C: Time required for full charge
※The time required charging time slightly varies depending on the model of the watch.
■ Abnormal display or improper function (Excluding VR42 · VR43)
When the watch shows an abnormal display or does not properly function, or does not move at all or at one-second intervals even after being fully charged, follow the instructions below to reset the built-in IC. Then the watch will resume its normal operation.
■ Resetting the built-in IC
① Pull out the crown to the second click.
The second hand stops.
If your watch has a screw lock type crown, unlock the crown. Crown
second hand
② Press and hold buttons A and B simultaneously for three seconds, and release.
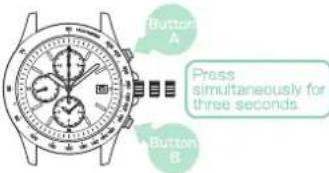
③ Push the crown back in to the normal position.
The second hand starts moving.
If the second hand is moving at two-second intervals, fully charge the watch until it starts moving at one-second intervals.
4 Adjust the preliminary position of the stopwatch (1/5-second and minute) hands, and then set the time and date.
※Refer to "Adjusting the preliminary position of the stopwatch 1/5-second and minute hands".
※Refer to "How to set the time and date".
When the preliminary position of the stopwatch hands (1/5-second and minute) are reset, and time and date are correctly set, the operation of resetting the built-in IC is completed.
Remarks on the battery
The battery used in this watch is a special secondary battery, which is totally different from ordinary silver oxide batteries.
Unlike other disposable batteries such as dry-cell batteries or button cells, this secondary battery can be used over and over again by repeating the cycles of discharging and recharging.
However, for various reasons such as long-term use or usage conditions, the capacity or recharging efficiency of the secondary battery may gradually deteriorate. Worn or contaminated mechanical parts or degraded oils may also shorten recharging cycles. If the efficiency of the secondary battery decreases, have the watch repaired.
WARNING
Remarks on replacing the secondary battery
- Do not remove the secondary battery yourself. Replacement of the secondary battery requires professional knowledge and skill. Please ask a watch retailer for repair. - Installation of an ordinary silver oxide battery can generate heat that can cause bursting or ignition.
乘Overcharge prevention function.
When the secondary battery is fully charged, the overcharge prevention function is automatically activated to avoid further charging. There is no need to worry about damage caused by overcharging no matter how much the secondary battery is charged in excess of the "time required for fully charging the watch".
※Refer to "Guideline of charging time" on page 54 to check the time required for fully charging the watch.
WARNING
Notes on charging the watch
- When recharging the watch, do not place it too close to incandescent light or other light sources as the watch temperature will become extremely high, causing damage to the parts inside the watch.
- When exposing the watch to sunlight to recharge it, do not leave it on the dashboard of a car, etc. for a long time, as the watch temperature becomes extremely high.
· Always keep the watch temperature under 50°C.
■ To preserve the quality of your watch
WARNING
- Immediately stop wearing the watch in the following cases :
○ if corrosion appears on the watch body or band, etc.
○ if the pins protrude from the band
※ Immediately consult the retailer from whom the watch was purchased or a SEIKO CUSTOMER SERVICE CENTER.
- Keep the watch and accessories out of the reach of babies and children.
Care should be taken to prevent a baby or a child accidentally swallowing any accessories.
· Do not remove the secondary battery from the watch.
※ About the secondary battery → Please refer to ■ REMARKS ON THE BATTERY
Replacement of the secondary battery requires professional knowledge and skill.
Please ask a watch retailer for replacement of the secondary battery. Installation of an ordinary silver oxide battery can generate heat that can cause bursting and ignition.
- Do not use the watch for scuba diving or saturation diving. The various inspections under simulated harsh environments, which are usually required for watches designed for scuba diving or saturation diving, have not been conducted on a water-resistant watch with a BAR (barometric pressure) display. For diving, use special watches.
CAUTION
- Avoid wearing or storing the watch in the following places:
○ Places where volatile agents (cosmetics such as polish remover, insect repellent, thinners etc.) are vaporizing
○ Places where the temperature drops below 5 °C or rises above 35 °C for a long time
○ Places of high humidity
- Places affected by strong magnetism or static electricity - Dusty places
○ Places affected by strong vibrations
- If you observe any allergic symptoms or skin irritation, stop wearing the watch immediately and consult a specialist such as a dermatologist or an allergist.
- Do not let running water from a faucet hit the watch.
The water pressure of tap water from a faucet is high enough to degrade the water resistant performance of a water resistant watch for everyday use. - Do not turn or pull out the crown when the watch is wet; water may get inside of the watch.
※ If the inner surface of the glass is clouded with condensation or water droplets appear inside of the watch for a long time, the water resistant performance of the watch is deteriorated. Immediately consult the
retailer from whom the watch was purchased or a SEIKO CUSTOMER SERVICE CENTER.
- Do not leave moisture, sweat and dirt on the watch for a long time. Be aware of the risk that a water resistant watch may have its water resistant performance lessened because of deterioration of the adhesive on the glass or gasket or the development of rust on stainless steel.
- Do not wear the watch while taking a bath or a sauna. Steam, soap or some components of a hot spring may accelerate the deterioration of the water resistant performance of the watch.
- Other cautions
○ Do not disassemble or tamper with the watch.
Keep the watch out of the reach of babies and children. Extra care should be taken to avoid risk of injury or allergic rash or itching that may be caused when they touch the watch.
When disposing of used batteries, follow the instructions of your local authorities.
If your watch is of the fob or pendant type, the strap or chain attached to the watch may damage your clothes, or injure the hand, neck, or other parts of your body.
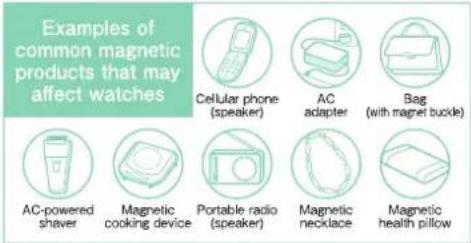
●Magnetic resistance
Affected by nearby magnetism, a watch may temporarily gain or lose time or stop operating.
| Indication on the case back | Condition of use |
| No Indication | Keep the watch more than 10 cm away from magnetic products. |
| Keep the watch more than 5 cm away from magnetic products.(JIS level-1 standard) | |
| Keep the watch more than 1 cm away from magnetic products.(JIS level-2 standard) |
If the watch becomes magnetized and its accuracy deteriorates to an extent exceeding the specified rate under normal use, the watch needs to be demagnetized. In this case, you will be charged for demagnetization and accuracy readjustment even if it happens within the guarantee period. The reason why watch is affected by magnetism. The built-in motor is provided with a magnet, which may be influenced by a strong external magnetic field.
●Daily care
The watch requires good daily care.
- Do not wash the watch when the crown is pull out.
· Wipe away moisture, sweat or dirt with a soft cloth.
· After soaking the watch in seawater, be sure to wash
the watch in clean pure water and wipe it dry carefully
※If your watch is rated as "non-water resistant" or "water resistant for daily use," do not wash the watch.
●Turn the crown
• To prevent rusting of the crown, please sometimes turning the crown.
- Please do the same for screw-lock type crown
●Water resistance
Refer the table below for the description of each degree of water resistant performance of your watch before using.
| Indication on the case back | Water resistant performance | Condition of use | |
| No indication | Non-water resistance | Avoid drops of water or sweat | |
| WATER RESISTANT | Water resistance for everyday use | The watch can withstand accidental contact with water in everyday life. | Not suitable for swimming |
| WATER RESISTANT 5 BAR | Water resistance for everyday use at 5 barometric pressures. | The watch is suitable for sports such as swimming. | |
| WATER RESISTANT 10(20)BAR | Water resistance for everyday use at 10 (20) barometric pressures. | The watch is suitable for diving not using an air cylinder. | |
Band
The band touches the skin directly and becomes dirty with sweat or dust. Therefore, lack of care may accelerate deterioration of the band or cause skin irritation or stain on a sleeve cuff. The watch requires a lot of attention for long usage.
Metallic band
Moisture, sweat or soil will cause rust even on a stainless steel band if they are left for a long time.
Lack of care may cause a yellowish or gold stain on a sleeve cuff of shirts.
Wipe off moisture, sweat or soil with a soft cloth as soon as possible.
To clean the soil around the joint gaps of the band, wipe it out and then brush it off with a soft toothbrush.
(Protect the watch body from water splashes by wrapping it in plastic wrap, etc.)
Because some titanium bracelets use pins made of stainless steel, which has outstanding strength, rust may form in the stainless steel parts.
If rust advances, pins may poke out or drop out, and the watch case may fall off the bracelet, or the clasp may not open.
If a pin is poking out, personal injury may result. In such a case, refrain from using the watch and request repair.
.eather band
A leather band is susceptible to discoloration and deterioration from moisture, sweat and direct sunlight.
Wipe off moisture and sweet as soon as possible by gently blotting with a dry cloth.
Do not expose the watch to direct sunlight for a long time.
Please take care when wearing a watch with a light-colored band.
as dirt or stains are likely to show.
- Refrain from wearing a leather band watch other than Aqua Free bands while bathing, swimming, and when working with water even if the watch itself is water-resistant enforced for daily use (10-BAR water resistant).
Polyurethane band
A polyurethane band is susceptible to discoloration from light, and it may be deteriorated by solvent or atmospheric humidity.
- Especially a translucent, white, or pale-colored band easily adsorbs other colors, resulting in color smears or discoloration.
- Wash off dirt in water and clean the band with a dry cloth.
(Protect the watch body from water splashes by wrapping it in plastic wrap, etc.)
- When the band becomes less flexible, have the band replaced with a new one. If you continue to use the band as it is, the band may develop cracks or become brittle over time.
Note on skin irritation and allergy:
Skin irritation caused by a band has various reasons such as an allergy to metals or leather, or skin reactions against friction or dust or the band itself.
Notes on the length of the band
Adjust the band to allow a little clearance with your wrist to ensure proper airflow. When wearing the watch, leave enough room to insert a finger between the band and your wrist.
Specifications
| Caliber number | V172 | V174 | V175 | V176 | VR42 · VR43 | VS72 | VS75 | VS76 |
| 1.Basic function | Main time with 3 hands (hour, minute, second)Date displayStopwatch (1/5-second and minute hands)Small alarm display (hour and minute hands) | Main time with 3 hands (hour, minute, second)24-hour handDate displayStopwatch (1/5-second and minute hands)Small alarm display (hour and minute hands) | Main time with 3 hands (hour, minute, second)24-hour handDate displayStopwatch (1/5-second and minute hands) | Main time with 3 hands (hour, minute, second)Date displayStopwatch (1/20-second, and minute hands) | Main time with 3 hands (hour, minute, second)24-hour handDate displayStopwatch (second and minute hands) | Main time with 3 hands (hour, minute, second)Date displayStopwatch (1/5-second and minute hands)Small alarm display (hour and minute hands) | Main time with 3 hands (hour, minute, second)24-hour handDate displayStopwatch (1/5-second and minute hands) | Main time with 3 hands (hour, minute, second)Date displayStopwatch (1/20-second and minute hands) |
| 2.Frequency of crystal oscillator | 3 2, 7 6 8 Hz(Hz = Hertz ... Cycles per second) | |||||||
| 3.Loss/gain (monthly rate) | Loss / gain ± 15 seconds on a monthly rate (When it is worn on the wrist within a normal temperature range between 5°C and 35°C.) | Loss / gain ± 20 seconds on a monthly rate (when it is worn on the wrist within a normal temperature range between 5°C and 35°C.) | ||||||
| 4.Operational temperature range | -10°C~+60°C | -5°C~+50°C | ||||||
| 5.Driving system | Step Motor, 4 pieces | Step Motor, 4 pieces | Step Motor, 3 pieces | Step Motor, 4 pieces | Step Motor, 2 pieces | Step motor, 4 pieces | Step motor, 3 pieces | Step motor, 4 pieces |
| 6.Power source | Secondary battery, 1 piece | |||||||
| 7.Duration of operation | Approx. 6 months (if the stopwatch is used for 1 hour per day, and the alarm is used one time to sound for 20 seconds per day) | Approx. 6 months (if the stopwatch is used for 1 hour per day) | Approx. 4 months (if the stopwatch is used for 1 hour per day) | Approx. 6 months (if the stopwatch is used for 1 hour per day)and the alarm is used one time to sound for 20 seconds per day) | Approx. 6 months (if the stopwatch is used for 1 hour per day) | |||
| 8.IC (Integrated Circuit) | Oscillator, frequency divider and driving circuit C-MOS-IC, 1 piece | |||||||
表 Overcharge prevention function
※The specifications are subject to change without prior notice for product improvement.
When the secondary battery is fully charged, the overcharge prevention function is automatically activated to avoid further charging. There is no need to worry about damage caused by overcharging no matter how much the secondary battery is charged in excess of the "time required for fully charging the watch".
After-sales service
Notes on guarantee and repair
- Contact the retailer the watch was purchased from or a SEIKO CUSTOMER SERVICE CENTER for repair.
- Within the guarantee period, present the certificate of guarantee to receive repair services.
• Guarantee coverage is provided in the certificate of guarantee. Read it carefully and retain it.
· For repair services after the guarantee period has expired, if the functions of the watch can
be restored by repair work, we will undertake repair services upon request and payment.
●Replacement parts
- SEIKO makes it a policy to typically keep a stock of replacement parts for this watch for 7 years. Replacement parts are those which are essential for maintaining the functional integrity of the watch.
- When repairing your watch, please keep in mind that if original parts are not available, parts may be replaced with substitutes whose outward appearance may differ from the originals. Also note that the complete set of parts with the case or band may be replaced, or if repair is difficult, the watch may be replaced with one of equal quality.