TX-28DT2 - Televizor PANASONIC - Manual de utilizare gratuit
Găsiți gratuit manualul dispozitivului TX-28DT2 PANASONIC în format PDF.

Întrebările utilizatorilor despre TX-28DT2 PANASONIC
0 întrebare despre acest aparat. Răspundeți la cele pe care le cunoașteți sau puneți-vă propria.
Pune o întrebare nouă despre acest aparat
Descărcați instrucțiunile pentru Televizor în format PDF gratuit! Găsiți manualul dvs. TX-28DT2 - PANASONIC și luați din nou în mână dispozitivul dvs. electronic. Pe această pagină sunt publicate toate documentele necesare pentru utilizarea dispozitivului dvs. TX-28DT2 mărcii PANASONIC.
MANUAL DE UTILIZARE TX-28DT2 PANASONIC
Panasonic
natural_image
Front view of a Panasonic TV set (no visible text or symbols on screen)TX--32DT2 TX--28DT2
ColourTelevision with

IntegratedDecoder
(U.K.Standard)
![[tau] FLAT DIGITAL](/content/2026/06/1176454/images/8548aeba266b1db294a29279738cc632a94aecd0db889bd859a3169ddb7c8790.jpg)
Quintrix F


Operating Instructions
WELCOME
DearPanasonicCustomer,
Welcome to the Panasonic family of customers. We hope that you have many years of enjoyment from your new colour television. This is a very advanced television; however, the Quick Start Guide will allow you to use the TV as quickly as possible. You can then read the instructions completely and retain them for future reference
Analogue and Digital television – what are they?
Analogue transmission is the system that has been used for many years for broadcasting television programmes. With continuous improvements in technology it is now possible to transmit programmes in a digital format, allowing clearer pictures, more stations and other services to be displayed on screen. Digital television is provided in three different ways; it can be sent along a cable connection direct to your house, broadcast from a satellite, or broadcast using traditional land based (terrestrial) transmitters. The first two options require you to have an extra 'set top box' decoder and in the case of satellite, a receiving dish mounted outdoors. While allowing you to receive traditional analogue transmissions in the usual way, this television can also receive terrestrial digital services using an integrated DVB (Digital Video Broadcasting) decoder. This allows you to enjoy the new era of digital terrestrial television, including future interactive services, without the need for a 'set top box' or satellite dish – your current roof or loft mounted antenna is all you need.
CONTENTS
Page
Warnings and Precautions 3
Accessories 4
Inserting the Remote Control Batteries 4
Basic Controls 5
Quick Start Guide 6
Using the On Screen Displays 12
Aspect Control 13
Picture Menu 15
Sound Menu 16
Setup Menu 17
Tuning Menu - overview 18
Tuning Menu - Programme edit 19
Tuning Menu - Auto setup 24
Tuning Menu - Shipping condition 25
Tuning Menu - Owner I.D. 26
Manual tuning - front panel controls 27
DVB Setup Menu 28
Page
PC Connection and Modem Menus 29
Common Interface Module Menu 30
System Update Menu 31
DVB Timer Programming Menu 32
TV Guide 35
AV Select and Setup 36
Q-Link 37
VCR Installation 39
VCR/DVD Operation 40
Teletext Operation 41
Audio / Video (AV) Connections 43
Via the front AV3 4 pin S-Video, RCA Audio / Video and Headphone Sockets 43
Scart and S-Video Terminal Information 43
Via the rear AV1 / AV2 21 Pin (Scart) and RCA Audio Out terminals 44
Troubleshooting 45
For your guidance 46
Specifications 46
WARNINGSANDPREEAUTODOSS
• This TV set is designed to operate on 220-240V, 50Hz A.C.
- To prevent damage which might result in electric shock or fire, do not expose this TV set to rain or excessive moisture.
• WARNING : HIGH VOLTAGE !!!
Do not remove the rear cover as live parts are accessible when it is removed. There are no user serviceable parts inside.
- Avoid exposing the TV set to direct sunlight and other sources of heat.
- The On/Off switch on this model does not fully disconnect the TV from the mains supply. Remove the mains plug from the wall socket when the TV set is not used for a prolonged period of time.
• CABINET AND PICTURE TUBE CARE
Remove the mains plug from the wall socket. The cabinet and picture tube can be cleaned with a soft cloth moistened with mild detergent and water. Do not use solutions containing benzol or petroleum. TV sets can produce static electricity, care must be taken whenever touching the TV screen.
- Adequate ventilation is essential to prevent failure of electrical components, we recommend that a gap of at least 5cm is left all around this television receiver even when it is placed inside a cabinet or between shelves.
FOR YOUR SAFETY PLEASE READ THE FOLLOWING TEXT CAREFULLY
This appliance is supplied with a fitted three pin mains plug for your safety and convenience. A 5 amp fuse is fitted in this plug. If the fuse is replaced then the replacement fuse must be 5 amp rated and should be approved by ASTA or BSI to BS1362.
Check for the ASTA mark

or the BSI mark

on the body of the fuse.
If the fitted plug has a removable fuse cover you must ensure that it is refitted when the fuse is replaced. If you lose the fuse cover the plug must not be used until a replacement cover is obtained. Replacement fuse covers can be purchased through your local Panasonic dealer.
The plug fitted to this appliance incorporates a mains filter circuit. If this is removed or replaced with a non-filtered plug this television will no longer meet the European standards for Electromagnetic Compatibility (EMC). If the fitted plug is unsuitable for the socket outlet in your home an appropriate adapter should be used.
Nonetheless, if the fitted plug is replaced, the fuse should be taken out and the cut-off plug disposed of safely. There is danger of severe electrical shock if the cut off plug is inserted into any 13 amp socket.
If a new plug is to be fitted please observe the wiring code as shown below. If in any doubt please consult a qualified electrician.
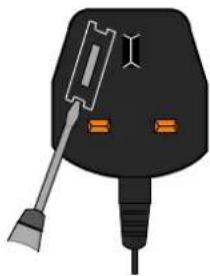
How to replace the fuse (for plug type shown in example 1):
Lift out the removable fuse compartment with a screwdriver and replace the fuse, then refit securely into the mains plug (see example 1).
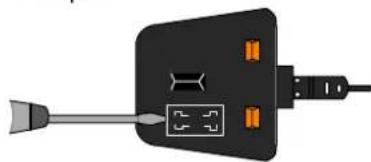
How to replace the fuse (for plug type shown in example 2):
Lift open the fuse compartment, in the mains plug, with a screwdriver, and replace the fuse, then press the fuse cover down securely (see example 2).
Example 1
natural_image
Illustration of a black electrical plug with a screwdriver and two orange buttons (no text or symbols)Example 2
natural_image
Illustration of a black electrical plug with two orange connectors and a connector pin (no text or symbols)IMPORTANT: - The wires in the mains lead of this appliance are coloured in accordance with the following code :
BLUE : NEUTRAL
BROWN : LIVE
As the colours of the wires in the mains lead of this appliance may not correspond to the markings identifying the terminals in your plug, proceed as follows :-
- The BLUE wire must be connected to the terminal marked 'N' or coloured black.
- The BROWN wire must be connected to the terminal marked 'L' or coloured red.
IMPORTANT NOTE: Under no circumstances should either of these wires be connected to the Earth terminal of the three pin plug, marked with the letter 'E' or the earth symbol.
ACCESSORIES
Check that you have the descent and their show shown


Operating Instruction book TQB8E2840

Remote Control Transmitter
EUR511230

Batteries for the Remote Control Transmitter.
(2 x R6 (UM3) size)
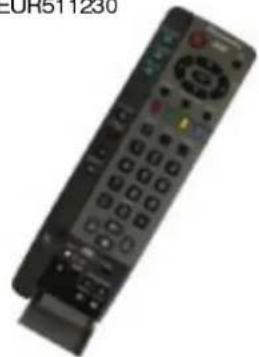
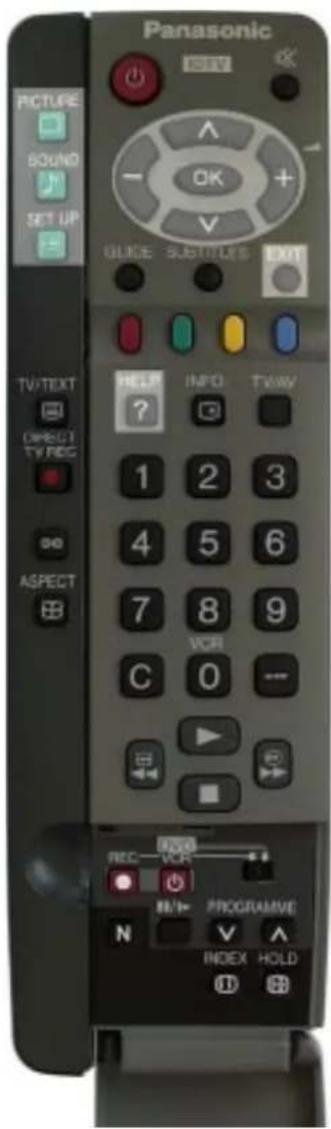
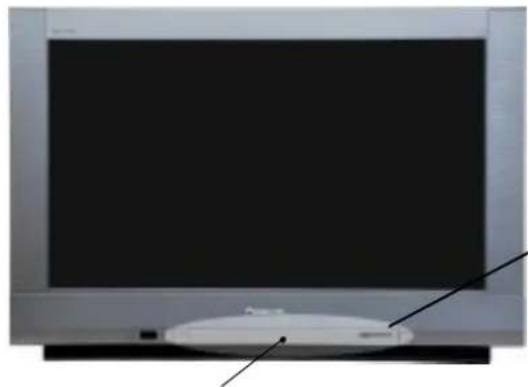
natural_image
Black remote control device with multiple ports and buttons (no visible text or symbols)

TV Guarantee

VS-PK1/2 (Video cabinet)
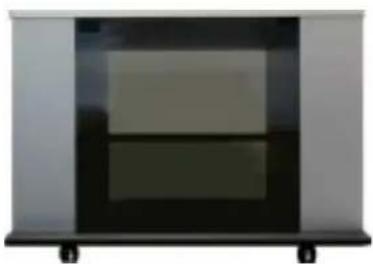
natural_image
Exterior view of a modern office building (no signage)
CRT Guarantee


DVB Software
Registration Card

Questionnaire


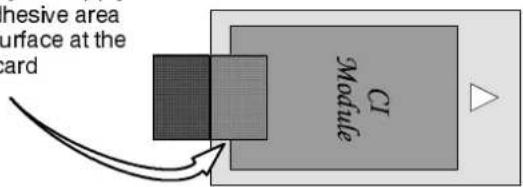
Adhesive felts
Some Common Interface modules are shorter in length than others and might therefore be difficult to retrieve from the front panel slots. If this occurs, attach one of the adhesive felts to the top surface of the CI module before insertion.
Remove backing from one side only and apply exposed adhesive area to the top surface at the rear of the card
INSERTINGTHEREEMMODEE CONTROLABATERIES
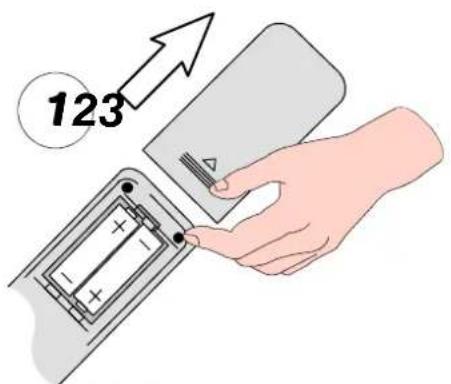
Slide off the battery cover
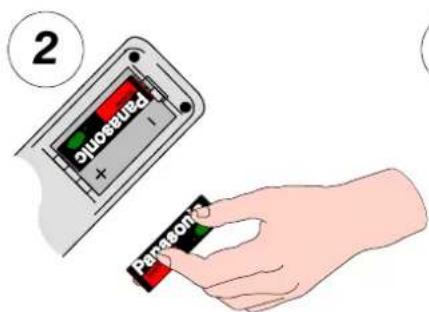
Insert batteries - note correct polarity (+ and -)

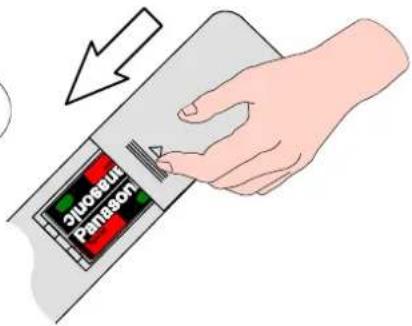
Replace the cover
Notes:
- Make sure that the batteries are fitted the correct way round.
- Do not mix old batteries with new batteries. Remove old, exhausted batteries immediately.
- Do not mix different battery types, i.e. Alkaline and Manganese. Do not use rechargeable (Ni-Cad) batteries.
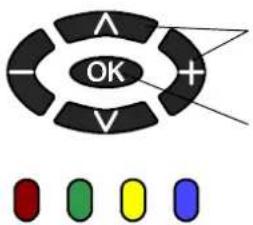
BASICCONTROLS : FRONTPANNELANDR BEMDECONTROL
Press here and open flap to expose TV controls, front AV3 and headphone terminals
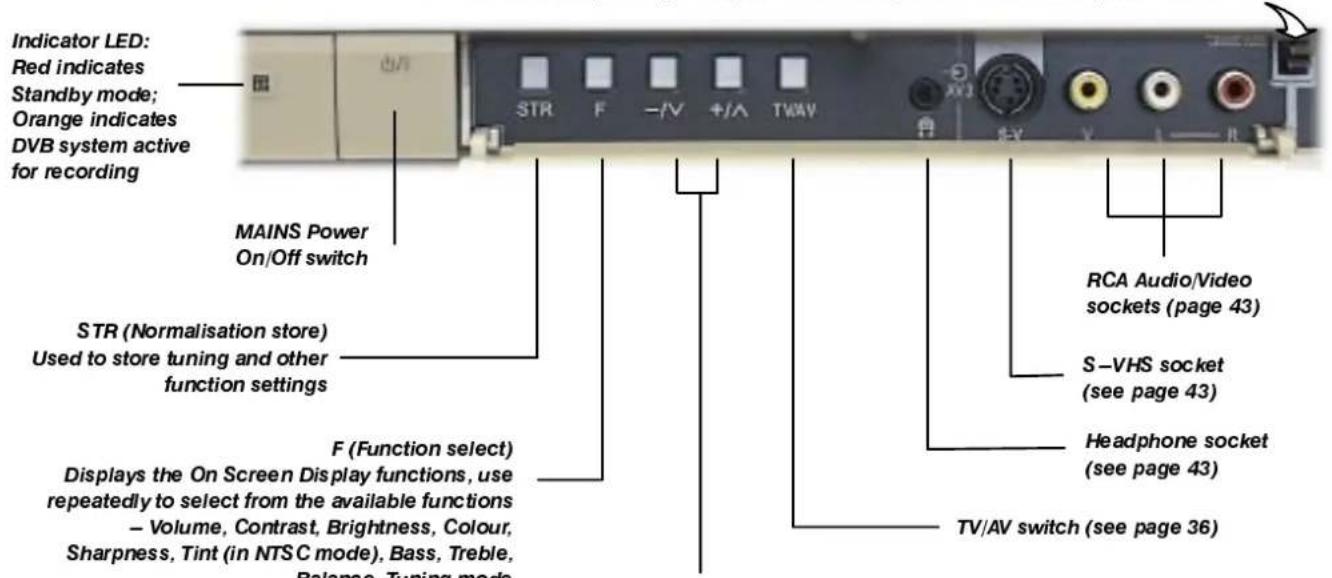
Increases or decreases the programme position by one. When a function is already displayed, press to increase or decrease the selected function
QUICKSSTARTGGUDEE
Connectionandsettingupoptions
- If connecting the TV using an RF cable only, proceed to option 1.
- If connecting the TV using Scart and RF cables, proceed to option 2.
- If connecting the TV to a Q-Link (or Q-Link compatible) VCR, proceed to option 3 on page 7.
1. Correction of TV U/Singang Range if applicable only
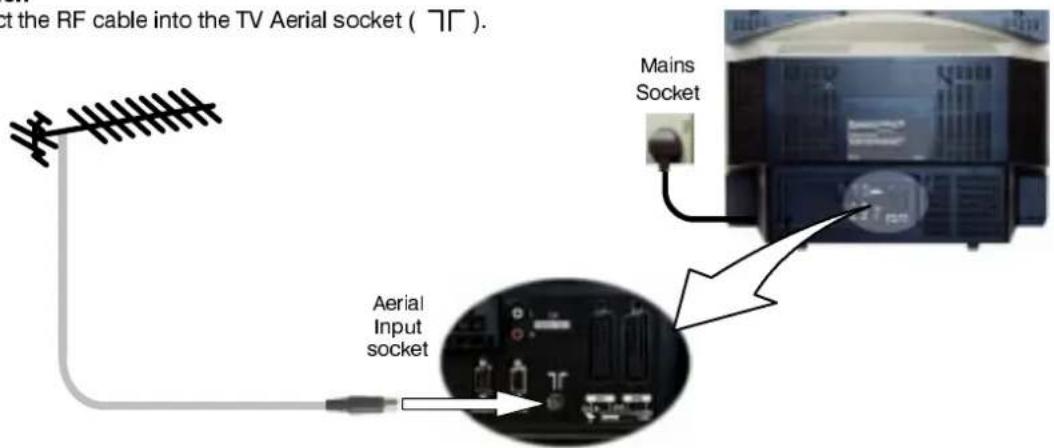
RF Connection
- Connect the RF cable into the TV Aerial socket ( 7Γ ).
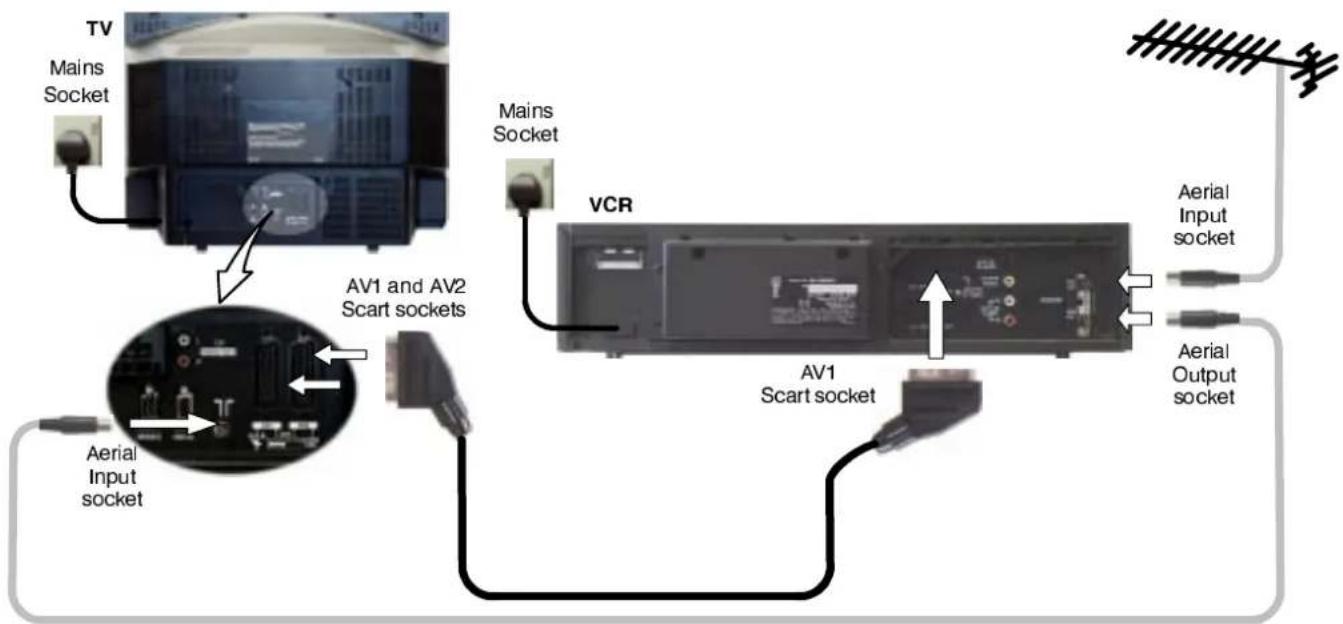
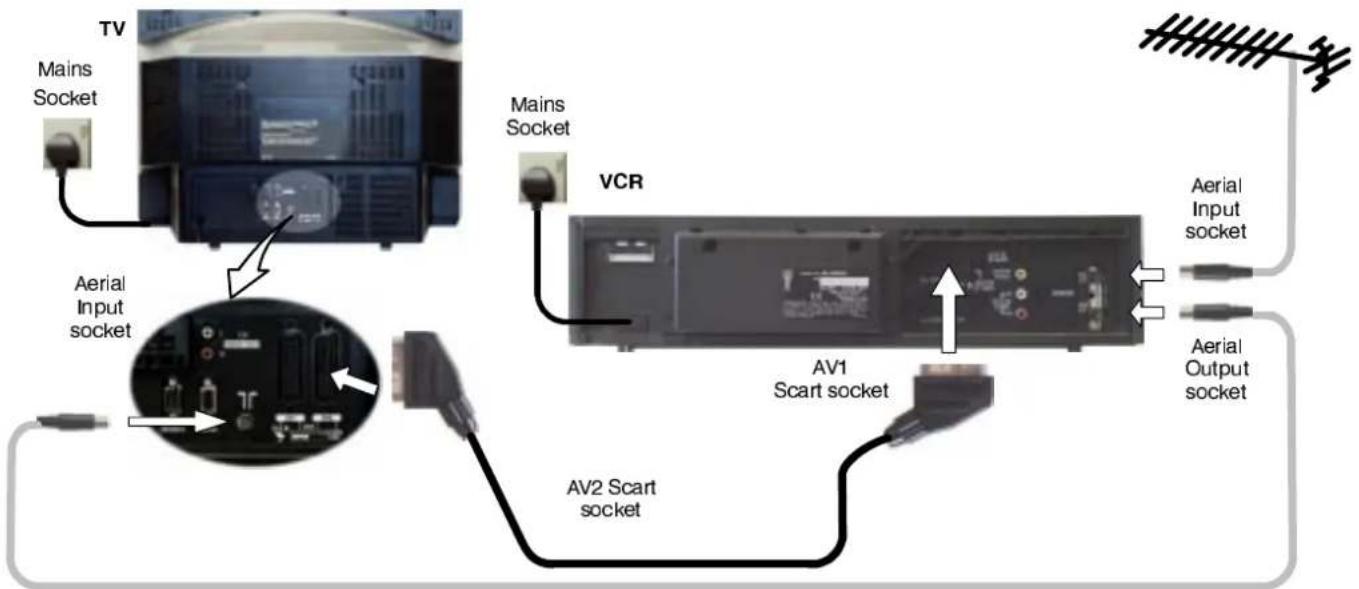
2. Connection of TV and VR/SGs (smart and Rcab) cables
Scart Connections
• The VCR can also be connected to the TV using a Scart cable if you are using a Scart equipped VCR.
• Use the TV's AV1 Scart socket for a VCR.
• Use the TV's AV2S Scart socket for an S-Video VCR.
RF Connection
- Connect the RF cable to the Aerial In socket of the VCR and an RF cable from the VCR Aerial Out socket to the TV Aerial socket ( 7F ).
Notes :
Additional equipment and cables are not supplied.
Further details of Audio/Video connections can be found on pages 43 and 44.
QUICKSTARRITCGGUIDEE
WhatisQLink?
Q-Link allows direct communication between the TV and a Q-Link (or Q-Link compatible) VCR, this will enable features such as downloading of tuning information from the TV to the VCR.
When using a "NEXTVIEWLINK" VCR the main features possible are the following :
- Preset Download - Downloading of tuning information from the TV to the VCR.
- Direct TV Record - For immediate recording of the current program (What You See Is What You Record).
When using a "QLink" VCR the main features possible are the following :
- Preset Download - Downloading of tuning information from the TV to the VCR.
- Direct TV Record - For immediate recording of the current program (What You See Is What You Record).
• TV/VCR Auto Power On - When the VCR plays a tape the TV will automatically switch On and select the AV2 input.
• VCR Auto Power Standby - When the TV is switched into Standby, the VCR will also switch into Standby. - VCR Image view On - If the TV is in Standby mode and the VCR sends a menu to be displayed on the TV screen (e.g. Main menu), the TV will automatically switch On and the menu will be displayed.
This TV will also communicate with other VCR's that bear the following logos :
• "DATA LOGIC" (a trademark of Metz Corporation).
- "Easy Link" (a trademark of Philips Corporation).
• "Megalogic" (a trademark of Grundig Corporation).
- "SMARTLINK" (a trademark of Sony Corporation).
These VCR's may support some or all of the above functions. Refer to the VCR operating instruction book.
Further information on Q-Link can be found on page 37.
In order for Q-Link to function correctly, the Scart cables must be connected in a certain way, dependent on whether the TV is being connected to a VCR (option 3, below) or other external equipment.
3. Q/Qa-koo knptionio6TVahTV @Rus#BSusing SdBFcardeSF cables
Scart Connection
- The VCR must be connected to the AV2 Scart socket of this TV using a "fully wired" Scart cable.
Note :
If using a "Q-Link" VCR then the AV1 Scart of the VCR must be connected to the AV2 socket of the TV. If your VCR is not a "Q-Link" VCR, please consult your VCR operating instruction book.
RF Connection
- Connect the RF cable to the Aerial In socket of the VCR and an RF cable from the VCR Aerial Out socket to the TV Aerial socket ( 7Γ ).
Notes :
Additional equipment and cables are not supplied.
Further details of Audio/Video connections can be found on pages 43 and 44.
Further information for VCR and Satellite Receiver installation with this TV can be found on page 39.
1 Ensure that the VCR is in Standby mode.
Plug the TV into mains socket and switch ON.
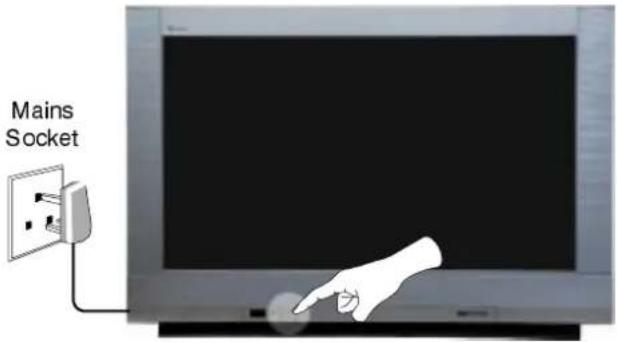
2 Programmes will appear immediately if your dealer has programmed the TV for you.
If the TV has not been programmed for you then Auto setup will begin.
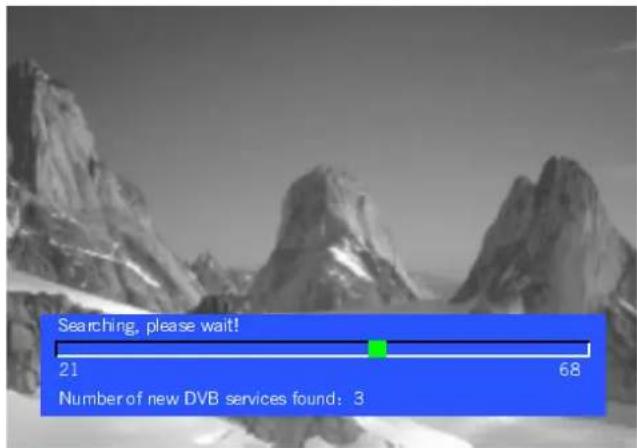
First, the TV will search for analogue stations:
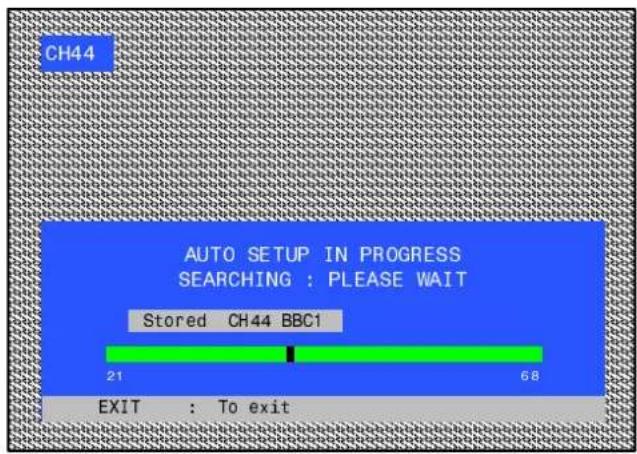
When the search for analogue stations is complete, the TV will continue to search for DVB stations.
TV stations will be located, sorted into order and stored ready for use.
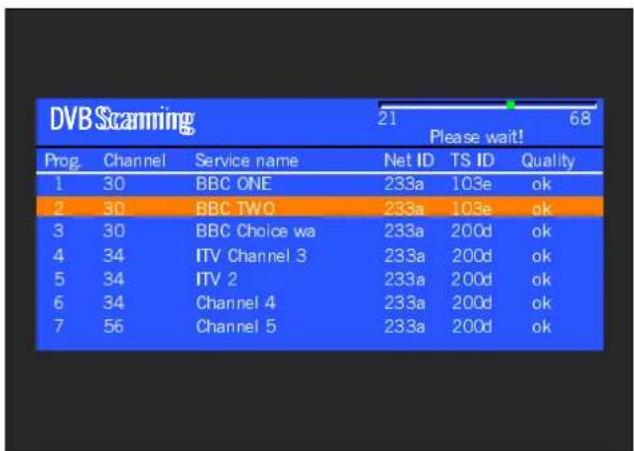
Stations are sorted into the following order:
- DVB Stations: BBC ONE, BBC TWO, ITV Channel 3, Channel 4 and Channel 5, if available. Other free-to-air stations and regional variations, for example S4C. Pay TV stations, in channel order.
followed by:
- Analogue Stations: All analogue stations, sorted into channel order.
The sorted programme order depends upon the TV signal, the broadcasting system, and reception conditions. If the order is not to your preference it can be rearranged. See page 22.
3
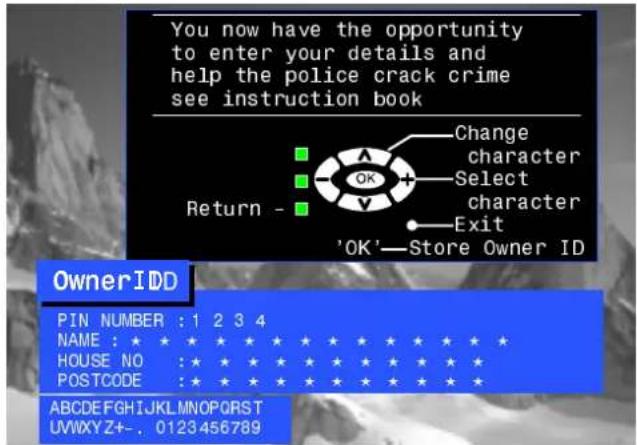
Owner ID
As an added feature, this TV has the option of adding a security code (Owner ID) and personal details into its memory, so that in the unfortunate event of theft it will help the Police to trace the owner.
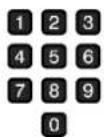
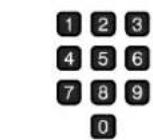
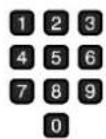
Enter required 4 digit Owner ID
PIN NUMBER.
(using 0 to 9 on the remote control).
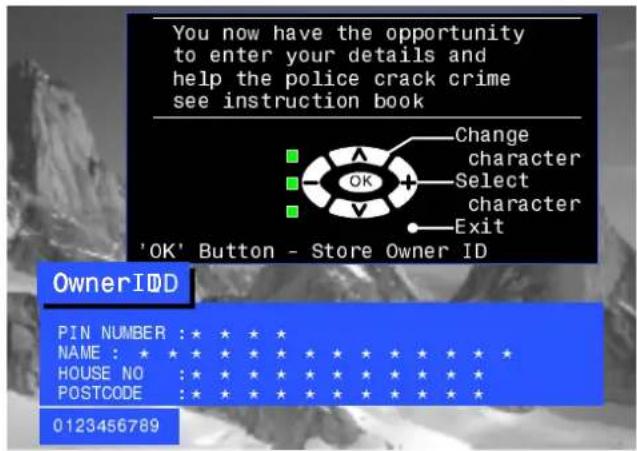
4
Enter NAME, HOUSE NUMBER and POSTCODE.
If a 4 digit PIN NUMBER was entered above, you will be taken automatically to the NAME line.
If not, move to the NAME line.
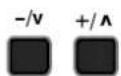
Change character.
Select character position.
Repeat above until NAME, HOUSE NUMBER and POSTCODE are entered.
Press OK to store the details.
Press OK again, when you are asked "Are you sure?"
natural_image
Abstract black-and-white graphic with curved shapes and symbols (no text or readable labels)

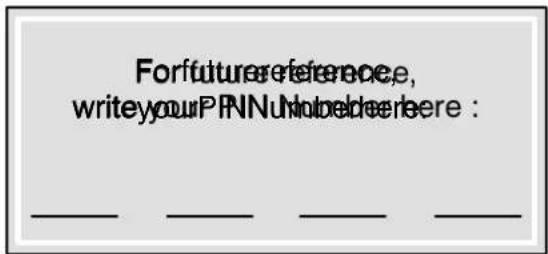
For further information on Owner I.D., see page 26.
A space is provided on page 26 to write down the PIN NUMBER for future reference.
QUICKSSTARTGGUDEE
5 TV to VCR Download
If a "Q-Link", "NEXTVIEWLINK" or compatible VCR has been connected to the AV2 socket before starting Step 1, programme information will be downloaded to the VCR.
Only the analogue programme positions will be downloaded to the VCR, in the correct order. See page 37.
Not all VCRs support this download of programme information, some may require to be started manually.
Refer to the VCR operating instruction book.
If a VCR other than those described above has been connected, then there will be no download operation, the TV is now ready for use:
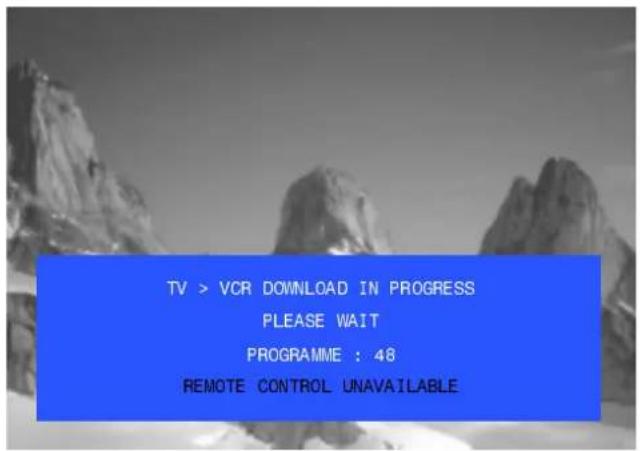
Notes :
If the VCR has not accepted download data from the TV, you may need to select the Download option from the VCR's menu system.
Refer to the VCR operating instruction book.

natural_image
Black-and-white mountain landscape with snow-covered peaks and a blue label reading 'BBC1' in the top-left cornerIf Q-Link is not operating correctly, check the following :
- The Scart cable is connected to the TV's AV2 Scart socket.
- The Scart cable is connected to the VCR's compatible (Q-Link, NEXTVIEWLINK or similar technology) Scart socket.
- The Scart cable is a "fully wired" type.
For further information on Q-Link and connecting equipment, see pages 37, 43 and 44.
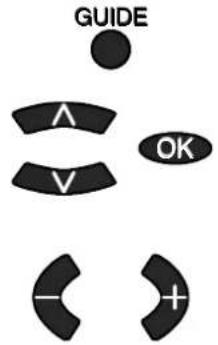
6
To view a list of the stations that have been found, press the GUIDE button on the remote control (see page 35).
DVB stations are shown with a √ in the DVB column, while analogue stations are denoted by their transmission channel number.
GUIDE

Use the cursor buttons to move the cursor bar up and down the list.
To view the selected programme press the OK button.


Categories
To make stations easier to find, specific stations can be listed by category; press the left or right cursor button to choose a category. The chosen category name is shown at the top of the menu.


For example, if you select 'Free TV', only 'free-to-air' stations will be listed – you can view any of these now.
If you select 'Pay TV', only subscription stations will be listed – you will need to contact the service provider to find out how to subscribe to these stations.
QUICK STARTGUIDE

Slight tilting of the picture may be noticeable or coloured patches may sometimes appear at the corners of the screen (colour purity). The Geomagnetic Correction feature can be used to eliminate them, if necessary:
First, ensure the Auto setup and Q-Link download procedures are complete. The screen should not be showing any On-Screen Display menus.
natural_image
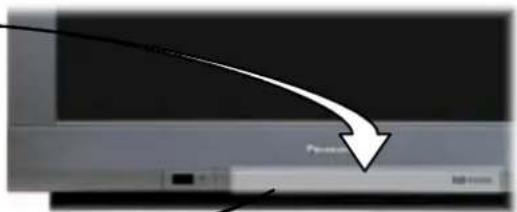
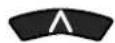
Black-and-white landscape photo of rugged mountain peaks and snow-covered ground (no text or symbols visible)Open the flap on the television's front panel
Press and release here to open flap
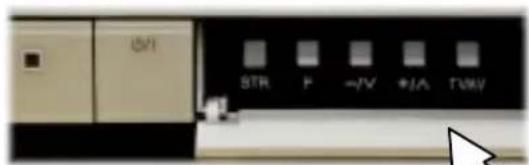
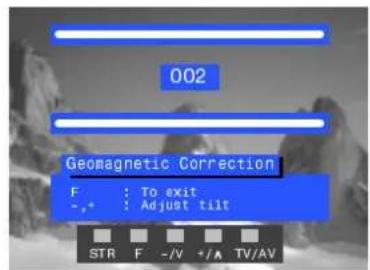
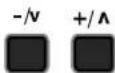
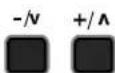
Press the F button repeatedly until the Geomagnetic Correction feature is displayed

F
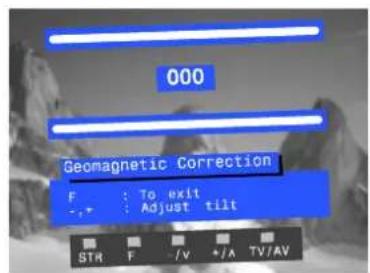
Press the + or - buttons repeatedly until the picture appears to be level

-/v

+/A
Press the F button again to return to normal viewing. Close the flap to prevent damage

F

We recommend that as soon as the Auto setup feature is completed, the picture controls are reset to normal viewing levels. To do this, press the "N" button, found under the remote control's pull down flap.


You are now ready to begin viewing programmes
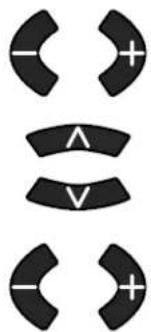
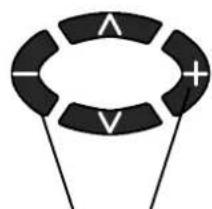
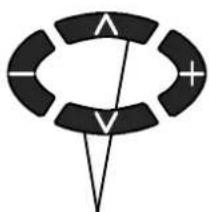
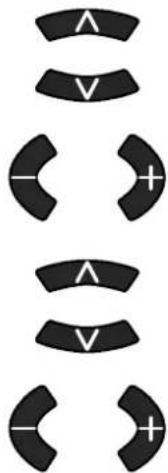
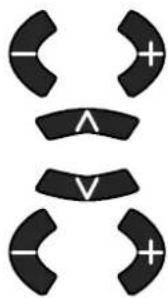
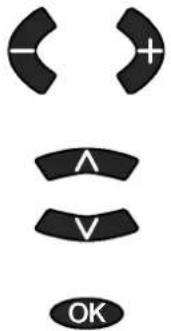
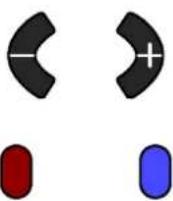
The cursor controls provide the two basic functions:
natural_image
Simple diagram of a lifebuoy with three legs and a central plus sign, no text or symbols present.Adjust Volume
natural_image
Pure diagram of a circular shape with internal symbols and lines, no text or labels presentChange Programme
USINGTHECONSSGBRENDISPLAYS
ThisTVhasacomprehensivesystemofOnScreenDisplay(OSD)menustoaccess adjustmentsandoptions
Some selections, for example, Contrast, Brightness, Colour and Sharpness will allow you to increase or decrease their level.
Some selections, for example, Off timer, allow a change of setting to be made.
Some selections, for example Tuning menu, will lead to a further menu.
The PICTURE, SOUND and SET UP buttons are used to open the main menus and also to return to the previous menu.
The up and down cursor buttons are used to move the cursor up and down the menus.
The left and right cursor buttons are used to access menus, adjust levels or to select from a range of options.
The OK button is used to store settings after adjustments have been made or options have been set, for example Picture and Sound settings.
The EXIT button is used to exit the menu system and return to the normal viewing screen.
The HELP button will run a demonstration of the menus available. During normal viewing, with no OSDs displayed, press the HELP button and select one of the options.


ASPECT CONTROLS
ThewidescreenTVwillallowyoutoenjoyviewingthepictureatitsmaximumsize,including widescreen'cinemaformat'pictures.
Note: Just mode is not available when viewing an RGB source.
Press the ASPECT button to move through the five aspect options: Panasonic Auto, 4:3, Zoom, 16:9 (Full) and Just
ASPECT

Panasonic Auto
Some broadcasts are transmitted together with a wide screen identification signal (WSS). If the TV receives this signal then it will automatically switch to wide screen 16:9 mode, maximum display.
The automatic widescreen switching depends upon reception conditions and the strength of the signal. If the signal is poor and therefore the WSS is weak then it is possible that the picture may not expand to 16:9 (full) size and that the TV will display black areas around the edges.
If the original source signal was a standard 4:3 aspect ratio then you might prefer to view it in its original size; the red and green keys that appear will allow you to choose between viewing at standard 4:3 size or expanded in Just mode.
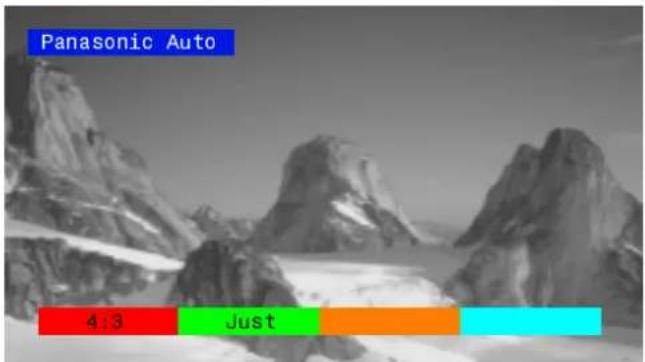
Panasonic Auto
4:3
4:3 will display a 4:3 picture at its standard 4:3 size and can be selected if you wish to view in this format.

natural_image
Black-and-white landscape photo of snow-covered mountains with no visible text or symbols4:3
ASPECT CONTROLS
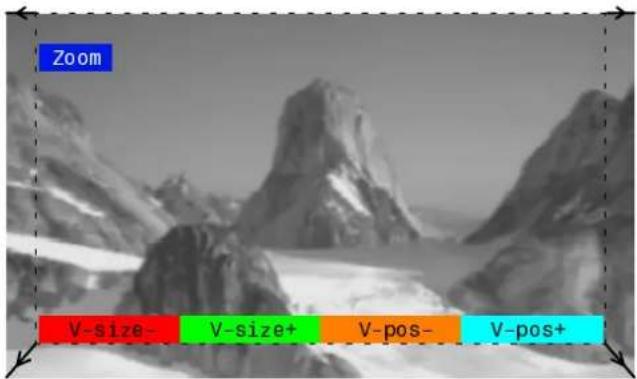
Zoom
Zoom mode magnifies the central section of the picture.
The picture can be moved and enlarged vertically using the coloured keys. The former adjustment is useful for viewing any sub-titles which may appear outside the picture.
The on screen selector keys that appear for some aspect functions will clear after a few seconds. If you subsequently wish to select an operation then press the Aspect key once more for the keys to reappear.
The widescreen aspect ratios of different films and programmes can vary. If these are wider than a standard 16:9 aspect picture then a black band may be visible at the top and bottom of the screen.
If, in Panasonic Auto mode, you experience problems with the screen display size when playing back widescreen format recordings from your VCR then it is possible that the tracking control of your VCR requires adjustment (your VCR instruction book will contain adjustment details).
16:9 (Full)
16:9 (Full) will display the picture at its maximum size but with slight elongation.
Just
Just mode will display a 4:3 picture at maximum size but with aspect correction applied to the centre of the screen so that elongation is only apparent at the left and right edges of the screen. The size of the picture will depend on the original signal.

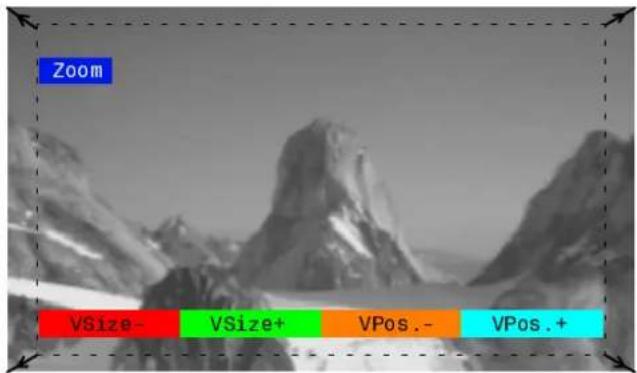
Zoom
Blue key has been pressed to move picture upwards

natural_image
Snow-covered mountain range with visible peaks and a blue timestamp overlay (16:9)16:9 (Full)
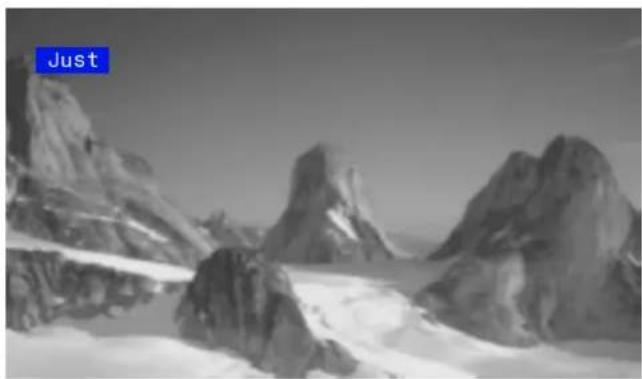
Just
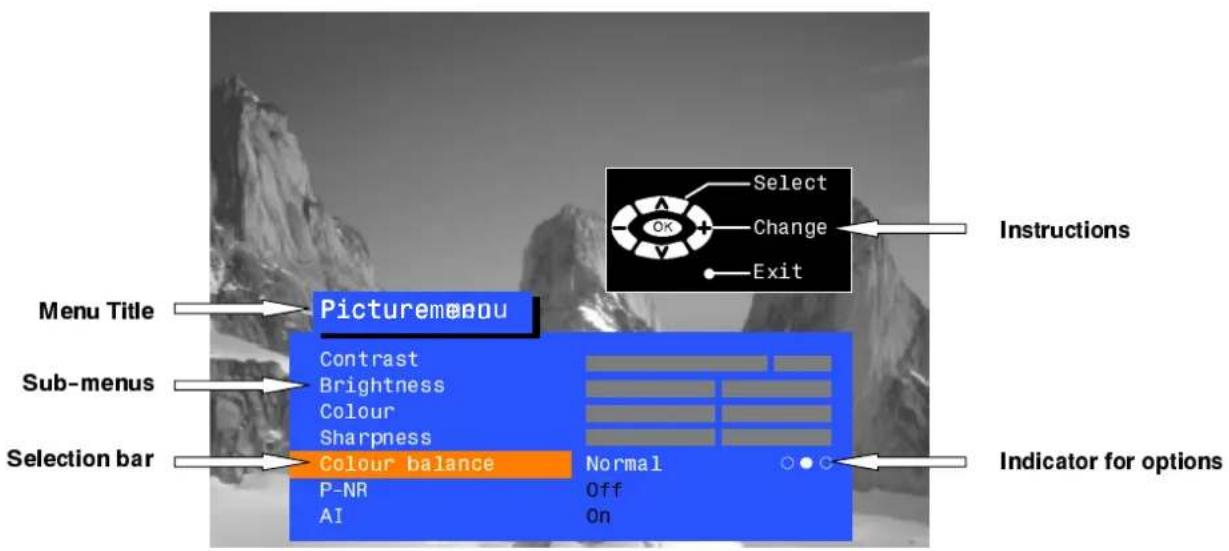
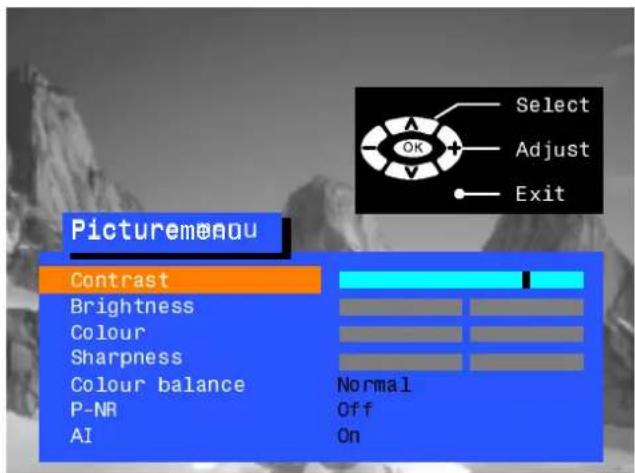
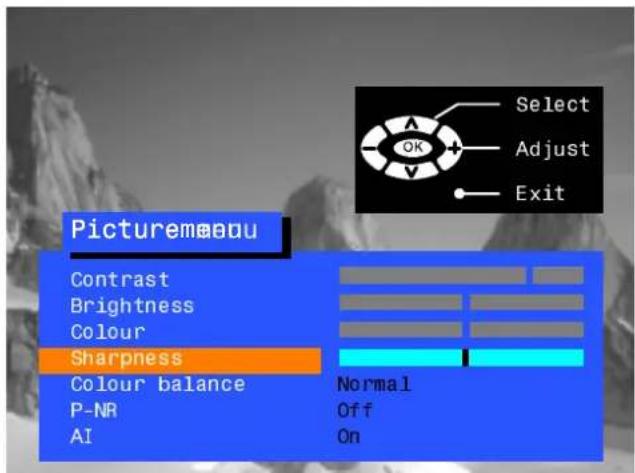
PICTUREMENNU
Open the Picture menu
Move to your choice
Increase or decrease levels or set options
Press the EXIT button to exit the Picture menu
PICTURE


EXIT

Contrast
Brightness
Colour
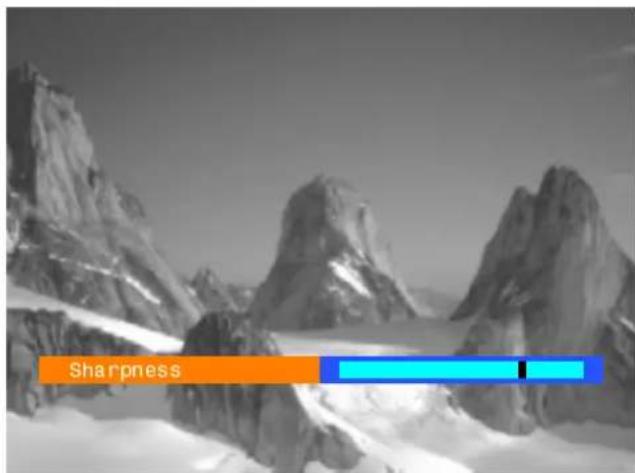
Sharpness
Tint
The Contrast, Brightness, Colour and Sharpness levels can be adjusted to suit your own preferences.
The Tint adjustment will only appear as a menu item if you have an NTSC signal source connected to the TV and will allow adjustment of the hue.
Colourbalance

The Colour balance setting allows you to set the overall colour tone of the picture.
P-NR

P-NR will automatically reduce unwanted picture noise.
AI

AI automatically analyses the incoming picture and processes it to give improved contrast and optimum depth of field.
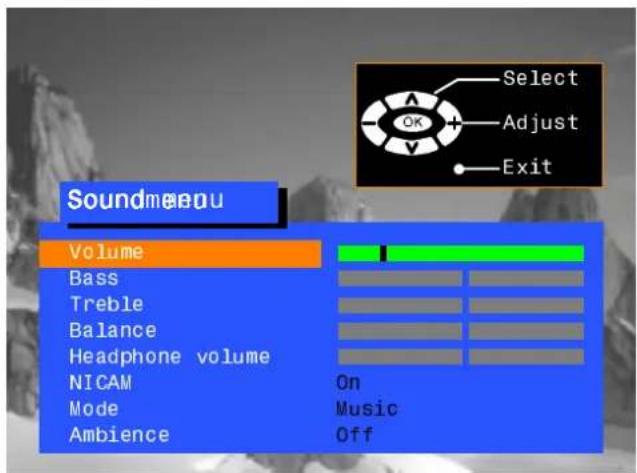
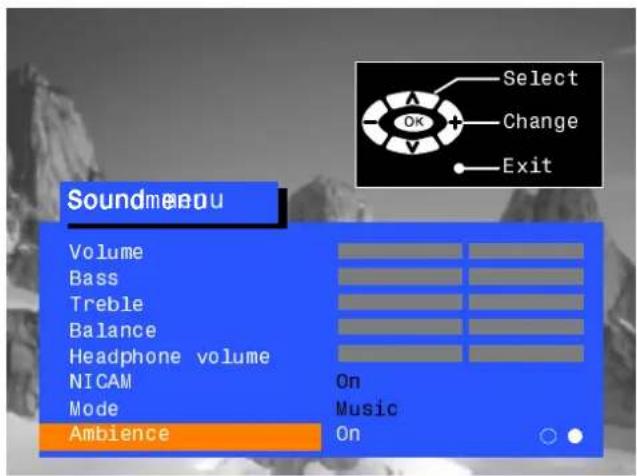
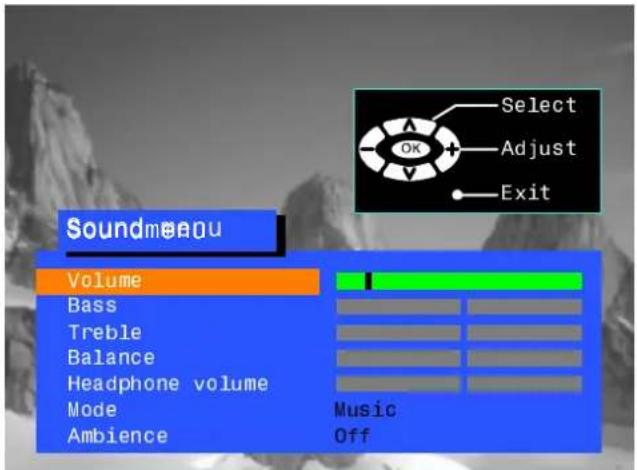
Volume
Bass
Treble
Balance

NICAM

Mode

Ambience

Multi audio

The Volume adjustment sets the overall output volume.
Bass adjustment will emphasise the lower, deeper frequencies and can be increased or decreased.
Treble adjustment will emphasise the sharper, higher frequencies and can be increased or decreased.
Balance affects the levels of sound between the left and right speakers. Adjustment can be made so that the level from the speakers will suit your listening position.
The headphone volume can be adjusted independently of the TV speakers so that everyone can enjoy listening at their own comfort level.
(Not available with DVB programmes). Select On to provide stereo sound reproduction. Select Off for FM Mono sound output.
If Nicam Mono is being transmitted select either FM Mono (Off), Nicam Mono I (M1) or Nicam Mono II (M2). The options depend upon the signal being transmitted.
If reception deteriorates it is advisable to switch to FM Mono (Off).
The sound can be improved during Music or Speech mode by selecting the appropriate function.
Ambience provides a dynamic enhancer to simulate improved spatial effects.
Multi audio, which will only appear when a DVB programme is selected, allows you to select an alternative sound track. The number of options available depends on each broadcast.

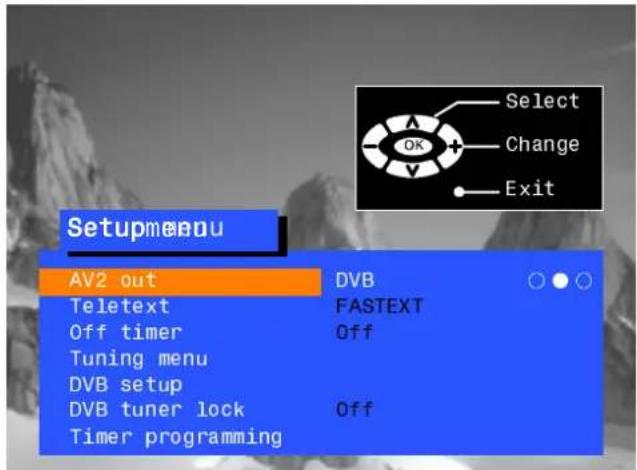
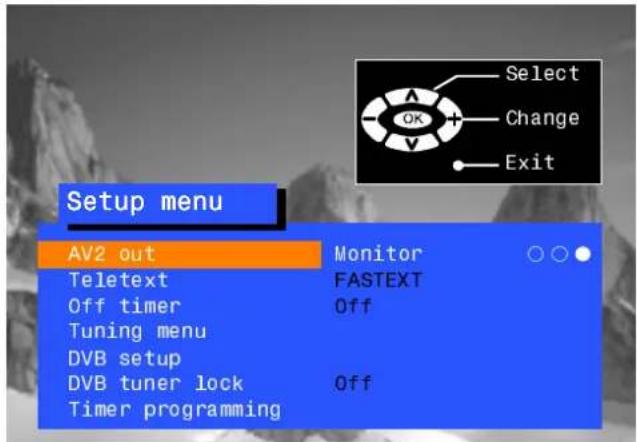
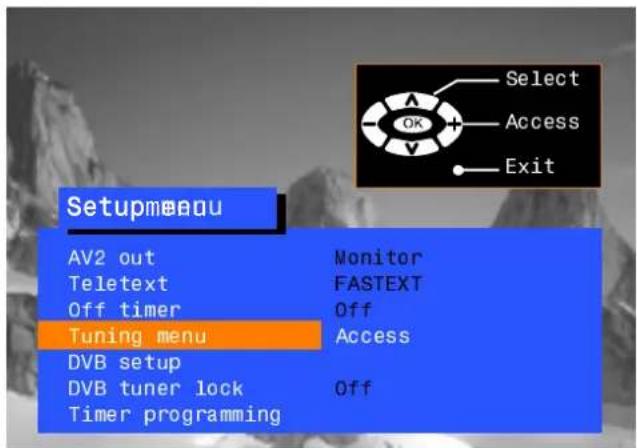
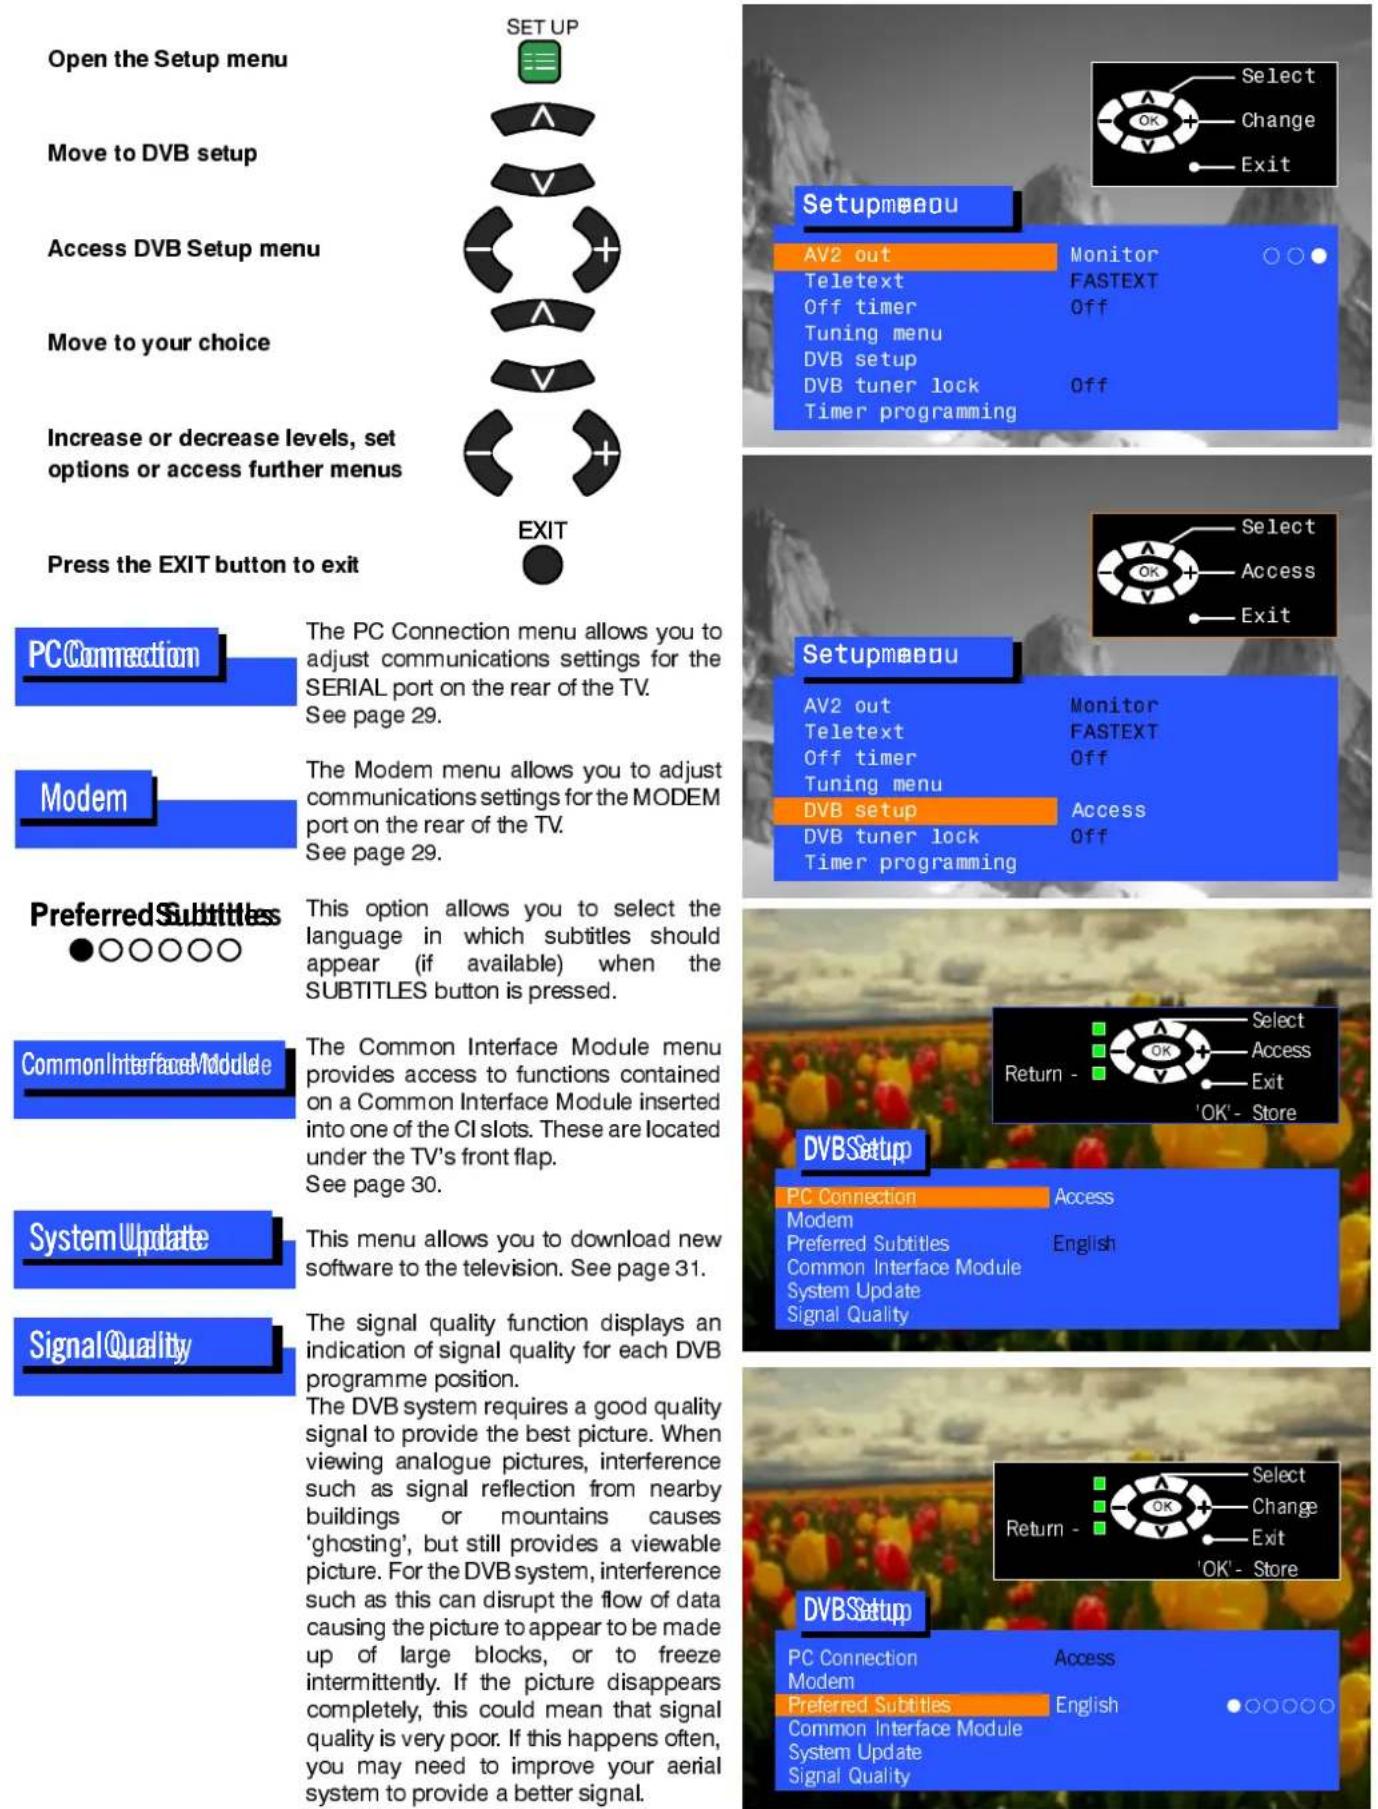
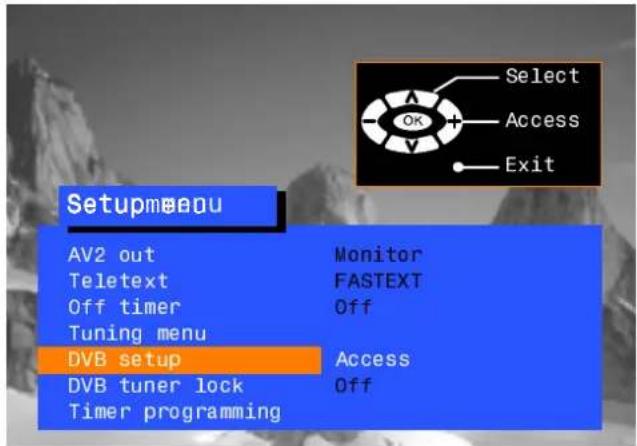
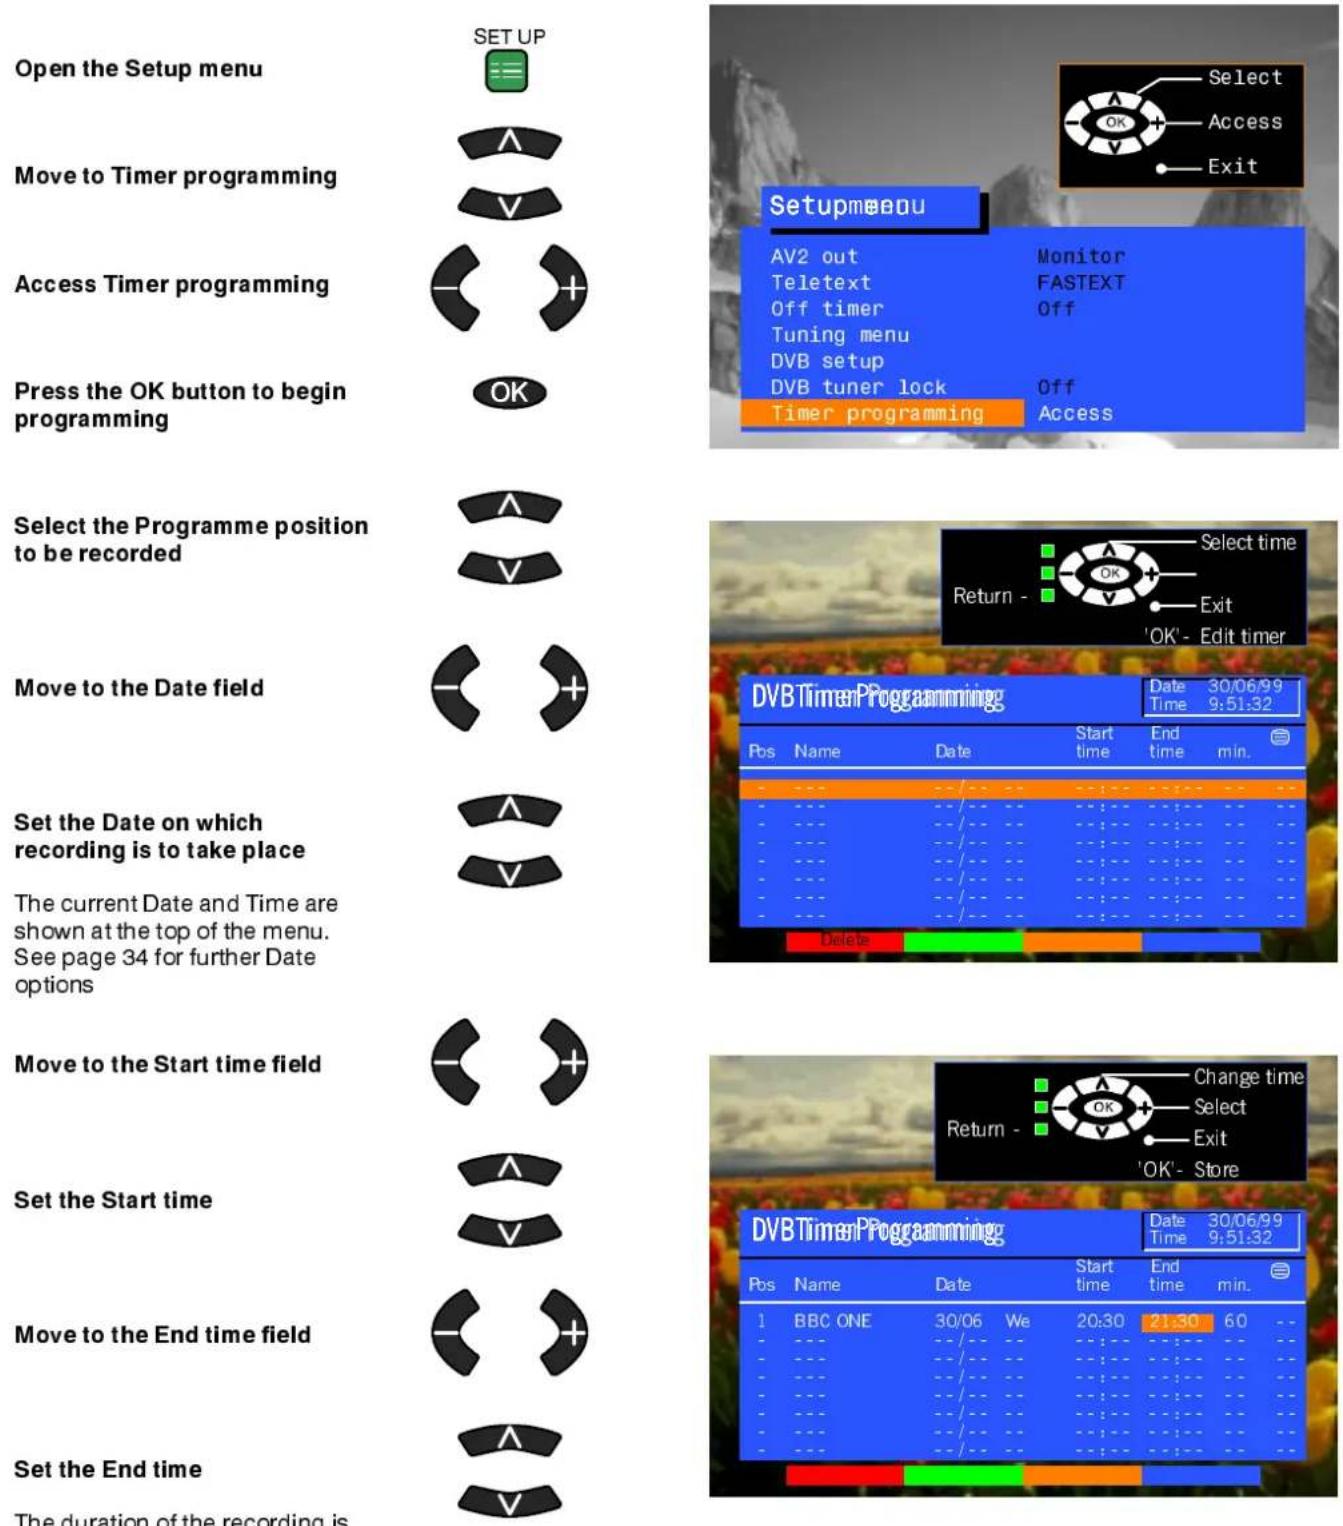
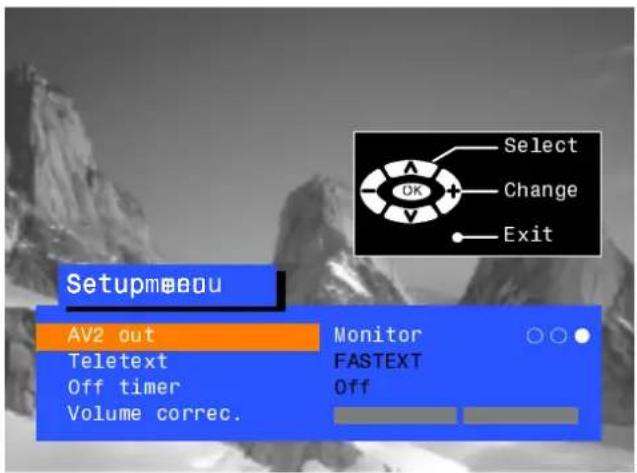
TheSetupmenuprovidesaccesstovariousadvancedfeaturesandalsototheTuningmenu
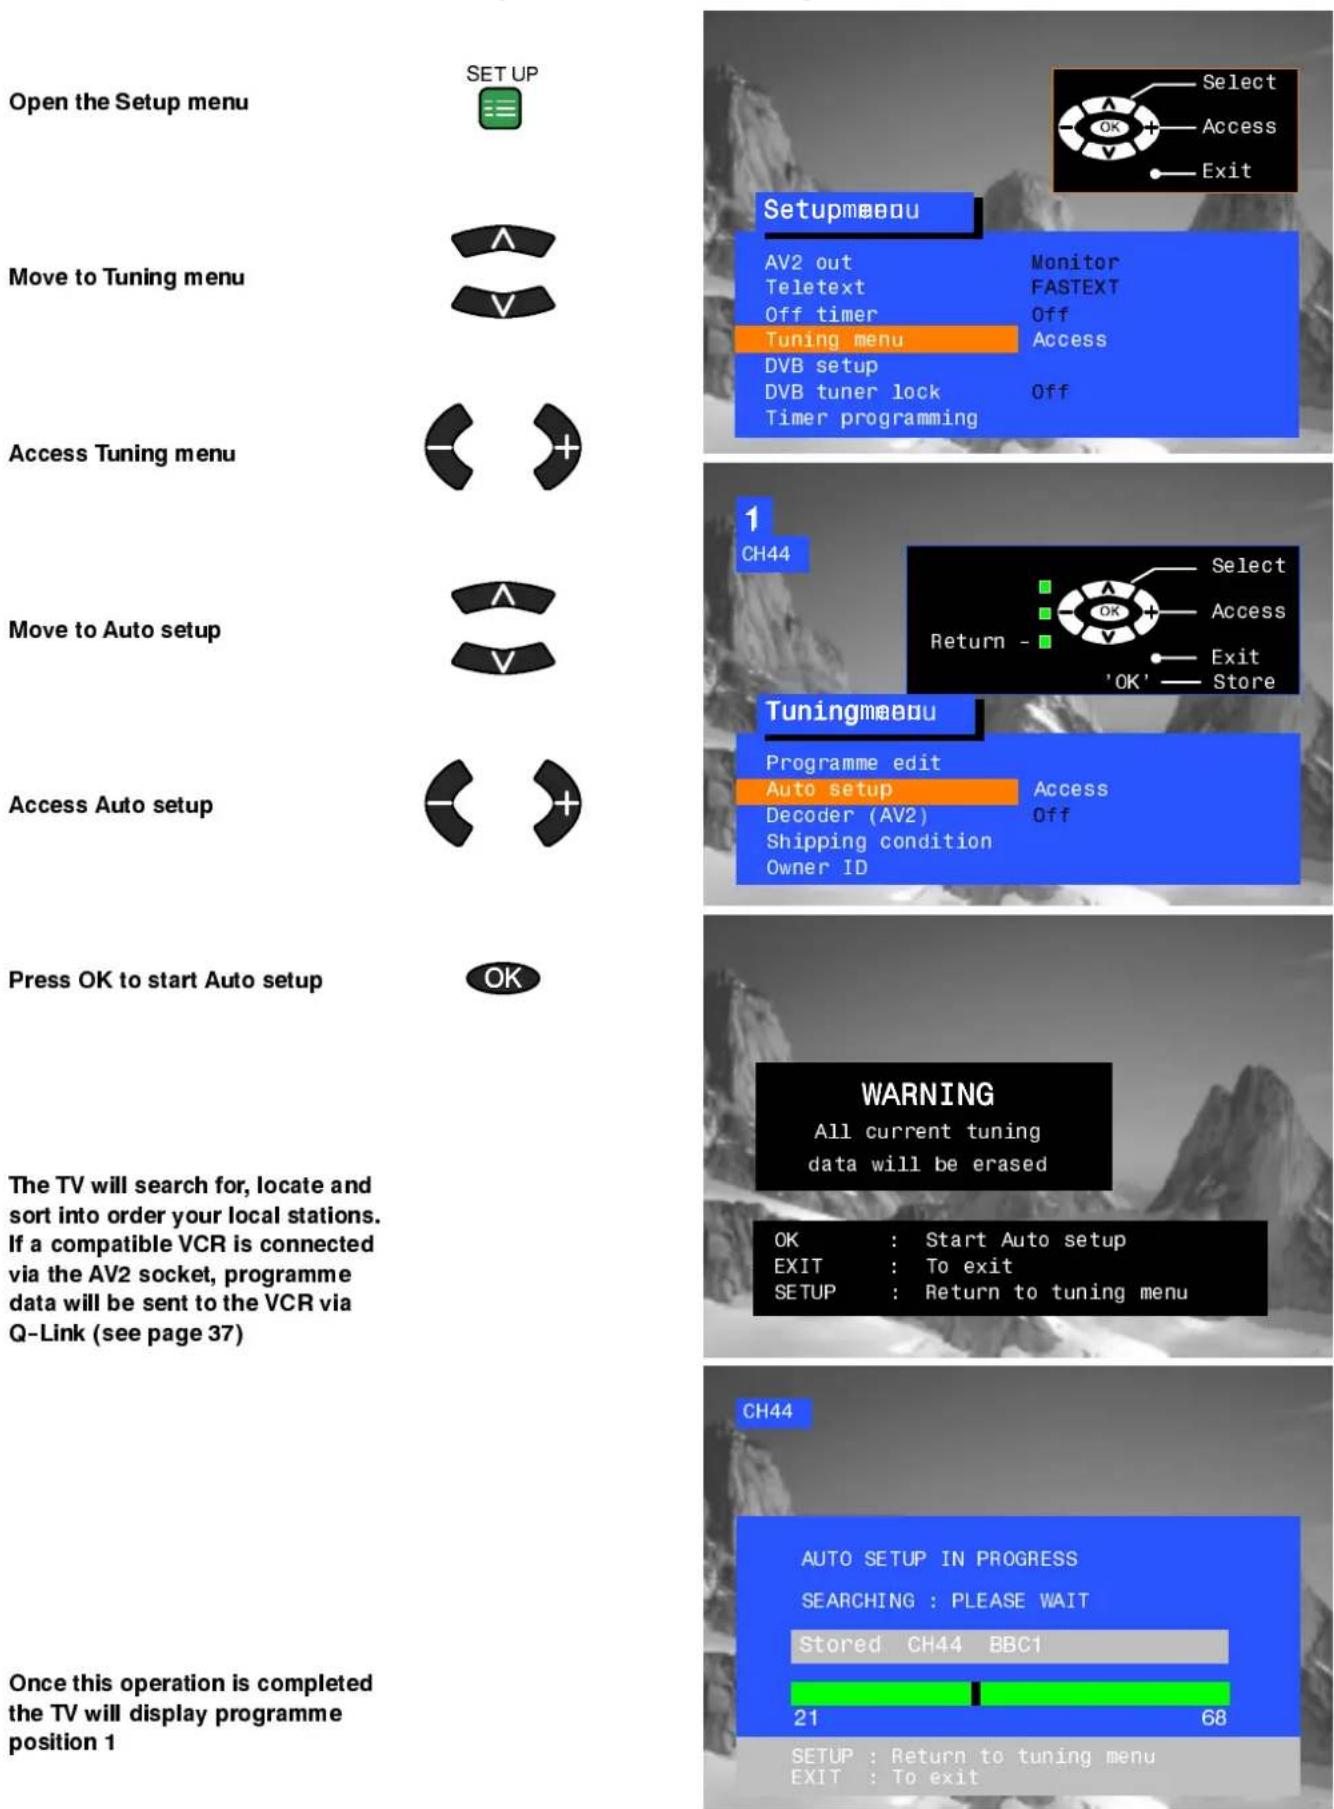
Open the Setup menu
Move to your choice
Increase or decrease levels, set options or access further menus
Press the EXIT button to exit the Setup menu
SET UP


EXIT

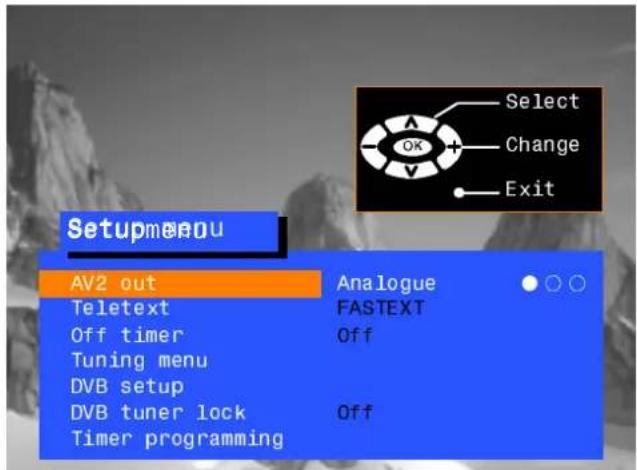
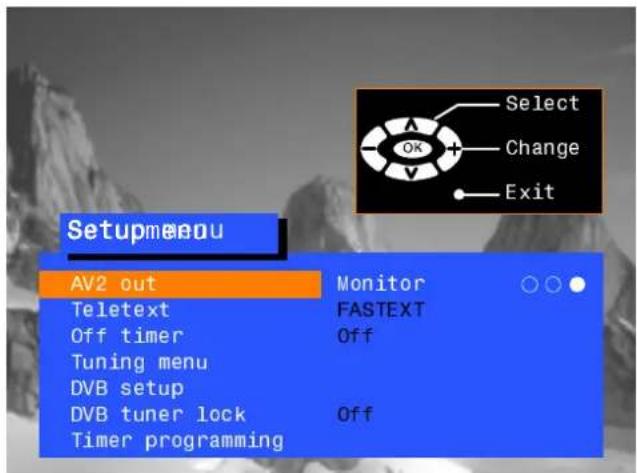
AV2cout

AV2 offers you a choice of signals to send to the AV2 SCART socket. You can choose from the signals currently tuned on the Analogue or DVB tuners, or Monitor – the picture displayed on screen.
Teletext

The Teletext option allows you to choose between FASTEXT or LIST mode. See page 41.

Off timer will switch the TV off within a preset time which you can choose from between 0 to 90 minutes in 15 minute intervals.
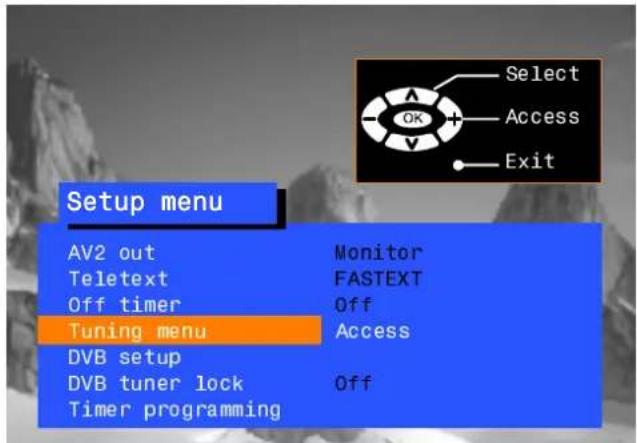
Tuning menu
The Tuning menu provides an entry to many other features including Programme edit and Auto setup. See page 18.
DVB setup
The DVB setup menu provides access to various specialised DVB options. See page 28.
DVBttumørdokk

DVB tuner lock prevents you from accidentally changing programme position while recording a DVB broadcast. If the TV is switched into standby mode while DVB tuner lock is on, the DVB tuner will remain active to ensure recording can still take place.
Timer programming
The Timer programming menu allows you to enter programme times at which the DVB tuner must switch on, ready for recording. See page 32.
Volume correc.
Volume correction (in AV mode only) allows you to adjust the volume level of each AV input to compensate for any differences in audio levels from external equipment.
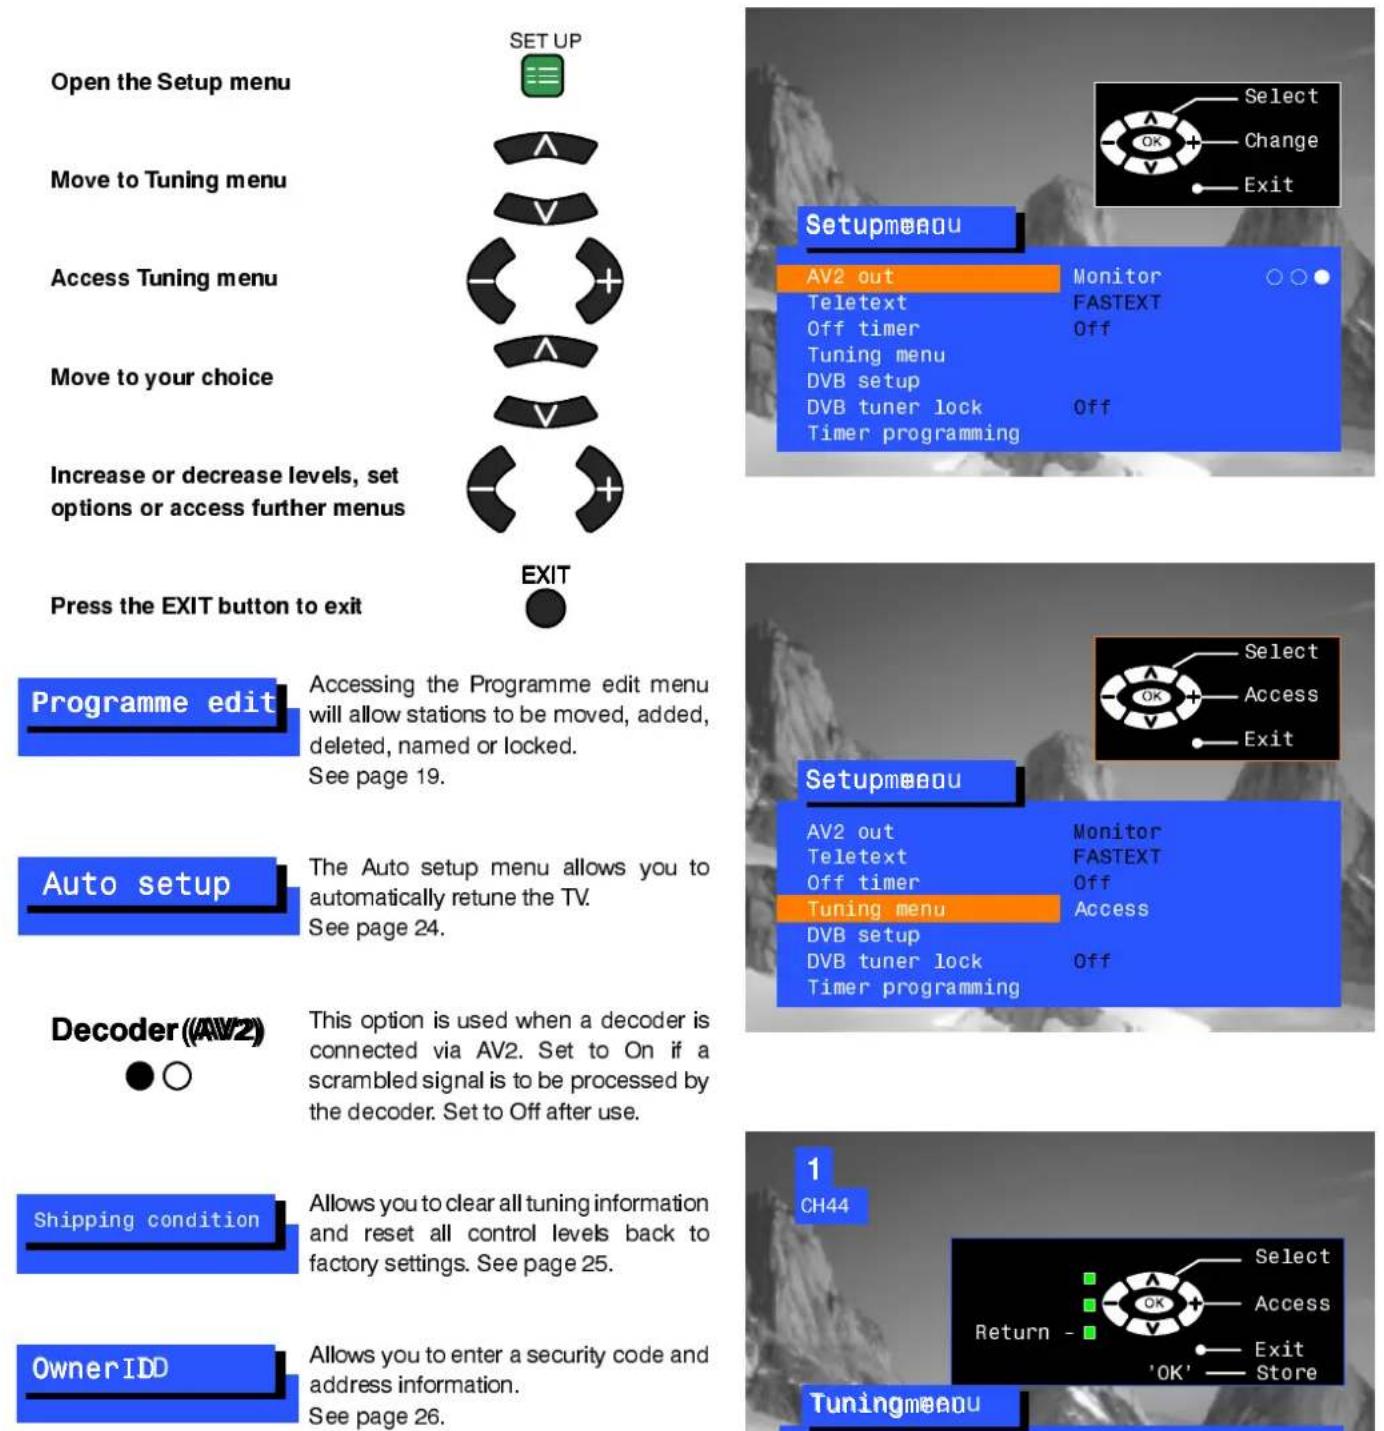
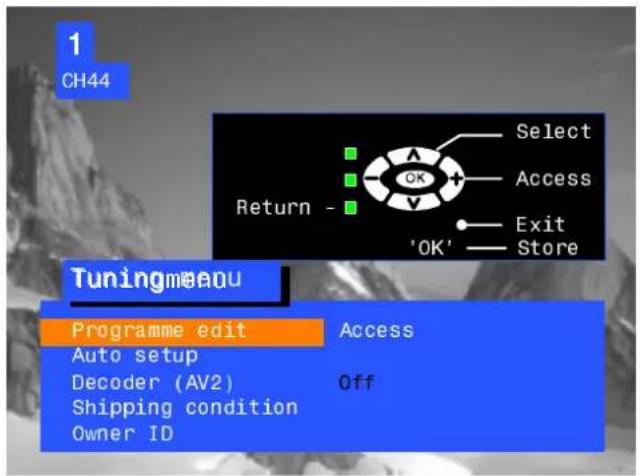
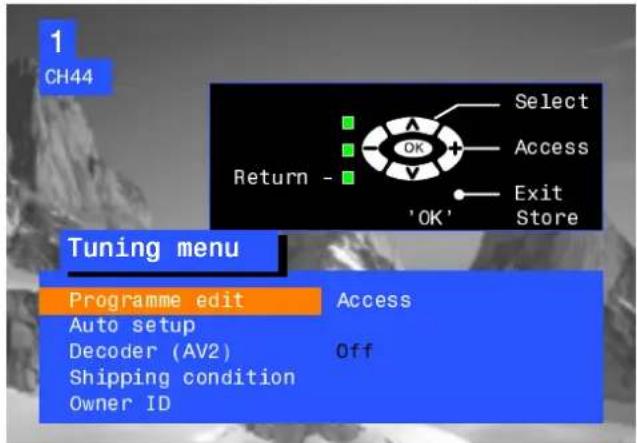
Programme edit
Accessing the Programme edit menu will allow stations to be moved, added, deleted, named or locked. See page 19.
Auto setup
The Auto setup menu allows you to automatically retune the TV. See page 24.
Decoder((AV2))
This option is used when a decoder is connected via AV2. Set to On if a scrambled signal is to be processed by the decoder. Set to Off after use.
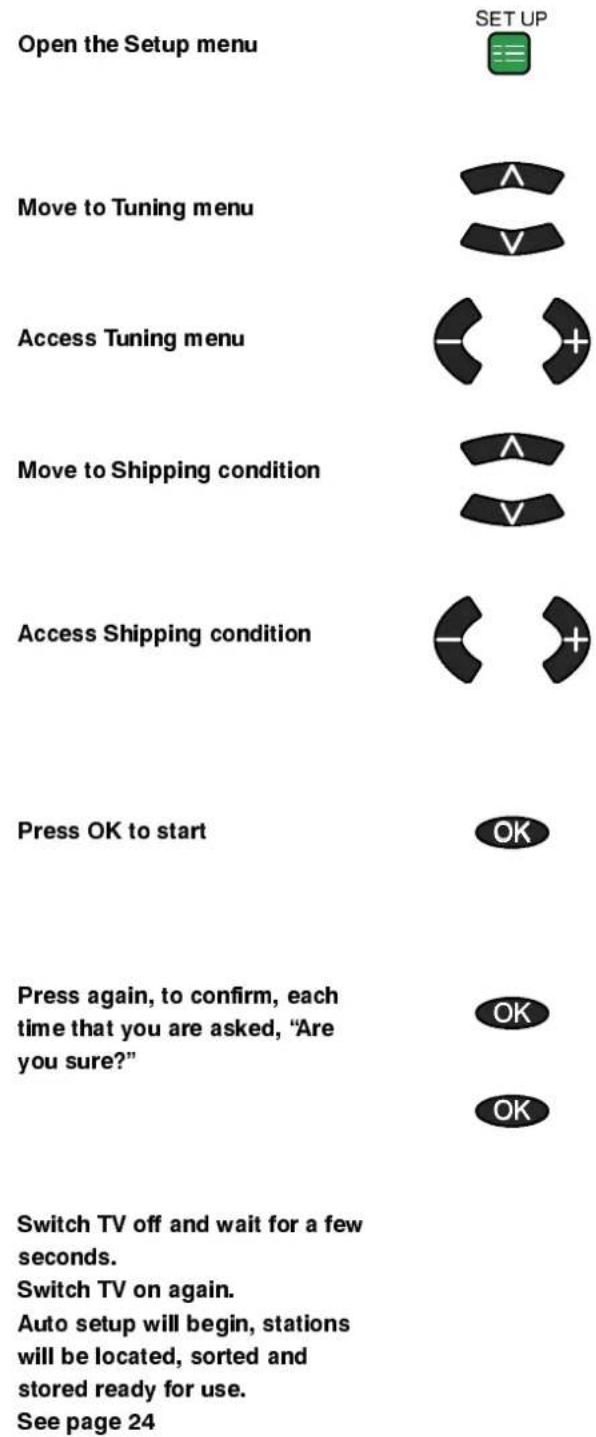
Shipping condition
Allows you to clear all tuning information and reset all control levels back to factory settings. See page 25.
OwnerIDD
Allows you to enter a security code and address information. See page 26.
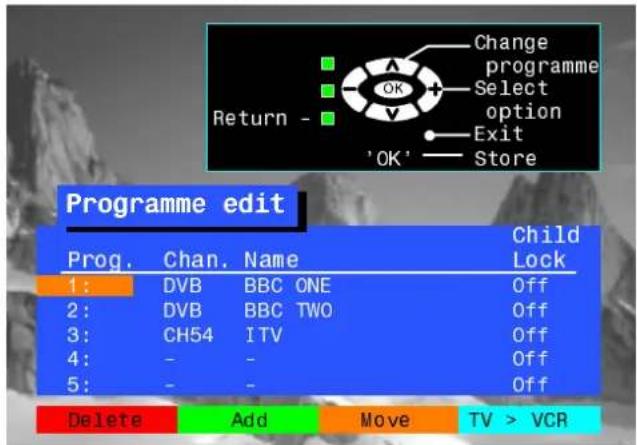
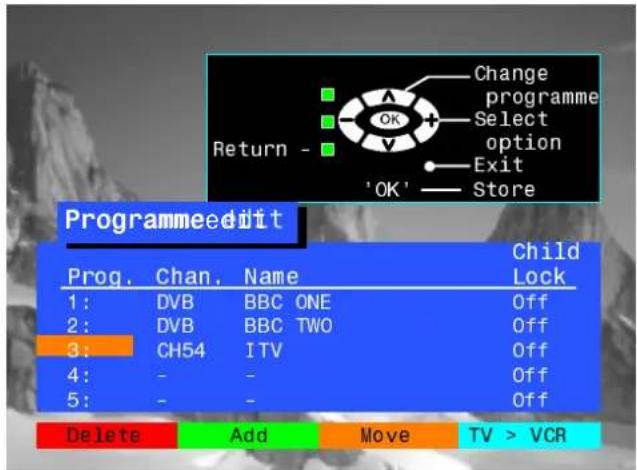
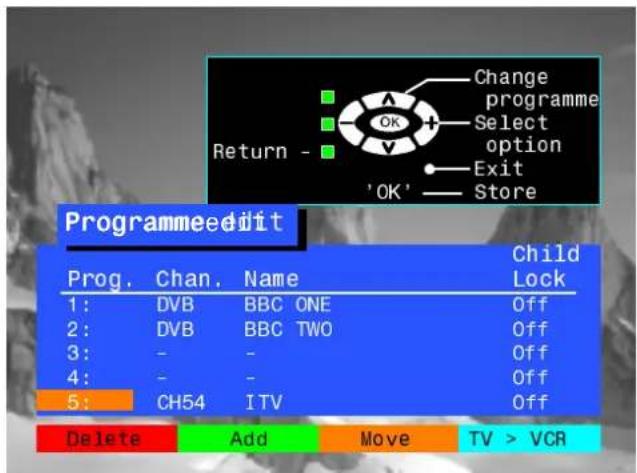
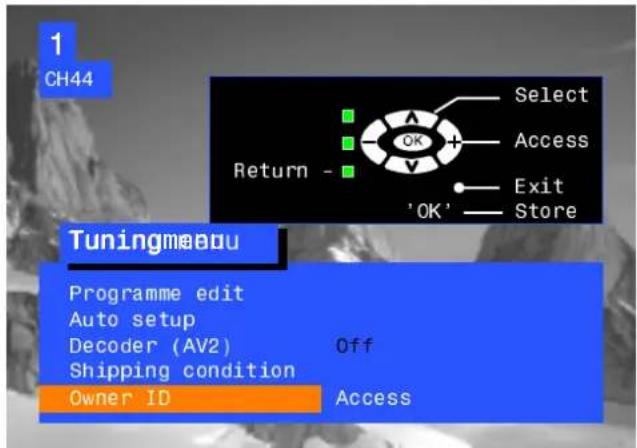
TUNINGMENUPROBGRANEMEBEDIT
TheProgrammeeditmenuallowsyoutoedittheprogrammepositionsettings
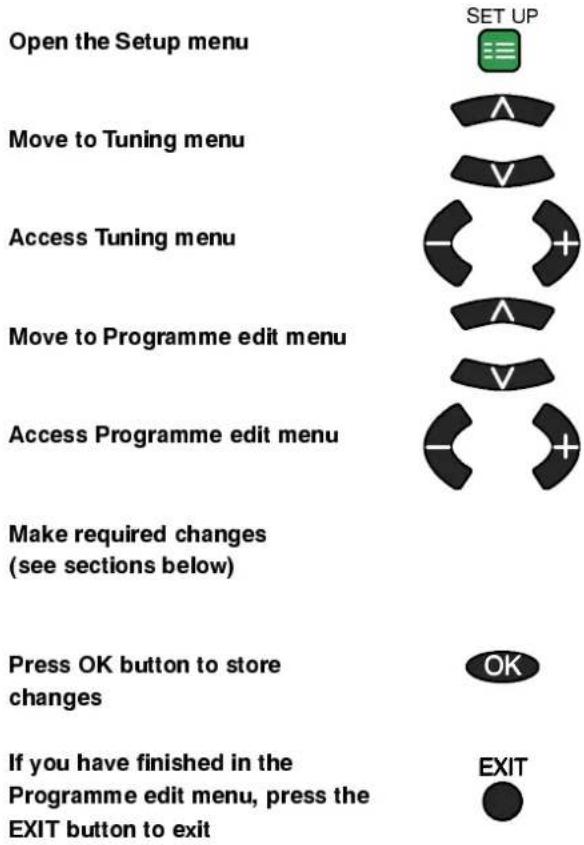
To delete an unvariate dr pog namepe siosis
Ensure that the cursor is in the Prog. Column
Choose the programme position

Press the Red button on remote control

Press the Red button again to confirm

If you have finished in the Programme edit menu, press the EXIT button to exit

Note :
Once a DVB programme position is deleted, it cannot be retuned manually. You will need to use the Auto setup function (page 24) to retune deleted DVB programmes.
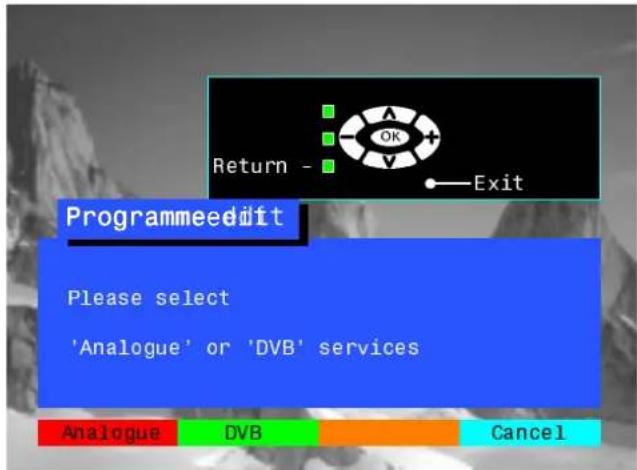
TUNINGMENUPROBGMANEEDIT
Toaddaprogrammeposition
To add an analogue station:
Press the Green button to Add

Press the Red button to select Analogue

Press repeatedly until the required station is found


(Optional: When the desired station is found, select the programme position where the new station is to be stored. The new station will overwrite any existing station on the chosen programme position).

Press OK to store the programme position

Press Setup to return to the Programme edit menu

If you have finished in the Programme edit menu, press the EXIT button to exit


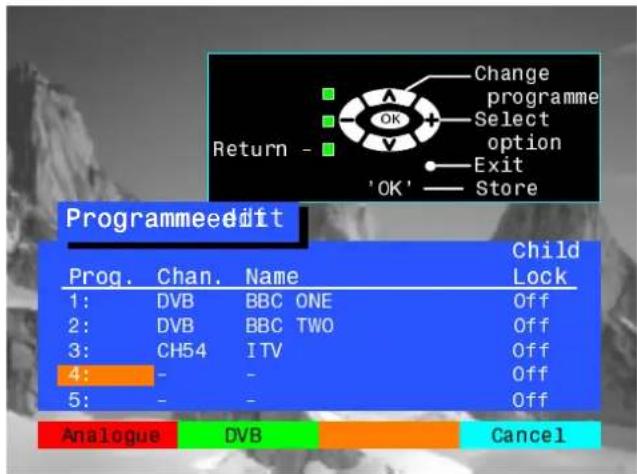
TUNINGMENUPROBGMANEEDIT
Toaddaprogrammeposition
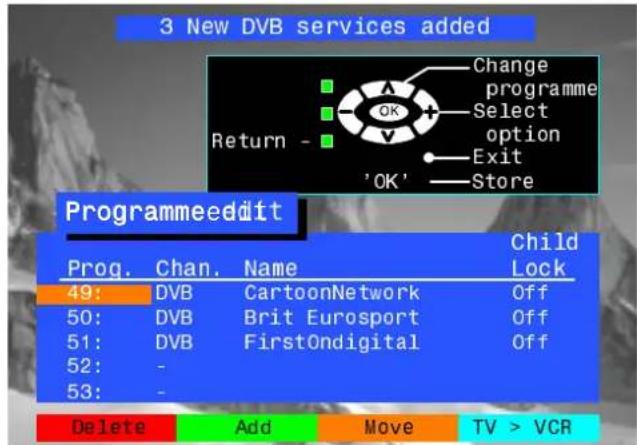
To add a DVB station:
Press the Green button to Add

Press the Green button again to select DVB

The DVB receiver will search for new stations and allocate them to programme positions at the end of the list. If you wish you can re-order the programme positions using the Move function (see page 22)
If you have finished in the Programme edit menu, press the EXIT button to exit


TUNINGMENUPROBGMANEEDIT
Tomoveaprogrammetoanotherposition
| Choose the programme position to be moved | A |
| V | |
| Press the Yellow button on remote control | |
| Choose the new position | A |
| V | |
| Press the Yellow button again to confirm | |
| If you have finished in the Programme edit menu, press the EXIT button to exit | EXIT |
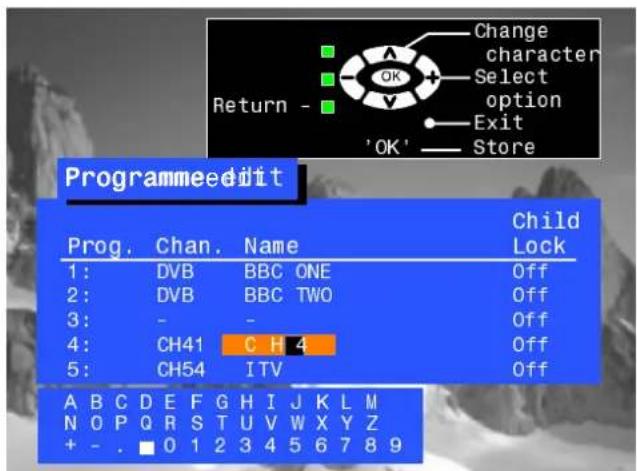
(Renaming is only available on analogue programme positions.)
Choose the programme position
Move to the Name column
Choose the new character
Move to the next character position
Continue until renaming is done
Press OK to store
If you have finished in the Programme edit menu, press the EXIT button to exit
natural_image
Abstract black curved shapes with plus and minus signs, no text or symbols present

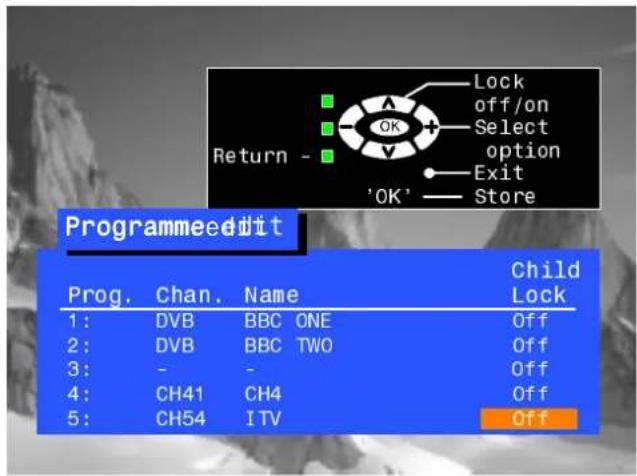
TUNINGMENUPROBGMANEEDIT
Tolockaprogrammepositiontoprevent access
Choose the programme position

Move to the Lock column

Select either On or Off

Press OK to store

If you have finished in the

Programme edit menu, press the
EXIT button to exit
Note :
When a programme position is locked, Direct Channel Access using the 'C' and numeric keys on the remote control is not available
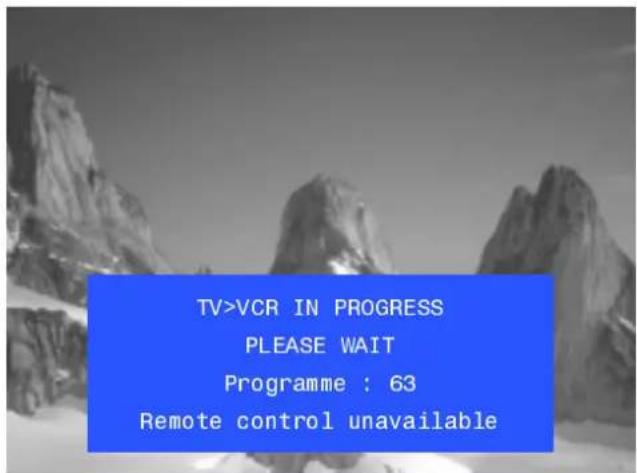
To copy programmer information to a compatible VCR connected to AX22
Move to the Prog. column

Press the Blue button on the remote control.
Programme data will now be sent to the VCR. This might take a while, depending on the number of stations stored. If the message "Unable to download, check your VCR" appears on the screen, the television is unable to send programme information to the VCR. See the VCR handbook for further information

If you have finished in the
Programme edit menu, press the EXIT button to exit

TUNINGMENUAUAOSETSETUP
TheAutosetupmenuwillallowyoutoautomaticallyretunetheTVtoyourlocalstations. Itisusefulifyoumovetoadifferentregion
TUNINGMENUSHISHINGKONION
ShippingconditionallowsyoutoresettheTVtoitsoriginalcondition,i.e.nochannelstunedin
This is useful, for example, if you move to a different area when you will probably want the TV to tune itself to your new local stations.
This can be done either through the Shipping condition menu or through the Auto setup menu.
The Shipping condition menu will reset all data, clearing all tuning information and resetting all control levels back to factory settings. You may need to adjust your VCR or programme position '0' VCR after operating the Shipping condition menu - refer to page 39.
Ownerl.D.allowsyoutoenterasecuritycodeandaddressinformationsothatintheunfortunate eventoftheftitwillhelpthePolicetodeterminetheowner.
IftheOwnerl.D.informationwasnotenteredafterAutosetuporitisnecessarytoaltersomeofthel.D.
informationitcanbere-accessedviatheTuningmenu.
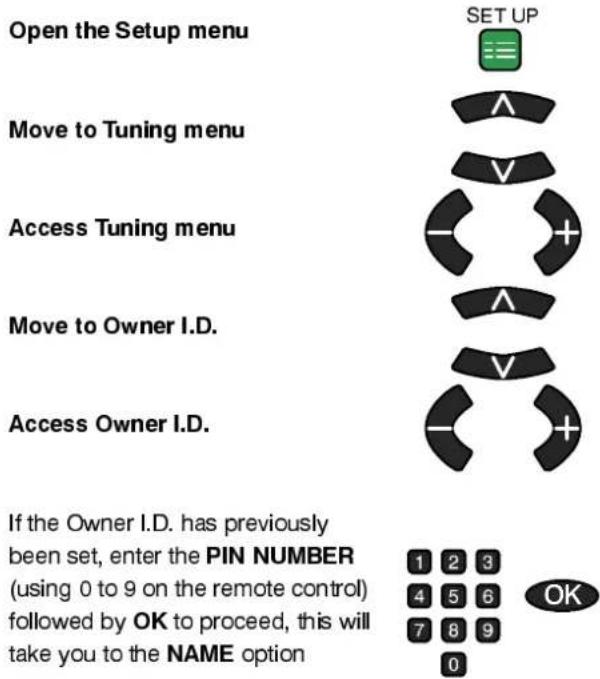
If no Owner I.D. has previously been set, enter the required 4 digit Owner I.D. PIN NUMBER (using 0 to 9 on the remote control)
If a 4 digit PIN NUMBER was entered above, you will be taken automatically to the NAME line
natural_image
Abstract black geometric shapes with curved and angular forms, no text or symbols presentIf not, move to the NAME line
Change character
Select character position
Repeat above until NAME, HOUSE NUMBER and POSTCODE are entered
Press OK to store the details. Press again, to confirm, when asked, "Are you sure?"
The Tuning menu will be displayed
Press the EXIT button to exit


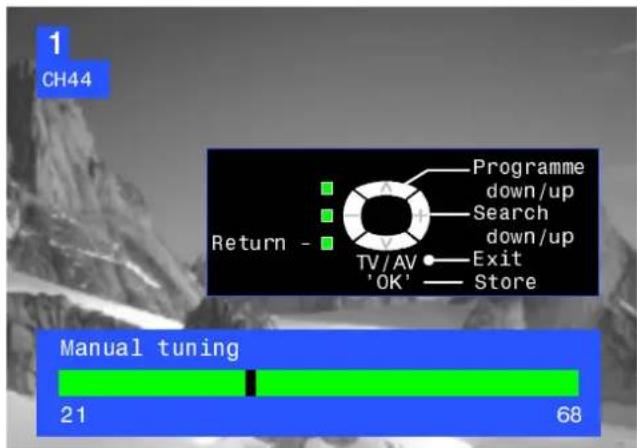
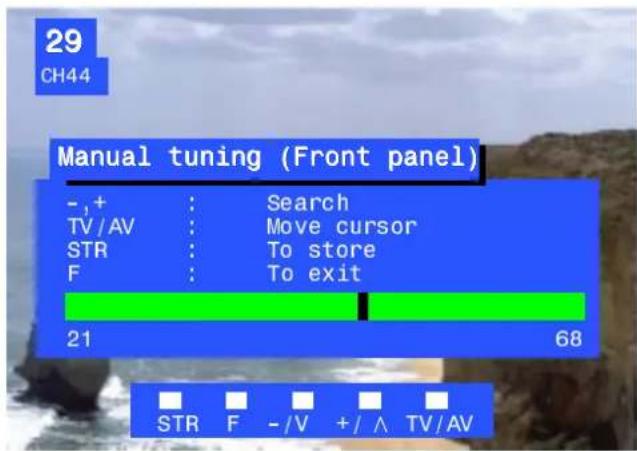
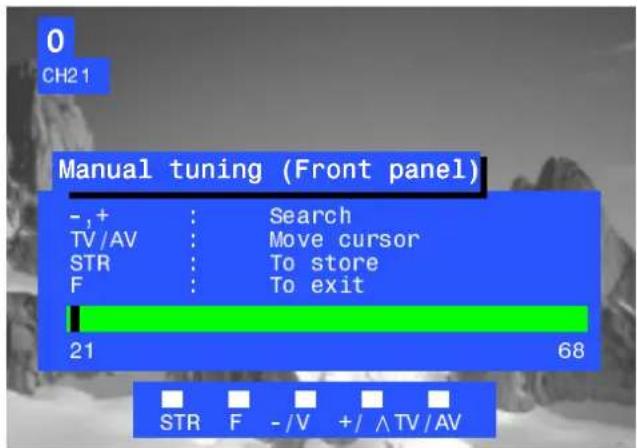
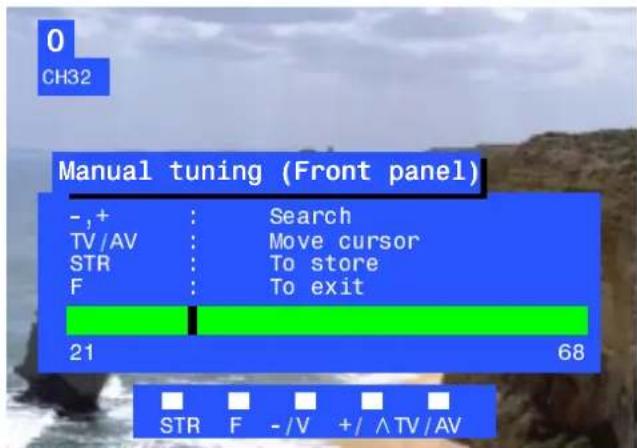
MANUALTUNING---FRONTPARNECONTRORSLS
Manualtuningofth: analogueprogrammepositionsisavailablefromthefrontpanelcontrols
The Front panel controls are located under the flap on the front of the TV.
Select an existing analogue programme position
Press the F button repeatedly until "Tuning mode" is reached
Press the - or + button to access Tuning mode. The next available programme position at the end of the current list will be selected.
Press - or + to begin searching for stations
The television will begin to search for stations. When a station is found the search will pause; if it is not the correct station, you can press the - or + buttons to continue searching.
When the desired station is found, press the TV/AV button to move to the programme position indicator
Press - or + to select the programme position in which the station is to be stored
Press STR to store the programme position
The programme position and channel number indicators will flash to indicate the station is being stored
To tune further stations press the TV/AV button and repeat the tuning process
To exit Manual Tuning, press the F button


natural_image
Black-and-white landscape photo of rugged mountain peaks with snow-covered slopes and no visible text or symbols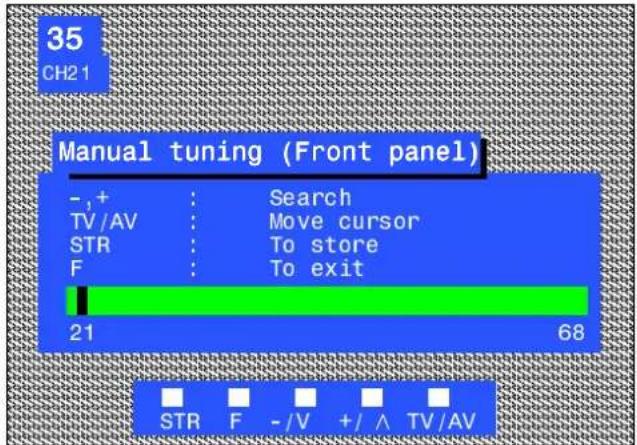
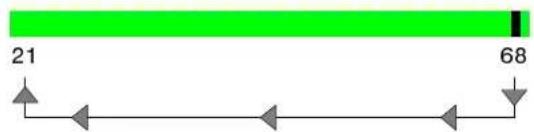
bar
| Category | Value | | ------------ | ----- | | Search | 68 | | Move cursor | 68 | | To store | 68 | | To exit | 68 | | STR | 21 | | F | 21 | | - / V | 21 | | + / ∧ | 21 | | TV / AV | 21 |Important note :
On passing channel 68, tuning will restart at channel 21.
TheDVBsetupmenuprovidesaccesstoDVBspecificoptions.
Note: If DVB transmissions cannot be received clearly, the DVB setup menu will not be available.
ThePCConnectionandModemmenusallowyoutomakeadjustmentstothecommunication settingsfortheSERIALandMODEMports.
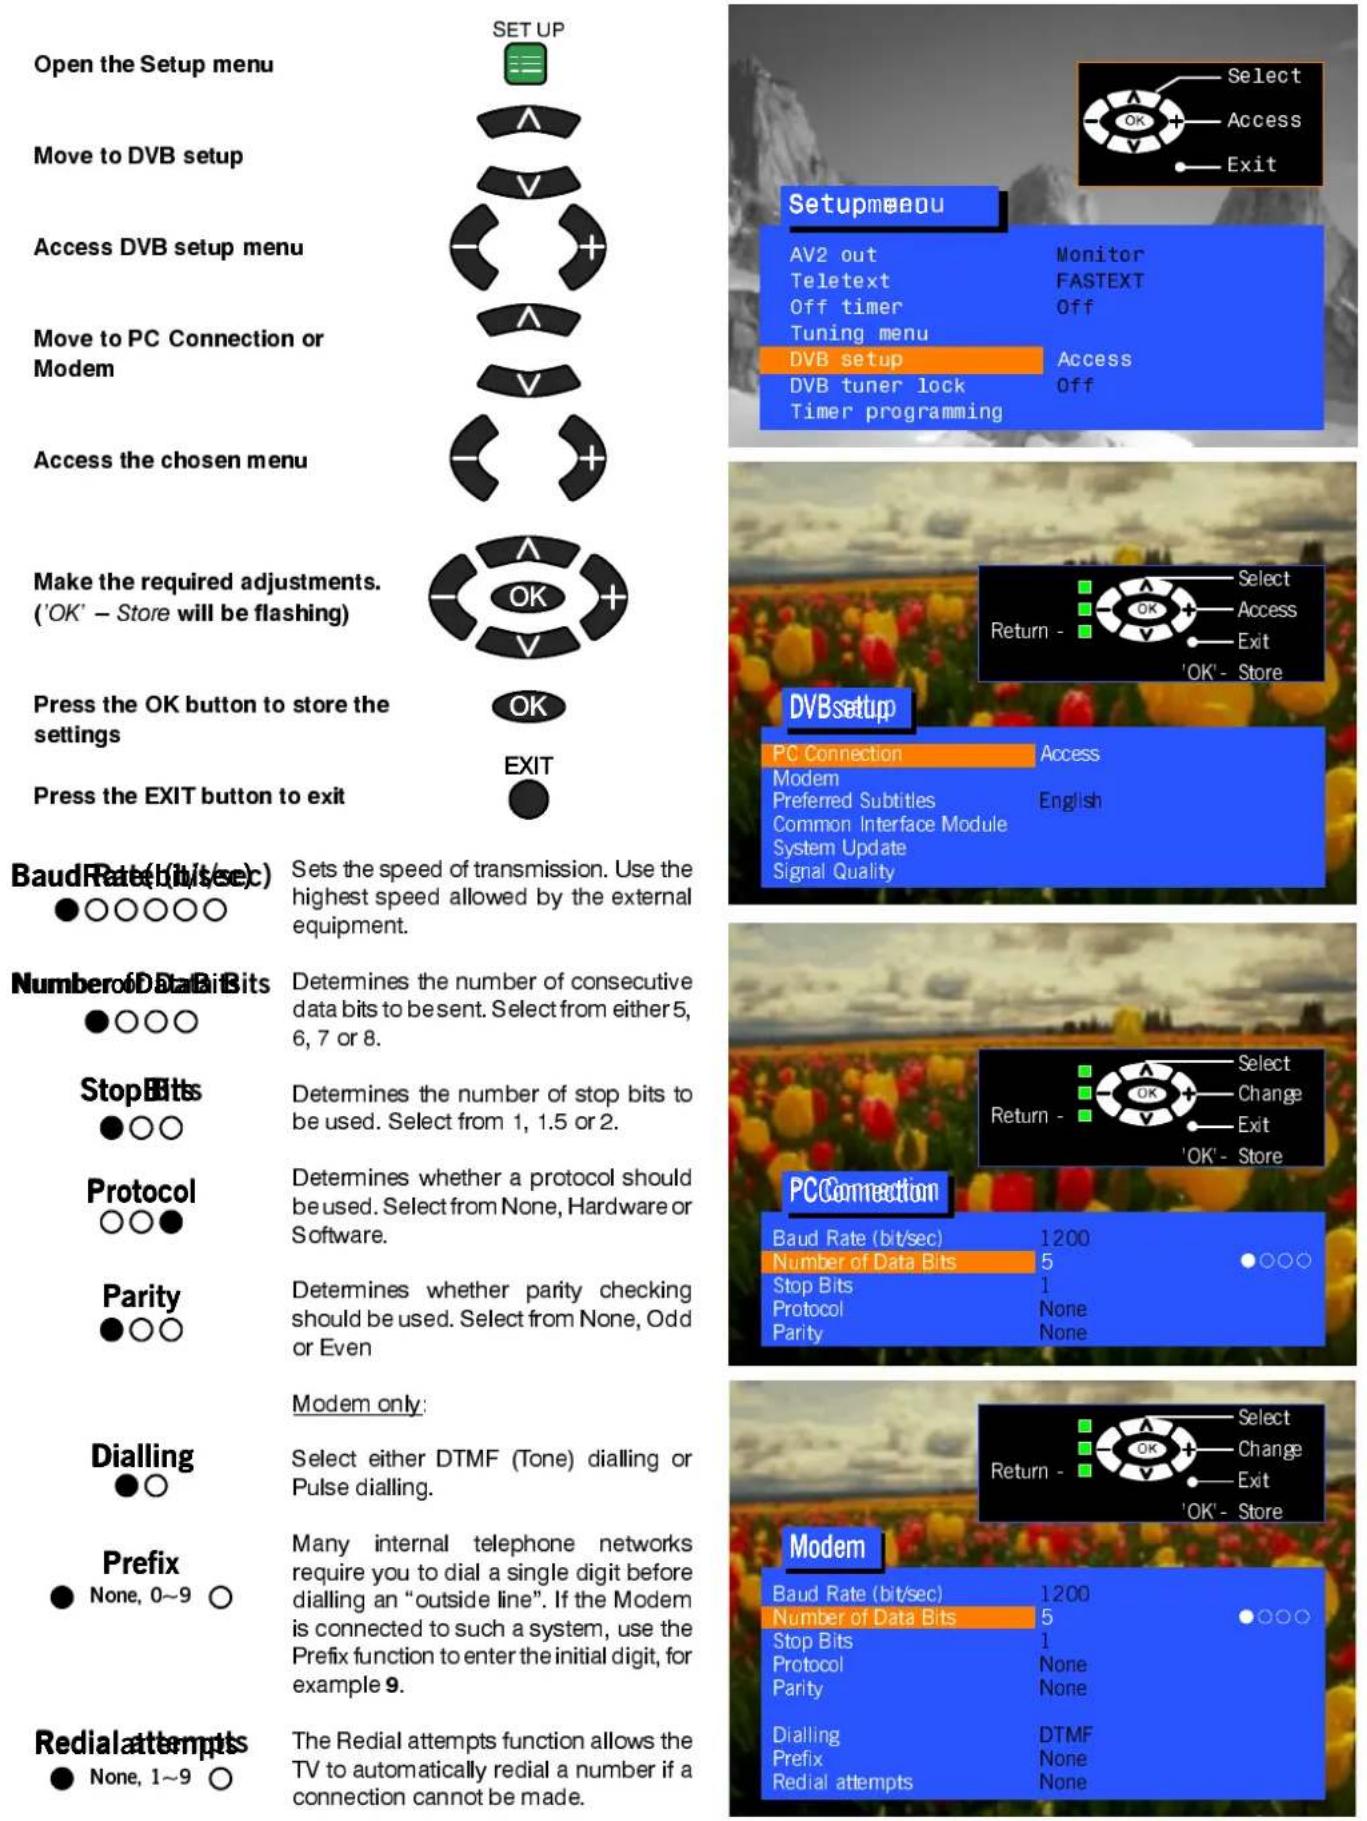
BaudRate(b/its/sec)
Sets the speed of transmission. Use the highest speed allowed by the external equipment.
Number of Data Bits
Determines the number of consecutive data bits to be sent. Select from either 5, 6, 7 or 8.
StopBits
Determines the number of stop bits to be used. Select from 1, 1.5 or 2.
Protocol
Determines whether a protocol should be used. Select from None, Hardware or Software.
Parity
Determines whether parity checking should be used. Select from None, Odd or Even
Dialling
Modem only:
Prefix
Select either DTMF (Tone) dialling or Pulse dialling.
Redial attempts
Many internal telephone networks require you to dial a single digit before dialling an "outside line". If the Modem is connected to such a system, use the Prefix function to enter the initial digit, for example 9.
The Redial attempts function allows the TV to automatically redial a number if a connection cannot be made.
COMMONINTERFACEMODULEMENNU
TheCommonInterfaceModulemenuprovidesaccesstosoftwarecontainedonCommonInterface Modules.Thesecanbeinsertedinthe“CI1”and“CI2”slotslocatedbehindtheTV'sfrontflap.
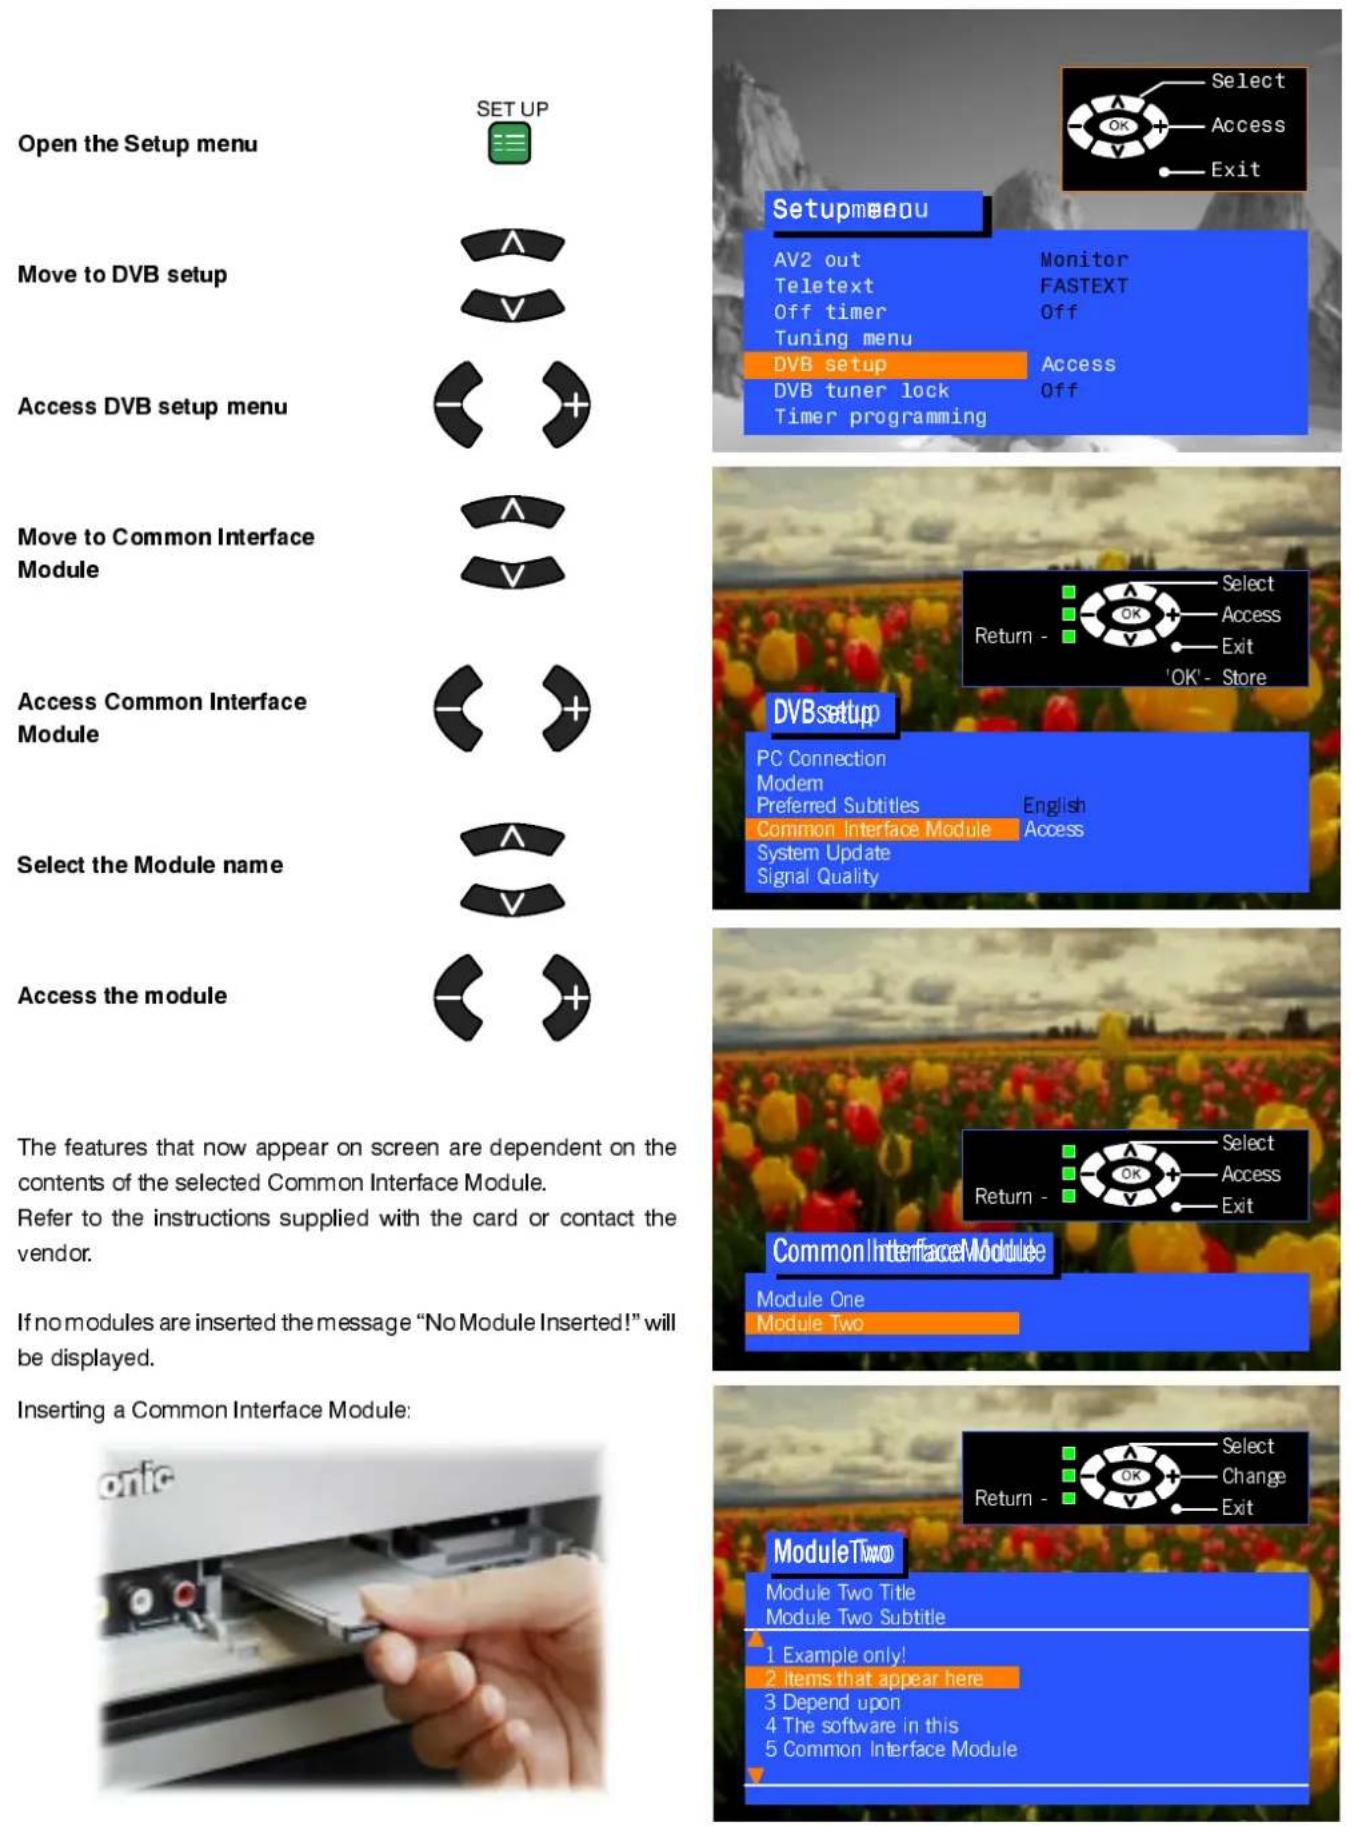
The features that now appear on screen are dependent on the contents of the selected Common Interface Module.
Refer to the instructions supplied with the card or contact the vendor.
If no modules are inserted the message "No Module Inserted!" will be displayed.
Inserting a Common Interface Module:
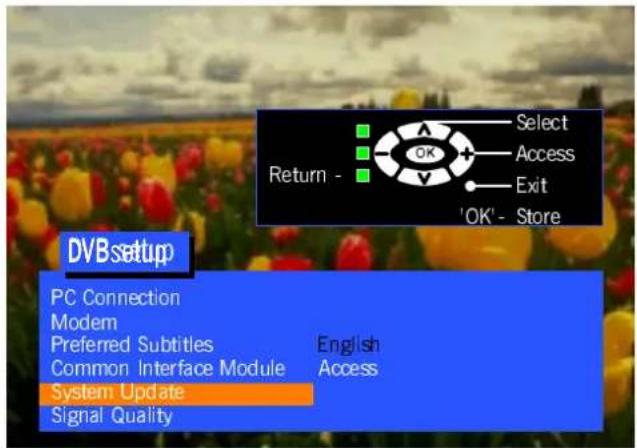
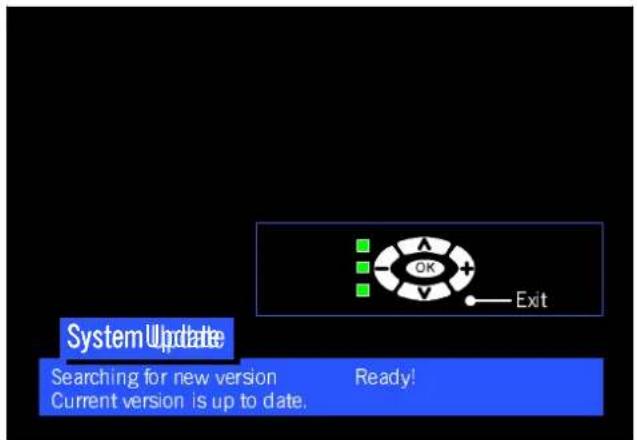
The System Update menu allows the DVB system to check that it has the latest software. If newer software is available, it can be downloaded.
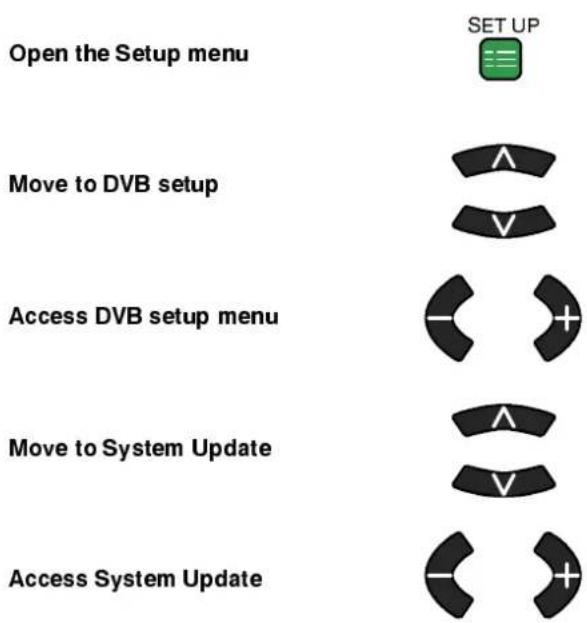
flowchart
graph TD
    A["Open the Setup menu"] --> B["Move to DVB setup"]
    B --> C["Access DVB setup menu"]
    C --> D["Move to System Update"]
    D --> E["Access System Update"]
The System Update Menu will appear
The DVB system will now begin to search for new software – this will take a few seconds.
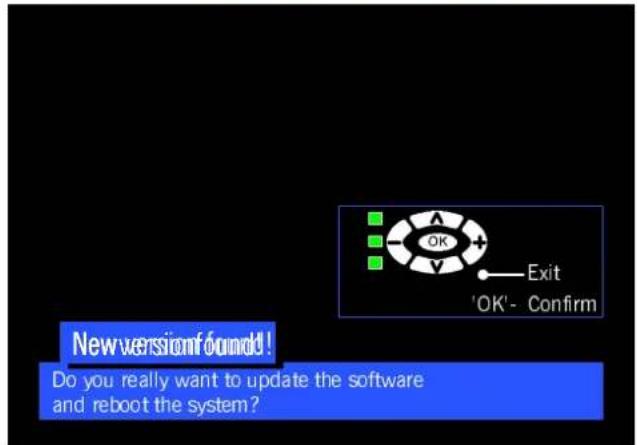
If a newer version is available:
Important Note!
You must not switch off the TV while downloading is in progress, as errors could occur. Downloading will take a few minutes to complete, so check first that there are no imminent programmes that you wish to watch.
Press the OK button to initiate download
If a newer version is not available:
A message will appear telling you that the current software is up-to-date.
Press the EXIT button to exit.
OK

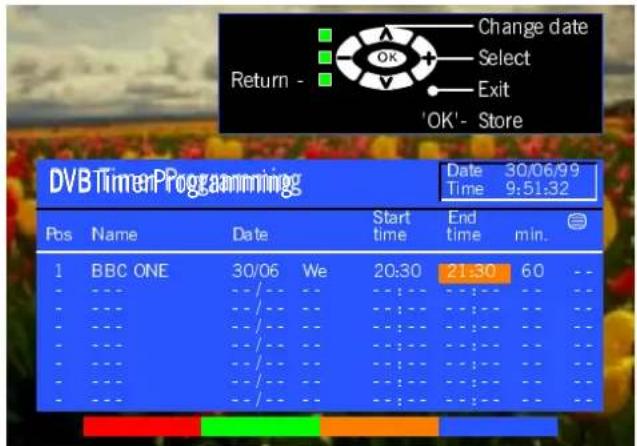
DVBTIMERPPROGAMWNIGMENIU
For an external VCR to record DVB programmes, the integrated DVB system must be active to provide the signal.
The Timer programming menu allows you to choose programmes that you wish to record. At the correct time, the DVB system will switch on and tune to the correct station (even if the TV is in standby mode). If the VCR is compatible with Q-Link or similar technologies (see page 37) you do not need to program the VCR – the DVB system will control the recording process.
The VCR must be connected to the TV using a SCART cable to record DVB programmes.
DVBTIMERPPROGAMWNIGMENIU
Move to the Subtitles field
If you wish to record subtitles (if available) select Auto
Press the OK button to store
Notes:
To delete a timer programme, select the recording with the cursor bar and press the Red multi function button.
To edit a previously entered timer programme, select it with the cursor bar and press the OK button.
Timer programmes can also be entered from the TV Guide – see page 35.
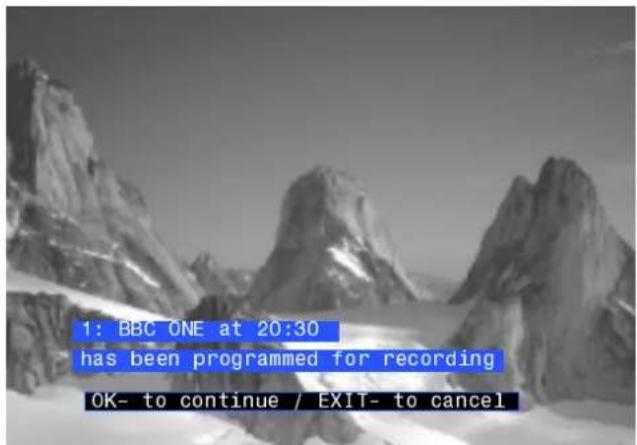
Note:
Two minutes before the recording is due to start, a reminder will appear on screen:
Press the OK button to remove the reminder from the screen
If you wish to cancel the recording, press the EXIT button


Notes:
Thirty seconds before the recording is due to start the DVB system will tune to the correct station. If you were already watching another DVB station you will see the station change on screen. If you were watching an analogue channel, you will not see the change.
You can continue to watch analogue stations while a timer recording is in progress.
If you attempt to switch to another DVB programme position while a timer recording is in progress the message "This prog. is locked for recording" will be displayed. Press the OK button to continue recording, or EXIT to unlock the programme position. Beware that if you press EXIT timer programming for this DVB position will be immediately deleted.

natural_image
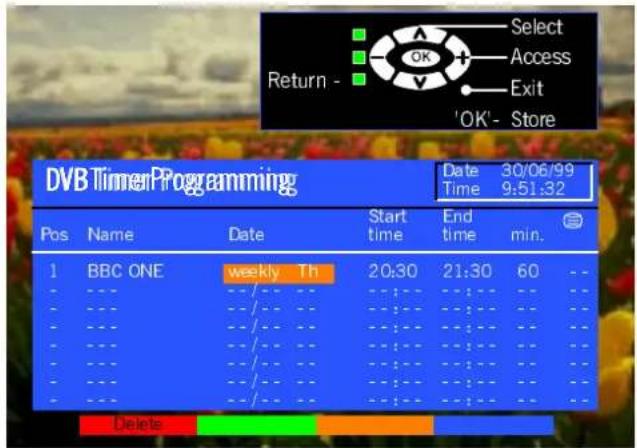
Field of colorful tulips under a cloudy sky, no text or symbols visibleDVB TIMER PROGRAMMINGMENNU
DailyandWeeklyTimerProgrammes
While in the Date field of the DVB Timer Programming menu, you can select various options to determine how often a recording should be made. Press the down cursor button repeatedly to access the following options:
Su-Sa
The VCR will record at the same time every day.
Mo-Sa
The VCR will record at the same time each day from Monday to Saturday.
Mo-Fr
The VCR will record at the same time each day from Monday to Friday.
Sa, Fr, Th, We, Tu, Mo, or Su
The VCR will record at the same time on the same day each week.
Note:
If new timer programme data overlaps any part of an existing timer programme, the message "Timer Incorrect" will be displayed and the new data will be cleared. If overlapping data is entered using the Timer function on the TV Guide menu (see page 35), the message "Timer cannot be set! Selected programme time repeated or overlapped" will appear.
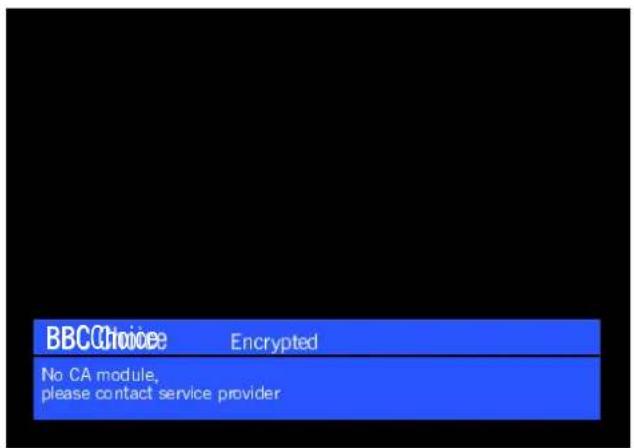
Encrypted Programmness
Some DVB programmes might be "scrambled" or "encrypted". This means that the DVB programme cannot be viewed or recorded unless you have the correct Common Interface module to decode the programme.
When you attempt to set Timer recording of a scrambled programme, a message will appear on screen.
The message will disappear after a few seconds.
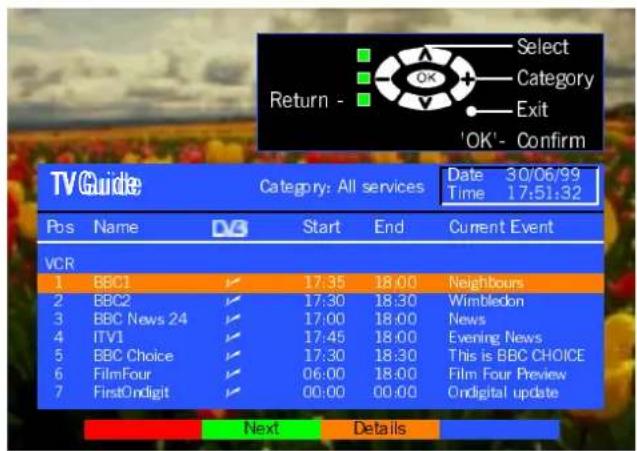
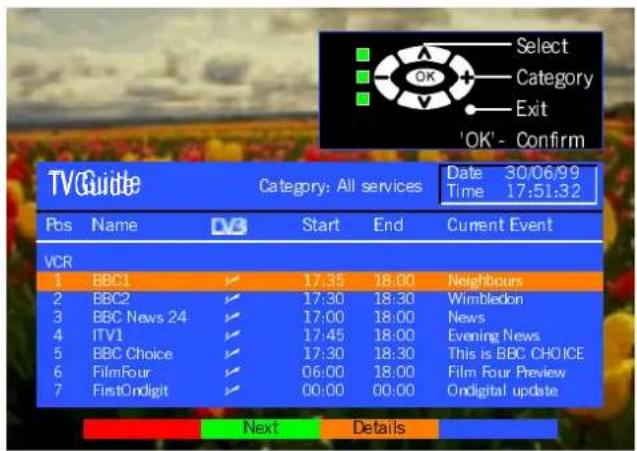
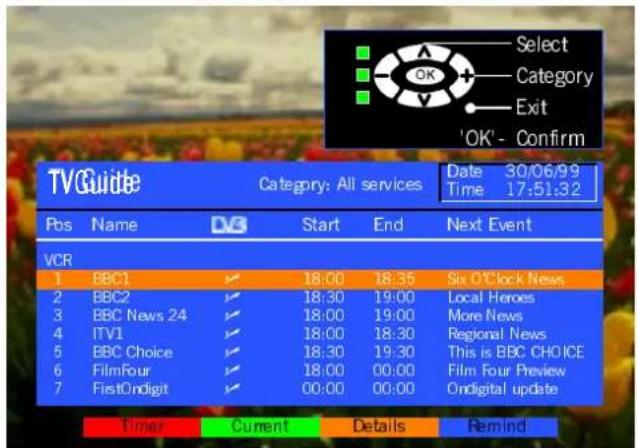
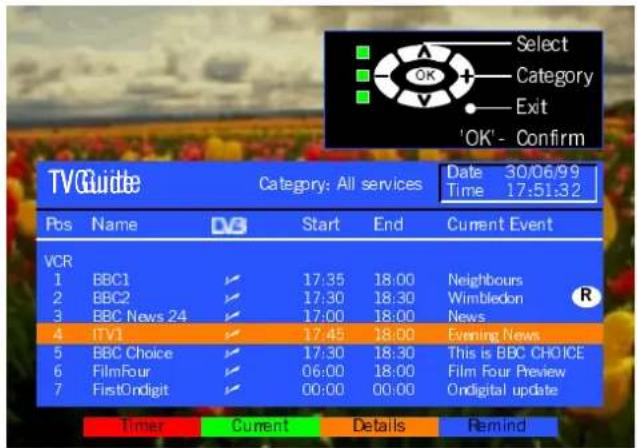
TheTVGuidedisplaysthecurrentprogrammesbeingtransmitted--andwhat thenextprogrammewillbeoneachDVBstation
Press the Guide button
After a few moments the TV Guide will be displayed. If you wish to view one of the listed programmes, select it with the up/down cursor keys and press the OK button.
You can also view a list of programmes by category, for example 'Free TV' or 'Pay TV' services, by pressing the left/right cursor buttons
Details
You can view further details about the selected programme:
Select a programme position
Press the Yellow multi function button to display the details.
Press the Yellow button again to return to the list.
Next
You can view the list of programmes that will be transmitted next:
Press the Green multi function button to display the details.
Press the Green button again to return to the list of current programmes.
Next--TimerandRemind
When you are viewing the list of next programmes, you have two additional options, Timer and Remind.
Timer will send the details of the selected programme to the Timer programme menu, ready for automatic recording at the correct time. Remind allows you to mark a programme that you do not want to miss. When the programme is about to start, a reminder will appear on screen, even if you are currently watching a non-DVB broadcast.
Select a programme position
Press the Red multi function button to add the details to the timer programme menu, or press the Blue multi function button to add a reminder.


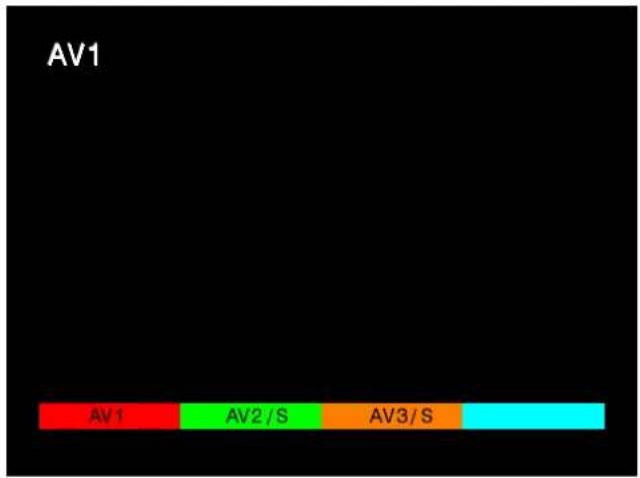
AVSELECTANDS SETUP
TheAVSelectmenuwillallowyoutochoosewhichAVsourcetoview
Press the TV/AV button
Press the appropriate coloured remote control button (whilst the options remain on screen)
The options will disappear
You may wish to make adjustments in the Setup or Sound menus
TV/AV


Setupmenu
Open the Setup menu
Move to your choice
Access adjustments or options
Press the EXIT button to exit
SET UP


EXIT

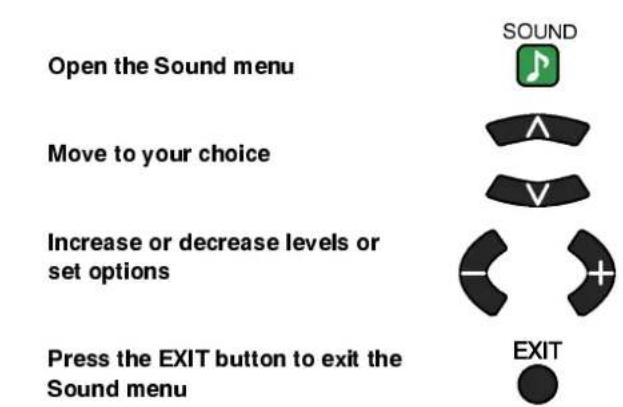
Soundmenu
Open the Sound menu
Move to your choice
Access adjustments or options
Press the EXIT button to exit
SOUND


EXIT

Q-LINK
Q-Link allows the television to communicate with a compatible VCR
For Q-Link communication to work, the TV must be connected to a VCR with the "Q-Link", "NEXTVIEWLINK", "DATALOGIC", "Easy Link", "Megalogic" or "SMARTLINK" logo using a "fully wired" Scart cable between the AV2 socket of the television and the appropriate socket on your VCR.
For connection to the appropriate Scart socket on the VCR, refer to the VCR operating instruction book.
When using a "NEXTVIEWLINK" VCR the main features possible are the following :
- Preset Download - Downloading of tuning information from the TV to the VCR.
- Direct TV Record - For immediate recording of the current program (What You See Is What You Record).
When using a "Q-Link" VCR the main features possible are the following :
- Preset Download - Downloading of tuning information from the TV to the VCR.
- Direct TV Record - For immediate recording of the current program (What You See Is What You Record).
• TV/VCR Auto Power On - When the VCR plays a tape the TV will automatically switch On from Standby and select the AV2 input. - VCR Auto Power Standby - When the TV is switched into Standby, the VCR will also switch into Standby.
- VCR Image view - When the VCR displays an OSD menu, the TV will automatically switch On from Standby and select the AV2 input.
This TV will also communicate with other VCR's that bear the following logos :
- "DATA LOGIC" (a trademark of Metz Corporation).
- "Easy Link" (a trademark of Philips Corporation).
- "Megalogic" (a trademark of Grundig Corporation).
- "SMARTLINK" (a trademark of Sony Corporation).
These VCR's may support some or all of the above functions. Refer to the VCR operating instruction book.
PresetDownload
This allows the programme order from the TV to be downloaded to the VCR, helping to ensure that correct recordings are made; there are several ways to perform this operation:
- During installation as explained in the 'Quick Start Guide' beginning on page 6.
- When Auto setup is started from within the Tuning menu, see page 24.
- When TV to VCR manual download is started from within 'Programme edit', see page 23.
- Preset download started from the VCR, refer to the VCR operating instruction book.
Because a VCR cannot tune to DVB stations, only the analogue programme positions are downloaded to the VCR. Since the TV stores analogue stations after DVB stations, analogue BBC1 may be stored at programme position 25, for example.
During downloading however, analogue BBC1 will be sent to the VCR as programme position 1. This allows you to find stations on the VCR where you would expect to find them, with BBC1 on position 1, BBC2 on position 2, ITV on position 3 etc.
The fact that the analogue programme positions stored on the TV and those stored on the VCR do not match will not affect recording via Q-Link. When recording an analogue station using the DIRECT TV REC button (see page 38), the TV will instruct the VCR to select the correct programme position for that station.
Important Note:
Not all VCRs support this type of data communication system. Some may support certain features, but not others. Refer to the VCR operating instruction book.
If Q-Link is inoperative, first confirm that your Scart cable is a "fully wired" type. Ask your dealer for further details.
WhatYouSeelsWhatYouRecord(DIRECTTVRECORDING)
This will allow the immediate recording of the program currently shown on the Television.
DIRECT TV REC
Press the DIRECT TV REC button on the remote control

If the VCR is in Standby mode with a useable tape inserted, it will automatically switch on when you press the DIRECT TV REC button.
If a "Q-Link" VCR is connected a message will appear on the TV screen showing what is being recorded, or if it is not possible to record. Some "Q-Link" compatible VCR's will only display the message when on the VCR programme position(0) or in AV mode. Refer to the VCR operating instruction book.
VCRreecopdingpresetptogVCRrecord
Recording this programme now
VCR is recording the programme signal from its own tuner. If you wish you can switch off the TV and leave the VCR recording in the normal way.
VCR recording TV source
VCR is recording the programme signal from the television. You must not change programme position or switch off the TV: if you do, the VCR will automatically stop recording and switch off.
Nonecondling TAPEAISPROSTEPCOEDCTED
The write protection tab on the back of the cassette has been removed.
Examples of other messages that might be displayed are:
NonecondingNOTAPETAPE
No recording - VCR IS PLAYING
VCRR Recording/CR/CR textalnal
Noreeoddingg ALREADXBECORDDROING!
No recording - TAPE MAY BE DAMAGED
No recording - NO SOURCE AVAILABLE
Recording DVB stations
If you press the DIRECT TV REC button while watching a DVB station, the VCR will automatically switch to its AV input to record the DVB signal from the TV (via the SCART cable), and the DVB programme position will be locked. If you attempt to select another DVB programme position while recording, you will see the message "This programme is locked". Press the OK button to clear the message, or the EXIT button to unlock the programme. Beware that if you press EXIT the DVB programme will be unlocked – switching to another DVB programme will spoil your intended recording.
TV / VCR Auto Power On
(With a Panasonic Q-Link VCR connected, this additional feature is available).
- If you insert a tape in the VCR and press the Play button whilst the TV is in 'Standby' mode, the TV will automatically switch On and select the AV2 input so that you can view the tape.
Some other VCR's may support this feature. Refer to the VCR operating instruction book.
VCRAutoPBooveSStadolby
(With a Panasonic Q-Link VCR connected, this additional feature is available).
When the TV is switched into 'Standby' mode, the VCR will also switch into 'Standby' mode if there is no tape in the VCR, or if there is a tape in and the VCR is in 'Rewind' or 'Stop' mode (if the VCR is rewinding a tape, it will not switch into 'Standby' mode until rewinding has finished).
Some other VCR's may support this feature. Refer to the VCR operating instruction book.
VCRIImageViewOn
(With a Panasonic Q-Link VCR connected, this additional feature is available).
If the TV is in Standby mode and the VCR sends a menu to be displayed on the TV screen (e.g. Main menu), the TV will automatically switch On and the menu will be displayed.
Some other VCR's may support this feature. Refer to the VCR operating instruction book.
VCRINSTALLATION
Your new TV is supplied with programme position '0' set to receive an RF signal from your VCR, although a Scart connection is preferable if the VCR is so equipped.
However, if for some reason your VCR is tuned to a different RF channel then you will not receive any picture or sound from your VCR on programme position '0' of the TV. It will be necessary to either adjust the RF channel of your VCR (some VCR's allow adjustment of their RF channel via their remote control unit) or to adjust the tuning of the TV's programme position '0' or both until it receives the RF output channel of your VCR.
It is intended that this advice is used in conjunction with the instruction books for your additional equipment.
Use the AV1 Scart terminal for a VCR.
Use the AV2S S cart terminal for an S-Video VCR.
Use the AV2S Scart terminal for a Q-Link, NEXTVIEWLINK or compatible VCR.
TotuneyourTVt#theVGRVCR
Switch on the VCR, insert and play a pre-recorded tape with known content
On the TV, select programme position '0'
Open the Front panel flap
Press the F button repeatedly until "Tuning mode" is reached
Press the - or + button to access Tuning mode
Press - or + to begin searching for the VCR playback
When the VCR playback is found, press the STR button to store the programme position
The programme position and channel number indicators will flash to indicate the station is being stored
To exit Manual Tuning, press the F button
Notes :
- If picture patterning occurs on programme position '0' it may be necessary to adjust the RF output channel of the VCR, refer to the VCR instruction book.
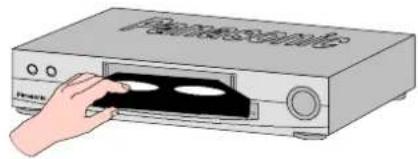
natural_image
Illustration of a hand inserting a CD into a device (no text or symbols visible)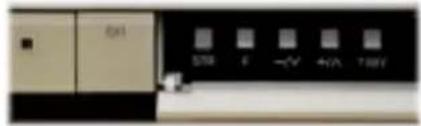


VCR/DIVDD DEEATION
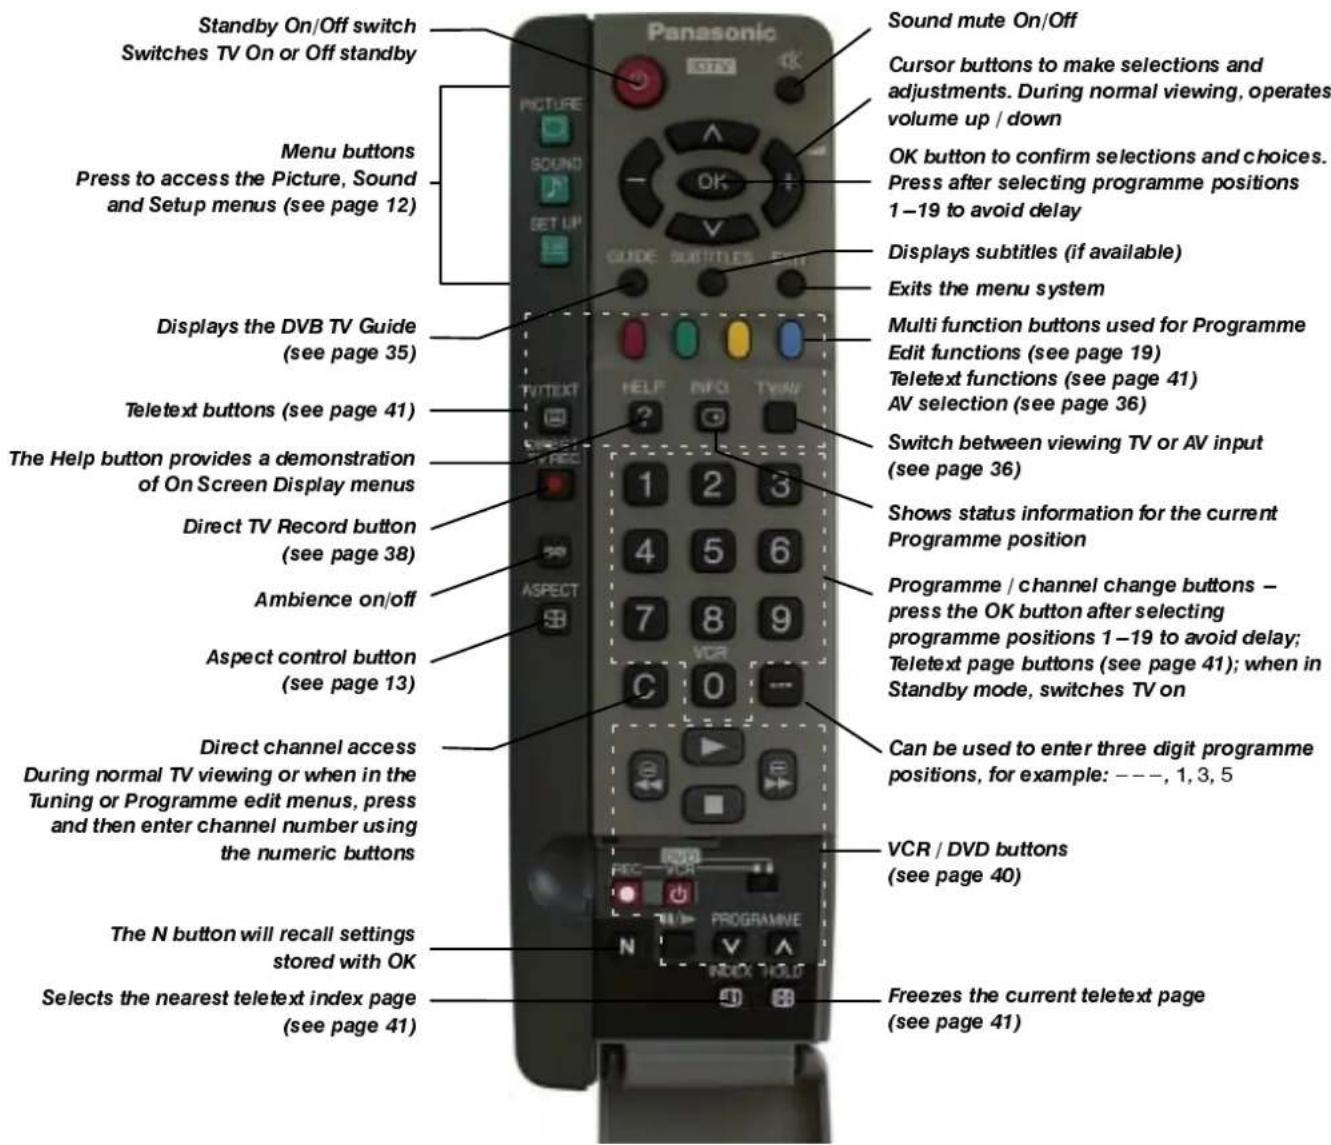
The Remote Control is capable of operating some functions of selected Panasonic VCRs and DVD (Digital Versatile Disc) equipment. Some VCR and DVD equipment have different functions, so to ensure compatibility please refer to the equipment's instruction book or consult your dealer for details.
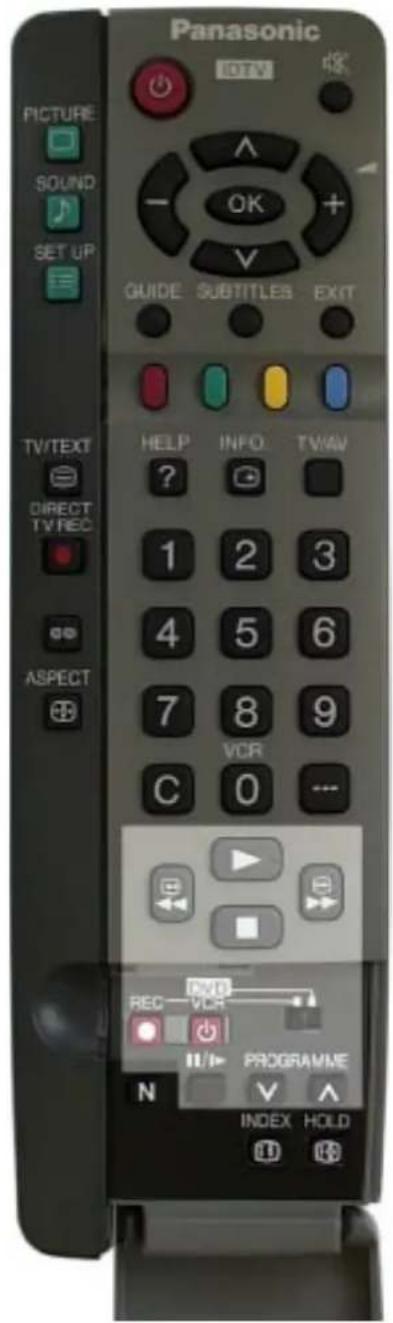
 | StandbyPress to switch the VCR or DVD to standby mode.Press again to switch back on. | |
 | VCR / DVD switchUse this switch to select whether controls operate DVD equipment or your VCR. | |
| [BYKZ] | PlayPress to playback the tape or DVD. | |
 | StopPress to stop the tape or DVD. | |
 | Skip / Fast Forward / CueVCR: Press to fast forward the tape. In Play mode, press to view the picture rapidly forward (Cue).DVD: Press once to skip to the next track. In play mode press and hold to view the picture rapidly forward. | |
 | Skip / Rewind / ReviewVCR: Press to rewind the tape. In Play mode, press to view the picture rapidly in reverse (Review).DVD: Press once to skip to the previous track. In play mode press and hold to view the picture rapidly in reverse. | |
 | Pause / StillPress in playback mode, the picture will pause.Press again to restart play. | |
 [AKHB] [AKHB] | Programme Up / DownPress to increase or decrease the VCR programme position by one. | |
 | RecordPress this button to start recording. |
TELETEXT@PERRATION
- Teletext features may vary depending on the Broadcasting Companies and is only available if the channel selected is transmitting Teletext. If a DVB station is not transmitting teletext, but you press the TV/TEXT button, press the EXIT button to clear.
- Pressing the Picture button whilst in Teletext operation will display the contrast function with a cyan bar, press ◀ to alter the setting as required.
Pressing the Setup button whilst in Teletext operation will display special function options at the bottom of the screen. - When in Teletext mode, the volume may still be altered to the desired listening level.
What is LSSTmbabe?
In LIST mode, four differently coloured page numbers are situated at the bottom of the screen. Each of these numbers can be altered and stored in the TV's memory.
What is FASTEXT?
In FASTEXT mode, four differently coloured subjects are situated at the bottom of the display. To access more information about one of these subjects, press the appropriately coloured button. This facility enables fast access to information on the subjects shown.
TV/TEXT

TV/Tetletextmode
Press the TV/TEXT button.
The screen will display the Teletext page.
Press again when you wish to return to TV mode.
Note: If you press the TV/TEXT button while viewing a DVB station that is not transmitting teletext, press the EXIT button to return to normal viewing.


Page Selection
Pages can be selected in two ways :
a. Press the Up / Down buttons to increase or decrease the page number by one.
b. By entering the page number, using 0 - 9 on the remote control.
SET UP


Full/Topo BotBont to m
Press the SET UP button to display special functions, followed by the Green button.
Press the Green button again to expand the BOTTOM half.
Press again to return to normal (FULL) size.
SET UP


Reveal
Press the SET UP button to display special functions, followed by the Red button to reveal hidden words e.g. quiz page answers. Press again to hide.


Red/Green/YeYelvo/BluBhuttontons
In FASTEXT mode these correspond to the differently coloured subjects. In LIST mode they correspond to the differently coloured page numbers.


ListStore
In LIST mode the four page numbers can be altered (only for analogue stations stored on programme positions 1 - 25).
To do this, press one of the four coloured buttons and enter the new page number.
Press and hold OK, the page numbers will change to white indicating that the page is stored.
HOLD

Hold
To hold the Teletext page when viewing multi-page information.
Press again to return to automatic page update.
TELETEXT@OPERATION
It is not possible to change the programme position when in News flash, Update or Sub Coded Page Access operation.
| SET UP | Update DisplayPress the SET UP button to display special functions, followed by the Yellow button to view the TV picture whilst searching for a Teletext page.When found, the screen will display the page number at the top left.Press the Yellow button to view the page.Press TV / TEXT again to return to normal TV operation.News FlashWhen a news flash page has been selected, press SET UP, Yellow, to view the TV picture. When an update is received, the page number will be displayed on screen.Press the Yellow button to display the News FlashPress TV / TEXT to return to normal TV operation.UpdatePress SET UP, Yellow to see the update of information on certain pages.When an update is received, the page number will be displayed at the top left of the screen.Press the Yellow button to view the page.Press TV / TEXT to return to normal TV operation. | |
| SET UP | Sub Coded Page AccessWhen Teletext information exceeds more than one page, it may take some time for the automatic changing of the sub pages to reach the sub page you require.It is possible to enter your required sub page and continue watching the normal programme until the correct sub page is found.Select the required page number using buttons 0 - 9.Press the SET UP button followed by the Blue button; T**** will be displayed at the top right of the screen.Enter desired sub page number before the T**** disappears.To select page 6 enter 0, 0, 0 and 6.(If in LIST mode, a 'T' will appear in the current box at the bottom).Press the Yellow button to view a normal TV programme.(Press SET UP, Yellow in LIST mode).When the page is available, press the Yellow button to view the page.To clear the page perform one of the following:Press SET UPSelect a new page number.Press TV/TEXT to return to normal TV operation. | |
| INDEX | IndexWhen in FASTEXT operationPress INDEX to return to the main index page.Depending on the way information is transmitted, this may have to be pressed more than once to return to the main index page. | |
 | ‘Arrow keys’‘Up/Down/Left/Right’‘Select’‘Go’‘OK’ | DVB Teletext service DVB Teletext services differ greatly from analogue teletext. When you switch to a DVB teletext service, the images you see can contain graphics and text, laid out and controlled in a manner decided by the broadcaster. In all cases, it is possible to navigate the pages using buttons on the remote control, but because the commands available must apply to all manufacturers of DVB equipment, some on-screen commands may not correspond exactly to the remote control buttons. For example:For the on-screen command ‘select’ or ‘go’, use the OK button.If you see the ▲ symbols, use the - or + cursor keys.If you see a line of key words displayed in red, green, yellow and blue, use the coloured multifunction buttons to operate the functions.The EXIT button should allow you to exit the teletext system. |
| EXIT |
FrontAV34PinS---Video,RCAAudio/
natural_image
Front view of a flat-screen television displaying (no visible text or symbols)Press and release to open
VideoandHeadphonesSockets
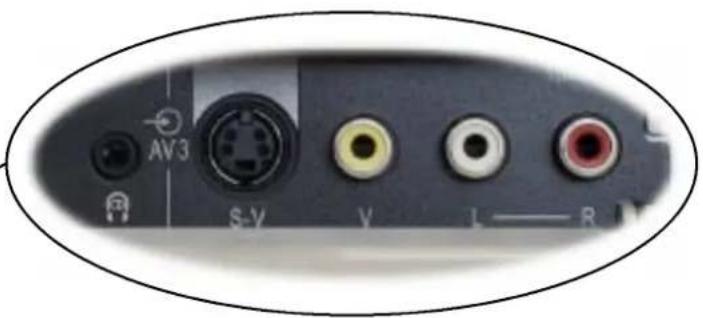
natural_image
Close-up of a computer audio component rear panel showing audio ports (AV3, S-V, V) and indicator lights (no readable text or symbols beyond labels)Output from Headphone
socket


S-V
Video input to
S-V
S-Video socket


L - R
Audio input to
L/R
sockets

STEREO HEADPHONES with 3.5mm Plug

Video input to V socket
RCA Video Cable
natural_image
Pure electrical circuit lines without any symbolsCAMCORDER
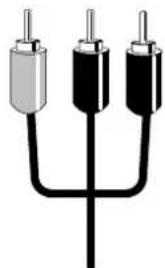
2 x RCA Audio Cables

natural_image
Illustration of a mounted optical device with lens and adjustment knobs (no text or symbols)Note :
Additional equipment and cables shown are not supplied with this TV set
■Socket Information
AV1 Scart socket
| Socket Earth | 21- | □ | □ | -20 | CVBS in (video) |
| CVBS out (video) | 19- | □ | □ | -18 | RGB status earth |
| CVBS earth | 17- | □ | □ | -16 | Status RGB |
| Red in | 15- | □ | □ | -14 | Earth |
| Red earth | 13- | □ | □ | -12 | -- |
| Green in | 11- | □ | □ | -10 | -- |
| Green earth | 9- | □ | □ | -8 | Status CVBS |
| Blue in | 7- | □ | □ | -6 | Audio in (L) |
| Blue earth | 5- | □ | □ | -4 | Audio earth |
| Audio out (L) | 3- | □ | □ | -2 | Audio in (R) |
| Audio out (R) | 1- | □ | □ |
Suitable inputs for AV1 include RGB (Red/Green/Blue)
AV2 Scart socket (S-Video, Q-Link)
| Socket Earth | 21- | □ | □ | - 20 | CVBS in (video) |
| CVBS out (video) | 19- | □ | □ | - 18 | Earth |
| CVBS earth | 17- | □ | □ | - 16 | -- |
| S.C. - In | 15- | □ | □ | - 14 | Earth |
| Earth | 13- | □ | □ | - 12 | -- |
| -- | 11- | □ | □ | - 10 | Q- Link data |
| Earth | 9- | □ | □ | - 8 | Status CVBS |
| -- | 7- | □ | □ | - 6 | Audio in (L) |
| Earth | 5- | □ | □ | - 4 | Audio earth |
| Audio out (L) | 3- | □ | □ | - 2 | Audio in (R) |
| Audio out (R) | 1- | □ |
AV2 - Pins 15 and 20 are dependent on AV2 S-VHS / VIDEO switching
S-Video 4 pin socket

MODEM socket
| DSR Data set ready | 6 | - | ○ | ○ | -1 | DCD (Carrier detect) |
| RTS Request to send | 7 | - | ○ | ○ | -2 | RXD (Receive data) |
| CTS Clear to send | 8 | - | ○ | ○ | -3 | TXD (Transmit data) |
| RI Ring indicator | 9 | - | ○ | ○ | -4 | DTR (Data terminal ready) |
| ○ | ○ | -5 | GND Ground |
Rear AV1/AV2(S) 21 Pin Scart and RCA Audio Out Terminals
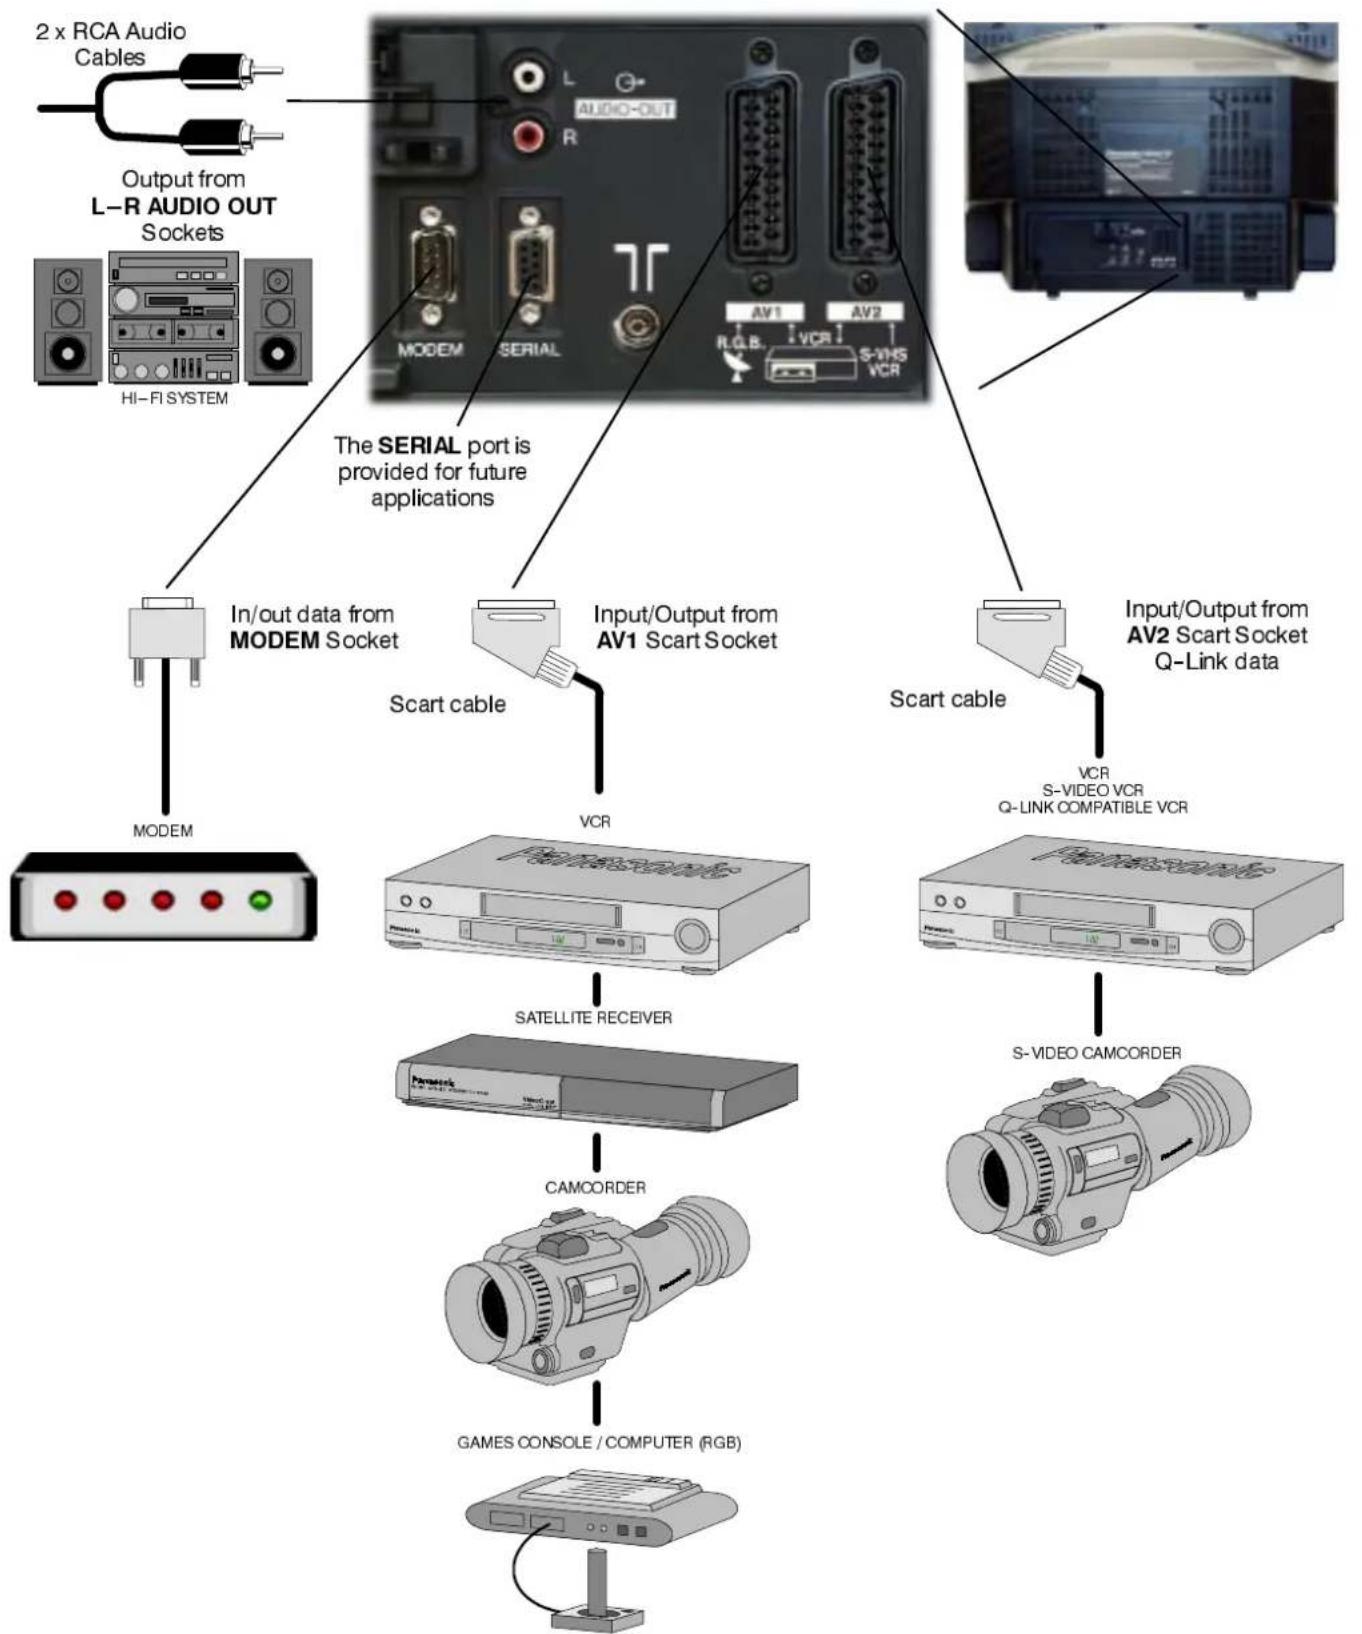
flowchart
graph TD
    A["2 x RCA Audio Cables"] --> B["Output from L-R AUDIO OUT Sockets"]
    B --> C["HI-FI SYSTEM"]
    D["The SERIAL port is provided for future applications"] --> E["In/out data from MODEM Socket"]
    D --> F["Input/Output from AV1 Scart Socket"]
    D --> G["Scart cable"]
    D --> H["Input/Output from AV2 Scart Socket Q-Link data"]
    E --> I["MODEM"]
    F --> J["SCART cable"]
    G --> K["SCART cable"]
    I --> L["SATELLITE RECEIVER"]
    J --> M["S-VIDEO CAMCORDER"]
    K --> N["GAMES CONSOLE / COMPUTER (RGB)"]
    L --> O["RAMOS"]
    M --> P["S-VIDEO CAMCORDER"]
    N --> Q["RAMOS"]
Notes:
Additional equipment and cables shown are not supplied with this TV set.
Do not connect a computer with TTL output (5V) to this set.
TROUBLESHOOTING
| Symptoms | Checks | |||
| Picture | Sound | |||
 | Snowy Picture |  | Noisy Sound | Aerial location, direction or connection. |
 | Multiple Images |  | Normal Sound | Aerial location, direction or connection |
 | Interference |  | Noisy Sound | Electrical appliances Cars / Motorcycles Fluorescent lights Switch on P-NR in Picture menu to reduce picture noise |
 | Blocky Interference or Intermittent Picture |  | Noisy or Intermittent Sound | DVB signal quality is poor. Aerial location, direction or connection. See 'Signal Quality' function on page 28. (Note: Due to the different techniques involved in digital reception, DVB signal quality can be poor even if you appear to have a strong signal when viewing analogue programmes). |
 | Normal Picture |  | No Sound | Volume level Sound mute switched on |
 | No Picture |  | No Sound | TV set to AV mode Not plugged into A.C. outlet Not switched on Picture / Sound controls set at minimum levels Check if in standby mode |
 | No Colour |  | Normal Sound | Colour controls set at minimum levels |
 | Poor or Distorted Picture |  | Weak or No Sound | Retune Channel(s) |
 | Coloured Patches |  | Normal Sound | Magnetic Interference from unshielded equipment Receiver moved while switched ON, switch TV off for 30 minutes. If picture is also tilted, use Geomagnetic Correction feature (see Quick Start Guide, page 11) |
 | Normal Picture |  | Weak or distorted sound | Sound reception may have deteriorated. Switch NICAM setting (Sound menu) to Off until reception improves. |
FORYOURGGUDIAANCE
■Service
Before requesting service, please refer to the trouble-shooting guide on previous page to determine the symptoms. To obtain service please contact your local Panasonic dealer quoting the model number and serial number (both are located at the rear of the TV).
■ TVG Games/Hseries Computers
Extended use of TV games or home computers with any television set can cause a permanent 'shadow' on the screen. This type of irreversible picture tube damage, can be limited by observing the following points:
- Reduce the brightness and contrast levels to a minimum viewing level.
- Do not operate the television set for a continuous period of time while using TV games or home computers.
- This type of picture tube damage, is not an operating defect, and as such is not covered by the Panasonic warranty.
■LastPBoitionMlneory
Certain functions have a last position memory, i.e. the setting at the time of switch-off will be the setting used when the receiver is switched on again:
| Programme | Tint (M.NTSC / NTSC only) |
| Mode | Volume correction (in AV mode only) |
| AV Position | Contrast |
| Volume | Sharpness |
| NICAM | Aspect mode |
| Bass | Standby |
| Treble | Artificial Intelligence (AI) |
| Balance | Colour |
| Colour Balance | Brightness |
| Status | P-NR |
| Teletext mode | Decoder (AV2) |
| Ambience | PC Connection |
| Preferred subtitles | Modem Connection |
■SleepFeature
If the set is not switched off when the TV station stops transmitting, it will automatically go to standby mode after 30 minutes. This function will not operate when the TV is in AV mode.
SPECIFICATIONS
| TX-32DT2 | TX-28DT2 | ||
| Power Source | 220 - 240V 50Hz A.C. | ||
| Power Consumption | 135W | 118W | |
| Standby Consumption | 1.7W (TV only)22W (TV + DVB system set to record Timer programmes) | ||
| Picture TubeVisible Diagonal | 76cm | 66cm | |
| Audio OutputMusic Power | Front Left / Right 20W x 2,8Ω impedance | ||
| Dimensions | H | 558mm | 503mm |
| W | 812mm | 720mm | |
| D | 572mm | 527mm | |
| Weight (kg) | 60 | 46 | |
| Receiving Systems/ Band name | PAL I UHF E21-68PAL 525/60 Playback of NTSC tape from some PAL Video recorders (VCR)DVB Digital terrestrial services via UHF aerial inputM.NTSC Playback from M.NTSC Videorecorders (VCR)NTSC (AV input only) Playback from NTSC Videorecorders (VCR) | ||
| Aerial - Rear | UHF | ||
| Headphones - Front | 3.5mm, 8Ω impedance | ||
| AV - Rear | AV1 - 21 pin terminal - Audio / Video in / out, RGB inAV2 - 21 pin terminal - Audio / Video in/out, S-Video in, Q-Link2 x RCA Audio Monitor Out | ||
| Data connections | MODEM - 9 pin male D-type connector - max. 38.4kbpsSERIAL - 9 pin female D-type connector - max. 38.4kbps | ||
| AV - Front | AV3 - S - Video in, RCA Audio / Video in | ||
Specifications are subject to change without notice. Weight and dimensions shown are approximate.