TX-W32D2DP - Televizor PANASONIC - Manual de utilizare gratuit
Găsiți gratuit manualul dispozitivului TX-W32D2DP PANASONIC în format PDF.

Întrebările utilizatorilor despre TX-W32D2DP PANASONIC
0 întrebare despre acest aparat. Răspundeți la cele pe care le cunoașteți sau puneți-vă propria.
Pune o întrebare nouă despre acest aparat
Descărcați instrucțiunile pentru Televizor în format PDF gratuit! Găsiți manualul dvs. TX-W32D2DP - PANASONIC și luați din nou în mână dispozitivul dvs. electronic. Pe această pagină sunt publicate toate documentele necesare pentru utilizarea dispozitivului dvs. TX-W32D2DP mărcii PANASONIC.
MANUAL DE UTILIZARE TX-W32D2DP PANASONIC
Panasonic
OperatingInstructions
ColourTelevision
TXW32D2DP
TX-W28D2DP
(U.K.Standard)


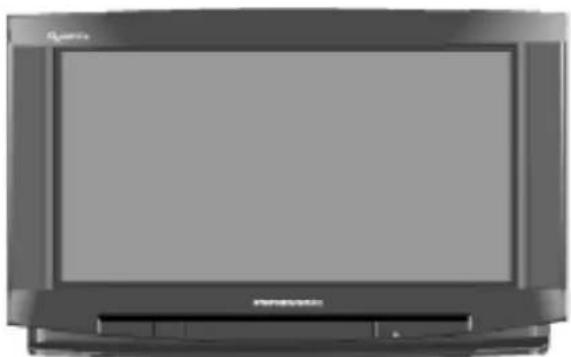
natural_image
Front view of a flat-screen television set (no visible text or symbols)King of Pictures
GAOO
TQB8E22402-
"Dolby", "ProLogic" and the double Symbol are trademark of Dolby Laboratories Licensing Corporation.
ManufacturedunderlicensefromDolbyLaboratories LicensingCorporation.
Pleasereadtheseinstructionscompletelybeforeuse andretainthemforfuturereference.

CONTENTS
WarningsandPrecautions3.
Accessories4.
FittingRemoteControlBatteries4.
QuickStartGuide5.
Basic Controls 8
Using the On Screen Menus 9
PIP Controls 10
Aspect Control 11
Main Menu 13
Sound Menu 14
.SetupMenu15
Tuning Menu 16
TuningMenu - Programmeedit 17
TuningMenu - AutoSetup 22
TuningMenu - Manualtuning 23
TuningMenu - ShippingCondition 24
AV Select and Setup 25
Dolby Pro Logic Surround Menu 26
Pro Logic mode 27
Simulated mode 28
Speaker level setup 28
Teletext Operation 29
VCR and Satellite Receiver Installation 31
VCR Control 32
Audio / Video Connections 33
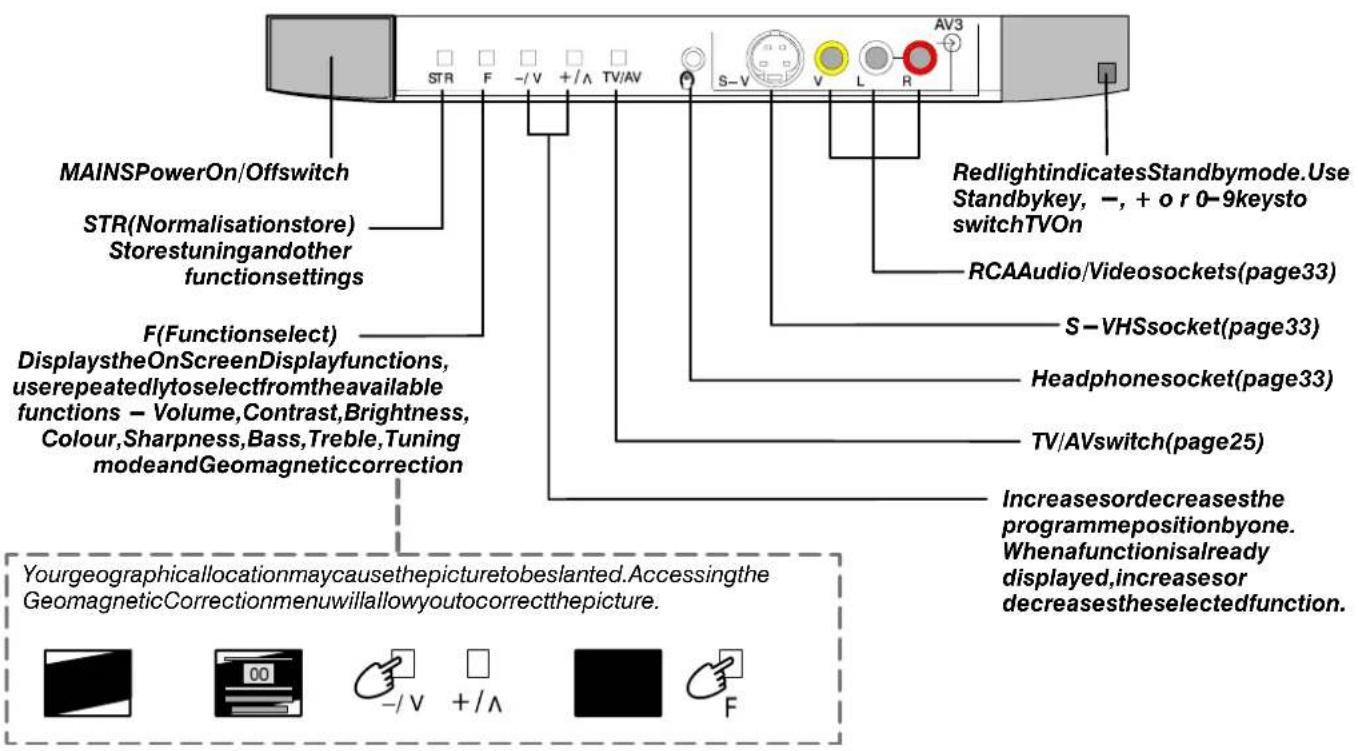
ViathefrontAV34pinS —Video,Audio/Video (RCA)andHeadphoneSockets33
SCART and S—Video Terminal Information ..... 33
ViatherearAV1/AV2/AV421Pin(SCART) and RCA Audio Out terminals 34
Using external amplifiers and speakers ..... 35
Trouble-shooting 36
For your guidance 37
Specifications 37
●ThisTVisdesignedtooperateonA.C.220240V,50Hz.
●ThisTViscapableofreceivingthefollowingtransmission standard,PALI.
- Topreventdamagewhichmightresultinelectricshockorfire,do notexposethisTVsettorainorexcessivemoisture.
●WARNING:HIGHVOLTAGE!!!
Donotremovetherearcoveraslivepartsareaccessiblewhenit isremoved.Therearenouserserviceablepartsinside.
- Avoid exposing the TV settodirect sunlight and othersources of heat.
- RemovethemainsplugfromthewallsocketwhentheTVsetis notusedforaprolongedperiodoftime.
• CABINETANDPICTURETUBECARE
Removethemainsplugfromthewallsocket.Thecabinet andpicturetubecanbecleanedwithasoftclothmoistened withmilddetergentandwater.Donotusesolutions containingbenzolorpetroleum.TVsetscanproducestatic electricity, care must be taken whenever touching the TV screen.
- Adequate ventilation is essential to prevent failure of electrical components. Were recommend that at least 5cm is left all around this TV even when it is placed inside a cabinet between the shelves.
FORYOURSAFETYPEASEREADTHEFOLLOWINGTEXTCAREFULLY
This appliance is supplied with a fitted three pin mains plug for your safety and convenience. A 5 amp fuse is fitted in this plug. If the fuseisreplacedthenthereplacementfusemustbe5ampratedandshouldbeapprovedbyASTAorBSItoBS1362.
CheckfortheASTAmark

ortheBSImark

onthebodyofthefuse.
Ifthefittedplughasaremovablefusecoveryoumustensurethatitisrefittedwhenthefuseis replaced. Ifyoulosethefusecovertheplugmustnotbeuseduntilareplacementcoveris obtained. ReplacementfusecoverscanbepurchasedthroughyourlocalPanasonicdealer.
The plug fitted to this appliance incorporates a mains filter circuit. If this is removed or replaced with a non-filtered plug this television will no longer meet the European standardsforElectromagneticCompatibility(EMC).Ifthefittedplugisunsuitablefor thesocketoutletinyourhomeanappropriateadaptershouldbeused.
Nonetheless,ifthefittedplugisreplaced,thefusesheuldbetakenoutandthecut -off plugdisposedofsafely.Thereisdangerofsevereelectricalshockifthecutoffplugis insertedintoany13amp.socket.
Ifanewplugistobefittedpleaseobservethewiringcodeasshownbelow. Ifinanydoubtpleaseconsultaqualifiedelectrician.
Howtoreplacethefuse(forplugtypeshowninexample1):
Liftouttheremovablefusecompartmentwithascrewdriverandreplacethefuse,thenrefit securelyintothemainsplug(Seeexample1).
Howtoreplacethefuse(forplugtypeshowninexample2):
Liftopenthefusecompartment, inthemainsplug, withascrewdriver, andreplacethefuse, thenpressthefusecoverdownsecurely. (Seeexample2).
Example1.
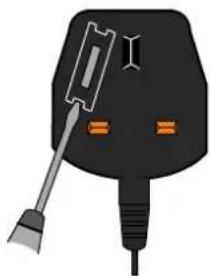
natural_image
Illustration of a black electrical plug with a screwdriver and two orange buttons (no text or symbols)Example2.
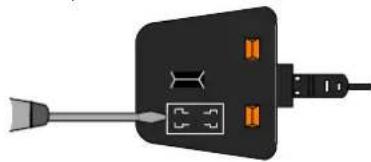
natural_image
Illustration of a black electrical plug with two orange connectors and a connector pin (no text or symbols)IMPORTANT : - The wires in the mains lead of this appliance are coloured in accordance with the following code : - BLUE:NEUTRAL BROWN:LIVE
As the colours of the wires in the mains lead of this appliance may not correspond to the markings identifying the terminals in your plug, proceedings follows:
- TheBLUEwiremustbeconnectedtotheterminalmarked'N'orcolouredblack.
- TheBROWN wiremustbeconnectedtotheterminalmarked'L'orcolouredred.
IMPORTANTNOTE : Under no circumstances should either of these wires be connected to the Earth terminal of the three pin plug, markedwiththeletter'E'ortheearthsymbol.
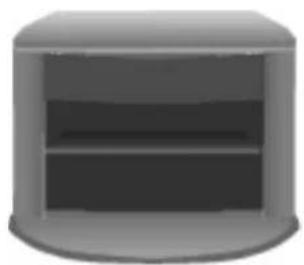
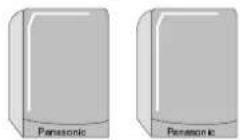
Checkthatyouhavetheaccessoriesanditemsshown
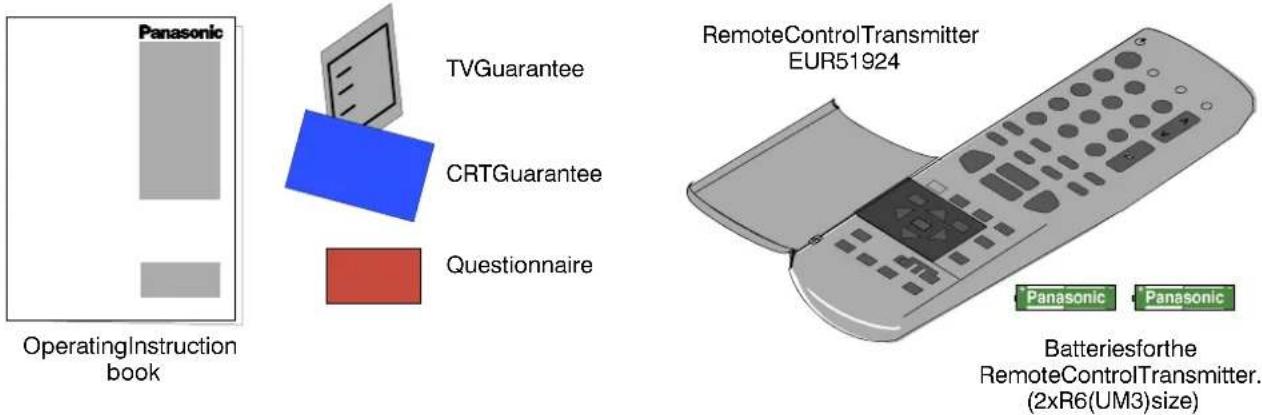
TS-400DP
Consistingof:
VS-WD2DPVideocabinet
1Centrespeaker
2xRearSpeakers
2xSpeakerCables

natural_image
3D rendering of a cylindrical container with two horizontal compartments (no text or symbols)Videocabinet


FITTINGREMOTECONTROLBATTERIES
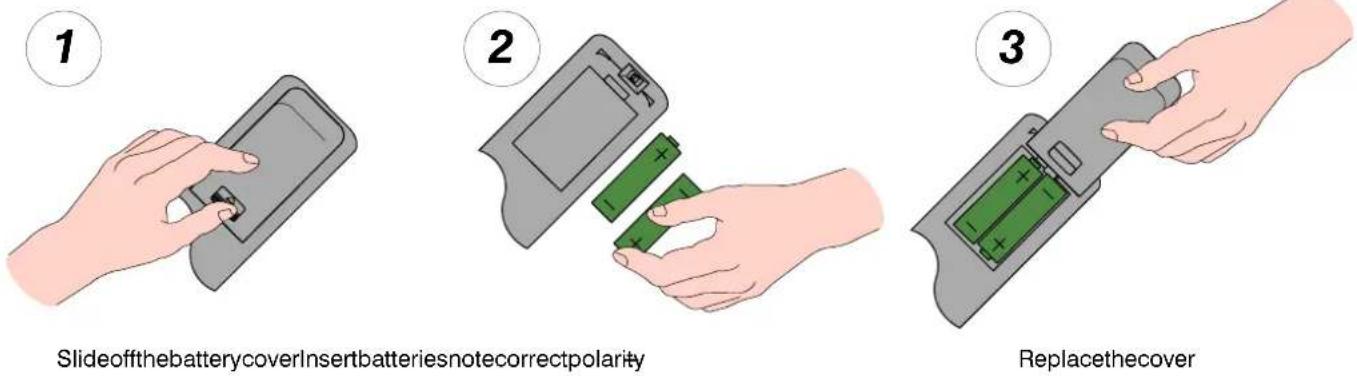
Notes:
●Makesurethatthebatteriesarefittedthecorrectwayround.
- Do not mix old batteries with new batteries. Remove old, exhausted batteries immediately.
- Do not mix different battery types, i.e. Alkaline and Manganese. Do not use rechargeable (Ni-Cad) batteries.
1.2.3.....
natural_image
Line drawing of a Panasonic air conditioner front panel with antenna and power cord (no text or symbols)
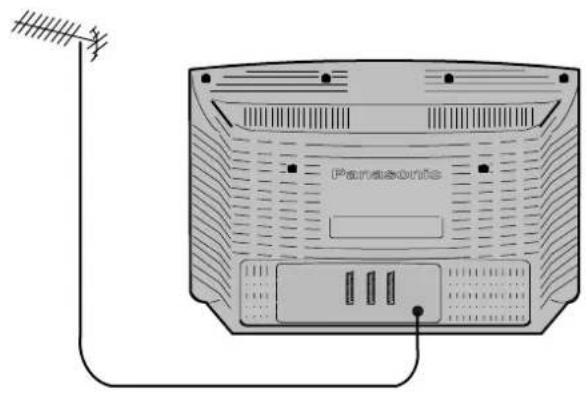
TVonly
ConnectAerialcoaxialcabledirecti toTVRFINsocket.
OR
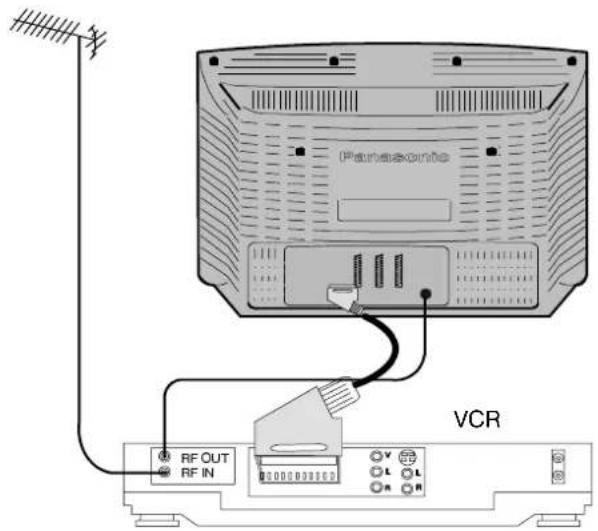
USINGAVCR
ConnectAerialcoaxialcabletoRFInputsocketof VCRandaRFcoaxialcablefromVCRRFOutsocketto TVRFINsocket.
TheVCRcanalsobeconnectedtotheTVusinga SCARTtoSCARTleadifyouareusingastereoVCR. UsetheAV121pinterminalforaVCR.Toconnectan S-VideoVCRusetheAV2S21pinterminal.
Further details of Audio/Videoconnections can be foundonpages33and34.
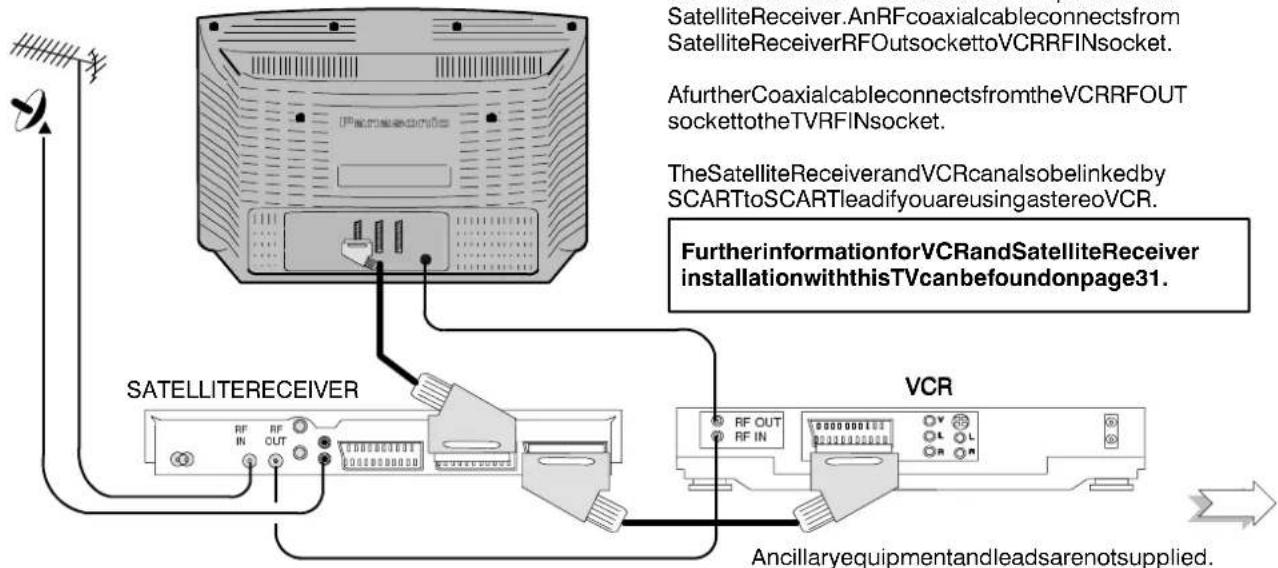
OR
USINGAVCRANDSATELLITERECEIVER
ConnectAerialco -axialcabletoRFInputsocket of SatelliteReceiver.AnRFcoaxialcableconnectsfrom SatelliteReceiverRFOutsockettoVCRRFINsocket.
A further Coaxial cable connects from the VCRRFOUT socket to the TVRFIN socket.
TheSatelliteReceiverandVCRcanalsobelinkedby SCARTtoSCARTleadifyouareusingastereoVCR.
FurtherinformationforVCRandSatelliteReceiver installationwiththisTVcanbefoundonpage31.
flowchart
graph TD
    A["SATelliteReceiver"] -->|RF OUT| B["VCR"]
    A -->|RF IN| B
    A -->|RF OUT| C["SATELLITERECEIVER"]
    C --> D["Antenna with antenna"]
    style A fill:#f9f,stroke:#333
    style B fill:#ccf,stroke:#333
    style C fill:#cfc,stroke:#333
    style D fill:#fcc,stroke:#333

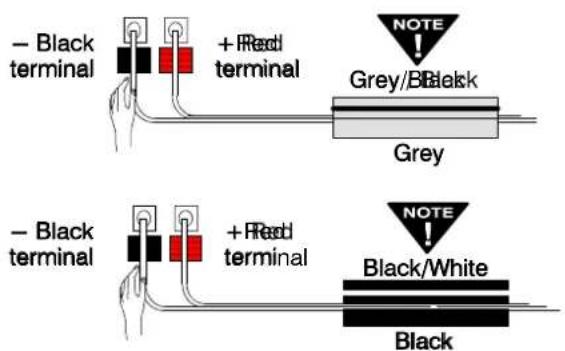
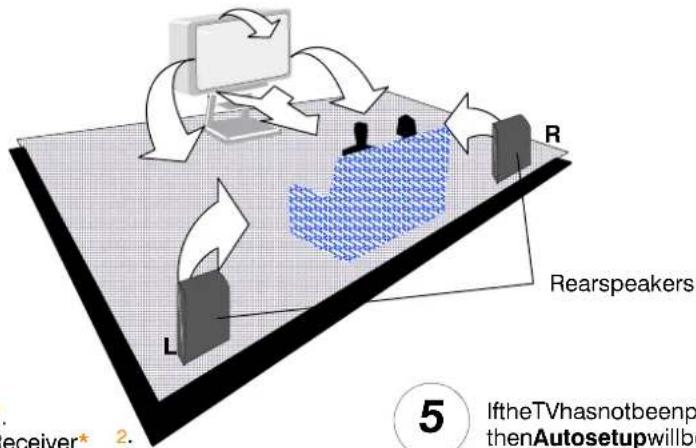
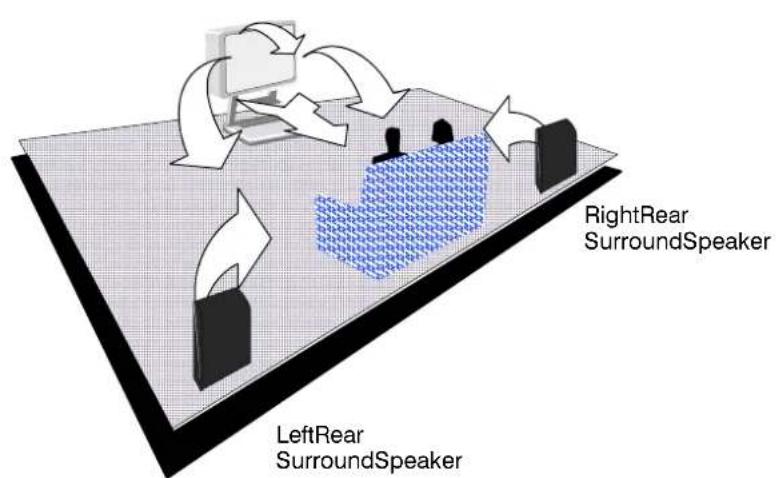
Connect the speakers with the TV switched off

Ensurethatbarespeaker wiresarenottouching

natural_image
Front view of a Panasonic electronic device casing with ventilation grilles and control buttons (no visible text or symbols)Rearspeakers
The REARspeakerscanbeconnected inoneoftwowaysAorB:

Withbothspeakersconnectedinthesameway thenthesoundwillbe'true'totheoriginal soundsignal.
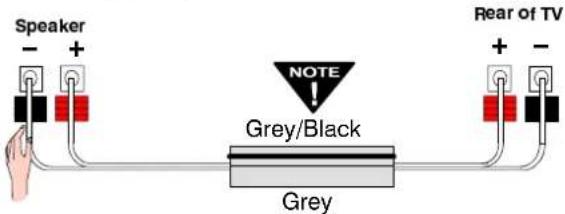

Withthewiringtoonespeaker'crossedover' thenanadditional,artificialambienceeffectwill becreated.
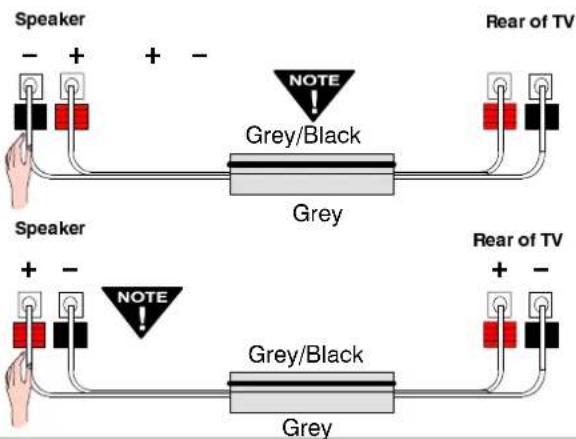
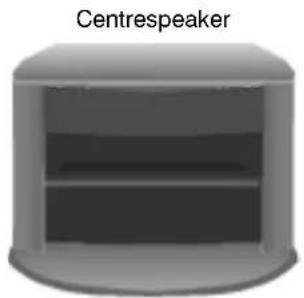
natural_image
3D rendering of a cylindrical device with a labeled 'Centrespeaker' above it (no other text or symbols)TheCENTREspeaker may be supplied with either greyorblackcable and should be connected to the TVasshown below:

Positionthespeakers
flowchart
graph TD
    A["User"] --> B["Rearspeakers"]
    B --> C{Interaction}
    C -->|Yes| D["User"]
    C -->|No| E["User"]
    D --> F["User"]
    E --> G["User"]
    F --> H["User"]
    G --> I["User"]
    H --> J["User"]
    I --> K["User"]
    J --> L["User"]
    K --> M["User"]
    L --> N["User"]
    M --> O["User"]
    N --> P["User"]
    O --> Q["User"]
    P --> R["User"]
    Q --> S["User"]
    R --> T["User"]
    S --> U["User"]
    T --> V["User"]
    U --> W["User"]
    V --> X["User"]
    W --> Y["User"]
    X --> Z["User"]
    Y --> AA["User"]
    Z --> AB["User"]

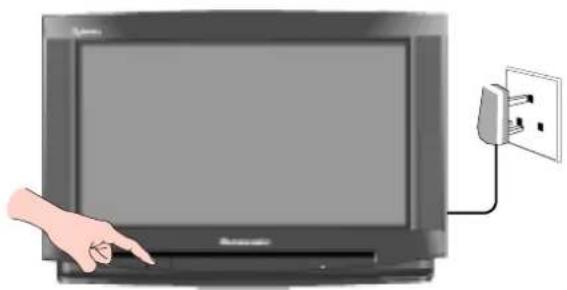
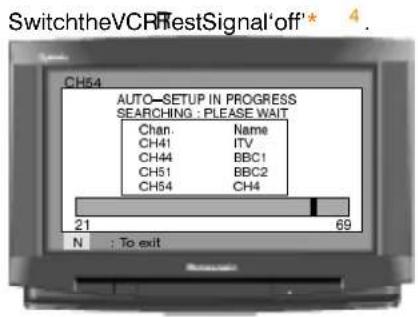
SwitchONyourVCR* 1. SwitchONyourSatelliteReceiver* 2. PlugtheTVintomainssocketandswitchon. Programmeswillappearimmediatelyifyour dealerhasprogrammedtheTVforyou.
natural_image
Illustration of a hand pointing at a screen connected to an electrical outlet (no text or symbols visible)
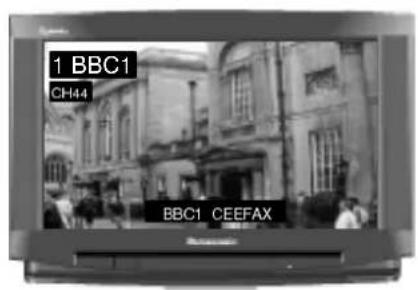
If the TV has not been programmed for you then Autosetup will begin. TV stations will be located, sorted into order and stored ready for use* 3.
... READY TO GO!
*1. We recommend that you have the VCR's test signal 'on' — refer to your VCR instruction book.
*2. We recommend that your Satellite Receiver is set to either SKY ONE or SKY NEWS to ensure reliable tuning, when Auto—Setup has finished, any satellite channel that have been stored will be listed as "SAT".
*3. The sorting order depends upon the TV signal, the broadcasting system, and reception conditions. If either BBC1, BBC2 or ITV are not located, then their respective pre-allocated programme positions 1 to 3 will not be used and therefore remain blank. Programme position4willalsobeblankifChannel4,S4CandChannel5arenotavailable.
| Prog. Position | All channels | No CH5 | No CH5 / S4C | No CH4 / CH5 | No S4C | No CH4 / S4C | No CH4 / S4C / CH5 |
| 1 | BBC1 | BBC1 | BBC1 | BBC1 | BBC1 | BBC1 | BBC1 |
| 2 | BBC2 | BBC2 | BBC2 | BBC2 | BBC2 | BBC2 | BBC2 |
| 3 | ITV | ITV | ITV | ITV | ITV | ITV | ITV |
| 4 | CH4 | CH4 | CH4 | S4C | CH4 | CH5 | - |
| 5 | S4C | S4C | SAT | SAT | CH5 | SAT | SAT |
| 6 | CH5 | SAT | SAT | ||||
| 7 | SAT |
If the order is not to your preference it can be rearranged. Refer to the Programme Edit menu — see page 17 for details.
*4. If your VCR Test Signal appears as a programme position it can be deleted or moved to programme position '0' using the Programme Edit menu. IT IS IMPORTANT THAT you use only programme position '0' for your VCR. If your VCR does not appear to operate on programme position 0 (the VCR Position) refertopage18or31forguidance.
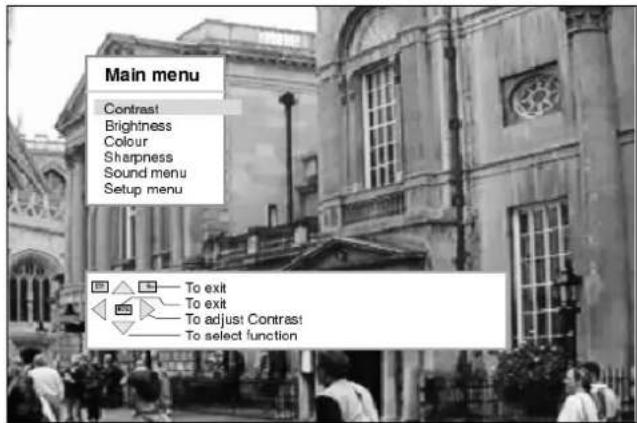
ThisTVhasacomprehensivesystemofOnScreenDisplaymenustoaccess adjustmentsandoptions.

The following comment on the key system is executed to assess and adjusted settings for the OIS GreenDi SpayMemus.
Some selections, for example, Contrast, Brightness, Colour and Sharpness will allow output increase or decrease their level.
Someselections,forexampleOfftimer,allowachocicetobemade.
Some selections, for example Tuning menu, will lead to a further menu.
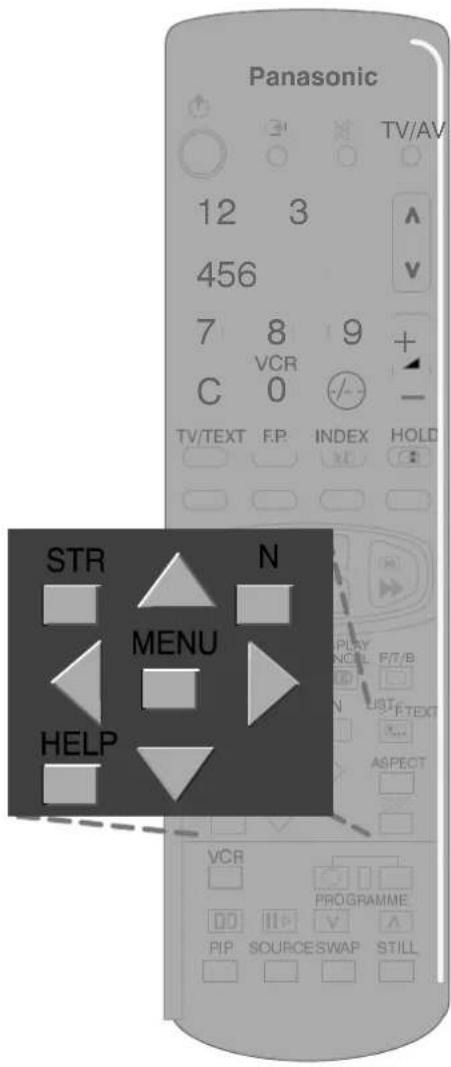
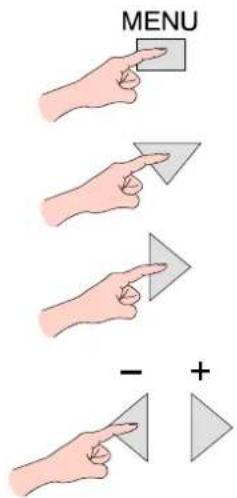
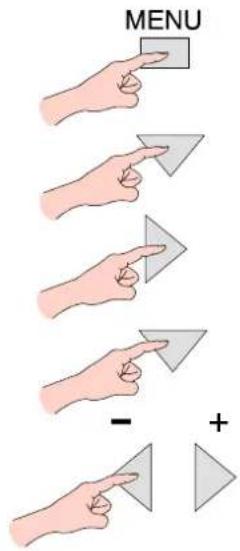
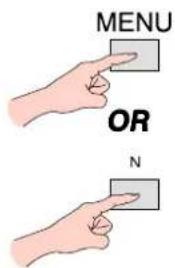
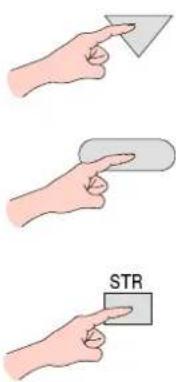
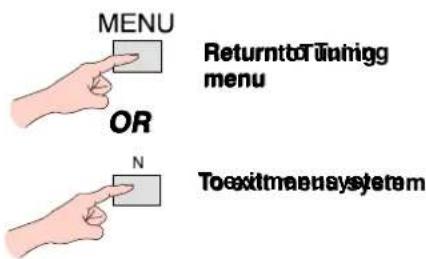
The 'MENU' key is used to open the Main menu and also return to either the Main menu or a previous menu.
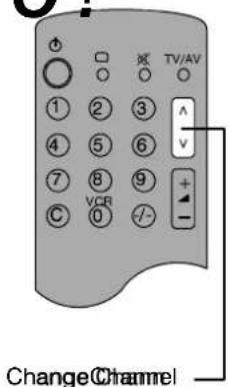
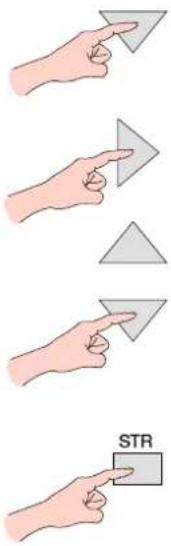
The▲▼ keysareusedtomovethecursorupor downthemenus.
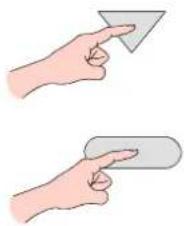
The◀▶ keysareusedtoaccessmenus,adjust levelsortoselectfromarangeofoptions.
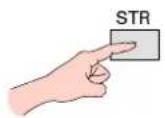
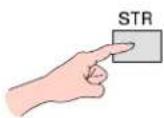
The 'STR' key is used to store settings after your adjustment or choice has been made.
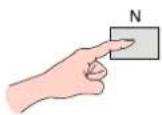
The 'N' key is used to leavethemenusystem and return to then normal viewingscreen.
The 'HELP' keywillrunademonstrationofthe menusavailable.

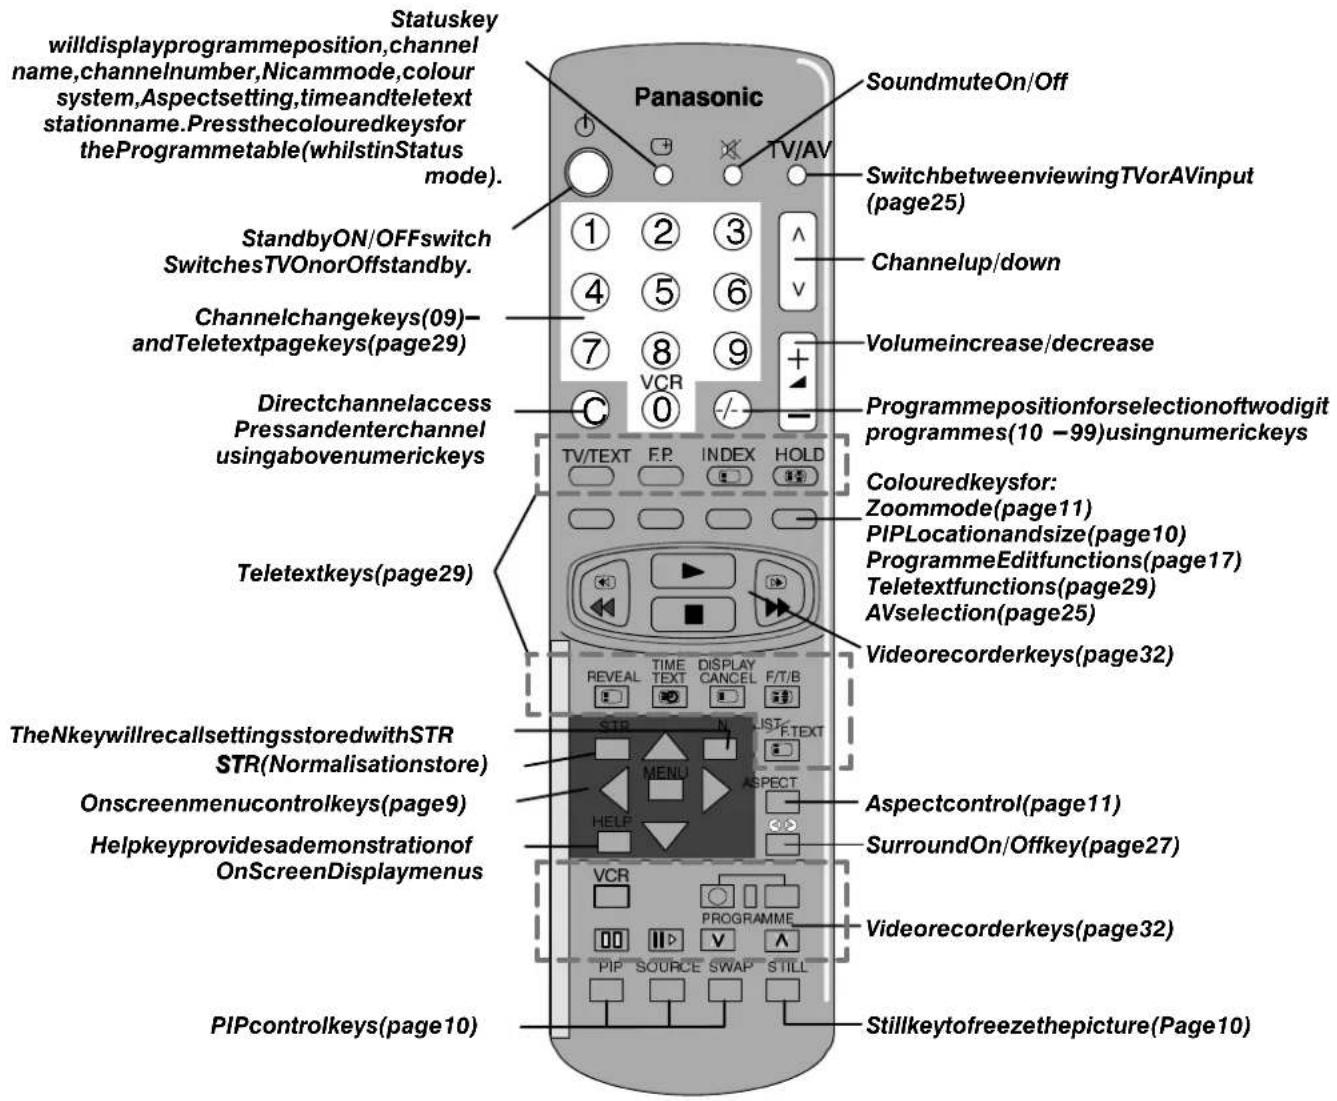
TheremotecontrolhaskeystocontrolthePIP(pictureinpicture)feature.
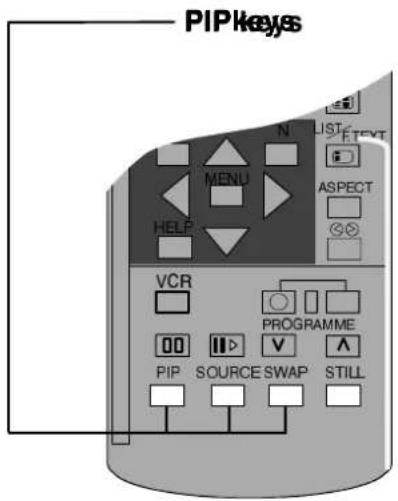

The PIPkey will wish the PIFuRtifomction OnandOff, PIPofferstwopiptoreviewing.
TheSOURCEkeywillallowyoutochoose whetheryouusethecurrentTVscreenor theinputtoAV1,AV2,AV3orAV4asthe PIPpicture.
TheSWAPkeywillallowyoutoswapthe PIPpicturewiththeMainpictureand vice-versa.

STILLControl
The STILLkeyallowsyoutofreezethe pictureatanytime.
When using the STILL key with the PIP function press to freeze the Main picture, press again to release the Main picture and freeze the PIP picture, press again to release the PIP picture.
natural_image
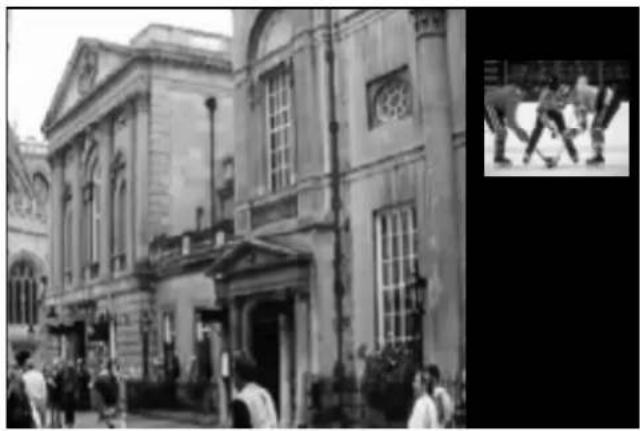
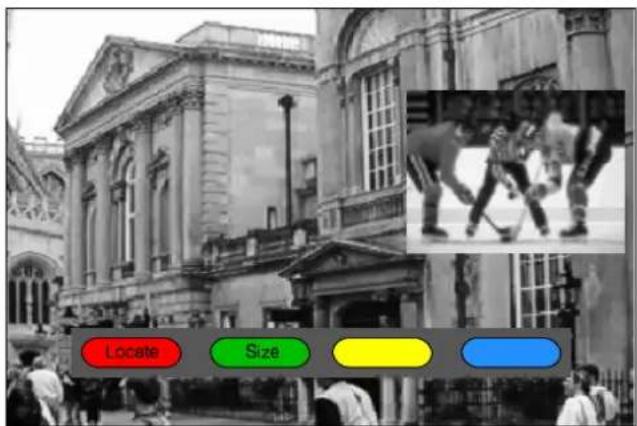
Exterior view of a classical-style building with people gathered in front (no visible text or signage)PressingthePIPkeywilldisplaythePIPpicture (shownin4:3Normalmode)
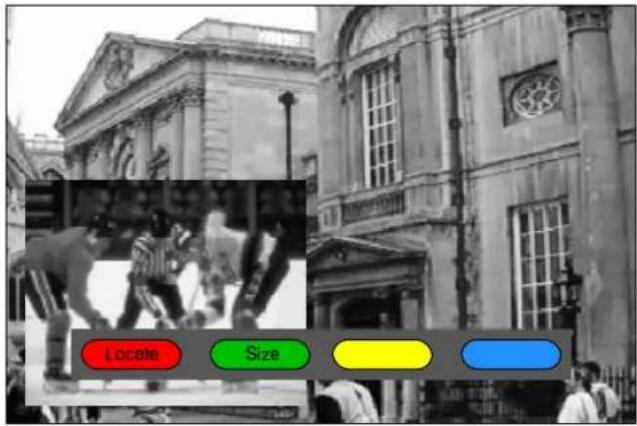
WhenviewinginanAspectmodeotherthan4:3,i.e. Wide,Zoom,S Zoom,FullorJust,pressingthePIPkey willalsodisplaytheLocateandSizeoptions.
ThePIPpicturehasbeenmovedtoanalternativeposition andmadesmallerbypassingtheLocatekeytwice followedbytheSizekeyonce.
ThewidescreenTVwillallowyoutoenjoyviewingthepictureatitsmaximumsize,including widescreen'cinemaformat'pictures.
WIDE/PANASONIC AUTO

natural_image
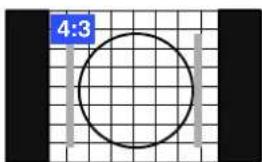
Grid background with two vertical gray bars and a large circle, no text or symbols presentSome broadcasts are transmitted together with a wide screen identification signal (WSS). If the TV receives this signal then it will automatically switch to widescreen 14:9 or 16:9 mode.
The automatic widescreenswitching depends upon reception conditions and the strength of the signal. If the signal is poor and therefore the WSS is weak then it is possible that the picture may not expand to full size and that the TV will display black areas around the edges.
A4:3picturesetto4:3A4:3pictureswitchedto
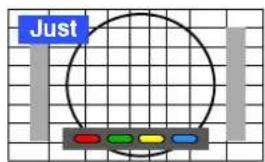
Justmode


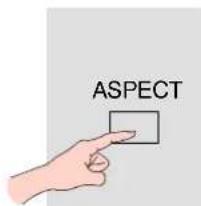
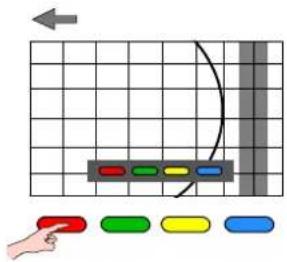
If the original sources signal was a standard 4:3 aspect ratio then you might prefer to view in its original size.
PresstheAspectkey,theredandgreenkeysthatappear,willallowyoutochoosebetweenviewingat standard4:3sizeorexpaniedinJustmode.
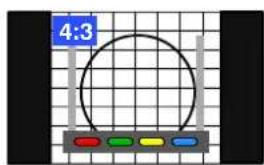
4:3
natural_image
Simple circular diagram on a grid background with no text or symbolsA4:3pictureswitchedto itsnormal4:3viewing mode
4:3 will display a 4:3 picture at its standard 4:3 size and can be selected if you wish to view in this format.
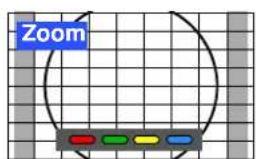
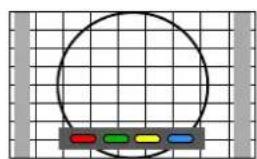
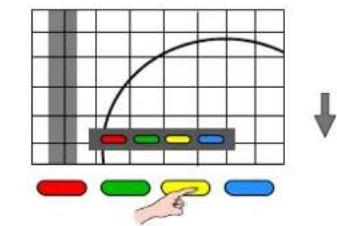
Zoom

natural_image
Grid background with a large circular outline and a color-coded rectangular bar at the bottom (no text or symbols)Theredkeywillreducethe
picturesizevertically


natural_image
Simple diagram with a curved line and colored blocks on a grid background (no text or symbols)
Thegreenkeywillenlarge
thepicturevertically

In Zoom mode the size of the visible picture may vary according to the aspect ratio of the original picture. Theredandgreenkeysallowyoutoadjustthesize.
Zoom
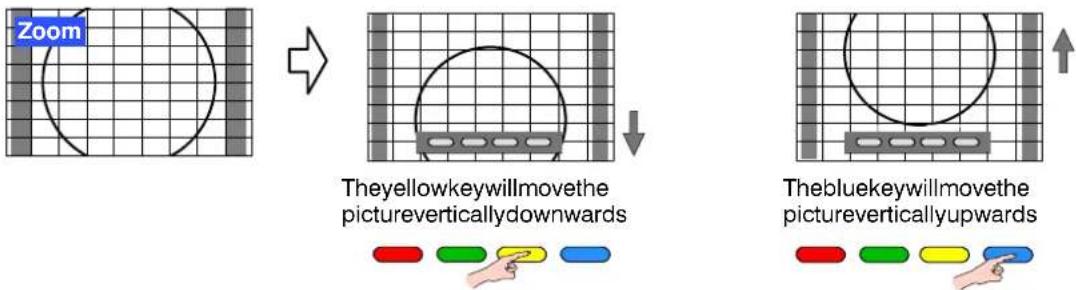
Thepicturecanbemovedverticallyusingtheblueandyellowkeys.
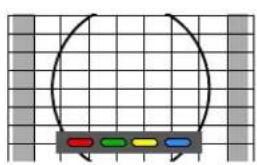
S-Zoom
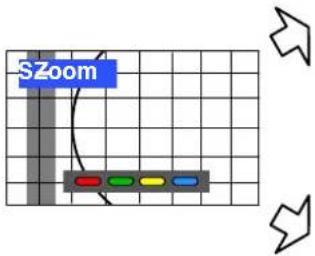
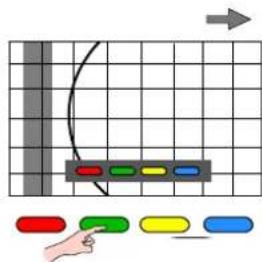
In S-Zoom mode the red and green keys will allow you to move the picture horizontally. Theyellowandbluekeyswillallowyoutomovethepicturevertically.
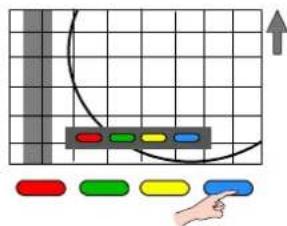
Full
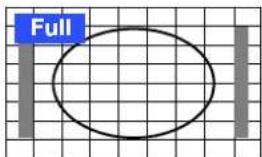
Fullwilldisplaythepictureatitsmaximum sizebutwithslightelongation.
Just
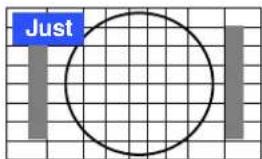
Justmodewilldisplaya4:3pictureatmaximumsizebutwithaspect correctionappliedtothecentreofthescreensothatelongationisonlyapparentattheleftandrightedgesofthescreen.Thesizeofthepicturewill dependupontheoriginalsignal.
Notes:
- The on screen selector keys that appear for some aspect functions will clear after a few seconds. If you subsequently wish to select anoperationthenpresstheAspectkeyoncemoreforthekeystoreappear.
- The widescreen aspect ratios of different films and programmes can vary. If these are wider than a standard 16:9 aspect picture thenablackbandmaybevisibleatthetopandbottomofthescreen.
- If, in WIDE mode, you experience problems with the screen display size when playing back widescreen format recordings from your VCR then it is possible that the tracking controls of your VCR require adjustment (your VCR instruction book will contain adjustment details).
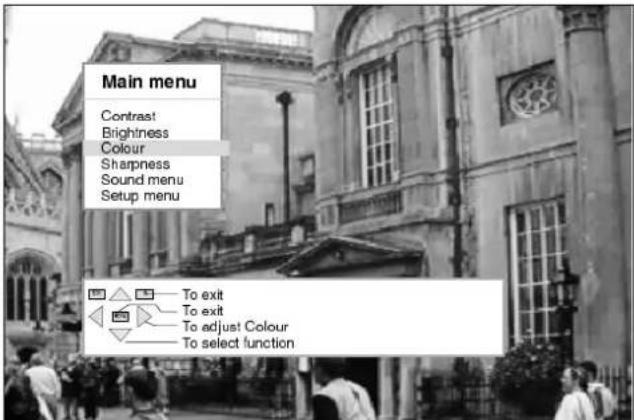
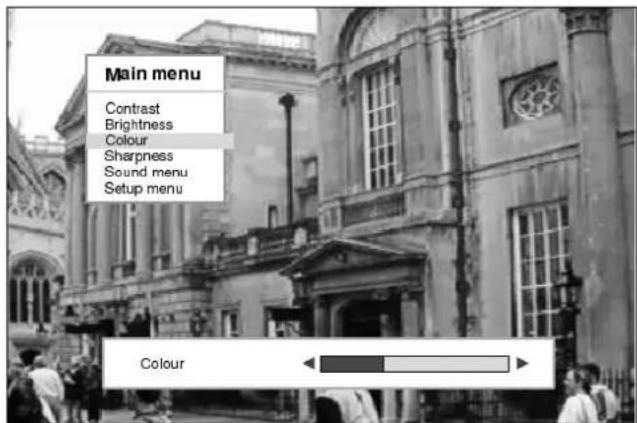
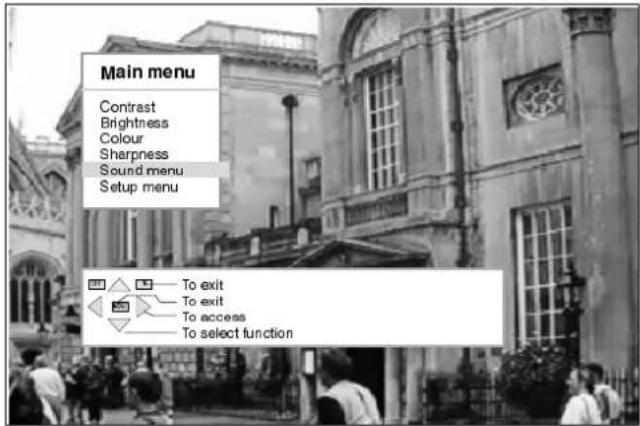
AllmenusstartfromtheMainmenu(exceptAVselectandTuningprocedure(Frontpanel)). Youwillalsofindthebasicpicturequalityadjustmentswithinthismenu.
OpentheMainmenu
Movetoyourchoice
Accessyourchoice
Increaseordecreaselevelsor movetotheSoundorSetup menus.
Contrast
TheContrastleveloftheTVcanbe adjusted,tosuitthelightingconditionsof theroom,asnecessary.
Brightness
TheBrightnesslevelcanbeadjustedto suityourviewingconditions.
Colour
TheColourlevelcanbeadjustedtoyour ownpreference.
Sharpness
Thepicturecanbesoftenedorsharpened toyourownpreference.
Tint
TheTintadjustmentwillonlyappearasa menuitemifyouhaveanNTSCsignal sourceconnectedtotheTVandwillallow adjustmentofthehue.
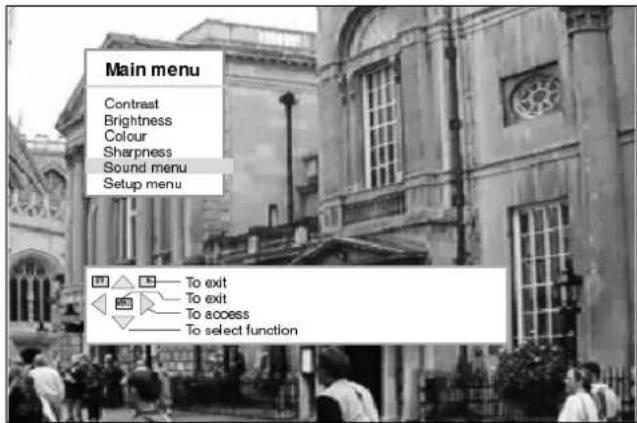
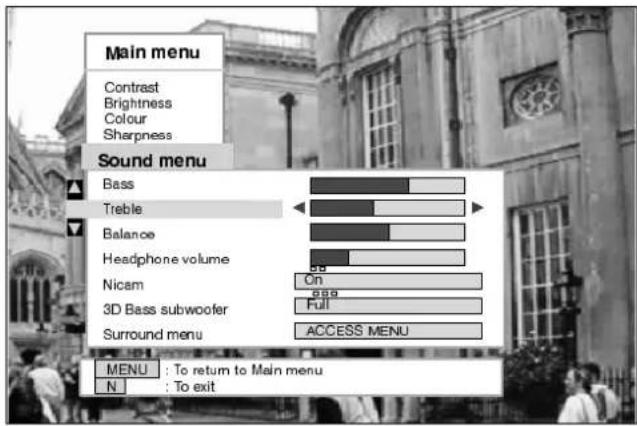
Sound Menu
LeadstotheSoundmenu andallows adjustmentstobemadeto thesound quality.
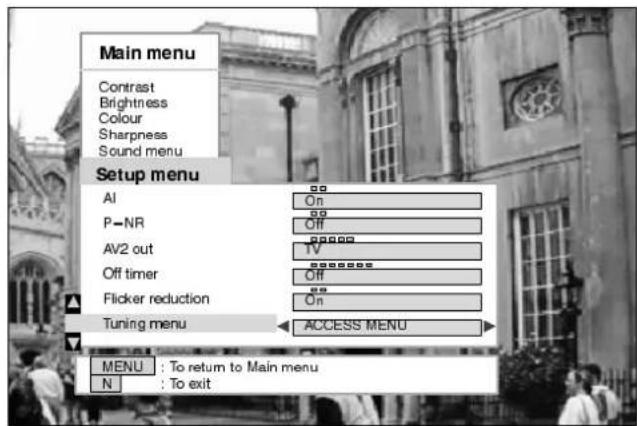
Setup Menu
Leads to the Setup menu for various featureadjustments.

Todoose Mainmenu
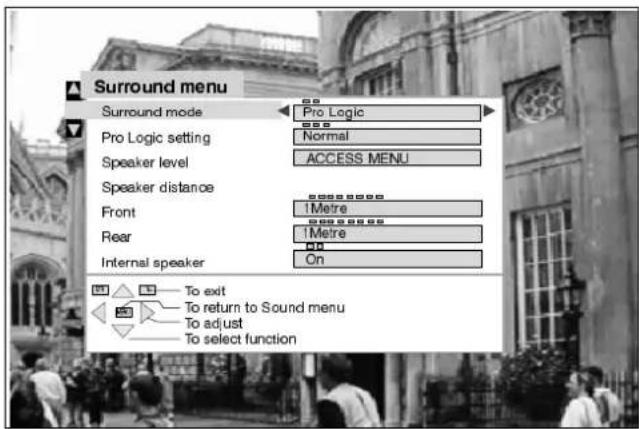
TheSoundmenuwillallowyoutosetyourpersonalpreferencesforallaspectsofsoundquality
OpentheMainmenu
MovetoSoundmenu
AccessSoundmenu
Movetoyourchoice
Increaseordecreaselevels, choosefromoptionsoraccessthe Surroundmenu.

Bass
Trehlitz
Balance


Nicam

3D Bases subwoofer
Surround Menu
Bassadjustmentwillemphasisethelower, deeperfrequenciesandcanbeincreased ordecreased.
Trebleadjustmentwillemphasisethe sharper, higherfrequenciesandcanbe increasedordecreased.
Balanceaffectsthelevelsofsound betweentheleftandrightspeakers. Adjustmentcanbemadesothatthelevel frombetweenspeakerswillsuityour listening position. Balance is not selectableinDolbyProLogicorSimulated operation.
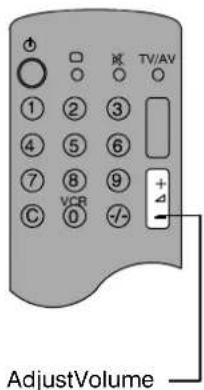
Theheadphonevolumecanbeadjusted independentlyoftheTVspeakerssothat everyonecanenjoylisteningattheirown comfortlevel.
SelectOntoprovidestereosoundreproduction.
SelectOffforFMMonosoundoutput.
IfNicamMonoisbeingtransmittedselecteitherFMMono(Off),NicamMonol(M1)orNicamMonoll(M2).Theoptionsdependuponthesignal beingtransmitted.
IfreceptiondeterioratesitisadvisabletoswitchtoFMMono(Off).
When Nicam transmissions are not being received, the sound will be FM Mono(Off) only.
3DBasssubwoofercanbeswitchedtoOff, Normal, or Full forsuper deepbassresponse.
LeadstotheSurroundmenuforDolbyProLogicandsimulatedmodes ofoperation, asdescribedonPages26to28.
MENU

ReturntoMaiimeranu
To exit means system
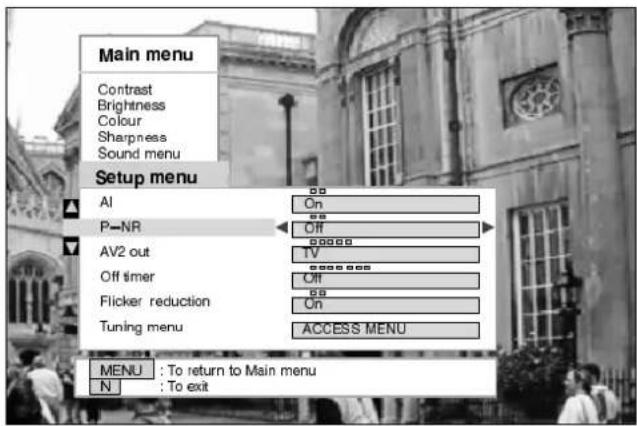
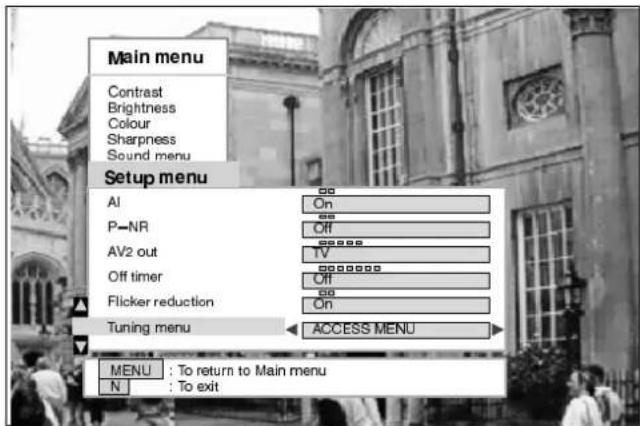
TheSetupmenuprovidesaccesstovariousadvancedfeaturesandalsototheTuningmenu
OpentheMainmenu
MovetoSetupmenu
AccessSetupmenu
Movetoyourchoice
Increaseordecreaselevelsor choosefromoptions


Alautomaticallyanalysestheincoming pictureandprocessesittogiveimproved contrast, optimumfieldofdepthandvivid colourtones.
P-NRwillautomaticallyreduce unwantedpictureinterference.
AV2offersyouachoiceofsignalstosend totheAV2SCARTsocket.Youcan choosefromthecurrentTVprogramme position,thesignalentering AV1/AV3/AV4ormonitor - thepicture displayedonscreen.
OfftimerwillswitchtheTVoffaftera presettimehaselapsed.You can choose from between 0 to 90 minutes in 15 minute intervals.
You will normally find that Flicker reductionisbestsettoONtoreduceany slightpicturemovement. However, it is possible that some occasional broadcastsmaybenefitbyselectingthe OFFposition.
LeadstoTuningoptions, asdescribedon Pages 16to24.
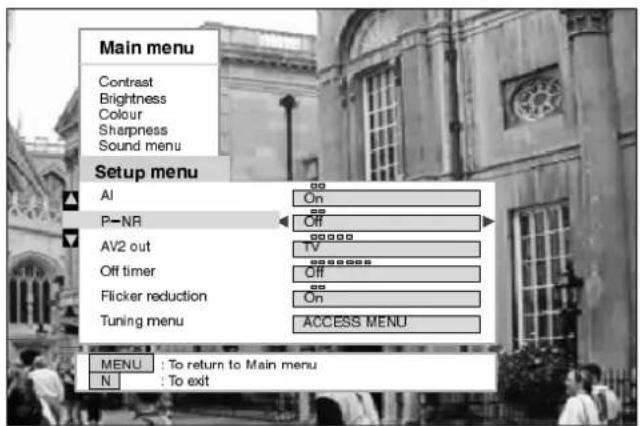
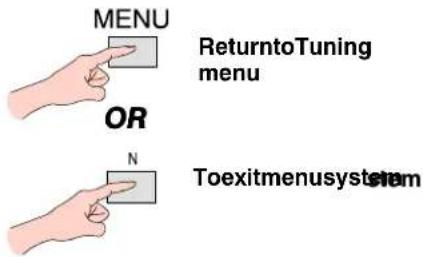
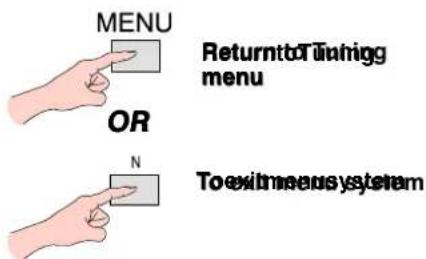
ReturntoMāirimenenu
To exit menus system
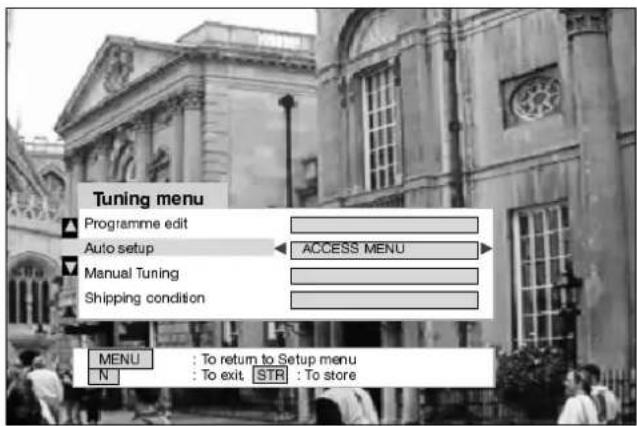
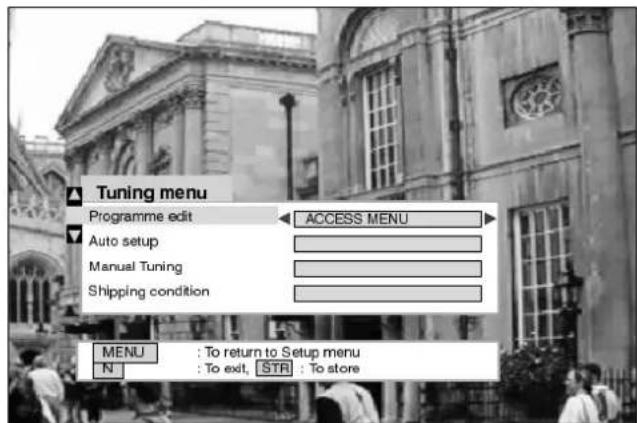
The Tuningmenuprovidesaccesstobothmanualandautomatictuningmenus
OpentheMainmenu
MovetoSetupmenu
AccessSetupmenu
MovetoTuningmenu
AccessTuningmenu
Movetoyourchoice
Increaseordecreaselevels, choosefromoptionsoraccess menu's.

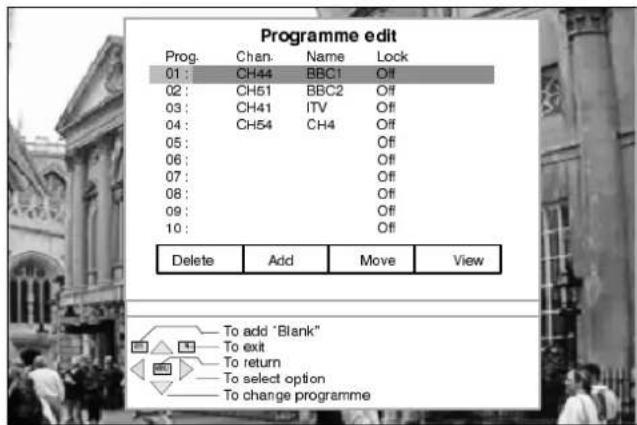
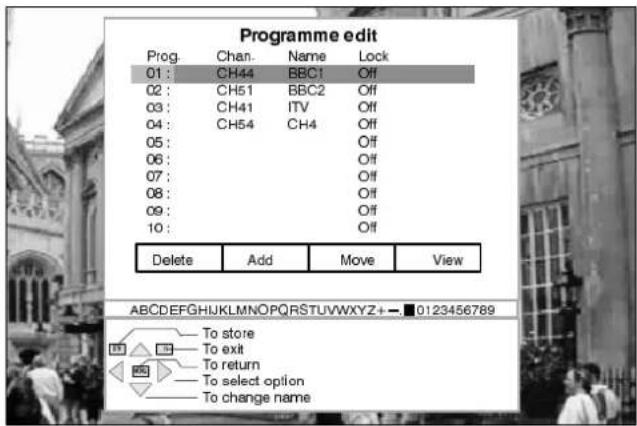
Programme edit
AccessingProgrammeeditmenuwill allowstationstobemoved,added, deleted,namedandlocked.Further detailsonpage17.
Auto setup
TheAutosetupmenuallowsyouto automaticallyretunetheTV.Further detailsonpage22.
Manualtuning
The Manual tuning menu allows individual programme positions to be tuned manually. Further detail on page 23.
Shipping condition
Allows you to clear all tuning information and reset all control levels back to factory settings. Further detail on page 24.
ReturntoSetippneranu
To exitmeerus system
TheProgrammeeditmenuallowsyoutodelete,add,move,retune,nameandlockchannels
OpentheMainmenu
MovetoSetupmenu
AccessSetupmenu
MovetoTuningmenu
AccessTuningmenu
MovetoProgrammeedit
AccessProgrammeedit
MENU
natural_image
Illustration of five hand gestures pointing at a square and two triangles (no text or symbols)
natural_image
Two hand gestures pointing to an arrow, one pointing upward and the other right (no text or symbols)Todeleteanunwantedprogrammeposition
Choosetheprogrammeposition
Presstheredkeyonremote control
PressSTRtodelete
Note: ItisnotpossibletodeletetheVCR channel.
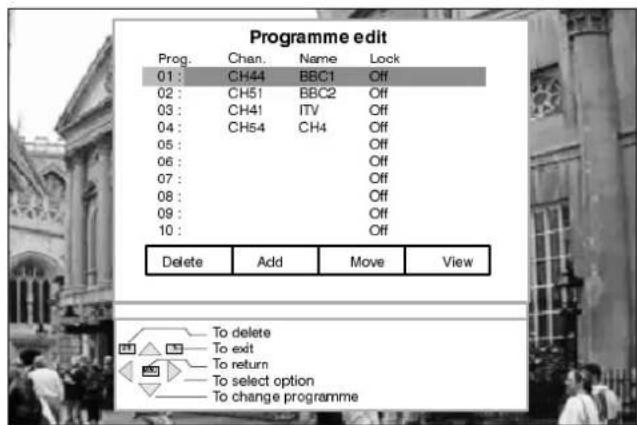
If you have completed changes the Program design edit menutthem

Toaddaprogrammeposition
Choosewheretoaddablank programme

Pressthegreenkey

PressSTRtoadd
Thisblankprogrammecanthenbe tuned, named, locked, movedor viewed.
If you have completed changesto the Programme edit menuthen
Tomoveaprogrammetoanotherposition
Choosetheprogrammeposition

Presstheyellowkeyonremote control

Choosenewposition
PressSTRtostore


If you have completed changesto the Programmeedit menuthen

Toviewaprogrammeposition
Choosetheprogrammeposition
Pressthebluekeyonremote control
natural_image
Illustration of two hands holding a triangular object, one pointing at it (no text or symbols)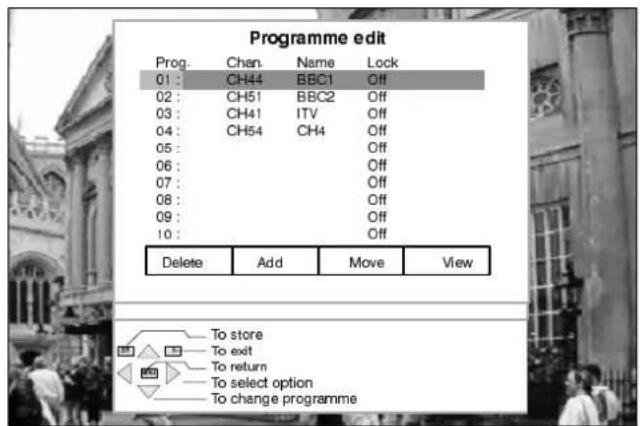
Thescreenwillreturnto Programmeeditafterafew seconds


Totuneaprogrammeposition
Choosetheprogrammeposition
Movetothechannelsetting
Increaseordecreasechannel number
PressSTRtostore


If you have completed changes the Programmeedit menuthen
Torenameaprogrammeposition
Choosetheprogrammeposition
MovetotheNameposition
Choosethenewcharacter
Movetothenextcharacter position
Continueuntilrenamingis completed
PressSTRtostore

If you have completed changesto the Programme edit menuthen
Tolockaprogrammepositiontoprevent access
Choosetheprogrammeposition
Movetothelockposition
Choosebetweenlockonorlock off
PressSTRtostore

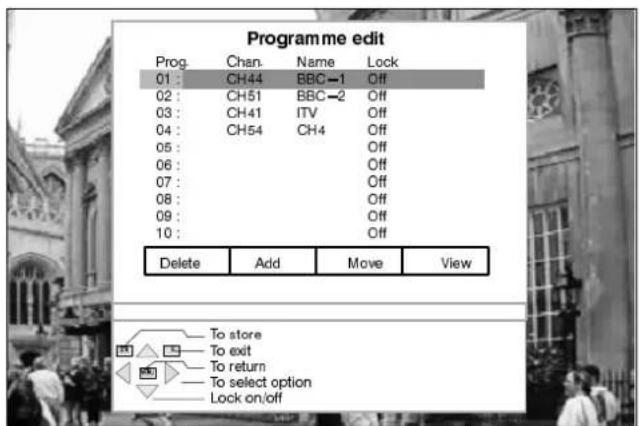
If you have completed changesto the Programme edit menuthen

Accesstothelockedprogramme positionisprevented.
Whenaprogrammepositionis locked,DirectChannelAccess usingthe'C'andnumerickeyson theremotecontrolisnotavailable.


TheAutosetupmenuwillallowyoutoautomaticallyretunetheTVtoyourlocalstations.
Itisusefulifyoumovetoadifferentregion.
OpentheMainmenu
MENU

MovetoSetupmenu

AccessSetupmenu

MovetoTuningmenu

AccessTuningmenu

MovetoAutosetup

AccessAutosetupmenu

PresstostartAutosetup
TheTVwillsearchfor,locateand orderyourlocalstations.
Oncethisoperationiscompleted theTVwilldisplayprogramme position1.
Note:
ThesortingorderdependsupontheTVsignal,thebroadcasting system,andreceptionconditions.Iftheorderisnottoyour preferenceitcanberearranged.RefertotheProgrammeEdit menuseepage17fordetails.
MENU

ReturntoTuning
menu
OR

To exitmeerus system
ManualtuningoftheProgrammepositionsisavailableeitherfromtheonscreendisplaymenu orfromthefrontpanelcontrols
Manualtuningmenu
OpentheMainmenu
MovetoSetupmenu
AccessSetupmenu
MovetoTuningmenu
AccessTuningmenu
MovetoManualtuning
AccessManualtuning
Selecttheprogrammeposition
Starttuning
PressSTRtostore
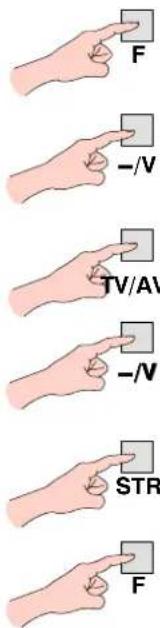
Manualtuning(Frontpanel)
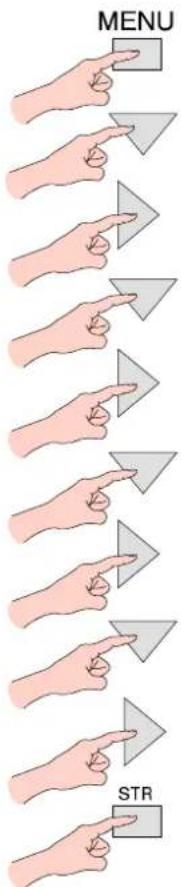
PresstheFbutton(Frontpanel) until "Tuningmode" is reached
Pressthe - or+buttontoaccess "Tuningmode"
PresstheTV/AVbuttontochange totherequiredprogramme position
Pressthe - or+buttontostart thetuningsearch
PressSTRtostorechanges
PresstheFbuttontoexit

bar
Manual Tuning | Category | Value | |---|---| | To store | 21 | | To exit | 69 | | To return to Tuning menu | | | To start search | | | To change programme | |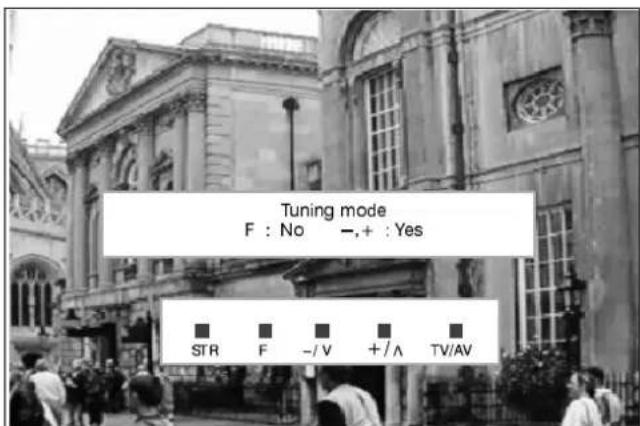

ShippingconditionallowsyoutoresettheTVtoitsoriginalcondition,i.e.nochannelstunedin.
This is useful for example, if you move to a different area then you will probably want the TV to tune itself to your new local stations.
This can be done either through the Shipping Condition menu or through the Auto setup menu.
The Shipping condition menu will reset all data, clearing all tuning information and resetting all control levels back to factory settings. You may need to adjust your VCR or programme position '0' VCR after operating the Shipping Condition menu – refertopage31.
OpentheMainmenu
MovetoSetupmenu
AccessSetupmenu
MovetoTuningmenu
AccessTuningmenu
MovetoShippingcondition
AccessShippingcondition
PressSTRtostart
Pressagain, to confirm, when you are asked, "Areyousure?"
SwitchTVoffandwaitforafew seconds.
SwitchTVonagain.
Autosetuptuningwillbegin, stationswillbelocated, sorted and storedreadyforuse. SeePage22 fordetails.


natural_image
Two hand gestures pointing at a gray triangular object, no text or symbols present


TheAVSelectmenuwillallowyoutochoosewhichAVsourcetoview.
PresstheTV/AVkey (remotecontrolorTV)
Presstheappropriatecoloured keyofremotecontrol(whilstthe optionsremainonscreen)
Pressthegreenoryellowkeys againstoselectS -Videoinput
Youmaywishtomake adjustmentsintheSetuporSound menus


SetupMenu
| OpentheMainmenu | MENU |
| MovetoSetupmenu | |
| AccessSetupmenu | |
| Movetoyourchoice | |
| Choosefromoptions |
SoundMenu
| OpentheMainmenu | MENU |
| MovetoSoundmenu | → |
| AccessSoundmenu | → |
| Movetoyourchoice | → |
| Increaseordecreaselevels, choosefromoptionsoraccessthe Surroundmenu. | → |

Normally stereo reproduction uses left and right speakers, but Dolby Pro Logic Surround also uses a centre channel and a rear channel. The centrechannelsharpenssoundperspectiveanddialogueclaritywhilsttherearchannelisusedtoimmersetheviewerin ambience and special effects. The reproduction is furtherenhanced by the Dolby ProLogic decoder incorporated to generate clearer positioning of sounds and a fulleffectoverawider listening area.
TouseDolbyProLogicSurroundwhenreceivingtelevisionprogrammesthathavebeenproducedwiththeDolbyProLogicSurround information, you must be able to receive NICAM Stereo transmissions, if NICAM Stereo transmissions are not transmitted in your area thentheDolbyPrologicSurroundinformationwillnotbepresentanditwillnotbepossibletouseProLogicoperation(unlessyouare playingbackfromastereoVCR).
Dolby Pro Logic Surround will operate with videos, laser discs and TV programmes that bear the Dolby Surround logo :
DO DOLBY SURROUND
OpentheMainmenu
MovetoSoundmenu
AccessSoundmenu
MovetoSurroundmenu
AccessSurroundmenu
Movetoyourchoice
Choosefromoptionsoraccessthe speakerlevelmenu.

Surroundmoote

Prollogio/ Simulated setting
ChoosingProLogicalallowsselectionof Normal, Phantomor3channelmodes, as describedonPage27.
Choosing Simulated allowsselection of Disco, Movieor Stadium modes, as described on Page 28.

Speaker level
Speaker distance Front / Rear

Allowsadjustmentoftheoutputlevelsfor eachchannel,asdescribedonPage28.
Allowssettingofthedistancefromthe listeningpositiontothefrontandrear speakers.Iftherearsurroundspeakers areclosertoyouthanthecentrespeaker, youmayheardialogue"leakage"fromthe rear surround speakers. It may be necessarytoreducetheoutputlevelofthe rearchanneltorectifythisphenomenon.

InternalSpeaker
NormallysettoOn, but, when separate external amplified frontspeakers are connected, then the internals peakers can be switched Off. See Page 35 for connection details.

ChoosingSurroundProLogicmodeallowsthreepossiblemodesofoperation:
Normal, Phantomor3Channel.
DolbySurroundProLogicNormalmode
PressingtheSurround switchwillswitchthe surroundmodeinto2 channelstereoonly (andvice -versa)
DolbySurroundProLogicPhantommode
DolbySurroundProLogic3Channelmode

This is the best modetouse if rear speakers are not connected. It offers Dolby Surround Pro Logice effect but without therear surrounds speakers.
SIMULATEDMODE
Simulated surround modes allow various types of surround effects to be produced by mimicking both the direct sound, as heard by the audience, and the sound reflected back from the surrounding walls e.g. ceiling and floor space in a space such as a Disco. There are three different effectstochoosefrom, each reflecting adifferentatmosphere.
| Setting | EffectAppropriatesources | |
| Disco | Aroomsofullofmusicthatitseemstoengulfthe listener. | Disco,DanceorJazzmusic. |
| Movie | Playbackofsoftware(films)notencodedwithDolby surround. | AllmoviesormusicsoftwarerecordedwithoutDolby surround. |
| StadiumAlargesportsstadiumpackedforalivegame.Anylivesportsoccasion. | ||
SPEAKERLEVELSETUP
The speaker output levels from the different options, e.g. Left, Centre, Right and Rear should be adjusted, from your usual listening position, to obtain the best results. The level can be set using either the TV sound or the provided test signal.
Theadjustmentsavailablewillvaryaccordingtothemodechosen.
SpeakerlevelsetupshowninProLogicmode
TELETEXTOPERATION
- Teletext features may vary depending on the Broadcasting Companies and is only available if the channel selected is transmitting Teletext.
- This TV set is capable of receiving German TOP Teletext transmissions, it will automatically switch to them if they are being received. This will be indicated in the display area at the bottom of the screen.
- Pressing the MENU key whilst in Teletext operation will display the contrast function with a cyan bar, press ◀ to alter the setting asrequired.
- Wheninteletextmode, thevolumemaystillbealteredtothedesiredlisteninglevel.
WhatisLISTmode?
In LIST mode, four differently coloured page numbers are situated at the bottom of the screen. Each of these numbers can be altered and stored in the TV's memory.
WhatisFASTEXT?
InFASTEXTmode, four differently coloured subjects are situated at the bottom of the display. To access more information about one of these subjects, press the appropriately coloured button. This facility enables fast access to information of the subjects shown.
| TV/TeletextmodePresstheTV/TEXTkey.ThescreenwilldisplaytheTeletextpage.PressagainwhenyouwishtoreturntoTV.mode. | |
| PageSelectionPagescanbeselectedintwoways:a.PresstheUp/Downkeystoincreaseordecreasethepagenumberbyone.b.Byenteringthepagenumber,using0 -9ontheremotecontrol. | |
| Red/Green/Yellow/BluekeysInFASTEXTmodethesecorrespondtothedifferentlycolouredsubjects.InLISTmodetheycorrespondtothedifferentlycolouredpagenumbers. | |
| List / F.textWheninList/FastextoperationPresstochangefromFASTEXTmodetoLISTmodeandviceversa.InFASTEXTmodefourdifferentlycolouredsubjectsaredisplayedatthebottomofthepage.Presstheappropriatecolouredkeytoaccessmoreinformationaboutoneofthesesubjects. | |
| ListStoreInLISTmodethefourpagenumberscanbealteredforchannelpositions125only. -Todothis,pressoneofthecolouredkeysandenterthenewpagenumber.PressandholdSTR,thepagenumberswillchangecolour. | |
| IndexWheninFASTEXToperationPressINDEXtoreturntothemainindexpage.Dependingonthewayinformationistransmitted,thismayhavetobepressedmorethanoncetoreturntothemainindexpage. | |
| Full/Top/BottomPresstoexpandtheTOPhalfofthepagepagPressagaintoexpandtheBOTTOMhalf.Pressagaintoreturntonormal(FULL)size. | |
| RevealPresstorevealhiddenwordse.g.quizpageanswers.Pressagaintohide. |
ItisnotpossibletochangetheprogrammepositionwheninNewsflash,UpdateorSubCodedPageAccessoperation.

Hold
To hold the Telexpagetheviewingtipalginformation.
Pressagaintoreturntoautomaticpageupdate.

DisplayCancel
Press DISPLAY CANCEL to view the TV picture whilst searching for a Teletext page.
Whenfound,thescreenwilldisplaythepagenumberatthetopleft.
PressDISPLAYCANCELtoviewthepage.
PressTV / TEXT to return on normal TV operation.
NewsFlash
When a news flash page has been selected, press DISPLAY CANCEL to view the TV picture, when an update is received, it will be displayed on screen.
PressDISPLAYCANCELtoremoveupdatednews.
PressTV / TEXT to return on normal TV. operation.
Update
Press DISPLAY CANCEL to see the update of information on certain pages.
Whenanupdateisreceived,thepagenumberwillbedisplayedatthetopleftofthe screen.
PressDISPLAYCANCELtoviewthepage.
PressTV / TEXT toreturnonormalTV.operation.
FavouritePage(F.P.)
Storesafavouritepageinmemoryforinstantrecall.Tostoresuchapage,theTVmust beinLISTmode,andtheprogrammepositionmustbefrom1 – 25.PresstheBLUE key,selectthepagenumber,thenpressSTR.Thepagenumberisnowstored.
PressFPtorecallthispage.
Dependingonthetransmissionsequence,whentheF.P.keyispressed,thecontentsof thefavouritepagemaytakesometimetoappear.Onlythepagenumberisstored,not it'scontents.

SubCoded PageAccess
Whenteletextinformationexceedsmorethanonepage,itmaytakesometimeforthe automaticchangingofthesubpagestoreachthesubpageyourequire.Itispossibleto entryyourrequiredsubpageandcontinuewatchingthenormalprogrammeuntilthe correctsubpageisfound.
Selecttherequiredpagenumberusingkeys0 - 9.
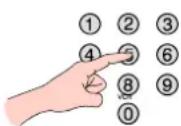
PressTIMETEXT,****willbedisplayed(toprightofthescreen).
Enterdesiredsubpagenumberbeforethe****disappears.
Toselectpage6enter0,0,0and6.
IfinLISTmode, a'T'willappearinthecurrentboxatthebottom.

Press DISPLAY CANCEL to view a normal TV programme.
When the page is available, press DISPLAY CANCEL to view the page.
Toclearthepageperformoneofthefollowing:
- Selectanewpagenumber.
- Press TV/TEXT to return to normal TV operation.
YournewTVissuppliedwithprogrammeposition'0'settoreceiveanRFsignalfromyourVCR.
However, if for some reason your VCR is tuned to a different RF channel then you will not receive any picture or sound from your VCR on programme position '0' of the TV. It will be necessary to either adjust the RF channel of your VCR or to adjust the tuning of the TV's programmeposition '0'orbothuntilreceivestheRFoutputchannelofyourVCR.
It is intended that this advice is used in conjunction with the instruction books for your ancillary equipment.
TOTUNEYOURVCRTOTHETV
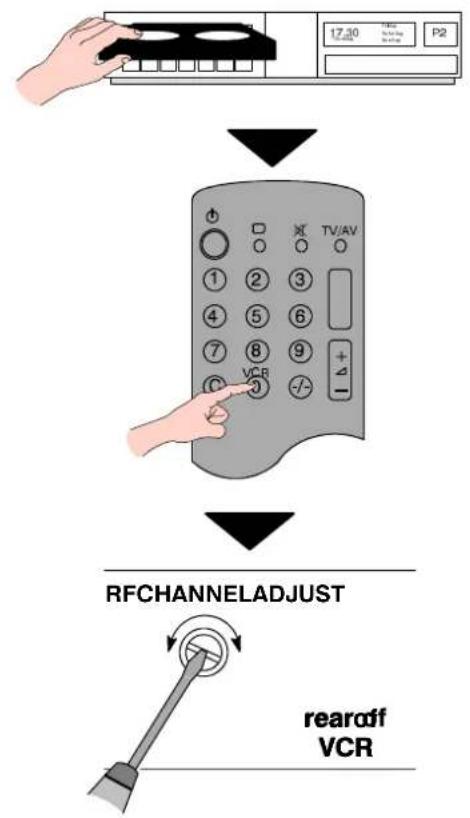
Note:
SomeVCR'sarecapableofadjustingtheir RFchannelviatheirremotecontrolunit.
natural_image
Line drawing of a classic convertible car (no text or symbols)Insert recorded tape and select playback
SetTVto programme position'0' VCR
Adjust tuning
Operation completed
Seebelowfor installationofVCR and SatelliteReceiver
TOTUNNEYQUBRVTKOTBIEVERVCR
AccesstheManualtuningmeneias as detailed on page 23.
▼ ▲ Toselectprogrammeposition'0'
◀ ▶ To start search from VCB playback
Programmepositionandcurrentchannel aredisplayedtopleftofscreen
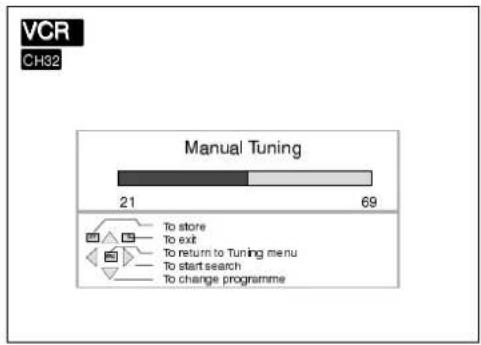
bar
VCR CH32 Manual Tuning | Category | Count | |---|---| | To store | 21 | | To exit | 69 | | To return to Tuning menu | | | To start search | | | To change programme | |
natural_image
Line drawing of a vintage convertible car (no text or symbols on the car itself)If you are going to use a Satellite Receiver and a VCR it is important, to avoid tuning problems, that they are both tuned to output their signals on differing channels. For example, if your VCR is tuned to output channel 32, your Satellite Receiver could be set to output channel 34. RefertoyourSatelliteReceiverandVCRinstructionbooksforprecisetuninginformation.
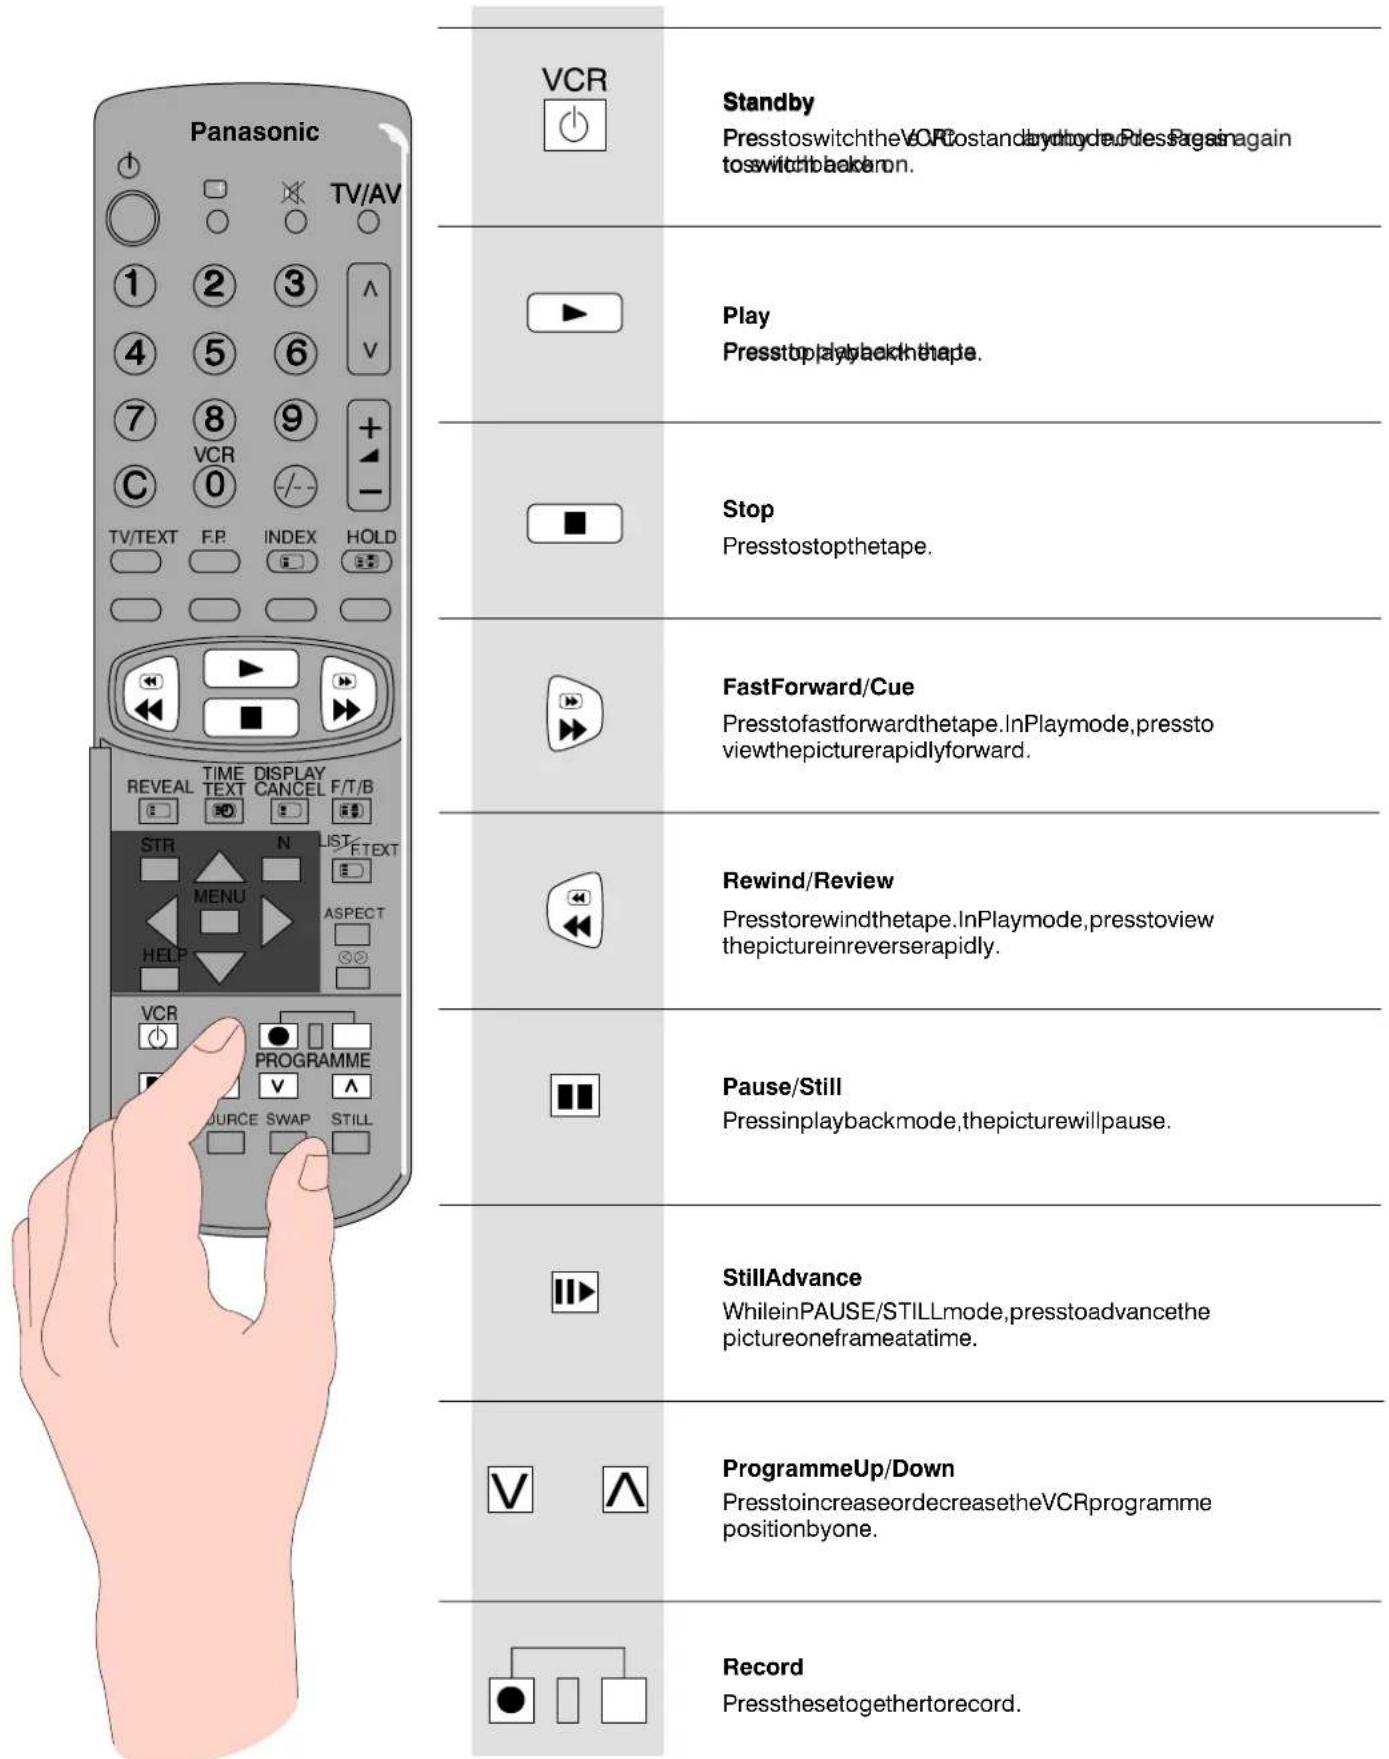
The Remote Control is capable of operating some functions of selected Panasonic VCRs, please consult your dealer for details. Some VCR have different functions, so to ensure compatibility, please refer to the VCR's instruction book.
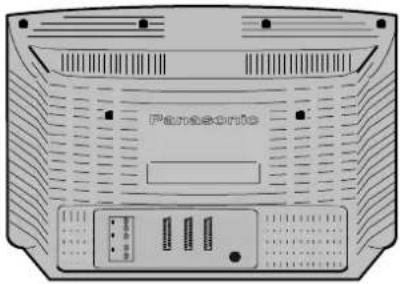
FrontAV34PinS -Video,RCAAudio/VideoandHeadphoneSockets
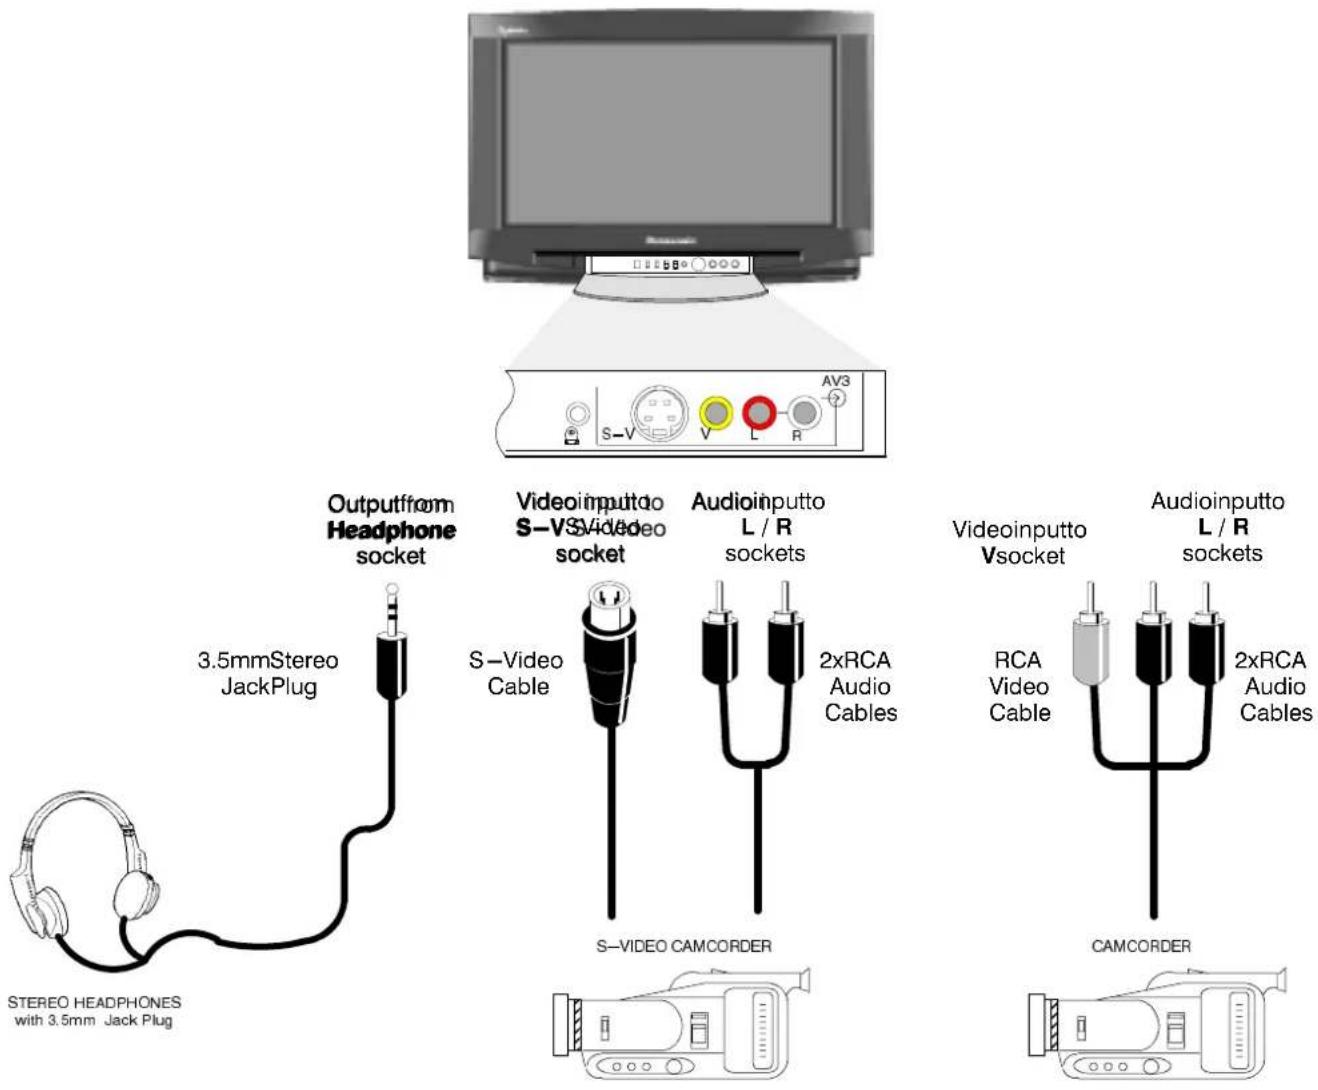
AncillaryequipmentandcablesshownarenotsuppliedwiththisTVset. et.
SCARTandSVideoTerminalInformation
AV1andAV421pinSCARTterminalsSVideo4pAM22pipi8SCARTentaimahal
Suitable inputs for AVN1circleRGB(Red/Red/Green/Blue).
AV4 does not have RGB input capability.
AV2 - Pins15and20aredependent on
AV2S4HSMDDE0SWtchwltghing.
RearAV1/AV2(S)/AV421PinSCARTandRCAAudioOutTerminals
flowchart
graph TD
    A["Input/Output from AV1SCARTSocket"] --> B["SCART Cable"]
    C["Input/Output from AV2SCART Socket"] --> D["SCART Cable"]
    E["Input/Output from AV4SCARTSocket"] --> F["SCART Cable"]
    B --> G["VCR"]
    D --> H["SECOND VCR OR S-VIDEO VCR"]
    F --> I["SATELLITE RECEIVER"]
    G --> J["SATELLITE RECEIVER"]
    H --> K["SATELLITE RECEIVER"]
    I --> L["SATELLITE RECEIVER"]
    J --> M["Panasonic"]
    K --> N["Panasonic"]
    L --> O["CAMCORDER"]
    M --> P["CAMCORDER"]
    N --> Q["COMPUTER (RGB)"]
    O --> R["COMPUTER (RGB)"]
Notes:
Ancillary equipment and address show area and supply policy this TV set. TV set.
DomconneetacomputerwithMIFLOItput(5V)tofVsssetthis set.
The AV2 21 pin terminal can also be used as an Output to Audio / Video Equipment (refer to page 15 for details).
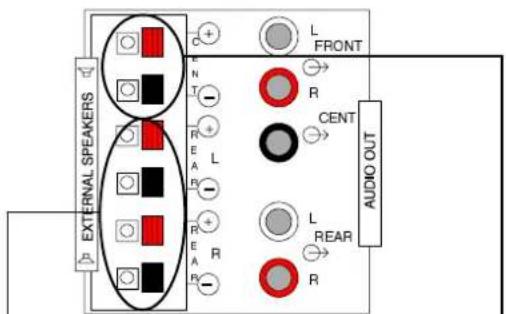
Audiooutusingexternalamplifiersandspeakers
The Audio Out sockets on the rear of the TV allow you to create your own custom sound output system using additional external amplifiers and speakers. You may decide, for example, to use an external amplifier and speakers for the Front surroundoutput.
Utilisinganexistingstereohi —fisystemcomprisingoneamplifier, connectedtotheFRONTDOLBYSURROUNDOUT socketsandtwospeakerstoallowseparatefrontleftandrightchannels.
TheinternalspeakercanbeswitchedoffintheSurroundmenu.
flowchart
graph TD
    A["External Front speakers connected to an additional amplifier"] --> B["R"]
    B --> C["L"]
    C --> D["R"]
    D --> E["R"]
    E --> F["R"]
    F --> G["L"]
    G --> H["R"]
    H --> I["R"]
    I --> J["R"]
    J --> K["L"]
    K --> L["R"]
    L --> M["R"]
    M --> N["L"]
    N --> O["R"]
    O --> P["L"]
    P --> Q["R"]
    Q --> R["L"]
    R --> S["R"]
    S --> T["L"]
    T --> U["R"]
    U --> V["L"]
    V --> W["R"]
    W --> X["L"]
    X --> Y["R"]
    Y --> Z["L"]
Notes:
AllAudiooutsocketscanbeconnectedtheateramalifiersafidspeakershipouvaityocreateyourowateustomsystem.
The level of the significance of the Abel A Ouits Oakesis is controlled by the TVyothene Tovolome control.
The extra equipment required districts supplied.
| Symptoms | Checks | |
| PictureSound | ||
 SnowyPicture SnowyPicture |  NoisySound NoisySound | Aeriallocation,directionorconnection |
 MultipleImages MultipleImages |  NormalSound NormalSound | Aeriallocation,directionorconnection |
 Interference Interference |  NoisySound NoisySound | ElectricalappliancesCars/MotorcyclesFluorescentlightsSwitchonP -NRinSetupmenutoreducepicture noise |
 NormalPicture NormalPicture | 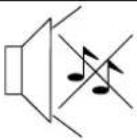 NoSound NoSound | VolumelevelSoundmuteswitchedon |
 NoPicture NoPicture |  NoSound NoSound | TVsettoAVmodeNotpluggedintoA.C.outletNotswitchedonPicture/SoundcontrolssetatminimumlevelsCheckifinstandbymode |
 NoColour NoColour |  NormalSound NormalSound | Colourcontrolssetatminimumlevels |
 PoororDistortedPicture PoororDistortedPicture |  WeakorNoSound WeakorNoSound | RetuneChannel(s) |
 ColouredPatches ColouredPatches |  NormalSound NormalSound | MagneticInterferencefromunshieldedequipmentReceivermovedwhileswitchedON,switchTVoffor 30minutes. |
 NormalPicture NormalPicture |  Weakordistortedsound Weakordistortedsound | Soundreceptionmayhavedeteriorated.SwitchNicamsetting(Soundmenu)toOffuntil receptionimproves. |
■Service
Beforerequestingservice, pleaserefertothetroubleshooting guideonpreviouspagetodeterminethesymptoms. To obtain servicepleasecontactyourlocalPanasonicdealerquotingthe modelnumberandserialnumber(botharelocatedattherearofthe TV).
■TVGames/HomeComputers
ExtendeduseofTVgamesorhomecomputerswithanytelevision setcancauseapermanent'shadow'onthescreen. Thistypeof irreversiblepicturetubedamage,canbelimitedbyobservingthe followingpoints:
- Reducethebrightness and contrast level to a minimum viewing level.
- Donotoperatethetelevisionsetforacontinuousperiodof timewhileusingTVgamesorhomecomputers.
- This type of picture tubed damage, is not an operating defect, and such is not covered by the Panasonic warranty.
■SleepFeature
If these is not switched off when the TV station stop transmitting, it will automatically go to standby mode after 30 minutes. This function will not operate when the TV in AV mode.
■LastPositionMemory
Certainfunctionshavealastpositionmemory,i.e.thesettingatthe timeofswitch -offwillbethesettingusedwhenthereceiveris switchedonagain: -
Programme Tint(M.NTSC/NTSConly) 3DBass PIP
AVPosition(ifpreviouslysetbyremotecontrol)
Flickerreduction Contrast
Volume Sharpness
Nicam Aspect
Bass Standby
Treble Artificial Intelligence(Al)
Balance Colour
AV2OUTselection Brightness
Status Headphonevolume
P-NR Surroundmode
Speakerlevelsetting Speakerdistance
Volumecorrection(inAVmodeonly)
SPECIFICATIONS
| TX-W32D2DP | TX-W28D2DP | |
| PowerSource | 220 -240V50HzA.C. | |
| Power consumption | 207W | 199W |
| Standbyconsumption | 1W | |
| Picture Tube | Diagonal 82cm, 76cm visible diagonal | Diagonal 70cm, 66cm visible diagonal |
| Audio Output (Music) | Front 20W x 2, Rear 15W x 2, Centre 20W, 3D Bass 26W | |
| Dimensions H | 555mm | 497mm |
| 862mm | 760mm | |
| 553mm | 503mm | |
| Weight (Kg) | 52 | 39 |
| Receiving Systems/ Bandname | PAL I UHF E21-69PAL525/60 Pla.ybackofNTSCta..pefromPALVideorecorders.c (VCR)M.NTSC Playback from M.NTSC Videorecorders (VCR)NTSC (AV input only) Playback from NTSC Videorecorders (VCR) | |
| Aerial - Rear | UHF | |
| Headphones - Front | 3,5mm | |
| AV1 - Rear | 21 pin terminal - Audio / Video in / out, RGB in | |
| AV2 - Rear | 21 pin terminal - Audio / Video in / out, S-Video in, Selectable output | |
| AV4 - Rear | 21 pin terminal - Audio / Video in /out | |
| DolbySurroundOut -Rear | 5xDolbySurroundOutRCAExternalSpeakerconnections - 2 x Front, 2 x Rear, 1 x Centre | |
| AV3 - Front | S-Video in, 2 x RCA Audio in, 1 x RCA Video in | |
- Specifications are subject to change without notice. Weight and dimensions shown are approximate.
- "Dolby", "ProLogic" and the double - Dsymbol are trademark of Dolby Laboratories Licensing Corporation. Manufactured under license from Dolby Laboratories Licensing Corporation.
NOTES