Waketower MRWT6W - Głośnik BOSS - Bezpłatna instrukcja obsługi
Znajdź bezpłatnie instrukcję urządzenia Waketower MRWT6W BOSS w formacie PDF.

Pytania użytkowników dotyczące Waketower MRWT6W BOSS
0 pytanie dotyczące tego urządzenia. Odpowiedz na te, które znasz, lub zadaj własne.
Zadaj nowe pytanie dotyczące tego urządzenia
Pobierz instrukcję dla swojego Głośnik w formacie PDF za darmo! Znajdź swoją instrukcję Waketower MRWT6W - BOSS i weź swoje urządzenie elektroniczne z powrotem w ręce. Na tej stronie opublikowane są wszystkie dokumenty niezbędne do korzystania z urządzenia. Waketower MRWT6W marki BOSS.
INSTRUKCJA OBSŁUGI Waketower MRWT6W BOSS
USER'S MANUAL
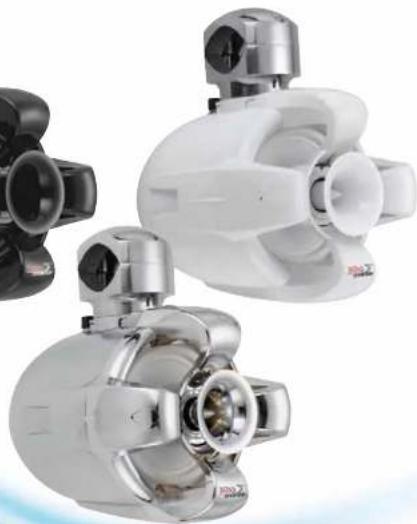
MRWT6B/ MRWT6C/ MRWT6W
2-Way Fully Marinized
Marine Waketower Speaker System
Making waterproof connections
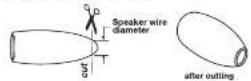
To ensure a tight, waterproof connection between the speaker wires and the terminals on the waketower speakers, we have included rubber terminal covers. Installed properly, these will prevent water penetration and reduce the risk of corrosion in the marine environment.
1- Snip off the end of each terminal cover. This will create a hole at that end, through which you will feed the speaker wire. Since a waterproof connection is desired, before you cut, try to determine the resulting ho e size you need -- the goal is that the wire fits very snugly in the hole.
2- Pull the speaker wires through the holes in the covers.
3- Attach the wires to the terminals and slide the covers fully onto the terminals. Be sure to observe proper speaker polarity for best sound.
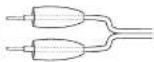

Slide rubber terminal cover onto terminal completely.
System dimensions
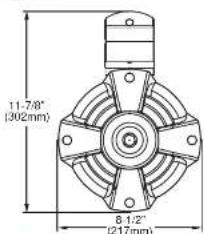

MRWT6B/MRWT6C/MRWT6W
2-WAY WAKETOWER SYSTEM
[1.20]

CE
e1
tech support: www.bossaudio.com/support
BOSS®
AUDIO SYSTEMS
BOSS Audio Systems • 3451 Lunar Court • Oxnard, CA 93030
www.bossaudio.com

natural_image
Close-up of a robotic arm partially submerged in water, creating large bubbles (no text or symbols visible)USER'S MANUAL
MRWT6W
MRWT6B
MRWT6C
6.5" (165mm) MARINE WAKETOWER
2-WAY FULL RANGE SPEAKER SYSTEM
natural_image
Three metallic industrial sensors with white and black components, no visible text or symbolsBOSS®
AUDIO SYSTEMS
BOSS® AUDIO SYSTEMS
MRWT6B MRWT6C MRWT6W 2-Way Fully Mannized Marine Waketower Speaker System
Congratulations on your purchase of a BOSS Marine Waketower Speaker System. It has been designed, engineer and manufactured to bring you the highest level of performance a quality, and will afford you year of listening pleasure.
Thank you for making BOSS your choice for marine audio entertainment!
Specifications
Mid Bass Driver: 6.5"(165mm) diameter poly injection cone santoprone surround 1.25"(32mm) high temperature KEISV voice coil
Tweeter: 1" (25mm) bullet tweeter
Crossover network: Built-in
Impedance: 4 Ohms
Power Capacity: 500W peak/250 watts RMS
Frequency Response: 60Hz - 20kHz
Sensitivity: 94dB (1 watt/1 meter)
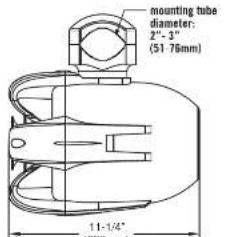
Dimensions: 8 1/2" (W) x 11-7/6" (H) x 11-1/4" (D) (217 (W) x 302 (H) x 286 (D) mm)
Weight (each speaker system): 8.4 lbs (3.9kg)
All specifications subject in charge without notice.
USER'S MANUAL
Introduction
Your new MRWT6B/MRWT6C/MRWT6W waketower speakers are high-powered, fully-waterproof 2-way systems featuring 6.5" drivers and a 1" bullet tweeter.
BOSS understands that waketower systems are placed in many different kinds of installations, so we have provided you with ability to securely attach these systems to mounting tube diameters of 2-3 inches (51-76mm).
What is included?
When first unpacking your new waketower speaker system, please check first that the package contains all of the items below. If something is missing, contact the store where you purchased the product.
• (1) Waketower speaker
• (1) mounting clamp
• (2) rubber mounting pads
• (2) mounting bolts
Safety considerations when installing
While we have designed the mounting system to provide a safe and stable installation, it is important to remember that these are heavy products and the boating environment can be extremely bumpy and turbulent. So please consider this and use extreme caution when mounting to avoid what may be a very serious accident.
Some safety considerations include:
1- Do not mount the speaker in a location where someone may either walk into it and strike their head or where a turbulent ride may make them lose their footing and be hurled into the speaker and injured.
2- Secure the wires to the speaker in many locations along their route to your audio source so that there are no hanging loops of wire. In dim lighting a vessel passenger may not see these and may be injured if it crosses their neck or face.
3- Use extreme care in tightening the mounting clamps. We have included rubber pads to dampen the attachment, but the rubber will compress under the clamps and as a result, the clamp may appear to be tighter than it actually is. So after your installation is complete, be sure to check the bolts and tighten further if possible before taking your boat out for an audio adventure.
4- Do not install these speakers where they may block the view of the pilot and prevent safe operation of the vessel.
MRWT6B/MRWT6C/MRWT6W 2-Way Fully Marinized Marine Waketower Speaker System
Installation
It is strongly recommended that you work with an assistant to install these speakers. They are very heavy and it is difficult to hold them in the mounting location AND insert and tighten the hardware.
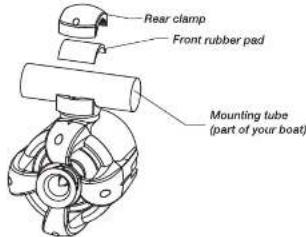
1- Unpack and disassemble the clamp systems on your waketower system, making sure to put all components of the system in a safe location.
2- Determine the optimal locations for your speaker systems on the mounting tubing on your vessel.
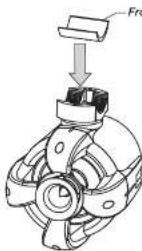
3- Place the front rubber pads on the inner surface of the front half of each clamp (the clamp part that is a permanent part of the speaker system).
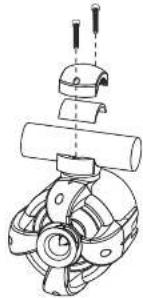
6 - Insert (2) bolts through each rear clamp into the front clamps and tighten each bolt until you feel resistance. Then tighten each of the four bolts a few turns, and repeat until all are fully tightened. By tightening all equally, you will greatly improve the safety of the mounting.
natural_image
Mechanical assembly diagram showing a motor or gear mechanism with no visible text or symbols4- Lift the speaker to the proper location so that the front clamps/rubber pads press on the front of the mounting tubing.
5- Place the rear rubber pads on the rear surface of the mounting tubing and put the rear clamp halves in place over the rubber pads.