
R8 - Voiture de sport AUDI - Notice d'utilisation et mode d'emploi gratuit
Retrouvez gratuitement la notice de l'appareil R8 AUDI au format PDF.
| Type de produit | Voiture de sport |
|---|---|
| Caractéristiques techniques principales | Moteur V10, 5.2 L, 570 ch (R8 V10), 610 ch (R8 V10 Plus) |
| Transmission | Transmission intégrale Quattro, boîte de vitesses à double embrayage S tronic |
| Dimensions approximatives | Longueur : 4 426 mm, Largeur : 1 942 mm, Hauteur : 1 235 mm |
| Poids | Environ 1 560 kg (selon la version) |
| Vitesse maximale | 330 km/h (version V10 Plus) |
| Accélération 0-100 km/h | 3,2 secondes (version V10 Plus) |
| Consommation de carburant | Environ 13,3 L/100 km (mixte) |
| Type de carburant | Essence sans plomb 98 |
| Entretien et nettoyage | Entretien régulier recommandé tous les 15 000 km ou 12 mois, nettoyage de la carrosserie avec des produits adaptés |
| Pièces détachées et réparabilité | Disponibilité de pièces d'origine chez les concessionnaires Audi, réparabilité variable selon les interventions |
| Sécurité | Équipements de sécurité avancés : ABS, contrôle de traction, airbags, système de freinage performant |
| Informations générales utiles | Voiture conçue pour la performance, idéal pour les passionnés de conduite sportive, attention à la consommation de carburant et aux coûts d'entretien |
FOIRE AUX QUESTIONS - R8 AUDI
Questions des utilisateurs sur R8 AUDI
0 question sur cet appareil. Repondez a celles que vous connaissez ou posez la votre.
Poser une nouvelle question sur cet appareil
Téléchargez la notice de votre Voiture de sport au format PDF gratuitement ! Retrouvez votre notice R8 - AUDI et reprennez votre appareil électronique en main. Sur cette page sont publiés tous les documents nécessaires à l'utilisation de votre appareil R8 de la marque AUDI.
MODE D'EMPLOI R8 AUDI
Audi R8
Quick reference guide
natural_image
Side profile of a silver Audi sports car against a studio lighting background (no visible text or symbols)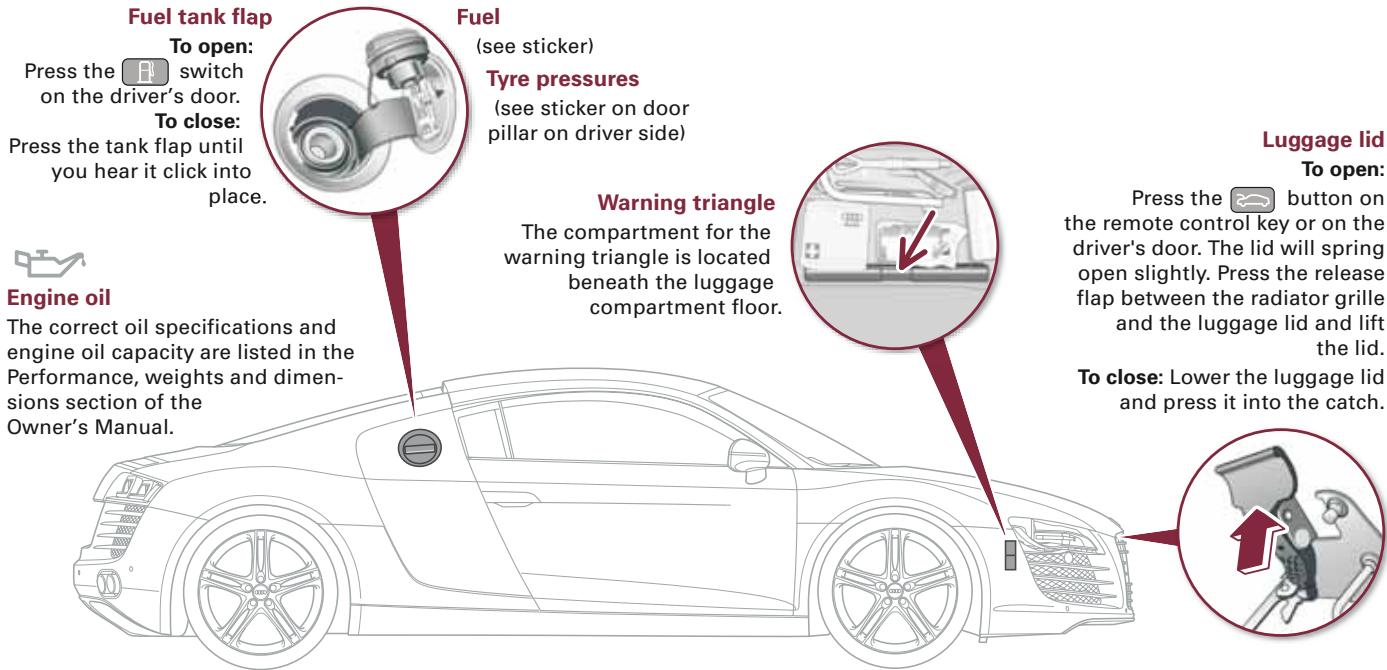
text_image
Fuel tank flap To open: Press the switch on the driver's door. To close: Press the tank flap until you hear it click into place. Fuel (see sticker) Tyre pressures (see sticker on door pillar on driver side) Warning triangle The compartment for the warning triangle is located beneath the luggage compartment floor. Luggage lid To open: Press the button on the remote control key or on the driver's door. The lid will spring open slightly. Press the release flap between the radiator grille and the luggage lid and lift the lid. To close: Lower the luggage lid and press it into the catch. Engine oil The correct oil specifications and engine oil capacity are listed in the Performance, weights and dimensions section of the Owner's Manual.Luggage lid
To open:
Press the 📄 button on the remote control key or on the driver's door. The lid will spring open slightly. Press the release flap between the radiator grille and the luggage lid and lift the lid.
To close: Lower the luggage lid and press it into the catch.
natural_image
Illustration of a mechanical device with a red upward arrow, no text or symbols present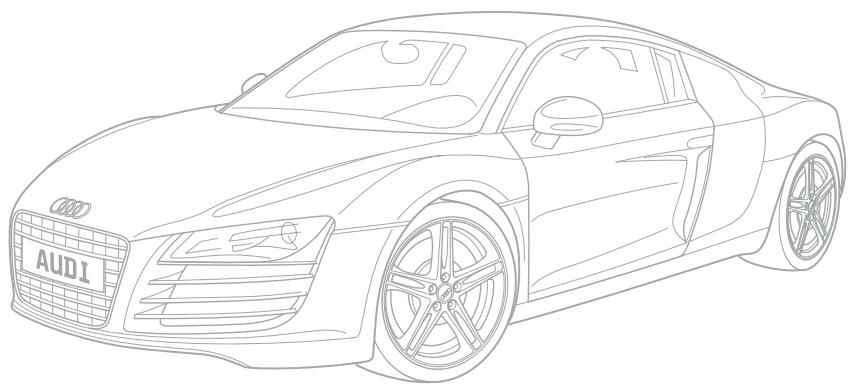
natural_image
Line drawing of a Audi car with no text or symbols on the bodyDear Audi Driver,
This quick reference guide gives you an overview of the main features and controls of your vehicle. However, it cannot replace the detailed Owner's Manual which contains important information and safety warnings.
Please refer to your Owner's Manual for detailed information on your vehicle. You will find everything you need to know about the radio, CD, navigation and telephone functions in the Operating Manual for your navigation system.
We wish you safe and enjoyable motoring with your new Audi.
AUDI AG
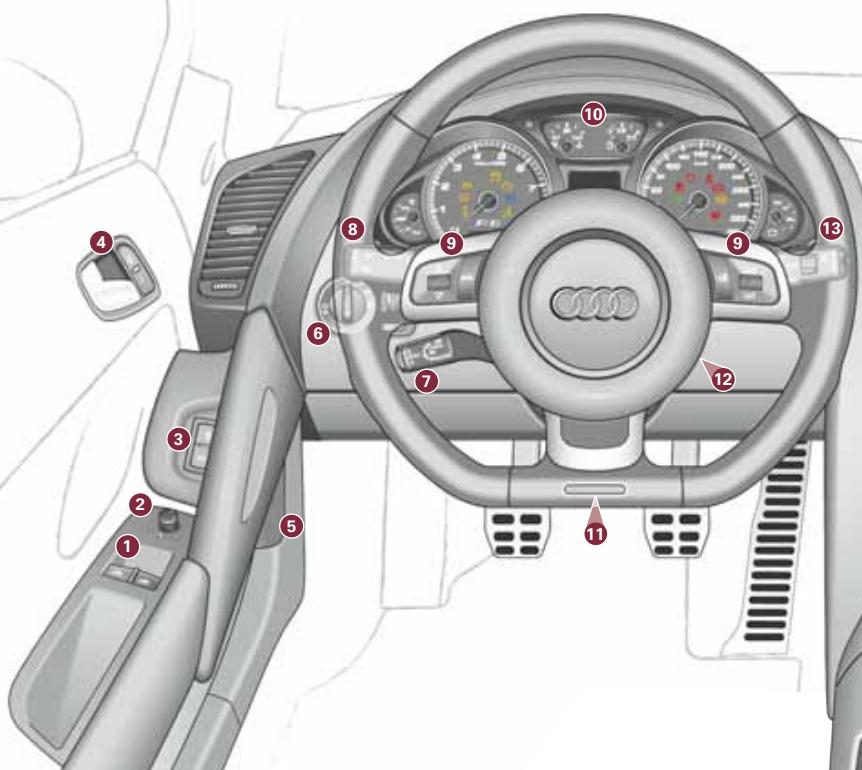
Controls and displays
1 Electric windows
To set the desired position: Press/pull to the first stop and hold. "One-touch" function: Press/pull briefly to the second stop.
② Adjuster for exterior mirrors
Turn the adjuster for:

Left exterior mirror

Exterior mirror heating

Right exterior mirror

Exterior mirror retraction
Press the adjuster to move the mirror glass in the desired direction.
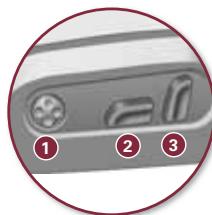
3 Unlock switches for:

Luggage lid

Tank flap
text_image
Diagram of the Audi vehicle's interior and dashboard with numbered labels pointing to key components such as steering wheel, dashboard, and air traffic controls.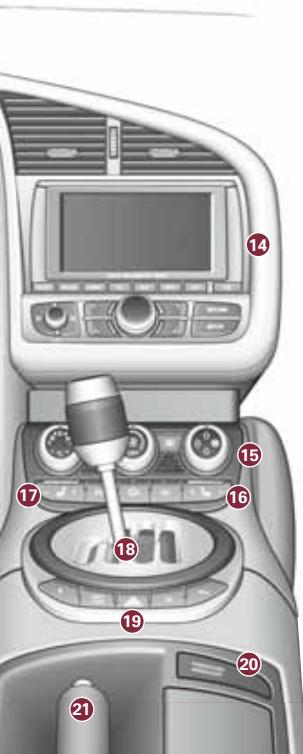
text_image
Diagram of car interior control panel with numbered labels pointing to various controls and gauges4 Door handle and central locking switch

Lock

Unlock
5 Bonnet lock release
6 Light switch
⑦ Cruise control system
8 Turn signal and main beam lever
9 Controls on multi-function steering wheel
10 Instruments and warning/indicator lamps
⑪ Steering wheel position adjuster
12 Ignition lock
13 Windscreen wipers/washer and buttons for on-board computer
14 Navigation system
15 Air conditioner
16 Front passenger's seat heating
17 Driver's seat heating
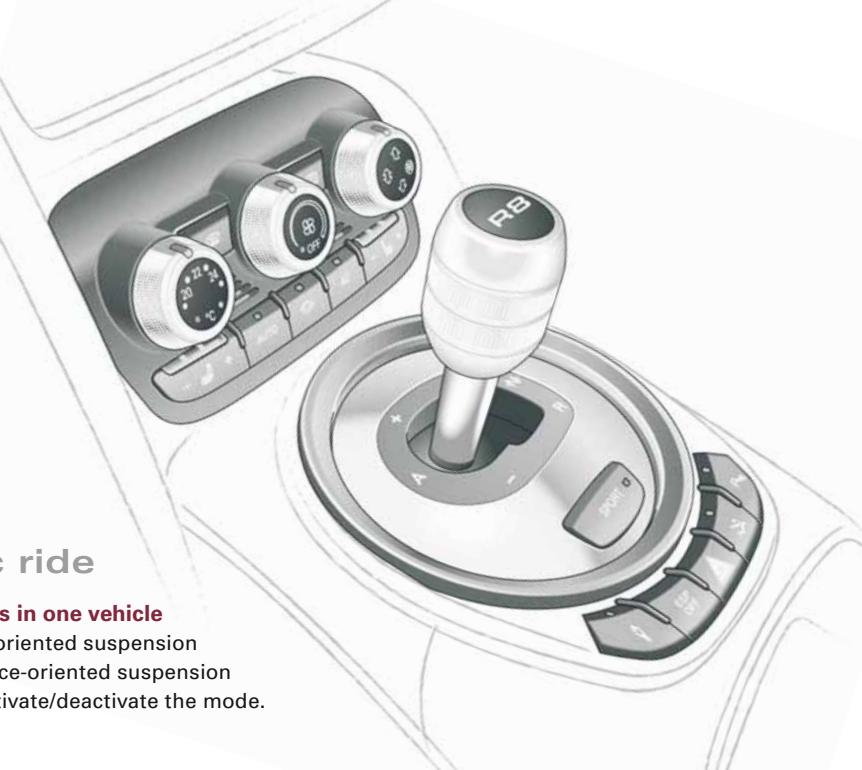
18 Gear lever or selector lever for R tronic
19 Buttons for:

Audi magnetic ride

Electronic stabilisation program

Hazard warning lights

Rear spoiler

parking system for activation/deactivation of parking aid
20 Warning lamp for front passenger's airbag
21 Handbrake
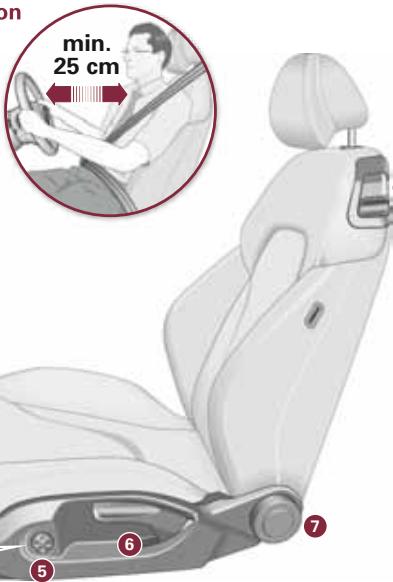
Sitting position
Sit in a normal upright position and do not sit too close to the steering wheel. If necessary, also adjust the position of the steering wheel.
text_image
min. 25 cm ⑤ ⑥ ⑦Seat adjustment
Electric seat adjustment
① To adjust lumbar support:
Press the appropriate part of the switch.
② To adjust seat height and move seat backwards or forwards:
Front of seat cushion up/down
Rear of seat cushion up/down
Seat up/down
Seat forwards/ backwards
3 To adjust backrest:
Backrest further upright/further reclined
natural_image
Close-up of a computer monitor with three labeled buttons (1, 2, 3) and a circular outline, no readable text or symbols beyond labels.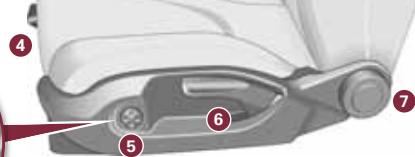
text_image
Diagram of a car seatbelt mechanism with numbered parts labeled 4, 5, 6, and 7Adjusting head restraints
Take hold of the sides of the head restraint with both hands and move it up or down as required. The top of the head restraint should be at eye level or higher.
8 Manual seat adjustment
4 To move seat backwards or forwards:
Lift the lever and move the seat.
Then release the lever and move the seat further until the catch engages.
5 To adjust lumbar support:
Press the appropriate part of the switch.
6 To adjust seat height:
Pull up or press down the lever repeatedly.
7 To adjust backrest:
Take your weight off the backrest and turn the knob.
8 To release backrest:
Pull the lever upwards and fold the backrest forwards.
Starting the engine
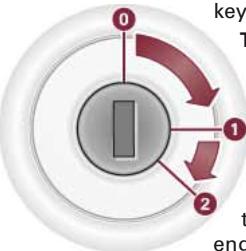
Switching on the ignition/starting the engine
Insert the key into the ignition lock.
To switch on the ignition: Turn the key to position 1.
text_image
0 1 2 key T t engTo start the engine (on vehicles with manual gearbox): Press the clutch and turn the key to position ② until the engine starts.
To start the engine (R tronic):
Press the brake pedal and turn the key to position 2 until the gine starts.
To switch off the engine: Turn the key to position 0.
R tronic
Automated manual gearbox
The clutch mechanism and gear changes are controlled electronically. You can drive in automatic mode or shift gears yourself manually.

text_image
+ A RB N R -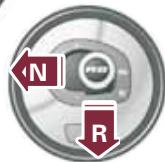
text_image
N RA - Automatic and manual gear selection
■ Briefly press the selector lever to position A. The gears are changed automatically.
- Briefly press the selector lever forwards (+) to shift up a gear.
- Briefly pull the selector lever back (-) to shift down a gear.
N - Neutral
■ Press the selector lever from position A towards the right (N) or from reverse gear (position R) towards the left (A).
R - Reverse gear
■ With the vehicle stationary (engine idling), press the brake pedal and briefly press the selector lever from position N to R.
Sport function
Press the SPORT button to activate/deactivate the sport function.
In the sport function mode, the engine's power reserves are utilised fully.
Switches for air conditioner
Control on left: Temperature selection
Control in middle: Switching air conditioner on/off and regulating blower speed.
Control on right: Air distribution

Automatic mode
Set the desired temperature and press the button.

Air recirculation
Circulates and filters the air in the interior of the vehicle

Switching air cooling system on/off

Defrosting windscreen and side windows

Rear window heating
text_image
ride s in one vehicle oriented suspension ce-oriented suspension ivate/deactivate the mode.Audi magnetic ride
Two suspension systems in one vehicle
Normal driving mode: Comfort-oriented suspension
Sport driving mode: Performance-oriented suspension
Press the

button to activate/deactivate the mode.
Rear spoiler
To increase stability
The down force of the rear axle increases when the rear spoiler is extended.
Automatic mode:
The rear spoiler extends at speeds above 100 km/h and retracts at speeds below 35 km/h.
Manual mode:
Briefly press the 📁 button to extend the rear spoiler.
Briefly press the 📁 button again (while driving between
20 km/h and 100 km/h) to retract the rear spoiler again.
Press and hold the button (while driving below
20 km/h) to retract the rear spoiler.
text_image
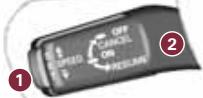
SPEED ON OFF CANCEL ON RESELL ① ②Cruise control system
When the system is switched on, the indicator lamp 📋 appears in the instrument cluster.
To switch on/off: Pull/press lever 2.
To set speed: Press button 1.
To adjust stored speed: Press lever up (faster) or down (slower).
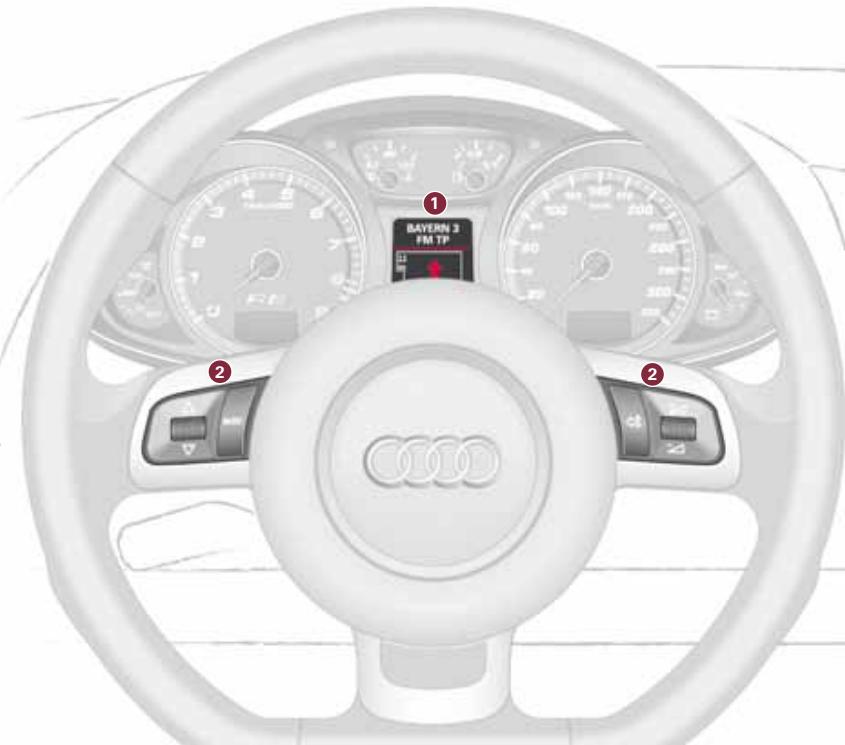
Audi Navigation System plus
Components
① Driver information system
② Multi-function steering wheel
Scroll the left thumbwheel to select a menu item in the driver information system. Press the thumbwheel to confirm the selection.
Press the MODE button to switch between the active audio source and the navigation and telephone functions.
Briefly press the 🏠 button to switch on the speech dialogue system.
Speak after the
Press and hold the talk button to switch off the speech dialogue system.
Scroll the right thumbwheel to adjust the volume. If you press the right thumbwheel, the last navigation cue will be repeated.
text_image
1 BAYERN 3 FM TP 2 2
text_image
Car dashboard display showing navigation map and control buttons with numbered labels③ Display
4 Function selector buttons
Press one of the buttons (e.g. RADIO) to activate the desired mode.
5 ON/OFF button
To switch on: Press briefly.
To adjust volume: Turn.
To mute: Press briefly.
To switch off: Press and hold.
6 Control buttons
To activate one of the functions shown in the four corners of the display, press the control button for that corner of the display.
7 Rotary pushbutton
To select a menu item on display 3:
Turn the rotary pushbutton.
To confirm selection:
Press the rotary pushbutton.
Operating logic
The operating logic for accessing the functions is always the same.
text_image
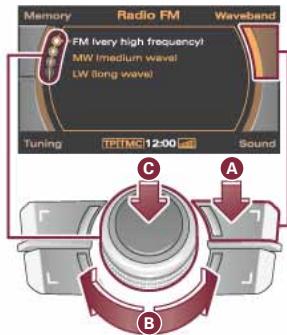
Memory Radio FM Waveband FM (very high frequency) MW (medium wave) LW (long wave) Tuning TP/MC 12:00 Sound C A BA To call up the menu in a corner of the display: Press the corresponding button.
B To select: Turn the rotary pushbutton.
C To confirm: Press the rotary pushbutton.
1 Press the RADIO function selector button.
text_image
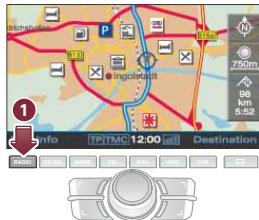
760cm 98 km 6.52 Info TPTM4C 12.00 Destination4 Press the control button for "Memory".
5 Turn the rotary pushbutton and, if desired, select "Store
desired, select "Store
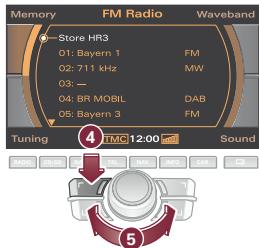
text_image
Memory FM Radio Waveband Store HR3 01: Bayern 1 FM 02: 711 kHz MW 03: — 04: BR MOBIL DAB 05: Bayern 3 FM Tuning TMC 12:00 Sound2 Turn the rotary pushbutton and select the desired station.
text_image
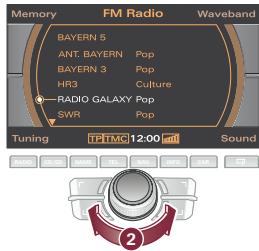
Memory FM Radio Waveband BAYERN 5 ANT. BAYERN Pop BAYERN 3 Pop HR3 Culture — RADIO GALAXY Pop SWR Pop Tuning TPATMC 12:00 aml Sound RADIO 20 MHz TEL RIO 100 MHz 2400 ②6 Press the rotary pushbutton. The next free position in the memory list will be highlighted.
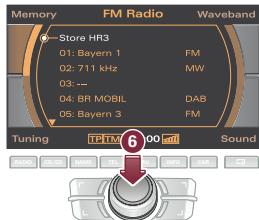
text_image
Memory FM Radio Waveband Store HR3 01: Bayern 1 FM 02: 711 kHz MW 03: -- 04: BR MOBIL DAB 05: Bayern 3 FM Tuning TPRTM 00 mV Sound3 Press the rotary pushbutton to confirm.
text_image
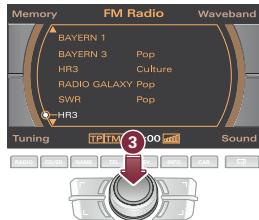
Memory FM Radio Waveband BAYERN 1 BAYERN 3 Pop HR3 Culture RADIO GALAXY Pop SWR Pop HR3 Tuning TPTTV 100 Hz Sound7 Turn the rotary pushbutton and select the desired memory position.
text_image
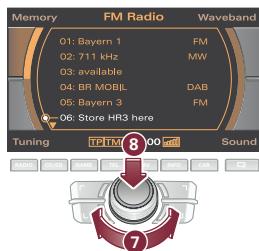
Memory FM Radio Waveband 01: Bayern 1 02: 711 kHz 03: available 04: BR MOBIL 05: Bayern 3 06: Store HR3 here Tuning TPTM 00 MHz Sound 8 78 Press the rotary push-button to confirm.
1 Press the NAV function selector button.

text_image
Memory FM Radio Waveband BAYERN 5 ANT, BAYERN Pop BAYERN 3 Pop HR3 Culture ● RADIO GALAXY SWR Tuning TPTM0 Sound 16 Repeat the above step to enter the remaining letters of the destination town until the name of the desired town appears on the display.
text_image
Memory Navigation Route Town/Zip MUN X MUNCH-LEU... X MUNCH-AUR... X MUNCH-BERG X MUNCH-BERG Nav-Info TP/MC 12:00 cml Map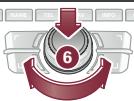
text_image
NAME TEL NAV INFO C 62 Turn the rotary pushbutton and select "Town/ZIP".
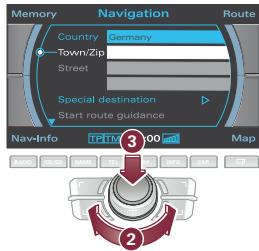
text_image
Memory Navigation Route Country Germany Town/Zip Street Special destination Start route guidance Nav-Info TPM 00 Map 3 23 Press the rotary push-button to confirm.
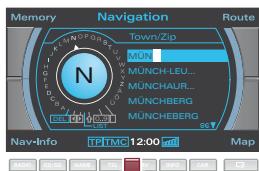
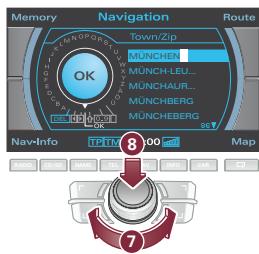
7 When you have entered the town, turn the rotary pushbutton and select "OK".
text_image
Memory Navigation Route Town/Zip MÜNCHER MUNCH-LEU... MUNCHAUR... MUNCHBERG MUNCHBERG 00 Nav-Info TPTAT Map 8 78 Press the rotary push-button to confirm.
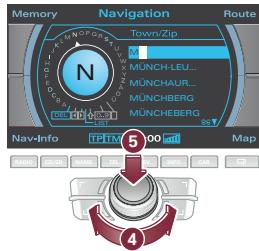
4 Turn the rotary pushbutton and select the first letter of the destination town.
text_image
Memory Navigation Route Town/Zip MUNCH-LEU... MUNCHAUR... MUNCHBERG MUNCHBERG Nav-Info TP-TW 00 mm Map 5 45 Press the rotary push-button to confirm.
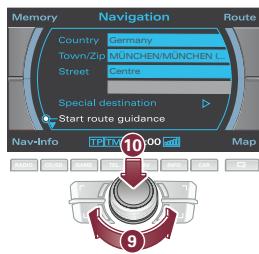
9 Select "Start route guidance" from the menu.
text_image
Memory Navigation Route Country Germany Town/Zip MÜNCHEN/MÜNCHEN C Street Centre Special destination Start route guidance Nav-Info TPATV 100 mm Map 10 910 Press the rotary push-button to confirm. The route will be calculated.
Functions
Establishing a Bluetooth™ connection for a mobile phone
You can quickly connect a Bluetooth mobile phone to the onboard phone system on your navigation system:
■ Switch on the ignition, navigation system and mobile phone.
- On your mobile phone, select the menu that looks for Bluetooth devices (e.g. "Hands-free").
- On the mobile phone, select "Audi UHV" and confirm.
■ Enter the PIN "1234" on your mobile phone.
natural_image
Close-up of a computer interface with a red arrow pointing to a card slot and control buttons (no readable text or symbols)
text_image
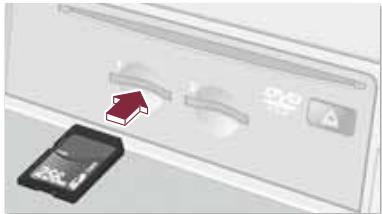
mobile Bluetooth®Memory cards
Loading:
■ Press the button to open the display.
■ Insert the memory card into the reader slot as shown in the illustration and press in the memory card until you feel it click into place.
Removing:
■ Press the button to open the display.
■ Press in the memory card. The card will be released and can then be removed from the reader slot.
Warning and indicator lamps
| Audi magnetic ride | |
| EPC | Engine management ^1) |
| Electronic stabilisation program (ESP) | |
| Emission control system | |
| Main beam headlights | |
| Rear spoiler | |
| Turn signals/hazard warning lights | |
| Cruise control system | |
| Airbag system ^1) | |
| Alternator ^1) | |
| Seat belt warning lamp |
| Handbrake is applied | |
| Anti-lock brake system1) | |
| Fuel level low | |
| Check engine oil level | |
| Engine oil sensor defective1) | |
| Brake pads worn1) | |
| Speed warning 1 | |
| Speed warning 2 | |
| Washer fluid level low | |
| Battery voltage1) | |
| Bulb monitor |
^1) If this warning lamp lights up when driving, please contact a qualified workshop without delay.
Warning symbols
| Brake light failure | |
| Light sensor/ rain sensor defective | |
| Selector lever defective ^1) | |
| No reverse gear ^1) | |
| Clutch overheating ^2) | |
| Gearbox malfunction ^2) |
^2) If this warning lamp lights up, stop the car immediately and refer to the Owner's Manual.
| (!) | Fault in the brake system |
| Fault in the cooling system | |
| Engine oil pressure too low | |
| (!) | Tyre pressure too low |
If one of these red symbols lights up in the display while you are driving, stop the car immediately, switch off the engine and refer to the Owner's Manual.
© 2007 AUDI AG
AUDI AG reserves the right to alter any part of the vehicle, its equipment and technical specifications. No legal commitment can be implied by the information, illustrations or descriptions in this publication. No part of this publication may be reprinted, reproduced or translated without the written permission of AUDI AG. All rights under the laws of copyright are expressly reserved by AUDI AG. Subject to alteration and amendment. Concept and layout: Pfiemer GmbH. Printed in Germany.
www.audi.com
Audi R8
Kurzanleitung
englisch 11.07
283.562.827.20