FG6040 - Tørketrommel Speed Queen - Gratis bruksanvisning og manual
Finn enhetens veiledning gratis FG6040 Speed Queen i PDF-format.

Brukerspørsmål om FG6040 Speed Queen
0 spørsmål om dette apparatet. Svar på dem du kjenner, eller still ditt eget.
Still et nytt spørsmål om dette apparatet
Last ned instruksjonene for din Tørketrommel i PDF-format gratis! Finn veiledningen din FG6040 - Speed Queen og ta den elektroniske enheten tilbake i hendene. På denne siden er alle dokumenter som er nødvendige for bruken av enheten din publisert. FG6040 av merket Speed Queen.
BRUKSANVISNING FG6040 Speed Queen
DRYER
OPERATING
INSTRUCTIONS
MODELS
FE6030 & FE6031
FG6040 & FG6041

natural_image
Patterned fabric with a vertical border and uniform dot texture (no text or symbols)Read complete instructions before using dryer. Refer often to the special information in the Speed Queen Handbook to Better Automatic Drying. Before using dryer for the first time, wash out the inside of the dryer drum with a sudsy cloth, then dry. The dryer must be properly installed according to the installation instructions.
TO DRY CLOTHES
TEMPERATURE

text_image
PERMANENT PRESS KNITS NORMAL DELCATE HEAVY FLUFF1 LOAD DRYER: Open door and place properly sorted laundry from washer into dryer. See Helps and Hints, page 8.
2 CLOSE DOOR: Dryer will not operate with door open.
3 SELECT DRYING TEMPERATURE: The TEMPERATURE switch controls the heat. The fiber in the fabric determines the heat selection.

text_image
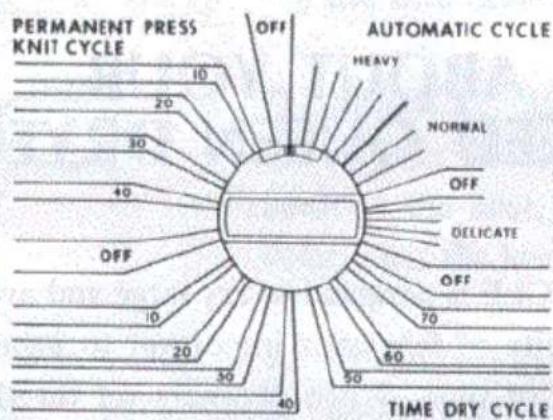
PERMANENT PRESS KNIT CYCLE 10 20 30 40 OFF 10 20 30 40 AUTOMATIC CYCLE HEAVY NORMAL OFF DELICATE OFF 70 60 50 TIME DRY CYCLE4 SELECT TIMER SETTING in cycle desired: AUTOMATIC, TIME DRY or PERMANENT PRESS—KNIT CYCLE. These cycles control the drying time. The setting is determined by the weight, absorbency (amount of moisture it holds) and bulk of the fabric. See pages 3 and 4 for detailed information.
PUSH TO START

5 START DRYER: With door closed and timer set, press the safety PUSH-TO-START button. Dryer will operate until the end of the cycle (when timer knob indicator reaches the OFF position).
TO STOP DRYER AT ANY TIME: Open dryer door or turn timer knob to OFF position.
TO RESTART DRYER: Close door, reset timer if necessary and press PUSH-TO-START button. Speed Queen dryers are designed so they will not operate if the door is open. The START button, which is out of the reach of small children, MUST be pressed to start the dryer if it has been stopped for any reason. This provides a safety feature.
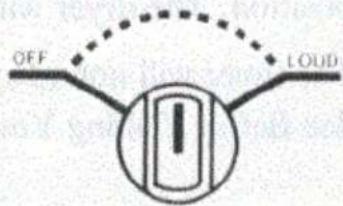
6 SET SIGNAL CONTROL: Turn selector to LOUD, loudest sound or to OFF, no sound, or to any level between. The signal will buzz for one to two minutes before the dryer stops at the end of the cycle as a reminder to remove the clothes from the dryer. The signal will also stop when the door is opened. Unless you want to change the sound level, the signal need not be set for each load. It will buzz automatically.
SIGNAL CONTROL
text_image
OFF LOUDABOUT YOUR SPEED QUEEN DRYER
AUTOMATIC CYCLE
The AUTOMATIC CYCLE is designed to dry large and average loads of similar weight fabrics. Uniformity of fabrics is important to insure that all items will dry in the same length of time. When properly set for the load, the AUTOMATIC CYCLE will shut the heat off when the load is dry. The dryer will then tumble without heat for 5 minutes before stopping at the OFF position.
Loads of a few small items or single articles, such as one sweat shirt, are not suitable loads. Large and small pieces together make the best loads for proper tumbling.
The AUTOMATIC CYCLE is marked into drying zones.
HEAVY — for heavy cottons such as quilts, large rugs, etc. This setting will not be required for most loads, but will be used for those occasional heavy bulky loads.
NORMAL — for cottons such as terry cloth towels, knits, corduroy, work clothes, mattress pads and mixed loads.
DELICATE — for fabrics the weight of sheets, shirts, dresses, etc., when they are dried with similar fabrics. Also for fabrics of or containing man-made fibers such as polyester, nylon, etc. Many fabrics today contain man-made fibers. These dry quickly and will not need the higher settings.
Turn the timer knob to the setting for the load. See Suggested Dryer Settings, page 6.
For the first several loads set the timer at the word NORMAL for regular loads and at the word DELICATE for lighter weight fabrics. You may find that a setting above or below this will be better for your loads. Your own experience will teach you the best settings for your drying requirements.
For more drying, turn the timer knob to the left to a higher setting. For less drying, turn the timer knob to the right to a lower setting.
The 5 minute cool-down (no-heat) will start at the last bar before the OFF position. The dryer will not heat if set at this position.
The timer will not advance with regularity as it does in the TIME DRY CYCLE. See Before Calling Your Serviceman, page 10.
text_image
PERMANENT PRESS KNIT CYCLE 10 20 30 40 OFF 30 50 40 AUTOMATIC CYCLE HEAVY NORMAL OFF DELICATE OFF 70 60 50 TIME DRY CYCLETIME DRY CYCLE
This cycle will operate the dryer for the number of minutes for which it is set (up to 75). Use for any load desired and especially loads of mixed fabrics which require that the more quickly dried pieces be removed from the dryer before the rest of the load is dry. Use also for knits and woolens which should be removed from the dryer when damp, and for "ironing-dampness".
Turn the timer knob for the number of minutes required for drying. See Suggested Dryer Settings, page 7. The dryer will not heat if set for 5 minutes or less.
PERMANENT PRESS — KNIT CYCLE
This cycle will operate the dryer for the number of minutes for which it is set (up to 50). The cycle is especially for garments of Premanent Press, Knits, and other fabrics of man-made fibers which require a shorter drying time. The 10 minute cool-down period at the end of the cycle cools the clothes while tumbling
to minimize wrinkling. For best results, remove these garments from the dryer as soon as tumbling stops. The dryer will not heat if set for 10 minutes or less.
LINT SCREEN
In-A-Door Lint Screen is located in the door for maximum efficiency and convenience. REMOVE AND CLEAN THE LINT SCREEN BEFORE DRYING EACH LOAD. This is important because a layer of lint on the screen will block the flow of air through the dryer, which will reduce drying efficiency.

text_image
LINT SCREENTo remove lint screen: Open dryer door, pull screen up and out of screen holder. Remove accumulated lint with your hand, then replace screen by sliding back into holder.
EXHAUST SYSTEM
We recommend that moisture laden dryer air be exhausted to the outside atmosphere to assure maximum dryer efficiency. The duct pipe should be cleaned periodically to remove any obstructions. Check occasionally to make sure the flapper on the outside weather hood moves freely, is not pushed in and that nothing has been shoved against it. Check too that the flapper is not standing open. If it is open, leaves or even snow could plug it. Any restriction of the air from the dryer will decrease drying efficiency.
If the room where the dryer is installed is adequately ventilated, it may be operated without an outside exhaust, but outside exhausting is the preferred method. The necessary suggestions and directions for exhausting are given in the Installation Instructions which are included with the dryer. See your Speed Queen dealer for full particulars.