CM100U - Kaffetrakter Gevalia - Gratis bruksanvisning og manual
Finn enhetens veiledning gratis CM100U Gevalia i PDF-format.

Brukerspørsmål om CM100U Gevalia
0 spørsmål om dette apparatet. Svar på dem du kjenner, eller still ditt eget.
Still et nytt spørsmål om dette apparatet
Last ned instruksjonene for din Kaffetrakter i PDF-format gratis! Finn veiledningen din CM100U - Gevalia og ta den elektroniske enheten tilbake i hendene. På denne siden er alle dokumenter som er nødvendige for bruken av enheten din publisert. CM100U av merket Gevalia.
BRUKSANVISNING CM100U Gevalia
CARE AND USE INSTRUCTIONS
12 Cup
Automatic
Coffee Maker
CREATED EXCLUSIVELY FOR

CM100W
CM100B
CM100G
CM100U
IMPORTANT SAFEGUARDS
When using electrical appliances, basic safety precautions should always be followed to reduce the risk of fire, electric shock, and/or injury to persons including the following:
-
READ ALL INSTRUCTIONS BEFORE OPERATING OR USING THIS APPLIANCE.
-
Do not touch hot surfaces.
-
To protect against electrical shock, do not place cord, plugs, or appliance in water or other liquid.
-
Close supervision is necessary when any appliance is used by or near children.
-
Unplug from outlet when not in use and before cleaning. Allow to cool before putting on or taking off parts, and before cleaning the appliance,
-
Do not operate any appliance with a damaged cord or plug or after the appliance malfunctions, or has been damaged in any manner. Return appliance to our authorized service facility for examination, repair, or adjustment. See warranty for service.
-
The use of an accessory not evaluated for use with this appliance may cause injuries.
-
Do not use outdoors.
-
Do not let cord hang over edge of table or counter, or touch hot surfaces.
-
Do not place on or near a hot gas or electric burner or in a heated oven.
-
Do not move entire unit when appliance is on or when thermal carafe contains hot liquids.
-
Prior to connecting or disconnecting the plug from the wall outlet, turn all controls to "OFF"
-
Do not use appliance for other than intended use.
-
WARNING: To reduce the risk of fire or electric shock, do not remove bottom cover. No user-serviceable parts are inside. Repair should be done by authorized personnel only.
-
Scalding may occur if the filter basket is opened during the brewing cycle.
-
Always use cold filtered or bottled water for best results. Warm water or other liquid could cause damage to the coffee maker.
-
Scalding may occur if the water reservoir cover is lifted or removed during the brewing cycle.
-
If the supply cord is damaged, it must be replaced by the manufacturer or a similarly qualified person in order to avoid a hazard.
Short Cord Instructions
This appliance has a polarized plug (one blade is wider than the other). To reduce the risk of electric shock, the plug is intended to fit into a polarized outlet only one way. If the plug does not fit fully into the outlet, reverse the plug. If it still does not fit, contact a qualified electrician. Do not attempt to modify the plug in any way.
A short power-supply cord is provided to reduce the risks of becoming entangled in or tripping over a longer cord. Extension cords are available and may be used if care is exercised in their use. If an extension cord is used, the marked electrical rating of the extension cord should be at least as great as the electrical rating of the appliance, and the cord should be arranged so it will not drape over the counter top or table top where it can be pulled on by children or tripped over unintentionally.
If the appliance is of the grounded type, the extension cord should be a grounded-type 3-wire cord.
OPERATING NOTICE
To avoid filter basket overflow during brewing:
-
Make sure the filter basket is securely locked in place.
-
Insure the carafe is correctly inserted in the coffee maker to activate the pause-n-serve mechanism.
-
To place only one filter paper into the basket; insure paper filter doesn't bend or fold.
After brewing is completed, there may still be some HOT liquid in the Filter Basket. Allow to drain completely and open Filter Basket carefully. Do not move coffeemaker immediately after operation.
GLASS CARAFE PRECAUTIONS:
To avoid damage of, or injury from carafe, please follow these instructions.
- The glass carafe is designed for use with this appliance only. It must never be used in any other drip-type coffeemaker, on a range top, or in a microwave oven.
- Never clean inside of carafe with a hard implement, scouring pad or other abrasive cleaners. Scratches in the glass can eventually cause glass liner to break.
- Never stir inside of the carafe with a spoon or other utensils.
- Do not use a cracked glass carafe or a carafe having a loose or weakened handle. If glass liner should break, do not consume beverage.
- Never use ice cubes in carafe, or place carafe in the refrigerator.
- Never drink directly from carafe. Always check beverages for broken glass before drinking.
- Do not use by or near children. This product is not intended for use by children.
- Do not tilt or overturn the carafe, as liquids may flow out.
- When carrying the carafe, always use the handle.
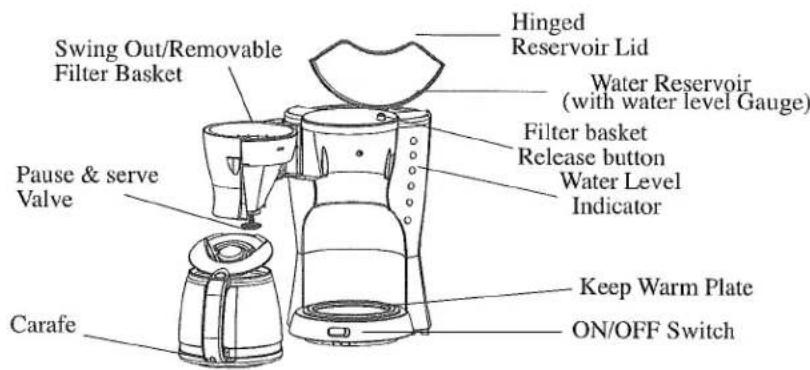
DESCRIPTION OF PARTS
SAVE THESE INSTRUCTION
HOW TO USE THE AUTOMATIC 12 CUP COFFEE MAKER
Before first use:
Before the first use it is suggested that you clean your new coffeemaker. Simply run through
2 brew cycles as described below without using coffee or a coffee filter.
PREPARATION FOR USE
- Place the coffeemaker on a hard, flat surface. With the coffeemaker turned off, plug into a 120V outlet.
- Fill the carafe with fresh, cold water (preferably bottled or filtered water). Open the hinged cover and pour the water into the water tank. The number of cups is shown by the water level indicator. Do not exceed the maximum fill level. We do not recommend making less than 4 cups.
Notes:
-
There is a drip hole on the back of the water reservoir to prevent exceeding the capacity of the coffee maker. If you add too much water, it will leak out from the back of the unit.
-
The amount of brewed coffee will be less than the water placed in the coffeemaker since about 10% is absorbed by the coffee grounds and the filter.
-
Place the carafe with the lid in place under the filter basket making sure it is fully seated in the coffeemaker to activate the pause-n-serve mechanism.
CAUTION: To avoid filter basket overflow, the carafe must fit securely into the coffee maker with the lid on.
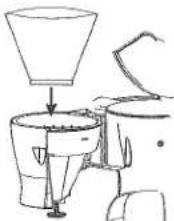
- Push down on the filter basket release button to open the filter basket. Insert a Gevalia #4 cone filter, folding the seamed edges to insure a snug fit in the basket. Use a fresh filter for each carafe of coffee.
PROPER PLACEMENT
OF FILTER PAPER
-
Add Gevalia coffee using the measuring scoop. Brew Gevalia coffee with the coffee water ratio you normally use when you prepare ground coffee. If you prefer strong coffee, we recommend the following European method, which produces rich, full-bodied flavor. Use one level Gevalia scoop for each cup (6 fluid ounces) or 10 level scoops per full pot of coffee. Experiment with the amount of coffee used in order to adjust the flavor to your taste. Do not exceed the 12 cup level.
-
Close the filter basket making sure the filter basket is securely locked in place to avoid a potential filter basket overflow.
CAUTION: If the filter basket door is not completely closed or the carafe is not securely/properly placed in the coffee maker with the lid on, then the Pause & Serve feature will not function properly. It could cause hot water or hot coffee to overflow.
- With the carafe and filter basket securely in place, press the on button. The LED light will come on.
CAUTION: Never open the filter basket during the brewing cycle; even if no water is draining from the filter basket. Extremely hot water/coffee can spill out from the basket and cause injury. If water/coffee is not draining from the filter basket, IMMEDIATELY unplug the unit and wait 10 minutes before opening and checking the filter basket.
-
When the brewing process ends and the water level indicator is empty, there will still be hot liquid in the filter basket. Wait a few minutes for the rest of the liquid to drip through into the carafe.
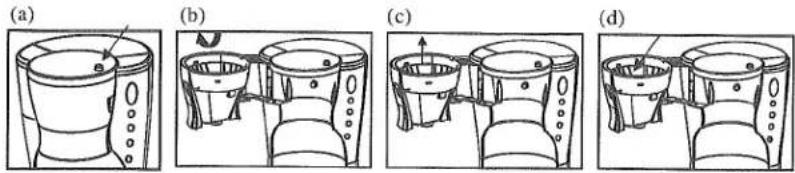
-
After coffee grounds have cooled, carefully open the filter basket by pushing down on the filter basket release button (a) and discard used coffee filter and grounds. To remove the filter basket from the coffeemaker simply swing basket outward using the basket handle (b); with basket in the far left position (c), lift up and pull basket off the basket hinge(d).
CAUTION: Coffeemaker becomes very hot during the brew cycle. Please handle with extreme care.
- The keep warm plate will operate as long as the switch is on.
- Always switch the coffee maker to OFF when the carafe is empty or you no longer want to keep coffee hot.
PAUSE & SERVE
Allows you to interrupt the brewing cycle and pour a cup of coffee before the entire carafe is finished brewing.
CAUTION: While this will temporarily stop the coffee from dripping into the carafe, it does not stop the brewing cycle. After serving, the carafe should be immediately returned to the carafe plate to prevent the filter basket from overflowing.
Make sure the carafe is positioned firmly against the back of the coffee maker.
NOTE: Strength of coffee poured mid -cycle may vary from finished brew, and will affect finished brew's strength and flavor.
CLEANING YOUR COFFEEMAKER
- Always unplug the coffeemaker & allow to cool before cleaning.
- Wash carafe/carafe lid and removable filter basket in hot, sudsy water, or place in top rack of the dishwasher. DO NOT place any other parts of your coffee maker in the dishwasher.
- Never use harsh or abrasive cleansers on any part of your coffee maker. To clean, simply wipe off with a soft, damp cloth. The keep warm plate may be wiped with a clean, damp cloth when necessary. For hard to remove stains, use a plastic mesh pad or cloth dampened in vinegar.
IMPORTANT: Never immerse the keep warm plate or main housing in water or any other liquid. Do not try to clean the inside of the water chamber with a cloth, this will leave a residue of lint and may clog your coffee maker. Just rinse with cold water periodically.
DECALCIFYING YOUR COFFEEMAKER
Calcium build-up frequently occurs in drip coffeemakers. This build -up is normal and is caused by minerals commonly found in drinking water. Periodically, your coffeemaker will need cleaning to remove calcium or mineral deposits that may form. You will know when your unit will need decalcifying when you notice an obvious slow down in brewing time. We recommend decalcifying your unit with a solution of white vinegar and cold water. A solution of two tablespoons of white vinegar to one carafe of cold water works best. Pour this solution into the water reservoir, and follow your normal operating instructions, without a filter in the filter holder. When the brew cycle is finished, empty the carafe and rinse with water. Refill the water reservoir with cold water only and repeat the brew cycle with water only, twice more. This will rinse out any remaining vinegar solution. We recommend you do this 4 times a year.
LIMITED WARRANTY
Global Marketing Corp. warrants this appliance shall be free from defects in materials and workmanship for a period of one year from the date of purchase or receipt. During that period, defects will be repaired or the product will be replaced at the manufacturer's option without charge. This warranty covers normal consumer use and does not cover damage or failure which results from alteration, accident, misuse, abuse, neglect, commercial use, or improper maintenance.
FOR SERVICE:
- Call the Gevalia Kaffe Import Service at 1-800-438-2542 for further information on repair or replacement of your defective coffeemaker.
Gevalia Kaffe is only available through the Gevalia Kaffe Import Service.
To place an order or obtain additional information, call us toll free at: 1-800-GEVALIA (1-800-438-2542)
OR
- Call Global Marketing Corporation at 1-800-969-2518 for warranty information.
NOTE : To facilitate service and better answer you questions before calling, please have the model number of your Gevalia coffeemaker and the date code of manufacture available. This information can be located by looking at the bottom of your coffeemaker. The date code is the 4 digit number next to the words "datecode."
Printed in China