UltraCompact - Ukategorisert Anthro - Gratis bruksanvisning og manual
Finn enhetens veiledning gratis UltraCompact Anthro i PDF-format.

Brukerspørsmål om UltraCompact Anthro
0 spørsmål om dette apparatet. Svar på dem du kjenner, eller still ditt eget.
Still et nytt spørsmål om dette apparatet
Last ned instruksjonene for din Ukategorisert i PDF-format gratis! Finn veiledningen din UltraCompact - Anthro og ta den elektroniske enheten tilbake i hendene. På denne siden er alle dokumenter som er nødvendige for bruken av enheten din publisert. UltraCompact av merket Anthro.
BRUKSANVISNING UltraCompact Anthro
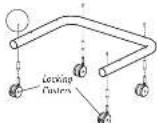
Step 8
Install all four caster inserts into the base tube and secure with one Caster Insert Screw per insert. Push the casters, (locking ones in front) into the caster inserts.
Next, place the base tube assembly onto the vertical legs of the shelf assembly. Attach the base tube to each leg using a total of four 3-1/2" Bolts.

1/2" Order Import Service 35-70×20
(五)本报告

3-1/2" Bolt 325-500 0-30
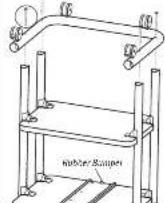
NOTE: The number of turns is located towards the rear of the cart
Step 9
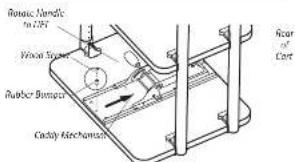
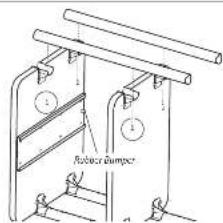
Unpack the remaining Keyboard & Mouse Caddy items.
Slide the Caddy Mechanism Into the tray.
NOTE: If needed, rotate the Mechanism Handle and LIFT to allow the Mechanism to slide to the rear.
Install the remaining Wood Screw and Rubber Bumper into the front of the Tray.

3/4" Wood Screw 325-5:08-00
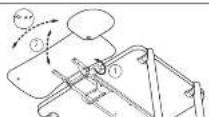
Step 10
Carefully rotate your cart back onto the casters.
Pull the mechanism to the front and place the platform onto the mechanism. Secure the platform using the four Caddy Screws and Acorn Nuts.
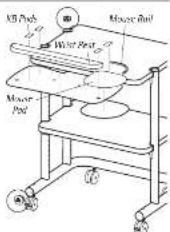
Then, install the Mouse Rail, Pad and Wrist Rest.
Pop the small end caps into the legs and the large end caps into the base tube.
After you add your equipment to the cart, select the cable management components that suit.
To install the Cable Alleys, expand each sleeve and fit it over a cart leg. Align the mounting hole(s) in the sleeve with the holes on the leg, then install with self-threading screws.
To install the Cord Handler, snap the large end around any cart leg, then route cables through the small end.
Congratulations! Your assembly is complete.
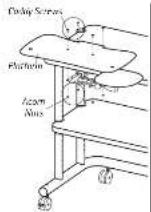
[10-24] Caddy Screw
575 500: 10
3/8" Acorn Nut 325-5023-00
Adjusting your Keyboard and Mouse Caddy
Adjust the Platform height & angle
-
Rotate the handle counterclockwise.
-
Reposition the shelf, then retighten the handle.
Adjust the Platform rotation:
- Firmly grasp the platform, then rotate
to the desired angle.
Questions? 1-800-325-3841

UltraCompact Cart
Assembly Instructions
Hello! Thank you for choosing Anthra.
Before beginning assembly of your
UltraCompact Cart, review the parts list below to verify that your shipment is complete.
It may be helpful to review the assembly
instructions of all Anthro products you purchased and plan to include in this installation.
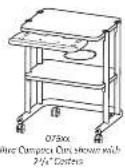
Does your Cart have 4" Casters?"
(Such as a 075x4.) Here are 4" caster pack outbees!

4" Locking Caster 150-3011-00

4" Non Locking Caster
150-5010-00
TOOLS
To make the assembly of your car, even easier, we have included these tools. Use the handy Hex Driver Bit in your electric drill in place of the Hex Driver.
Hex Driver 5/22°....375-5009-60
Hex Driver du 5/37....375-5003-00
8 oz. Rubberallet.....3/5-5022-00
A Phillips Screwdriver and an Adjustable Virech (not included) are required for this assembly.
Enclosed Parts List
Detailed views of all Hardware are provided with each Assembly Step.
| 01-Caddy Tray | Ory 1 | 275-5046-06 |
| 02-Rubber Bumpers | Ory 2 | 175-5130-08 |
| 03-Caddy Screws | Ory 4 | 575-5001-00 |
| 04-Keyboard Pads | Ory 4 | 575-5001-01 |
| 05-Wind Roel | Ory 1 | 575-5001-04 |
| 06-Caddy Platform | Ory 1 | 575-5001-04 |
| 07-Acorn Ruts | Ory 4 | 325-5023-00 |
| 08-Caddy Mechanism | Ory 1 | 575-5001-06 |
| 09-Mouse Pad | Ory 1 | 575-5001-02 |
| 10-Mouse Rail | Ory 1 | 575-5001-02 |
| 11-1/2 Wood Screws | Ory 0 | 325-5108-00 |
| 12-1.75" Large End Caps | Ory 2 | 175-5021-xx |
| 13-2 3/4" Lacking Casters | Ory 2 | 150-5003-00* |
| 14-3-1/2" Bolt | Ory 4 | 325-5000-00 |
| 15-Caster Inserts | Ory 4 | 575-1000-00* |
| 16-Caster Insert Screws | Ory 4 | 325-5052-00 |
| 17-2 3/4" Ram-Locking Casters | Ory 2 | 150-5002-00* |
| 18-Vertical Legs | Ory 4 | 125-5049-xx |
| 19-1.5" Small End Caps | Ory 4 | 175-5020-xx |
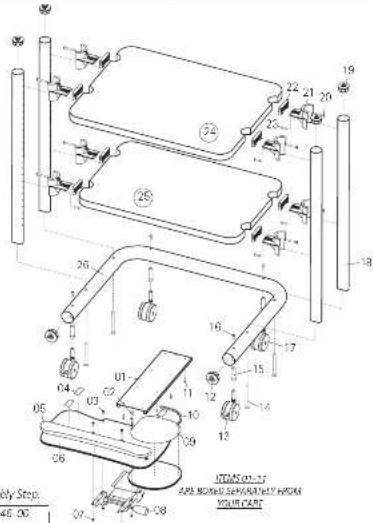
| 20- 1-5/8" Screws....Qty. B....375-5086-xx | |
| 21- Shelf Supports....Qty. B....175-5060-xx | |
| 22- Shelf Clamps....Qty. B....175-5059-xx | |
| 23- Self-Threading Screws....Qty. B....375-5010-xx | |
| 24- Ultra Compact Large Shelf....Qty. T....100-6004-xx | |
| 25- Ultra Compact Small Shelf....Qty. T....100-6005-xx | |
| 26- Ultra Compact Base Tube....Qty. T....125-5046-xx | |
| All fastener quantities listed here are the minimum needed for your cart assembly. Your shipment may include a few extras. | |
Cable Management Components
| Cable Alley, 9" | Qty 1 | 175-5061-03 |
| Cable Alley, 2" | Qty 1 | 175-5062-03 |
| Cord Handler | Qty 1 | 175-5001-03 |
| Self-threading Screws | Qty 6 | 325-5010-00 |
Anhro Corporation Technology Furniture 10450 S/W Manhasset Drive Tualatn Oregon 97082 an.hru.com
1-800-325-3841
SAVE THESE INSTRUCTIONS!
Rev C, January 2015

ANTHRO
Technology Furniture
Ultra Compact Cart
Assembly Instructions
Questions? 1-800-325-3841
Step 1
Before proceeding, please review the Assembly Instructions of all Anthro products you purchased and are planning to include in this installation.
These instructions will cover both the Ultra Compact Cart and Universal Keyboard and Mouse Caddy assembly.
You may disregard the Keyboard & Mouse Caddy Instructions that came in the separate packaging.
Step 2
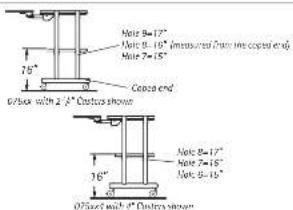
Determine the best location for your cart's shelves.
Your cart is designed to have the large shelf installed above the small shelf (as shown in these instructions).
For a small shelf location that is higher or lower than 16' from the floor, refer to the illustrations shown at right to determine which hole to attach your small shelf.
Once assembled, it is very difficult to move a shelf without taking the cart apart and starting over.
NOTE: These instructions will place your small shelf 16" from the floor using the standard 2 ^-1/3 " casters.
REIMINDER: You may want to measure your equipment to make save it his between the selected shelf locations.

DON'T FORGET: The Keyboard Control will require additional space between the shelves in order to fully slide to the neck of the tray.
Step 3
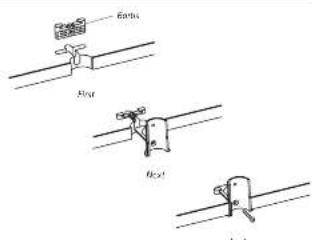
Attach four shelf supports to both shelves.
Begin by first installing a shelf clamp into the shelf notch. Be sure the pointed barbs face towards the outer shelf edge.
Slide a shelf support into the recesses of the shelf clamp and shelf. Push in as far as possible.
Secure with a 1-5/B" Screw.

1-5/8" Screen 205-5088-00
Antara Corporation Technology Furniture 70450 SW Manhasset Drive, Lusatin, Oregon 97362 anthro.com
Step 4
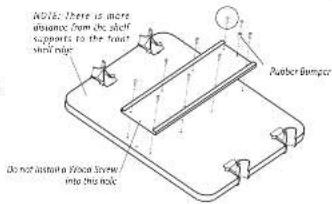
Unpack the Universal Keyboard and Mouse Caddy items.
Align the ten Caddy Tray holes with those on the underside of your cart's large shelf. Secure the tray using eight Wood Screws, 325-5106-00 (installed on the edges of the tray).
Finally, insert one wood screw through a rubber stop and install the stop towards the rear of your cart.
NOTE: One hole will be left open.

3/4" Wood Screw 325-5106-00
Step 5
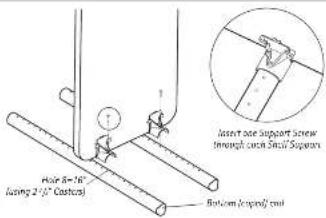
Loosely attach the small shelf to hole 8 from the bottom (coped end) of two vertical legs using two Self-threading Screws (325-5010-00). These fasteners are cutting threads into the leg, so the first few turns will require some force.
NOTE: Handle the shelf assembly carefully until the cart is fully assembled.

Self-threading Screw 325-5010-00
Step 6
Loosely attach the large shelf to hole 2 from the top (non-coped end) of the vertical leg assembly (from Step 5) using two Self-threading Screws.
TIP: Use the holes in the vertical legs as a ruler to ensure that your Self-threading Screws are installed into the correct locations.

Self-threading Screw 325-5010 00
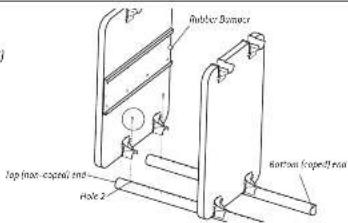
Step 7
Loosely attach the 3" and 4" vertical legs to the shelf assembly (from Step 6) using one Self-threading Screw per shelf support.
Once all four vertical legs are attached, tighten all Self-threading Screws.
TIP: Use the holes in the vertical legs as a ruler to ensure that your Self-threading Screws are installed into the correct locations.
In preparation for Step 8, rotate your cart upside down.

Self-threading Screw 325-5010-00
anthro.com