Vaio VGC-RB13M - Stasjonær datamaskin SONY - Gratis bruksanvisning og manual
Finn enhetens veiledning gratis Vaio VGC-RB13M SONY i PDF-format.

Brukerspørsmål om Vaio VGC-RB13M SONY
0 spørsmål om dette apparatet. Svar på dem du kjenner, eller still ditt eget.
Still et nytt spørsmål om dette apparatet
Last ned instruksjonene for din Stasjonær datamaskin i PDF-format gratis! Finn veiledningen din Vaio VGC-RB13M - SONY og ta den elektroniske enheten tilbake i hendene. På denne siden er alle dokumenter som er nødvendige for bruken av enheten din publisert. Vaio VGC-RB13M av merket SONY.
BRUKSANVISNING Vaio VGC-RB13M SONY
IMPORTANT! PLEASE READ BEFORE YOU START
These easy instructions are intended to guide you through the replacement process.
√ To avoid electric shock please make sure product is turned off and disconnected from the power source. Remove jewelry before you begin work to avoid scratching the surface of your desktop computer.*
√ Place your desktop computer on a clean, stable and covered surface to avoid damage to the computer's case.*
√ Follow the ESD (Electrostatic Discharge) damage prevention instructions:
- Hold parts by the edges, away from exposed circuitry when possible.
- Do not walk around excessively as this promotes static build-up.
√ The appearance of the electronic components shown in the illustrations may be different from the components shipped. This slight difference does not affect the accuracy of these instructions.
* Sony is not responsible for any loss of data associated with your computer or any damage caused by incorrect handling of the computer under these procedures. The terms of your Sony Limited Warranty continue to apply.

text_image
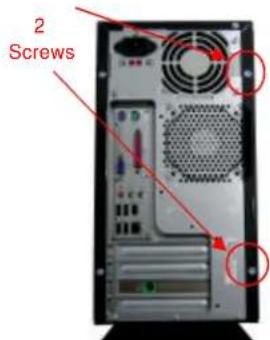
2 Screws
natural_image
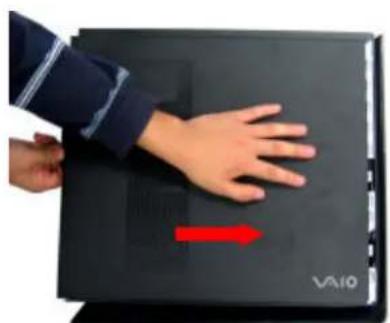
Hand pressing down on a black electronic device with a red arrow indicating left motion (no text or symbols visible)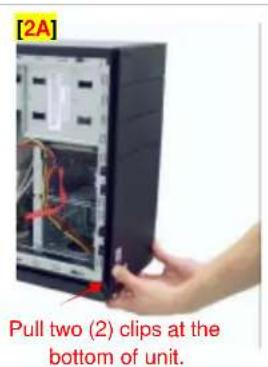
text_image
[2A] Pull two (2) clips at the bottom of unit.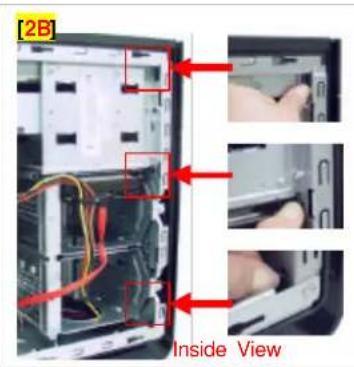
text_image
[2B] Inside ViewStep 2. Loosen the front panel cover by pulling down the two (2) black clips on the bottom of the unit: Step [2A] and the three (3) black clips on the inside of the front of the unit: Step [2B], as indicated above.
Step 1. CAUTION! Disconnect the power cord. Failure to do so can result in damage to the PC or personal injury.
Using the enclosed magnetic screwdriver, remove the 2 indicated screws, loosening the chassis panel cover. Rotate the unit so the panel with the vents is facing you. Remove the panel and set it aside.
natural_image
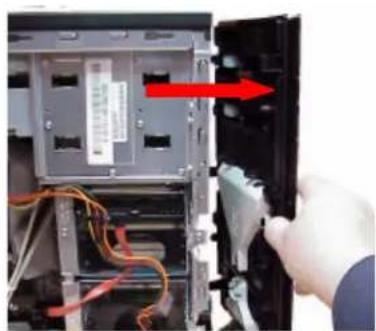
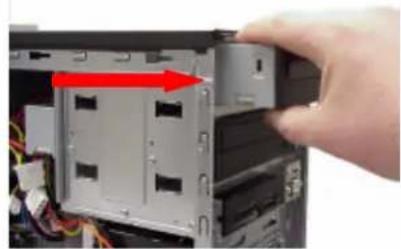
Close-up of a computer tower internal with visible drive bays and cable, showing a hand inserting a component (no text or symbols)Step 3. Carefully remove the front panel in the direction of arrow and set aside.
natural_image
Close-up of a hand inserting a cable into a computer drive (no visible text or symbols)
text_image
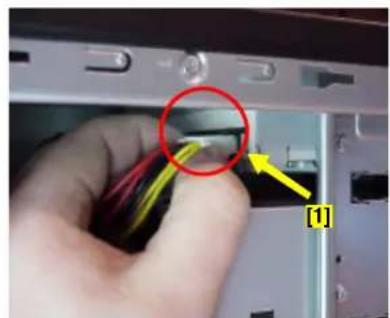
Close-up photo of a hand inserting a USB into an electronic device, with a red circle highlighting the component and a yellow arrow pointing to it.Step 4. Remove the power connector [1] and the IDE data cable [2] from the optical disk drive you are replacing. (In this example: the upper optical drive.) NOTE Your PC may be equipped with more than one optical disk drive.
SONY®
VGC-RBxx Series Optical Disk Drive Upper Replacement Instructions

natural_image
Interior view of a computer tower case showing internal components and wiring (no visible text or labels)Step 5. Using the enclosed magnetic screwdriver, remove the two (2) screws from the optical drive you are replacing. (In this example: the upper optical drive.)
natural_image
Close-up of a computer tower internal component with a hand adjusting its top panel (no visible text or symbols)Step 6. Pull out the original optical drive from the chassis in the direction of the arrow.

natural_image
Close-up of a computer tower internal structure with a hand adjusting its top panel (no visible text or symbols)Step 7. Carefully slide the new optical drive into the newly vacant space in the chassis, making sure the screw holes are aligned.

natural_image
Interior view of a server rack with two labeled ports (1 and 2) showing internal components and wiring (no readable text or symbols)Step 8. Using the enclosed magnetic screwdriver, reinstall the previously removed screws following the above sequence. (In this example: the upper optical drive.) IMPORTANT! Do not over tighten the screws!

natural_image
Close-up of a hand inserting a component into a device, with a red circle highlighting a specific area (no text or symbols visible)Step 9. Reconnect the IDE data cable [1] and the power cable [2] to the new optical disk drive you have replaced. (In this example: the lower optical drive.)

natural_image
Close-up of a hand inserting a small electronic component into a device (no visible text or symbols)
natural_image
Close-up of hands installing a computer tower into an open drive bay (no visible text or symbols)Step 10. Reinstall the front panel to its original position, as shown.
natural_image
Hand pressing down on a black electronic device with a red arrow indicating motion (no text or symbols visible)Step 11. Reinstall the left chassis cover panel in the direction of arrow. Then using the enclosed magnetic screwdriver, reinstall the two (2) previously removed screws.
IMPORTANT! Do not over tighten the screws! Return the original optical disk drive to Sony following the included shipping instructions