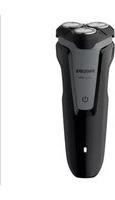
Series 1000 S1041 - Elektrisch scheerapparaat PHILIPS - Gratis gebruiksaanwijzing en handleiding
Vind de handleiding van het apparaat gratis Series 1000 S1041 PHILIPS in PDF-formaat.


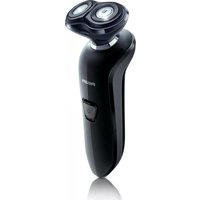
| Producttype | Elektrisch scheerapparaat |
| Merk | Philips |
| Model | Series 1000 S1041 |
| Afmetingen (ca.) | 10 x 5 x 5 cm |
| Gewicht | Ongeveer 200 gram |
| Voeding | Oplaadbaar via snoer |
| Oplaadtijd | 8 uur voor 20 minuten gebruik |
| Scheersysteem | Roterende messen met zelfscherpende functie |
| Scheerkoppen | 2 flexibele scheerkoppen |
| Natte en droge scheerbeurt | Droog scheren, niet geschikt voor nat gebruik |
| Display | LED-indicatielampje voor opladen en reinigen |
| Reiniging | Reinig onder stromend water; afneembare kop |
| Onderhoud | Om de 2 jaar scheerkoppen vervangen |
| Vervangingsonderdelen | Scheerkoppen: Philips SH30 |
| Veiligheid | Draadloos gebruik, geïsoleerde behuizing |
| Garantie | 2 jaar fabrieksgarantie |
| Inhoud verpakking | Scheerapparaat, beschermkap, snoer, gebruiksaanwijzing |
| Kleur | Zwart-wit combinatie |
| Geluidsniveau | Minder dan 70 dB |
Veelgestelde vragen - Series 1000 S1041 PHILIPS
Gebruikersvragen over Series 1000 S1041 PHILIPS
0 vraag over dit apparaat. Beantwoord die u kent of stel uw eigen vraag.
Stel een nieuwe vraag over dit apparaat
Download de handleiding voor uw Elektrisch scheerapparaat in PDF-formaat gratis! Vind uw handleiding Series 1000 S1041 - PHILIPS en neem uw elektronisch apparaat weer in handen. Op deze pagina staan alle documenten die nodig zijn voor het gebruik van uw apparaat. Series 1000 S1041 van het merk PHILIPS.
GEBRUIKSAANWIJZING Series 1000 S1041 PHILIPS


©2019 Philips Japan, Ltd. 1050-037-10331/04/18
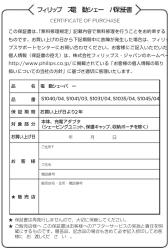
★ 製品の使用方法や修理に関するお問い合わせ

フィリップ スフェーバーをお買い上げいただき、まことにありがとうございます。長い間ご愛用いただくために、ご使用前にこの取扱説明書をよくお読みのうえ、正しくお使いください。また、お読みになった後は、お使いになる方がいつでも見られるところに必ず保管してください。

お買い上げるお図番へ 祐めてご使用になる際は、ご使用前に充電してください
广力云智慧零售收银系统
[Non-Text]
目次
①《公司章程》(草案)
① 名称の名称
② 容重の仕安
① 本议案:全体代表(以下)
② 2014年1月1日
① 2023年1月1日(星期六) ② 书签入单方法
② 分纸箱数从本
② 担除本表中的取扱付方
② 保証キレフローの取引付け方 ③ 巳の交換
①为0支质 ②3-15 车度穿透了上水
① 好期参加以下用,必填:
① 保障が準に悪化した ② 保障に同様な、共一人間
② 保証にノブターナ ヒス
② 记录 ③ 招出流程说明
⑤ 煮料修造规定
Guidance in English
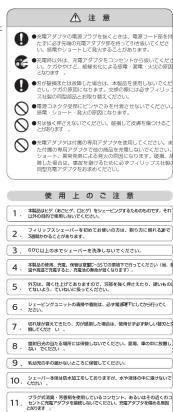
① 必ずお守りください
安全上の注意
为了员工可以主动改善项目,④会议模式及费用由内容逐步分配。
■ 本店所の代理理念等の場合は、安全体関する重要な内容です。は、お ず守ってください。
■仮った取扱いをしたときに想定される内容友「警告」と「注意」
区分けしています。
二絵表示について
A 記局は、「警告、注意」を示します。
2013年不进入《网上媒体的注册内容指引》。
A 原告 人が死亡または重傷を負担可能性が限定される内容。
B
注意 人が傷害を負う可能性及び物的傷害の発生が限定され
-
○給表示の例
・記号はしこいけない「禁止」を示します。図の中や近くに具
① 本表正内容(注释)是指本表未禁止予以示示。
・記号は、必ずしていただく「強制」を示します。臨の中や近 体的な施設内容(支隔の場合は需要上げるガソニセントから必
こと)を示します。






























































































General description (Fig. 1)
1 Protection cap
2 Shaving unit
3 On/off button
4 Charging light
5 Socket for small plug
6 Retaining frame
7 Cutter
8 Guard
9 Supply unit
10 Small plug
11 Pouch (S)035 only)
Note: You can find the type number on the back of
Introduction
Congratulations on your purchase and welcome to Philips! To fully benefit from the support that Philips offers, register your product at www.philips.com/welcome.
Please read this user manual, as it contains information about the features of this shaver as well as some tips to make shaving easier and more enjoyable.
Important safety information
Important safety information Read this important information carefully before you use the appliance and its accessories and save it for future reference. The accessories supplied may vary for different products.
Danger
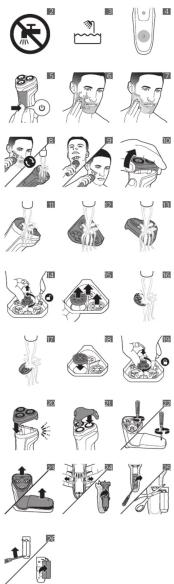
-Keep the supply unit dry (Fig. 2)
Warning
-To charge the battery, only use the detachable
supply unit (A00390) provided with the
The supply unit contains a transformer. Do not
- The supply unit contains a transformer. Do not cut off the supply unit to replace it with another
plug, as this causes a hazardous situation.
-This appliance can be used by children aged from
8 years and above and persons with reduced
physical, sensory or mental capabilities of lack of avonations and knowledge if they have been
of experience and knowledge if they have been than supervision or instruction concerning use of
the appliance in a safe way and understand the
hazards involved. Children shall not play with the
appliance. Cleaning and user maintenance shall
not be made by children without supervision.
-Always unplug the shaver before you clean it under the lip
-Always check the appliance before you use it. Do
not use the appliance if it is damaged, as this mar
cause injury. Always replace a damaged part with
one of the original type.
-Do not open the appliance to replace the
rechargeable battery.
Caution
- Never immerse the cleaning system or the
charging stand in water and do not rinse it under
the tap (Fig. 2). Never use water better than 60°C to rise the
Never use water model than 100° C to rinse the shauer.
-Only use this appliance for its intended purpose
as shown in the user manual.
-For hygienic reasons, the appliance should only
be used by one person.
- Never use compressed air, scouting pads, abrasivoo cleaning agents or aggressive liquid
advisative clearing agents or aggressive liquids such as petrol or acetone to clean the appliance
-If your shaver comes with a cleaning system,
always use the original Philips cleaning fluid
(cartridge or bottle, depending on the type of
cleaning system).
-Always place the clearing system on a stable, level and horizontal surface to prevent leakage.
If your cleaning system uses a cleaning cartridge
always make sure the cartridge compartment is
closed before you use the cleaning system to
clean or charge the shaver.
-When the cleaning system is ready for use, do not move it to prevent lesions of clearing fluid.
move it to prevent leakage of cleaning fluid. Water may drop from the rocket at the bottom
- Watch may grip from the socket at the bottom of the shaver when you rinse it. This is normal
and not dangerous because all electronics are
enclosed in a sealed power unit inside the shaver
-Do not use the supply unit in or near wall sockets
that contain an electric air freshener to prevent inoperable damages to the supply unit
Imparable damage to the supply unit
Electromagnetic fields (EMF)
This Philips appliance compiles with all applicable standards and regulations regarding exposure to electromagnetic fields.
General
-This shaver is waterproof (Fig. 3). It is suitable
for use in the bath or shower and for cleaning
under the tap. For safety reasons, the shaver can
therefore only be used without cord.
- The supply unit is suitable for mains voltages ranging from 100 to 340 volts.
The supply unit transforms 130-240 volts to a
The supply of low voltage is 102-215 volts to a safe low voltage of less than 24 volts.
Charging
Charging
Note: This appliance can only be used without cord.
When you charge the appliance for the first time or
When you charge the appliance for the first time of after a long period of disuse, let it charge for at least
10 hours.
A fully charged appliance provides up to 40 minutes
of shaving time.
The shaving time may be less as a result of your
shaving behavior, your cleaning habits of your beard type
(1)
Charging with the supply unit
1 Make sure the shaver is switched o
2 Put the small plug in the shaver and put the supply unit in the wall socket.
supply unit in the wall socket. The display of the shaves indicates that the
The display of the shaver is charging
-
After charging some
-
Atom charging, Remove the supply unit from the wall socket and pull the small plug out of the
appliar
Charge indications
Battery Low
Battery low When the battery is almost empty, the appliance
When the battery is almost starts working more slowly
Changine
When the appliance is charging, the charging light
lights up v
-The charging light will keep lighting up white
when the appliance is fully charged.
Note. After charging, remove the supply unit from
the wall socket and pull the small plug out of the
appliance
Using the appliance
Note: This appliance can only be used without
Note: This appliance can only be used without cord.
2017年
Switching the appliance on and off
1 To switch the appliance on or off, press the on/off
button
Shaving tips
-Use the shaver with shaving gel or foam t
skin comfort, or use the shaver dry for extra
convenience
-We advise you to use the shaver with shaving gel at farm when you want a few watershav.
get of tea Do not us
with this shaver.
-When you
advise you to make sure your skin is fully dry
so that th
sich. For host results on elite comfort, run trim hits.
-For best result heard if you
-For optimal shaving results, make circular
movements
-The shaver is waterproof and can be used in the
bath or show
-Your skin may need 2 or 3 weeks to get
accustomed to the Philips shaving system.
Wet shaving
For a more comfortable shave, you can also use this way to use a little bit of sugar.
this appliance of slaving gel
Shaving get. To shave with shaving foam or shaving swi, follow
the steps below
1 Apply some water to your skin (Fig. 6).
2 Apply shaving
(Fig. 7).
3. Ilnse the sha that the chay
that the shaving unit guides smoothly over your skin (Fig. 8).
4. Switch on the
- Move the shaving heads over your skin in circular
movements
directions (Fig. 9). Make sure each shaving head is fully in contact with the skin. Even gentle
Is fully in contact with the soft exert genio pressure for a close comfortable cloak
Note: Ripra
Note: Innise the shaving unit regularly to ensure that it continues to glide smoothly over your skin.
6. Div your face
7 Clean the appliance after use (see 'Cleaning and
maintenance
Note: Make sure you rinse all foam or shaving gel
off the appli
Dry shading
Dry shaving
- Switch on the appliance
-
Move the shaving head
-
Move the sharing of all your own data movements to catch all hairs growing in different
directions (Fig. 9). Make sure each shaving head
is fully in car
pressure for a close, comfortable shave.
Note: Do not
irritation.
3 Clean the app
maintenance).
Cleaning and maintenance
The following table provides a full view of the
Cleaning the shaver under the tap
Clean the shaver after every shave for optimal.
performance.
Always hope you clean it.
Note: Water may leak from the socket at the bottom
of the shaver when you rinse it. This is normal and
not dangerous because all electronics are enclosed
In a sealed power unit inside the shaver.
Be careful with hot water. Always check if the water
is not too hot, to prevent burning your hands.
Never dry the shaving unit with a towel or tissue, as
this may damage the shaving heads.
1 Hold the shaving unit and first lift the front, then
the back upwards of the appliance (Fig. 10).
Note: Make sure to hold the shaving unit while doing so.
-
Rinse the hair chamber under the tap (Fig. 11).
-
Rinse the inside of the shaving unit under a warm
-
There is to inside on the sharing unit under & warm tan (Fig. 12).
4 Rinse the outside of the shaving unit under a
warm tap (Fig. 13).
Thorough cleaning
5 Tum the lock anticlockwise and remove the
retaining frame from the shaving unit (Fig. 14).
- Remove and clean one shaving head at a time
(Fig. 15). Each shaving head consists of a cutter and a guard.
Do not sleep more than one uttered award.
Do not clean more than one cutter and guard at a time, since they are all matching sets. If you
is a time, since they saw an matching set. If you accidentally mix up the cutters and guards, it
may take several weeks before optimal shaving
performance is restored.
7 Remove the cutter from the shaving guard and
rinse it with water (Fig. 16).
- Rinse the inside and outside of the shaving guard with water (Fig. 17).
with water (Fig. 17) 9. Put the shaving be
(FIG. 18) Make sure that the projections of the
shaving heads fit exactly into the recesses.
10 Put the retaining frame back into the shaving unit
and turn the lock clockwise (Fig. 19)
11 Reattach the shaving unit (Fig. 20).
Note: If you cannot reattach the shaving unit property check if you have inserted the shaving
property, check if you have inserted the shaving heads properly and if the retaining frame is
Head's property and the rejoining market is locked.
- Carefully shake off excess water, open the
shaving unit again and leave it open to let the
shaving unit air dry completely.
Caution: Be careful not to hit the shaving unit
against anything while you shake off excess
water.
Storage
Storage
Protection cap
We advise you to let the appliance dry before you
put the protection cap on
1 Switch off the appliance. 2 Put the protection set on
2 Put the protection cap on the shaving unit after use to prevent damage and to avoid dirt
at 100 gm to prevent damage and to avoid the accumulation in the shaving heads (Fig. 21).
Dough (51035 only)
Pouch (Sloss only)
Note: Make sure the appliance is dry before you store it in the pouch.
-
Switch off the appliance
-
Store the appliance in the pouch
-
2017-2-16 指标
Replacement
Bc
Replacing the shaving heads. For maximum shaving performance
For maximum shaving performance, we advise you to replace the shaving heads every two years.
Replace damaged shaving heads immediately.
Always replace the shaving heads with original
Philips shaving heads' (see 'Ordering accessories')
1 Switch off the appli
the power outlet. 7. Hold the shaving unit and first lift th
- Hold the shaving unit and first hit the back upwards of the appliance
Note: Make sure to hold the shaving unit while
NOTE: Make sure to hold the shaving unit while doing so.
- Turn the lock anticlockwise and remove the
retaining frame.
4 Remove the shaving heads and place new ones
in the shaving unit. Make sure that the projections
of the shaving heads fit exactly into the recesses. 5. Put the retaining frame back into the shaving unit
3 Put the retaining name back into the shaving unit and turn the lock clockwise (Fig. 19).
- Reattach the shaving unit.
Note: If you cannot real
properly, check if you have inserted the shaving
heads properly and if the retaining frame is
locked
Outstanding
Ordering accessories
To buy accessories or spare parts, visit www.shopphilling.org from the go to you. Philips displays it
philips.com/service of go to your Philips dealer. You can also contest the Philips Consumer Care Center in
can also contact the Philips Consumer Care Center in your country (see the international warranty leaflet
for contact details).
The following accessories and spare parts are
available:
-SH30/ST Philips shaving heads
Note: Availability of the accessories may differ by
country.
Recycling
Recycling Do not throw away the product with the normal
-DO NOT THROW AWAY the product with the normal household waste at the end of its life, but hand
it in at an official collection point for recycling. By
doing this, you help to preserve the environ
-This product contains a built-in rechargeable
battery which shall not be disposed of with
normal household waste. Please take your product to an official collection point or a Philips
service center to have a professional remove the
rechargeable batte
-Follow your country
collection of electrical and electronic products
and rechargeable batteries. Correct disposal
helps prevent negative consequences for the environment and human health
公司于2017年4月25日召开的2017年度股东大会审议通过了《关于使用部分闲置募集资金进行现金管理的议案》。
Removing the rechargeable battery
Only remove the rechargeable battery when
Only remove the rechargeable battery when you discard the shaver. Before you remove
you discard the shaver. Before you remove the battery, make sure that the shaver is
disconnected from the mains and that the
battery is completely empty.
Take your recommendation for recommendations when
Take any necessary safety precautions when you handle tasks to open the above.
you handle tools to open the shaver.
Be careful, the battery strips are sharp.
- Disconnect the shaver from the wall socket.
-
Let the shaver operate until it stops.
-
Remove the screws in the back of the shaver and
in the hair chamber (Fig. 22).
4 Remove the top part of the shaver (Fig. 23).
5 Remove the front panel and the back panel (Fig. 20)
23).
6 Take out the power unit (Fig. 24)
Be careful, the hooks are sharp.
-
Band the snap hooks aside and remove the transparent cover of the power unit (Fig. 24).
-
Lift out the battery holder and cut the wires with
a pair of cutting pliers or scissors (Fig. 25).
9 Bend the battery tags aside with a screwdriver
(Fig. 26).
10 Remove the rechargeable batteries.
Warranty and support
If you need information or support, please visit
www.philips.com/support or read the international
warranty leaflet.
- GENERAL DESCRIPTION (FIG. 1)
- INTRODUCTION
- IMPORTANT SAFETY INFORMATION
- DANGER
- WARNING
- RECHARGEABLE BATTERY
- CAUTION
- ELECTROMAGNETIC FIELDS (EMF)
- GENERAL
- CHARGING
- (1)
- APPLIAR
- CHANGINE
- LIGHTS UP V
- APPLIANCE
- USING THE APPLIANCE
- 2017年
- BUTTON
- SHAVING TIPS
- CONVENIENCE
- GET OF TEA DO NOT US
- WHEN YOU
- SO THAT TH
- FOR BEST RESULT HEARD IF YOU
- MOVEMENTS
- BATH OR SHOW
- WET SHAVING
- THIS APPLIANCE OF SLAVING GEL
- THE STEPS BELOW
- 2 APPLY SHAVING
- ILNSE THE SHA THAT THE CHAY
- SWITCH ON THE
- NOTE: RIPRA
- DIV YOUR FACE
- MAINTENANCE
- OFF THE APPLI
- DRY SHAVING
- IS FULLY IN CAR
- NOTE: DO NOT
- 3 CLEAN THE APP
- CLEANING AND MAINTENANCE
- WARM TAP (FIG. 13)
- THOROUGH CLEANING
- STORAGE
- PROTECTION CAP
- DOUGH (51035 ONLY)
- POUCH (SLOSS ONLY)
- BC
- OUTSTANDING
- ORDERING ACCESSORIES
- RECYCLING
- 23)
- 6 TAKE OUT THE POWER UNIT (FIG. 24)
Merk : PHILIPS
Model : Series 1000 S1041
Categorie : Elektrisch scheerapparaat