U14M42B0GB - Oven NEFF - Gratis gebruiksaanwijzing en handleiding
Vind de handleiding van het apparaat gratis U14M42B0GB NEFF in PDF-formaat.

| Type product | Inbouwoven |
| Merk | Neff |
| Model | U14M42B0GB |
| Afmetingen (HxBxD) | 595 x 594 x 548 mm |
| Gewicht | Circa 35 kg |
| Netspanning | 220-240 V, 50/60 Hz |
| Aansluitwaarde | Circa 3,4 kW |
| Energielabel | A+ |
| Capaciteit ovenruimte | 71 liter |
| Verwarmingsmethoden | Boven- en onderwarmte, hetelucht, grill, circulatiegrill, intensieve warmte |
| Temperatuurbereik | 50 °C tot 275 °C (grill tot 300 °C) |
| Soort reiniging | Pyrolytische zelfreiniging |
| Bediening | Draaiknoppen en TFT-display |
| Veiligheidsvoorzieningen | Kinderslot, automatische uitschakeling, koelventilator |
| Kookwekker | Ja, met timer en startuitstel |
| Niveau rekken | 5 roosterstanden |
| Licht in oven | Halogeenlamp, vervangbaar |
| Garantie | 2 jaar (uitgebreid tegen betaling) |
| Repareerbaarheid | Reserveonderdelen 7 jaar beschikbaar |
| Meegeleverde accessoires | 1 rooster, 1 universele bakplaat, 1 braadslede |
Veelgestelde vragen - U14M42B0GB NEFF
Gebruikersvragen over U14M42B0GB NEFF
0 vraag over dit apparaat. Beantwoord die u kent of stel uw eigen vraag.
Stel een nieuwe vraag over dit apparaat
Download de handleiding voor uw Oven in PDF-formaat gratis! Vind uw handleiding U14M42B0GB - NEFF en neem uw elektronisch apparaat weer in handen. Op deze pagina staan alle documenten die nodig zijn voor het gebruik van uw apparaat. U14M42B0GB van het merk NEFF.
GEBRUIKSAANWIJZING U14M42B0GB NEFF
Dearcustomer,
congratulationsonthepurchaseofyournewNeffoven.
We wouldliketothankyouforyourconfidenceinusandwe hopethatyouwillhavemanyyearsofenjoymentandcooking pleasurewithyournewappliance.
Tobeabletotakefulladvantageofallthetechnicalfeaturesof yourcooker, pleasereadtheseinstructionsforuse.
The detailed table of contents will guide you quickly to all the important information:
■ Youwillbeinformedofimportantsafetyinformation.
- You will then be familiarised with the individual parts of your new oven.
■Stepbystepguideonhowtoselectparticularsettings.
The tables list the settings and shelf positions for a selection of typical recipes, allof which are tested in our cookery centre.
■ Intheunlikelyeventofamalfunction, thisiswhereyouwillfind informationonhowtorectifyminorfaultsyourself.
Havefuncooking.
Instructionsforuse
U14M42.0GB
en
9000272820
Tableofcontents
Safety information 5
Beforeinstallation5......
Informationforyoursafety5......
Causesofdamage7......
Energyandenvironmenttips8......
Saving energy 8
Environmentally friendly disposal 8
Your new appliance 9
Control panel 9
Operating modes 10
Shelf positions 11
Accessories 12
Beforeusingtheapplianceforthefirsttime ... 14
Setting the time 14
Cleaning the appliance 15
Using the appliance 15
Switching on the appliance 15
Switching off the appliance 16
Electronic clock 17
Clock display 17
Timer 18
Cooking time 19
End of operation 20
Preselection mode 21
Setting the time 22
Checking, correcting or deleting settings ..... 22
Tableofcontents
Baking 23
Bakingononelevel23......
Bakingontwoormorelevels24......
Bakingtable25......
Bakingtablefor pre-preparedproducts27......
Tips and tricks 28
Roasting and braising 30
Roasting 30
Braising 31
Tables for roasting and braising 31
Tips and tricks 33
Grilling 34
Wire rack position 35
Grilling table 35
Defrosting 37
Defrosting with Circotherm hot air 37
Defrost setting 38
Yoghurt 38
Cleaning and care 39
Cleaning the appliance exterior 40
Cleaning the cooking compartment 40
Self-cleaning surface 42
Removing and fitting the appliance door 42
Cleaning the door panels 44
Cleaning hook-in racks 47
Tableofcontents
Faultsandrepairs48......
Changingthecookingcompartmentbulb49......
Replacingthedoorseal50......
After-salesservice50......
Testdishes51......
⚠️Safetyinformation
Readthisinstructionmanualcarefully.Pleasekeep theinstructionandinstallationmanualsinasafe place.Pleasepassonthesemanualstothenew ownerifyouselltheappliance.
Beforeinstallation
Transportdamage
Checktheappliancefordamageafterunpackingit. Donotconnecttheapplianceifithasbeendamaged intransport.
Electricalconnection
Onlyallowalicensedprofessionaltoconnectthe appliance.Damagecausedbyincorrectconnectionis notcoveredunderwarranty.
Informationforyour safety
This appliance is intended for domestic use only. This appliance must only be used for food preparation.
Adultsandchildrenmustnotoperatetheappliance withoutsupervision,
■iftheyarephysicallyormentallyincapableofdoing soor
■iftheylacktheknowledgeandexperience.
Neverletchildrenplaywiththeappliance.
Hotcookingcompartment
Thereisariskofburns.
Nevertouchtheinteriorsurfacesofthecooking compartmentortheheatingelements.Openthe appliancedoorcarefully.Hotsteammayescape.
Smallchildrenmustbekeptatasafedistancefrom theappliance.
Thereisariskoffire.
Neverstorecombustibleitemsinthecooking compartment.
Neveropentheappliancedoorifthereissmoke inside.Switchofftheappliance.Pulloutthemains plugorswitchofftheappliancebythefuseinthefuse box.
Thereisariskofshort-circuiting.
Nevertrapconnectingcablesofelectricalappliances inthehotappliancedoor. Thecableinsulationcould melt.
Thereisariskofscalding
Neverpourwaterintothehotcookingcompartment. Thiswillcausehotsteam.
Thereisariskofburns.
Neverpreparefoodcontaininglargequantitiesof drinkswithahighalcoholcontent.Alcoholicvapours cancatchfireinthecookingcompartment.Onlyuse smallquantitiesofdrinkswithahighalcoholcontent andopentheappliancedoorcarefully.
Hotaccessoriesand ovenware
Thereisariskofburns.
Neverremoveovenwareandaccessoriesfromthe cookingcompartmentwithoutanovenclothoroven gloves.
Incorrectrepairs
Thereisariskofelectricshock.
Incorrectrepairsaredangerous. Repairsmayonlybe carriedoutbyoneofourexperiencedafter-sales engineers.
If the appliance is defective, pull out them mains plug or switch off the appliance by the fuse in the fuse box.
Calltheafter-salesservice.
Causesofdamage
Accessories,foil, greaseproofpaperor ovenwareonthecooking compartmentfloor
Donotplaceaccessoriesonthecooking compartmentfloor.Donotcoverthecooking compartmentfloorwithanysortoffoilorgreaseproof paper.Donotplaceovenwareonthecooking compartmentfloorifatemperatureofover50 °C is set.
This will cause heat accumulation. The baking and roasting times will no longer be correct and the enamel will bed damaged.
Waterinthehotcooking compartment
Neverpourwaterintothehotcookingcompartment. Thiswillcausesteam. Thetemperaturechangecan causedamagetotheenamel.
Moistfood
Donotstoremoistfoodintheclosedcooking compartmentforlongperiods. Thiswilldamagethe enamel.
Fruitjuice
Whenbakingverymoistfruitflan, donotputtoomuch onthebakingtray. Fruitjuicedrippingfromthebaking trayleavesstainsthatcannotberemoved. Ifpossible, usethedeeperuniversalpan.
Coolingwiththeovendoor open
Onlyleavethecookingcompartmenttocoolwiththe doorclosed.Evenifyouonlyleavetheovendoor openslightly,thefrontsofadjacentunitsmaybecome damagedovertime.
Verydirtyovenseal
Iftheovensealisverydirty, theovendoorwillno longercloseproperlywhentheovenisinuse. The frontsofadjacentunitscouldbedamaged. Always keeptheovensealclean.
Ovendoorasaseator storagespace
Donotstandorsitontheopenovendoor.Donot placeovenwareoraccessoriesontheovendoor.
Transportingtheappliance
Donotcarryorholdtheappliancebythedoorhandle. Thedoorhandlecannotsupporttheweightofthe applianceandcouldbreak.
Energyandenvironmenttips
Hereyoucanfindtipsonhowtosaveenergywhen bakingandroastingandhowtodisposeofyour applianceproperly.
Savingenergy
Only preheat the oven if this is specified in the recipe or in the operating instruction tables.
Usedark, blacklacqueredorenamelledbakingtins. They absorbtheheatparticularlywell.
Opentheappliancedooraslittleaspossibleduring cooking,bakingorroasting.
Itisbesttobakeseveralcakesoneaftertheother. Thecookingcompartmentisstillwarm. This may reducethebakingtimeforthesecondcake.
Forlongercookingtimes,youcanswitchtheovenoff 10 minutesbeforetheendofthecookingtimeand usetheresidualheattofinishcooking.
Environmentally-friendlydisposal

Disposeofpackaginginanenvironmentally-friendly manner.
This appliance is labelled in accordance with European Directive 2002/96/ECon Waste Electrical and Electronic Equipment-WEEE. The directive gives a framework for the collection and recycling of fold appliances, which is valid across the EU.
Yournewappliance
Thissectionprovidesinformationon
■thecontrolpanel
■ theoperatingmodes
■ theshelfpositions
■ theaccessories
Controlpanel
Loweroven
| ControlelementUse | |
| Operatingmodesand temperaturesselector | Switchesontheinteriorlighting, selectsthetemperatureforCircoTherm□ortheDefrost operatingmode |
| ClockfunctionbuttonSelectstherequiredclockfunction (seesection:Electronicclock) | |
| RotaryselectorMakessettingswithinaclockfunction (seesection:Electronicclock) | |
Upperoven
ControlelementUse
| OperatingmodeselectorSelectsthedesiredoperatingmode |
| TemperatureselectorSetsthedesiredtemperature |
Pop-outcontrolknobs
Therotary, temperature and operating modes selectors can all be popped out. Topop the knob in and out, push the appropriate operating knob.
Operatingmodes
Hereisanoverviewoftheoperatingmodesofyour appliance.
Loweroven
OperatingmodeApplication
| InteriorlightingProvidesassistancewhenmaintainingandcleaningthe cookingcompartment | |
| 50 - 270 °C CircoTherm | For baking and roasting on one or more levels |
| DefrostForgentledefrostingofpiecesofmeat,breadanddelicate pastries(e.g.creamgateau) | |
Upperoven
OperatingmodeApplication
| ☐ Top/bottom heat | Especially suitable for cakes with moist toppings (e.g.cheesecake) |
| ☐Full-surfacegrillForlargeamountsofflat,smallitemsforgrilling (e.g.steaks,sausages) | |
| ☐InteriorlightingProvidesassistancewhenmaintainingandcleaningthe cookingcompartment | |
Shelfpositions
Theshelfpositionsinthecookingcompartmentare countedfromthebottomup.
Note:
WhenbakingandroastingwithCircotherm, donot useshelfposition2. Aircirculationisadversely affectedandtheresultsofbakingandroastingare impaired.
Loweroven
The cooking compartment of the lower oven has four shelf positions.
natural_image
Interior view of a server room with ventilation duct and numbered compartments (1-4), no visible text or symbols.Upperoven
The cooking compartment of the upper oven hast two shelf positions.
natural_image
Diagram of a door with two numbered lanes (1 and 2) showing horizontal insulation or ventilation slots (no text or symbols beyond lane numbers)Accessories
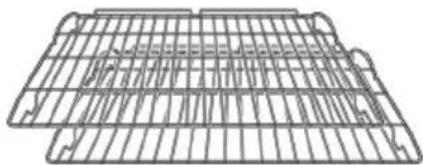
Your appliance is equipped with the following accessories:
natural_image
Exterior view of a rectangular baking tray (no text or symbols)Universalpan, enamelled
forbaking, roasting and grillingor for collecting dropsof liquid

natural_image
Line drawing of a rectangular metal tray with internal grating (no text or symbols)Steppedwirerack, closemeshed
forbaking, roasting and grilling, forplacing in the universalpan
natural_image
Pure technical line drawing of a grid-like structure without any text, numbers, or symbols2xwirerack,flat, withtiltprotection
forbaking
Inserttheflatwireracksinsuchawaythattherear upstand(topreventitemsslidingoffthebackofthe shelf)isatthebackandispointingupwards(see illustrationbelow).Otherwise,thetiltprotectionfeature willnotworkproperly.
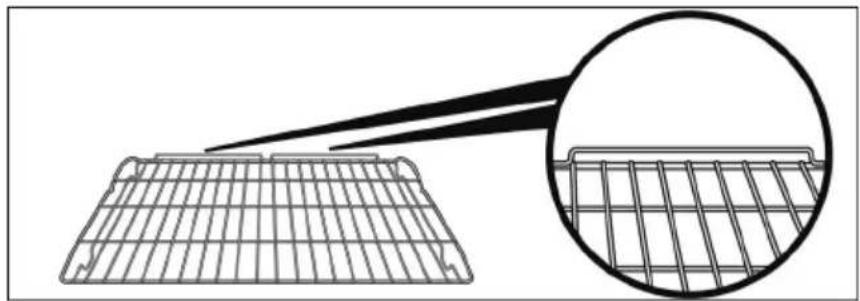
natural_image
Diagram showing a grid structure with a magnified inset highlighting the top section (no text or symbols)Youcanobtainfurtheraccessoriesfromspecialist retailers:
| AccessoriesOrderno. | |
| SystemsteamerN8642X0EU | |
| GrillsetZ1240X2 | |
| GlasspanZ1262X0 | |
| EnamelledroastingpanZ1272X0 | |
| AluminiumbakingtrayZ1332X0 | |
| EnamelledbakingtrayZ1342X0 | |
| Non-stickbakingtrayZ1343X0 | |
| Bakingandroastingshelf,closemeshedZ1453X0 | |
| Two-pieceenamelledroastingtrayZ1512X0 | |
| CLOU1xtelescopicrailingretrofitkitZ1701X1 | |
| CLOU3xtelescopicrailingsretrofitkitZ1742X1 | |
| CLOU4xtelescopicrailingsretrofitkitZ1752X1 | |
| Tiltprotectionretrofitkit,pull-outstopZ9110X0 | |
| EnamelleduniversalroastingdishZ9930X0 | |
| Protectivedeviceforovendoor | 361480 |
Note:
The baking tray or universal pan may become distorted when the oven is operating. This is caused by the considerable temperature differences on the accessories. This may happen when only a part of the accessory is covered with food or when frozen items such as pizza have been placed on the accessory.
Beforeusingtheapplianceforthefirst time
Thissectioncontainsinformationon
■howtosethetimeonyourapplianceafterthe powerisconnected
■howtocleanyourappliancebeforeusingitforthe firsttime
Settingthetime
0:00flashesintheclockdisplay.
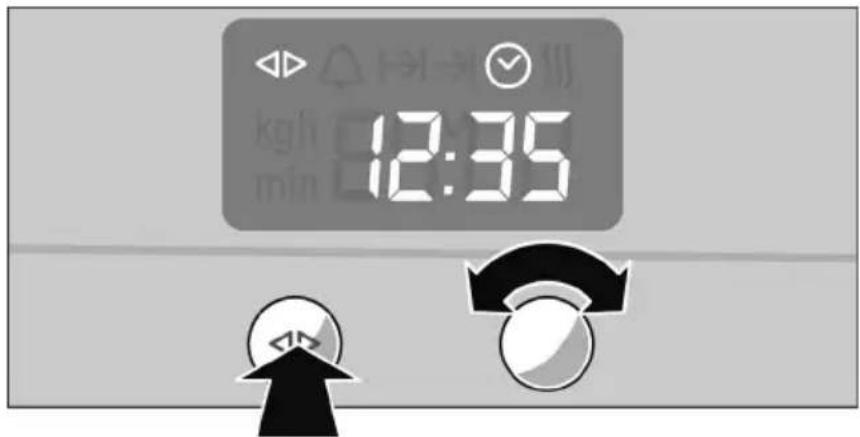
- Presstheclockfunctionsettingbutton.
The ◀ and ⏰ symbolsarelit.
12:00flashesintheclockdisplay.
- Set the current time using the rotary selector.
Yoursettingisautomaticallyadoptedafter 3 seconds.
Changingthetime
Tosubsequentlychangethetime,presstheclock functionbuttonrepeatedlyuntilthe◀▷and ⬢ symbolsarelit.Setthecurrenttimeusingtherotary selector.
Cleaning the appliance
Cleanyourappliancebeforeusingitforthefirsttime.
- Remove accessories and residual packaging from both cooking compartments.
- Cleantheaccessoriesandcookingcompartments withhotsoapywater(seesection:Cleaning and care).
- Heattheupperovenat270°CusingFull-surface grillandthelowerovenat240°Cusing CircoTherm®for30minutes.
- Oncethecooking compartments have cooled, wipethemoutwithhotsoapywater.
- Cleantheoutsideoftheappliancewithasoft dampclothandsoapywater.
Usingtheappliance
Thissectioncontainsinformationon
■howtoswitchyourapplianceonandoff
■ howtoselectanoperatingmodeandtemperature
Switchingonthe appliance
Loweroven
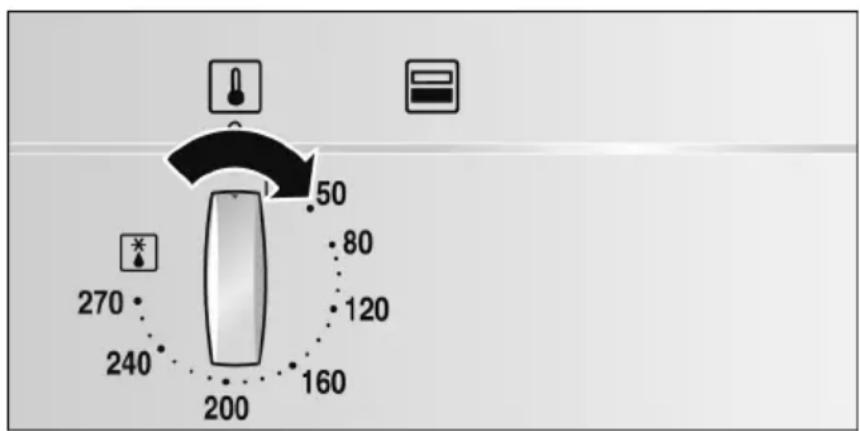
Interiorlighting
Turntheoperatingmodeandtemperatureselector to the positioninordertoswitchontheinterior lighting.
CircoTherm
Turntheoperatingmodeandtemperatureselector to therequiredtemperatureinordertoswitchon CircoTherm.
Defrost
Turntheoperatingmodeandtemperatureselector to the☀positioninordertoswitchonthedefrost setting.
Upperoven
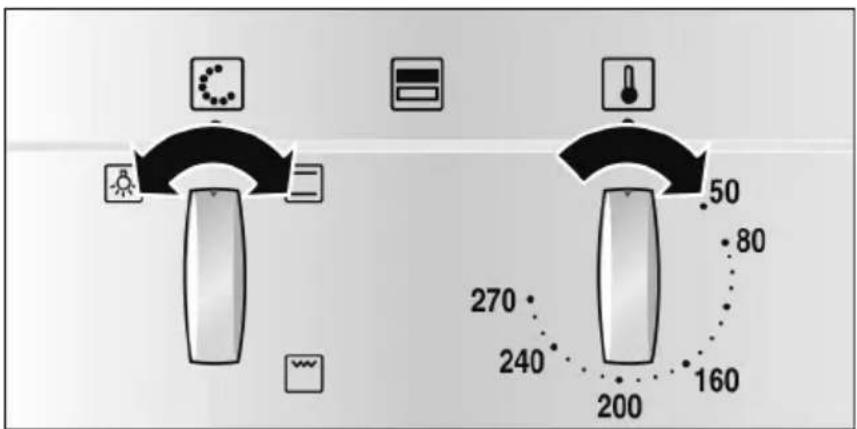
-
Turntheoperatingmodeselectoruntilthedesired operatingmodeisselected.
-
Turnthetemperatureselectoruntilthedesired temperatureisselected.
The ⚠indicatorlampisilluminatedwhilethe applianceisheatingupandduringany subsequentheating.
Switchingoffthe appliance
Resettheoperatingmodeandtemperatureselectors totheoposition.
Aftertheapplianceisswitchedoff,thecoolingfan maycontinuetorun.
Electronicclock
Thissectioncontainsinformationon
■howtosetthetimer
■howtoswitchyourapplianceoffautomatically (cookingtimeandendofoperation)
■howtoswitchyourapplianceonandoff automatically(preselectionmode)
■howtoseththetime
Clockdisplay
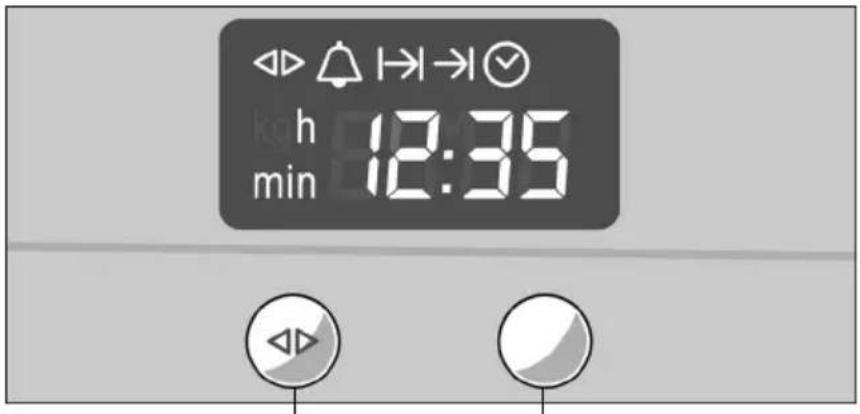
RotaryselectorClockfunctionbutton
| ClockfunctionUse | |
| TimerYoucanusethetimerasaneggtimerorakitchentimer. | |
| Theappliancedoesnotswitchonoroffautomatically. | |
| I→I Cooking time | Lower oven: The oven switches off automatically after a cooking timesettinghaselapsed(e.g. 1:30hours). |
| →I End of operation | Lower oven: The oven switches off automatically at a set time (e.g. 12:30). |
| PreselectionmodeLoweroven:Theovenswitchesonandoffautomatically.Cookingtimeandendofoperationarecombined. | |
| ClockSettingtheclock | |
Notes:
■ Between 22:00 and 5:59, the clock display is darkenedifyoudonotalteranysettingsduringthis timeorifnoclockfunctionisactivated.
For the 🔒 timer, I→I cooking time, →I end of operation and preselection mode clock functions, asignalsounds when the cooking time has elapsed and the 🔒 or →I symbol flashes. To cancel the audiblesignal before it ends, presstheclock function button.
Switchingtheclockdisplay onandoff
-
Pressandholdtheclockfunctionbutton for 6 seconds.
Theclockdisplayswitchesoff.Ifaclockfunctionis active,theassociatedsymbolremainslit. -
Presstheclockfunctionbuttonbriefly. Theclockdisplayswitcheson.
Timer
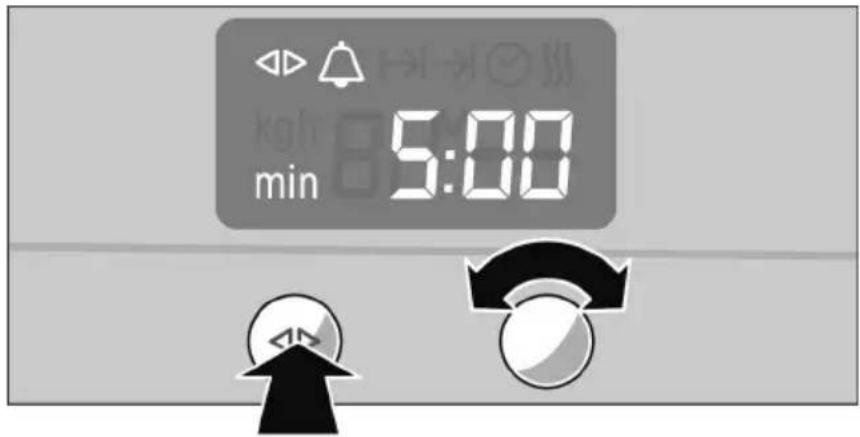
- Presstheclockfunctionbuttonrepeatedlyuntil the ◀ and △ symbolslightup.
- Usetherotaryselectortosetthecookingtime (e.g. 5:00minutes).
Thesettingisacceptedautomatically. Then the clockisdisplayedagainandthetimerstarts countingdown.
Cookingtime
Automaticswitch-offafterasetcookingtime.
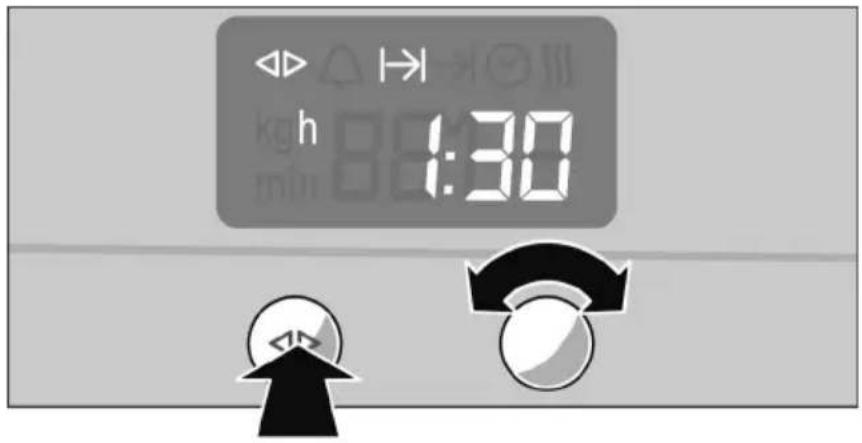
- Settheoperatingmodeandtemperatureforthe loweroven.
Thelowerovenstartsheating.
-
Presstheclockfunctionbuttonrepeatedlyuntil the ◀▶andl→lsymbolslightup.
-
Usetherotaryselectortosetthecookingtime (e.g. 1:30 hours).
Thesettingisacceptedautomatically. Then the clockisdisplayedagainandthesetcookingtime startscountingdown.
Oncethecookingtimehaselapsed,theloweroven switchesoffautomatically.
-
Turntheoperatingmodeandtemperature selectorsbacktotheoposition.
-
Presstheclockfunctionbuttonontoquittheclock function.
Endofoperation
Automaticswitch-offatasettime.

- Settheoperatingmodeandtemperatureforthe loweroven.
Thelowerovenstartsheating.
-
Presstheclockfunctionbuttonrepeatedlyuntil the ◀ and → Isymbolslightup.
-
Usetherotaryselectortosettheendofoperation (e.g. 12:30).
Thesettingisacceptedautomatically. Theclockis thendisplayedagain.
Thelowerovenswitchesoffautomaticallyatthetime setfortheendofoperation.
- Turntheoperatingmodeandtemperature selectorsbacktotheoposition.
5.Presstheclockfunctionbuttonontoquittheclock function.
Preselectionmode
Thelowerovenswitchesonautomatically and switchesoffatthetimepreselectedfortheendof operation. Tosetthisfunction, combinetheclock functionscookingtimeandendofoperation.
Bearinmindthatfoodwhichspoilseasilymustnot stayinthecookingcompartmentfortoolong.
- Settheoperatingmodeandtemperatureforthe loweroven.
Thelowerovenstartsheating. - Presstheclockfunctionbuttonrepeatedlyuntil the ◀▶andl→lsymbolslightup.
-
Usetherotaryselectortosetthecookingtime (e.g. 1:30 hours).
Thesettingisacceptedautomatically. -
Presstheclockfunctionbuttonrepeatedlyuntil the ◀ and → Isymbolslightup.
-
Usetherotaryselectortosetthetimefortheend ofoperation(e.g. 12:30).
Thelowerovenswitchesoffandwaitsuntil the correcttimetoswitchon(intheexample at 11:00).
Thelowerovenswitchesoffautomaticallyatthetime set for the end of operation 12:30). A signal sounds andthe→Isymbolflashes.
-
Turntheoperatingmodeandtemperature selectorsbacktotheoposition.
-
Presstheclockfunctionbuttonontoquitpreselection mode.
Settingthetime
Youcanonlychangetheclock, whennootherclock functionsareactive.
- Presstheclockfunctionbuttonrepeatedlyuntil the ◀ and √ symbolslightup.
- Set the time using the rotary selector. Thesetting is accepted automatically.
Checking, correctingor deletingsettings
- To check your settings, press the clock function button repeatedly until the correspondings symbol lightsup.
- If necessary, you can correct your settings using the rotary selector.
- If you want to delete your settings, turn the rotary select to the left, back to the original value.
Baking
Inthissection,youwillfindinformationon
■Bakingononelevel
■Bakingontwoormorelevels
Thebakingtable
■Thebakingtableforpre-preparedproducts
■ Tipsandtricksforbaking
Note:
When baking with CircoTherm, donotuseshef height2. Aircirculationisadverselyaffectedandthe resultsofbakingareimpaired.
Werecommendthatyouusedarkbakingtinsmade frommetal.
Light-colouredbakingtinsandglassdisheslengthen thebakingtimeandthecakewillnotbrownsoevenly.
Alwaysslidetheuniversalpanincarefullyasfarasit will go and makes sure that the sloping edge is facing the appliance door.
Slideawirerackinsothattherearupstandtoprevent itemsslidingoffthebackoftheshelfisattherear. This preventsbakingtinsslippingofftheback.
Bakingononelevel
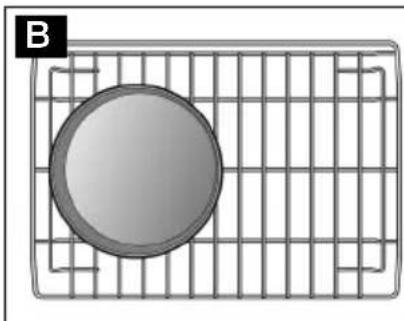
If you are baking on one level with Circo Therm always place around baking in the centre (figure A) and acaket indiagonally (figure B) on the stepped wirerack.
natural_image
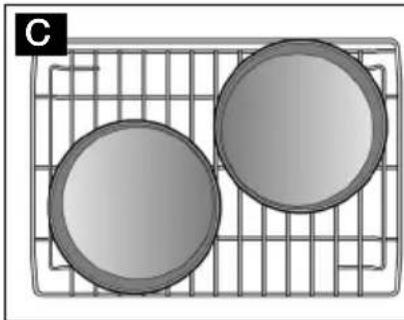
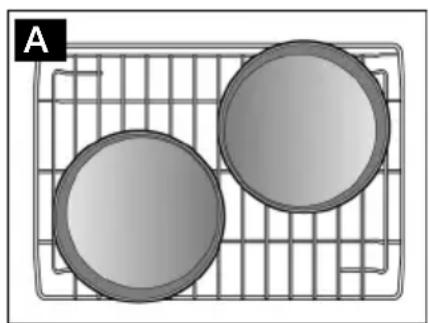
Two grayscale diagrams labeled A and B showing a circular object inside a grid and a rectangular object inside a grid (no text or symbols)If you are baking on one level with Circo Therm, always place two round baking tins diagonally on the on the stepped wirerack (figure C).
natural_image
Two circular objects placed on a wire rack inside a grid (no text or symbols)Bakingontwoor morelevels
Twobakingtinson two levels
Whenbakingonseverallevels,onlyusethe CircoThermoperatingmode.
Bearinmindthatyouritemsmaybrownatdifferent ratesoneachlevel.Theitemsonthetoplevelwill brownmostquicklyandcanbetakenoutearlier.
Whenbakingwithtworoundbakingtinsortwotrays, slidethesteppedwirerackinatshelfposition1 and thestraightwirerackinatshelfposition3.
Positionthelowerbakingtinontheleft(figureA) and theupperbakingtinontheright(figureB)onthe differentwireracks.
natural_image
Two identical diagrams (A and B) showing a circular object placed inside a wire mesh, with no text or symbols present.Four baking tinson two levels
Whenbakingwithfourroundbakingtins,slide the steppedwirerackinatshelfposition1andthe straightwirerackinatshelfposition3.
Positionthelowerbakingtinsdiagonallyasshown in figureCandtheupperbakingtinsdiagonallyas showninfigureDonthedifferentwireracks.
natural_image
Two circular metallic components placed on a wire grid (no text or symbols visible)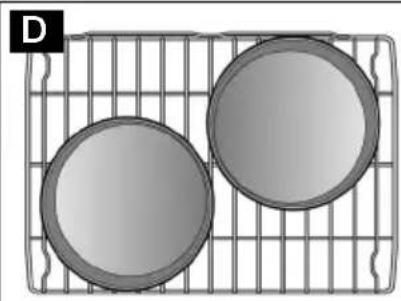
natural_image
Two circular metallic components placed on a wire grid (no text or symbols visible)Baking table
The values in the table are average values and apply to dark baking tins. The values may vary depending on the type and amount of dough/mixture and on the baking tin.
Werecommendthatyousetthelowerofthespecified temperaturesthefirsttime. Thiswillgenerallyallow moreevenbrowning.
If you are baking with your own recipe, uses similar recipes in the table as a guide.
Observethenotesinthetableaboutpreheating.
| MealOvenSettingLevelTemperature | in°C | Timein minutes | |||
| Victoriaspongecake | |||||
| ■1level1160-170*25-30 | |||||
| ■1level | 1160-170*25-30 | ||||
| ■2 levels | 1 + 3 | 150 - 160* | 25 - 35 | ||
| Scones | |||||
| ■1level1180-200*10-15 | |||||
| ■1level | 1200-210*10-12 | ||||
| ■2 levels | 1 + 3 | 180 - 200* | 10 - 15 | ||
| * Preheat oven | |||||
| ** Preheattheovento130°C | |||||
| MealTimein | LevelSetting temperature in°C | minutes | |||
| Smallcakes | |||||
| ■1level1160-170*20-30 | |||||
| ■1level1160-170*25-30 | |||||
| ■2 levels | 1 + 3 | 150 - 160* | 25 - 35 | ||
| Light fruit cake | 1 | 140 - 150* | 80 - 100 | ||
| Rich fruit cake | 1 | 140 - 150* | 210 - 240 | ||
| Jamtartes | |||||
| ■1level1190-200*15-20 | |||||
| ■1level1190-210*15-25 | |||||
| ■2 levels | 1 + 3 | 190 - 200* | 20 - 25 | ||
| Swiss roll | 1 | 180 - 190* | 10 - 15 | ||
| 1190-200*10-15 | |||||
| Tart | |||||
| ■1level1160-170*50-60 | |||||
| ■2 levels | 1 + 3 | 160 - 170* | 50 - 60 | ||
| Pies | |||||
| ■1level1170-180*65-75 | |||||
| ■2 levels | 1 + 3 | 170 - 180* | 65 - 75 | ||
| Biscuits | |||||
| ■1level1160-170*15-20 | |||||
| ■1level1160-170*20 | |||||
| ■2 levels | 1 + 3 | 160 - 170* | 20 - 25 | ||
| ■3 levels | 1 + 3 + 4 | 160 - 170* | 20 - 25 | ||
| Baiser | 1 | 80* | 100 - 130 | ||
| 1 | 80* | 110-140 | |||
| Pavlova | 1 | 90 - 100** | 90 - 120 | ||
| Fruit crumble | 1 | 170 - 180* | 45 - 55 | ||
| Yorkshire pudding | |||||
| ■1level1200-220*15-20 | |||||
| ■2 levels | 1 + 3 | 200 - 220* | 15 - 20 | ||
| Vol au vents | 1 | 190 - 200* | 20 - 30 | ||
| Quiche | 1180-200*45-55 | ||||
| (White) bread | |||||
| ■1level1210-220*20-25 | |||||
| Homemade pizza | |||||
| ■1level1190-200*20-30 | |||||
| ■2 levels | 1 + 3 | 180 - 190* | 35 - 45 | ||
| * Preheat oven | |||||
| ** Preheattheovento130°C | |||||
| MealTimein | LevelSetting | Temperature in°C | minutes | |
| Jacketpotatoes | ||||
| ■1 level 1160-17060-70 | ||||
| ■2 levels | ☐ | ☐ | 1 + 3 | 160 - 170 |
| *Preheatoven | ||||
| ** Preheattheovento130°C | ||||
Bakingtable for pre-prepared products
Pleasenotethefollowingpointsforpre-prepared products:
■Usetheuniversalpan
■ Onlyusegreaseproofpaperthatissuitableforthe selectedtemperature
■ Spreadchipsoutinasinginglelayer
■Turnfrozenpotatoproductshalfwaythroughthe bakingtime
■ Onlyseasonfrozenpotatoproductsafterthey havefinishedbaking
Leavealittlespacebetweenbreadrollswhen crispingthemup.Donotplacetoomanyinthe universalpan
■ Coverlasagnewithplentyofcheese,sothatthe topbrownsevenly
■ Donotusefrozenproductswithfreezerburn
■ Donotusefrozenproductsthatareheavilyfrosted
■ Followthemanufacturer's instructions
The values in the table are average values and apply to the universal plan.
Werecommendthatyousetthelowerofthespecified temperaturesthefirsttime. Thiswillgenerallyallow moreeven browning.
Whenbakingonseverallevels,onlyusethe
CircoThermoperatingmode.
Observethenotesinthetableaboutpreheating.
| MealOvenSettingLevelTemperature | in°C | Timein minutes | |||
| Frozenpizza | |||||
| ■1level1180-200*15-25 | |||||
| ■1level | 1180-200*10-20 | ||||
| ■2 levels | 1 + 3 | 170 - 190* | 20 - 30 | ||
| Chilled pizza | |||||
| ■1level1200-210*10-15 | |||||
| Part-baked white bread | |||||
| ■1level1180-190*10-20 | |||||
| ■2 levels | 1 + 3 | 170 - 180* | 15 - 20 | ||
| French fries | 1 | 180 - 200* | 25 - 30 | ||
| Potato wedges | 1 | 180 - 190* | 20 - 25 | ||
| Croquettes1180-190*25-30 | |||||
| Fish fingers | 1 | 180 - 200* | 15 - 20 | ||
| Lasagne, frozen (400 g) | 1 | 180 - 190* | 40 - 45 | ||
| Lasagne, frozen (1200 g) | 1 | 180 - 190* | 45 - 50 | ||
| Lasagne, chilled (400 g) | 1 | 170 - 180* | 35 - 40 | ||
| Lasagne, chilled (1200 g) | 1 | 170 - 180* | 40 - 45 | ||
| * Preheat oven | |||||
Tips and tricks
| The cake is too light in colour | Check the shelf height.Check whether you have used the bakeware that we have recommended.Placeyourtinonthe wirerackandnotonthebakingtray.If the shelf height and the bakeware are correct, then you should either extend the baking time or increase the temperature. |
| The cake is too dark | Check the shelf height.If the shelf height is correct, you should either shorten the baking time or reduce the temperature. |
| Thecakeisunevenlybrownedin thebakingtin | Checktheshelfheight.Checkthetemperature.Makesurethatyourbakingtinisnotplaceddirectyinfrontof theairoutletsintherearwallofthecookingcompartment.Checkthatthebakingtiniscorrectlypositionedonthewirerack. |
| The cake is too dry | Set a slightly higher temperature and a slightly shorter baking time. |
| Thecakeistoomoistinthecentre | Setaslightlylowertemperature.Note:youcannotdecreasethebakingtimebysettingahigher temperature(theoutsidewillbecooked,buttheinsidewill remainuncooked).Selectalongerbakingtimeandallowthecakemixturetoprove forlonger.Addlessliquidtothemixture. |
| Thecakecollapseswhenyoutake itoutoftheoven | Uselessliquidforthemixture.Setalongerbakingtimeoraslightlylowertemperature. |
| Thespecifiedbakingtimeisnot correct | Forsmallitems,checktheamountonthebakingtray.Theitems mustnotbetouchingeachother. |
| Frozenproductsarenotbrowned evenlyafterbaking | Checkwhetherthefrozenproductisunevenlybrownedbefore baking.Thisunevenbrowningwillremainafterthebakingtime. |
| Severalcakesonelevelare unevenlybrowned | Checkthepositionofthebakingdishesonthewirerack. |
| Frozenproductsarenotbrowned, notcrispyorthespecifiedtimeis notcorrect | Removeicefromfrozenproductsbeforebaking.Donotuse frozenproductsthatareheavilyfrosted. |
| Savingenergy | Onlypreheattheappliancewhenitisspecifiedinthebaking tablethatyoushoulddoso.Usedarkbakingtinsastheseabsorbtheheatbetter.Makeuseoftheresidualheatwithlongerbakingtimesand switchtheovenoff5-10minutesbeforetheendofthebaking time. |
Roastingandbraising
Inthissection, you will find information on
Roasting
■Braising
■ Tablesforroastingandbraising
Tipsandtricks

Thereisariskofinjuryifyouuseroastingdishes that arenoheat-resistant.Onlyuseroastingdishes thataremarkedasbeingsuitableforuseintheoven.
Note:
Whenroastingwith☒CircoTherm☐,donotuse shelf height2.Theaircirculationwouldbeimpaired andthiswillhaveanegativeeffectonyourroast.
Roasting
Roastingintheuniversal pan
Forroasting, a roasting dish without alidis used.
Juicesescapefromtheroastingmeatandare collectedintheuniversalpan.Youcanusethese juicesasthebasisforatastygravy.
Deglazethepanofthejuiceswithhotwater,stock, wineorsimilar,bringittotheboil,thickenwith cornflour,seasonandpassthroughasieveif necessary.
Youcanalsocooksidedishes(e.g. vegetables)atthe same time as roasting meat in the universal pan.
Note:
Forsmallerjoints, you can use as smaller roasting dish instead of the universal plan. Placethis directly on the wirerack.
Roastingintheuniversal panwithsteppedwirerack
Placethesteppedwirerackontheuniversalpanand slidethemintogetheratthesameshelfheight.
Roastingintheuniversal panwithroastingsheet
Forfattymeatandpoultry, add ^1/8 to ^1/4 litreofwaterto theuniversalpan, dependingonthesizeandtypeof thejoint.
Whilethemeatisroasting, the liquid in theroasting dish willevaporate. Pour in more hot water if required.
Theroastingsheetreducesdirtinthecooking compartment. Placetheroastingsheetinthe universalpanandslidethemintogetheratthesame shelfheight.
Drippingfatandmeatjuicesarecaughtinthe universalpan.
Braising
Forbraising, a roasting dish with alidis used. Ensure that theroasting dish and lid are designed for one another and fit closely.
First,searthemeatifrequired.
Addthemeat, vegetablesandliquidtotheroasting dishintheproportion1:1:1andplaceitwiththelid closedonthewirerackonshelfposition1.
Whilethemeatisbraising, the liquid in the roasting dish willevaporate. Pour in more liquid if required.
Tablesforroasting andbraising
The values in the tables are only average values.
Poultry
The information in the tables applied on unstuffed poultry. Turn the poultry after half of the cooking time.
Leanmeat
Coatleanmeatwithfatoroilasrequiredandcoverit withstripsofbacon.
Cookingtime and temperature
The cooking time and temperature depend on the size, height, type and quality of the food and the roasting dish.
Ingeneral, the larger the joint, the lower the temperature and the longer the roasting time.
| Youshouldsetthelowerofthespecified temperaturesthefirsttime. Thiswillgenerallyallow moreevenbrowning.Thevaluesforcookingtimeapplyto0.5-2kg of food.Forgreaterweights,reducethetemperature andincreasethecookingtime.Formultiplepieces, applythecookingtimefortheweightoftheheaviest piece. | |
| Standingtime | Attheendofthecookingtime,switchtheovenoff andleavetheroasttostandforapproximately 10 minutesinthecookingcompartmentwiththedoor closed.Therecommendedstandingtimeisnot includedinthecookingtimesspecified.Theinformationinthetablesapplytofoodplaced in a coldovenandformeattakendirectlyfromthe refrigerator. |
| MealOvenSettingLevelTemperature | in°C | Timein minutes (per500g) | ||
| Beef | ||||
| Slowroastjoint114040+40Topside/toprump116030+25 | ||||
| Lamb | ||||
| Leg117030+25Shoulder(bone-in)117025+20Shoulder (boned and rolled)Rackoflamb | 118025+25 | 1 | 170 | 30 + 25 |
| Pork | ||||
| Roastjoint | 118035+35 | |||
| Loinjoint | 118030+30 | |||
| Belly | 116030+25 | |||
| Gammon | ||||
| Joint | 116030+30 | |||
| * +timeforyorkshirepudding | ||||
| MealTimein | LevelSetting | Temperature in°C | minutes (per500g) | |
| Chicken | ||||
| Wholechicken1170-18020+25 | ||||
| Portion(boned)119020+25 | ||||
| Quarter119020+25 | ||||
| Duck | 1 | 1 | 180 | 20 + 20 |
| Turkey | ||||
| Drumstick | 118020+20 | |||
| Crown | 116025+20 | |||
| Whole | 1150-16025+25 | |||
| CompleteMeal | ||||
| with beef | 1 + 3 | 160 | 30 + 25* | |
| with chicken | 1 + 3 | 180 | 20 + 25 | |
| * +timeforyorkshirepudding | ||||
| Casseroles | Oven | Setting | Level | Temperature in°C | Timein minutes (per500g) |
| Dicedmeat (beef,pork,lamb,chicken) | 114040+80 | ||||
| Braisingsteak | 114045+80 | ||||
| Chicken pieces (boned) | 1 | 140 | 50 + 70 |
Tips and tricks
| Crust too thick and/or roast too dry | Reduce the temperature or shorten the roasting time.Checktheshelfheight. |
| Crust too thin | Increase the temperature or switch on the grill briefly at the end oftheroastingtime. |
| Themeatisnot cooked right through | Removeanyaccessoriesthatarenotrequiredfromthecooking compartment.Increasetheroastingtime.Checkthecoretemperatureofthejointusingameat thermometer. |
| Steaminthecookingcompartment iscondensingontheappliance door | Thesteamdriesduringthecourseofthecooking.Ifthereisan excessivevolumeofsteam,youcancarefullyopenthedoor brieflytodissipatethesteammorequickly. |
| Themeatisburnedslightlyduring braising | Addthemeat,vegetablesandliquidtotheroastingdishinthe proportion1:1:1.Theroastingdishandlidmustdesignedforoneanotherand fitclosely.Reducethetemperature. |
Grilling
Inthissection,youwillfindinformationon
■The largegrilloperatingmode
Grillingtable
Caution
Thereisariskofdamagetokitchenunitsifyougrill withtheappliancedooropen. Theadjacentunitsmay bedamagedbytheextremeheat. Keeptheappliance doorclosedwhenusingthegrill.
Notes:
■Alwaysusethesteppedwirerackandthe universalpanwhengrilling
■Placethesteppedwirerackintheuniversalpan andslidethembothinattheheightspecifiedinthe grillingtable
■Alwaysplacethefoodtobegrilledinthecentreof thesteppedwirerack
■ If you are grilling more than one piece of meat, makes sure that they are the same a sort of meat and that they are of similar thickness and weight
■Brushtheitemstobegrilledwithalittleoiltotaste
■Turntheitemsafterhalftotwo-thirdsofthegrilling time
Wire rack position
You can influence the grilling result by changing the position of the wirerack.
| Wirerack type/ position | Use |
| Placethesteppedwirerackintheuniversalpan withthestepointingdownwards:suitableforgrillingitemsthatshouldbewell-done | |
| Placethesteppedwirerackintheuniversalpan withthestepointingupwards:suitableforgrillingitemsthatshouldberareto medium |
Grillingtable
The information in the table are guidelines and apply to the enamelled universal pan with stepped wire rack. The values may vary depending on the type and amount of food to be grilled.
You should set the lower of these specified temperature the first time. This will generally allow more even browning.
The values are for food placed in a cold oven and for meattakendirectly from therefrigerator.
| MealOvenSettingLevelTemperature | in°C | Timeinminutes | ||
| Beef | ||||
| Steaks,high2-3cm | ☐ | 2270*1stside:10-13 | 2ndside:6-8 | |
| Burgers,high1-2cm | ☐ | 22701stside:10-12 | 2ndside:6-8 | |
| *Preheatfor3minutes** Turn frequently | ||||
| MealTimeinminutesTemperature | LevelSettingOven in°C | ||
| Lamb | |||
| Steaks,high2-3cm | ☐ | 22701stside:6-8 | 2ndside:4-6 |
| Chops,high2-3cm | ☐ | 22701stside:7-9 | 2ndside:5-8 |
| Pork | |||
| Steaks,high1-2cm | ☐ | 2270*1stside:9-12 | 2ndside:6-8 |
| Chops,high2-3cm | ☐ | 22701stside:10-13 | 2ndside:8-12 |
| Burgers,high1-2cm | ☐ | 22701stside:10-12 | 2ndside:6-8 |
| Sausages,ø2-4cm | ☐ | 2270 14-18** | |
| Gammon | |||
| Steaks,high1-2cm | ☐ | 22701stside:10-12 | 2ndside:5-7 |
| Chicken | |||
| Drumsticks | ☐ | 22501stside:16-20 | 2ndside:12-15 |
| Breast(boneless) | ☐ | 22501stside:13-15 | 2ndside:8-10 |
| Fish | |||
| Filets | ☐ | 1220 1stside:9-13 | 2ndside:8-12 |
| * Preheatfor3minutes** Turn frequently | |||
Defrosting
Inthissection,youcanreadabout
■ how to defrost with Circotherm hot air
■howtousethedefrostsetting
Defrostingwith Circotherm\\hotair
UseCircothermhotairtodefrostandcookfrozen products.Pleasenotethefollowingpointhere:
■ Frozenproductsthathavebeendefrosted(meatin particular)requireshortercookingtimesthanfresh products
■The cooking time for frozen meat increases by the defrosting time
■Alwaysdefrostfrozenpoultrybeforecooking,so thatthegibletscanberemoved
■ Cookfrozenfishatthesametemperaturesas freshfish
■ Youcanplacelargequantitiesofreadymade frozenvegetablesinaluminiumdishesinthe cookingcompartmentatthesametime
■ Useshelfposition 1 when defrostingonone level, and shelfpositions 1 + 3 when using two levels
- Observethemanufacturer's instructions when using frozenfoods
Defrosttable
| FrozenmealsTemperature | in °C | Defrosting timein minutes |
| Rawfrozenproducts/ foods | 5030-90 | |
| Bread/breadrolls (750-1500g) | 5030-60 | |
| Dry,frozentraybakes6045-60 | ||
| Moist,frozentraybakes5050-70 |
Defrostsetting
With this operating mode you can defrost delicate baked goods (e.g. cream cakes) particularly well.
1.Switchonthedefrostsetting*.
2. Defrost frozen products for 25 - 45 minutes, dependingonthetypeandsize.
3. Removethefrozenproductfromthecooking compartmentandallowittodefrostforafurther 30-45 minutes.
Note:
With small quantities (pieces) the defrosting time is shortened to 15-20 minutes and the extended defrosting time is shortened to 10-15 minutes.
Yoghurt
Youcanalsomakehome-madeyoghurtwithyour appliance.Theheatfromtheinteriorlightingis usedforthis.
Usethelowerovenforyoghurt.
-
Remove accessories and hook-inrack, telescopic shelfor individual connectorsystem.
-
Heatup1 litreUHTmilk(3.5% fat) or pasteurised freshmilk to 40°C
or
Bring 1 litreoffreshmilktotheboilandallowto cooldownto40°C.
-
Add 300 g setyoghurt to the heated milk, stiritin and pourequal amounts tintoglasses or bowls. Do not add more than 200 ml to a container.
-
Afterfilling, coverthecontainers with asuitable lid orclingfilm.
-
Place and arrange the container seven lyspaced over the whole cooking compartment floor.
-
Closetheappliancedoorandswitchonthe interiorlight.
- After 7 hours, switch off the interior light and placethe containers in there refrigerator for at least 18 hours.
Cleaningandcare
Inthissection,youwillfindinformationon
■Cleaningandcareofyourappliance
■Cleaningagentsandaids
■Self-cleaningsurfacesinthecooking compartment.
Riskofshort-circuit.Donotusehigh-pressure cleanersorsteamjetcleanerstocleanyour appliance.
Caution!
Damagetosurfaces.Donotusesharporabrasive cleaningagents.Donotuseabrasivecleaningaids suchassteelwoolorscourers.
Note:
Highlyrecommendedcleaningandcareproducts canbepurchasedthroughourafter-salesservice. Observethemanufacturer'sinstructions.
Cleaningthe applianceexterior
| Appliancepart/surfaceCleaningagent/aid | |
| StainlesssteelsurfacesApplycommerciallyavailabledetergentwithasoft,dampclothorchamoisleather;drywithasoftcloth.Usecleanersformattedstainlesssteelifverydirty. | |
| PaintedsurfacesApplycommerciallyavailabledetergentwithasoft,dampclothorchamoisleather;drywithasoftcloth. | |
| GlasssurfacesApplycommerciallyavailabledetergentwithasoft,dampclothorchamoisleather;drywithasoftcloth. | |
| DoorpanelsUsecommerciallyavailableglasscleanerorapplycommerciallyavailabledetergentwithasoft,dampclothorchamoisleather;drywithasoftcloth.Theinnerdoorpanelontheappliancedoorhasacoatingwhichreducesthetemperatureandreflectstheheat.Theviewthroughtheappliancedoorisnotimpairedbythis.Whentheappliancedoorisopenthiscoatingcanhavetheeffectofalight-colouredfilm.Thisispartofthedesignandisnotduetoanyqualitydefect. |
Cleaningthe cooking compartment
Caution!
Damagetosurfaces.Donotcleantheappliancewhile stillwarm,evenifusingovencleanersspecially intendedforthispurpose.
Notes:
■ Enamelisbakedonatveryhightemperatures duringmanufacture. Thiscancausesomeslight colourvariation. Thisisnormalanddoesnotaffect properfunctioning.
■Theedgesofthintrayscannotbecompletely enamelled.Asaresult,theseedgescanberough. Anti-corrosionprotectionisstillguaranteed, however.
| AppliancepartCleaningagent/aid | |
| Enamelsurfaces(smoothsurfaces) | Tofacilitatecleaningyoucanswitchontheinteriorlighting anddetachtheappliancedoorifnecessary.Applycommerciallyavailabledetergentorvinegarsolution withasoft,dampclothorchamoisleather;drywithasoft cloth.Loosenbakedonfoodresidueswithadampclothand detergent.Werecommendusingovencleaninggeliftheovenisvery dirty.Thiscanbeappliedneattothestain.Leavethecookingcompartmentopentodryaftercleaning. |
| Self-cleaningsurfaces(roughsurfaces) | Pleaseobservetheinstructionsinthesection:Self-cleaning surfaces |
| DoorsealHotsoapywater | |
| Hook-inrack/telescopicshelfHotsoapywater | |
| AccessoriesSoakinhotsoapywater,cleanwithabrushandspongeor washinthedishwasher | |
Keeping the appliance clean
Toavoidgettingthecookingcompartmentdirty,
■cleanthecookingcompartmentaftereachuse,as dirtwillbakeonthenexttimeitisheatedup,and thiscanonlyberemovedwithdifficulty
■alwaysremovelime,grease,starchandegg-white stainsimmediately
■ qhere possible use Circotherm hot air ☒. This operatingmodecreateslessdirt
■ usetheuniversalpantobakeverymoistcakes
■usesuitableovenwarewhenroasting(e.g.roasting dish)oraroastingsheet(seethesection: Accessories
Self-cleaning surface
Thebackpanelinthemainoven☑iscoatedwith self-cleaningenamel. Thiscoatingabsorbsand disintegratessplashesfrombakingandroastingwhile theovenisinoperation.
Largesplashesonlydisappearaftertheovenhas beenusedseveraltimes.
Discolourationontherearwalldoesnotaffectthe self-cleaningfunction.
Caution
Damagetheself-cleaningsurfaceduetothe applicationofovencleaner.
■ Nevercleantheself-cleaningsurfacewithoven cleaner.
■ Ifovencleanerisaccidentallyappliedtothe self-cleaningsurface,removeitimmediatelywitha spongeandplentyofwater.
Caution
Damagetosurfacesonself-cleaningareasduetothe useofabrasiveandacidiccleaningagentsandaids.
■ Donotusecleaningagentscontainingabrasive substancesoracids.
■ Donotuseabrasivecleaningaidssuchassteel woolorscourers.
Removing and fittingtheappliance door

Youcanremovetheappliancedoortocleanitmore thoroughly.
Riskofinjury! Thehingesontheappliancedoorcansnapbackwith greatforce.Alwaysopenthelockingleveronthe hingefullywhenremovingtheappliancedoorand closeitagainfullyafterfittingit.Donotreachintothe hinge.

Riskofinjury! Iftheappliancedoorisdetachedononeside, donot reachintothehinge. Thehingecansnapback with greatforce. Calltheafter-salesservice.
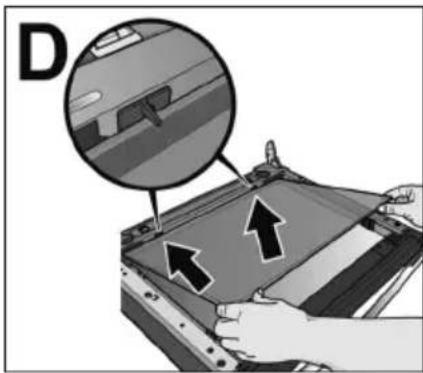
Removingtheappliance door
natural_image
Diagram showing a device being opened into a rack, with an inset close-up illustrating the process (no text or symbols present)-
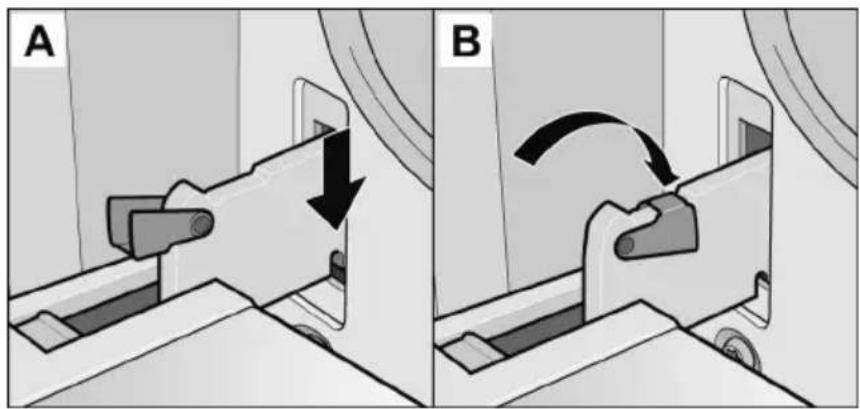
Opentheappliancedoorfully.
-
Openthelockingleversontheleftandright-hand sidefully.
Thehingesaresecuredandcannotsnapclosed.
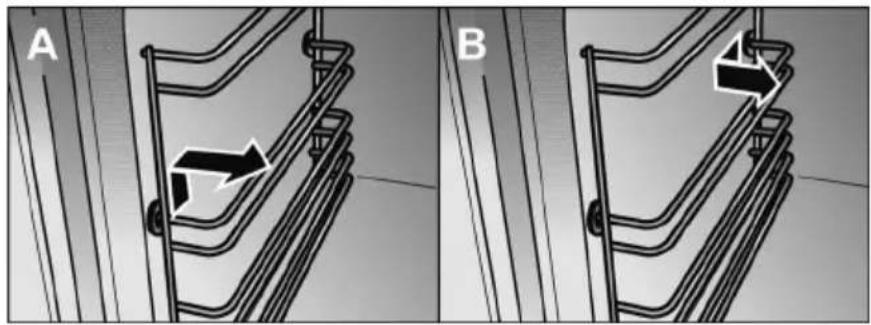
natural_image
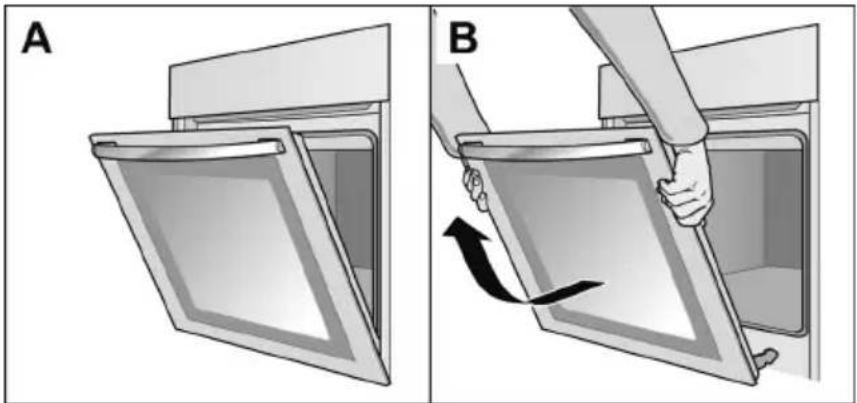
Two-panel diagram showing a door opening process: (A) open with a handle, (B) closed with a hand holding a tool, both without any text or symbols.-
Closetheappliancedooronlyuntilresistance becomesnoticeable(Fig.A).
-
With both hands, griptedoor on the left and right-hand side, closetedoor alittle more and pullout (Fig.B).
Fittingtheappliancedoor
natural_image
Mechanical assembly diagrams showing two stages (A and B) of a device with a downward arrow indicating motion, no text or symbols present.- Insert the hinges in the left and right-handholders (Fig.A).
Thenotchonbothhingesmustengage. - Opentheappliancedoorfully.
- Closethelockingleversontheleftandright-hand sidefully(Fig.B).
Theappliancedoorissecuredandcannolonger beremoved. - Closetheappliancedoor.
Cleaningthe door panels

Tofacilitatecleaning, you can remove the inner door panels from the appliance doors.
Riskofinjury.
The components inside the appliance doorm may have sharpedges. Take care not to cut yourself.
Wear protectivegloves.
Caution.
The appliance must not be used again until the door panels and appliance should have been correctly refitted.
Beforeeremoving, makeanoteofthepositioninwhich thedoorpanelisfitted, sothatitisnotrefittedthe wrongwayround.
Removingthedoorpanels
Lowerovenand Upperoven
- Unhook the appliance and layton as soft, cleansurface with the front side facing downwards (see section: Removing and fitting the appliance door).
natural_image
Diagram showing two curved arrows indicating rotational motion or force directions, with no text or symbols present.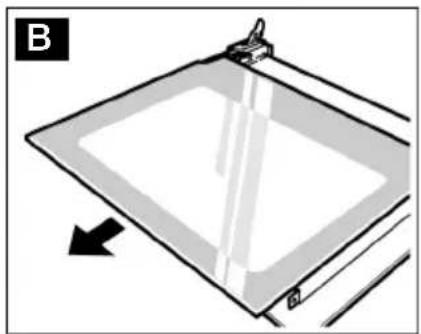
natural_image
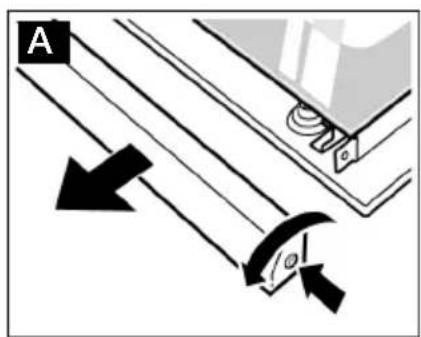
Diagram of a tilted rectangular frame with a vertical line and arrow indicating direction (no text or symbols)- Unscrew the appliancedoor cover at the top on the left and right-hand side and remove it (Fig. A).
3.Liftthedoorpanelandpullitout.(Fig.B).
Upperoven
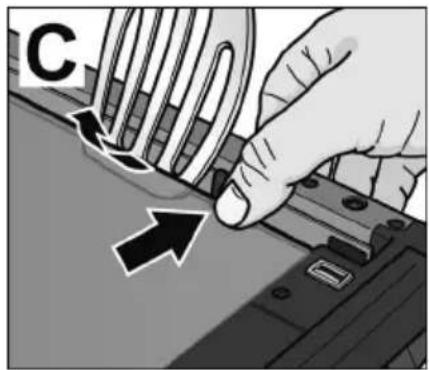
Intheupperoven,youcanalsoremoveandcleanan intermediatepanel.
-
Presstheintermediatepanelholderoneside anddisengageitwithe.g.aspatula(Fig.C).
-
Disengagetheothersideinthesameway and removetheintermediatepanel.
Cleanthepanelswithglasscleanerandasoftcloth.
Caution.
Donotuseanysharporabrasivemediumoraglass scraper. The glass could be comedamaged.
Cleaning
Fittingthedoorpanels
Upperoven
natural_image
Illustration of hands installing or adjusting a device panel with arrows indicating movement (no text or symbols present)-
Insert the left and right-hand sides of the intermediate panel into the supports (Fig. D).
-
Presstheintermediatepaneldownintothe holders.
Lowerovenand Upperoven
1.Slideinthedoorpanelasfarasthestop.
2.Fitthecoverandscrewitinplace.
- Refittheappliancedoor.
Cleaninghook-in racks

Foreasiercleaning, you can remove the hook-in racks.
Riskofburningduetohotelementsinthecooking compartment. Waituntilthecookingcompartment hascooleddown.
Removehook-inrack
natural_image
Diagram showing two views (A and B) of a mechanical component with directional arrows indicating movement or force, no text or symbols present.Cleaninghook-inracks
- Push the hook-in rack upwards at the front and unhook to the side (figure A).
- Push the hook-in rack forwards at therear and unhook to the side (figure B).
Cleanhook-inrackswithdetergentandaspongeor brush.
Hanginghook-inracks

Alwaysinstallthehook-inrackwiththeindentation(a) facingdownwards,sothattheshelfpositionsmatch.
- Insert the hook-in-rack at therear until the limit stop and pushtotherear (figureA).
- Insert the hook-in rack at the front until the limit stop and push downwards (figure B).
Faultsandrepairs
Itisnotalwaysnecessarytocalltheafter-sales service.Insomecases,youcantakeremedial actionyourself.Youwillfindsometipsfor troubleshootinginthefollowingtable.

Riskofelectricshock.
■Workontheapplianceelectronicsmustonly becarriedoutbyanexpert
■Duringworkontheapplianceelectronics, the powersupplytotheappliancemustbe disconnected.Switchoffthecircuitbreakeror takeoutthefuseinyourhouseholdfusebox
ProblemPossiblecauseRemedialaction
| Thereisnoelectricalfunction (e.g.indicatorlampdoes notlightup) | BlownfuseCheckthefusesinthefusebox | andreplaceifnecessary |
| Liquidorthindoughrunstoone side | AppliancenotinstalledlevelChecktheapplianceinstallation (seethelinstallation instructions) | |
| 0:00 flashes in the clock display | There was a power cut | Reset the clock (seesection:Electronicclock) |
| Electronicallycontrolledfunctions aremalfunctioning | Energysurges (e.g.lighteningstrike) | Resetthefunctionconcerned |
| Smokeisgeneratedduring roastingorgrilling | Fatisburningonthegrillelement | Continuegrillingorroasting untilthefatonthegrillelement isburntaway |
| Wirerackoruniversalpan insertedincorrectly | Placethewirerackinthe universalpanandinsertthem togetherintoalowshelfheight | |
| Highlevelsofcondensationare generatedinthecooking compartment | Normaloccurrence(e.g.with cakeswithverymoisttoppings oralargeroastjoint) | Opentheapplancedoor occasionallyduringoperation |
| Enamelledaccessorieshavelight, mattmarks | Normaloccurrencecausedby drippingmeatorfruitjuices | Notpossible |
| DoorpanelsaremistedupNormaloccurrencecausedby temperaturedifferences | Heattheapplianceupto 100 °Candthenswitchoff againafter5minutes | |
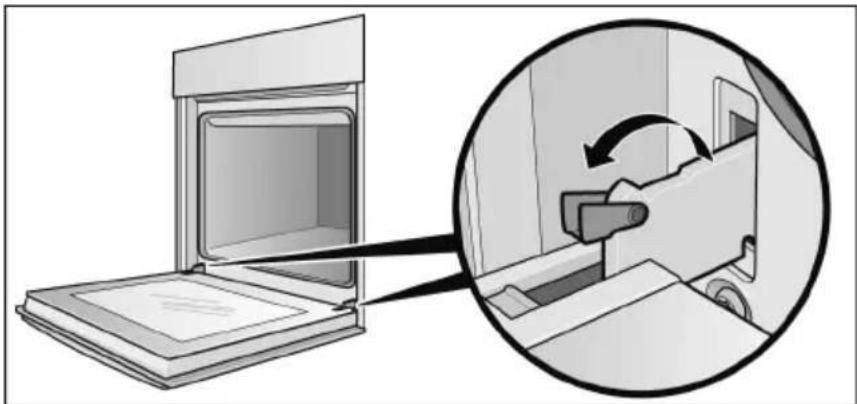
Changingthe cookingcompartmentbulb
Replacefaultycookingcompartmentbulbs. Spare bulbscanbeobtainedfromtheafter-salesserviceor specialistshops:
E14,220-240V,40W,heatresistantto300 °C Usethesebulbsonly.

Riskofelectricshock.
Disconnecttheappliancefromthepowersupply. Switchoffthecircuitbreakerortakeoutthefusein thehouseholdfusebox.
- Placeateatowelinthecoldoventoprevent damage.
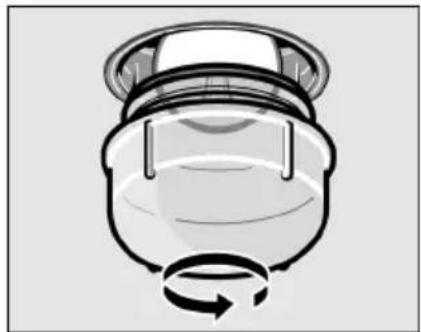
natural_image
Diagram of a mechanical component with a rotating arrow indicating rotational motion (no text or symbols)- Turntheglasscoveranticlockwiseandremoveit.
- Replacethebulbwithoneofthesametype.
- Screwon the glass cover again.
- Removetheteatowelandswitchonthefuse.
Replacingthedoor seal
If the door sealis defective, it must bere placed. Replacement seals for your appliance can be obtained from the after-saless service.
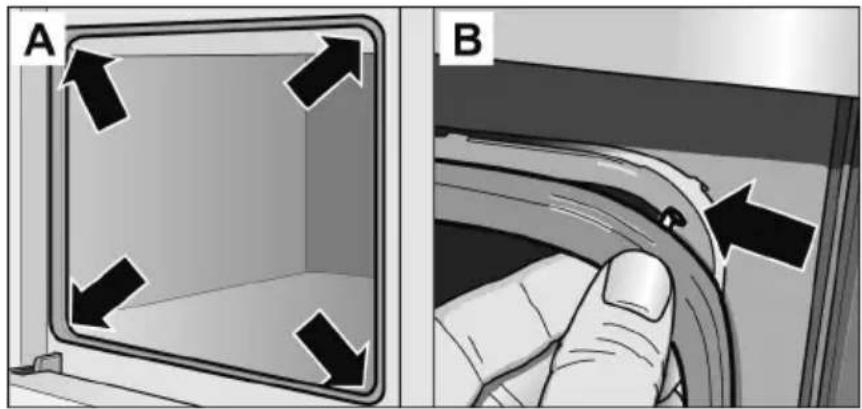
natural_image
Two-panel diagram showing a door panel with arrows indicating direction and a hand holding a curved pipe (no text or symbols)The doorsealis attached in four places (figureA). To replace it, disconnector attach the hooks at all four points (figureB).
Checktoensureinparticularthatthesealisseated correctlyinthecorners.
After-salesservice
Intheeventoffaultsandrepairsthatyoucannotsolve yourself,pleaseuseourafter-salesservice.
Youcanfindtheaddressesintheafter-salesservice directory.
Note:
Youwillbechargedforcallingtheafter-salesservice regardinganoperatingfault.
EnumerandFDnumber
Forafter-salesservicecases,pleasespecifythe E-numberandFDnumber.
You can find these on the rating plate behind the applianced door on the left-hand bottom edge.
E-Nr. FD
Testdishes
DishestestedinaccordancewithstandardEN 60350. Plesenotetheinformationinthetablesabout preheating.
| BakingCookwareOvenSettingLevelTemperature | in°C | Timein minutes | ||||
| Shortbread | ||||||
| ■ 1 level | Baking tray*** | 1 | 140 - 150** | 20 - 30 | ||
| ■ 2 levels | 2 baking trays*** | 1 + 3 | 140 - 150** | 20 - 30 | ||
| ■ 3 levels | 3 baking trays*** | 1 + 3 + 4 | 130 - 150** | 35 - 45 | ||
| Smallcakes(20pieces) | ||||||
| ■ 1 level | Baking tray*** | 1 | 150 - 160* | 25 - 35 | ||
| ■ 2 levels | 2 baking trays*** | 1 + 3 | 150 - 160* | 25 - 35 | ||
| ■ 3 levels | 3 baking trays*** | 1 + 3 + 4 | 150 - 160* | 25 - 35 | ||
| Fatlessspongecake | Springformcaketinø26cm | 1150-160**20-30 | ||||
| Applepie | ||||||
| ■1level(seefigureA) | 2x | 1170-180**70-80 | ||||
| Springformcaketinø20cm | ||||||
| ■2levels(seefigureBandC) | 2 x | 1 + 3 | 170 - 180** | 70 - 80 | ||
| Springformcaketinø20cm | ||||||
| * Preheatfor10minutes | ||||||
| ** Preheatoven | ||||||
| *** Onlyuseoriginalbakingtrays,orderno.Z1342X0 | ||||||
WhenbakingapplepiesusingCircoTherm, alwaysplacethetwospringformcaketinsdiagonally onthesteppedwirerack(figureA).
natural_image
Two circular objects placed on a wire cage, labeled 'A' in the top-left corner (no text or symbols on objects)Whenbakingapplepiesontwolevels, placethelower bakingtintotheleftonthesteppedwirerack(figure B)andtheupperbakingtintotherightonthestraight wirerack(figureC).
natural_image
Simple diagram of a circular object on a grid background, no text or symbols present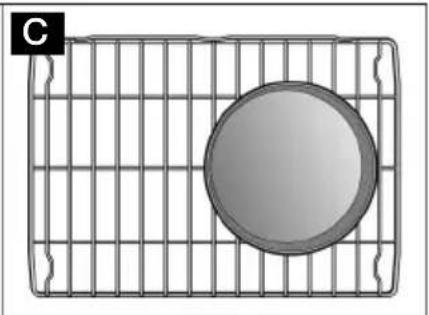
natural_image
Simple 3D diagram of a circular object on a grid background, no text or symbols present| GrillingOvenWirerack | SettingLevelTemperature | Timein minutes | |
| position | in°C | ||
| Whitebread(universalpan +steppedwirerack) | |||
| Beefsteaks(universalpan +steppedwirerack) | |||
| *Preheatfor10minutes** Turnafter ^2/_3 ofthetime | |||