Ayo 3in1 - Kinderwagen Baninni - Gratis gebruiksaanwijzing en handleiding
Vind de handleiding van het apparaat gratis Ayo 3in1 Baninni in PDF-formaat.

| Type product | Kinderwagen (3in1) |
| Merk | Baninni |
| Model | Ayo 3in1 |
| Afmetingen (opgevouwen) | Ca. 80 x 60 x 40 cm |
| Afmetingen (uitgevouwen) | Ca. 100 x 60 x 110 cm |
| Gewicht | Ca. 12 kg |
| Maximale belasting (zitje) | Tot 15 kg |
| Voeding | Geen (handmatig) |
| Functies | 3in1: draagwieg, reiswieg, autostoeladapter (niet inbegrepen) |
| Wielen | 4 wielen, voorste zwenkwielen, achterste met rem |
| Vergrendelingssysteem | Centrale rem op achterwielen |
| Verstelbare rugleuning | Ja, meerdere standen |
| Verstelbare voetensteun | Ja, verstelbaar |
| Kap | Uitschuifbare zonnekap met UV-bescherming |
| Zitje richting | Vooruit en achteruit gericht |
| Onderstel | Vouwbaar, met automatische vergrendeling |
| Onderhoud en reiniging | Bekleding afneembaar en wasbaar (handwas of machinewas 30°C) |
| Veiligheid | 5-puntsgordel, rem op achterwielen, stabiliteitsstandaard |
| Reserveonderdelen | Verkrijgbaar via Baninni-dealer of website |
| Garantie | 2 jaar |
Veelgestelde vragen - Ayo 3in1 Baninni
Gebruikersvragen over Ayo 3in1 Baninni
0 vraag over dit apparaat. Beantwoord die u kent of stel uw eigen vraag.
Stel een nieuwe vraag over dit apparaat
Download de handleiding voor uw Kinderwagen in PDF-formaat gratis! Vind uw handleiding Ayo 3in1 - Baninni en neem uw elektronisch apparaat weer in handen. Op deze pagina staan alle documenten die nodig zijn voor het gebruik van uw apparaat. Ayo 3in1 van het merk Baninni.
GEBRUIKSAANWIJZING Ayo 3in1 Baninni
Baninni
AYO BN1144
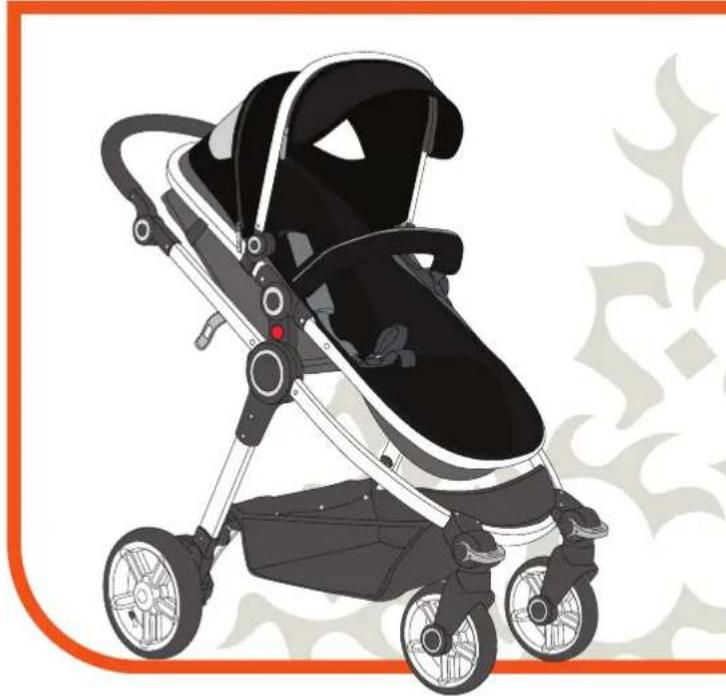
natural_image
Illustration of a baby stroller with black and silver body, no text or symbols present⚠ WARNING!
Attention, users and guardians, in order to make a correct use of the stroller, please read the manual carefully before use it and keep it properly for future reference. Failing to use the stroller in accordance with this manual might result in your baby's safety.
- The stroller reclining seat is suitable for child from 0 to 36 months when it is adjusted to the lowest position, it is unsuitable for the child under 6 months on other positions!
• The weight of the child using the stroller should not exceed 15kgs! - To avoid serious injury, always use the harness provided to secure your child!
• It may be dangerous to leave your unattended!
• Use a harness as soon as your child can sit unaided! - Ensure all the locking devices are engaged before using!
• Always apply all the brakes whenever you park stroller! - Do not use accessories other than those supplied and approved by manufacturer!
- Do not hang bags or goods from the handle as this may cause the stroller to become unstable!
- Keep away from fire!
- Do not place additional mattress of thickness exceed 10mm inside the seat!
• This stroller is designed for one child only! - Do not use the stroller on stairs or escalators when child is in it!
- Do not use the stroller while running or skating!
- Do not release locking devices to avoid mistake folding when child is in it!
- Ensure that all the locking devices are engaged before use!
- Do not lift the stroller by the bumper bar or tray(if supplied)!
- Promptly stop using the stroller when the parts are broken or worn out!
• Do not place more than 3kgs (6. 61 b) in the basket!
• To avoid the risk of suffocation, keep all plastic materials out of reach
of children!
- A pocket on the rear canopy is approved for the carriage of 0.2kg (0.441 b).goods evenly distributed!
- Please read the manual for car seat or carry cot if you would like to use them as a part of stroller!
• Color and features of product may differ from the diagrams shown!
DIAGRAMS OF PROHIBITION:

Always use harness!
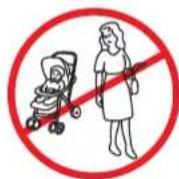
Don't leave child unattended!
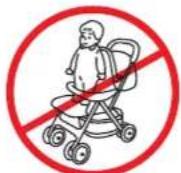
Do not allow child to stand on the stroller!
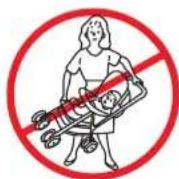
Do not lift stroller by the bumper!
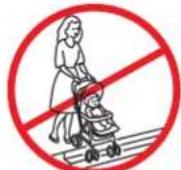
Do not use stroller when go down stairs!
CONTENTS
Part list 18
English Instruction 19-28
Warranty 29-30
PART LIST
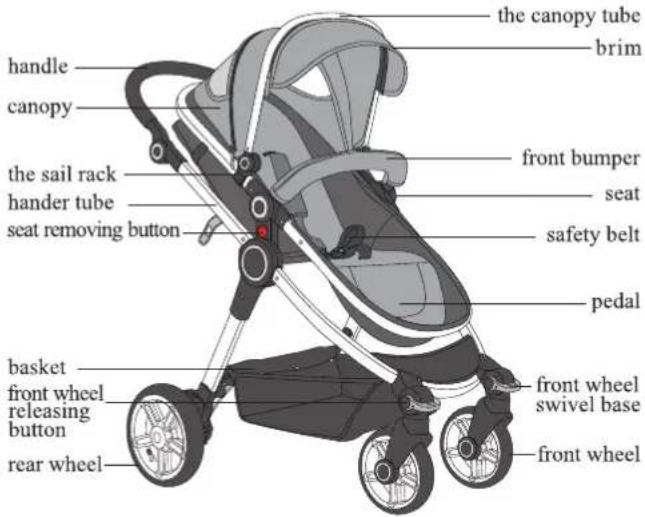
text_image
handle canopy the sail rack hander tube seat removing button basket front wheel releasing button rear wheel the canopy tube brim front bumper seat safety belt pedal front wheel swivel base front wheelPRODUCTION SPECIFICATION
• Model No.: BN1144
• Product standards N.:GB14748-2006
- Main materials: Aluminum tube, metal, plastic and fabric.
• Aluminum frame, easy and light to use
- Adjustable footrest makes baby more comfortable
• Equipped with skylight, convenient for mom to see baby
• 2 in 1 of seat and carrycot, meet the different demand for baby
• A five-point safety belt makes baby more safe
- Removing front armrest make mama take out baby more convenient
• The adjustable handler make mama use more easily
- Reversible seat make mama face baby
- Shock-proof wheels make baby more comfortable
- Adjusting seat back meet demands of sitting and sleeping
- Double brake on the rear wheel, more convenient to brake the stroller
• One-click folding to make mama operation more convenient
• Super storage basket
• Unfolded dimension: 103x69x103cm
- Folded dimension: 102x69x42cm
• Net weight: 10.9kgs
PRODUCT INSTALLATION AND INSTRUCTIONS
OPEN THE CARTON AND TAKE OUT THE PARTS
The parts include:
Frame 1PC
Seat IPC
Canopy 1PC
Brim IPC
Rear wheel 2PCS
Front wheel 2PCS
Front bumper 1PC
Foot cover IPC
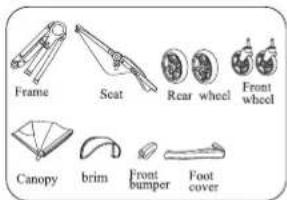
text_image
Frame Seat Rear wheel Front wheel Canopy brim Front bumper Foot coverUNFOLDING THE STROLLER
- Unfasten folding hook(figure1) and lift the handlebarThen push it upward;
The handlebar will lock into place with" click". The frame will unfold itself.
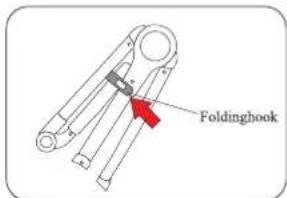
text_image
Foldinghook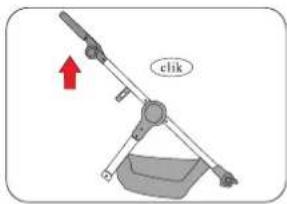
text_image
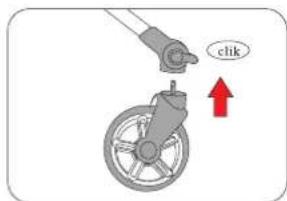
clkMOUNTING THE FRONT WHEELS
- Squeeze the assembling front wheel while inserting it into the front wheel housing, push it until you hear a" click". Pull to confirm it is assembled securely.
DISMANTILING THE FRONT WHEELS
- Press the red button to release the front wheel.
SWIVEL WHEEL OPERATION
• To block the rotating front wheel, press the blockade button; To unblock the front wheels, lift the blockade button up.
• MOUNTING THE REAR WHEELS
Insert the rear wheel into the rear wheel plastics system as the arrow shows until hear click.
text_image
clik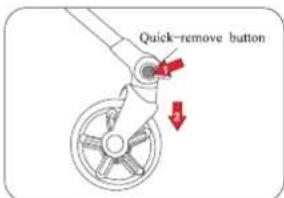
text_image
Quick-remove button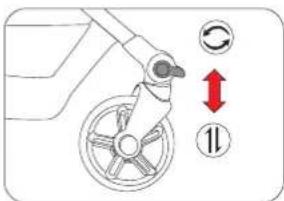
text_image
Diagram showing a car wheel with directional arrows and a circled number 11, likely indicating motion or movement.
natural_image
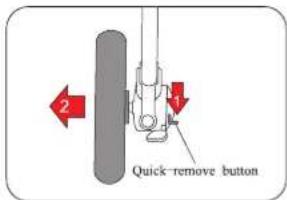
Diagram showing a mechanical component with a red arrow pointing to a gray cylindrical part and a wire being inserted (no text or symbols)DISMANTILING THE REAR WHEELS
- Pull the rear wheel releasing metal and take out the wheel.
THE REAR WHEEL BRAKING
- Step down the braking board in the rear wheel to apply the brake (the stroller is hard to move forward or backward) and lift the linkbrake up to release (the stroller is free to move forward or backward).
MOUNTING THE SEAT
- Slide both sides of the seat into the frame until you hear each side" click". Pull to confirm it is assembled securely.
DISMANTLING THE SEAT
- Push the buttons on both sides downwards and lift the seat.
text_image
Quick-remove button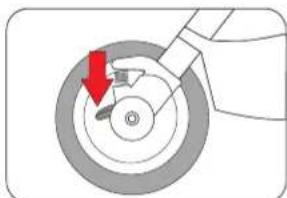
natural_image
Diagram of a hand turning a circular component with a red arrow indicating rotation (no text or symbols)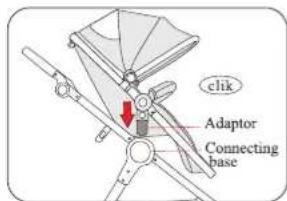
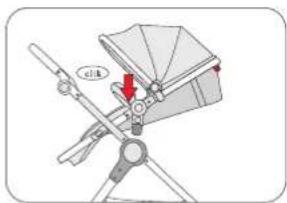
text_image
click Adaptor Connecting base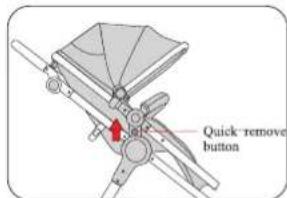
text_image
Quick-remove buttonTHE SEAT ADJUSTMENT
- Slide both sides of the seat into the frame until you hear each sides "click".
text_image
引头SEAT ADJUSTMENT
- Press the red button on the top rear of the seat and move the seat to desired position.( total 3-position reclining seat).
natural_image
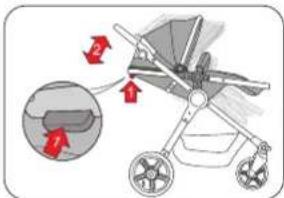
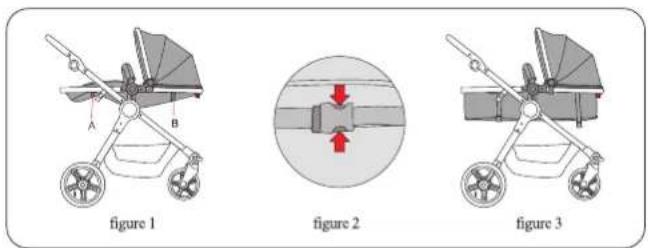
Illustration of a baby stroller with a magnified inset showing the blade and seat (no text or symbols)SEAT TURNS TO CARRYCOT
- Seat turns to carrycot: First reverse the seat, press down the seat adjustment button, and make the seat on horizontal position (As shown figure 1,) Second, find the strap on place A and place B.(As shown figure 2). Third, Unlock two straps, and seat turn to the carrycot.(As shown in figure 3)
text_image
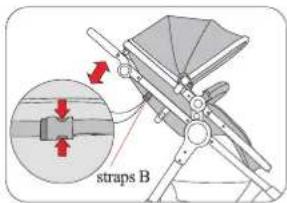
A B figure 1 figure 2 figure 3BACKREST ADJUSTMENT
Unlock straps B pull down the recline adjuster; Lock straps B pull the recline adjuster up.
text_image
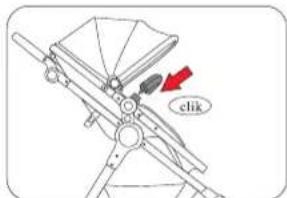
straps BATTACHING FRONT BUMPER
- Insert front bumper into openings on seat until you hear each sides" click".
text_image
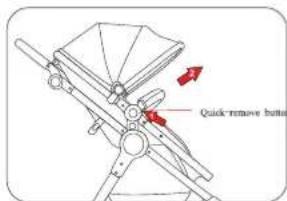
clkREMOVING FRONT BUMPER
- Press buttons under each side of safety bar(figure1) and pull the bar off the seat(figure2). Always secure the child with the restraining straps.
text_image
Quick-remove buttonASSEMBLE THE CANOPY
- Insert the canopy retainer into the slot in the handle tube as arrows show.
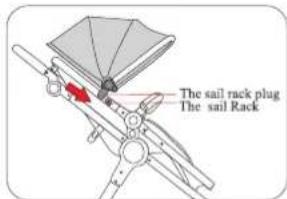
text_image
The sail rack plug The sail RackDISMANTLLE THE CANOPY
- Press the button in the canopy retainer and take out the canopy directly.
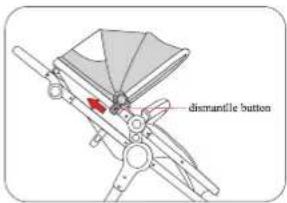
text_image
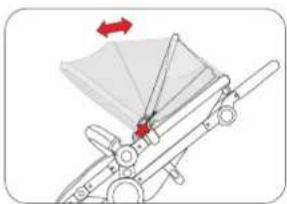
dienandle buttonCANOPY ADJUSTMENT
- Slide the canopy up and down the frame.
natural_image
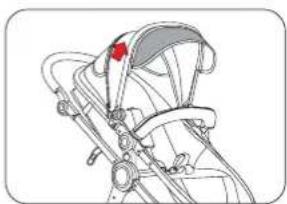
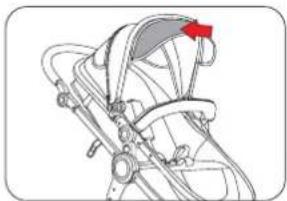
Diagram of a mechanical device with a red arrow indicating rotation or force direction (no text or symbols)INSTALLATION BRIM
• The brim covered zipper plug socket, then zipped it up brim that is installed place.
natural_image
Line drawing of a bicycle seatbelt with a red circular marking on the seat (no text or symbols)REMOVING THE BRIM
- The roof came sliver zipper pull, you can remove the brim.
natural_image
Mechanical diagram showing a linkage mechanism with a red arrow indicating a specific point (no text or symbols present)HANDLE ADJUSTMENT
- Press the button inside the hander bar to adjust its height.
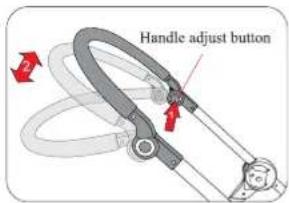
text_image
Handle adjust buttonFIX THE FOOT COVER
- Put the foot cover goes on the carrycot, and then zip up between the foot cover and the carrycot.
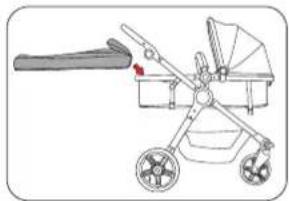
natural_image
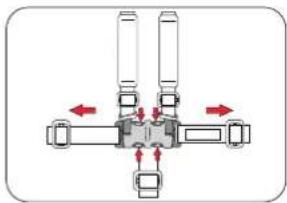
Illustration of a baby stroller with handle and wheels (no text or symbols)LOCK HARNESS
- Insert the shoulder belt buckle into buckle prong, then insert the prong into buckle housing until hear "clicks"
WARNING
Tighten straps snugly around your child!
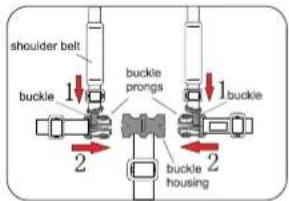
text_image
shoulder belt buckle 1 buckle prongs 1buckle 2 buckle housing 2RELEASE HARNESS
- Squeeze the buckle prong in two sides to release the buckle.
natural_image
Pure mechanical assembly diagram with no text, numbers, or symbolsHARNESS ADJUSTMENT
- Tighten or loosen the shoulder straps, slide the slider up or down to adjust to the desired fit. Always adjust the harness strap when changing the seating position of the child.

text_image
sliderFOLDING STROLLER
- Lock straps B pull the recline adjuster up the backrest; Squeeze the handlebar buttons on both sides to adjust the handle downwards, step the folding lever and push handle downwards towards rear wheels. The folding hook is looked in the frame until you hear a "click".
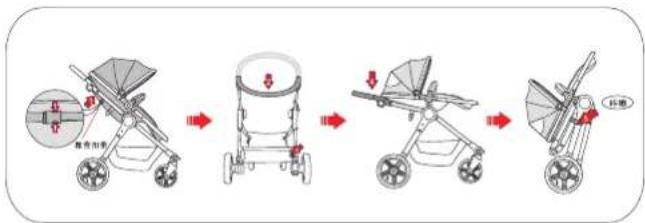
text_image
操作步骤 1. 选择物体 2. 选择物体 3. 选择物体 4. 选择物体 5. 选择物体 6. 选择物体 7. 选择物体 8. 选择物体 9. 选择物体 10. 选择物体 11. 选择物体 12. 选择物体 13. 选择物体 14. 选择物体 15. 选择物体 16. 选择物体 17. 选择物体 18. 选择物体 19. 选择物体 20. 选择物体 21. 选择物体 22. 选择物体 23. 选择物体 24. 选择物体 25. 选择物体 26. 选择物体 27. 选择物体 28. 选择物体 29. 选择物体 30. 选择物体 31. 选择物体 32. 选择物体 33. 选择物体 34. 选择物体 35. 选择物体 36. 选择物体 37. 选择物体 38. 选择物体 39. 选择物体 40. 选择物体 41. 选择物体 42. 选择物体 43. 选择物体 44. 选择物体 45. 选择物体 46. 选择物体 47. 选择物体 48. 选择物体 49. 选择物体 50. 选择物体 51. 选择物体 52. 选择物体 53. 选择物体 54. 选择物体 55. 选择物体 56. 选择物体 57. 选择物体 58. 选择物体 59. 选择物体 60. 选择物体 61. 选择物体 62. 选择物体 63. 选择物体 64. 选择物体 65. 选择物体 66. 选择物体 67. 选择物体 68. 选择物体 69. 选择物体 70. 选择物体 71. 选择物体 72. 选择物体 73. 选择物体 74. 选择物体 75. 选择物体 76. 选择物体 77. 选择物体 78. 选择物体 79. 选择物体 80. 选择物体 81. 选择物体 82. 选择物体 83. 选择物体 84. 选择物体 85. 选择物体 86. 选择物体 87. 选择物体 88. 选择物体 89. 选择物体 90. 选择物体 91. 选择物体 92. 选择物体 93. 选择物体 94. 选择物体 95. 选择物体 96. 选择物体 97. 选择物体 98. 选择物体 99. 选择物体MAINTENANCE OF THE STROLLER
- It would prolong the life of using the stroller by lubricating its movable parts regularly and make it easy to unfold and fold the stroller.
- Please check the stroller regularly; and if any part such as bolt, screw, fabric or sewing part is loosened or damaged, please repair or replace it.
* Please keep locking devices, braking, wheels, life belt, seat adjustor and fixing devices always movable, and please check them regularly to ensure their safety, reliability and normality in working.
* Braking system and wheels are easily worn-out parts; please replace them in time if they are damaged. - Please do not place the stroller under direct sunlight for long, or else it will make its fabric part fading.
- Please implement maintenance on the stroller if it is offered to other kid to use or after it has been used for 18 months.
- Please do not keep the stroller in moisture place, or else it will go mouldy and distorted.
- Please dry the stroller before keep it.
WASH AND CLEAN
• The plastic and metal parts of the stroller are required to be washed and cleaned with sponge absorbed with warm water and soft detergent.
- Please never use abrasive agent, ammonia cleaner, bleaching cleaner or other cleaners containing alcohol to wash and clean the stroller.
• After the stroller has been kept in moisture place, please dry it with soft fabric and unfold it completely and put it in ventilated place for drying.
Baninni
Voortstraat 12
2490 Balen - Belgium
T:+32 14 41 25 04
F:+32814482
info@baninni.com
www.baninni.com