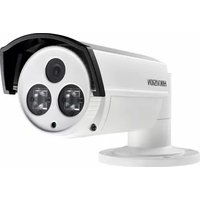
DS-2CE16C2T-IT5(16MM) - Bewakingscamera Hikvision - Gratis gebruiksaanwijzing en handleiding
Vind de handleiding van het apparaat gratis DS-2CE16C2T-IT5(16MM) Hikvision in PDF-formaat.


| Producttype | Bewakingscamera (bullet) |
| Merk | Hikvision |
| Model | DS-2CE16C2T-IT5(16MM) |
| Beeldsensor | 2 MP CMOS |
| Resolutie | 1920 × 1080 (Full HD) |
| Lens | 16 mm vaste lens |
| IR-afstand | Tot 20 meter |
| Beveiligingsnorm | IP67 (water- en stofdicht) |
| Voeding | 12 V DC ± 10% |
| Stroomverbruik | Max. 4 W |
| Afmetingen | 186 × 80 × 80 mm |
| Gewicht | Ca. 600 g |
| Beeldhoek | 15° (horizontaal) |
| Video-uitgang | 1 × BNC (CVBS) |
| Werkomgevingstemperatuur | -40°C tot 60°C |
| Onderhoud | Reinig de lens met een zachte, droge doek |
| Veiligheid | Gebruik uitsluitend de meegeleverde adapter |
| Reparabiliteit | Neem contact op met een erkend servicecentrum |
| Inhoud van de verpakking | Camera, montagemateriaal, handleiding |
Veelgestelde vragen - DS-2CE16C2T-IT5(16MM) Hikvision
Gebruikersvragen over DS-2CE16C2T-IT5(16MM) Hikvision
0 vraag over dit apparaat. Beantwoord die u kent of stel uw eigen vraag.
Stel een nieuwe vraag over dit apparaat
Download de handleiding voor uw Bewakingscamera in PDF-formaat gratis! Vind uw handleiding DS-2CE16C2T-IT5(16MM) - Hikvision en neem uw elektronisch apparaat weer in handen. Op deze pagina staan alle documenten die nodig zijn voor het gebruik van uw apparaat. DS-2CE16C2T-IT5(16MM) van het merk Hikvision.
GEBRUIKSAANWIJZING DS-2CE16C2T-IT5(16MM) Hikvision

TURBO HD
Bullet Camera
User Manual
UD.6L0201D1518A01
www.hikvision.com
Thank you for purchasing our product. If there are any questions, or requests, please do not hesitate to contact the dealer. This manual applies to
| Type | Model | |
| 720P | I | DS-2CE16C2T-IRP |
| DS-2CE16C2T-IR | ||
| II | DS-2CE16C2T-IT1 | |
| DS-2CE16C2T-IT3 | ||
| III | DS-2CE16C2T-IT5 | |
| 1080P | I | DS-2CE16D5T-IR |
| DS-2CE16D5T-IT1 | ||
| DS-2CE16D5T-IT3 | ||
| III | DS-2CE16D5T-IT5 |
This manual may contain several technical incorrect places or printing errors, and the content is subject to change without notice. The updates will be added to the new version of this manual. We will readily improve or update the products or procedures described in the manual.
Please refer to the product specification for camera parameters and functions.
0100001040420
HIKVISION
Regulatory Information
FCC Information
FCC compliance: This equipment has been tested and found to comply with the limits for a digital device, pursuant to part 15 of the FCC Rules. These limits are designed to provide reasonable protection against harmful interference when the equipment is operated in a commercial environment. This equipment generates, uses, and can radiate radio frequency energy and, if not installed and used in accordance with the instruction manual, may cause harmful interference to radio communications. Operation of this equipment in a residential area is likely to cause harmful interference in which case the user will be required to correct the interference at his own expense.
FCC Conditions
This device complies with part 15 of the FCC Rules. Operation is subject to the following two conditions:
-
This device may not cause harmful interference.
-
This device must accept any interference received, including interference that may cause undesired operation.
EU Conformity Statement
CE This product and - if applicable - the supplied accessories too are marked with "CE" and comply therefore with the applicable harmonized European
standards listed under the Low Voltage Directive 2006/95/EC, the EMC Directive 2004/108/EC, the RoHS Directive 2011/65/EU.

2012/19/EU (WEEE directive): Products marked with this symbol cannot be disposed of as unsorted municipal waste in the European Union. For proper recycling, return this product to your local supplier
upon the purchase of equivalent new equipment, or dispose of it at designated collection points. For more information see: www.recyclethis.info.

2006/66/EC (battery directive): This product contains a battery that cannot be disposed of as unsorted municipal waste in the European Union.
See the product documentation for specific battery information. The battery is marked with this symbol, which may include lettering to indicate cadmium (Cd), lead (Pb), or mercury (Hg). For proper recycling, return the battery to your supplier or to a designated collection point. For more information see: www.recyclethis.info.
1 Introduction
1.1 Product Features
This series of camera adopts new generation sensor with high sensitivity and advanced circuit design technology. It features high resolution, low image distortion and low noise, etc., which. makes it suitable for surveillance system and image processing system.
● High performance CMOS sensor and high resolution bring high-quality image;
- Low illumination;
- OSD menu, parameters are configurable;
● Support auto white balance, auto gain control, electronic shutter control;
●SMART IR mode;
●Unit transmission control;
- Advanced 3-axis design meets different installation requirements.
1.2 Overview
1.2.1 Overview of Type I Camera

1.2.2 Overview of Type Camera

1.2.3 Overview of Type Cameral||
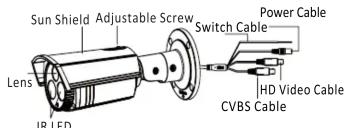

- All the diagrams only apply to cameras with a 1080p resolution. The cameras with a 720p resolution of these three types do not have CVBS cables and switch cables.
- The switch cables are designed for toggling status of the WDR functions for 1080p cameras. The WDR function is disabled by default, and you can short the white and black line-ends of the switch cable to enable the function.
2 Installation
Beforeyoustart:
- Please make sure that the device in the package is in good condition and all the assembly parts are included.
●Make sure that all the related equipment is power-off during the installation. - Check the specification of the products for the installation environment.
- Check whether the power supply is matched with your power output to avoid damage.
- Please make sure the wall is strong enough to withstand three times the weight of the camera and the mounting.
- If the wall is the cement wall, you need to insert expansion screws before you install the camera. If the wall is the wooden wall, you can use self-tapping screw to secure the camera.
- If the product does not function properly, please contact your dealer or the nearest service center. Do not disassemble the camera for repair or maintenance by yourself.
2.1 Ceiling Mounting for Type I Camera
Steps:
- Drill the screw holes and the cable hole in the ceiling according to the supplied drill template.
- Hammer the supplied plastic expansion bolt into the screw holes.
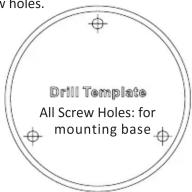
Figure 2-1 Drill Template
- Route the cables to the cable hole and connect the corresponding power cable and video cable.
- Fix the camera to the ceiling with the supplied screws.

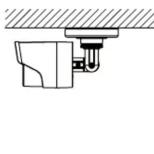
Figure 2-2 Fix the Camera to the Ceiling
- Adjust the surveillance angle.
1). Loosen No.3 adjusting screw to adjust the panning position (0° \~ 360°).
2). Tighten No.3 adjusting screw
3). Loosen the No.2 adjusting screw to adjust the tilting position ( 0° 90° ).
4). Tighten No.2 adjusting screw.
5). Loosen No.1 adjusting screw to adjust the azimuth angle of the image (0° \~ 360°).
6). Tighten No.1 adjusting screw

Figure 2-3 3-axis Adjustment
2.2 Wall Mounting for Typél/III Camera
Steps:
- Drill the screw holes and the cable hole in the ceiling according to the supplied drill template.
- Hammer the supplied plastic expansion bolt into the screw holes.

Figure 2-4 Drill Template
- Route the cables to the cable hole and connect the corresponding power cable and video cable.
- Fix the camera to the ceiling with the supplied screws.

Figure 2-5 Fix the Camera to the Wall
- Adjust the surveillance angle.
1). Loosen No.3 adjusting screw to adjust the pan position ( 0° 360° ).
2). Tighten No.3 adjusting screw.
3). Loosen No.2 adjusting screw to adjust the tilting position(0° \~ 90°).
4). Tighten No.2 adjusting screw.
5). Loosen No.1 adjusting screw to adjust the rotation position(0° \~ 360°).
6). Tighten No.1 adjusting screw.

Figure 2-6 3-axis Adjustment
3 Menu Operation
![graph TD A["Menu"] --> B["ACNE"] A --> C["LENS"] A --> D["EXPOSURE"] A --> E["ACCESS"] A --> F["WORK"] A --> G["WBS"] A --> H["GAAPWITCH"] A --> I["NR"] A --> J["SPECIAL"] A --> K["ADJUST"] A --> L["RESIST"] A --> M["EXIT"] B --> N["INDOOR"] B --> O["EXTERNAL"] B --> P["AGC"] B --> Q["SENS-UP"] B --…](/content/2026/05/1113127/images/0b0eebfeeb7c92ad2e450f310541f22bf6b7a8d87db1f2485ad13c648bfc2664.jpg)
Figure 3-1 Main Menu

●A coaxial camera controller (purchase separately) is required to select the menu and adjust the camera parameters.
- Cameras with a 720p resolution of these three types do not support menu operation.
3.1 VIDEO.OUT
PAL or NTSC is selectable.
3.2 LANGUAGE
English, Japanese, CHN1, CHN2, Korean, German,
French, Italian, Spanish, Polish, etc., are selectable.
3.3SETUP
3.3.1 SCENE
You can select indoor, outdoor, indoor 1 and low-light as the working environments.
3.3.2 LENS
The camera is equipped with a fixed lens.
3.3.3 EXPOSURE
SHUTTER: AUTO, 1/25, 1/50, FLK, 1/200, 1/400,
1/1k, 1/2k, 1/5k, 1/10k, 1/50k, x2, x4, x6, x8, x10, and x15 are selectable.
You can set the AGC value from 0 to 15.AGC
: You can set the SENS-UP to OFF or AUTO.SENS-UP
: You can set the brightness valueBRIGHTNESS
from 1 to 100.
: You can set the D-WDR to ON to improveD-WDR the image quality or OFF to disable the function.
: You can set the defog function as ON toDEFOG
enable the function. Position, size, and the defog gradation are configurable.

Figure 3-2 Exposure
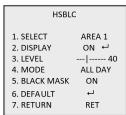
Figure 3-3 HSBLC
3.3.4 Backlight
Backlight Compensation (BLC):
Set the gain of BLC as High, Middle, or Low.-GAIN:
Press the up/down/left/right button to-AREA:
define the BLC position and size. Select RET or AGAIN to go back the BLC menu or re-define the BLC area.
-Default: Restore the BLC settings to the default. HSBCLE: Select an HSBCLE area. Set the DISPLAY status as ON. Press the up/down/left/right button to define the area position and size. Set the HSBCLE LEVEL from 0 to 100. Select ALL DAY or Night for the HSBCLE mode. Set the BLACK MASK status as ON or OFF.
3.3.5 White Balance (WB)
INDOOR, OUTDOOR, MANUAL, ATW (Auto-tracking White Balance), AWC→SET are selectable.
3.3.6 Day & Night
Color, B/W, and EXT are selectable for DAY and NIGHT switches.
3.3.7 NR
.D NR : You can set 2D NR status as ON or OFF.
3D NR Set the Smart NR status as ON and adjust the 3D smart NR sensitivity ranges from 0 to 100.
Set the 3D NR LEVEL ranges from 0 to 100. Set the
START. AGC level as the threshold to enable AGC, and set the END. AGC level as the threshold to
isable AGC.

Figure 3-5 NR
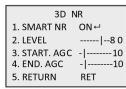
Figure 3-6 3D NR
3.3.8 SPECIAL
Camera Title: Edit the camera title on this section. D-effect:
-FREEZE: Set the freeze function as ON or OFF. -MIRROR: OFF, MIRROR, V-FLIP, and ROTATE are selectable for mirror.
Define the zoom area by configuring-D-ZOOM the position from PAN & TILT.
-SMART D-ZOOM:The D-Zoom area, sensitivity and time are configurable.
-NEG.IMAGE: Set the NEG IMAGE as ON or OFF.

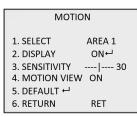
Figure 3-7 Special Figure 3-8 Motion Detection
Motion: Select a MOTION area. Set the DISPLAY status as ON or OFF. Press the up/down/left/right button to define the position and size of the area. Set the SENSITIVITY from 0 to 60. Set the MOTION VIEW status as ON or OFF.
Privacy: Select a PRIVACY area. Set the DISPLAY status as INV, MOSAIC, COLOR or OFF. Press the up/down/left/right button to define the position and size of the area.
Defect: LIVE DPC, STATIC DPC and Black DPC are adjustable in this section.
Version : You can check the software version of the device.

Figure 3-9 Privacy Mask
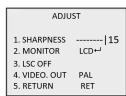
Figure 3-10 Adjust
3.3.9 ADJUST
: Adjust the sharpness from 0 to 15. Sharpness Monitor: Monitor CRT, and Monitor LCD are selectable.
LSC : Set the LSC status as ON or OFF.
3.3.10 RESET
Reset all the settings to the default.
3.3.11 EXIT
Press OK to exit the menu.


- TURBO HD
- BULLET CAMERA
- USER MANUAL
- HIKVISION
- REGULATORY INFORMATION
- FCC INFORMATION
- FCC CONDITIONS
- EU CONFORMITY STATEMENT
- 1 INTRODUCTION
- 1.1 PRODUCT FEATURES
- 1.2 OVERVIEW
- 1.2.1 OVERVIEW OF TYPE I CAMERA
- 2 INSTALLATION
- BEFOREYOUSTART
- 2.1 CEILING MOUNTING FOR TYPE I CAMERA
- STEPS
- 2.2 WALL MOUNTING FOR TYPÉL/III CAMERA
- 3 MENU OPERATION
Merk : Hikvision
Model : DS-2CE16C2T-IT5(16MM)
Categorie : Bewakingscamera