Manual SRM M100XWH2-SRM - Projectiescherm Elite Screens - Gratis gebruiksaanwijzing en handleiding
Vind de handleiding van het apparaat gratis Manual SRM M100XWH2-SRM Elite Screens in PDF-formaat.

| Producttype | Handmatig projectiescherm |
| Merk | Elite Screens |
| Model | Manual SRM M100XWH2-SRM |
| Schermdiagonaal | 100 inch (254 cm) |
| Beeldverhouding | 16:9 |
| Schermtype | Wit mat (gainer factor 1.0) |
| Zwarte randen | Ja, aan alle vier zijden |
| Ophangsysteem | Muur- of plafondmontage |
| Bediening | Handmatig met trekkoord en vergrendeling |
| Oprolmechanisme | Veergebalanseerd, traploos verstelbaar |
| Afmetingen scherm (BxH) | 221 x 124 cm |
| Afmetingen behuizing (LxBxH) | 245 x 7 x 7 cm |
| Gewicht | 10,5 kg |
| Materiaal scherm | Brandvertragend PVC |
| Kleur behuizing | Zwart |
| Ondersteunde resolutie | HD, Full HD, 4K |
| Reiniging | Zachte, droge doek; geen agressieve middelen |
| Montage | Inclusief bevestigingsmateriaal en installatiehandleiding |
| Garantie | 2 jaar fabrieksgarantie |
| Veiligheid | Niet zelf demonteren; professionele installatie aanbevolen |
Veelgestelde vragen - Manual SRM M100XWH2-SRM Elite Screens
Gebruikersvragen over Manual SRM M100XWH2-SRM Elite Screens
0 vraag over dit apparaat. Beantwoord die u kent of stel uw eigen vraag.
Stel een nieuwe vraag over dit apparaat
Download de handleiding voor uw Projectiescherm in PDF-formaat gratis! Vind uw handleiding Manual SRM M100XWH2-SRM - Elite Screens en neem uw elektronisch apparaat weer in handen. Op deze pagina staan alle documenten die nodig zijn voor het gebruik van uw apparaat. Manual SRM M100XWH2-SRM van het merk Elite Screens.
GEBRUIKSAANWIJZING Manual SRM M100XWH2-SRM Elite Screens

natural_image
Abstract black logo design with stylized 'S' shape (no text or symbols)ELITE SCREENS
Manual SRM Pro Series
Premium Quality Manual Pull-Down Projection Screen User's Guide
Pre-installation
- Carefully unpack the screen.
- Always handle the screen in a leveled position on a clean surface.
Installation
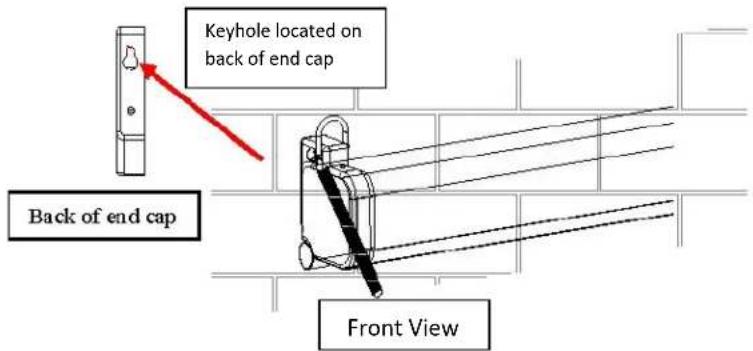
A. Flush Wall Mounting
- Mark the location of where the screen is to be installed for the pre-drilled hole.
- After marking the area and drilling the hole, insert the proper screw into the drilled hole and leave about 1/8" of an inch from the wall to mount the screen.
- Mount your screen from the keyhole located on back of screen's left and right end cap.
Note: Do not remove the end caps to mount the screen to the wall.
Removing the end caps will release the tension of the internal spring mechanism.
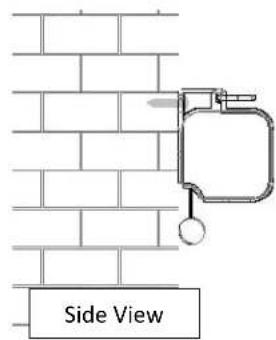
B. Ceiling Mounting (additional hardware required)
Optional installation using a chain to hang the screen from the ceiling.
- You can also hang the screen on a ceiling by using a chain (not included) and hang it by the two d-rings loops located on each end of the case.
natural_image
Pure mechanical diagram showing two circular components mounted on a horizontal beam with arrows indicating force or direction (no text or symbols)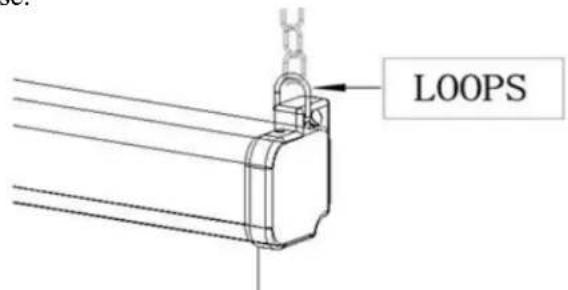
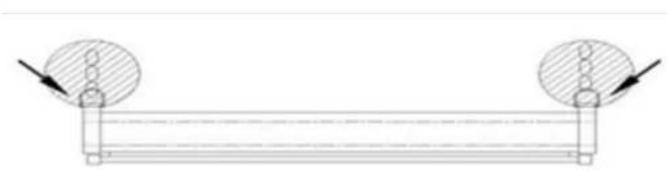
Screen Operation
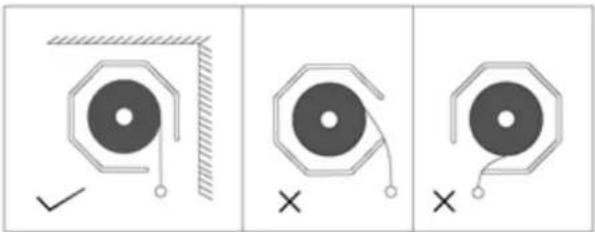
Note: Always pull the screen down or let it up in a 90-degree vertical angle. Do not allow the screen to touch the screen case when the screen goes up or comes down to avoid damaging the screen material.
natural_image
Three identical diagrams showing a circular object with a checkmark and a cross, each with a hatched border (no text or symbols)- Pull the screen down from the lanyard or from the handle only in a 90-degree angle. Do not attempt to pull the screen down by the surface or touch the screen, as it will damage the screen and void the warranty.
Note: An internal auto-lock mechanism system will cause the screen to stop and lock on the position at intervals.
- If you want to the screen to retract back, simply pull the screen down more than 2 inches and retract the screen back releasing it up gently. The screen is equipped with a SLOW RETRACT MECHANISM which allows the screen to slowly retract without the need to hold on to the handle or lanyard. Simply release the handle and the screen will retract by itself.
Note: Always release at a 90-degree angle. If ever the screen feels stuck, keep in mind that the screen's mechanism is new and needs to be brought up/down a few times to loosen up. If this happens, carefully with a little force, yank the screen straight down to unlock the screen.
Note: Improperly bringing the screen up/down will damage the screen material or rolling system.
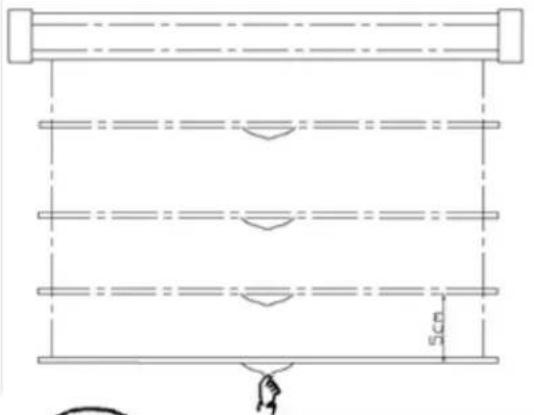
RETRACTION TIP: If you are not able to pull the screen down two inches when attempting to retract it, give the screen a quick yank downwards with a little bit of force. Please be sure to not stand directly under the housing of the unit when yanking down on the screen.
Maintenance
Clean matte white screen material with a soft cloth and mild soap with water. When not in use, retract screen in its housing to keep the screen material surface clean.
Note:
natural_image
Pure architectural floor plan lines without any text, numbers, or symbols
Regardless of mounting method, the screen should be securely supported so that vibration or even abusive pulling on the viewing surface will not cause the case to work loose or fall. The installer must insure that the fasteners used are of adequate strength and suitable for the mounting surface chosen.
For more information, technical support or your local Elite Screens contact, please visit www.elitescreens.com