
TL12E - 4 Campomatic - Panduan pengguna gratis
Temukan panduan perangkat secara gratis TL12E Campomatic dalam format PDF.

Pertanyaan pengguna tentang TL12E Campomatic
0 pertanyaan tentang perangkat ini. Jawab yang Anda tahu atau ajukan milik Anda sendiri.
Ajukan pertanyaan baru tentang perangkat ini
Unduh instruksi untuk 4 dalam format PDF gratis! Temukan panduan Anda TL12E - Campomatic dan ambil kembali perangkat elektronik Anda. Di halaman ini diterbitkan semua dokumen yang diperlukan untuk penggunaan perangkat Anda. TL12E merek Campomatic.
PANDUAN PENGGUNA TL12E Campomatic
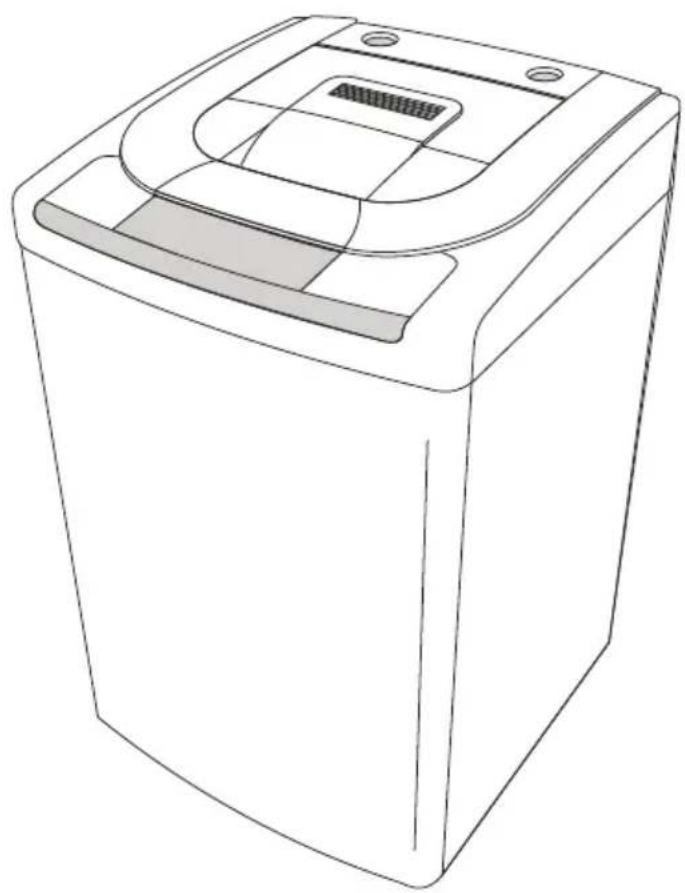
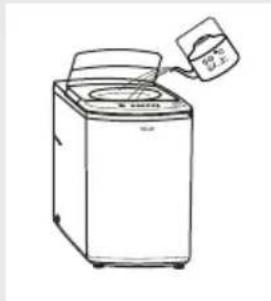
TLI2E
Full Automatic Washer
natural_image
Line drawing of a rectangular electronic device with a recessed top and side slots (no text or symbols)Made in China
CONTENTS
| FIRSTLYYou should know | Safety and precaution......2Parts identification of the washer......5Instruction of washer operating panel......6Installation of washer......8Preparation before washing......10 | Preparation before application |
| SECONDLYWhen you want to use | Operation of normal wash program......11Operation of self-programed procedure......12Operation of delay program......13Operation of single wash program......14Operation of tub clean program......15Operation of other full-automatic wash program......16Operation of the special program of soak......17About the procedure of full automatic wash program...18 | About washing program |
| FURTHEREasier for your operation | Application of washing powder, softener and bleacher......19The amount of washing powder and softener......20Setting washing capacity and water level......20 | Detergent etc washing capacity and water level |
| IfYou are in trouble | Maintenance of washer......20Abnormal display and alarm of the washer......21Identify usual trouble of washer......22Following phenomena are not faults of washer......23Specifications and technical parameters of washer......23 | Maintenance and after service |
FIRSTLY
SECONDLY
FURTHER
SAFETY AND PRECAUTIONS
Observe the following items in order to prevent from injuring yourself, others and the damage of property:

Warning
This indicates serious injury or death to human being may be caused.

Caution
This will remind you that injury to people and damage to property may occur.
Please observe following contents of graphics.

This graphics represents [cause attention], and detailed cautions will be displayed inside the graphics. △

This graphics represents [operation prohibited], and detailed prohibitive items will be displayed inside the graphics.

This graphic represents [forcible execution], and detailed forcible execution items will be displayed inside the graphics.

Warning
Please do not disassembly
and assembly the machine without authorization.

No dismantling
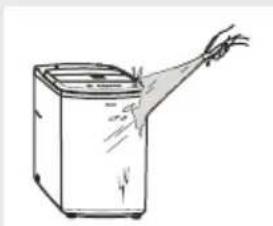
natural_image
Line drawing of a hand holding a small appliance next to a washing machine (no text or symbols)Please do not insert your hand and take out clothes inside the
spin barrel before it is fully stopped.

No touching
natural_image
Line drawing of a washing machine with a thought bubble showing a hand holding a small object (no text or symbols present)Please do not install the machine in damp and raining environment to avoid electric shocking, catching fire, faults
and distortion accidents.

No dampness
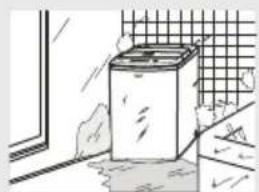
natural_image
Line drawing of a washing machine placed near a window with tiled floor (no text or symbols)Please do not directly rinse the machine with water when cleaning.

No rinsing
natural_image
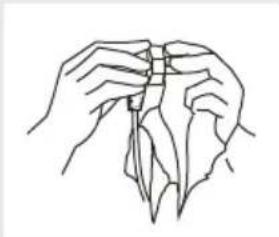
Line drawing of a hand stretching a whiteboard into a container (no text or symbols)
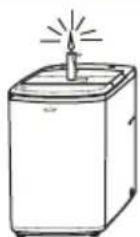
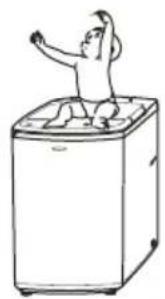
Warning
Please do not let children climb the machine or peer into the rotating spin barrel to avoid accidents.

Prohibited

natural_image
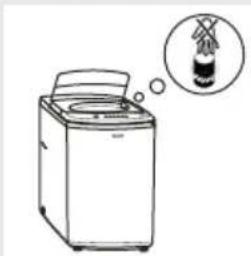
Simple cartoon illustration of a baby with a large sun partially behind her (no text or symbols)It is prohibited to wash the clothes touching with kerosene, gasoline, alcohol and other flammable materials.

Prohibited
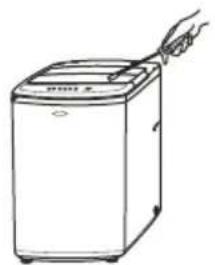
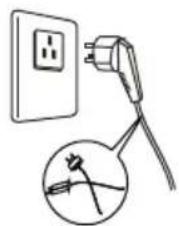
Please do not damage power flexible cord and power plug to avoid electric shocking, short circuit and catching fire.

Prohibited
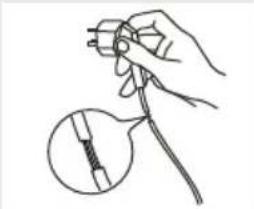
natural_image
Hand holding a tool with a magnified inset showing a small cylindrical object (no text or symbols)Regularly clean the power plug to remove dust and dirt to avoid contact failure.

natural_image
Line drawing of two hands holding a thin object, possibly a tool or device (no text or symbols present)Please pull out plug from the socket if the machine is not in use.

Pull out the plug
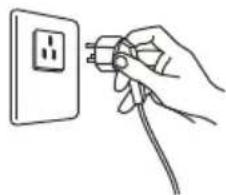
natural_image
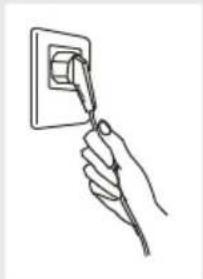
Hand holding a plug inserted into an electrical outlet (no text or symbols visible)Please well connect the earth line of socket to avoid electric shocking by accidental leakage.
(earthing)

Earthing
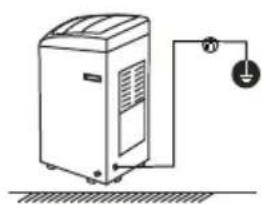
natural_image
Simple line drawing of a portable air conditioner unit connected to a power outlet (no text or symbols)Please insert the power plug tightly.

natural_image
Line drawing of a hand inserting a plug into an electrical outlet (no text or symbols)Please do not place on the washer burning candle, mosquito-repellent incense,
cigarette and other flammable things, as well as electric stove, air heating fan and other

heating sources.
Smoke and fire prohibited
Please use 220V AC power source.

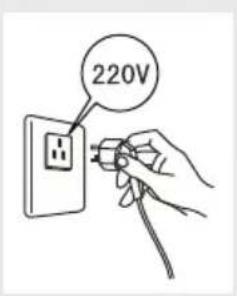
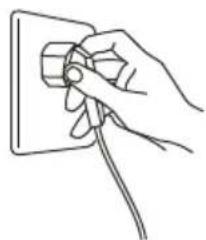
Please do not pull out or insert the plug with wet hands to avoid electric shocking.

Wet hands are prohibited
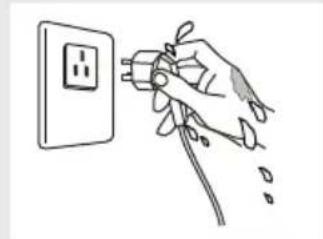
natural_image
Hand inserting a plug into an electrical outlet (no text or symbols visible)
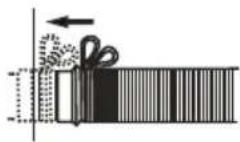
Caution
Please ensure that the water inlet pipe is connected and the tap is opened
before washing clothes.

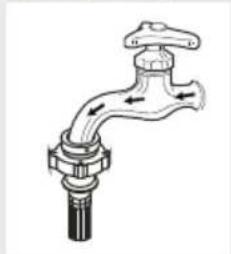
natural_image
Illustration of a faucet with directional arrows indicating flow or movement (no text or symbols)The water temperature shall not exceed
50°C when washing with warm water.

Prohibited
natural_image
Line drawing of a washing machine with a hand pouring liquid into it (no text or symbols)Customers are not allowed to change the power line without permission.

Prohibited
natural_image
Simple line drawing of an electrical outlet connected to a power plug, with an inset showing a plug inserted into a socket (no text or symbols)It is strictly prohibited to place and sit
children or lay weights on the washer.

Prohibited
natural_image
Simple line drawing of a person sitting on a large refrigerator with arms raised (no text or symbols)Please do not pull the electric cord
when pulling out the plug.

natural_image
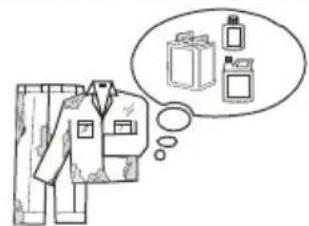
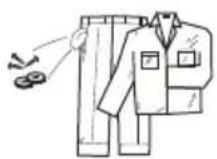
Line drawing of a hand inserting a plug into an electrical socket (no text or symbols)Please do not wash down jacket, raincoat, fishing coat and similar
clothes in the washer.

Prohibited
Parts identification of the washer
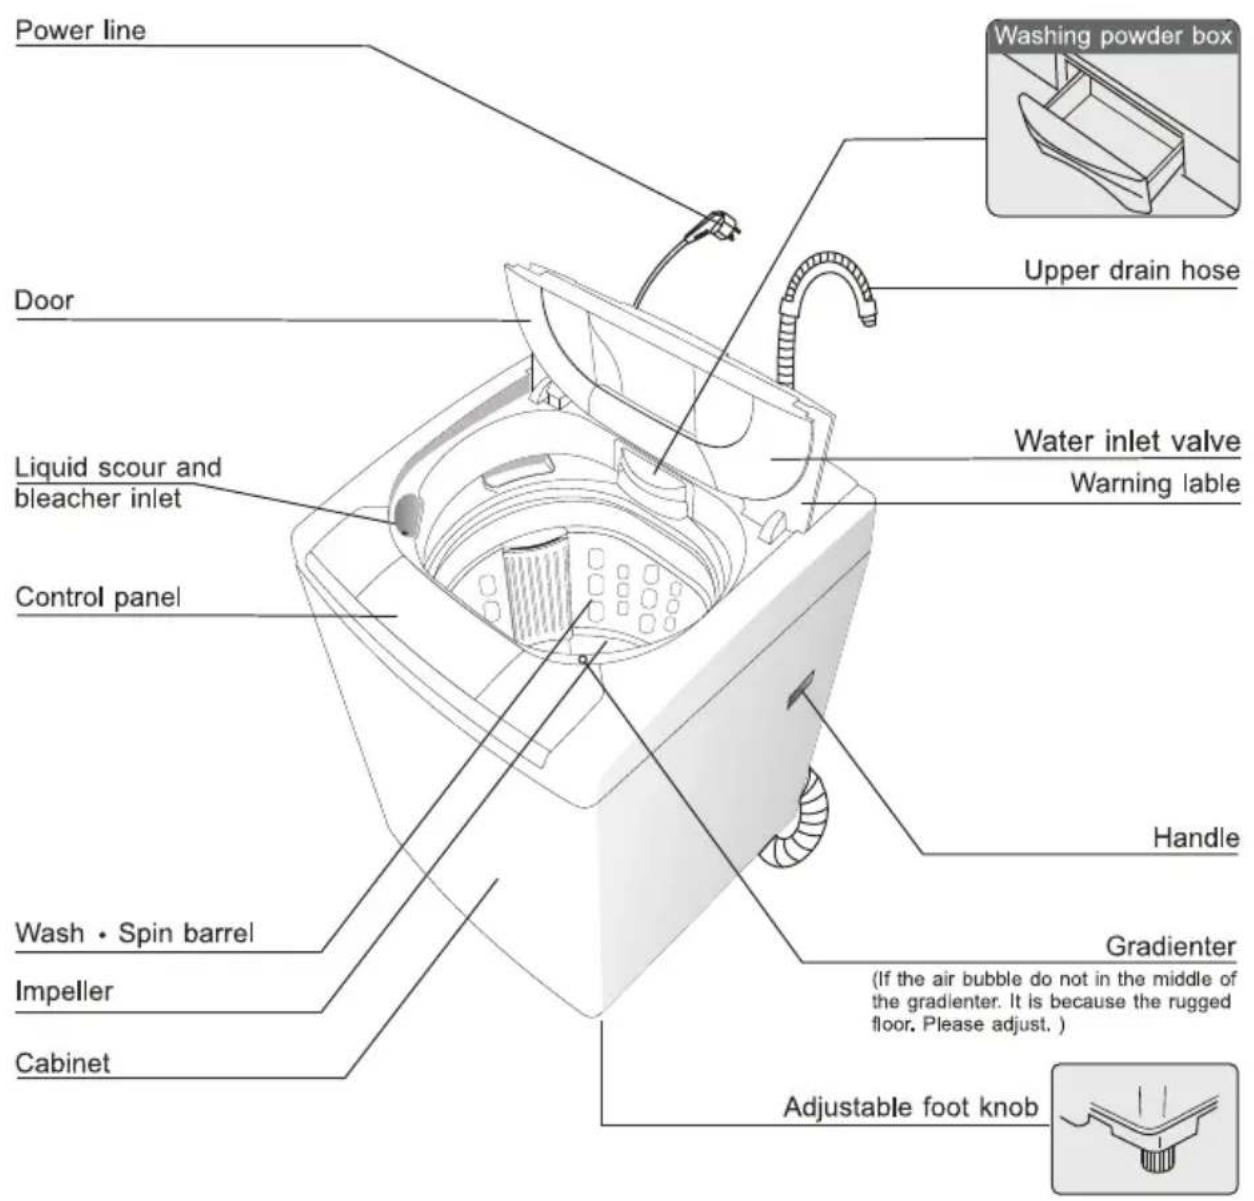
Accessories
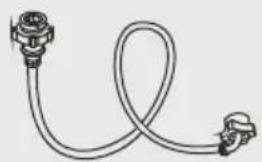
natural_image
Line drawing of a coiled cable or hose with two connectors (no text or symbols)Inlet hose 2pc
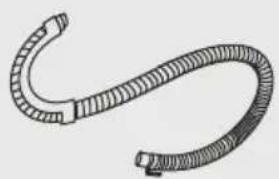
natural_image
Illustration of a coiled, segmented cable or filament (no text or symbols)Upper drain hose 1pc
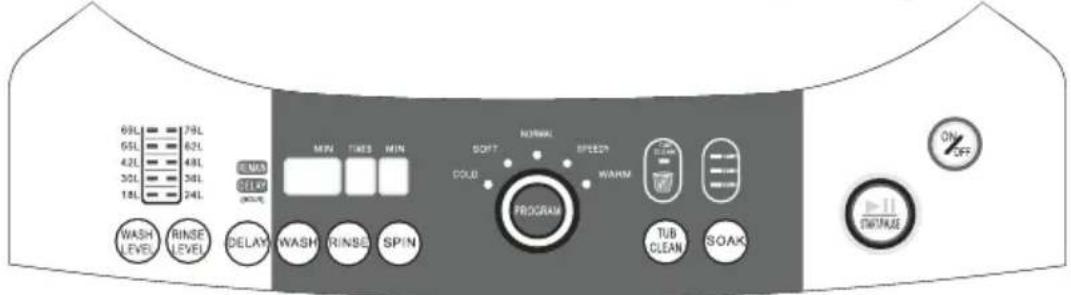
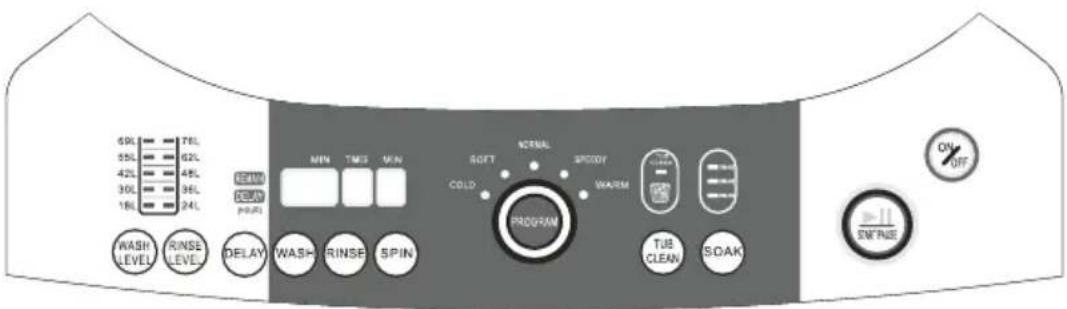
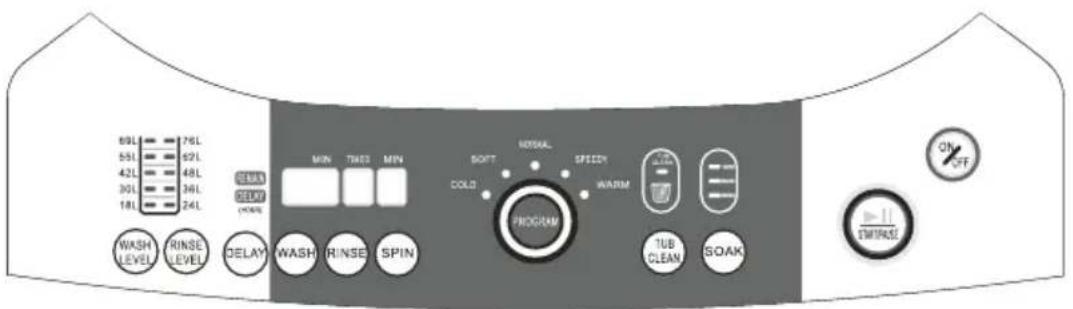
Instruction of the washer operation panel

flowchart
graph TD
    A["Ten water levels are set for this washer from 18L at the lowest level to 76L at the highest level."] --> B["WASH LEVEL"]
    A --> C["RINSE LEVEL"]
    D["User can set the delay start time from 1hour to 24 hours separately. After the time you set runs out, this machine will start to work with the set program."] --> E["Indicator light of remain time(minute)"]
    E --> F["REMAIN DELAY (HOUR)"]
    E --> G["WASH RINSE SPIN"]
    H["Water Level Selection"] --> I["Water level is divided into [Wash level"] and["Rinse level"]. These two button are used by user to select and change water level. Continuously pressing the button, the figures circularly display will be varied from 18L to 76L. According_to_the_setting_of_this_washer["Rinse level"] is_no_lower_than["Wash level"].]
    J["Wash Rinse Spin"] --> K["[Wash"], [Rinse] and["Spin"], these three buttons represent the process of washing. Continuously_pressing["Wash"] button can change the washing time. Press["Rinse"] button can select rinsing times. Press["Spin"] button can determine how long time will be spent for spin.]
    L["Accor time (conjunct great)"] --> M["NORMAL"]
    M --> N["COLD"]
    N --> O["PROGRAM"]
    P["It will be barrel be quality. If the adhere clothing"] --> Q["Before starting, con among [Normal"] programs.]
flowchart
graph TD
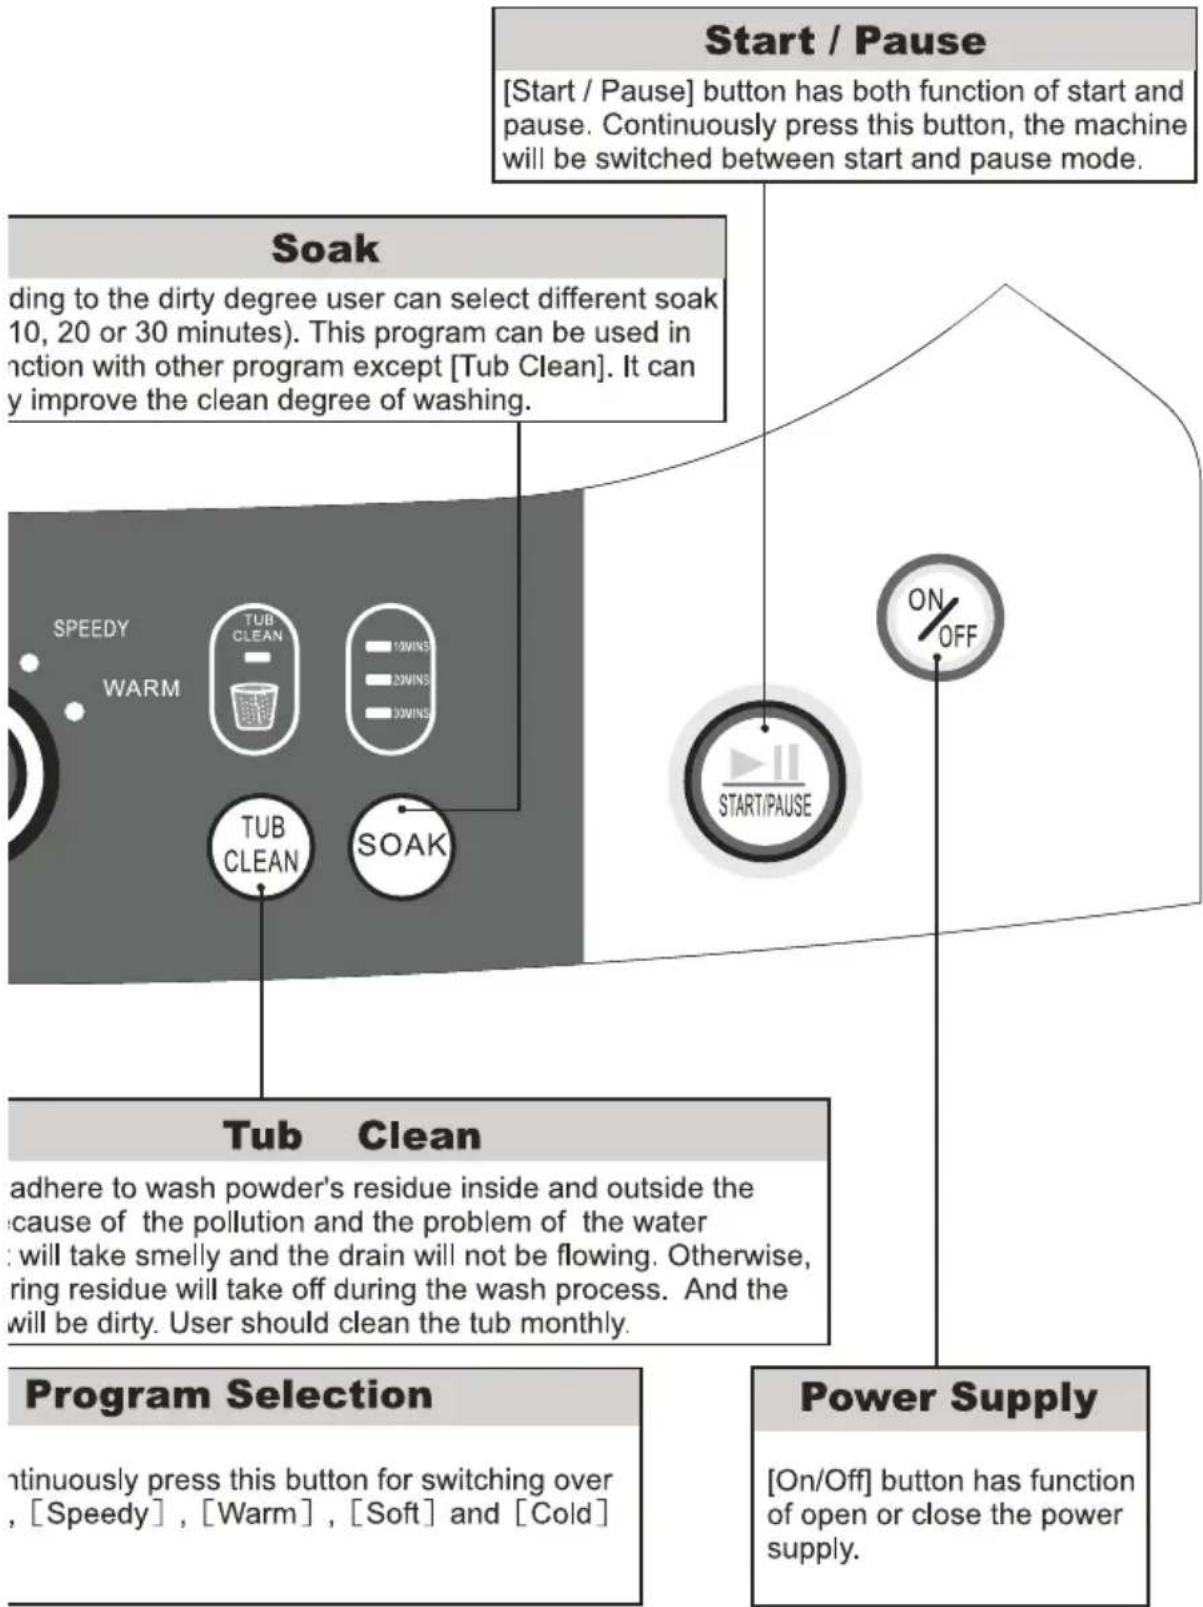
A["Start / Pause"] --> B["Start / Pause"]
B --> C["Soak"]
C --> D["Tub Clean"]
D --> E["Program Selection"]
E --> F["Power Supply"]
subgraph Start / Pause
G["[Start / Pause"] button has both function of start and pause. Continuously press this button, the machine will be switched between start and pause mode.]
end
subgraph Soak
H["ding to the dirty degree user can select different soak 10, 20 or 30 minutes). This program can be used in action with other program except [Tub Clean"]. It can y improve the clean degree of washing.]
end
subgraph Tub Clean
I["SPEEDY WARM"] --> J["TUB CLEAN"]
J --> K["12WINS"]
K --> L["22WINS"]
L --> M["32WINS"]
M --> N["TUB CLEAN"]
N --> O["SOAK"]
end
subgraph Power Supply
P["[On/Off"] button has function of open or close the power supply.]
end
Installation of the washer
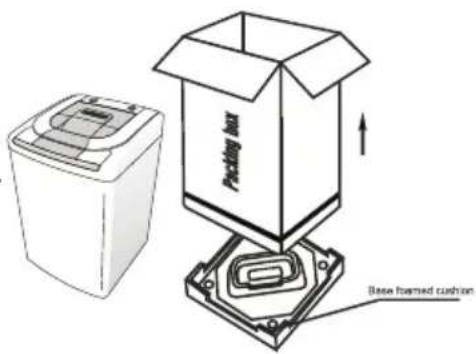
Remove package
- Remove package and take out the bottom board of the cabinet on the foam cover.
- Open the lid of washer's door and take out accessories.
- A trial operation or washing on the foamed cushion is strictly forbidden.
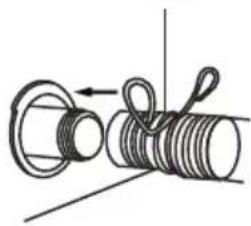
Installation of drain hose
natural_image
Mechanical diagram showing a coiled spring with a loop and directional arrow (no text or symbols)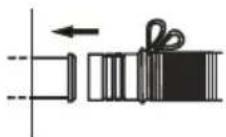
• Completely sleeve the drain hose over the sewer.
• Fix and tighten it with a hoop.
( As shown in the figure )
Installation of water inlet hose
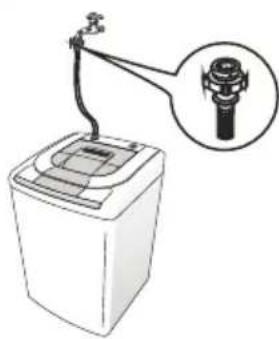
natural_image
Line drawing of a washing machine with a close-up inset showing the internal components (no text or symbols)Water inlet adapter
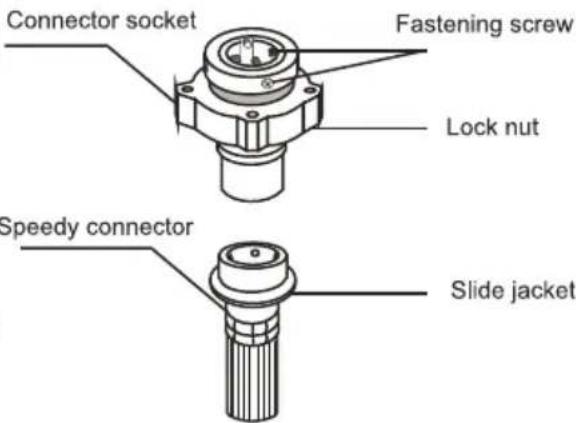
The water inlet consists of connection socket and speedy connector.
Installation of washer
Installation of water inlet pipe
flowchart
graph TD
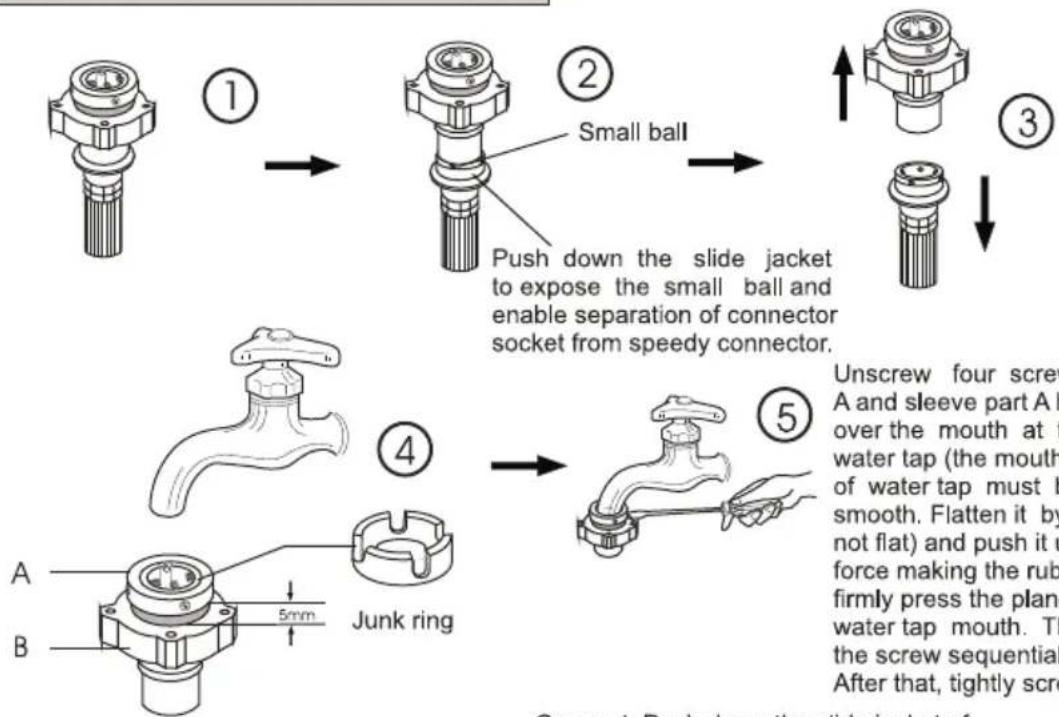
A["① Small ball"] --> B["② Push down the slide jacket to expose the small ball and enable separation of connector socket from speedy connector."]
B --> C["③"]
C --> D["④ Junk ring"]
D --> E["⑤ Unscrew four screws A and sleeve part A should over the mouth at water tap (the mouth of water tap must be smooth). Flatten it by not flat) and push it up force making the rub firmly press the plane water tap mouth. The screw sequential after that, tightly screed."]
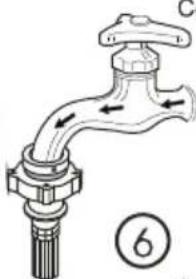
Unscrew four screws of part A and sleeve part A horizontally over the mouth at the end of water tap (the mouth at the end of water tap must be flat and smooth. Flatten it by filing if it is not flat) and push it upward with force making the rubber washer firmly press the plane center of water tap mouth. Then tighten the screw sequentially.
After that, tightly screw on part B.
The connection socket consists of A and B two parts. Before installation, A and B two parts must be unscrewed to about 5mm, or directly disconnected. If the bore of water tap is larger, remove the plastic junk ring of part A.
natural_image
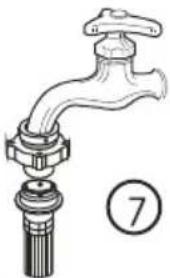
Illustration of a faucet with directional arrows indicating flow or movement (no text or symbols)Connect
Connect: Push down the slide jacket of speedy connector (4 small balls must be exposed), insert it into the connection socket and then push upward Release the connection of water tap with speedy connector is completed. If it is required to feed water, simply open the water tap.
Separate: Close the water tap, push down the slide jacket of speedy connector and pull out the speedy connector.
natural_image
Illustration of a faucet with a handle and base, no text or symbols presentSeparate
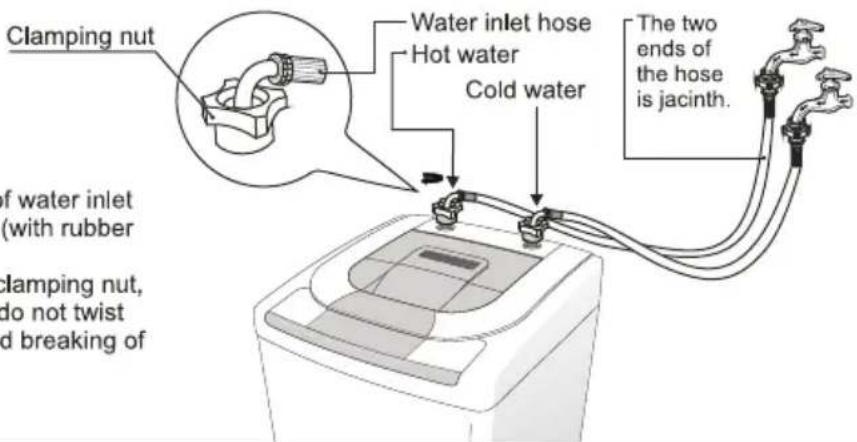
Tightly screw another end of water inlet hose on water inlet valve. (with rubber seal ring inside).
Note: When tightening the clamping nut, evenly apply the force and do not twist the water inlet valve to avoid breaking of water inlet valve joint.
Preparation before washing
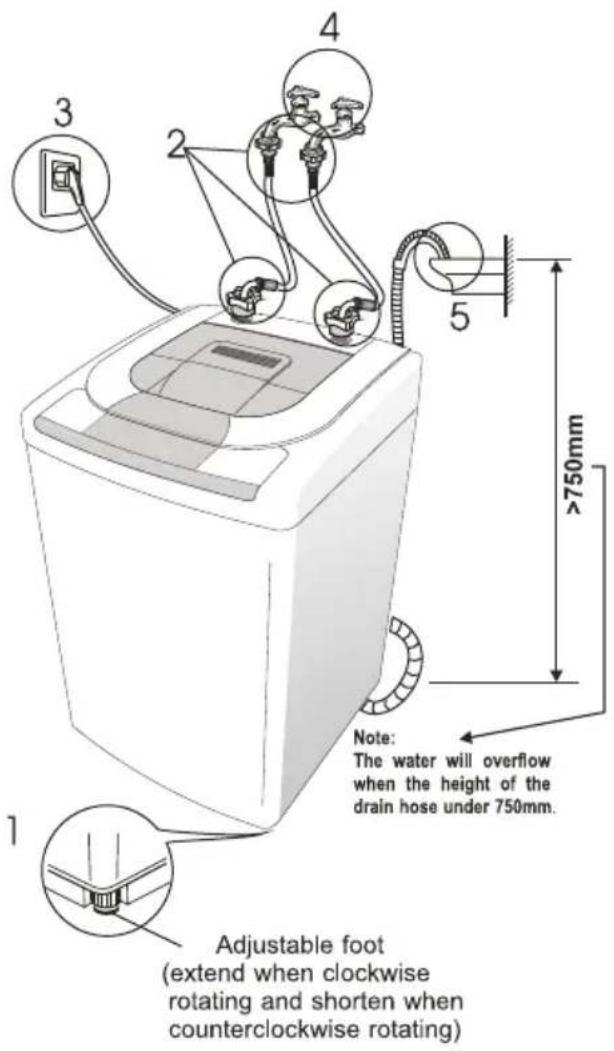
- Adjust the adjustable foot making the washer be placed stable.
(Slightly incline the washer first and loosen the adjustable foot knob. Adjust the adjustable foot so as to ensure four corners of washer be steadily contacted with the ground. Then tighten the adjustable foot knob and lock it. If the ground is obviously not flat, correction should be made on the ground surface, otherwise the washer barrel will incline and knock the cabinet)
- install the water inlet hose.
(Connect the cold water inlet hose and hot water inlet hose before washing.)
3.connect with power source. 4.open water tap. - hang the upper drain hose on the pond.
6.put in clothes and suitable amount of washing powder.
Before washing, please do take out coins, keys and other hard goods, and pull to close the zip fastener to prevent clothes and barrel from damage.
Notice:
Make sure the cold water tap open when you select the [Normal], [Warm], [Normal]+[Soak] or [Warm]+[Soak] program. It is in order to the water temperature too high to scorch the clothes.
Operation of normal wash program
Instructions to the normal wash program
- [Normal] wash program is the easiest, most convenient and most common washing program. When the user press the power switch and then press [Start/Pause] button, the normal washing program will start to work.
- When the washer start to work, the digital tube show the remain time. The indicator light which stand for remaining time is flickering.
- Close the lid of the door when machine is running, otherwise, it will automatically stop working during spin process and send out abnormal warning.
•The washer will not work when the filled water does not reach the set water level.
• After pressing down [ Power Switch ], if the [Start / Pause ] button is not pressed, the power will be automatically cut off after 10 minutes. - The selection of rinse water level: the level is equal to wash water level. Press [Rinse Level] button, the indicator light which stand for rinse level flickered. User can select the rinse water level according to needs. Rinse level exceed that wash level all the time. It shows the wash level if not press this button. And only show rinse level when rinse.
Preparation before washing:
Plug in the power wire - open water tap - hang the upper drain hose on the pond - put in clothes - put in suitable amount of detergent - close the door lid.

Press the power switch.
The [Normal] program as default set in the computer now is ready for washing.

According to the washing amount choose the proper water level.
Details refer to page 20 [the relationship between water level amount and washing amount].

Press [Start / Pause] button.
The [Normal] program starts working.
Completion of washing
• After completion of washing, the buzzer will buzz continuously for 6 times and then the power will be automatically cut off.
- Close the water tap.
- Although the power can be cut off automatically, the power plug must be pull out as well for the safety.
Operation of self-programmed procedures
Instructions to self-programmed procedures.
- User can freely select any combination among [Wash], [Rinse] and [Spin] modes according to the dirty degree of clothes. Detail operation methods are following:
Continuously pressing the washing button to select washing time. (1\~20 minutes, or no wash process)
Continuously pressing the rinse button to select rinse times. (1\~3 times, or no rinse process)
Continuously pressing the spin button to select the spin time. (3\~9 minutes or no spin process)
- The selection of rinse water level: the level is equal to wash water level. Press [Rinse Level] button, the indicator light which stand for rinse level flickered. User can select the rinse water level according to needs. Rinse level exceed that wash level all the time. It shows the wash level if not press this button. And only show rinse level when rinse.
Preparation before washing:
Plug in the power wire - open water tap - hang the upper drain hose on the pond - put in clothes - put in suitable amount of detergent - close the door lid.

Press the power switch.
The [normal] program as default set in the computer now is ready for washing.

According to the washing amount choose the proper water level.
You should see about page 20 [the relationship between water level amount and washing amount] for detail.

Select the self-programed procedure required by the user.

Press [Start / Pause] button.
The set self-programmed washing procedure starts working.
Completion of washing
• After completion of washing, the buzzer will buzz continuously for 6 times and then the power will be automatically cut off.
- Close the water tap.
- Although the power can be cut off automatically, the power plug must be pull out as well for the safety.
Operation of delay program
Instructions to delay procedures.
• This washer has the functions of delay start for 24 hours.
• After the [Delay] program start to work, the digital tube show the delay start time. And the indicator light which stand for delay lightened. When the time arrive, the indicator light which stand for delay goes out. And the indicator light which stand for remain lightened. Showing the remain time.
- The [Delay] time stand for washing clothes after [XX] hours.
- The selection of rinse water level: the level is equal to wash water level. Press [Rinse Level] button, the indicator light which stand for rinse level flickered. User can select the rinse water level according to needs. Rinse level exceed that wash level all the time. It shows the wash level if not press this button. And only show rinse level when rinse.
Preparation before washing:
Plug in the power wire - open water tap - hang the upper drain hose on the pond - put in clothes - put in suitable amount of detergent - close the door lid.
1 Press the power switch. The [normal] program as default set in the now is ready for washing.
According to the washing amount choose the proper water level. 2 You should see about page 20 [the relationship between water level amount and washing amount] for detail.
3 Select the programs required by the user.
4 Press the [Delay] button, and select the delay time.
5 Press [Start / Pause] button. The set self-programmed washing procedure starts working.
Completion of washing
• After completion of washing, the buzzer will buzz continuously for 6 times and then the power will be automatically cut off.
- Close the water tap.
- Although the power can be cut off automatically, the power plug must be pull out as well for the safety.
Operation of single washing program
Instructions to single washing program
- User may freely select any single procedure, or any combination of procedures among [Wash], [Rinse] and [Spin] according to the actual requirements. It is only required to turn off any one or two of these three indicators that not needed by the user. And keep the indicator be on showing the process needed by the user.
Detail operation methods are following:
- Single wash -- after switching on the power, turn off [Rinse] and [Spin] two indicators by pressing these two keys. The operation for single rinse and single spin is similar.
- Single wash - spin - after switching on the power, turn off [Rinse] indicator by pressing that key. The operation for single rinse - spin and single wash - rinse is similar.
- The selection of rinse water level: the level is equal to wash water level. Press [Rinse Level] button, the indicator light which stand for rinse level flickered. User can select the rinse water level according to needs. Rinse level exceed that wash level all the time. It shows the wash level if not press this button. And only show rinse level when rinse.
Preparation before washing:
Plug in the power cord - open water tap - hang the upper drain hose on the pond - put in clothes - put in suitable amount of detergent - close the door lid.

Press the power switch.
The "Normal" program as default set in the computer now is ready for washing.

Select the single washing program required by the user.
If the procedure include [Wash], [Rinse] process, you need to choose proper water level according to amount of clothes.

Press [Start / Pause] button.
The washer will start to work with the set program.
Completion of washing
- After completion of washing, the buzzer will buzz continuously for 6 times and then the power will be automatically cut off.
- Close the water tap.
- Although the power can be cut off automatically, the power plug must be pull out as well for the safety.
Operation of tub clean program
Instruction to the tub cleaning program
It will be adhere to wash powder's residue inside and outside the barrel because of the pollution and the problem of the water quality. It will take smelly and the drain will not be flowing. Otherwise, the adhering residue will take off during the wash process. And the clothing will be dirty. User should clean the tub monthly.
- Please do not start the program continuously.
- You should take few chloric bleacher to enhance the effect of tub clean.
- This program is used for clean the barrel and do not put the clothes in.
1 Press the [tub clean] button.
2 Close the door lid. If the door open, the program will rise
3 Press the [Start/Pause] button.
4 [Tub clean] program complete. When the tub clean program complete, the buzzer buzz continuously.
Completion of tub cleaning
- After completion of tub cleaning, the buzzer will buzz continuously for 6 times and then the power will be automatically cut off.
- Close the water tap.
- Although the power can be cut off automatically, the power plug must be pull out as well for the safety.
Operation of other full automatic washing program
Instruction to other full automatic washing program
• [Cold] program is used for washing the normal clothes and not so dirty clothes.
- [Soft] program is used for washing this underline or linsey-woolsy.
• [Speedy ] program is used for washing the clothes not so dirty and the whole washing process will be completed in about 25 minutes.
- [Warm] program is used for washing more dirtier clothes. The temperature of the water is about 42°C. But the temperature will change according to the local area.
- The selection of rinse water level: the level is equal to wash water level. Press [Rinse Level] button, the indicator light which stand for rinse level flickered. User can select the rinse water level according to needs. Rinse level exceed that wash level all the time. It shows the wash level if not press this button. And only show rinse level when rinse.
Preparation before washing:
Plug in the power wire - open water tap - hang the upper drain hose on the pond - put in clothes - put in suitable amount of detergent - close the door lid.
1
Press the power switch.
The [Normal] program as default set in the computer now is ready for washing.
2
Select any one program of [Cold] [Soft] [Speedy] or [Warm].
3
According to the washing amount choose the proper water level.
You should see about page 20 [the relationship between water level amount and washing amount] for detail.
4
Press [Start / Pause] button.
The washer will start to work with the set program.
Completion of washing
• After completion of washing, the buzzer will buzz continuously for 6 times and then the power will be automatically cut off.
- Close the water tap.
- Although the power can be cut off automatically, the power plug must be pull out as well for the safety.
Operation of the special program of soak
Instruction to the special program of soak
• [Soak] program is used for washing more dirtier clothes. This program can be used in conjunction with other programs except [Tub Clean].
- When you press the [Soak] button, the indicator light of soak lightened. And continuously press the [Soak] button to choose the soak time (10 minutes, 20 minutes or 30 minutes).
Preparation before washing:
Plug in the power wire - open water tap - hang the upper drain hose on the pond - put in clothes - put in suitable amount of detergent - close the door lid.
1
Press the power switch.
The [Normal] program as default set in the computer now is ready for washing.
2
Select the proper wash program.
3
Select [Soak] program.
And select the proper soak time.
Press the [Soak] button continuously to choose the soak time.
4
According to the washing amount choose the proper water level.
You should see about page 20 [the relationship between water level amount and washing amount] for detail.
5
Press [Start / Pause] button.
The washer will start to work with the set program.
Completion of washing
• After completion of washing, the buzzer will buzz continuously for 6 times and then the power will be automatically cut off.
- Close the water tap.
- Although the power can be cut off automatically, the power plug must be pull out as well for the safety.
About the procedure of full automatic wash program
| Program\Contents | Water Level (L) | Wash Time (minutes) | Spin Time (minutes) | Complete Time (minutes) | Rinsing Times | Washings (recommended) |
| Cold | 18~76 | 15 | 7 | 54 | 2 | Normal clothes or not so dirty clothes |
| Cold+Soak | 18~76 | 15 | 7 | 64~84 | 2 | Normal clothes or dirty clothes |
| Soft | 18~62 | 12 | 5 | 49 | 2 | Thin underline or linsey-woolsey |
| Soft+Soak | 18~62 | 12 | 5 | 59~79 | 2 | Normal clothes or dirty clothes |
| Normal | 18~76 | 15 | 7 | 54 | 2 | Normal clothes |
| Normal+Soak | 18~76 | 15 | 7 | 64~84 | 2 | Normal clothes or dirty clothes |
| Speedy | 18~76 | 7 | 3 | 26 | 1 | Less dirty clothes |
| Speedy+Soak | 18~76 | 7 | 3 | 36~56 | 1 | Normal clothes or dirty clothes |
| Warm | 18~76 | 15 | 7 | 54 | 2 | Normal clothes or dirty clothes |
| Warm+Soak | 18~76 | 15 | 7 | 64~84 | 2 | |
| Tub clean | 76 | 6 | 3 | 27 | 1 | Empty |
Note: The time required will also vary with water pressures of intake pipe, different clothes textures and different water drain conditions.
Application of washing powder, softener and bleacher
Application of washing powder
There are two ways to use washing powder. One way is put washing powder into barrel of the washer directly. The another way is put the washing powder into the box. (You must put the washing powder into the box when [Delay] program.) It is necessary to use proper amount of washing powder. Using too much washing powder will be a kind of waste, and it is no good for rinse.
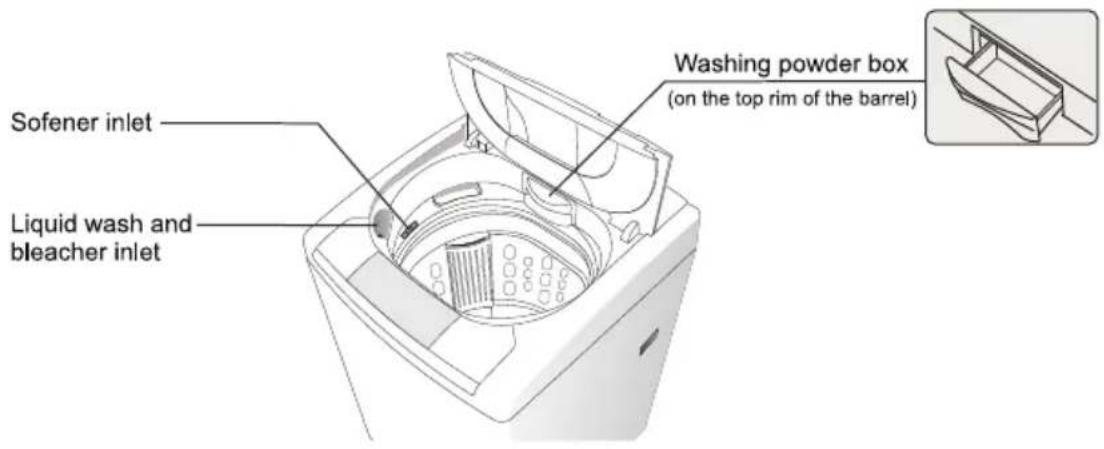
Application of softener
You must read the softener manul to learn the correct using amount and the using method.
Slowly pour the clothes softener in the softener inlet, but washing powder, bleacher and sizing agent should not be filled from this opening. (If the location of the softener inlet does not fit the operation, clockwise rotate the spin barrel to change the location of softener inlet)
The softener can only be used in the whole procedure of washing program. However, the effect will be much better when using normal washing program and heavy washing program.
The softener will be inject into the washing barrel automatically before the final rinsing operation.
After the clothing softener is filled, the door lid of the washer should not be opened during the spin procedure, otherwise an error will be caused for the automatic filling time of softener so that it can not exert effective functions.
Do not place the clothes softener in filling opening for long time, otherwise it will get solidified resulting in slack filling.
Application of bleacher
Before start washing, dilute the bleacher with sufficient water and then fill it through the bleacher inlet.
The bleacher should not be poured into the washing barrel directly, or it will cause fading of colourful clothes. Please refer to the application method of bleacher and use the bleacher correctly.
The amount of washing powder and softener
Standard using amount of water, washing powder and clothes softener
| Rated amount of water (liter) | 18 ----38 ----58 ----76 | ||||
| Using amount of washing powder | Fast Program | 10 - 16g | 12 - 19g | 14 - 22g | 35 - 55g |
| Other program | 20 - 32g | 24 - 38g | 27 - 42g | 35 - 55g | |
| Using amount of Clothes softener | about 16 ml | about 18 ml | about 21 ml | about 23 ml | |
Note: The using amount of washing powder will vary with its different quality.
setting washing capacity and water level
The relationship between water level amount and washing amount
| Water Level Amount (Liter) | 18 | 24 | 30 | 36 | 42 | 48 | 55 | 62 | 69 | 76 |
| Washing Amount (kg) | <0.5 | 1.2 | 2.0 | 2.8 | 3.6 | 4.5 | 5.5 | 7.0 | 8.5 | 10.0 |
Maximum washing amount of each program
| Program | Cold | Soft | Normal | Speedy | Warm |
| Max. Washing Amount (kg) | 10.0 | 6.0 | 10.0 | 5.0 | 10.0 |
Maintenance of washer
Please keep the washer with neat appearance and perform correct maintenance to prolong the service life of washer.
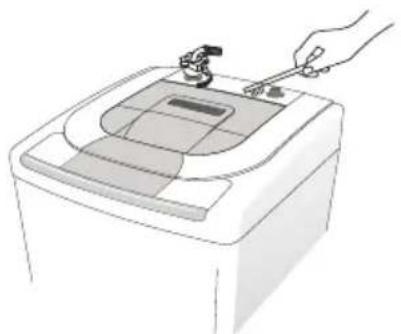
Cleaning of water inlet hose joint
Unscrew and remove the water inlet hose joint from the washer and clean the filtering screen of inlet valve with brush.
natural_image
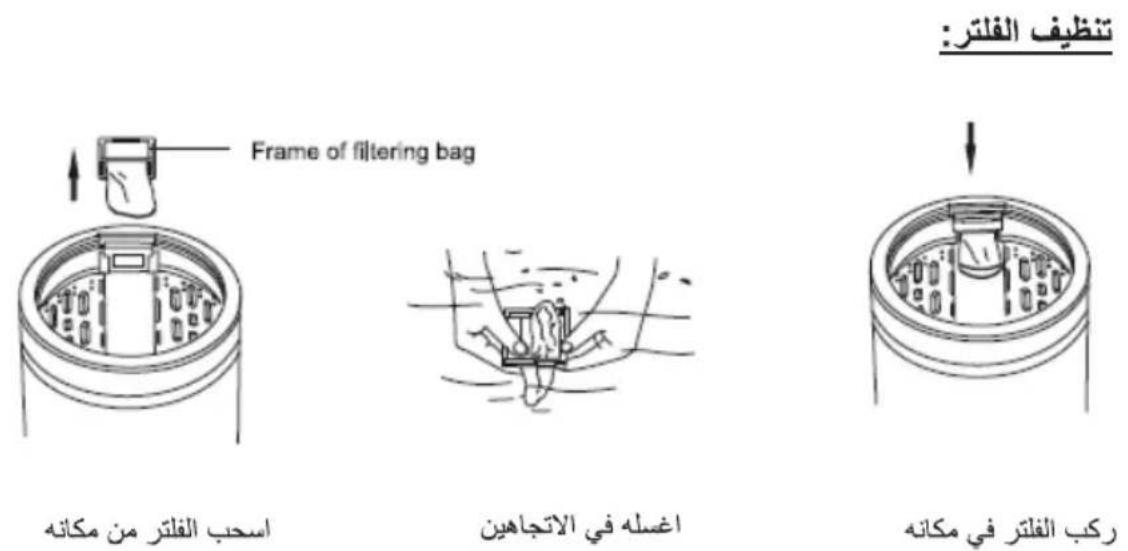
Illustration of a hand using a tool to press or install a machine component (no text or symbols visible)Cleaning of filtering bag
The special circulation water flow is designed for this washer, thus the flock powder and flock residues will be automatically collected into the filtering bag. After application, the user shall regularly clean the filtering bag to remove the flock powder and flock residues. Detail operation methods are following:
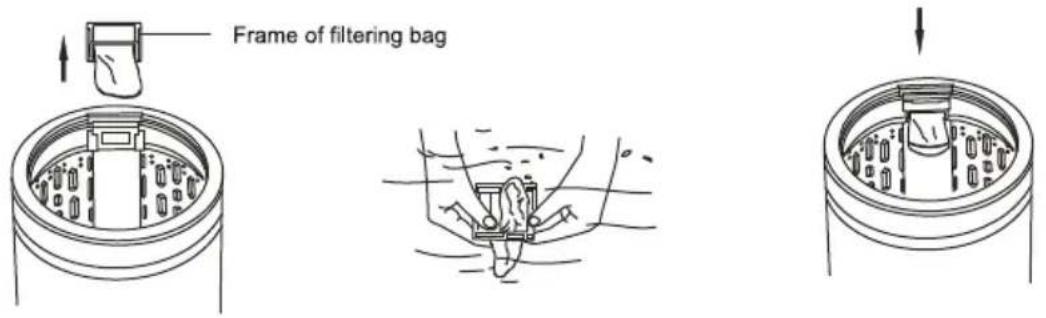
Grasp the filtering bag frame and pull it upwards, thus the filtering bag can be dismantled.
Pull out the filtering bag in an opposite direction and clean it with water.
Insert the filtering bag frame into the slot and then push it downwards.
Abnormal display and alarm of the washer
When the washer is in trouble, please contact local service office or the sales service department of our company and the customer should not dismantle the machine without permission.
If the washer can not work normally, and the abnormal indication is shown in the nixie tube window or the machine alarms, please check and correct as follows.
| Display | Causes | |
| FO | Blinking display and the other light goes out. | Alarm for cutting power failed. |
| E1 | Blinking display and the other light unchanged. | Alarm of water intaking or making up over 1 hour. |
| E2 | Blinking display and the other light unchanged. | Alarm for water drain time out. |
| E3 | Blinking display and the other light unchanged. | Alarm for lid not closed before spin. (Or before delay start) |
| E4 | Blinking display and the other light unchanged. | Alarm for shocking in the same spin process third times. |
| F8 | Blinking display and the other light unchanged. | Alarm for water level sensor. |
| HU | Blinking display and the other light goes out. | Alarm for voltage too high to cut power failed. |
Identify usual trouble of washer
When the washer is in trouble, please contact local service office or the sales service department of our company and the customer should not dismantle the machine without permission.
If the washer can not work normally, or appear abnormality or alarms, please check and correct as follows.
List of faults and inspection
| Faults | Inspection Items |
| No water flows in | ·If the power is off or the fuse is burned out.·If the water supply is cut off or the water pressure is too low.·If the inlet hose is properly connected and the water tap is opened.·If the filtering screen of inlet valve is blocked by dirt.·If the coil of inlet valve is damaged. (The slight electromagnetic sound is normal phenomenon when the inlet valve is switched on)·If the "Start / Pause" button is pressed after the power switch is pressed. |
| No washing | ·If the power is off or the fuse is burned out.·If the power supply voltage is too low.·If the water amount reaches to the required water level. (The washer will not work if the water amount does not reach the required water level)·If it is set to "Delay" washing mode. (It will only start to work until the reservation time reached) |
| Abnormal draining | ·If the water drain hose is placed very high.·If the end of water drain hose is sealed in pond.·If the internal rubber ring of drain valve is blocked by dirt. |
| Abnormal spin | ·If the door lid is closed.·If all clothing piled largely at one side of barrel or the clothing is excessively placed.·If the washer is not placed in stable condition or it is placed in inclination state. (The ground is not flat).·If the motor belt is loosened. |
Note: During the de spin process, if washing are piled at one side of the spin barrel, it will cause unbalance of spin barrel resulting in striking. At this moment, the computer inside the washer will feel this unbalance phenomenon and will automatically correct it (fill in water Washing). However, if unbalance situation is not removed after continuous three corrections, which means the computer auto-correction can not resolve the problem. Then the user has to manually and evenly place the clothing inside the barrel to solve the problem.
Following phenomena are not faults of washer
| Symptom | Causes |
| There is water leaks from the water drain hose when use for fist time | This is residue water after the performance test in the factory. |
| Make up water during washing process | During the washing process, the water will be automatically made up when the water level declined. |
| During the dehydrating process, spin suddenly stops and water filling and rinsing start running. | This is because the clothes is at one side. So the safety switch starts to work to make up water, rabble while running. The spin process will be continued when the clothes is in balance status. In case of failure of three corrections of the machine, the buzzer will alarm. Please manually adjust the balance of clothes. |
| The clothes are not sufficiently dry after spin process. | The spin efficiency of full automatic washer is a little lower than that of double barrel washer. The heavy and thick part of clothes will cause uneven spin. |
Specifications and technical parameters of washer
| Rated power supply | 220V - 240V/ 50Hz |
| Input power of motor | 460W |
| Overall dimensions | 580X605 X 956.3 |
| Application water pressure | 0.03MPa~0.8MPa |
| Weight of whole machine | 41kg |
| Washing mode | New water flow |
| Draining mode | Upper draining |
| Spin mode | Centrifugal spin |
ب rapمج الغسيل و تطبيقها:
| نوع الثياب | ICOالتفويح | الوقت الكامل | وقت التعصر | وقت الغسيل | مستوى الماء | المحتوى |
| البرنامج | ||||||
| عادي قليلالاتساخ | 2 | 54 | 7 | 15 | 76-18 | بارد |
| عادي شديدالاتساخ | 2 | 64-84 | 7 | 15 | 76-18 | بارد مع نفع |
| دقيق/صوف | 2 | 49 | 5 | 12 | 76-18 | دقيق |
| عادي/شديدالاتساخ | 2 | 59-79 | 5 | 12 | 76-18 | دقيق مع نفع |
| عادي | 2 | 54 | 7 | 15 | 76-18 | عادي |
| عادي/شديدالاتساخ | 2 | 64-84 | 7 | 15 | 76-18 | عادي مع نفع |
| قليل الاتساخ | 1 | 26 | 3 | 7 | 76-18 | سريع |
| عادي/شديدالاتساخ | 1 | 36-56 | 3 | 7 | 76-18 | سريع مع نفع |
| عادي/شديدالاتساخ | 2 | 54 | 7 | 15 | 76-18 | ساخن |
| عادي/شديدالاتساخ | 2 | 64-84 | 7 | 15 | 76-18 | ساخن مع نفع |
| فارغة | 1 | 27 | 3 | 6 | 76 | تنظيف |
كيفية كشف الاعطل من خلال الرموز على شاشة العرض :
| نوع المشكلة | رمز الشاشة |
| عند انتهاء البرنامج، لم تتوقف الغسالة | F0 |
| تعبئة الماء متواصلة | E1 |
| تفريع متواصل | E2 |
| غطاء جرن التعصير غير مقال | E3 |
| مشكلة في التعصير | E4 |
| مشكلة في فواشة الماء | F8 |
| الفلوية عالية جداً | HU |
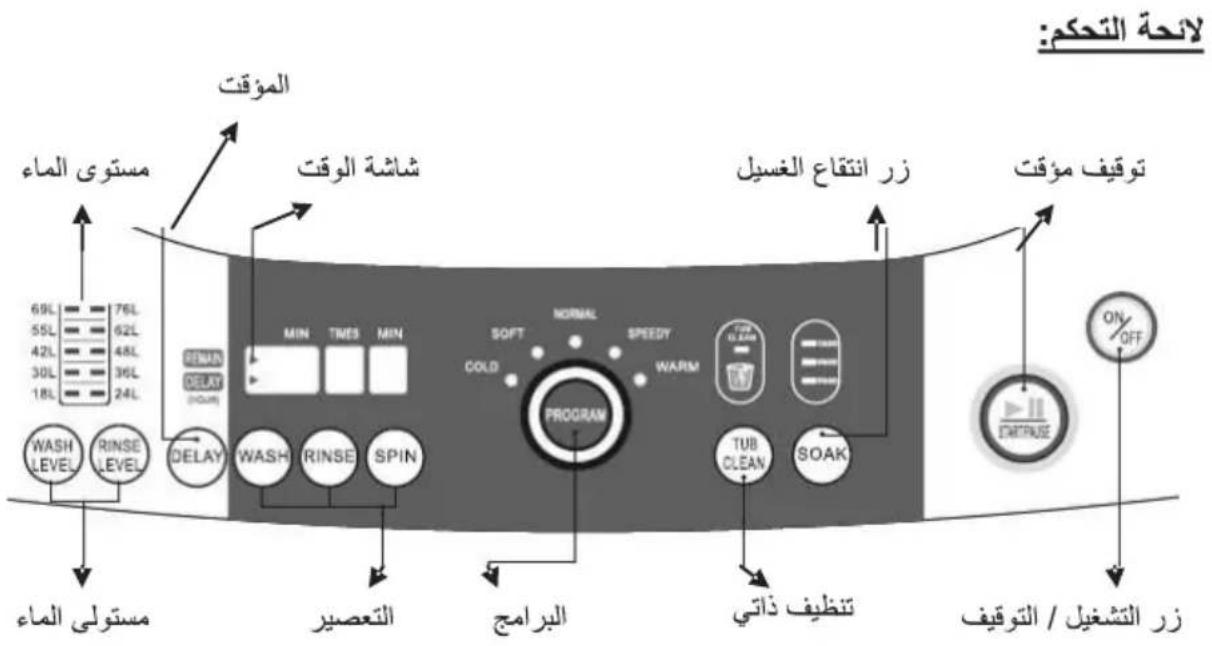
flowchart
graph TD
    A["Laîche التحكم:"] --> B["النّحّم"]
    B --> C["المؤقت"]
    B --> D["شاشة الوقت"]
    B --> E["زر انتقاءغ الغسيل"]
    B --> F["توفيف مؤقت"]
    B --> G["تنظيف ذاتي"]
    B --> H["الب램ج"]
    B --> I["PROGRAM"]
    B --> J["SOFT"]
    B --> K["COLD"]
    B --> L["PIN"]
    B --> M["RINSE"]
    B --> N["RINSE"]
    B --> O["WASH"]
    B --> P["WASH LEVEL"]
    B --> Q["RINSE LEVEL"]
    B --> R["DELAY"]
    B --> S["MIN"]
    B --> T["TIMES"]
    B --> U["MIN"]
    B --> V["MIN"]
    B --> W["MIN"]
    B --> X["MIN"]
    B --> Y["MIN"]
    B --> Z["MIN"]
    B --> AA["MIN"]
    B --> AB["MIN"]
    B --> AC["MIN"]
    B --> AD["MIN"]
    B --> AE["MIN"]
    B --> AF["MIN"]
    B --> AG["MIN"]
    B --> AH["MIN"]
    B --> AI["MIN"]
    B --> AJ["MIN"]
    B --> AK["MIN"]
    B --> AL["MIN"]
    B --> AM["MIN"]
    B --> AN["MIN"]
    B --> AO["MIN"]
    B --> AP["MIN"]
    B --> AQ["MIN"]
    B --> AR["MIN"]
    B --> AS["MIN"]
    B --> AT["MIN"]
    B --> AU["MIN"]
    B --> AV["MIN"]
    B --> AW["MIN"]
    B --> AX["MIN"]
    B --> AY["MIN"]
    B --> AZ["MIN"]
    B --> BA["MIN"]
    B --> BB["MIN"]
    B --> BC["MIN"]
    B --> BD["MIN"]
    B --> BE["MIN"]
    B --> BF["MIN"]
    B --> BG["MIN"]
    B --> BH["MIN"]
    B --> BI["MIN"]
    B --> BJ["MIN"]
    B --> BK["MIN"]
    B --> BL["MIN"]
    B --> BM["MIN"]
    B --> BN["MIN"]
    B --> BO["MIN"]
    B --> BP["MIN"]
    B --> BQ["MIN"]
    B --> BR["MIN"]
    B --> BS["MIN"]
    B --> BT["MIN"]
    B --> BU["MIN"]
    B --> BV["MIN"]
    B --> BW["MIN"]
    B --> BX["MIN"]
    B --> BY["MIN"]
    B --> BZ["MIN"]
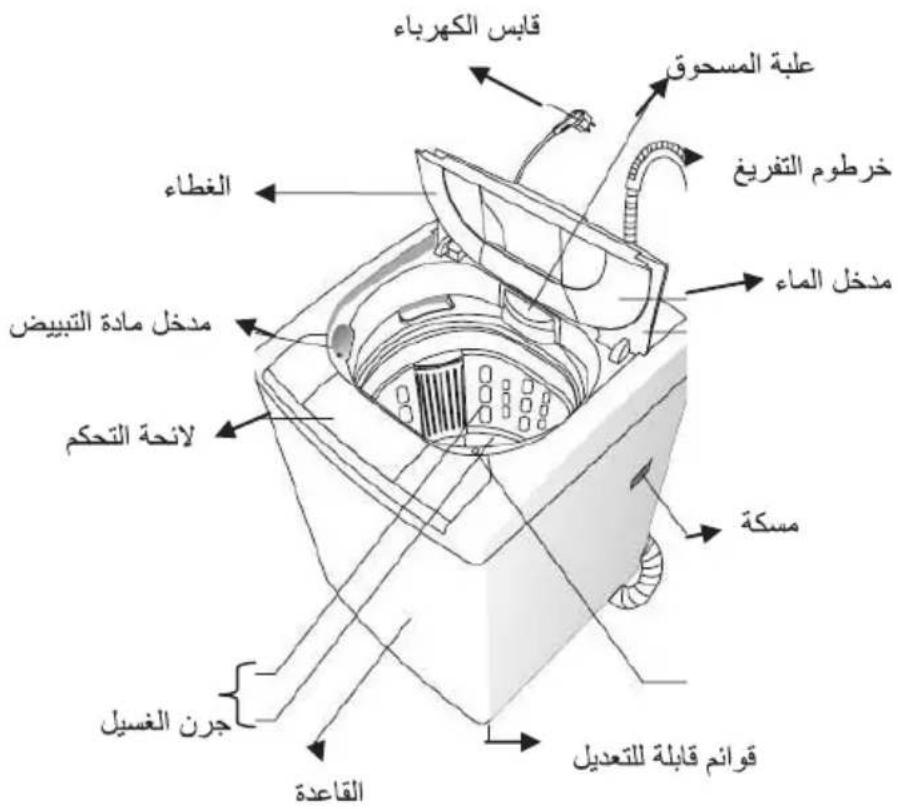
محتويات الغسالة:
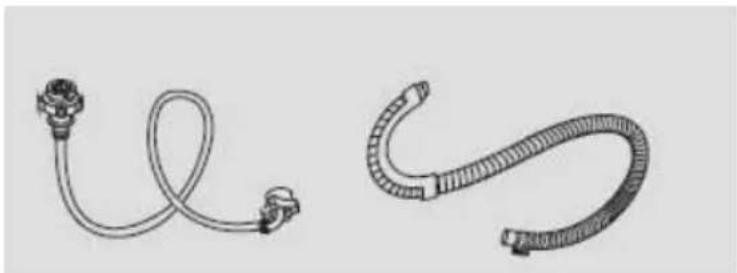
natural_image
Two types of cable connectors shown in line drawings, no text or symbols presentخرطوم مدخل
الماء عدد ٢
خرطوم التفريقغ
220V - 240V/ 50Hz
وصف: غسالة كامبوماتك
TL12E : طراز رقم
460W : (WO)
220V\~240V\~ 50Hz : الفولطية
تحذير و سلامة عامة: اقراً تعليمات الاستخدام قبل استعمال الجهاز. احتفظ بهذه التعليمات كمرجع للمستقبل.
تحذير: فولطية خطيرة بالداخل. يجب توصيل الجهاز بكابل ارضا فعال letفريق الشحنات المتجعة.
. في حال حصول ضرر او تلف لكابل التغذية الرئيسي، يجب استب ddاله فوراً عن طريق . كامبو ماتك او مركز الصينة المخول من قبل كامبو ماتك لتجب الاضRAR التي قد تنجم عنه. . تأكد من ان الفول tpية المبية على الجهاز تتوافق مع الفول tpية الرئيسية في بيتك قبل أن تصل الجهاز. . الصينة و ا改装اح، يجب أن يقوم بها فقط احد فنيين كامبو ماتك المتخصصين. إنه في مت hei الخطورة ان يقوم أي انسان باصلاح الجهاز او فkke بغرض اصلاحه من غير الفنيين المخصصين في ذلك. . لا يجب أن تتعد حرارة الماء الساخنة 50 درجة. . لا تسعمل الغسالة في اماكن ذو الروبة العالمية. . قبل فتح باب الغسالة فترة التعصرير، تأكد من ان الجرن متوفق تماماً. . لمなく وقوع الحرائق او الصدمة الكهربائية لا قم بتعريض لوحة التحكم البل . لا تحaul سحب thyاب من الغسالة قبل توقفها تماماً. . لا تغسل الغسالة مباشرة بصنبور الميه. . لا تسمح ابداً للاطقال بتشغير او اللعب بالغسالة. . افصل سلك الكهرباء عن الغسالة عند عدم الاستعمال.
TLI2E
Full Automatic Washer

natural_image
Line drawing of a rectangular kitchen appliance with a recessed top and side panel (no text or symbols)- TLI2E
- Full Automatic Washer
- FIRSTLY
- SECONDLY
- FURTHER
- SAFETY AND PRECAUTIONS
- Warning
- Caution
- Please observe following contents of graphics.
- Parts identification of the washer
- Accessories
- Instruction of the washer operation panel
- Installation of the washer
- Remove package
- Installation of washer
- Preparation before washing
- Notice:
- Operation of normal wash program
- Instructions to the normal wash program
- Preparation before washing:
- Press the power switch.
- According to the washing amount choose the proper water level.
- Press [Start / Pause] button.
- Completion of washing
- Operation of self-programmed procedures
- Select the self-programed procedure required by the user.
- Operation of delay program
- Operation of single washing program
- Instructions to single washing program
- Select the single washing program required by the user.
- Operation of tub clean program
- Instruction to the tub cleaning program
- Completion of tub cleaning
- Operation of other full automatic washing program
- Select any one program of [Cold] [Soft] [Speedy] or [Warm].
- Operation of the special program of soak
- Select the proper wash program.
- Select [Soak] program.
- About the procedure of full automatic wash program
- Application of washing powder, softener and bleacher
- Application of washing powder
- Application of softener
- Application of bleacher
- The amount of washing powder and softener
- setting washing capacity and water level
- Maintenance of washer
- Cleaning of filtering bag
- Abnormal display and alarm of the washer
- Identify usual trouble of washer
- Following phenomena are not faults of washer
- Specifications and technical parameters of washer
Merek : Campomatic
Model : TL12E
Kategori : 4