BIE62210X - 1472 BEKO - Panduan pengguna gratis
Temukan panduan perangkat secara gratis BIE62210X BEKO dalam format PDF.

Pertanyaan pengguna tentang BIE62210X BEKO
0 pertanyaan tentang perangkat ini. Jawab yang Anda tahu atau ajukan milik Anda sendiri.
Ajukan pertanyaan baru tentang perangkat ini
Unduh instruksi untuk 1472 dalam format PDF gratis! Temukan panduan Anda BIE62210X - BEKO dan ambil kembali perangkat elektronik Anda. Di halaman ini diterbitkan semua dokumen yang diperlukan untuk penggunaan perangkat Anda. BIE62210X merek BEKO.
PANDUAN PENGGUNA BIE62210X BEKO
Built-in Oven
User manual
natural_image
Simple line drawing of a kitchen appliance with a rectangular frame and top button (no text or symbols)BIE62210X
EN | DE | FR | NL
285.4461.27/R.AA/10.01.2018
Please read this user manual first!
Dear Customer,
Thank you for purchasing this Beko product. We hope that you get the best results from your product which has been manufactured with high quality and state-of-the-art technology. Therefore, please read this entire user manual and all other accompanying documents carefully before using the product and keep it as a reference for future use. If you handover the product to someone else, give the user manual as well. Follow all warnings and information in the user manual.
Remember that this user manual is also applicable for several other models. Differences between models will be identified in the manual.
Explanation of symbols
Throughout this user manual the following symbols are used:

Important information or useful hints about usage.
Warning of hazardous situations with regard to life and property.
Warning of electric shock.
Warning of risk of fire.
Warning of hot surfaces.
Arçelik A.Ş.
Karaağaç caddesi No:2-6
34445 Süflüce/Istanbul/TURKEY
Made in TURKEY

This product was manufactured using the latest technology in environmentally friendly conditions.
TABLE OF CONTENTS
1 Important instructions and warnings for safety and environment 4
General safety 4
Electrical safety 4
Product safety 5
Intended use 7
Safety for children....7
Disposing of the old product....8
Package information 8
2 General information 9
Overview 9
Package contents 10
Technical specifications ....11
3 Installation 12
Before installation....12
Installation and connection....14
Future Transportation....16
4 Preparation 17
Tips for saving energy....17
Initial use....17
First cleaning of the appliance.... 17
Initial heating 17
5 How to operate the oven 18
General information on baking, roasting and grilling18
How to operate the electric oven 18
Operating modes....19
Using the oven clock 20
Cooking times table....20
How to operate the grill.... 21
Cooking times table for grilling....21
6 Maintenance and care 22
General information....22
Cleaning the control panel 22
Cleaning the oven 22
Removing the oven door 23
Removing the door inner glass 23
Replacing the oven lamp.... 24
7 Troubleshooting 25
1 Important instructions and warnings for safety and environment
This section contains safety instructions that will help protect from risk of personal injury or property damage. Failure to follow these instructions shall void any warranty.
General safety
- This appliance can be used by children aged from 8 years and above and persons with reduced physical, sensory or mental capabilities or lack of experience and knowledge if they have been given supervision or instruction concerning use of the appliance in a safe way and understand the hazards involved.
Children shall not play with the appliance. Cleaning and user maintenance shall not be made by children without supervision.
- The appliance is not to be used by persons (including children) with reduced physical, sensory or mental capabilities, or lack of experience and knowledge, unless they have been given supervision or instruction. Children should be supervised and ensure they do not play with the appliance
- If the product is handed over to someone else for personal use or second-hand use purposes, the
user manual, product labels and other relevant documents and parts should be also given.
- Installation and repair procedures must always be performed by Authorised Service Agents. The manufacturer shall not be held responsible for damages arising from procedures carried out by unauthorised persons which may also void the warranty. Before installation, read the instructions carefully.
- Do not operate the product if it is defective or has any visible damage.
- Ensure that the product function knobs are switched off after every use.
Electrical safety
- If the product has a failure, it should not be operated unless it is repaired by an Authorised Service Agent. There is the risk of electric shock!
- Only connect the product to a grounded outlet/line with the voltage and protection as specified in the “Technical specifications”. Have the grounding installation made by a qualified electrician while using the product with or without a
transformer. Our company shall not be liable for any problems arising due to the product not being earthed in accordance with the local regulations.
- Never wash the product by spreading or pouring water onto it! There is the risk of electric shock!
- The product must be disconnected during installation, maintenance, cleaning and repairing procedures.
- If the power connection cable for the product is damaged, it must be replaced by the manufacturer, its service agent or similarly qualified persons in order to avoid a hazard.
- The appliance must be installed so that it can be completely disconnected from the mains supply. The separation must be provided by a switch built into the fixed electrical installation, according to construction regulations.
- Rear surface of the oven gets hot when it is in use. Make sure that the electrical connection does not contact the rear surface; otherwise, connections can get damaged.
- Do not trap the mains cable between the oven door and frame and do not route it over hot surfaces. Otherwise, cable
insulation may melt and cause fire as a result of short circuit.
- Any work on electrical equipment and systems should only be carried out by authorised and qualified persons.
- In case of any damage, switch off the product and disconnect it from the mains. To do this, turn off the fuse at home.
• Make sure that fuse rating is compatible with the product.
Product safety
- WARNING: The appliance and its accessible parts become hot during use. Care should be taken to avoid touching heating elements. Children less than 8 years of age shall be kept away unless continuously supervised.
- Never use the product when your judgment or coordination is impaired by the use of alcohol and/or drugs.
- Be careful when using alcoholic drinks in your dishes. Alcohol evaporates at high temperatures and may cause fire since it can ignite when it comes into contact with hot surfaces.
- Food Poisoning Hazard: Do not let food sit in oven for more than 1 hour before or after cooking. Doing so can result in food poisoning or sickness.
- Do not place any flammable materials close to the product as the sides may become hot during use.
- During use the appliances becomes hot. Care should be taken to avoid touching heating elements inside the oven.
- Keep all ventilation slots clear of obstructions.
- Do not heat closed tins and glass jars in the oven. The pressure that would build-up in the tin/jar may cause it to burst.
- Do not place baking trays, dishes or aluminium foil directly onto the bottom of the oven. The heat accumulation might damage the bottom of the oven.
- Do not use harsh abrasive cleaners or sharp metal scrapers to clean the oven door glass since they can scratch the surface, which may result in shattering of the glass.
- Do not use steam cleaners to clean the appliance as this may cause an electric shock.
- (Varies depending on the product model.)
Placing the wire shelf and tray onto the wire racks properly It is important to place the wire shelf and/or tray onto the rack properly. Slide the wire shelf or tray between 2 rails and make sure that it is balanced before placing food on it (Please see the following figure).
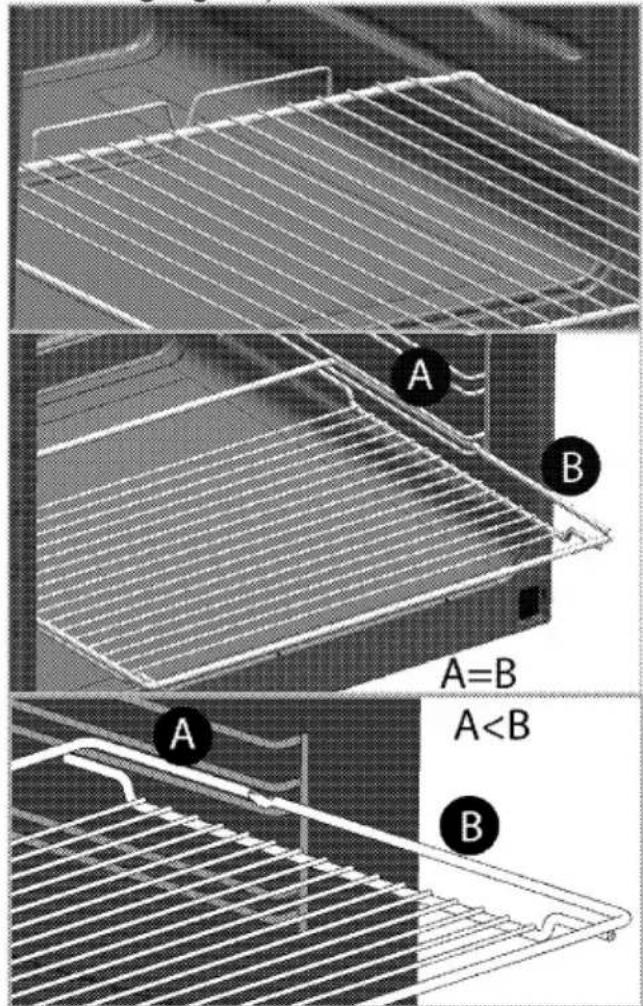
text_image
A B A=B A - Do not use the product if the front door glass removed or cracked. - Do not use the oven handle to hang towels for drying. Do not hang up towel, gloves, or similar textile products when the grill function is at open door. - Always use heat resistant oven gloves when putting in or removing dishes into/from the hot oven. - Place the baking paper into the cooking pot or on to the oven accessory (tray, wire grill etc) together with the food and then insert all into the preheated oven. Remove the excess parts of the baking paper overflowing from the accessory or the pot in order to prevent the risk of touching the oven's heating elements. Never use the baking paper in an operating temperature higher than the indicated value for the baking paper. Do not place the baking paper directly on the base of the oven. - WARNING: Ensure that the appliance is switched off before replacing the lamp to avoid the possibility of electric shock. - The appliance must not be installed behind a decorative door in order to avoid overheating. Prevention against possible fire risk! \- Ensure all electrical connections are secure and tight to prevent risk of arcing. \- Do not use damaged cables or extension cables. \- Ensure liquid or moisture is not accessible to the electrical connection point.Intended use
\- This product is designed for domestic use. Commercial use will void the guarantee. \- This appliance is for cooking purposes only. It must not be used for other purposes, for example room heating. \- This product should not be used for warming the plates under the grill, drying towels, dish cloths etc. by hanging them on the oven door handles. This product should also not be used for room heating purposes. \- The manufacturer shall not be liable for any damage caused by improper use or handling errors. \- The oven can be used for defrosting, baking, roasting and grilling food.Safety for children
\- WARNING: Accessible parts may become hot during use. Young children should be kept away. \- The packaging materials will be dangerous for children. Keep the packaging materials away from children. Please dispose of all parts of the packaging according to environmental standards. \- Electrical products are dangerous to children. Keep children away from the product when it is operating and do not allow them to play with the product. \- Do not place any items above the appliance that children may reach for. \- When the door is open, do not load any heavy object on it and do not allow children to sit on it. It may overturn or door hinges may get damaged.Disposing of the old product Compliance with the WEEE Directive and Disposing of the Waste Product:
 This product complies with EU WEEE Directive (2012/19/EU). This product bears a classification symbol for waste electrical and electronic equipment (WEEE). This product has been manufactured with high quality parts and materials which can be reused and are suitable for recycling. Do not dispose of the waste product with normal domestic and other wastes at the end of its service life. Take it to the collection center for the recycling of electrical and electronic equipment. Please consult your local authorities to learn about these collection centers.Compliance with RoHS Directive:
The product you have purchased complies with EU RoHS Directive (2011/65/EU). It does not contain harmful and prohibited materials specified in the Directive.Package information
\- Packaging materials of the product are manufactured from recyclable materials in accordance with our National Environment Regulations. Do not dispose of the packaging materials together with the domestic or other wastes. Take them to the packaging material collection points designated by the local authorities.2 General information
Overview
text_image
Labeled diagram of an oven with numbered parts for identificationtext_image
7 6 8 9text_image
P o 1 2 T max 250 200 75 100 150 10 20 30 40 50 60 250 100 150 3 4Package contents
 Accessories supplied can vary depending on the product model. Not every accessory described in the user manual may exist on your product.1. User manual
2. Oven tray
Used for pastries, frozen foods and big roasts. natural_image
Exterior view of a square baking tray with grid pattern (no text or symbols)3. Wire Shelf
Used for roasting and for placing the food to be baked, roasted or cooked in casserole dishes to the desired rack. natural_image
Isometric line drawing of a rectangular metal grate or rack structure (no text or symbols)natural_image
Line drawing of a rectangular grid-like structure with two side handles (no text or symbols)4. Placing the wire shelf and tray onto the telescopic racks properly
(This feature is optional. It may not exist on your product.) Telescopic racks allow you to install and remove the trays and wire shelf easily. When using the tray and wire shelf with telescopic racks, make sure that the pins at the rear section of the telescopic rack stands against the edges of the wire shelf and tray. text_image
Technical diagram of a door frame with Chinese text annotations describing structural components and safety notes.natural_image
Close-up of a metal structure with a magnified inset showing a hand holding a rope (no text or symbols visible)| Voltage / frequency | 220-240 V ~ 50/60 Hz |
| Total power consumption | 2.4 kW |
| Fuse | 16 A |
| Cable type / section | min.H05W-FG3 x 1,5 mm ^2 |
| External dimensions (height / width / depth) | 595 mm/594 mm/567 mm |
| Installation dimensions (height / width / depth) | **590 or 600 mm/560 mm/min. 550 mm |
| Main oven | Multifunction oven |
| Inner lamp | 15/25 W |
| Grill power consumption | 2.2 kW |
Basics: Information on the energy label of electrical ovens is given in accordance with the EN 60350-1 / IEC 60350-1 standard. Those values are determined under standard load with bottom-top heater or fan assisted heating (if any) functions.
Energy efficiency class is determined in accordance with the following prioritization depending on whether the relevant functions exist on the product or not. 1-Cooking with eco-fan, 2-Turbo slow cooking, 3-Turbo cooking, 4-Fan assisted bottom/top heating, 5-Top and bottom heating. \*\* See. Installation, page 12.  Technical specifications may be changed without prior notice to improve the quality of the product.  Figures in this manual are schematic and may not exactly match your product.  Values stated on the product labels or in the documentation accompanying it are obtained in laboratory conditions in accordance with relevant standards. Depending on operational and environmental conditions of the product, these values may vary.3 Installation
Product must be installed by a qualified person in accordance with the regulations in force. The manufacturer shall not be held responsible for damages arising from procedures carried out by unauthorized persons which may also void the warranty.  Preparation of location and electrical installation for the product is under customer's responsibility. DANGER:
The product must be installed in accordance with all local electrical regulations. DANGER:
Prior to installation, visually check if the product has any defects on it. If so, do not have it installed. Damaged products cause risks for your safety.Before installation
The appliance is intended for installation in commercially available kitchen cabinets. A safety distance must be left between the appliance and the kitchen walls and furniture. See figure (values in mm). - Surfaces, synthetic laminates and adhesives used must be heat resistant (100 °C minimum). • Kitchen cabinets must be set level and fixed. - If there is a drawer beneath the oven, a shelf must be installed between oven and drawer. • Carry the appliance with at least two persons.  Do not install the appliance next to refrigerators or freezers. The heat emitted by the appliance will lead to an increased energy consumption of cooling appliances.  The door and/or handle must not be used for lifting or moving the appliance.  If the appliance has wire handles, push the handles back into the side walls after moving the appliance.  min. text_image
500 35 560 590 30 35 500 550* 555 570 595 547 20 594Installation and connection
\- The product must be installed in accordance with all local gas and electrical regulations.Electrical connection
Connect the product to a grounded outlet/line protected by a miniature circuit braker of suitable capacity as stated in the "Technical specifications" table. Have the grounding installation made by a qualified electrician while using the product with or without a transformer. Our company shall not be liable for any damages that will arise due to using the product without a grounding installation in accordance with the local regulations. DANGER:
The product must be connected to the mains supply only by an authorised and qualified person. The product's warranty period starts only after correct installation. Manufacturer shall not be held responsible for damages arising from procedures carried out by unauthorised persons. DANGER:
The power cable must not be clamped, bent or trapped or come into contact with hot parts of the product. A damaged power cable must be replaced by a qualified electrician. Otherwise, there is risk of electric shock, short circuit or fire! - Connection must comply with national regulations. - The mains supply data must correspond to the data specified on the type label of the product. Open the front door to see the type label. - Power cable of your product must comply with the values in "Technical specifications" table. DANGER:
Before starting any work on the electrical installation, disconnect the product from the mains supply. There is the risk of electric shock!Connecting the power cable
 While performing the wiring, you must apply with the national/local electrical regulations and must use the appropriate socket outlet/line and plug for oven. In case of the product's power limits are out of current carrying capability of plug and socket outlet/line, the product must be connected through fixed electrical installation directly without using plug and socket outlet/line. 1. If it is not possible to disconnect all poles in the supply power, a disconnection unit with at least 3 mm contact clearance (fuses, line safety switches, contactors) must be connected and all the poles of this disconnection unit must be adjacent to (not above) the product in accordance with IEE directives. Failure to obey this instruction may cause operational problems and invalidate the product warranty. Additional protection by a residual current circuit breaker is recommended. If a cable is supplied with the product: text_image
TERMINAL BLOCK BLUE L N BROWN GREEN / YELLOW SUPPLY CORDInstalling the product
1. Slide the oven into the cabinet, align and secure it while making sure that the power cable is not broken and/or trapped. natural_image
Diagram of a microwave oven with internal grating and ventilation slots (no text or labels)text_image
1 2 3Final check
1. Operate the product. 2. Check the functions.Future Transportation
- Keep the product's original carton and transport the product in it. Follow the instructions on the carton. If you do not have the original carton, pack the product in bubble wrap or thick cardboard and tape it securely. - To prevent the wire grill and tray inside the oven from damaging the oven door, place a strip of cardboard onto the inside of the oven door that lines up with the position of the trays. Tape the oven door to the side walls. - Do not use the door or handle to lift or move the product.  Do not place any objects onto the product and move it in upright position.  Check the general appearance of your product for any damages that might have occurred during transportation.4 Preparation
Tips for saving energy
The following information will help you to use your appliance in an ecological way, and to save energy: - Use dark coloured or enamel coated cookware in the oven since the heat transmission will be better. - While cooking your dishes, perform a preheating operation if it is advised in the user manual or cooking instructions. - Do not open the door of the oven frequently during cooking. - Try to cook more than one dish in the oven at the same time whenever possible. You can cook by placing two cooking vessels onto the wire shelf. • Cook more than one dish one after another. The oven will already be hot. - You can save energy by switching off your oven a few minutes before the end of the cooking time. Do not open the oven door. • Defrost frozen dishes before cooking them.Initial use
First cleaning of the appliance
 The surface might get damaged by some detergents or cleaning materials. Do not use aggressive detergents, cleaning powders/creams or any sharp objects during cleaning. Do not use harsh abrasive cleaners or sharp metal scrapers to clean the oven door glass since they can scratch the surface, which may result in shattering of the glass. 1. Remove all packaging materials. 2. Wipe the surfaces of the appliance with a damp cloth or sponge and dry with a cloth.Initial heating
Heat up the product for about 30 minutes and then switch it off. Thus, any production residues or layers will be burnt off and removed. WARNING
Hot surfaces cause burns! Product may be hot when it is in use. Never touch the hot burners, inner sections of the oven, heaters and etc. Keep children away. Always use heat resistant oven gloves when putting in or removing dishes into/from the hot oven.Electric oven
1. Take all baking trays and the wire grill out of the oven. 2. Close the oven door. 3. Select Static position. 4. Select the highest oven power; See How to operate the electric oven, page 18. 5. Operate the oven for about 30 minutes. 6. Turn off your oven; See How to operate the electric oven, page 18Grill oven
1. Take all baking trays and the wire grill out of the oven. 2. Close the oven door. 3. Select the highest grill power; see How to operate the grill, page 21. 4. Operate the grill about 30 minutes. 5. Turn off your grill; see How to operate the grill, page 21  Smoke and smell may emit for a couple of hours during the initial operation. This is quite normal. Ensure that the room is well ventilated to remove the smoke and smell. Avoid directly inhaling the smoke and the smell that emits.5 How to operate the oven
General information on baking, roasting and grilling
WARNING
Hot surfaces cause burns! Product may be hot when it is in use. Never touch the hot burners, inner sections of the oven, heaters and etc. Keep children away. Always use heat resistant oven gloves when putting in or removing dishes into/from the hot oven. DANGER:
Be careful when opening the oven door as steam may escape. Exiting steam can scald your hands, face and/or eyes.Tips for baking
- Use non-sticky coated appropriate metal plates or aluminum vessels or heat-resistant silicone moulds. • Make best use of the space on the rack. - Place the baking mould in the middle of the shelf. - Select the correct rack position before turning the oven or grill on. Do not change the rack position when the oven is hot. - Keep the oven door closed.Tips for roasting
- Treating whole chicken, turkey and large piece of meat with dressings such as lemon juice and black pepper before cooking will increase the cooking performance. - It takes about 15 to 30 minutes longer to roast meat with bones when compared to roasting the same size of meat without bones. • Each centimeter of meat thickness requires approximately 4 to 5 minutes of cooking time. - Let meat rest in the oven for about 10 minutes after the cooking time is over. The juice is better distributed all over the roast and does not run out when the meat is cut. - Fish should be placed on the middle or lower rack in a heat-resistant plate.Tips for grilling
When meat, fish and poultry are grilled, they quickly get brown, have a nice crust and do not get dry. Flat pieces, meat skewers and sausages are particularly suited for grilling as are vegetables with high water content such as tomatoes and onions. - Distribute the pieces to be grilled on the wire shelf or in the baking tray with wire shelf in such a way that the space covered does not exceed the size of the heater. - Slide the wire shelf or baking tray with grill into the desired level in the oven. If you are grilling on the wire shelf, slide the baking tray to the lower rack to collect fats. Add some water in the tray for easy cleaning.  Foods that are not suitable for grilling carry the risk of fire. Only grill food which is suitable for intensive grilling heat. Do not place the food too far in the back of the grill. This is the hottest area and fatty food may catch fire.How to operate the electric oven Select temperature and operating mode
text_image
1 2Switching off the electric oven
Switch the oven timer to off position.  When the timer is set to a certain time, it will turn off automatically; see Turn the function knob and temperature knob to off (upper) position.Rack positions (For models with wire shelf)
It is important to place the wire shelf onto the side rack correctly. Wire shelf must be inserted between the side racks as illustrated in the figure. Do not let the wire shelf stand against the rear wall of the oven. Slide your wire shelf to the front section of the rack and settle it with the help of the door in order to obtain a good grill performance. text_image
1 2 3 4 5Operating modes
The order of operating modes shown here may be different from the arrangement on your product.Top and bottom heating
 Top and bottom heating are in operation. Food is heated simultaneously from the top and bottom. For example, it is suitable for cakes, pastries, or cakes and casseroles in baking moulds. Cook with one tray only.Bottom heating
 Only bottom heating is in operation. It is suitable for pizza and for subsequent browning of food from the bottom.  This function must be used for easy steam cleaning as well.Fan supported bottom/top heating
 Top heating, bottom heating plus fan (in the rear wall) are in operation. Hot air is evenly distributed throughout the oven rapidly by means of the fan. Cook with one tray only.  Large grill at the ceiling of the oven is in operation. It is suitable for grilling large amount of meat. - Put big or medium-sized portions in correct rack position under the grill heater for grilling. - Set the temperature to maximum level. • Turn the food after half of the grilling time.  Grilling effect is not as strong as in Full Grill - Put small or medium-sized portions in correct shelf position under the grill heater for grilling. • Set the desired temperature. • Turn the food after half of the grilling time.  This function is used to heat the oven rapidly; it is not suitable for cooking food. - Select the desired temperature after selecting this function. Temperature light turns on and oven is heated. • Light turns off after the heating process is completed. Now select the desired function to cook your food. Using the oven clock text_image
10 20 30 40 50 60 70 80 90 100Turning off the oven before the set time
1. Turn the Time Adjustment knob counterclockwise until it stops. 2. Turn off the oven with the Function knob and Temperature knob.Cooking times table
 The timings in this chart are meant as a guide. Timings may vary due to temperature of food, thickness, type and your own preference of cooking.Baking and roasting
 1st rack of the oven is the bottom rack.| Dish | Cooking level number | Rack position | Temperature (°C) | Cooking time (approx. in min.) | |
| **Cakes in tray | One level | 3 | 175 | 25 ... 30 | |
| **Cakes in mould | One level | 2 | 175 | 40 ... 50 | |
| **Cakes in cooking paper | One level | 3 | 175 | 25 ... 30 | |
| **Sponge cake | One level | 3 | 200 | 5 ... 10 | |
| **Cookie | One level | 3 | 175 | 25 ... 30 | |
| **Dough pastry | One level | 2 | 200 | 30 ... 40 | |
| **Rich pastry | One level | 2 | 200 | 25 ... 35 | |
| **Leaven | One level | 2 | 200 | 35 ... 45 | |
| **Lasagna | One level | 2 - 3 | 200 | 30 ... 40 | |
| **Pizza | One level | 2 | 200 ... 220 | 15 ... 20 | |
| Beef steak (whole) / Roast | One level | 3 | 25 min. 250/max, then 180 ... 190 | 100 ... 120 | |
| Leg of Lamb (casserole) | One level | 3 | 25 min. 220 then 180 ... 190 | 70 ... 90 | |
| Roasted chicken | One level | 2 | 15 min. 250/max, then 180 ... 190 | 55 ... 65 | |
| Turkey (5.5 kg) | One level | 1 | 25 min. 250/max, then 180 ... 190 | 150 ... 210 | |
| Fish | One level | 3 | 200 | 20 ... 30 |
Tips for baking cake
- If the cake is too dry, increase the temperature by 10^ C and decrease the cooking time. - If the cake is wet, use less liquid or lower the temperature by 10^ C. - If the cake is too dark on top, place it on a lower rack, lower the temperature and increase the cooking time. - If cooked well on the inside but sticky on the outside use less liquid, lower the temperature and increase the cooking time.Tips for baking pastry
\- If the pastry is too dry, increase the temperature by 10^ C and decrease the cooking time. Dampen the layers of dough with a sauce composed of milk, oil, egg and yoghurt. - If the pastry takes too long to bake, pay care that the thickness of the pastry you have prepared does not exceed the depth of the tray. - If the upper side of the pastry gets browned, but the lower part is not cooked, make sure that the amount of sauce you have used for the pastry is not too much at the bottom of the pastry. Try to scatter the sauce equally between the dough layers and on the top of pastry for an even browning.  Cook the pastry in accordance with the mode and temperature given in the cooking table. If the bottom part is still not browned enough, place it on one lower rack next time.Tips for cooking vegetables
- If the vegetable dish runs out of juice and gets too dry, cook it in a pan with a lid instead of a tray. Closed vessels will preserve the juice of the dish. - If a vegetable dish does not get cooked, boil the vegetables beforehand or prepare them like canned food and put in the oven.How to operate the grill
WARNING
Close oven door during grilling. Hot surfaces may cause burns! \- Turn the Time Adjustment knob counter clockwise to Hand symbol when grilling.Switching on the grill
1. Turn the Function knob to the desired grill symbol. 2. Then, select the desired grilling temperature. 3. If required, perform a preheating of about 5 minutes. » Temperature light turns on.Switching off the grill
1. Turn the Function knob to Off (top) position.  Foods that are not suitable for grilling carry the risk of fire. Only grill food which is suitable for intensive grilling heat. Do not place the food too far in the back of the grill. This is the hottest area and fatty food may catch fire.Cooking times table for grilling
Grilling with electric grill| Food | Insertion level | Grilling time (approx.) |
| Fish | 4...5 | 20...25 min. |
| Sliced chicken | 4...5 | 25...35 min. |
| Lamb chops | 4...5 | 20...25 min. |
| Roast beef | 4...5 | 25...30 min. |
| Veal chops | 4...5 | 25...30 min. |
| Toast bread | 4 | 1..2 min. |
| #depending on thickness | ||
6 Maintenance and care
General information
Service life of the product will extend and the possibility of problems will decrease if the product is cleaned at regular intervals. DANGER:
Disconnect the product from mains supply before starting maintenance and cleaning works. There is the risk of electric shock! DANGER:
Allow the product to cool down before you clean it. Hot surfaces may cause burns! - Clean the product thoroughly after each use. In this way it will be possible to remove cooking residues more easily, thus avoiding these from burning the next time the appliance is used. - No special cleaning agents are required for cleaning the product. Use warm water with washing liquid, a soft cloth or sponge to clean the product and wipe it with a dry cloth. • Always ensure any excess liquid is thoroughly wiped off after cleaning and any spillage is immediately wiped dry. - Do not use cleaning agents that contain acid or chloride to clean the stainless or inox surfaces and the handle. Use a soft cloth with a liquid detergent (not abrasive) to wipe those parts clean, paying attention to sweep in one direction.  The surface might get damaged by some detergents or cleaning materials. Do not use aggressive detergents, cleaning powders/creams or any sharp objects during cleaning. Do not use harsh abrasive cleaners or sharp metal scrapers to clean the oven door glass since they can scratch the surface, which may result in shattering of the glass.  Do not use steam cleaners to clean the appliance as this may cause an electric shock.Cleaning the control panel
Clean the control panel and knobs with a damp cloth and wipe them dry.  Do not remove the control buttons/knobs to clean the control panel. Control panel may get damaged!Cleaning the oven
To clean the side wall
(This feature is optional. It may not exist on your product.) 1. Remove the front section of the side rack by pulling it in the opposite direction of the side wall. 2. Remove the side rack completely by pulling it towards you. text_image
Technical diagram showing two labeled components (1 and 2) of a mechanical or electrical assembly with internal wiring and connections.Catalytic walls
(This feature is optional. It may not exist on your product.) The inner side walls (A) and/or the rear wall (B) of your product may be coated with catalytic enamel. Catalytic walls have a light matte colour and a porous surface. Catalytic walls of the oven should not be cleaned. Porous surfaces of the catalytic walls are automatically cleaned by absorbing and converting the spilled oil (steam and carbon dioxide). natural_image
Close-up of a grid-patterned panel with a circular marker labeled 'A' (no readable text or symbols beyond the label)natural_image
Diagram of a device casing with hexagonal pattern and labeled point B (no readable text or symbols)Easy Steam Cleaning
It ensures easy cleaning because the dirt (having waited not for too long) is softened with the steam that forms inside the oven and the water drops condensing on the inner surfaces of the oven. 1. Remove all accessories inside the oven. 2. Pour 500 ml of water into the oven tray and place the tray at the 2nd rack of the oven. natural_image
Illustration of a laptop with a cup and wings, no text or symbols presentClean oven door
To clean the oven door, use warm water with washing liquid, a soft cloth or sponge to clean the product and wipe it with a dry cloth.  Don't use any harsh abrasive cleaners or sharp metal scrapers for cleaning the oven door. They could scratch the surface and destroy the glass.Removing the oven door
1. Open the front door (1). 2. Open the clips at the hinge housing (2) on the right and left hand sides of the front door by pressing them down as illustrated in the figure. text_image
1 2 3natural_image
Technical diagram of a mechanical joint or bracket with a directional arrow indicating rotation (no text or symbols present)text_image
Technical diagram showing a mechanical assembly with labeled parts 1, 2, and 3, and an upward arrow indicating direction.Removing the door inner glass (This feature is optional. It may not exist on your product.)
The inner glass panel of the oven door can be removed for cleaning. Open the oven door. natural_image
Close-up of a mechanical component with labeled parts 1 and 2 (no text or symbols beyond labels)text_image
1 2 3 1 2natural_image
3D diagram of a mechanical component with labeled parts A and B, showing internal structure and motion direction (no text or symbols beyond labels)Replacing the oven lamp
DANGER:
Before replacing the oven lamp, make sure that the product is disconnected from mains and cooled down in order to avoid the risk of an electrical shock. Hot surfaces may cause burns!  The oven lamp is a special electric light bulb that can resist up to 300 °C. See Technical specifications, page 11 for details. Oven lamps can be obtained from Authorised Service Agents or technician with licence.  Position of lamp might vary from the figure.  The lamp used in this appliance is not suitable for household room illumination. The intended purpose of this lamp is to assist the user to see foodstuffs.  The lamps used in this appliance have to withstand extreme physical conditions such as temperatures above 50 °C.If your oven is equipped with a round lamp:
1. Disconnect the product from mains. 2. Turn the glass cover counter clockwise to remove it. natural_image
Close-up of a hand holding a circular component over a mechanical component (no visible text or symbols)natural_image
Mechanical component with rotational arrow indicating motion (no text or symbols)natural_image
Close-up of a mechanical component with an arrow indicating direction, no visible text or symbols7 Troubleshooting
Oven emits steam when it is in use
\- It is normal that steam escapes during operation. >>> This is not a fault.Product emits metal noises while heating and cooling.
\- When the metal parts are heated, they may expand and cause noise. >>> This is not a fault.Product does not operate.
- The mains fuse is defective or has tripped. >>> Check fuses in the fuse box. If necessary, replace or reset them. • Product is not plugged into the (grounded) socket. >>> Check the plug connection.Oven light does not work.
- Oven lamp is defective. >>> Replace oven lamp. - Power is cut. >>> Check if there is power. Check the fuses in the fuse box. If necessary, replace or reset the fuses.Oven does not heat.
- Might not be set to a certain cooking function and/or temperature. >>> Set the oven to a certain cooking function and/or temperature. - In models equipped with a timer, the timer is not adjusted. >>> Adjust the time. (In products with microwave oven, timer controls only microwave oven.) - Power is cut. >>> Check if there is power. Check the fuses in the fuse box. If necessary, replace or reset the fuses.(In models with timer) Clock display is blinking or clock symbol is on.
\- A previous power outage has occurred. >>> Adjust the time / Switch of the product and switch it on again.  Consult the Authorised Service Agent or technician with licence or the dealer where you have purchased the product if you can not remedy the trouble although you have implemented the instructions in this section. Never attempt to repair a defective product yourself.Einbau-Backofen
Gebrauchsanleitung
Bitte zuerst diese Bedienungsanleitung lesen!
Sehr geehrte Kundin, sehr geehrter Kunde, vielen Dank für den Kauf eines Beko-Produktes. Wir hoffen, dass dieses Produkt, das mit hochwertiger und hochmoderner Technologie hergestellt wurde, beste Ergebnisse erzielt. Daher bitte die gesamte Bedienungsanleitung und alle beiliegenden Dokumente aufmerksam durchlesen und zum zukünftigen Nachschlagen aufbewahren. Bei Weitergabe des Produktes auch die Bedienungsanleitung mit aushändigen. Alle Warnungen und Informationen in der Bedienungsanleitung einhalten. Bitte beachten, dass diese Bedienungsanleitung für unterschiedliche Modelle geschrieben wurde. Unterschiede zwischen den verschiedenen Modellen werden natürlich in der Anleitung erwähnt.Die Symbole
In dieser Anleitung verwenden wir folgende Symbole:  Wichtige Informationen oder nützliche Tipps zum Gebrauch.  Warnung vor gefährlichen Situationen, in denen es zu Verletzungen oder Sachschäden kommen kann.  Warnung vor Stromschlägen.  Warnung vor Brandgefahr.  Warnung vor heißen Flächen.1 Wichtige Sicherheits- und Umwelthinweise 4
Allgemeine Sicherheit......4 Elektrische Sicherheit....5 Produktsicherheit......6 Bestimmungsgemäße Verwendung 8 Sicherheit von Kindern 8 Altgeräte entsorgen....8 Verpackungsmaterialien entsorgen 82 Allgemeine Informationen 9
Geräteübersicht 9 Lieferumfang....10 Technische Daten 113 Installation 12
Vor der Installation....12 Einbauen und Anschließen ....14 Transport 164 Vorbereitungen 17
Tipps zum Energiesparen 17 Erste Inbetriebnahme....17 Erstreinigung des Gerätes....17 Erstaufheizung....175 Bedienung des Backofens 18
Allgemeine Hinweise zum Backen, Braten und Grillen 18 So bedienen Sie den Backofen.... 18 Betriebsarten 19 Ofenuhr verwenden....20 Garzeitentabelle 20 So bedienen Sie den Grill....21 Garzeitentabelle zum Grillen.... 216 Reinigung und Wartung 22
Allgemeine Hinweise 22 Bedienfeld reinigen 22 Backofen reinigen 22 Backofentür ausbauen....23 Türinnenscheibe ausbauen 23 Beleuchtung des Backofens auswechseln.... 247 Problemlösungen 25
1 Wichtige Sicherheits- und Umwelthinweise
Dieser Abschnitt enthält Hinweise, die für die Sicherheit des Benutzers und anderer Personen unerlässlich sind. Diese Hinweise müssen beachtet werden, damit es nicht zu Verletzungen oder Sachschäden kommt. Bei Nichteinhaltung dieser Anweisungen erlöschen sämtliche Garantieansprüche.Allgemeine Sicherheit
\- Dieses Gerät darf von Kindern (ab acht Jahren) oder Personen bedient werden, die unter körperlichen, sensorischen oder geistigen Einschränkungen leiden oder denen es an der nötigen Erfahrung und Wissen im Umgang mit solchen Geräten mangelt, wenn solche Personen beaufsichtigt werden und, zuvor gründlich mit der sicheren Bedienung des Gerätes vertraut gemacht wurden und sich der damit verbundenen Gefahren voll und ganz bewusst sind. Kinder dürfen nicht mit dem Gerät spielen. Reinigungs- und Wartungsarbeiten dürfen von Kindern nicht ohne Aufsicht eines Erwachsenen durchgeführt werden. \- Das Gerät darf nicht von Personen genutzt werden, die unter körperlichen oder geistigen Einschränkungen leiden oder denen es an der nötigen Erfahrung im Umgang mit solchen Geräten mangelt. Ausnahmen sind nur dann möglich, wenn solche Personen beaufsichtigt werden oder gründlich über den richtigen Umgang mit dem Gerät aufgeklärt wurden. Dies gilt natürlich auch für Kinder. Kinder müssen stets beaufsichtigt werden, damit sie nicht mit dem Gerät spielen. \- Falls das Produkt an jemand anderen zur persönlichen oder Secondhand-Benutzung übergeben wird, sollten Bedienungsanleitung, Produktetiketten und andere relevante Dokumente und Teile ebenfalls übergeben werden. \- Installation und Reparaturen müssen grundsätzlich vom autorisierten Kundendienst ausgeführt werden. Der Hersteller haftet nicht für Schäden, die durch den Eingriff nicht autorisierter Personen entstehen; zudem kann dadurch die Garantie erlöschen. Vor der Installation aufmerksam alle Anweisungen lesen. \- Gerät nicht nutzen, falls es nicht ordnungsgemäß funktioniert oder sichtbare Beschädigungen aufweist. \- Nach jeder Benutzung prüfen, ob die Funktionsknöpfe des Produktes ausgeschaltet sind.Elektrische Sicherheit
\- Falls das Produkt einen Fehler aufweist, sollte es bis zur Reparatur durch einen autorisierten Kundendienstmitarbeiter nicht in Betrieb genommen werden. Es besteht Stromschlaggefahr! - Schließen Sie das Produkt nur an eine geerdete Steckdose an, deren Spannung und Schutz den Angaben unter „Technische Daten“ entsprechen. Lassen Sie durch einen qualifizierten Elektriker eine Erdung vornehmen. Unser Unternehmen haftet nicht für Probleme, die durch ein nicht entsprechend den örtlichen Richtlinien geerdetes Produkt entstehen. - Reinigen Sie das Produkt niemals, indem Sie Wasser darauf verteilen oder schütten! Es besteht Stromschlaggefahr! - Das Produkt darf während Installation, Wartung, Reinigung und Reparatur nicht an eine Steckdose angeschlossen sein. - Falls das Netzkabel des Produktes beschädigt ist, muss es zur Vermeidung von Gefahren vom Hersteller, einem Kundendienstmitarbeiter oder vergleichbar qualifizierten Personen ausgetauscht werden. - Das Gerät muss so installiert sein, dass es vollständig vom Netzwerk getrennt werden kann. Die Trennung muss entsprechend den Baurichtlinien entweder durch einen Netzstecker oder einen in der festen elektrischen Installation eingebauten Schalter ermöglicht werden. • Die Rückseite des Ofens wird im Betrieb heiß. Achten Sie darauf, dass der Elektroanschluss die Rückseite nicht berührt; andernfalls kann der Anschluss beschädigt werden. - Klemmen Sie das Netzkabel nicht zwischen Backofentür und Rahmen ein; führen Sie es nicht über heiße Oberflächen. Andernfalls kann die Kabelisolierung schmelzen und in Folge eines Kurzschlusses einen Brand verursachen. - Jegliche Arbeiten an elektrischen Geräten und Systemen sollten von autorisierten und qualifizierten Personen ausgeführt werden. - Schalten Sie das Gerät bei Schäden aus, unterbrechen Sie die entsprechende Stromversorgung. Schalten Sie dazu die Sicherungen im Haus ab. \- Stellen Sie sicher, dass die Sicherungsangaben mit dem Produkt kompatibel sind.Produktsicherheit
\- WARNUNG: Das Gerät und seine zugänglichen Teile werden während des Betriebs heiß. Keine Heizelemente berühren. Kinder unter 8 Jahren fernhalten, sofern nicht kontinuierlich beaufsichtigt. \- Produkt niemals nutzen, wenn Urteilsvermögen oder Koordination durch Alkohol und/oder Drogen beeinträchtigt sind. \- Bei alkoholischen Getränken in den Gerichten entsprechend vorsichtig sein. Alkohol verdampft bei hohen Temperaturen und kann durch Entzünden bei Kontakt mit heißen Oberflächen Feuer verursachen. \- Keine brennbaren Materialien in der Nähe des Produktes aufstellen, da die Seiten während des Gebrauchs heiß werden können. \- Während des Gebrauchs wird das Gerät heiß. Keine Heizelemente im Inneren des Backofens berühren. \- Darauf achten, dass keine Belüftungsschlitze blockiert werden. \- Keine geschlossenen Dosen und Glasgefäße im Ofen erhitzen. Der in der Dose/im Glasgefäß entstehende Druck könnte Dose/Glasgefäß bersten lassen. \- Backbleche, Gerichte und Alufolie nicht direkt auf den Boden des Backofens stellen. Der Hitzestau kann den Boden des Backofens beschädigen. \- Zur Reinigung der Backofen-Glastür keine aggressiven scheuernden Reiniger oder scharfen Metallschaber verwenden, da diese die Oberfläche zerkratzen und so das Glas springen lassen können. \- Zur Reinigung des Gerätes keine Dampfreiniger verwenden; andernfalls besteht Stromschlaggefahr. \- (Variiert je nach Produktmodell.) Rost und Backblech richtig einsetzen Es ist wichtig, dass Rost und/oder Blech richtig in den Einschüben sitzen. Schieben Sie Rost oder Blech zwischen zwei Schienen ein, vergewissern Sie sich, dass insbesondere der Rost gerade sitzt, bevor Sie Lebensmittel darauf legen; bitte schauen Sie sich die folgende Abbildung an. text_image
A B A=B A - Produkt nicht verwenden, falls das Glas der Fronttür entfernt oder gesprungen ist. - Griff der Ofentüre nicht zum Trocknen von Geschirrtüchern verwenden. Keine Geschirrtücher, Handschuhe oder vergleichbare Textilprodukte aufhängen, wenn die Grillfunktion bei geöffneter Tür arbeitet. - Beim Hineingeben oder Herausnehmen von Gerichten in den/aus dem heißen Ofen immer hitzebeständige Handschuhe verwenden. - Legen Sie das Backpapier mit den Lebensmitteln in einem Kochtopf oder auf einem Ofenzubehör (Backblech, Rost etc.) aus und geben Sie alles zusammen in den vorgeheizten Ofen. Entfernen Sie überschüssige Bereiche des Backpapiers, die über das Zubehör oder den Topf hinausragen, damit es keine Heizelemente des Ofens berührt. Verwenden Sie Backpapier niemals bei einer Betriebstemperatur, welche die für das Backpapier angegebenen Werte übersteigen. Legen Sie Backpapier nicht direkt auf dem Boden des Ofens aus. - WARNUNG: Zur Vermeidung von Stromschlaggefahr vor dem Auswechseln der Lampe sicherstellen, dass das Gerät abgeschaltet ist. - Damit es nicht zu Überhitzung kommt, darf das Gerät nicht hinter Zierklappen/Ziertüren aufgestellt werdenBrandschutzvorkehrungen des Produktes:
- Sicherstellen, dass die elektrische Verbindung richtig in die Steckdose eingesteckt ist und keine Funken erzeugt. - Keine beschädigten oder abgeschnittenen Kabel bzw. Verlängerungskabel verwenden; nur das Originalkabel einsetzen. - Beim Anschließen des Produktes sicherstellen, dass sich keine Flüssigkeit oder Feuchtigkeit an der elektrischen Verbindung befindet.Bestimmungsgemäße Verwendung
- Dieses Gerät wurde für den reinen Hausgebrauch entwickelt. Eine gewerbliche Nutzung ist nicht zulässig. - Dieses Gerät dient ausschließlich der Zubereitung von Speisen. Es darf nicht zu anderen Zwecken eingesetzt werden. - Benutzen Sie das Gerät nicht zum Vorwärmen von Tellern, hängen Sie keine Küchentücher, Handtücher und dergleichen zum Trocknen oder Anwärmen an die Griffe. - Der Hersteller haftet nicht für Schäden, die durch unsachgemäßen Gebrauch oder falsche Bedienung verursacht werden. - Das Gerät ist zum Garen, Auftauen, Backen, Braten und Grillen von Lebensmitteln geeignet.Sicherheit von Kindern
- WARNUNG: Verschiedene Teile des Gerätes werden während des Gebrauchs heiß. Daher kleine Kinder vom Gerät fernhalten. - Verpackungsmaterialien können eine Gefahr für Kinder darstellen. Sämtliche Verpackungsmaterialien an einem sicheren Ort und außerhalb der Reichweite von Kindern aufbewahren. - Elektrische Produkte können eine Gefahr für Kinder darstellen. Kinder im Betrieb daher unbedingt vom Gerät fernhalten. Kinder nicht mit dem Gerät spielen lassen. - Keine Gegenstände auf das Gerät stellen, die Kinder erreichen können. - Wenn die Ofentür geöffnet ist, keine schweren Gegenstände darauf ablegen und keine Kinder darauf sitzen lassen. Das Gerät kann kippen oder die Ofentür oder die Türscharniere können beschädigt werden.Altgeräte entsorgen
Erfüllung von WEEE-Vorgaben zur Entsorgung von Altgeräten:
 Dieses Produkt erfüllt die Vorgaben der EU-WEEE-Direktive (2012/19/EU). Das Produkt wurde mit einem Klassifizierungssymbol für elektrische und elektronische Altgeräte (WEEE) gekennzeichnet. Dieses Gerät wurde aus hochwertigen Materialien hergestellt, die wiederverwendet und recycelt werden können. Entsorgen Sie das Gerät am Ende seiner Einsatzzeit nicht mit dem regulären Hausmüll; geben Sie es stattdessen bei einer Sammelstelle zur Wiederverwertung von elektrischen und elektronischen Altgeräten ab. Ihre Stadtverwaltung informiert Sie gerne über geeignete Sammelstellen in Ihrer Nähe.Einhaltung von RoHS-Vorgaben:
Das von Ihnen erworbene Produkt erfüllt die Vorgaben der EU-RoHS Direktive (2011/65/EU). Es enthält keine in der Direktive angegebenen gefährlichen und unzulässigen Materialien.Verpackungsmaterialien entsorgen
• Die Verpackung des Gerätes besteht aus wiederverwertbaren Materialien. Entsorgen Sie diese vorschriftsgemäß und entsprechend sortiert. Entsorgen Sie solche Materialien nicht mit dem normalen Hausmüll.2 Allgemeine Informationen
Geräteübersicht text_image
Labeled diagram of an oven with numbered parts for identificationtext_image
7 6 8 9text_image
P o 1 2 3 4Lieferumfang
 Je nach Modell wird eventuell unterschiedliches Zubehör mitgeliefert. Daher kann es vorkommen, dass nicht sämtliches in der Anleitung erwähntes Zubehör mit Ihrem Gerät geliefert wird.1. Bedienungsanleitung
2. Backblech
Für Backwaren, Tiefkühlgerichte und große Braten. natural_image
Exterior view of a square baking tray with no text or symbols3. Gitterrost
Zum Rösten und Grillen und als Unterlage für Behälter, in denen unterschiedlichste Lebensmittel gegart werden können. natural_image
Line drawing of a rectangular metal grate or rack structure (no text or symbols)natural_image
Line drawing of a rectangular metal grate with slats and a handle (no text or symbols)4. Gitterrost und Backblech richtig in die Teleskopeinschübe einschieben (Dieses Merkmal ist optional. Es ist bei Ihrem Modell möglicherweise nicht vorhanden.)
Durch die Teleskopeinschübe lassen sich Bleche und Rost besonders leicht einlegen und entfernen. Achten Sie beim Einsatz von Backblech und Gitterrost mit den Teleskopeinschüben darauf, dass die Stifte am rückwärtigen Teil des Teleskopeinschubs die Kanten von Backblech und Gitterrost berühren. natural_image
Close-up of a mechanical component with grid lines and a circular inset (no visible text or symbols)natural_image
Close-up of a metal hinge with a magnified inset showing a finger detail (no text or symbols visible)| Spannung/Frequenz | 220-240 V ~ 50/60 Hz |
| Leistungsaufnahme gesamt | 2.4 kW |
| Sicherung | 16 A |
| Kabeltyp/Kabelquerschnitt | MinimumH05VV-FG 3 × 1,5 mm^2 |
| Außenabmessungen (Höhe/Breite/Tiefe) | 595 mm/594 mm/567 mm |
| Einbaumaße (Höhe/Breite/Tiefe) | **590 oder 600 mm/560 mm/Minimum 550 mm |
| Hauptofen | Multifunktionsofen |
| Garraumleuchte | 15/25 W |
| Leistungsaufnahme Grill | 2.2 kW |
Allgemeine Hinweise: Energieangaben von Elektroöfen werden gemäß des Standards EN 60350-1 / IEC 60350-1 ermittelt. Die entsprechenden Werte werden unter üblichen Einsatzbedingungen bei Ober-/Unterhitze oder im Umluftbetrieb (sofern vorhanden) ermittelt.
Die Energieeffizienzklasse wird gemäß Funktion ermittelt: je nachdem, ob das Gerät mit den entsprechenden Funktionen ausgestattet ist. 1. Garen mit Eco-Umluft, 2. Turbo-Niedertemperaturgaren, 3. Turbogaren, 4. Ober-/Unterhitze mit Umluft, 5. Ober-/Unterhitze \*\* Siehe Installation, Seite 12.  Im Zuge der Qualitätsverbesserung können sich technische Daten ohne Vorankündigung ändern.  Die Abbildungen in dieser Anleitung dienen lediglich der Veranschaulichung und können etwas vom tatsächlichen Aussehen des Gerätes abweichen.  Angaben am Produkt oder in der begleitenden Dokumentation wurden unter Laborbedingungen unter Berücksichtigung der zutreffenden Richtlinien ermittelt. Solche Werte können je nach Einsatzumgebung und Nutzungsweise des Gerätes abweichen.3 Installation
Gerät vom nächstgelegenen autorisierten Kundendienst gemäß gültigen Bestimmungen installieren lassen. Andernfalls erlischt die Garantie. Der Hersteller haftet nicht für Schäden, die durch Aktivitäten nicht autorisierter Personen entstehen; zudem kann dadurch die Garantie erlöschen.  Die Vorbereitung des Aufstellungsortes und der elektrischen Anschlüsse sind Sache des Kunden. GEFAHR:
Die Installation des Gerätes muss in Übereinstimmung mit sämtlichen zutreffenden Vorschriften zur Elektroinstallation erfolgen. GEFAHR:
Gerät vor der Installation auf eventuelle, sichtbare Defekte untersuchen. Falls Defekte vorliegen, darf das Gerät nicht installiert werden. Beschädigte Geräte müssen grundsätzlich als Sicherheitsrisiko betrachtet werden.Vor der Installation
Das Gerät ist für den Einbau in handelsübliche Küchenmöbel vorgesehen. Zwischen Gerät und angrenzenden Küchenwänden und -möbeln muss ein Sicherheitsabstand verbleiben. Siehe Abbildung auf der nächsten Seite (Angaben in mm). - Oberflächen, Kunststoffbeläge und verwendete Kleber müssen hitzebeständig sein (bis mindestens 100 °C). - Küchenmöbel müssen waagerecht ausgerichtet und fixiert sein. - Befindet sich unter dem Backofen eine Schublade, muss zwischen Backofen und Schublade ein Trennboden eingesetzt werden. - Tragen Sie das Gerät grundsätzlich mit mindestens zwei Personen.  Stellen Sie das Gerät nicht neben Kühl- oder Gefriergeräten auf. Die Wärmeabgabe des Gerätes führt zu steigendem Energieverbrauch der Kühlgeräte.  Missbrauchen Sie die Tür/den Türgriff nicht zum Anheben oder Bewegen des Gerätes.  Bei Geräten mit Drahtgriffen schieben Sie die Griffe nach dem Transport des Gerätes wieder in die Seitenwände zurück.  \* Minimum text_image
500 35 560 590 30 35 500 550* 555 570 595 547 20 594Einbauen und Anschließen
• Die Installation des Gerätes muss in Übereinstimmung mit sämtlichen zutreffenden Vorschriften zur Gas- und Elektroinstallation erfolgen.Elektrischer Anschluss
Schließen Sie das Gerät an eine geerdete Schutzkontaktsteckdose/Leitung an, die mit einem Miniatur-Leistungstrennschalter passender Kapazität gemäß der „Technische Daten“-Tabelle abgesichert wird. Lassen Sie durch einen qualifizierten Elektriker eine Erdung vornehmen, egal ob Sie das Produkt mit oder ohne Transformator verwenden. Der Hersteller haftet nicht bei Schäden, die durch den Einsatz des Gerätes ohne vorschriftsmäßige Erdung entstehen. GEFAHR:
Das Gerät darf nur von einer autorisierten Fachkraft an das Stromnetz angeschlossen werden. Der Hersteller haftet nicht für Schäden, die durch Aktivitäten nicht autorisierter Dritter entstehen. GEFAHR:
Das Netzkabel darf nicht eingeklemmt, geknickt oder gequetscht werden und darf nicht mit heißen Geräteteilen in Berührung kommen. Beschädigte Netzkabel müssen durch einen zugelassenen Elektriker ausgetauscht werden. Andernfalls kann es zu Stromschlägen, Kurzschlüssen und Bränden kommen! - Der Anschluss muss gemäß nationalen Richtlinien erfolgen. • Die Netzanschlussdaten müssen mit den Daten auf dem Typenschild des Gerätes übereinstimmen. Das Typenschild finden Sie nach Öffnen der Ofentür an der Unterseite des Gerätes. - Verwenden Sie nur Netzkabel, die den Angaben im Abschnitt „Technische Daten“ entsprechen. GEFAHR:
Trennen Sie das Gerät vollständig von der Stromversorgung, bevor Sie mit der Elektroinstallation beginnen. Es besteht Stromschlaggefahr!Netzkabel anschließen
 Beim Ausführen der Elektroinstallation müssen die nationalen/lokalen Elektroinstallationsregeln eingehalten und muss eine korrekte Steckdose und ein passender Stecker für den Ofen verwendet werden. Falls die Anschlusswerte des Geräts zu hoch für den Steckeranschluss sind, muss es ohne Steckverbindung mit direktem Kabelanschluss fest installiert werden. 1. Falls der Netzanschluss nicht vollständig getrennt werden kann, muss ein Trennschalter (Sicherung, Netzschalter oder dergleichen) mit mindestens 3 mm Kontaktabstand zwischengeschaltet werden. Die einschlägigen Installationsvorschriften (in Deutschland VDE 0100) sind dabei einzuhalten. Bei Nichtbeachtung kann es zu Betriebsstörungen und zum Erlöschen der Garantie kommen. Wir empfehlen eine zusätzliche Absicherung mit einem Fehlerstromschutzschalter (FI-Schutzschalter).Netzanschluss am Gerät :
text_image
ANSCHLUSSBLOCK BLAU L N BRAUN GRON/GELB NETZKABEL2. Bei Einphasenanschluss erfolgt der Anschluss der Kabel wie folgt:
• Braunes/Schwarzes Kabel = L (Phase) • Blaues/graues Kabel = N (Nullleiter) • Grünes/gelbes Kabel = (E) ⏻ (Erde) » oder • Graues/Schwarzes Kabel = L (Phase) • Blaues/braunes Kabel = N (Nullleiter) • Grünes/gelbes Kabel = (E) ⏻ (Erde)Gerät installieren
1. Schieben Sie den Backofen in die vorgesehene Nische/Küchenschrank, richten Sie ihn richtig aus und fixieren Sie ihn – achten Sie dabei unbedingt darauf, dass das Netzkabel nicht beschädigt oder eingeklemmt wird. natural_image
Isometric line drawing of a microwave oven with internal grating and ventilation slots (no text or labels)text_image
1 2 3Endkontrolle
1. Betrieb des Geräts. 2. Prüfen Sie die Funktion.Transport
- Bewahren Sie den Originalkarton auf, falls Sie das Gerät künftig transportieren müssen. Halten Sie sich an die Hinweise auf dem Karton. Falls Sie den Originalkarton nicht mehr besitzen sollten, verpacken Sie das Gerät in Luftpolsterfolie oder starken Karton, anschließend gut mit Klebeband sichern. - Damit Gitterroste und Bleche nicht zu Beschädigungen der Ofentür führen, schützen Sie die Ofentür von innen mit einem passenden Stück Karton. Fixieren Sie die Ofentür mit Klebeband. - Verwenden Sie die Tür/den Türgriff nicht zum Anheben oder Bewegen des Gerätes.  Legen Sie keine Gegenstände auf dem Gerät ab, bewegen Sie das Gerät grundsätzlich in aufrechter Position.  Überprüfen Sie das Gerät nach dem Transport genau, überzeugen Sie sich davon, dass es nicht zu Beschädigungen gekommen ist.4 Vorbereitungen
Tipps zum Energiesparen
Mit den folgenden Hinweisen nutzen Sie Ihr Gerät umweltbewusst und energiesparend: - Verwenden Sie am besten dunkles oder emailliertes Kochgeschirr – dies leitet die Wärme besser. - Lassen Sie den Backofen vorheizen, wenn dies durch Bedienungs- oder Zubereitungsanleitung empfohlen wird. - Verzichten Sie bei der Zubereitung auf häufiges Öffnen der Backofentür. - Bereiten Sie mehrere Gerichte gleichzeitig zu, sofern dies möglich ist. Dazu stellen Sie einfach mehrere Behälter auf den Gitterrost. - Größere Gerichte und solche, deren Geschmack sich nicht gegenseitig beeinflussen soll, bereiten Sie nacheinander zu. Der Backofen ist dann bereits vorgeheizt. - Sie können zusätzliche Energie sparen, indem Sie den Backofen ein paar Minuten vor Ende der Garzeit bereits abschalten. Verzichten Sie während der Zubereitung möglichst auf ein Öffnen der Backofentür. • Tauen Sie gefrorene Gerichte vor der Zubereitung auf.Erste Inbetriebnahme Erstreinigung des Gerätes
 Durch bestimmte Reinigungsmittel können die Oberflächen des Gerätes beschädigt werden. Verwenden Sie keine aggressiven Reinigungsmittel, keine Scheuermittel und keine scharfen oder spitzen Gegenstände bei der Reinigung. 1. Entfernen Sie sämtliches Verpackungsmaterial. 2. Geräteoberflächen mit einem feuchten Tuch oder Schwamm abwischen und mit einem Tuch trocknen.Erstaufheizung
Lassen Sie das Gerät etwa 30 Minuten lang aufheizen, schalten Sie es anschließend ab. Auf diese Weise werden sämtliche Rückstände und Beschichtungen durch Abbrennen entfernt. WARNUNG
Verbrennungsgefahr durch heiße Flächen! Das Gerät kann sich im Betrieb stark aufheizen. Berühren Sie niemals heiße Brenner, das Innere des Backofens, Heizelemente und so weiter. Halten Sie Kinder fern. Tragen Sie grundsätzlich hitzebeständige Schutzhandschuhe, wenn Sie etwas in den Backofen stellen oder herausnehmen.Elektroofen
1. Nehmen Sie sämtliches Zubehör (z. B. Backbleche und Gitterrost) aus dem Backofen heraus. 2. Schließen Sie die Backofentür. 3. Wählen Sie die Einstellung „Ober- und Unterhitze“. 4. Wählen Sie die höchste Ofentemperatur; Siehe "So bedienen Sie den Backofen, Seite 18". 5. Lassen Sie den Backofen etwa 30 Minuten lang arbeiten. 6. Schalten Sie den Backofen ab; Siehe "So bedienen Sie den Backofen, Seite 18"Grill
1. Nehmen Sie sämtliches Zubehör (z. B. Backbleche und Gitterrost) aus dem Backofen heraus. 2. Schließen Sie die Backofentür. 3. Wählen Sie die höchste Temperatureinstellung; Siehe "So bedienen Sie den Grill, Seite 21". 4. Lassen Sie den Grill etwa 30 Minuten lang arbeiten. 5. Schalten Sie den Grill ab; Siehe" So bedienen Sie den Grill, Seite 21"  Bei der ersten Inbetriebnahme kann es über mehrere Stunden zu Rauch- und Geruchsentwicklung kommen. Dies ist völlig normal. Lüften Sie den Raum gut durch, damit Rauch und Gerüche schnell abziehen können. Atmen Sie die Dämpfe möglichst nicht ein.5 Bedienung des Backofens
Allgemeine Hinweise zum Backen, Braten und Grillen
WARNUNG
Verbrennungsgefahr durch heiße Flächen! Das Gerät kann sich im Betrieb stark aufheizen. Berühren Sie niemals heiße Brenner, das Innere des Backofens, Heizelemente und so weiter. Halten Sie Kinder fern. Tragen Sie grundsätzlich hitzebeständige Schutzhandschuhe, wenn Sie etwas in den Backofen stellen oder herausnehmen. GEFAHR:
Öffnen Sie die Backofentür vorsichtig: Heißer Dampf kann austreten. Der austretende Dampf kann zu Verbrühungen von Händen, Gesicht und Augen führen.Tipps zum Backen
- Benutzen Sie Metallgeschirr mit Antihaftbeschichtung oder hitzebeständige Silikonformen. - Nutzen Sie den Platz auf dem Gitterrost gut aus. - Stellen Sie Backformen in die Mitte des Gitterrostes. - Wählen Sie die richtige Einschubposition, bevor Sie Backofen oder Grill einschalten. Wechseln Sie die Einschubposition nicht, solange der Backofen heiß ist. • Halten Sie die Backofentür geschlossen.Tipps zum Rösten
- Eine Würzmischung aus Zitronensaft und schwarzem Pfeffer sorgt für eine besonders schmackhafte Zubereitung von ganzen Hühnern, Puten und größeren Fleischportionen. - Fleisch mit Knochen braucht etwa 15 – 30 Minuten länger zum Garen als dieselbe Menge Fleisch ohne Knochen. - Jeder Zentimeter an Fleischdicke braucht etwa 4 – 5 Minuten mehr an Garzeit. - Lassen Sie Fleisch nach Ablauf der Garzeit noch etwa 10 Minuten im Backofen ruhen. Der Fleischsaft verteilt sich so gleichmäßiger im Braten und läuft beim Anschneiden nicht aus. - Fisch stellen Sie auf einem hitzebeständigem Teller möglichst in der mittleren oder unteren Einschubposition in den Backofen.Tipps zum Grillen
Fleisch, Geflügel und Fisch werden durch das Grillen schnell braun, bekommen eine schöne Kruste und trocknen dabei nicht aus. Insbesondere flache Stücke, Fleischspieße und Würstchen sowie Gemüse mit hohem Wasseranteil (wie Tomaten oder Zwiebeln) sind zum Grillen gut geeignet. - Verteilen Sie das Grillgut so auf dem Gitterrost, dass es nicht über die Kanten des Gitterrostes hinausragt. - Schieben Sie den Gitterrost (mit darunter eingeschobener Tropfschale) in die richtige Einschubposition. Vergessen Sie nicht, die Tropfschale beim Grillen in den untersten Einschub einzuschieben, damit das Fett aufgefangen wird. Geben Sie etwas Wasser in die Tropfschale – so wird die Reinigung einfacher.  Lebensmittel, die nicht zum Grillen geeignet sind, können sich im schlimmsten Fall entzünden. Grillen Sie nur Lebensmittel, die bei der starken Hitze beim Grillen keinen Schaden nehmen. Platzieren Sie das Grillgut nicht nahe der Backofenrückwand. Dort wird es besonders heiß, fettes Grillgut kann in Brand geraten.So bedienen Sie den Backofen Temperatur und Betriebsart einstellen
text_image
1 2Backofen ausschalten
Bringen Sie den Ofentimer in die Aus-Position.  Wenn der Timer auf eine bestimmte Zeit eingestellt ist, schaltet er sich automatisch ab; siehe Ofenuhr verwenden, Seite 20 Bringen Sie Funktions- und Temperatureinstellungsknopf in die obere Position (Aus).Einschubpositionen (bei Modellen mit Grillrost)
Es ist wichtig, dass der Grillrost richtig in die Einschübe eingesetzt wird. Setzen Sie den Grillrost wie in der Abbildung gezeigt in den Einschub ein. Achten Sie darauf, dass der Grillrost nicht die Rückwand des Ofens berührt. Schieben Sie den Rost daher nur so weit ein, bis sich die Backofentür problemlos schließen lässt – so funktioniert der Grill am besten. text_image
1 2 3 4 5Betriebsarten
Die hier gezeigte Reihenfolge der Betriebsarten kann je nach Gerätemodell etwas abweichen.Ober- und Unterhitze
 Ober- und Unterhitze werden eingesetzt. Das Gargut wird gleichzeitig von oben und unten erhitzt. Diese Betriebsart eignet sich beispielsweise für Kuchen, Gebäck und Aufläufe. Nur ein Blech verwenden.Unterhitze
 Bei dieser Betriebsart wird lediglich das untere Heizelement eingesetzt. Geeignet z. B. für Pizza und zum Nachbräunen von unten.  Diese Funktion muss auch zur einfachen Dampfreinigung verwendet werden.Umluft
 Bei dieser Betriebsart werden Oberhitze, Unterhitze und der Lüfter (in der Rückwand) eingesetzt. Durch den Lüfter wird heiße Luft schnell gleichmäßig im Backofen verteilt. Nur ein Blech verwenden.Grill, groß
 Der große Grill an der Oberseite des Backofens ist in Betrieb. Diese Betriebsart eignet sich insbesondere zum Grillen größerer Fleischmengen. - Stellen Sie mittelgroße bis große Portionen auf dem richtigen Einschub direkt unter das Grillelement. • Stellen Sie die maximale Temperatur ein. • Wenden Sie das Grillgut nach der Hälfte der Garzeit.Grill + Umluft
 Der Grilleffekt ist nicht so stark wie bei Flächengrill - Kleine oder mittelgroße Portionen in der richtigen Einschubposition unter dem Grill-Heizkörper grillen. - Stellen Sie die gewünschte Temperatur ein. • Wenden Sie das Grillgut nach der Hälfte der Garzeit.Schnellheizen
 Diese Funktion dient dazu, den Backofen schnell aufzuheizen; sie eignet sich nicht zum Garen von Speisen. - Stellen Sie nach der Auswahl dieser Funktion die gewünschte Temperatur ein. Die Temperaturleuchte schaltet sich ein, der Backofen wird aufgeheizt. - Nach dem Aufheizen schaltet sich die Leuchte aus. Dann stellen Sie die gewünschte Funktion zum Garen ein. Ofenuhr verwenden text_image
10 20 30 40 50 60 70 80 90 100Ofen vor der eingestellten Zeit ausschalten
1. Drehen Sie den Zeitknopf soweit wie möglich gegen den Uhrzeigersinn. 2. Schalten Sie den Ofen mit dem Temperaturknopf und Funktionswähler ab. Garzeitentabelle  Die Zeitangaben in dieser Tabelle sollen als Richtwerte dienen. Zeitangaben können aufgrund von Temperatur, Dicke, Typ der Lebensmittel und Ihren eigenen Vorlieben abweichen. Backen und Braten  Der erste Einschub ist der untere Einschub.| Gericht | Backblechanzahl (Anzahl Einschübe) | Funktion | Einschubposition | Temperatur (°C) | Garzeit (ca.- Angabe in Min.) |
| **Kuchenblech | Ein Blech | 3 | 175 | 25 ... 30 | |
| **Kuchen, Form | Ein Blech | 2 | 175 | 40 ... 50 | |
| **Kuchen in Backpapier | Ein Blech | 3 | 175 | 25 ... 30 | |
| **Biskuitkuchen | Ein Blech | 3 | 200 | 5 ... 10 | |
| **Kekse | Ein Blech | 3 | 175 | 25 ... 30 | |
| **Teiggeback | Ein Blech | 2 | 200 | 30 ... 40 | |
| **Teilchen | Ein Blech | 2 | 200 | 25 ... 35 | |
| **Sauerteig | Ein Blech | 2 | 200 | 35 ... 45 | |
| **Lasagne | Ein Blech | 2 - 3 | 200 | 30 ... 40 | |
| **Pizza | Ein Blech | 2 | 200 ... 220 | 15 ... 20 | |
| Rindersteak (ganz)/Braten | Ein Blech | 3 | 25 Min. bei 250 max., dann 180 ... 190 | 100 ... 120 | |
| Lammkeule (Auflauf) | Ein Blech | 3 | 25 Min. bei 220, dann 180 ... 190 | 70 ... 90 | |
| Brathähnchen | Ein Blech | 2 | 15 Min. bei 250 max., dann 180 ... 190 | 55 ... 65 | |
| Pute (5,5 kg) | Ein Blech | 1 | 25 Min. bei 250 max., dann 180 ... 190 | 150 ... 210 | |
| Fisch | Ein Blech | 3 | 200 | 20 ... 30 |
Tipps zum Kuchenbacken
\- Falls Gebäck zu trocken wird, erhöhen Sie die Temperatur etwas und vermindern gleichzeitig die Garzeit. - Werden Kuchen zu feucht, reduzieren Sie die Flüssigkeiten oder senken die Temperatur um 10 °C. - Sofern die Oberseite des Kuchens zu stark gebräunt wird, backen Sie etwas länger mit reduzierter Temperatur. - Wenn der Kuchen außen gut gelingt, innen jedoch noch klebrig ist, geben Sie weniger Flüssigkeit hinzu, senken die Temperatur und verlängern dafür die Garzeit etwas.Tipps für Gebäck
- Falls Gebäck zu trocken wird, erhöhen Sie die Temperatur etwas und vermindern gleichzeitig die Garzeit. Befeuchten Sie den Teig mit einer Mischung aus Milch, Öl, Ei und Joghurt. - Sollte Gebäck sehr lange zum Garen benötigen, achten Sie darauf, dass das Gebäck nicht über die Oberkante des Backblechs hinausragt. - Wird Gebäck an der Oberseite gut gebräunt, innen jedoch nicht richtig gar, achten Sie darauf, dass sich Flüssigkeiten nicht am Boden des Gebäcks konzentrieren. Versuchen Sie, Flüssigkeitsmischungen gleichmäßig zwischen den Teigschichten zu verteilen; so erreichen Sie eine gleichmäßige Bräunung.  Halten Sie sich beim Backen an die Betriebsart- und Temperaturempfehlungen der Zubereitungstabelle. Falls die Unterseite nicht ausreichend gebräunt wird, nutzen Sie beim nächsten Mal den nächstniedrigeren Einschub.Tipps zur Zubereitung von Gemüse
\- Falls Gemüsegerichte zu trocken werden, bereiten Sie diese in einem Geschirr mit Deckel statt auf dem Blech zu. Geschlossene Behälter sorgen dafür, dass nicht zu viel Flüssigkeit verloren wird. Elektrischer Grill| Speise | Einschubebene | Grilldauer (ca.) |
| Fisch | 4...5 | 20...25 Min. # |
| Hühnerklein | 4...5 | 25...35 Min. |
| Lammkoteletts | 4...5 | 20...25 Min. |
| Rinderbraten | 4...5 | 25...30 Min. # |
| Kalbskoteletts | 4...5 | 25...30 Min. # |
| Toastbrot | 4 | 1...2 min. |
| # je nach Dicke | ||
So bedienen Sie den Grill
WARNUNG
Backofentür beim Grillen geschlossen halten. Verbrennungsgefahr durch heiße Flächen! \- Drehen Sie den Zeitknopf während des Grillens gegen den Uhrzeigersinn auf das Handsymbol.Grill einschalten
1. Drehen Sie den Funktionswähler auf das gewünschte Grillsymbol. 2. Wählen Sie dann die gewünschte Grilltemperatur. 3. Heizen Sie den Grill bei Bedarf etwa 5 Minuten vor. » Die Temperaturleuchte schaltet sich ein.Grill ausschalten
1. Drehen Sie den Funktionswähler in die Aus-Position (oben).  Lebensmittel, die nicht zum Grillen geeignet sind, können sich im schlimmsten Fall entzünden. Grillen Sie nur Lebensmittel, die bei der starken Hitze beim Grillen keinen Schaden nehmen. Platzieren Sie das Grillgut nicht nahe der Backofenrückwand. Dort wird es besonders heiß, fettes Grillgut kann in Brand geraten.Garzeitentabelle zum Grillen
6 Reinigung und Wartung
Allgemeine Hinweise
Durch regelmäßiges Reinigen verlängern Sie die Lebenserwartung Ihres Gerätes und beugen Fehlfunktionen vor. GEFAHR:
Trennen Sie das Gerät von der Stromversorgung, bevor Sie es reinigen. Es besteht Stromschlaggefahr! GEFAHR:
Lassen Sie das Gerät vor dem Reinigen gründlich abkühlen. Verbrennungsgefahr durch heiße Flächen! - Reinigen Sie das Gerät nach jedem Gebrauch gründlich. Dadurch lassen sich Speisereste leichter entfernen und können beim nächsten Einsatz des Gerätes nicht einbrennen. - Zur Reinigung benötigen Sie keine Spezialreiniger. Verwenden Sie am besten warmes Wasser mit etwas herkömmlichem Reiniger, ein weiches Tuch oder einen Schwamm. Anschließend mit einem Tuch trocknen. - Achten Sie stets darauf, überschüssige und verschüttete Flüssigkeiten nach der Reinigung gründlich ab- bzw. aufzuwischen. - Wenn Sie Edelstahl und Griffe reinigen verzichten Sie auf Reinigungsmittel, die Säuren oder Chlor enthalten. Reinigen Sie diese Teile mit einem weichen Tuch und etwas Flüssigreiniger (kein Scheuermittel); wischen Sie dabei am besten nur in eine Richtung.  Durch bestimmte Reinigungsmittel können die Oberflächen des Gerätes beschädigt werden. Verwenden Sie keine aggressiven Reinigungsmittel, keine Scheuermittel und keine scharfen oder spitzen Gegenstände bei der Reinigung.  Nutzen Sie keine Dampfreiniger zur Reinigung des Gerätes – es besteht Stromschlaggefahr.Bedienfeld reinigen
Reinigen Sie Bedienfeld und Knöpfe mit einem feuchten Tuch; anschließend trocken reiben.  Ziehen Sie die Knöpfe zum Reinigen des Bedienfelds nicht ab. Das Bedienfeld kann beschädigt werden!Backofen reinigen
So reinigen Sie die Seitenwand (Dieses Merkmal ist optional. Es ist bei Ihrem Modell möglicherweise nicht vorhanden.) 1. Lösen Sie den vorderen Bereich der seitlichen Halterungen, indem Sie diese von der Seitenwand wegziehen. 2. Ziehen Sie die seitliche Halterung komplett zu sich hin heraus. text_image
Technical diagram showing two labeled components (1 and 2) of a mechanical or electrical assembly with internal wiring and structural elements.Katalytische Seitenwände
(Dieses Merkmal ist optional. Es ist bei Ihrem Modell möglicherweise nicht vorhanden.) Seitenwände (A) und/oder Rückwand (B) Ihres Produktes können mit katalytischer Emaille beschichtet sein. Die katalystischen Wände haben eine helle matte Farbe und eine poräse Oberfläche. Die katalytischen Seitenwände des Backofens sollten nicht gereinigt werden. Die poröse Oberfläche der katalytischen Wände reinigt sich durch Absorbierung und Umwandlung von Rückständen (Dampf und Kohlendioxid) von selbst. natural_image
Close-up of a grid-patterned panel with horizontal lines and a circular marker labeled 'A' (no readable text or symbols beyond the label)natural_image
Top-down view of a device casing with hexagonal grid pattern and labeled point B (no text or symbols beyond label)SimpleSteam Reinigung
Diese Funktion gewährleistet eine einfache Reinigung, da Schmutz (der durch langes Warten eingetrocknet ist) mit dem im Inneren des Backofens entstehenden Dampf und den an den Innenflächen des Backofens kondensierenden Wassertropfen aufgeweicht wird. 1. Entfernen Sie sämtliches Zubehör aus dem Garraum. 2. Gießen Sie 500 ml Wasser in das Blech und platzieren Sie es im 2. Einschub des Ofens. natural_image
Illustration of a laptop with a glass resting on it, surrounded by decorative wings (no text or symbols)Backofentür reinigen
Verwenden Sie zum Reinigen der Backofentür am besten warmes Wasser mit etwas herkömmlichem Reiniger, ein weiches Tuch oder einen Schwamm. Anschließend mit einem Tuch trocknen.  Verzichten Sie bei der Reinigung der Backofentür auf aggressive Reinigungsmittel und auf scharfkantige Schaber aus Metall. Solche Hilfsmittel können die Oberflächen zerkratzen und das Glas beschädigen.Backofentür ausbauen
1. Öffnen Sie die Backofentür (1). 2. Öffnen Sie die Clips am Scharniergehäuse links und rechts der Backofentür, indem Sie diese wie in der Abbildung gezeigt nach unten drücken. text_image
1 2 3natural_image
Technical diagram of a mechanical joint or bracket with a directional arrow indicating rotation (no text or symbols present)text_image
1 2 3Türinnenscheibe ausbauen
(Dieses Merkmal ist optional. Es ist bei Ihrem Modell möglicherweise nicht vorhanden.)
Die Türinnenscheibe kann zur Reinigung ausgebaut werden. Öffnen Sie die Backofentür. natural_image
Close-up of a mechanical component with labeled parts 1 and 2 (no text or symbols beyond labels)text_image
1 2 3 1 2natural_image
3D diagram of a mechanical component with labeled parts A and B, showing internal structure and directional arrows (no text or symbols beyond labels)Beleuchtung des Backofens auswechseln
GEFAHR:
Bevor Sie die Beleuchtung des Backofens auswechseln, sorgen Sie dafür, dass das Gerät vollständig von der Stromversorgung getrennt und komplett abgekühlt ist; ansonsten droht Verbrennungs- und Stromschlaggefahr. Verbrennungsgefahr durch heiße Flächen! text_image
Als Leuchtmittel wird eine spezielle Glühlampe eingesetzt, die für Temperaturen bis 300 °C ausgelegt ist. Weitere Hinweise finden Sie in "Technische Daten, Seite 11" Passende Leuchtmittel erhalten Sie beim autorisierten Kundendienst. Die Position der Beleuchtung kann etwas von der Abbildung abweichen. Die in diesem Gerät verwendete Lampe ist nicht zur Raumbeleuchtung geeignet. Der vorgesehene Zweck dieser Lampe besteht darin, dass der Nutzer Lebensmittel besser sehen kann. Die in diesem Gerät verwendeten Lampen müssen extremen physikalischen Bedingungen, wie Temperaturen über 50 °C standhalten.Wenn Ihr Ofen mit einer runden Leuchte ausgestattet ist:
1. Trennen Sie das Gerät vollständig von der Stromversorgung. 2. Schrauben Sie die Glasabdeckung gegen den Uhrzeigersinn ab. natural_image
Close-up of a hand operating a mechanical component with a circular part inserted (no visible text or symbols)natural_image
Mechanical assembly diagrams showing two configurations (A and B) with rotating components and directional arrows, no text or symbols present.7 Problemlösungen
Aus dem Backofen tritt im Betrieb Dampf aus
\- Während des Betriebs ist ein Dampfaustritt normal. >>> Dies ist kein Fehler.Beim Aufheizen und Abkühlen sind metallische Geräusche zu hören.
\- Wenn sich die Temperatur von Metallteilen ändert, dehnen sich diese aus oder ziehen sich zusammen – dabei entstehen Geräusche. >>> Dies ist kein Fehler.Das Gerät funktioniert nicht.
• Die Sicherung ist durchgebrannt oder ausgelöst. >>> Kontrollieren Sie die Sicherungen im Sicherungskasten. Bei Bedarf austauschen oder zurücksetzen. - Das Gerät ist nicht richtig an die (geerdete) Steckdose angeschlossen. >>> Überprüfen Sie die Steckerverbindung.Die Ofenbeleuchtung funktioniert nicht.
• Das Leuchtmittel ist defekt. >>> Tauschen Sie das Leuchtmittel aus. - Die Stromversorgung wurde unterbrochen. >>> Überprüfen Sie die Stromversorgung. Kontrollieren Sie die Sicherungen im Sicherungskasten. Sicherungen bei Bedarf austauschen oder zurücksetzen.Backofen heizt nicht.
- Passende Garfunktion und/oder Temperatur nicht eingestellt. >>> Stellen Sie den Ofen auf die richtige Garfunktion und/oder Temperatur ein. - Bei Modellen mit Timer ist der Timer eventuell nicht richtig eingestellt. >>> Stellen Sie die richtige Zeit ein. (Bei Produkten mit Mikrowellenofen kontrolliert der Timer nur die Mikrowelle.) - Die Stromversorgung wurde unterbrochen. >>> Überprüfen Sie die Stromversorgung. Kontrollieren Sie die Sicherungen im Sicherungskasten. Sicherungen bei Bedarf austauschen oder zurücksetzen.(Bei Modellen mit Timer:) Die Uhrzeitanzeige blinkt oder das Uhrensymbol leuchtet.
\- Es gab einen Stromausfall. >>> Stellen Sie die aktuelle Uhrzeit ein, schalten Sie das Gerät aus und anschließend wieder ein.  Falls sich ein Problem nicht mit den obigen Hinweisen lösen lassen sollte, wenden Sie sich bitte an den autorisierten Kundendienst oder an den Händler, bei dem Sie das Gerät gekauft haben. Versuchen Sie niemals, ein defektes Gerät selbst zu reparieren.Four Encastrables
Manuel de l'utilisateur
Avant de commencer, merci de bien vouloir lire ce manuel d'utilisation!
Chère cliente, cher client, Nous vous remercions d'avoir porté votre choix sur un produit Beko. Nous espérons que vous tirerez le meilleur parti de votre produit, qui a été fabriqué dans des usines de pointe avec des matériaux de qualité. C'est pourquoi nous vous prions de lire attentivement le présent manuel et tous les autres documents connexes dans leur intégralité avant d'utiliser le produit et de les conserver. Si vous cédez l'appareil à une tierce personne, n'oubliez pas de lui fournir le Manuel d'utilisation. Respectez tous les avertissements et informations contenus dans le manuel d'utilisation. Souvenez-vous que ce Manuel d'utilisation s'applique également à plusieurs autres modèles. Les différences entre les modèles seront identifiées dans le manuel.Explication des symboles
Vous trouverez les symboles suivants dans ce Manuel d'utilisation :  Informations importantes ou astuces utiles d'utilisation.  Avertissement de situations dangereuses relatives à la santé et aux biens.  Avertissement de risque de choc électrique.  Avertissement de risque d'incendie.  Avertissement de surfaces brûlantes.1 Instructions importantes et mises en garde relatives à la sécurité et à l'environnement 4
Sécurité générale....4 Sécurité électrique....4 Sécurité du produit 5 Utilisation prévue 7 Sécurité des enfants 8 Mise au rebut de l'ancien appareil ....8 Elimination des emballages 82 Généralités 9
Vue d'ensemble....9 Contenu de l'emballage....10 Caractéristiques techniques....113 Installation 12
Avant l'installation....12 Installation et branchement....14 Déplacement ultérieur....164 Préparation 17
Conseils pour faire des économies d'énergie .....17 Première utilisation.... 17 Premier nettoyage de l'appareil.... 17 Première cuisson 175 Utilisation du four 18
Informations générales concernant la pâtisserie, la rôtisserie et les grillades.... 18 Utilisation du four électrique.... 18 Modes de fonctionnement 19 Utilisation de l'horloge du four....20 Tableau des temps de cuisson.... 20 Utilisation du grill.... 21 Tableau des temps de cuisson pour le grill.... 216 Maintenance et entretien 22
Généralités 22 Nettoyage du bandeau de commande.... 22 Nettoyage du four....22 Retirer la porte du four. 23 Retrait de la vitre de la porte.... 23 Remplacement de l'ampoule du four 247 Recherche et résolution des pannes 25
1 Instructions importantes et mises en garde relatives à la sécurité et à l'environnement
Ce chapitre contient les instructions de sécurité qui vous aideront à éviter les risques de blessure corporelle ou de dégâts matériels. Le non respect de ces instructions entraînera l'annulation de toute garantie.Sécurité générale
- Cet appareil peut être utilisé par des enfants de 8 ans et plus et des personnes aux capacités physiques, sensorielles ou mentales réduites ou des personnes dénuées d'expérience ou de connaissance si elles ont pu bénéficier d'une surveillance ou d'instructions concernant l'utilisation de l'appareil en toute sécurité et comprennent les risques encourus. Les enfants ne doivent pas jouer avec l'appareil. Le nettoyage et l'entretien ne doivent pas être effectués par un enfant sans surveillance. \- Cet appareil n'est pas conçu pour être utilisé par des personnes (y compris les enfants) présentant des aptitudes physiques, sensorielles et mentales réduites, ou sans expérience et sans connaissances, à moins d'avoir été encaadrées ou reçu des consignes d'utilisation. Les enfants bénéficiant d'un encadrement ne doivent pas jouer avec l'appareil. - Si l'appareil est confié à une autre personne pour usage personnel ou vendu en seconde main, assurez-vous qu'il est toujours accompagné du manuel d'utilisation, des étiquettes, de tout autre document pertinent et des pièces. - Les procédures d'installation et de réparation doivent être effectuées par des agents d'entretien qualifiés. Le fabricant ne sera pas responsable des dommages causés à la suite d'une utilisation faite par des personnes non qualifiées, situation susceptible d'annuler aussi la garantie. Avant l'installation, lisez attentivement les instructions. \- Ne faites pas fonctionner l'appareil s'il est défectueux ou présente des dégâts visibles. \- Assurez-vous que les boutons de fonctionnement de l'appareil sont en position d'arrêt après chaque utilisation.Sécurité électrique
\- Si le produit est en panne, ne l'utilisez pas, à moins qu'il ne soit réparé par un Agent d'entretien agréé. Vous risqueriez un choc électrique ! \- Branchez l'appareil uniquement à une sortie/ligne avec mise à la terre ainsi que la tension et la protection spécifiées dans le chapitre « Spécifications techniques ». Faites installer la mise à la terre par un électricien qualifié lorsque vous utilisez l'appareil avec ou sans transformateur Notre entreprise décline sa responsabilité par rapport à tout problème consécutif à la non mise à la terre de l'appareil suivant la réglementation locale en vigueur. \- Ne lavez jamais l'appareil en y versant de l'eau. Vous risqueriez un choc électrique ! \- Débranchez l'appareil pendant les opérations d'installation, d'entretien, de nettoyage et de réparation. \- Si le cordon d'alimentation est endommagé, il doit être remplacé par le fabricant, l'un de ses techniciens ou une personne de qualification similaire afin d'éviter tout risque. \- Installez l'appareil de sorte que l'on puisse le déconnecter complètement du réseau. La séparation doit être effectuée par une prise secteur ou un commutateur intégré à l'installation électrique fixe, suivant la réglementation en matière de construction. - La surface arrière du four devient chaude pendant l'utilisation. Vérifiez que le raccordement de électrique n'est pas en contact avec la surface arrière, cela pourrait endommager les connexions. - Ne pas coincer le câble d'alimentation entre la porte du four et le châssis et ne pas le faire passer sur des surfaces brûlantes. Dans le cas contraire, l'isolation du câble pourrait fondre et provoquer un incendie suite à un court-circuit. - Toutes les opérations sur des équipements et des systèmes électriques ne peuvent être réalisées que par des personnes habilitées et qualifiées. - En cas de dégâts, éteignez l'appareil et débranchez-le du secteur. Pour ce faire, coupez le fusible domestique. - Vérifiez que la tension du fusible est compatible avec l'appareil.Sécurité du produit
\- AVERTISSEMENT : Les parties accessibles de l'appareil deviennent chaudes au cours de son utilisation. Des mesures doivent être prises pour éviter de toucher aux éléments de chauffage. Les enfants de moins de 8 ans doivent être maintenus à l'écart, sauf s'ils sont continuellement surveillés. - Ne jamais utiliser l'appareil sous l'emprise de l'alcool ou de toute autre drogue. - Prenez garde lorsque vous utilisez des boissons alcoolisées dans vos plats. L'alcool s'évapore à températures élevées et peut provoquer un incendie étant donné qu'il peut s'enflammer lorsqu'il entre en contact avec des surfaces chaudes. \- Assurez-vous qu'aucune substance inflammable ne soit placée à proximité de l'appareil étant donné que les côtés peuvent chauffer pendant son utilisation. \- L'appareil chauffe pendant son utilisation. Des mesures doivent être prises pour éviter de toucher aux éléments de chauffage qui se trouvent à l'intérieur du four. \- Évitez d'obstruer les éventuelles sorties d'aération. \- Ne pas faire chauffer de boîtes de conserves et de bocaux en verre clos dans le four. La pression qui s'accumulerait dans la boîte/le bocal pourrait le faire éclater. \- Ne placez pas de plaques de cuisson, de plats ou de feuille d'aluminium directement sur le bas du four. L'accumulation de chaleur pourrait endommager le fond du four. \- N'utilisez pas de nettoyants fortement abrasifs ou de grattoir en métal affûté pour nettoyer la porte vitrée du four car ils peuvent rayer la surface, ce qui peut entraîner fêler la vitre. \- N'utilisez pas de nettoyeurs à vapeur pour le nettoyage de l'appareil, car ceux-ci présentent un risque d'électrocution. \- (Varient en fonction du modèle de four.) Placer correctement la grille et le lèchefrite sur les gradins Faites coulisser la grille ou le lè-chefrite entre 2 glissières de coulissement et vérifiez-en l'équilibre avant de placer des aliments dessus (Observez l'illustration ci-dessous). natural_image
Close-up of a white mesh grid structure with no visible text or symbolstext_image
A B A=Btext_image
A A - Ne pas utiliser l'appareil si la porte en verre est absente ou fendue. - La poignée du four n'est pas un sèche-serviettes. Ne pendez pas de serviettes, gants ou produits textiles similaires lorsque la porte est ouverte avec la fonction gril. - Utilisez toujours des gants de protection thermique lorsque vous placez ou retirez des plats du four chaud. - Placez le papier de cuisson contenant les aliments dans la casse-role ou sur l'accessoire du four (plateau, grille métallique, etc.) et insérez l'ensemble dans le four préchauffé. Retirez le surplus de papier de cuisson qui déborde de l'accessoire ou de la casserole afin d'éviter tout contact avec les éléments chauffants du four. N'utilisez jamais le papier de cuisson à une température de fonctionnement supérieure à la valeur recommandée pour un papier de cuisson. Évitez de placer le papier de cuisson directement sur la base du four. - AVERTISSEMENT : Assurez-vous que votre appareil est déconnecté de l'alimentation électrique avant de procéder au remplacement de l'ampoule. Cette précaution vous évite tout risque de choc électrique. - Pour éviter toute surchauffe, l'appareil ne doit pas être installé derrière une porte décorative. Pour que votre appareil soit fiable: - veillez à ce que la fiche soit bien branchée dans la prise afin que des étincelles ne se produisent pas. - Utilisez uniquement les câbles de rallonge d'origine, et veillez à ce qu'ils ne soient pas coupés ou autrement endommagés. - Assurez-vous également que la prise ne contient pas de liquide ni de moisissure avant de brancher l'appareil.Utilisation prévue
- Cet appareil est conçu pour un usage domestique. L'utilisation commerciale est interdite. - Cet appareil sert uniquement à des fins de cuisson. Il ne doit pas être utilisé à d'autres fins, par exemple le chauffage du local. - Évitez d'utiliser cet appareil pour réchauffer les assiettes sous le grill, accrocher des serviettes et des torchons, etc. sur les poi- gnées, sécher et réchauffer quoi que ce soit. - Le fabricant ne saurait être tenu responsable des dégâts causés par une utilisation ou une manipulation incorrecte. - Le four peut être utilisé pour décongeler, cuire, rôtir et griller des aliments. - Les pièces détachées d'origine sont disponibles pendant 10 ans, à compter de la date d'achat du produit.Sécurité des enfants
- AVERTISSEMENT : Les parties accessibles peuvent s'échauffer pendant l'utilisation. Les enfants doivent être tenus à l'écart. - Les matériaux d'emballage peuvent présenter un danger pour les enfants. Gardez les matériaux d'emballage hors de portée des enfants. Veuillez jeter les pièces de l'emballage en respectant les normes écologiques. - Les appareils électriques sont dangereux pour les enfants. Tenez les enfants à l'écart de l'appareil lorsqu'il fonctionne et inter-disez-leur de jouer avec. - Ne rangez pas d'objets au dessus de l'appareil que les enfants pourraient atteindre. \- Lorsque la porte avant est ouverte, ne posez pas d'objets lourds dessus et ne permettez pas aux enfants de s'y asseoir. Il pourrait basculer ou les charnières de porte être endommagées.Mise au rebut de l'ancien appareil Conformité avec la directive DEEE et mise au rebut des déchets :
 Ce produit est conforme à la directive DEEE (2012/19/UE) de l'Union européenne). Ce produit porte un symbole de classification pour la mise au rebut des équipements électriques et électroniques (DEEE). Le présent produit a été fabriqué avec des pièces et du matériel de qualité supérieure susceptibles d'être réutilisés et adaptés au recyclage. Par conséquent, nous vous conseillons de ne pas le mettre au rebut avec les ordures ménagères et d'autres déchets à la fin de sa durée de vie. Au contraire, rendez-vous dans un point de collecte pour le recyclage de tout matériel électrique et électronique. Veuillez vous rapprocher des autorités de votre localité pour plus d'informations concernant le point de collecte le plus proche.Conformité avec la directive LdSD :
L'appareil que vous avez acheté est conforme à la directive LdSD (2011/65/UE) de l'Union européenne. Il ne comporte pas les matériels dangereux et interdits mentionnés dans la directive.Elimination des emballages
\- Les emballages sont dangereux pour les enfants. Conservez les emballages en lieu sûr à l'écart des enfants. Les emballages de l'appareil sont fabriqués à partir de matériaux recyclés. Eliminez-les de manière appropriée et triez-les en fonction des instructions de recyclage des déchets. Ne les jetez pas avec les déchets domestiques normaux.2 Généralités
Vue d'ensemble
text_image
Labeled diagram of an oven with numbered parts for identificationtext_image
7 6 8 9text_image
P o 1 2 3 4Contenu de l'emballage
 Les accessoires fournis peuvent varier selon le modèle de l'appareil. Tous les accessoires décrits dans le manuel d'utilisation peuvent ne pas faire partie de votre appareil.1. Manuel de l'utilisateur
2. Lèchefrite
Utilisée pour les pâtisseries, les aliments congelés et les grands rôtis. natural_image
Gray square baking tray with a mesh pattern (no text or symbols visible)3. Grille
Utilisée pour les rôtis et pour les aliments à cuire, rôtir ou pour les ragoûts, elle se place dans le four à la hauteur souhaitée. natural_image
Isometric line drawing of a rectangular metal grate or rack structure (no text or symbols)natural_image
Line drawing of a grid-patterned sheet with two rectangular tabs on top (no text or symbols)4. Placer correctement l'étagère métallique et la plaque sur les châssis télescopiques (Cette fonction est optionnelle. Elle peut ne pas être disponible sur votre produit.)
Les châssis télescopiques vous permettent d'installer et de retirer facilement les plaques et l'étagère métallique. Lorsque vous utilisez la plaque et l'étagère métallique avec les châssis télescopiques, vérifiez que les goupilles situées à l'arrière du châssis télescopique reposent contre les bords de l'étagère métallique et du plateau. natural_image
Close-up of a mechanical component with internal channels and a textured surface (no visible text or symbols)natural_image
Close-up of a metal structure with ribbed elements and a magnified inset showing a textured surface detail (no text or symbols)| Tension/fréquence | 220-240 V ~ 50/60 Hz |
| Consommation d'énergie totale | 2.4 kW |
| Fusible | 16 A |
| Type de câble/section | min.H05VV-FG3 x 1,5 mm ^2 |
| Dimensions extérieures (hau-teur/longueur/profondeur) | 595 mm/594 mm/567 mm |
| Dimensions d'installation (hauteur/longueur/profondeur) | **590 ou 600 mm/560 mm/min. 550 mm |
| Four principal | Four multifonction |
| Ampoule interne | 15/25 W |
| Consommation énergétique du grill | 2.2 kW |
3 Installation
Le produit doit être installé par une personne qualifiée conformément à la réglementation en vigueur. Dans le cas contraire, la garantie n'est pas valable. Le fabricant se sera pas tenu pour responsable des dégâts consécutifs à des procédures réalisées par des personnes non autorisées et pourra annuler la garantie dans ce cas.  La préparation de l'emplacement et l'installation de l'électricité pour l'appareil sont sous la responsabilité du client. DANGER:
Installez l'appareil conformément aux réglementations en matière de gaz et d'électricité en vigueur dans votre localité. DANGER:
Avant l'installation, regardez si l'appareil présente des défauts. Si tel est le cas, ne le faites pas installer. Les appareils endommagés présentent des risques pour votre sécurité.Avant l'installation
L'appareil est destiné à être installé dans les meubles de cuisine disponibles dans le commerce. Une dis- tance de sécurité doit être laissée entre l'appareil et les parois de la cuisine et des meubles. Voir le schéma (valeurs en mm). - Les surfaces, les feuilles laminées synthétiques et les adhésifs doivent résister à la chaleur (jusqu'à 100 °C min.). - Les meubles de cuisine doivent être stables et fixés. - S'il y a un tiroir sous le four, une étagère doit être installée entre ce four et le tiroir. - Transportez l'appareil avec au minimum deux personnes.  N'installez pas l'appareil à proximité de réfrigérateurs ou congélateurs. La chaleur émise par l'appareil augmenterait la consommation d'énergie des dispositifs de refroidissement.  N'utilisez pas la porte et/ou la poignée pour porter ou déplacer l'appareil.  Si votre appareil est doté de poignées métalliques, veuillez les repousser à l'intérieur des parois latérales après l'avoir déplacé. text_image
560 550* 600 30 35 500 555 570 595 547 20 594 min.text_image
500 35 560 590 30 35 500 550* 555 570 595 547 20 594Installation et branchement
\- Installez l'appareil conformément à toutes les réglementations en matière de gaz et d'électricité en vigueur.Raccordement électrique
Branchez l'appareil à une prise mise à la terre protégée par un disjoncteur miniature de capacité suffisante tel qu'indiqué dans le tableau « Caractéristiques techniques ». Faites installer la mise à la terre par un électricien qualifié lors de l'utilisation de l'appareil avec ou sans transformateur. Notre société ne sera pas tenue pour responsable des dégâts résultant de l'utilisation de l'appareil sans une installation de mise à la terre conforme aux réglementations locales en vigueur. DANGER:
L'appareil doit uniquement être raccordé à l'alimentation électrique par une personne autorisée et qualifiée. La période de garantie de l'appareil démarre uniquement après son installation correcte. Le fabricant se sera pas tenu pour responsable des dégâts consécutifs à des procédures réalisées par des personnes non autorisées. DANGER:
Le câble d'alimentation ne doit pas être serré, plié ou pincé ou entrer en contact avec des pièces chaudes de l'appareil. Un câble d'alimentation endommagé doit être remplacé par un électricien qualifié. Dans le cas contraire, il présente un risque d'électrocution, de court-circuit ou d'incendie ! - La connexion doit être conforme aux réglementations nationales en vigueur. - Les valeurs de l'alimentation électrique doivent correspondre aux valeurs figurant sur la plaque signalétique de l'appareil. Ouvrez la porte pour voir la plaque signalétique. - Le câble d'alimentation de l'appareil doit être conforme aux valeurs du tableau "Caractéristiques techniques". DANGER:
Avant d'effectuer tout travail sur l'installation électrique, l'appareil doit être débranché du réseau d'alimentation électrique. Vous risqueriez un choc électrique !Raccordement du câble d'alimentation
 Lors du câblage, vous devez respecter les réglementations nationales/locales en matière d'électricité. Par ailleurs, vous devez utiliser des prises et des fiches recommandées pour fours. Au cas où la limite de puissance de l'appareil est supérieure à la capacité de conduction du courant par la fiche et la prise, branchez l'appareil directement sur une installation électrique fixe sans utiliser de fiche ni de prise. 1. S'il n'est pas possible de débrancher tous les pôles de la source d'alimentation, une unité de déconnexion avec une ouverture minimale de 3 mm (fusibles, interrupteurs de sécurités, contacts) doit être connectée et tous les pôles de cette unité de déconnexion doivent être adjacents au produit (et non au-dessus), conformément aux directives IEE. Le non respect de ces instructions risque de causer des problèmes de fonctionnement et d'invalider la garantie du produit. Une protection supplémentaire par un disjoncteur de courant résiduel est recommandée.Si un câble est fourni avec l'appareil :
text_image
BOITIER DE RACCORDEMENT BLEU MARRON VERT / JAUNE CABLE D'ALIMENTATIONInstallation des produits
1. Faites coulisser le four dans le meuble, alignez-le et fixez-le en vous assurant que le câble d'alimentation n'est pas rompu et/ou coincé. natural_image
Technical line drawing of an oven with internal grating and ventilation slots (no text or symbols)text_image
1 2 3Vérification finale
1. Mise en marche de l'appareil. 2. Vérifiez les fonctions.Déplacement ultérieur
- Conservez le carton d'origine de l'appareil et utilisez-le pour déplacer le produit. Suivez les instructions figurant sur le carton. Si vous n'avez plus le carton original, emballez l'appareil dans du film à bulles ou du carton épais avec du ru-ban adhésif pour maintenir le tout. - Afin d'éviter que la grille et la lèchefrite situés à l'intérieur du four n'endommagent la porte, placez une bande de carton sur la contre-porte à hauteur des plaques. Attachez la porte du four aux parois latérales à l'aide de ruban adhésif. - N'utilisez pas la porte ou la poignée pour soulever ou déplacer l'appareil.  Ne placez aucun objet sur l'appareil et déplacez-le bien à plat.  Inspectez l'aspect général de l'appareil pour déceler les dégâts potentiellement dus au transport.4 Préparation
Conseils pour faire des économies d'énergie
Les conseils suivants vous permettront d'utiliser votre appareil de façon écologique et d'économiser ainsi de l'énergie : - Utilisez des ustensiles de cuisine recouverts d'émail car la transmission de chaleur sera améliorée. - Lorsque vous cuisinez, lancez un préchauffage si cela est conseillé dans le manuel d'utilisation ou la description de la recette. - N'ouvrez pas la porte du four trop souvent pendant la cuisson. - Essayez de faire cuire plusieurs plats simultanément dans le four lorsque vous le pouvez. Vous pouvez placer deux plats de cuisson sur le châssis métallique. - Faites cuire plusieurs plats successivement. Le four sera déjà à température. - Vous pouvez économiser de l'énergie en éteignant votre four quelques minutes avant la fin du temps de cuisson. N'ouvrez pas la porte du four. • Décongelez les plats surgelés avant de les cuire.Première utilisation
Premier nettoyage de l'appareil
 La surface pourrait être endommagée par certains détergents ou produits de nettoyage. N'utilisez pas de détergents agressifs, de poudre/crèmes de nettoyage ou d'objets tranchants pour le nettoyage. 1. Retirez tous les matériaux d'emballage. 2. Essuyez les surfaces de l'appareil à l'aide d'un chiffon humide ou d'une éponge et terminez avec un chiffon sec.Première cuisson
Faites chauffer l'appareil pendant 30 minutes puis éteignez-le. De cette manière, tous les résidus de production ou les couches de conservation seront brûlés et supprimés. AVERTISSEMENT
Les surfaces chaudes peuvent provoquer des brûlures ! L'appareil peut être très chaud pendant son utilisation. Ne touchez jamais les brûleurs, sections internes du four, résistances, etc. lorsqu'ils sont chauds. Tenez les enfants à l'écart. Utilisez toujours des gants de protection thermique lorsque vous placez ou retirez des plats du four chaud.Four électrique
1. Sortez toutes les plaques de cuisson et la grille métallique du four. 2. Fermez la porte du four. 3. Sélectionnez la position "Traditionnel". 4. Sélectionnez l'intensité la plus forte pour le grill ; voir Utilisation du four électrique, page 18. 5. Faites fonctionner le four environ 30 minutes. 6. Eteignez votre four ; voir Utilisation du four électrique, page 18Four à grill
1. Sortez toutes les plaques de cuisson et la grille métallique du four. 2. Fermez la porte du four. 3. Sélectionnez l'intensité la plus forte pour le grill ; voir Utilisation du grill, page 21. 4. Faites fonctionner le four environ 30 minutes. 5. Eteignez votre grill ; voir Utilisation du grill, page 21  Une odeur et de la fumée peuvent se dégager pendant quelques heures au cours de la première utilisation. Ce phénomène est tout à fait normal. Assurez-vous que la pièce est bien aérée pour évacuer l'odeur et la fumée. Évitez de respirer la fumée et l'odeur qui se déga- gent.5 Utilisation du four
Informations générales concernant la pâtisserie, la rôtisserie et les grillades
AVERTISSEMENT
Les surfaces chaudes peuvent provoquer des brûlures ! L'appareil peut être très chaud pendant son utilisation. Ne touchez jamais les brûleurs, sections internes du four, résistances, etc. lorsqu'ils sont chauds. Tenez les enfants à l'écart. Utilisez toujours des gants de protection thermique lorsque vous placez ou retirez des plats du four chaud. DANGER:
Faites attention lors de l'ouverture du four car de la vapeur peut s'en échapper. La vapeur peut provoquer des brûlures sur vos mains, votre visage et/ou vos yeux.Conseils pour la pâtisserie
- Utilisez des plats en métal anti-adhérent adaptés ou des ustensiles en aluminium ou des moules en silicone résistant à la chaleur. • Utilisez l'espace de la plaque au mieux. - Placez le moule de cuisson au milieu. - Sélectionnez l'emplacement adapté avant d'allumer le four ou le grill. Ne changez pas d'emplacement lorsque le four est chaud. • Gardez la porte du four fermée.Conseils pour rôtir
• Assaisonner les poulets entiers, dindes et gros morceaux de viande avec du jus de citron et du poivre noir avant la cuisson augmentera la performance de cuisson. - La viande rôtie met 15 à 30 minutes de plus à cuire avec des os par rapport à un rôti équivalent sans os. - Chaque centimètre d'épaisseur de viande requiert environ 4 à 5 minutes de temps de cuisson. - Laissez la viande reposer dans le four pendant environ 10 minutes après le temps de cuisson. Le jus se répartira sur l'ensemble de la viande et ne coulera pas à sa découpe. • Le poisson doit être placé au milieu du four ou plus bas dans un plat résistant au feu.Conseils pour les grillades
Lorsque la viande, poissons et volailles sont grillés, ils brunissent rapidement, deviennent croustillants et ne sèchent pas. Les morceaux minces, les brochettes de viandes et les saucisses mais également les légumes à forte teneur en liquide (par exemple les tomates et les oignons) sont particulièrement adaptés à cette cuisson. - Répartissez les morceaux à griller sur la grille métallique ou la plaque de cuisson avec la grille métallique de manière à ce que l'espace couvert ne dépasse pas la taille de la résistance. - Glissez la grille ou la plaque de cuisson avec la grille dans le four au niveau souhaité. Si vous faites des grillades sur la grille, glissez la plaque de cuisson sur le châssis pour recueillir les graisses. Ajoutez un peu d'eau dans la plaque de cuisson pour faciliter le nettoyage.  Les aliments non adaptés pour le gril exposent à des risques d'incendie. N'utilisez que des aliments à griller adaptés à une chaleur de gril intense. Ne placez pas la nourriture trop au fond du gril. Il s'agit de la zone la plus chaude et les aliments gras pourraient prendre feu.Utilisation du four électrique
Sélection d'une température et d'un mode de fonctionnement.
text_image
1 2Arrêt du four électrique
Placez le minuteur de four sur la position arrêt.  Lorsque le minuteur est réglé sur une période définie, il s'arrêtera automatiquement ; voir Utilisation de l'horloge du four, page 20 Tourmez la manette des fonctions et celle de la température sur la position arrêt (supérieure).Positions des châssis (pour modèle avec grill)
Il est important de placer la grille correctement sur le châssis. La grille doit être insérée entre les châssis métalliques comme sur l'illustration. Ne laissez pas la plaque du gril appuyée sur le mur arrière du four. Faites coulisser la grille vers l'avant du châssis et placez-la à l'aide de la contre-porte afin d'obtenir les meilleures performances du grill. text_image
1 2 3 4 5Modes de fonctionnement
L'ordre des modes de fonctionnement présenté peut varier sur votre appareil.Convection naturelle
 Les éléments chauffants supérieurs et inférieurs fonctionnent simultanément. Les aliments sont cuits simultanément par le dessus et le dessous. Par exemple, il est adapté pour des gâteaux, des pâtisseries ou des gâteaux et des ragoûts dans des moules. Cuisson avec une seule plaque.Sole
 Seule la sole fonctionne. Adapté par ex. pour des pizza et pour dorer le dessous des plats. Cette fonction doit également être utilisée pour faciliter le nettoyage vapeur.Elément chauffant supérieur/inférieur avec ventilateur
 Les éléments supérieur et inférieur et le ventilateur (dans la paroi arrière) sont en marche. De l'air chaud est rapidement envoyé également dans le four au moyen du ventilateur. Cuisson avec une seule plaque.  Le grand grill sur le haut du four fonctionne. Adapté pour les griller de grandes quantités de viande. - Placez des portions de grande ou moyenne taille correctement sous la résistance de grill pour les grillades. - Réglez la température sur le niveau maximum. - Retournez la nourriture à micuisson.Grill pulsé
 L'effet grill n'est pas aussi fort que sur Grill fort - Placez des portions de petite ou moyenne taille correctement sous l'élément de grill pour les grillades. • Réglez la température désirée. - Retournez la nourriture à micuisson.Booster
 Cette fonction est utilisée pour chauffer le four rapidement, elle ne convient pas pour cuire les aliments. - Sélectionnez la température désirée après avoir sélectionné cette fonction. Le voyant de la température s'allume et le four chauffe. - Le voyant s'éteint après la fin du processus de chauffage. Sélectionnez maintenant la fonction désirée pour cuire vos aliments.Utilisation de l'horloge du four
text_image
100 90 80 70 60 50 40 30 20 10 1Démarrage de la cuisson
 Pour faire fonctionner le four, vous devez sélectionner le mode de cuisson et la température désirée et régler l'heure. Dans le cas contraire, le four ne fonctionnera pas. 1. Tournez la manette de réglage de l'heure dans le sens des aiguilles d'une montre pour régler le temps de cuisson. 2. Placez votre plat dans le four. 3. Sélectionnez une température et un mode de fonctionnement, voir. Utilisation du four électrique, page 18. » Le four chauffera jusqu'à la température définie et il maintiendra cette température jusqu'à la fin de la durée de cuisson sélectionnée. 4. Lorsque la durée de cuisson est terminée, le bouton de réglage de la durée tournera automati- quement dans le sens inverse des aiguilles d'une montre. Un son avertisseur retentit pour indiquer que la durée définie est arrivée à échéance et l'alimentation électrique est coupée.  Si vous ne souhaitez pas utiliser la fonction de minuterie, tournez la manette dans le sens inverse des aiguilles d'une montre sur le symbole de la main. 5. Eteignez le four à l'aide du bouton de réglage du temps, la manette des fonctions ou celle des températures.Eteindre le four avant l'heure réglée
1. Tournez la manette de réglage du temps dans le sens contraire des aiguilles d'une montre jusqu'à son arrêt. 2. Eteignez le four à l'aide du bouton de réglage des températures et de la manette des fonctions.Tableau des temps de cuisson
 Les durées indiquées dans ce tableau ne servent que d'exemple. Elles peuvent varier selon la température, l'épaisseur et le type d'aliments, ainsi que vos préférences de cuisson.Cuisson au four et rôtisserie
 Le 1er étage du four est l'emplacement du premier gradin.| Plat | Numéro du niveau de cuisson | Hauteur des gradins | Température (°C) | Temps de cuisson (approx. en min.) | |
| **Gâteaux sur plaque | Un niveau | 3 | 175 | 25 ... 30 | |
| **Gâteaux en moule | Un niveau | 2 | 175 | 40 ... 50 | |
| **Gâteaux dans du papier alimentaire | Un niveau | 3 | 175 | 25 ... 30 | |
| **Génoise | Un niveau | 3 | 200 | 5 ... 10 | |
| **Cookies | Un niveau | 3 | 175 | 25 ... 30 | |
| **Pâte à choux | Un niveau | 2 | 200 | 30 ... 40 | |
| **Pâte au beurre | Un niveau | 2 | 200 | 25 ... 35 | |
| **Levain de pâte | Un niveau | 2 | 200 | 35 ... 45 | |
| **Lasagnes | Un niveau | 2 - 3 | 200 | 30 ... 40 | |
| **Pizza | Un niveau | 2 | 200 ... 220 | 15 ... 20 | |
| Bifteck (entier) / Rôti | Un niveau | 3 | 25 min. 250/max, puis 180 ... 190 | 100 ... 120 | |
| Gigot d'agneau (casserole) | Un niveau | 3 | 25 min. 220, puis 180 ... 190 | 70 ... 90 | |
| Poulet rôti | Un niveau | 2 | 15 min. 250/max, puis 180 ... 190 | 55 ... 65 | |
| Dinde (5,5 kg) | Un niveau | 1 | 25 min. 250/max, puis 180 ... 190 | 150 ... 210 | |
| Poisson | Un niveau | 3 | 200 | 20 ... 30 |
Conseils pour la pâtisserie
- Si le gâteau est trop sec, augmentez la température de 10°C et réduisez le temps de cuisson. - Si le gâteau est trop humide, utilisez moins de liquide ou baissez la température de 10°C. - Si le gâteau est trop foncé sur le dessus, placez-le au niveau inférieur, baissez la température et augmentez le temps de cuisson. - S'il est bien cuit à l'intérieur mais collant à l'extérieur, utilisez moins de liquide, baissez la température et augmentez le temps de cuisson.Conseils pour la pâtisserie
- Si la pâtisserie est trop sèche, augmentez la température de 10°C et réduisez le temps de cuisson. Humectez les couches de pâte avec une sauce composée de lait, d'huile, d'oeuf et de yaourt. - Si la pâtisserie met trop de temps pour cuire, faites attention à ce que l'épaisseur de la pâtisserie que vous avez préparée ne dépasse pas la profondeur de la plaque. - Si la partie supérieure de la pâtisserie dore mais que la partie inférieure n'est pas cuite, vérifiez que vous n'avez pas utilisé trop de sauce pour le bas de la pâtisserie. Essayez de répandre la sauce équitablement sur les couches de pâte et le haut de la pâtisserie afin de les dorer au même niveau.  Faites cuire la pâte conformément au mode et à la température indiqués dans le tableau de cuisson. Si la partie inférieure n'est toujours pas suffisamment dorée, la prochaine fois, placez-la à un niveau inférieur.Conseils pour la cuisson des légumes
\- Si le plat de légumes ne contient plus de jus et devient trop sec, cuisez-les dans une casserole avec un couvercle au lieu d'une plaque. Les récipients clos préservent le jus du plat. \- Si un plat de légumes ne cuit pas, faites bouillir les légumes au préalable ou préparez-les comme des aliments en conserve et placez-les au four.Utilisation du grill
AVERTISSEMENT
Fermez la porte du four pendant les grillades. Les surfaces chaudes peuvent brûler ! \- Tournez la manette du réglage de l'heure dans le sens inverse des aiguilles d'une montre sur le symbole main pendant le grill.Allumage du grill
1. Tournez la manette Fonction dans le sens des aiguilles d'une montre sur le symbole du grill. 2. Réglez ensuite la température désirée du grill. 3. Si nécessaire, effectuez un préchauffage d'environ 5 minutes. » Le voyant du thermostat (température) s'allume.Extinction du grill
1. Tournez la manette des fonctions sur la position arrêt (haut).  Les aliments non adaptés pour le gril exposent à des risques d'incendie. N'utilisez que des aliments à griller adaptés à une chaleur de gril intense. Ne placez pas la nourriture trop au fond du gril. Il s'agit de la zone la plus chaude et les aliments gras pourraient prendre feu.Tableau des temps de cuisson pour le grill
Grillade par grill électrique| Aliments | Position de la grille | Temps de grillade (environ) |
| Poisson | 4...5 | 20...25 min. |
| Ailes ou cuisses de poulet | 4...5 | 25...35 min. |
| Côtelettes d'agneau | 4...5 | 20...25 min. |
| Rôti de bœuf | 4...5 | 25...30 min. |
| Côtelettes de veau | 4...5 | 25...30 min. |
| Pain toast | 4 | 1...2 min. |
| * selon l'épaisseur | ||
6 Maintenance et entretien
Généralités
Un nettoyage régulier de l'appareil en rallongera la durée de vie et diminuera l'apparition de problèmes. DANGER:
Débranchez l'appareil de la prise d'alimentation avant de commencer le nettoyage et l'entretien. Vous risqueriez un choc électrique ! DANGER:
Laissez l'appareil refroidir avant de le nettoyer. Les surfaces chaudes peuvent brûler ! - Nettoyez l'appareil après chaque utilisation. Il vous sera ainsi possible d'ôter plus facilement les résidus de nourriture éventuels, évitant ainsi qu'ils ne brûlent lors de l'utilisation suivante. - Aucun produit nettoyant particulier n'est nécessaire pour nettoyer l'appareil. Utilisez de l'eau tiède avec du détergent, un chiffon doux ou une éponge pour nettoyer l'appareil et essuyez-le à l'aide d'un chiffon sec. - Veillez toujours à bien essuyer les excès de liquide après le nettoyage et essuyez immédia-tement tout déversement. - N'utilisez pas de détergents contenant de l'acide ou du chlore pour nettoyer les surfaces en acier inoxydable et la poignée. Utilisez un chiffon doux avec un détergent liquide non abrasif pour nettoyer ces parties, en prenant soin de toujours frotter dans le même sens.  La surface pourrait être endommagée par certains détergents ou produits de nettoyage. N'utilisez pas de détergents agressifs, de poudre/crèmes de nettoyage ou d'objets tranchants pour le nettoyage.  N'utilisez pas de nettoyeurs à vapeur pour le nettoyage de l'appareil, car ceux-ci présentent un risque d'électrocution.Nettoyage du bandeau de commande
Nettoyez le bandeau de commande et les boutons de commande avec un chiffon humide et essuyez-les.  Ne retirez pas les boutons de commande pour nettoyer le bandeau de commande. Le panneau de commande pourrait être endommagé !Nettoyage du four
Pour nettoyer la paroi latérale
(Cette fonction est optionnelle. Elle peut ne pas être disponible sur votre produit.)
1. Retirez la partie avant du rail latéral en le tirant vers le côté opposé de la paroi latérale. 2. Retirez le rail latéral complètement en le tirant vers vous. text_image
Technical diagram showing two labeled components (1 and 2) of a mechanical or electrical assembly with internal wiring and structural elements.Parois catalytiques
(Cette fonction est optionnelle. Elle peut ne pas être disponible sur votre produit.)
Les parois latérales internes (A) et/ou la paroi arrière (B) de votre produit peuvent être revêtues d'un émail catalytique. Les parois catalytiques ont une couleur matte claire et une surface poreuse. Ne nettoyez pas les parois catalytiques du four. Les surfaces poreuses des parois catalytiques sont nettoyées automatiquement par absorption et conversion des déversements d'huile (vapeur et dioxyde de carbone). text_image
Anatural_image
Top-down view of a device casing with hexagonal grid pattern and labeled point B (no text or symbols beyond label)Nettoyage vapeur facile
Il assure un nettoyage facile parce que la saleté (après avoir attendu pas très longtemps) est ramollie par la vapeur qui se forme à l'intérieur du four et les gouttes d'eau de condensation sur les surfaces intérieures du four. 1. Retirez tous les accessoires du four. 2. Versez 500 ml d'eau sur la plaquedufour et placez-la sur la deuxième grille. natural_image
Illustration of a laptop with a screen showing a cartoon character (no text or symbols)Nettoyage de la porte du four.
Utilisez de l'eau tiède avec du détergent, un chiffon doux ou une éponge pour nettoyer la porte du four et essuyez l'appareil à l'aide d'un chiffon sec.  N'utilisez pas de détergents abrasifs ou de grattoirs en métal dur pour nettoyer la porte du four. Vous pourriez rayer la surface et endommager la vitre.Retirer la porte du four.
1. Ouvrez la porte frontale (1). 2. Ouvrez les clips sur le logement de la charnière (2) sur les côtés droit et gauche de la porte frontale en faisant pression sur les clips, tel qu'illustré dans le schéma. text_image
1 2 3natural_image
Technical diagram of a mechanical joint or bracket with a directional arrow indicating rotation (no text or symbols present)text_image
1 2 3Retrait de la vitre de la porte
(Cette fonction est optionnelle. Elle peut ne pas être disponible sur votre produit.) Le panneau vitré interne de la porte du four peut être retiré pour le nettoyage. Ouvrez la porte du four. natural_image
3D diagram of a mechanical component with labeled parts 1 and 2 (no text or symbols beyond labels)text_image
1 2 3 1 2natural_image
3D diagram of a mechanical component with labeled parts A and B, showing internal structure and directional arrows (no text or symbols beyond labels)Remplacement de l'ampoule du four
DANGER:
Avant de remplacer l'ampoule de four, vérifiez que l'appareil est débranché de l'alimentation et froid afin d'éviter tout risque de choc électrique. Les surfaces chaudes peuvent brûler !  L'ampoule du four est une ampoule électrique d'éclairage spéciale pouvant résistant à des chaleurs allant jusqu'à 300°C. Reportez-vous aux Caractéristiques techniques, page 11 pour les détails. Des ampoules de four sont disponibles auprès de votre technicien autorisé.  L'emplacement le la lampe peut varier par rapport à l'illustration.  L'ampoule utilisée dans cet appareil n'est pas appropriée à l'éclairage d'une pièce d'un ménage. Cette ampoule est destinée à aider l'utilisateur à distinguer les denrées alimentaires.  Les ampoules utilisées dans cet appareil doivent résister à des conditions physiques extrêmes telles que des températures supérieures à 50 °C.Si votre four est équipé d'une lampe ronde :
1. Débranchez l'appareil de l'alimentation. 2. Dévissez le cache de l'ampoule en le tournant dans le sens contraire des aiguilles d'une montre pour l'enlever. natural_image
Close-up of a hand holding a circular component, possibly a mechanical part or tool, with no visible text or symbols.natural_image
Mechanical component with rotational arrows indicating motion (no text or symbols)natural_image
Mechanical component with a cylindrical shaft and circular housing, showing an arrow indicating direction (no text or symbols)7 Recherche et résolution des pannes
Le four émet de la vapeur lorsqu'il est en marche.
\- Il est normal que de la vapeur s'échappe pendant le fonctionnement. >>> Cela n'est pas un défaut.Le appareil émet des bruits métalliques lors des phases de chauffage et de refroidissement.
\- Lorsque les pièces métalliques sont chauffées, elles peuvent se détendre et émettre ces bruits. >>> Cela n'est pas un défaut.Le appareil ne fonctionne pas.
- Le fusible d'alimentation est défectueux ou grillé. >>> Vérifiez les fusibles dans la boîte à fusibles. Remplacez ou réactivez-les le cas échéant. • L'appareil n'est pas relié à la prise de mise à la terre. >>> Vérifiez le branchement de la prise.La lumière du four ne s'allume pas.
• L'ampoule du four est défectueuse. >>> Remplacer l'ampoule du four. - L'alimentation est coupée. >>> Vérifiez s'il y a du courant. Vérifiez les fusibles dans la boîte à fusibles. Remplacez ou réactivez-les le cas échéant.Le four ne chauffe pas.
- Peut ne pas être réglé sur une certaine fonction de cuisson et/ou à une certaine température. >>> Ré-glez le four sur une certaine fonction de cuisson et/ou à une certaine température. - Sur les modèles équipés d'un minuteur, le minuteur n'est pas réglé. >>> Réglez l'heure. (Sur les produits avec four micro-ondes, le minuteur ne contrôle que le micro-ondes.) - L'alimentation est coupée. >>> Vérifiez s'il y a du courant. Vérifiez les fusibles dans la boîte à fusibles. Remplacez ou réactivez-les le cas échéant.(Sur les modèles avec un minuteur) L'écran de l'horloge clignote ou le symbole de l'horloge est allumé.
\- Une coupure de courant a eu lieu. >>> Réglez l'heure / Eteignez l'appareil, puis rallumez-le.  Consultez le technicien autorisé ou le reven- deur qui vous a vendu l'appareil si vous ne parvenez pas à résoudre le problème après avoir suivi les instructions comprises dans ce chapitre. N'essayez jamais de réparer un appareil défectueux vous-même.Inbouwoven
Gebruikershandleiding
Gelieve eerst deze gebruikershandleiding te lezen!
Beste klant, Dank u voor het aankopen van een Beko-product. We hopen dat u de beste resultaten verkrijgt uit uw product, dat vervaardigd is met de allernieuwste technologie van hoge kwaliteit. Lees daarom deze volledige gebruikershandleiding en alle andere bijgevoegde documenten zorgvuldig door voordat u het product in gebruik neemt en houd deze ter referentie voor toekomstig gebruik. Als u het product aan iemand anders overdraagt, voeg daar dan de gebruikershandleiding ook bij. Volg alle waarschuwingen en informatie in deze gebruikershandleiding op. Vergeet niet dat deze gebruikershandleiding ook van toepassing kan zijn op verschillende andere modellen. De verschillen tussen de modellen zijn duidelijk aangegeven in de handleiding.Verklaring van symbolen
In deze gebruikershandleiding worden de volgende symbolen gebruikt:  Belangrijke informatie of nuttige aanwijzingen over het gebruik.  Waarschuwing voor levensgevaarlijke situaties en schade aan eigendommen.  Waarschuwing voor een elektrische schok.  Waarschuwing voor brandgevaar.  Waarschuwing voor hete oppervlakken.1 Belangrijke instructies en waarschuwingen voor veiligheid en milieu 4
Algemene veiligheid 4 Elektrische veiligheid....4 Productveiligheid 5 Bedoeld gebruik....7 Kindveiligheid 8 Het oude product afvoeren 8 Verpakkingsmateriaal afvoeren 82 Algemene informatie 9
Overzicht....9 Inhoud pakket....10 Technische specificaties....113 Installatie 12
Voor installatie....12 Installatie en verbinding....14 Toekomstig transport 164 Voorbereidingen 17
Tips om energie te besparen 17 Het eerste gebruik 17 Eerste reiniging van het toestel....17 Eerste opwarming....175 Hoe de oven te bedienen 18
Algemene informatie over bakken, roosteren en grillen 18 Hoe de elektrische oven te bedienen 18 Werkingsmodussen....19 Het gebruik van de ovenklok 20 Tabel kooktijden.... 20 Hoe de grill bedienen.... 21 Tabel kooktijden voor grillen.... 216 Onderhoud en verzorging 22
Algemene informatie 22 Het bedieningspaneel reinigen 22 De oven reinigen 22 De ovendeur verwijderen 23 Binnenglas deur verwijderen 23 De ovenlamp vervangen 247 Problemen oplossen 25
1 Belangrijke instructies en waarschuwingen voor veiligheid en milieu
Dit gedeelte bevat veiligheidsvoorschriften die helpen persoonlijk letsel of schade aan eigendommen te voorkomen. Het niet opvolgen van deze instructies laat alle garantie vervallen.Algemene veiligheid
\- Dit apparaat kan worden gebruikt door kinderen vanaf 8 jaar en personen met verzwakte fysieke, zintuiglijke of mentale toestand, of met een gebrek aan ervaring en kennis, als deze onder toezicht staan of instructies zijn gegeven betreffende het veilige gebruik van het apparaat en op de hoogte zijn van de betrokken gevaren. Laat kinderen niet met het apparaat spelen. Reiniging en gebruikersonderhoud dienen niet zonder toezicht door kinderen uitgevoerd te worden. \- Dit apparaat mag niet worden gebruikt door personen (kinderen inbegrepen) in verzwakte fysieke, zintuiglijke of mentale toestand, of met een gebrek aan ervaring en kennis, tenzij ze onder toezicht staan of instructies hebben gekregen. Zie erop toe dat kinderen niet met het apparaat spelen. - Indien het product voor persoonlijk of tweedehands gebruik aan iemand anders wordt overgedragen, dienen de gebruikershandleiding, productetiketten en andere relevante documenten en onderdelen ook te worden overhandigd. - Installatie- en reparatiewerk moet altijd uitgevoerd worden door bevoegde serviceagenten. De fabrikant is niet aansprakelijk voor schade die voortvloeit uit werkzaamheden door onbevoegde personen. Dit kan de garantie ongeldig maken. Lees alvorens de installatie de instructie zorgvuldig door. - Gebruik het apparaat niet als het defect is of zichtbare schade vertoont. - Controleer of de functieknoppen van het product na ieder gebruik zijn uitgeschakeld.Elektrische veiligheid
\- Indien het product een defect heeft. moet het niet in gebruikt worden genomen zonder dat het gerepareerd is door een bevoegde onderhoudsdienst. Er is kans op elektrische schokken! \- Sluit het product uitsluitend aan op een geaarde uitgang/lijn met een voltage en beveiliging zoals gespecificeerd in de "Technische specificaties". Laat de aardingsinstallatie aanleggen door een bevoegd elektricien terwijl u het product met of zonder transformator gebruikt. Ons bedrijf is niet aansprakelijk voor problemen die zijn ontstaan doordat het product niet geaard is in overeenstemming met de plaatselijke voorschriften. \- Reinig het product nooit door er water overheen te gooien! Er is kans op elektrische schokken! \- Het product moet tijdens installatie, onderhoud, reiniging en reparatiehandelingen losgekoppeld zijn. \- Als het stroomkabel van het product beschadigd is, moet deze om gevaar te voorkomen worden vervangen door de fabrikant, door zijn onderhoudsdienst of door soortgelijke bevoegde personen. \- Het apparaat dient dusdanig geïnstalleerd te zijn dat het volledig van het netwerk afgesloten kan worden. De loskoppeling dient te geschieden door het uittrekken van de stekker of het uitschakelen van een schakelaar die in de vaste elektrische installatie is ingebouwd, volgens de constructievoorschriften. - Achterkant van de oven wordt warm wanneer deze in gebruik is. Zorg ervoor dat de elektriciteitsaansluiting de achterkant niet raakt; dit kan leiden tot beschadiging van de aansluitingen. - Zorg dat het netsnoer niet tussen de oven en het frame vastgeklemd zit en leidt het niet over de hete oppervlakken. Anders kan de kabelisolatie smelten en brand veroorzaken als gevolg van kortsluiting. - Werk aan elektrische apparatuur of systemen mag uitsluitend worden uitgevoerd door bevoegde en gekwalificeerde personen. - Zet in geval van schade het product uit en sluit het af van het elektriciteitsnet. Verwijder daartoe de zekering in huis. - Zorg ervoor dat de stroomwaarde van de zekering compatibel is met het product.Productveiligheid
\- WAARSCHUWING: Het toestel en de toegankelijke onderdelen worden warm tijdens de werking. Zorg ervoor dat u geen verwarmingselementen aanraakt. Behalve als ze voortdurend onder toezicht staan, moeten kinderen jonger dan 8 jaar uit de buurt worden gehouden. \- Gebruik het product niet wanneer uw beoordelingsvermogen of coördinatie nadelig beïnvloed worden door het gebruik van drugs en/of alcohol. \- Wees voorzichtig bij het gebruiken van alcoholische dranken in uw maaltijden. Alcohol verdampt bij hoge temperaturen en kan brand veroorzaken aangezien het vlam vat wanneer het in contact komt met warme oppervlakken. \- Plaats geen ontvlambare materialen dichtbij het apparaat aangezien de zijkanten heet worden tijdens gebruik. \- Tijdens het gebruik wordt het apparaat warm. Zorg ervoor dat u geen verwarmingselementen in de oven aanraakt. \- Houd alle ventilatiesleuven vrij van obstakels. \- Verwarm geen gesloten conservenblikken en glazen potten in de oven. De druk die zich in het blik/de pot ontwikkelt kan ervoor zorgen dat deze barst. \- Plaats geen bakschalen, schotels of aluminiumfolie rechtstreeks op de bodem van de oven. De warmteaccumulatie kan de bodem van de oven beschadigen. \- Gebruik geen krassende schuurmiddelen of scherpe metalen schrapers om het glas van de ovendeur te reinigen. Deze kunnen het oppervlak krassen, wat tot barsten van het glas kan leiden. \- Gebruik geen stoomreinigers om het toestel schoon te maken, want dat kan elektrische schokken veroorzaken. \- (De functies verschillen per productmodel.) Het rooster en de plaat correct op de draadrekken plaatsen Het is belangrijk het rooster en/of de plaat correct op het rek te plaatsen. Schuif het rooster of de plaat tussen twee rails en zorg dat deze stabiel is voordat u er voedsel op legt (zie de afbeelding hieronder). natural_image
Technical diagram of a multi-layered stainless steel rack with labeled points A and B, showing internal structure (no text or symbols beyond labels)text_image
A A - Gebruik het product niet wanneer de glazen ovendeur verwijderd of gebarsten is. - Het handvat van de oven is geen handdoekenrek. Hang hier geen handdoeken, wanten of soortgelijke stoffen voorwerpen aan als de grill met open deur werkzaam is. - Gebruik altijd warmtebestendige ovenhandschoenen wanneer u schotels in de oven plaatst of eruit haalt. - Plaats het bakpapier in de kookpot of op het ovenaccessoire (plaat, rooster, enz.) samen met de eetwaren en steek het allemaal samen in de voorverwarmde oven. Verwijder de overtollige gedeelten van het bakpapier van het accessoire of de pot om het risico te voorkomen dat het de verwarmingselementen van de oven aanraakt. Gebruik nooit het bakpapier aan een werkingstemperatuur hoger dan de vermelde waarde voor het bakpapier. Plaats het bakpapier niet direct op de bodem van de oven. - WAARSCHUWING: Zorg ervoor dat het apparaat is uitgeschakeld voordat u de lamp vervangt om de mogelijkheid van een elektrische schok te voorkomen. - Het apparaat mag niet achter een decoratieve deur worden geïnstalleerd om oververhitting te voorkomen. Voor de betrouwbaarheid van de brandbaarheid van het product; - Zorg ervoor dat de stekker past bij de contactdoos en dat er geen vonken kunnen ontstaan. - Gebruik geen beschadigde of gesneden kabel of een verlengkabel, behalve de originele kabel. - Zorg ervoor dat er geen vloeistof of vocht zit op de ingestoken stekker van het product.Bedoeld gebruik
- Dit product is bedoeld voor huishoudelijk gebruik. Commercieel gebruik is niet toegelaten. - Dit toestel is uitsluitend bedoeld voor het koken. Het mag niet als verwarmingstoestel worden gebruikt". - Dit product dient niet te worden gebruikt voor het opwarmen van platen onder de grill, het drogen van handdoeken, theedoeken enz. op de handgrepen, en als verwarming. - De fabrikant is niet aansprakelijk voor schade veroorzaakt door foutief gebruik of bediening. - De oven kan gebruikt worden voor het ontdooien, bakken, roosteren en grillen van voedsel.Kindveiligheid
- WAARSCHUWING: Toegankelijke onderdelen kunnen tijdens gebruik heet worden. Houd jonge kinderen uit de buurt. - De verpakkingsmaterialen kunnen gevaarlijk zijn voor kinderen. Houd de verpakkingsmaterialen buiten het bereik van kinderen. Doe alle delen van de verpakking weg volgens de milieunormen. - Elektrische toestellen zijn gevaarlijk voor kinderen. Houd kinderen bij het product vandaan als het in gebruik is en sta niet toe dat ze ermee spelen. - Plaats geen items boven het toestel binnen het bereik van kinderen. - Plaats geen zwaar voorwerp op een open deur en laat kinderen er niet op zitten. De oven kan omkantelen of deurscharnieren kunnen beschadigd worden.Het oude product afvoeren
Voldoet aan de WEEE-richtlijn en de richtlijnen voor afvoeren van het restproduct:
 Dit product voldoet aan de EU-richtlijn WEEE (2012/19/EU). Dit product is voorzien van een classificatiesymbool voor afvalsortering van elektrische en elektronische apparatuur (WEEE). Dit product werd vervaardigd uit onderdelen en materialen van hoge kwaliteit die hergebruikt kunnen worden en geschikt zijn voor recycling. Gooi het restproduct aan het einde van zijn levensduur niet weg bij normaal huishoudelijk of ander afval. Breng het naar het verzamelpunt voor recycling van elektrische en elektronische apparatuur. Raadpleeg uw plaatselijke autoriteiten om te weten waar u deze verzamelpunten aantreft.Voldoet aan RoHS-richtlijn:
Het door u aangekochte product voldoet aan de EU- richtlijn RoHS (2011/65/EU). Het bevat geen schadelijke en verboden materialen die in deze richtlijn zijn opgenomen.Verpakkingsmateriaal afvoeren
\- Verpakkingsmateriaal is gevaarlijk voor kinderen. Houd verpakkingsmateriaal op een veilige plek buiten het bereik van kinderen. Verpakkingsmateriaal van het product wordt vervaardigd van recyclebaar materiaal. Voer het netjes af en sorteer het overeenkomstig de regels voor recyclebaar afval. Werp het niet weg bij het normale huisafval.2 Algemene informatie
Overzicht
text_image
Labeled diagram of an oven with numbered parts for identificationtext_image
7 6 8 9text_image
P o 1 2 3 4Inhoud pakket
 De bijgeleverde accessoires kunnen variëren, afhankelijk van het productmodel. Het is mogelijk dat uw product niet alle accessoires bevat die in de gebruikershandleiding worden beschreven.1. Gebruikershandleiding
2. Ovenplaat
Wordt gebruikt voor gebakjes, bevroren voedsel en grote braadstukken. natural_image
Exterior view of a square baking tray with a mesh pattern (no text or symbols)3. Draadrooster
Gebruikt bij het braden en voor het plaatsen van te bakken, roosteren of koken voedsel in stoofgerechten op het gewenste rek. natural_image
Line drawing of a rectangular metal grate or rack structure (no text or symbols)natural_image
Line drawing of a rectangular grid-like structure with two side brackets (no text or symbols)4. Het grillrooster en de plaat correct op de uitschuifrekken plaatsen
(Deze functie is optioneel. Het is mogelijk dat uw product er niet meer is uitgerust.) Uitschuifrekken maken het mogelijk de platen en rooster makkelijk in te schuiven en te verwijderen. Als u de plaat en het rooster met uitschuifrekken gebruikt moet u zich ervan verzekeren dat de pennen aan de achterkant van het uitschuifrek tegen de zijkanten van het rooster en de plaat staan. natural_image
Close-up of a mechanical component with internal channels and a textured surface (no visible text or symbols)natural_image
Close-up of a metal bracket with a magnified inset showing a textured surface detail (no text or symbols visible)| Elektrische spanning / frequentie | 220-240 V ~ 50/60 Hz |
| Totaal stroomverbruik | 2.4 kW |
| Zekering | 16 A |
| Kabeltype/-functionaliteit | min.H05VV-FG3 x 1,5 mm ^2 |
| Buitenste afmetingen (hoogte/breedte/diepte) | 595 mm/594 mm/567 mm |
| Installatieafmetingen (hoogte/breedte/diepte) | **590 of 600 mm/560 mm/min. 550 mm |
| Hoofdoven | Multifunctionele oven |
| Binnenlamp | 15/25 W |
| Stroomverbruik grill | 2.2 kW |
3 Installatie
Product dient geïnstalleerd te worden door een bekwaam persoon in overeenstemming met de van kracht zijnde voorschriften. De fabrikant is niet aansprakelijk voor schade die voortvloeit uit werkzaamheden door onbevoegde personen. Mogelijk kan dit de garantie ongeldig maken.  De voorbereiding van de locatie en de elektriciteitsinstallatie voor het product vallen onder de verantwoordelijkheid van de klant. GEVAAR:
Het product moet aangesloten worden overeenkomstig de lokale gas- en elektriciteitsvoorschriften. GEVAAR:
Controleer vóór installatie van het product of het zichtbare gebreken heeft. Zo ja, laat het dan niet installeren. Beschadigde producten vormen een gevaar voor uw veiligheid.Voor installatie
Het toestel is bedoeld voor installatie in commercieel beschikbare keukenkasten. Er moet een veiligheidsafstand worden gelaten tussen het apparaat en de keukenwanden en het keukenmeubilair. Zie afbeelding (waarden in mm). - Oppervlakken, synthetische laminaten en hechtmiddelen die worden gebruikt, moeten warmtebestendig zijn. (100° C minimum). - Keukenkasten moeten vlak en vast worden geplaatst. - Indien er een lade is onder de oven moet er een plaat worden geïnstalleerd tussen oven en lade. • Draag het toestel met minstens twee personen.  Installeer het product niet naast koelkasten of diepvriezers. De door het product afgegeven warmte zal het stroomverbruik van koeltoestellen verhogen.  Draag of verplaats het product niet met behulp van de deur- en/of handgreep.  Indien uw product draadhendels heeft, duw deze terug tegen de zijwanden, nadat u het product verplaatst hebt.  min. text_image
500 35 560 590 30 35 500 550* 555 570 595 547 20 594Installatie en verbinding
\- Het product moet overeenkomstig de lokale gasen elektriciteitsvoorschriften aangesloten worden.Elektrische aansluiting
Sluit het product aan op een geaarde contactdoos die beveiligd is door een zekering met geschikte capaciteit zoals vermeld in de tabel "Technische specificaties". Laat de aardingsinstallatie aanleggen door een bevoegd elektricien terwijl u het product met of zonder transformator gebruikt. Ons bedrijf is niet aansprakelijk voor schade die voortvloeit uit het gebruik van het product zonder een aardingsinstallatie overeenkomstig de plaatselijke voorschriften. GEVAAR:
Het product mag uitsluitend door een bevoegde en gekwalificeerde persoon op de netvoeding aangesloten worden. De garantieperiode van het product gaat uitsluitend in na correcte installatie. De fabrikant is niet aansprakelijk voor schade die voortvloeit uit werkzaamheden door onbevoegde personen. GEVAAR:
De stroomkabel mag niet worden vastgeklemd, verbogen of samengedrukt of in contact komen met warme onderdelen van het product. Een beschadigde stroomkabel moet door een bevoegde elektricien worden vervangen. Anders bestaat er een risico op een elektrische schok, kortsluiting of brand! - De aansluiting moet voldoen aan de landelijke voorschriften. - De gegevens over de stroomvoorziening moeten overeenkomen met de gegevens vermeld op het typeplaatje van het product. Open de deur aan de voorzijde om het typeplaatje te zien. - De stroomkabel van uw product moet voldoen aan de waarden in de tabel "Technische specificaties". GEVAAR:
Koppel het product los van het elektriciteitsnet voordat met werk aan de elektrische installatie begonnen wordt. Er is kans op elektrische schokken!Het aansluiten van de stroomkabel
 Tijdens het aanleggen van de bedrading dient u de nationale/plaatselijke elektrische voorschriften na te leven en de geschikte contactdoos en stekker voor de oven te gebruiken. In het geval de stroomlimieten van het product de draagcapaciteit van de stekker en contactdoos overschrijden, dient het product direct op de vaste elektrische installatie te worden aangesloten zonder de stekker en contactdoos te gebruiken. 1. Indien het niet mogelijk is alle polen in de stroomtoevoer af te sluiten dient er een afsluiteenheid met minstens 3 mm contactdoorlaat (zekeringen, lijnveiligheidschakelaars, schakelaars) aangesloten te worden en dienen alle polen van deze afsluiteenheid zich in de buurt (niet boven) van het product te bevinden overeenkomstig de IEE-richtlijnen. Het niet nakomen van deze instructie kan operationele problemen veroorzaken en de garantie van het product ongeldig maken. Aanvullende bescherming door een overblijvende stroomonderbreker wordt aanbevolen.Indien er een kabel met het product wordt geleverd:
text_image
AANSLUITBLOK BLAUW L N BRUIN GROEN/GEEL NETSNOER2. Sluit voor eenfase aansluiting de draden aan zoals hieronder aangegeven:
• Bruine/Zwarte kabel = L (fase) • Blauwe/Grijze kabel = N (neutraal) • Groene/gele kabel= (E) ⏚ (Aarde) >> of • Grijze/Zwarte kabel = L (fase) • Blauwe/Bruine kabel = N (neutraal) • Groene/gele kabel= (E) ⏻ (Aarde)Het product installeren
1. Schuif de oven in de kast, uitlijn en bevestig deze terwijl u ervoor zorgt dat de stroomkabel niet breekt en/of vastgeklemd zit. natural_image
Diagram of an open oven with internal grating and ventilation slots, shown in 3D perspective (no text or labels)Voor producten met een koelventilator (Het is mogelijk dat uw product er niet meer is uitgerust.)
text_image
1 2 3Laatste controle
1. Het product bedienen. 2. Controleer de functies.Toekomstig transport
- Bewaar de originele doos van het product en vervoer het product daarin. Volg de aanwijzingen op de doos. Als u de originele doos niet hebt, verpak het product dan in luchtkussenfolie of dik karton en tape het goed vast. - Om te verhinderen dat de draadgrill en de plaat in de oven de ovendeur beschadigen, plaats een strip karton op de binnenkant van de ovendeur zodat deze overeenkomt met de positie van de plaat. Bevestig de ovendeur aan de zijkanten met tape. - Til of verplaats het product niet met behulp van de deur of handgreep.  Plaats geen voorwerpen op het product en verplaats het rechtopstaand.  Controleer globaal het uiterlijk van uw product op eventuele schade die tijdens het transport werd veroorzaakt.4 Voorbereidingen
Tips om energie te besparen
De volgende informatie zal u helpen om uw apparaat op een ecologische manier te gebruiken en energie te besparen: - Gebruik donkerkleurige of gelakte kookwaren in de oven; dit zorgt voor een betere warmtetransmissie. - Verwarm de oven tijdens het koken van uw gerechten voor als dit wordt aanbevolen in de gebruikershandleiding of kookbeschrijving. - Open de ovendeur zo weinig mogelijk tijdens het koken. - Probeer wanneer dit mogelijk is meer dan één gerecht tegelijkertijd in de oven te bereiden. U kunt koken door twee pannen op het grillrooster te plaatsen. - Bereid meer dan één gerecht na elkaar. De oven zal al warm zijn. - U kunt energie besparen door uw oven een paar minuten voor het einde van de bereidingstijd uit te schakelen. Zet de ovendeur niet open. - Ontdooi bevroren gerechten voor u ze bereidt.Het eerste gebruik
Eerste reiniging van het toestel
 Het oppervlak kan beschadigd geraken door sommige detergenten of reinigingsmaterialen. Gebruik geen agressieve detergenten, reinigingspoeder/melk of scherpe voorwerpen tijdens het reinigen. 1. Verwijder alle verpakkingsmaterialen. 2. Veeg de oppervlakken van het toestel met een vochtige doek of spons en droog het met een doek.Eerste opwarming
Warm het product ongeveer 30 minuten op en schakel het dan uit. Zo worden alle productieresten of -lagen afgebrand en verwijderd. WAARSCHUWING
Hete oppervlakken veroorzaken brandwonden! Het product kan heet zijn wanneer het in gebruik is. Raak de hete branders, de binnenste delen van de oven, verwarmers enz. nooit aan. Houd kinderen uit de buurt. Gebruik altijd warmtebestendige ovenhandschoenen wanneer u schotels in de oven plaatst of eruit haalt.Elektrische oven
1. Neem alle bakschalen en het grillrooster uit de oven. 2. Sluit de ovendeur. 3. Kies de stand Elektrisch. 4. Selecteer de hoogste grillstand; zie Hoe de elektrische oven te bedienen, pagina 18. 5. Laat de oven ongeveer 30 minuten werken. 6. Draai uw oven uit; zie Hoe de elektrische oven te bedienen, pagina 18Grilloven
1. Neem alle bakschalen en het grillrooster uit de oven. 2. Sluit de ovendeur. 3. Selecteer de hoogste grillstand; zie Hoe de grill bedienen, pagina 21. 4. Laat de oven ongeveer 30 minuten werken. 5. Draai uw grill uit; zie Hoe de grill bedienen, pagina 21  Tijdens het eerste gebruik kunnen gedurende enkele uren geur en rook worden afgegeven. Dit is heel normaal. Zorg ervoor dat de keuken goed geventileerd is om de rook en geur af te voeren. Voorkom directe inademing van de geproduceerde rook en geur.5 Hoe de oven te bedienen
Algemene informatie over bakken, roosteren en grillen
WAARSCHUWING
Hete oppervlakken veroorzaken brandwonden! Het product kan heet zijn wanneer het in gebruik is. Raak de hete branders, de binnenste delen van de oven, verwarmers enz. nooit aan. Houd kinderen uit de buurt. Gebruik altijd warmtebestendige ovenhandschoenen wanneer u schotels in de oven plaatst of eruit haalt. GEVAAR:
Wees voorzichtig bij het openen van de lovendeur, want er kan stoom ontsnappen. Ontsnappende stoom kan uw handen, gezicht en/of ogen verbranden.Tips bij het bakken
- Gebruik geschikte metalen schotels met een anti-kleeflaag, aluminium pannen of hittebestendige siliconenvormen. • Maak optimaal gebruik van de ruimte op het rek. • Zet de bakvorm in het midden van het rek. - Kies de juiste roosterpositie voordat u de oven of grill aanzet. Wijzig de roosterstand niet wanneer de oven heet is. • Houd de ovendeur gesloten.Tips bij het roosteren
- Het vooraf behandelen van hele kip, kalkoen en grote stukken vlees met dressings zoals citroensap en zwarte peper verhoogt de kookprestatie. - Vlees met botten heeft ongeveer 15 tot 30 minuten langer nodig om te bakken dan een braadstuk van dezelfde grootte zonder botten. - U moet ongeveer 4 tot 5 minuten bereidingstijd rekenen per centimeter dikte van het vlees. - Laat het vlees in de oven rusten voor ongeveer 10 minuten na het verstrijken van de kooktijd. De jus wordt beter verdeeld over het hele braadstuk en loopt niet weg wanneer het vlees wordt gesneden. - Vis moet in een vuurvaste schaal in het middelste of lage rooster worden geplaatst.Tips voor het grillen
Wanneer vlees, vis en gevogelte wordt gegrild, wordt dit snel bruin, heeft het een mooie korst en droogt het niet uit. Platte stukken, vleesspiezen en worst, maar ook groenten met een hoog watergehalte (bijv. tomaten en uien) zijn bijzonder geschikt om te worden gegrild. - Verdeel de te grillen stukken op de draadgrill of in de bakschaal met draadgrill zodanig dat de ingenomen ruimte de afmetingen van de verwarmer niet overschrijdt. - Schuif de draadgrill of de bakschaal met grill in de oven op het gewenste niveau. Als u grillt op de draadgrill, schuif dan de bakschaal naar het rek eronder om vet op te vangen. Voeg wat water toe aan de bakschaal om deze gemakkelijk te reinigen.  Voedsel dat niet geschikt is voor grillen heeft het risico te verbranden. Gebruik enkel grillvoedsel dat geschikt is voor intensieve grillwarmte. Plaats het voedsel niet te ver naar achteren in de grill. Dit is het heetste gebied en hier kan vettig voedsel vlam vatten.Hoe de elektrische oven te bedienen Selecteer temperatuur en werkingsmodus.
text_image
1 2Schakel de elektrische oven uit.
Draai de timer van de oven naar de stand "off" (uit).  Wanneer de timer op een bepaalde tijd is ingesteld, gaat deze automatisch uit; zie Het gebruik van de ovenklok, pagina 20 Draai de functieknop en temperatuurknop naar uit-positie (bovenste stand).Roosterstanden (voor modellen met draadgrill)
Het is belangrijk dat de draadgrill goed in het draadrek geplaatst wordt. De draadgrill moet tussen de draadrekken geschoven worden zoals afgebeeld in de figuur. Laat de draadgrill niet tegen de achterwand van de oven rusten. Schuif uw draadgrill naar het voorste deel van het rooster en duw deze voor goede grillresultaten met de deur op zijn plaats. text_image
1 2 3 4 5Werkingsmodussen
De volgorde van de hier getoonde werkingsmodi kan afwijken van de schikking op uw product.Boven- en onderverwarming
 Boven- en onderverwarming zijn in werking. Het voedsel wordt gelijk van de bovenkant en de onderkant verwarmd. Bijvoorbeeld geschikt voor cakes, gebak of cakes en stoofpotjes in bakvormen. Met één schaal koken.Onder
 Alleen de verwarmer onder is in werking. Bijvoorbeeld geschikt voor pizza en voor verder bruinen van gerechten aan de onderkant.  Deze functie moet ook gebruikt worden voor gemakkelijke stoomreiniging.Onder-/bovenverwarming met hetelucht
 Boven- en onderverwarming en ventilator (in de achterwand) zijn in werking. Door de ventilator wordt hete lucht snel gelijkmatig door de oven verspreid. Met één schaal koken.Volledige Grill
 De grote grill aan het ovenplafond is in werking. Deze is geschikt voor het grillen van grote hoeveelheden vlees. - Plaats grote en middelmatige porties in de juiste roosterstand onder de grillverwarmer om te grillen. - Stel de temperatuur in op het maximumniveau. - Draai het voedsel na de helft van de grilltijd om.Grill+Ventilator
 Het grilleffect is niet zo sterk als op volledige grill - Plaats kleine en middelgrote porties in juiste plaatpositie onder de grillverwarmer om te grillen. - Stel de gewenste temperatuur in. - Draai het voedsel na de helft van de grilltijd om.Booster
 Deze functie wordt gebruikt om de oven snel te verwarmen; niet geschikt om gerechten te bereiden. - Kies de gewenste temperatuur na deze functie geselecteerd te hebben. De temperatuurverlichting gaat aan en de oven wordt verwarmd. - De verlichting gaat uit als het verwarmingsproces voltooid is. Kies nu de gewenste functie om uw gerecht te bereiden. Het gebruik van de ovenklok text_image
10 20 30 40 50 60 70 80 90 100Het uitzetten van de oven voordat de ingestelde tijd is verstreken
1. Draai de tijdregelknop tegen de klok in totdat deze stopt. 2. Schakel de oven uit met de temperatuur- en functieknop.Tabel kooktijden
 De tijden in dit schema dienen als richtlijn. Tijden kunnen variëren door de voedseltemperatuur, dikte, soort en uw eigen bereidingsvoorkeuren.Bakken en roosteren
 1ste rek van de oven is het onderste rek.| Gerecht | Nummer bereidingsniveau | Roosterstanden | Temperatuur (°C) | Kooktijd (ong. in min.) | |
| **Cakes op plaat | Eén niveau | 3 | 175 | 25 ... 30 | |
| **Cakes in vorm | Eén niveau | 2 | 175 | 40 ... 50 | |
| **Cakes in bakpapier | Eén niveau | 3 | 175 | 25 ... 30 | |
| **Russisch gebak | Eén niveau | 3 | 200 | 5 ... 10 | |
| **Koekje | Eén niveau | 3 | 175 | 25 ... 30 | |
| **Deeggebak | Eén niveau | 2 | 200 | 30 ... 40 | |
| **Rijk gebak | Eén niveau | 2 | 200 | 25 ... 35 | |
| **Zuurdeeg | Eén niveau | 2 | 200 | 35 ... 45 | |
| **Lasagne | Eén niveau | 2 - 3 | 200 | 30 ... 40 | |
| **Pizza | Eén niveau | 2 | 200 ... 220 | 15 ... 20 | |
| Biefstuk (volledig) / rosbief | Eén niveau | 3 | 25 min. 250/max., dan 180 ... 190 | 100 ... 120 | |
| Lamsbout (stoofpotje) | Eén niveau | 3 | 25 min. 220 dan 180 ... 190 | 70 ... 90 | |
| Gebraden kip | Eén niveau | 2 | 15 min. 250/max., dan 180 ... 190 | 55 ... 65 | |
| Kalkoen (5,5 kg) | Eén niveau | 1 | 25 min. 250/max., dan 180 ... 190 | 150 ... 210 | |
| Vis | Eén niveau | 3 | 200 | 20 ... 30 |
Tips voor het bakken van cakes
- Als de cake te droog is, verhoog dan de temperatuur met zo'n 10 en verkort de baktijd. - Als de cake vochtig is, gebruik dan minder vocht of verlaag de temperatuur met 10°C. - Als de cake bovenop te donker is, zet deze dan op een lager rooster, verlaag de temperatuur en verleng de baktijd. - Als de cake goed van binnen gebakken is maar een plakkerige buitenkant heeft, gebruik dan minder vocht, verlaag de temperatuur en verhoog de baktijd.Tips bij het bakken van gebak
- Als de cake te droog is, verhoog dan de temperatuur met zo'n 10 en verkort de baktijd. Bevocht de deeglagen met een sausje van melk, olie, eieren en yoghurt. - Als het deeg te lang moet bakken, zorg ervoor dat de dikte van het deeg dat u bereid heeft niet hoger is dan de diepte van de schaal. - Als de bovenkant van het deeg bruin wordt maar het onderste deel niet, zorg ervoor dat er niet teveel van de voor het deeg gebruikte saus onderin het deeg zit. Probeer de saus gelijkmatig te verdelen tussen de deeglagen en op het gebak voor gelijkmatig bruinen.  Bereid het gebak conform de modus en temperatuur die in de bereidingstabel staan vermeld. Als het onderste deel niet bruin genoeg is, plaats het gebak de volgende keer dan op een lager rooster.Tips voor het bereiden van groenten
\- Als het groentegerecht vocht tekort komt en droog wordt, bereid het dan in een pan met deksel in plaats van een open schaal. In afgesloten pannen blijft het vocht van het gerecht behouden. \- Als een groentegerecht niet gekookt wordt, kook de groenten dan eerst en bereid ze als ingeblikt voedsel en plaats het gerecht in de oven.Hoe de grill bedienen
WAARSCHUWING
Sluit de ovendeur tijdens het grillen. Hete oppervlakken kunnen brandwonden veroorzaken! \- Draai bij het grillen de tijdregelknop tegen de klok in naar het handsymbool.Aanzetten van de grill
1. Draai de functieknop naar het gewenste grillsymbool. 2. Stel dan de gewenste grilltemperatuur in. 3. Verwarm, indien gewenst, ongeveer 5 minuten voor. » Het temperatuurlampje gaat aan.Het uitzetten van de grill
1. Draai de functieknop naar uit-positie (top).  Voedsel dat niet geschikt is voor grillen heeft het risico te verbranden. Gebruik enkel grillvoedsel dat geschikt is voor intensieve grillwarmte. Plaats het voedsel niet te ver naar achteren in de grill. Dit is het heetste gebied en hier kan vettig voedsel vlam vatten.Tabel kooktijden voor grillen
Grillen met elektrische grill| Voedsel | Plaatsingsniveau | Grilltijd (ongeveer) |
| Vis | 4...5 | 20...25 min. # |
| Gesneden kip | 4...5 | 25...35 min. |
| Lamskoteletten | 4...5 | 20...25 min. |
| Varkensvlees roosteren | 4...5 | 25...30 min. # |
| Kalfskoteletten | 4...5 | 25...30 min. # |
| Geroosterd brood | 4 | 1...2 min. |
| # afhankelijk van dikte | ||