
Competence 321 V W - Sütő AEG - Ingyenes használati útmutató
Találja meg az eszköz kézikönyvét ingyenesen Competence 321 V W AEG PDF formátumban.


Felhasználói kérdések a következőről Competence 321 V W AEG
0 kérdés erről a készülékről. Válaszolj azokra, amiket ismersz, vagy tedd fel a sajátod.
Tegyél fel egy új kérdést erről a készülékről
Töltse le az útmutatót a következőhöz Sütő PDF formátumban ingyenesen! Találja meg kézikönyvét Competence 321 V W - AEG és vegye vissza elektronikus eszközét a kezébe. Ezen az oldalon közzé van téve az eszköze használatához szükséges összes dokumentum. Competence 321 V W márka AEG.
HASZNÁLATI ÚTMUTATÓ Competence 321 V W AEG
COMPETENCE 321V
Free Standing Electric Cooker
Operating Instructions
Contents
| Safety instructions | |
| For the installer | 4-7 |
| For the user | 8 |
| Appliance description | |
| Features | 9 |
| First use | |
| Operating the controls | 10 |
| Switching on the electronic timer | 10 |
| Precleaning the oven | 11 |
| Operating the electronic timer | 12-15 |
| Hob | |
| Features | 16/17 |
| Vapour Vent | 18 |
| General | 19 |
| Operating the plates | 19-22 |
| How to use the ovens | |
| General | 23 |
| How to use the cooking functions for the ovens | 23/24 |
| Switching on and off | 25 |
| Baking | 26/27 |
| Roasting and stewing | 28/29 |
| Grilling | 30/31 |
| Specialised applications of the hot air oven | |
| - Menu cooking | 32 |
| - Defrosting | 33 |
| - Bottling | 34 |
| Cleaning and care | |
| Hob | 35 |
| Ovens | 36-40 |
| Optional extras | 41/42 |
| What to do if... | 43 |
| Service | 44 |
For the electrical installer
Safety Instructions
To comply with safety regulations manufacturers have to draw your attention to the following:
- According to the technical connection conditions of the electricity board serving your area, the appliance may only be connected to the mains supply by an approved electrical installer.
- In the fixed connection, a device allowing the appliance to be isolated on all poles from the mains supply with a contact opening width of at least 3 mm must be provided. Suitable isolating devices are line protection switches, fuses (to be removed from the holder), FI switches and contractors.
- Please note that in the case of built-in furniture units the plastic coating or the veneer must be applied with a heat resistant adhesive (100 °C). If the plastic coating and the adhesive are not heat resistant, it is possible for the coating to deform or become detached, particularly along the edges of the built-in furniture units.
- In respect of fire protection, the appliance conforms to type Y (IEC 335-2-6). Only appliances of this type may be installed on one side of adjacent upright kitchen housings or walls.
- The distance between a hob and fume extractor hood must be of the extent indicated in the installation instructions of the fume extractor hood.
- My plinth recess can be adjusted to line up with the furniture plinth of most types of kitchens.
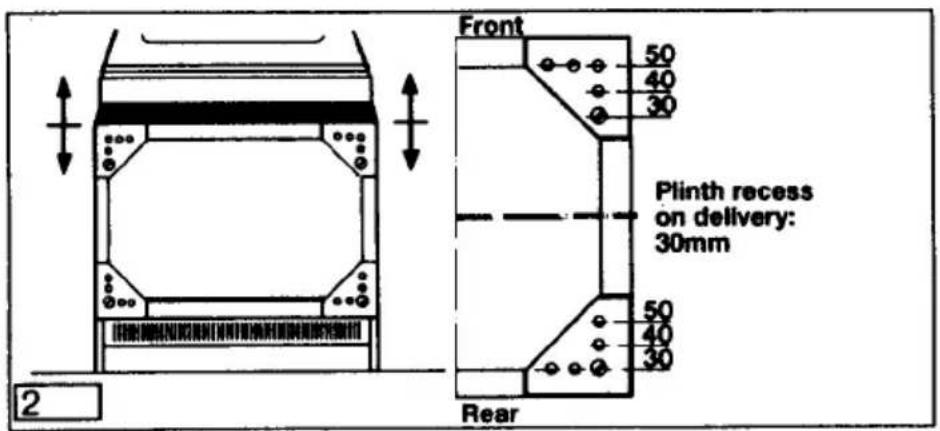
- My height can be adjusted from 85 cm to 92 cm to line up with your kitchen furniture. The side panels extend downwards after removing the adhesive strips. To adjust the height, lay the appliance on its back and screw the four feet into the four corners. Make sure the feet are all the same length before righting the appliance. You will find the feet supplied in a separate bag in the appliance.

Electrical connection
Local and national electrical regulations must be observed.
All instructions given by the Electricity Board must be followed carefully when connecting the oven to the mains supply.
This is a job for a qualified and approved electrician. The appliance is rated for 240 volts single phase and must be permanently connected.
The cooker must be installed in such a way that it can be easily disconnected from the mains supply before servicing, e.g., by an adjacent cooker control unit.
Sufficient cable should be left to enable the appliance to be removed from its position whilst still connected to the mains supply.
WARNING - THIS APPLIANCE MUST BE EARTHED!
Voltage and current
Please ensure that the voltage and current indicated on the rating plate agrees with the voltage of your electricity supply. 220/240 volts - i.e., (220/240 V a.c.).
- Loosen screws and open the lid of the terminal box sideways as illustrated in fig. G.

natural_image
Diagram of a mechanical device with internal components and directional arrows, no readable text or symbols present.- Pass cable through the grommet in the lower back panel and the cable clamp.
- Connect the wires to the terminals in accordance with the diagram. Ensure that links are correctly positioned between terminals (5 or 6 way terminal block). The length of the earth conductor must be adequate to ensure that in case of the cable clamp breaking the earth wire is subject to mechanic strain only after the live wires.
- Tighten the cable clamp screw.
- Close the cover of the terminal box and re-tighten screws.
- When pushing the cooker into its permanent position make sure that the mains cable is neither kinked nor trapped under the appliance.
After installation there must be no access to live parts.

Safety instructions
For the user
- When you use me to prepare your food, my oven doors and cooking plates become hot. Therefore keep small children well away from me.
This especially applies when you are grilling or pyrolytically cleaning my oven (where applicable). - Overheated fat and cooking oil may ignite. Prepare foods requiring fat or oil (chips) only under constant supervision.
- Do not use me to heat your room.
- Take care when using small electrical appliances near the cooker. Connection leads should not come in contact with hot hobs/cooking zones or get trapped in the hot oven door.
- Do not use my ceramic hob as a table top (where applicable).
- My ceramic hob, where applicable, is very durable but under certain circumstances it can break, e. g., heavy or pointed objects dropping onto the surface.
In case of breakage or cracks, do not use my hob. Turn all my controls for the hob to 0 and isolate me from the electrical supply. - Do not line my oven base with aluminium foil or place any other cooking utensil on my base, as this will trap heat resulting in damage to my enamel interior. This invalidates my warranty.
- The vitreous enamel in your oven is very durable. However, vitreous enamel is adversely affected by fruit acids (rhubarb, lemon, etc.) and tea which will discolour and dull the enamel. The performance of the oven is not affected. To prevent spillage of the above coming in contact with the enamel, place the cooking container on a baking sheet.
- Do not place the grill/meat pan on the cooking plate to make gravy. The direct heat will weaken the pan base resulting in warping and twisting of the pan when next used as a meat or grill pan.
- I comply with radio interference suppression specifications EN 55014 (previously EEC Directive 82/499) and as appropriate with EN 60555 relating to the Retroactive Effect of the Mains Supply.
Appliance description
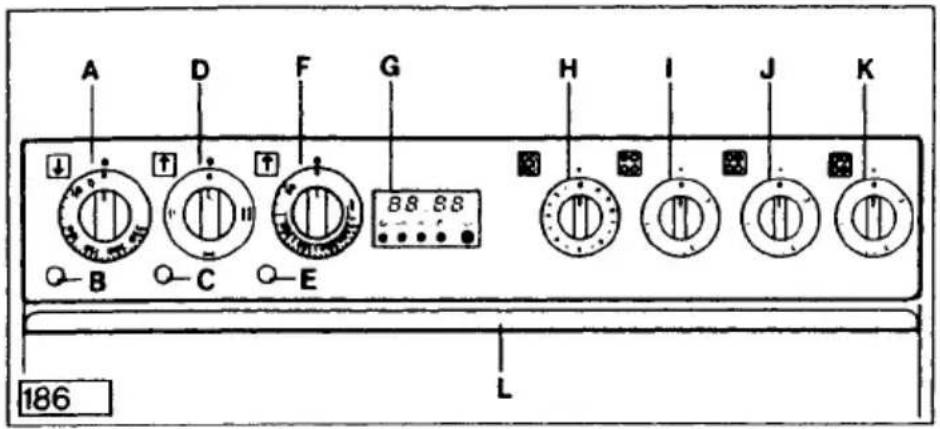
A Temperature control for main oven
B Thermostat control light (red) is on when main oven is heating
C Pilot light (yellow) is on when the appliance is switched on
D Cooking method selector for secondary oven
E Thermostat control light (red) is on when secondary oven is heating
F Temperature control for secondary oven
G Electronic clock with minute minder, and auto-timer for main oven
H Control knob for automatic plate, 210 mm diameter, front left
I Control knob for 145 mm diameter plate, rear left
J Control knob for 145 mm diameter plate, rear right
K Control knob for Halogen plate, 180 mm diameter, front right
L Handles to open my oven doors
The vapours from my two ovens are vented from the rear of the hob up to a cooker hood above (where fitted).
First Use
Operating the control knobs
My control knobs (D, I, J and K) can be turned clockwise or anticlockwise to any position. Further information to this can be found in the "hob" and "oven" sections.
However, my oven temperature control knobs (A) and (F) must be turned clockwise to set and anti-clockwise to turn off.
The same applies to my control knob (H) for my automatic plate.
Switching on the electronic timer
As soon as I am connected to the mains supply (and also after a power cut), the display in my electronic timer flashes 0.00.
Only when you have set me to the correct time of day am I ready to operate.
Setting the time of day
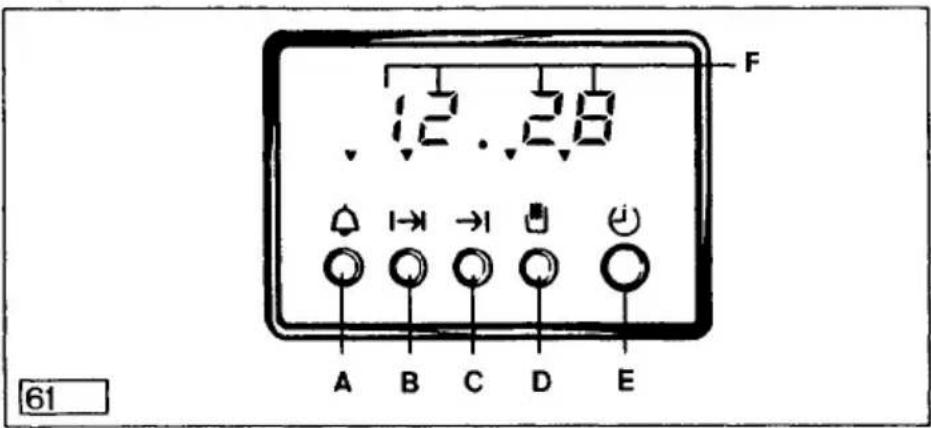
You should also be aware of the following:
- Press knob E 📁 to release. (This does not apply to appliances with an enamelled control panel).
- When finished with knob E press to retract. (This does not apply to appliances with an enamelled control panel).
- Press buttons A △ and B ➡ at the same time, hold them in position, and set the actual time of day by turning my knob E 🔊.
The time of day appears for you in display F.
- The red triangle above button D ☐ for automatic operation flashes. It is cancelled by pressing button D.
Only now is my oven ready to operate.
Before using my ovens for the first time, clean all accessories with warm water and washing-up liquid. Then switch both my ovens either to the conventional or the hot air cooking method (as appropriate) and select the highest temperature and leave both ovens on for at least one hour with both oven doors closed.
During this period there is an unavoidable odour which is not harmful to your health. We recommend that the room is well ventilated for your convenience.
When my ovens have cooled down, clean them with water and washing-up liquid.
Operating the electronic timer
Setting the minute minder
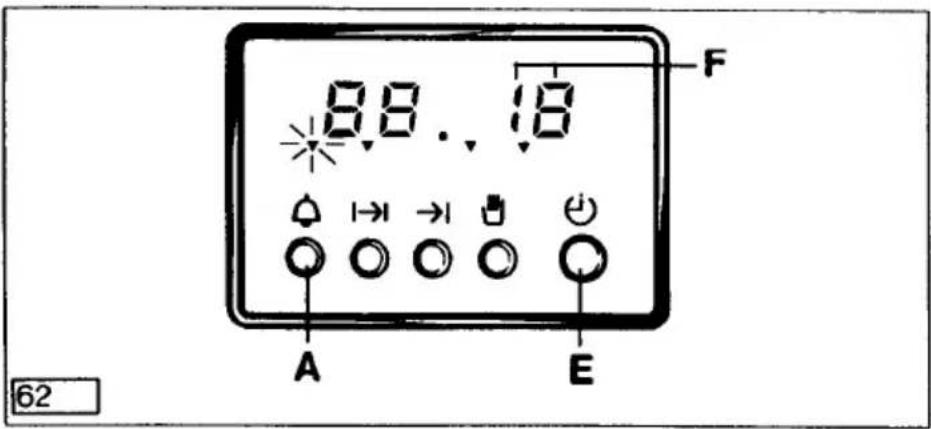
You should also be aware of the following:
- Press button A, hold it in position and set the required time with my knob E. The duration appears in display F. The red triangle above symbol is lit for the entire duration.
- The time of day reappears in display F after release of button A.
- To check the cooking time, press my button A. The remaining cooking time now appears in display F.
When the selected time has elapsed you will hear an audible signal which will switch off automatically after approximately 2 minutes. To switch this off manually press button A ☐.

My electronic timer is designed to switch my main oven on and off automatically.


Setting the minute minder (up to 23 hours 59 minutes)

Manual or automatic operation of the oven

Setting the cooking duration of the oven

Setting the end of the cooking duration (up to 23 hours 59 minutes in advance)

Rotary control for time selections

Indicator symbol, illuminated during time controlled cooking
How to programme the oven to switch off automatically
You should be aware of the following:

- Select the cooking method and temperature as required.
- Press my button B ⬆, hold it depressed, and enter the required duration with knob E ⏻. When my button B is released, the time of day reappears in display F.
- The red triangles above the symbols ⏻ and ⏱ show until the duration has elapsed.
My oven immediately switches on and automatically off after the elapsed duration.
At the end, an audible signal sounds for about two minutes. You can prematurely cancel it by pressing my button B. After time controlled cooking, set the cooking method selector and temperature control to the off position.
- The red triangle above button D ☐ flashes. It is cancelled by pressing my button D.
My oven is ready to operate manually again.
You can check the remaining cooking duration and the cooking end at any time during time controlled cooking by pressing either my button B or C.
If you want to cancel automatic operation, press my button B and turn my knob E until 0.00 appears in the display F. Then press my button D to cancel "AUTO". Then set my cooking method selector to the O (for multi-function ovens) and oven temperature control to the off position.
- Set my cooking method selector and temperature control as required.
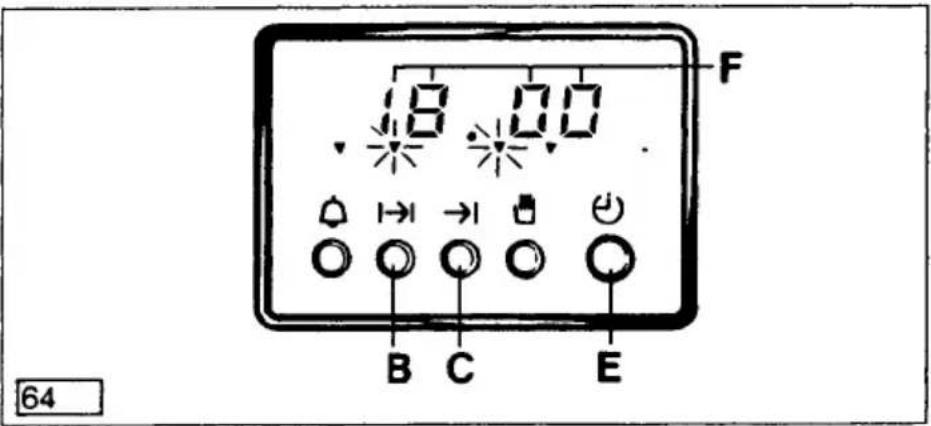
- Press my button B →, hold it depressed and enter the required duration with knob E ⏻, and then, by pressing my button C →, set the cooking end time.
- When my buttons B → and C → are released, the time of day reappears in display F.
- The red triangles above the symbols ⏻ and ⏱ show until the duration has elapsed. The symbol ⏻ disappears once the oven has been switched on.
My oven switches on automatically at the correct time, having deducted the cooking duration from the cooking end. It then switches off automatically at the cooking end.
At the end, an audible signal sounds for around two minutes.
You can prematurely cancel it by pressing my button B ↗.
- The red triangle above button D ☐ flashes. It is cancelled by pressing my button D.
My oven is ready to operate manually again.
You can check the remaining cooking duration and the cooking end at any time during time controlled cooking by pressing either my button B or C.
If you want to cancel automatic operation, press my button B and turn my knob E until 0.00 appears in the display F. Then press my button D to cancel "AUTO". Then set my cooking method selector to the O (for multi-function ovens) and oven temperature control to the off position.
The Hob
Features - Ceramic Hob
As this section covers several cooker models, not all plates described herein will be found on your model.
■ Single circuit plate
natural_image
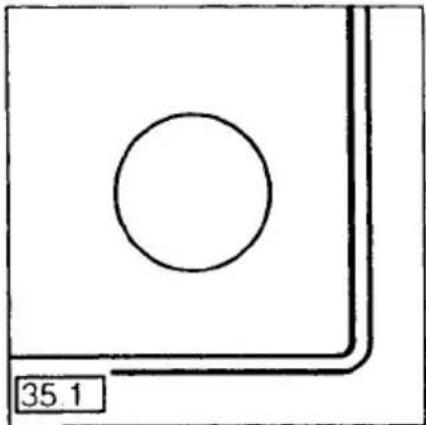
Simple geometric diagram with a circle inside a square and a numbered label '35.1' below (no text or symbols within the diagram itself)The plate is controlled by the knob on the control panel.
■ Dual circuit plate

natural_image
Simple line drawing of a camera aperture with no text or symbolsThe relevant control knob on the control panel switches on the small area and by additionally pressing the button on the control panel the second circuit can be activated to provide a large cooking surface.
Once the dual circuit plate is in operation the control knob is used to regulate the heat of the plate and to switch the plate off.
■ Elongated cooking plate
natural_image
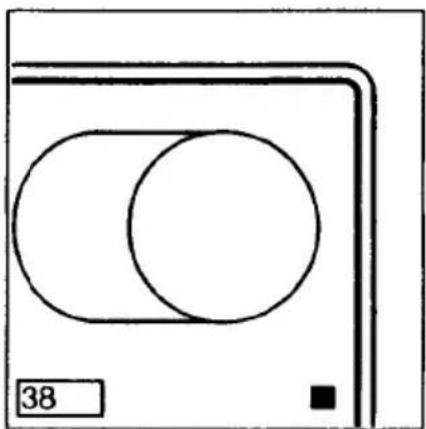
Simple line drawing of two overlapping circles inside a rectangular frame, with a black square marker labeled '38' (no text or symbols beyond the number)The relevant control knob on the control panel switches on the circular plate and by additionally pressing the button on the control panel the elongated plate can be activated to provide a large cooking surface.
The control knob regulates the heat of the plate and is used to switch the plate off.
■ Halogen plate

Special Halogen lamps provide the plate with rapid heating properties. The plate is regulated by the relevant control knob on the control panel.
■ Residual heat indicators
There is a residual heat indicator for each of my cooking plates. When the indicator is on it means the plate is still hot. After the plate has cooled down the indicator lamp goes out.
Vapour Vent
The vapours created in my oven are vented through the back of the hob.
Please press my push-button only when the cooking plates are not in operation to prevent the risk of burning yourself. Should you operate my push-button when the cooking plates are in use, we recommend you to use a long-handled cooking spoon to open or close the vent.

natural_image
Simple line drawing of a device with a handle, buttons, and curved surfaces (no text or symbols)This enables you to control the moisture in my oven during baking or roasting.
Closed: Push-button released, red edge visible
Open: Push-button pressed
During preheating and during the first third of the cooking time when baking bread or bread rolls, you should close my vapour vent to obtain better rising and browning.
During roasting, you should also keep my vapour vent closed, unless you want to achieve a crispy brown finish, e. g. for poultry and pork.
The tables on baking and roasting contain more detailed instructions.
General - the correct pans
■ For best results use good quality pans with smooth flat bases.
The pan base should be thick and flat. Pans with uneven, distorted or rough bases (e.g., cast iron) should not be used as they extend the cooking times and may cause damage to the cooking plates.
■ Cooking plates and pan base should be of the same or similar diameter. The pan should be placed centrally on the cooking plate.
■ Shiny based pans are unsuitable for use on halogen cooking plates. These pans may also damage the decor on normal ceramic hobs so do avoid using such pans on a ceramic hob.
Make use of the residual heat - switch the plates off 5 - 10 minutes before the end of the cooking time.
You are wasting energy if:

natural_image
Line drawing of four identical storage tanks arranged in a row, with no text or symbols present.Pan too small
Lid not closed
Uneven pan base
Pan too large (ceramic)
(Ceramic and solid plates)
After you have switched on one of my ceramic plates you will hear a faint hum caused by my radiant heating elements.
Do not place aluminium foil or plastic containers on my hot ceramic hob.
Do not allow sugar or foodstuffs containing sugar to come in contact with my hot ceramic hob - it will damage my hob.
Protect the cooking areas from damp to prevent them from deteriorating; dry pan base before use; dry cooking areas well after cleaning.
Keep the cooking plates clean – soiled plates work less efficiently and damage may occur to the hob.
Using the automatic cooking plate

To use the automatic cooking plate on a manual basis proceed as follows:
Frying
- Place the frying pan on the hob and turn the control knob to 9 to heat the pan. Place the food to be fried into the pan and lower the heat setting to 6. If this is too high or low adjust accordingly.
Cooking
- To bring the food to the boil turn the control to setting 9. To reduce the heat turn the control to a setting between 1 and 5 as required.
Intermediate settings e.g., 3• (or •2 on appliances with electronic indication) can also be selected.
The chart below will give you some recommendations for the use of the settings between 1 and 9.
My automatic system relieves you of having to turn the control to 9 first to heat pan and contents and then reduce the heat by turning to a lower setting as described above.
To use the automatic system proceed as follows:
- Turn control clockwise to A to activate the automatic system, then turn control to a setting between 1 and 8 as required. Setting 9 is ineffective when using the automatic system. Turning the control to A first provides an initial heat-boost to the cooking area before it automatically resets itself to the lower setting chosen. The length of the heat-boost is selected automatically by the system. On some models this period is indicated by a lamp.
- The automatic system can be cancelled by turning the controls to 0.
| Switch settings | Suggested uses |
| 9 | Fast frying, deep fat frying, to bring large quantities of liquid to the boil |
| 7-8 | Deep fat frying, sealing of meat, fast frying of meat, pancakes |
| 6-7 | Slow frying of eggs, liver, preparing roux, frying of meat, fish, sausages and pancakes, hamburgers |
| 4-5 | Cooking larger quantities of food, stews and soups, potatoes |
| 3-4 | Steaming vegetables or fish in own juice, pot roasting |
| 2-3 | Re-heating food, cooking rice, small amounts of potatoes, vegetables, simmering |
| 1-2 | Holding warm, to prepare egg or cream sauces, to melt butter, chocolate |
| 0 | Off. Use of residual heat |
Guidelines for automatic cooking plate
Using the non-automatic cooking plate
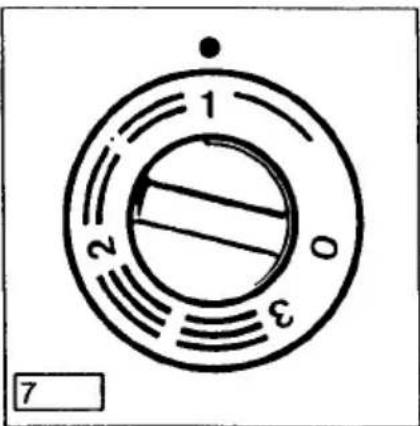
The cooking plate is infinitely variable. The chart below shows some basic settings and their uses.
0 Off. Use of residual heat
1 Holding warm, simmering of small quantities
|| Simmering
|| Simmering of larger quantities, slow frying
2 Frying, making roux
Frying
3 Fast frying/boiling, deep fat frying
To start cooking set control to 3 to heat pan and contents, continue cooking on a lower setting as required.
Ovens
Before using for the first time, refer to the section describing pre-cleaning of the ovens.
My secondary oven is a conventional one with top and bottom heat and grill.
My main oven is a hot air oven. For further details consult the relevant sections in this booklet.
My different cooking options
■ Conventional electric cooking

This method of cooking uniformly radiates heat from above and below. You should however make sure that you only cook on one level to ensure a uniform distribution of heat.
■ Dual-circuit grill

To grill large quantities of food use my large grill area [☐]. For smaller quantities, e.g., 4 slices of toast, use my smaller grill area [☐].
Hot air cooking

A fan ensures that hot air is continuously circulated around the oven allowing you to cook, bake and roast at several levels simultaneously. This cooking method also uses lower temperatures. This system saves you time and is highly energy efficient.
My ovens feature shelf supports which are removable for cleaning. The cooking tables supplied recommend the shelf positions on which my main oven will produce best results.
The roof of my secondary oven is fitted with a catalytic liner which largely prevents my oven roof from becoming soiled.

Fat filter
The fat filter supplied protects my fan against soiling. It must always be in place when:
- I am used as a Hot Air oven 📁 and meat is cooked in uncovered containers (i. e., do not insert when baking!);
- During Rotitherm roasting/grilling ☒ (on multi-function ovens only).
How to insert my fat filter:
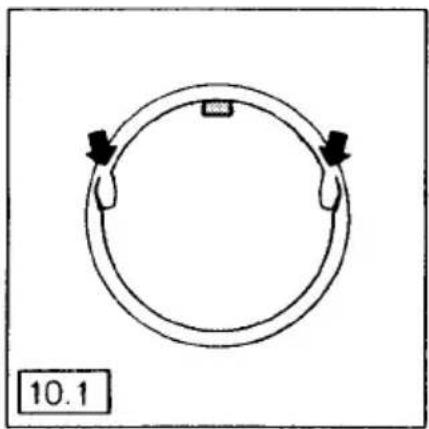
Hold the fat filter by the handle and insert the two tabs (see illustrations) into the slots in the back panel of the oven thereby covering the fan opening. The fat filter must cover the opening completely.
Cleaning the fat filter
The fat filter should be cleaned after every use. How to clean the filter, see "Cleaning the fat filter" in this booklet.
natural_image
Simple circular diagram with arrows indicating clockwise motion, labeled '10.1' at bottom (no text or symbols within the diagram itself)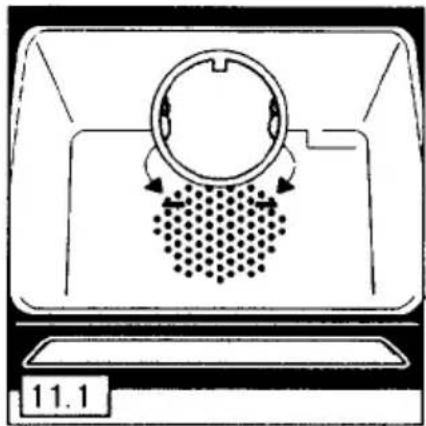
natural_image
Diagram of a device with a circular component and a hexagonal pattern inside, no text or symbols present
Oven interior light
The main oven is illuminated when you turn my oven temperature control to the lamp symbol ⚙️.
Secondary oven
Decide whether you want to use my conventional oven or my grill. Select the relevant symbol on my cooking method selector and the temperature required.
Main oven
Turn my temperature control clockwise to the required temperature.
Both ovens
The red thermostat lights are on for as long as the ovens are preheating. The thermostat lights cycle on and off during operation, indicating heating periods.
When pre-heating my oven (see information in the relevant cooking charts) position food in the oven after the red thermostat light has gone out for the first time. To utilise the residual heat in the oven switch the oven off 5 – 10 minutes before the end of the cooking time by returning the oven controls, anti-clockwise, to the off positions.
With conventional top/bottom heat

With hot air

Bakeware
Cakes are baked either in cake tins or alternatively on baking-sheets, full width baking sheets are available from AEG Spare Parts as an optional extra.
How bakeware affects browning:
1) Bakeware, which is dark in colour, has a non-stick coating or is made from aluminium is the best as heat is absorbed and then transferred to the cake resulting in shorter cooking times, lower energy and better browning.
2) Bakeware which is light in colour or is made of tin reflect the heat resulting in longer cooking times and poorer browning. It is advisable not to use such bakeware when using conventional top and bottom heat.
■ Baking on one level
Use one level only. The shallower the cake, the higher you should place it in my oven.
■ Baking times and temperatures
In many cases, it is not necessary to preheat me. The recommended temperatures and times given in the enclosed chart are guidelines only. To suit personal taste it may be necessary to make small adjustments.
■ Recommendations
I recommend hot air cooking for all types of baking. However, you may prefer cooked cheesecakes, all types of sponges, bread and rich fruit cakes cooked by the conventional method.
When you use my hot air cocking system I can cook on several levels simultaneously. This saves time, is convenient and energy efficient. I can also cook different cakes at the same time for instance a Victoria Sandwich and a Bakewell Tart or a Madeira Cake with a Dundee Cake. Simply make sure that the cooking temperatures are roughly the same and that sufficient space is left between the shelves to allow the air to circulate freely.
If baking cakes with a high moisture content such as several apple pies, it may be advisable to use only 2 shelves at the same time to prevent too much steam forming in the oven.
■ Baking times and temperatures
When baking with hot air it is often unnecessary to pre-heat my oven. For exceptions see enclosed baking charts.
If you use my oven for batch baking, choose cakes which require similar temperatures. Different cooking times can be overcome by either placing cakes into the oven later or by removing them earlier.
The baking chart is provided as a quick reference to keep near the oven.
When baking on more than one level the time given in the cooking charts has to be extended by 10-20 minutes.
■ Baking on one or more levels

flowchart
graph TD
    A["2"] --> B["4"]
    C["312.1"] --> A
    A --> D["Container Box"]
    B --> D
    style A fill:#f9f,stroke:#333
    style B fill:#bbf,stroke:#333
    style C fill:#f9f,stroke:#333

flowchart
graph TD
    A["2"] --> B["4"]
    B --> C["6"]
    C --> A
    style A fill:#f9f,stroke:#333
    style B fill:#ccf,stroke:#333
    style C fill:#cfc,stroke:#333
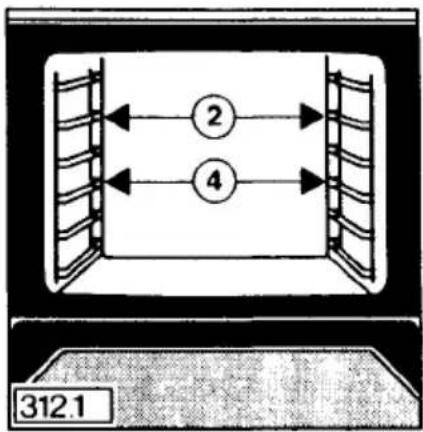
You can bake on several levels simultaneously. Place cake tins centrally on the wire shelves to ensure even cooking results. Full width baking sheets and additional wire shelves are available as optional extras. – See section "Optional Extras" in this booklet.
Roasting and stewing
Main oven with hot air
Secondary oven with conventional top and bottom heat
Recommendations
Wipe and weigh the meat. If stuffing is used, weigh the stuffed joint to calculate the cooking time. Place the joint in a suitable roasting dish, season with salt and pepper and brush lean joints with melted fat.
When cooking pies, place dish on a baking sheet to avoid spillage dripping on to the floor of the oven.
Cooking temperatures and times
■ The times and temperatures given in the roasting chart provide a guide when cooking meat. Some adjustments may be necessary depending on the type of meat to be cooked. Cooking times have been given for meat which is at room temperature.
■ Prime cuts can be cooked at higher temperatures than those which require a longer cooking time to tenderise the meat. A thick joint will require longer to cook through than a thinner one.
■ A boned rolled joint will require a longer cooking time than one with the bone left in as bone is a conductor of heat.
A small joint will require longer cooking time per 450 g (1 lb) than a large one. Allow an extra 30 minutes cooking time for joints up to and including 1.5 kg (3 lb).
If the joint is cooked in foil the temperature has to be increased by 10 °C. To brown the joint, remove foil for the last 15 minutes or so of the cooking time.
If cooking from frozen, place joint in a covered container and extend the calculated cooking time by approximately one third. To brown and crisp meat remove cover for the last 30 minutes of the cooking period.
Ovenware
Never use stainless steel ovenware in my oven, since it reflects the heat. Meat, poultry, and fish should be cooked in ovenproof dishes or in my meat pan for large quantities.
Choose a dish which is just a little larger than the joint itself. This will contain any fat in a smaller area and reduce splashing. If you wish to roast potatoes in the same dish around the joint rather than in a separate one you need to make allowances for this when selecting a suitable dish.
Never place cooking containers on the base of my oven, but on the wire shelf which you should insert on the 4th or 5th level from the top depending on the size of the food to be cooked.
When using the Rotitherm roasting/grilling method (where featured) place the joint on the wire shelf 3rd and 4th from the top (depending on size of roast) and slot the drip-pan into the 5th or 6th from the top to catch the juices. If you want to roast potatoes in the dripping, allow approximately 1 - 1^1/4 hours cooking time.
Turn the roast over halfway through cooking to ensure an all round crisp and brown joint.
Secondary Oven
My secondary oven is useful for cooking small quantities of food, e.g., one small cake or a small roast (max. 2kg). Do not overload my secondary oven as too much food may result in excessive amounts of steam developing.
When using my secondary oven place the cooking container on a wire shelf having removed all other oven equipment first.
Inserting/ removing grill handle
Warning!
The handle must be removed whilst grilling. Failing to do so will result in overheating of the handle. This may cause damage leading to breakage of the handle.
Inserting the handle
Lock it into the grip at the front of the pan. See illustration.

natural_image
Hand holding a tool with a downward arrow, no visible text or symbolsMake sure that the handle is firmly attached to the pan!
Removing the handle
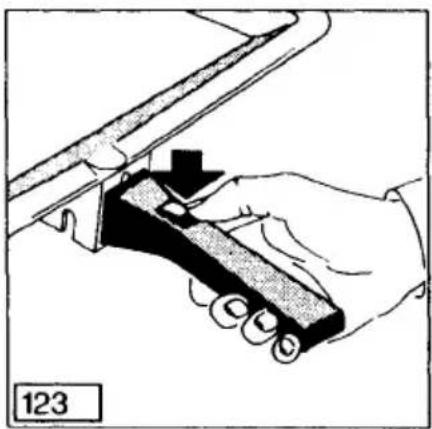
Press the button on the handle. See illustration.
natural_image
Illustration of a hand holding a tool with a downward arrow, no text or symbols presentPrime cuts of meat such as steaks and chops or fish weighing less than 1 kg can either be fried or grilled. Salt large pieces shortly before grilling and small ones just after grilling.
Turn meat/fish after half the grilling time so that both sides are uniformly browned. Turn thin pieces once; thicker pieces need turning more often.
On appliances with a dual circuit grill ☐, you should set the grill to grill symbol ☐ for small amounts and to symbol ☐ for larger amounts.
Select the highest setting on the variable temperature selector to seal the food and then turn down to a lower temperature. Position the wire shelf with the projection facing upwards or downwards in a shelf position of your choice depending on the thickness of the food you wish to grill.
Place the grill pan on the wire shelf and remove the grill pan handle.
Where the appliance features a vapour vent, this must be open during grilling.
Main oven: the oven door is closed during grilling (if oven features a grill element) Secondary oven: the oven door is left OPEN during grilling
There is no need to pre-heat my grill unless you prefer to do so.
Grill pan and wire shelf can be cleaned more easily if soaked in the sink with water and washing-up liquid after grilling.
Traditional grilling

How to use the grill
Menu cooking in my main oven
■ My hot air oven is extremely versatile since you can cook a complete meal in it. You can cook different foods at the same time, such as fish and cakes, without any transfer of smell or taste from one to the other.
■ When menu cooking try to choose foods which require similar cooking temperatures.
■ When cooking meat in uncovered containers the fat filter must be inserted.
When cooking pies or cakes at the same time as a roast you can choose pies or cakes which normally cook at temperatures 20°C lower than the roast. Temperature differences of 10 °C lower than the roast can be compensated by longer or shorter cooking times.
Shelf positions are chosen according to the food being cooked and in connection with the cooking guidelines in the recipe book supplied.
| Menu suggestion: | Meat Loaf |
| Potato Bake | |
| Buttered Carrots | |
| Fruity Rice Pudding |
| Ovenware: | Oblong ovenproof dishes |
| Shelf positions: | Meat Loaf & Potato BakeSide by side 3rd from topCarrots and Fruity Rice PuddingSide by side 5th from top |
| Cooking method: | Hot Air |
| Temperature: | 170-180 °C |
| Time: | Approx. 60-75 minutes |
| Vapour vent:(where featured) | Open unless you wish to retain moisture in the oven to prevent food from drying out such as pheasants etc. |
■ Food in flat aluminium containers defrost especially well since aluminium is a good heat conductor. For freezing and subsequent defrosting of meat and vegetable dishes, flat aluminium containers should therefore be used. For defrosting uncooked frozen meat and fruit, closed ovenroof dishes are especially well suited.
■ Position the containers on the wire shelf or in the meat pan 4th from the top.
| Food | Temp. °C | Time - Hours/min. | |
| Ready-made meals (1-4 portions) | 200 | 0.40-0.50 | thawing and heating ready to serve |
| Small cakes without cream fillings or toppings (in foil) | 200 | 0.15-0.20 | ready to serve |
| Large cakes without cream fillings or toppings (in foil) | 200 | 0.30-0.45 | ready to serve |
| Unsliced bread in foil (approx. 450 g/1 lb) | 200 | 0 15 + 0.30 al room temp. | ready to serve |
| Bread rolls | 200 | 0.15 + 0.30 al room temp. | ready to serve |
| Fruit, e.g. 300 g strawberries, raspberries (in covered container) | 200 | 0.15 + 0.15 al room temp. | ready to serve |
| Ready to cook foods (pizza, pies) | 200 | 0.45-1.00 | ready to serve |
| Uncooked joints (e.g. 1.5 kg) | 180-200 | 2.00-3.00 depending on type of meat | thawed and cooked |
| Chicken approx. 1 kg (cover with greaseproof paper) | 50 | 1.00-1.15 | thawed, remove giblets and roast |
Defrosting by Hot Air in the main oven

Bottling in the main oven
For bottling, use only jars with rubber seals and glass lids. Never use jars with screw fittings or bayonet catches or metal tins. And make sure you use fresh foodstuffs.
The oven holds 6 bottling jars of 1-1.5 litres capacity.
Pour 1 litre of hot water in the drip-pan so that the necessary humidity is retained in the oven.
■ Position the jars in the enamelled pan on the 4th level from the top. The jars should not touch, must wherever possible be filled to the same level with the same contents and must be securely clamped.
■ To switch on, turn my oven temperature control to 160 °C.
■ Keep an eye on the food being bottled.
As soon as the liquid in the first jars (when bottling fruit or gherkins) begins to bubble (after around 40-45 minutes for 1 litre jars), switch off the oven, but allow the jars to stand a further 30 minutes or so – around 15 minutes for soft fruit, e.g., strawberries – in the closed oven.
When bottling vegetables or meat, set back my oven temperature control to 150 °C as soon as the liquid in the first jars begins to bubble and allow the contents to cook for a further 60-90 minutes. Then switch off the oven and allow the jars to stand a further 30 minutes in the closed oven.
Cleaning and care
Although ceramic hobs are easy to clean they require regular care and cleaning to maintain them in good condition. Let the hob cool down before cleaning.
- Never use abrasive cleaners or scouring powders or scouring pads.
- Clean the hob after every use while the soilage is still minimal. Use a soft damp cloth and a little washing up liquid. Rub the hob dry using a soft clean cloth. Make sure that no residual cleaning material is left on the hob.
- Once a week clean the hob thoroughly with "Stahl-Fix" or "WK-Top" (available from AEG Spare Parts Department) using a soft clean cloth. Clean the hob with clean water and polish dry with a clean soft cloth. Make sure that no cleaning material is left on the hob to prevent damage to the hob.
Boiled over food
Soften such soilage with a damp cloth then remove deposits carefully using a glass scraper in a patent holder. Then clean the hob as described under 3.
Sugar and foodstuffs containing sugar - Plastic materials
Do not allow any of the above to come in contact with the hob. If they do, remove from the hob immediately while still hot using a glass scraper in a patent holder. Then clean hob after it has cooled down as described under 3. Melted sugar or plastic may damage the hob permanently. Damage by the above may be reduced by regular treatment with "Collo-profi" or "Cera-Fix" (cleaner/conditioner) available from AEG Spare Parts Department.
Stains
Mineral deposits present in hard water and food may cause discoloration in the form of grey, blue or mother of pearl stains which appear to be in the surface. Clean such discolorations while the cooking area is still warm (not hot) as described under 3.
Make sure that the cooking areas and the pan bases are clean before use. Grit for instance from vegetable peelings will scratch and damage the hob surface.
Recommended Cleaners
"Stahl-fix" for normal or heavy soilage, "Cera-fix" or "Collo-profi" for light soilage and conditioning. These are available from AEG Spare Parts Department:
"Stahl-fix" E No. 022 300 702
"Collo-profi" E No. 661 908 524, "Collo-profi" set consisting of "Collo-profi" glass scraper and polishing cloth E No. 661 908 626, and "Cera-fix" E No. 022 300 703.
A razor blade in a patent holder held at an angle of 30^ C can be used to remove stubborn soilage. This is also available from Spare Parts Department – E No. 298 001 273.
Ceramic hob - general
Cleaning and care
Ovens
These instructions refer to a large range of AEG double and single ovens.
■ All secondary ovens have a catalytic roof panel as standard.
The main oven has catalytic roof (except Vitratherm ceramic roof models), sides and back panels, either as standard or they are available as optional extras from your AEG retailer depending on the model you selected to buy (except ovens which include microwave). If your main oven has a pyrolytic self-cleaning system, then also consult the relevant pages for cleaning the oven.
Before cleaning my ovens
Allow my ovens to cool down if they have been used before cleaning.
Switch off the ovens before cleaning.
Cleaning
Ovens which are cleaned after every use need very little attention. If left and used again fat splashes will bake on and are then difficult to remove.
Clean glass surfaces, trims and controls with a soft cloth and lukewarm water. Polish dry with a soft cloth.
The ceramic glass oven roof (Vitratherm - where featured) can be cleaned with an oven spray or with "Ovenpad" or "Kleenoff".
Vitreous enamel interior surfaces can be cleaned with:
- a damp cloth and mild detergent
- cream cleaners such as "Jif" and a cloth.
- oven cleaners such as "Ovenpad" or "Kleenoff". Do follow the manufacturers instruction on the cleaning materials you use carefully.
Take care that oven cleaners do not come in contact with the fan or any other part of the oven other than the vitreous enamel.
Do not use scouring pads or abrasive powder which may scratch the surface of any part of the appliance.
Catalytic liners
Secondary oven
Do not use any detergents, abrasives or oven cleaners on catalytic liners
It should not normally be necessary to clean the catalytic roof in water. If you feel you would like to do so, take out the roof and wash in warm, soapy water, followed by rinsing in clear water.
If your oven has a catalytic roof, sides and back panel either as standard equipment or if you have bought these parts separately and fitted them, then the following information will be of interest to you.
The liners help to keep the oven cleaner as they clean themselves to a great extent during roasting and baking at temperatures above 200 °C. As cleaning may be improved by exposure to a higher temperature it may be necessary to run the oven at 250 °C for 1 or 2 hours per week. Before carrying out such a heat cycle, remove all oven equipment and make sure that you have cleaned the unlined surfaces to prevent any soil from baking on. For isolated stubborn stains use a soft brush and very hot soapy water. Never use abrasive cleaners or scouring powders.
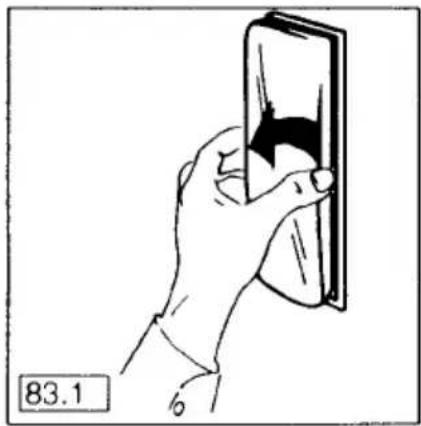
Warning! Isolate my oven from supply before replacing my oven lamp(s).
To clean the glass cover(s) or change my oven lamp(s) the glass cover(s) should only be unclipped by hand. Do not use tools of any kind.
After cleaning the lamp cover(s) or changing the light bulb(s) refit the lamp cover(s).
natural_image
Hand holding a smartphone with a black arrow pointing to the screen (no text or symbols on the device itself)You can illuminate my oven for cleaning. To do this, turn my oven control knob or my cooking method selector to the lamp position [8].
■ Thorough cleaning
For thorough cleaning, you can remove various parts:
Removing the oven door (main and/or secondary ovens)
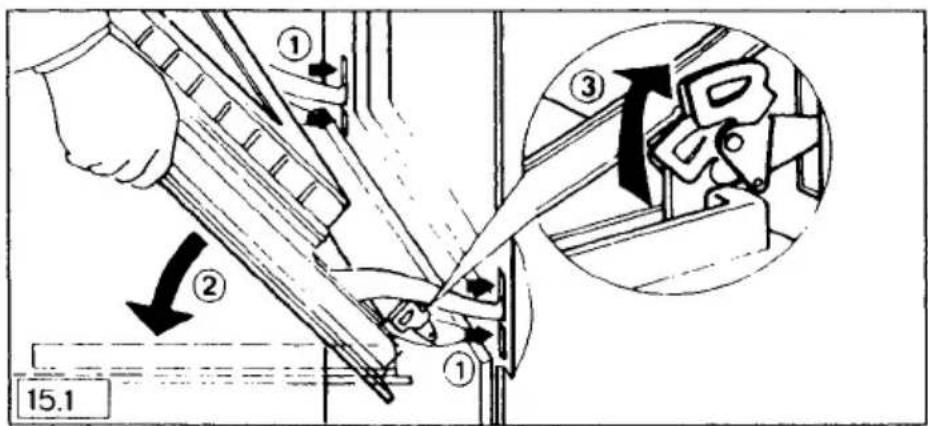
■ Removing the oven door Fully open the oven door.
- Lift the door catch on both door hinges (see illustration).
- Lift the door up and pull forward away from the oven (grip the sides - do not pull on the door handle!)

■ Replacing the oven door
- Insert both brackets into the oven front frame.
- Fully open the door and return door catches to their working positions (see illustration).
■ Shelf supports
To clean the sides of the oven, the shelf supports (see illustration) can be removed.

natural_image
Illustration of a hand using a ladder to lift a wall-mounted rack, with no text or symbols present.Pull the shelf support at the bottom, towards the centre of the oven and unhook from the top. Replace in reverse order.
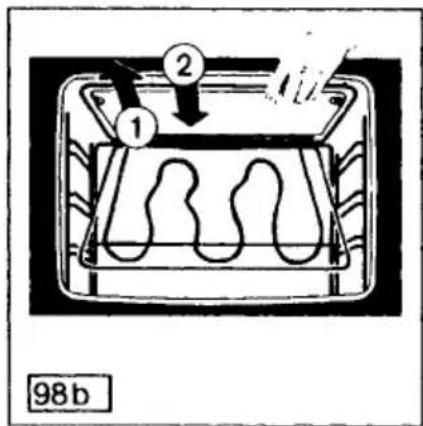
The catalytic roof of your secondary oven may require cleaning from time to time. To remove the roof panel proceed as follows:
Loosen the two holding screws (98a).
Remove the catalytic roof for cleaning (98b).
After cleaning re-insert roof panel and re-fasten screws (98c).


Cleaning the fat filter
The fat filter should be cleaned after every use. To remove filter, hold it by the handle and lift upwards. Place the fat filter in a saucepan, add approximately 2 tbsp. of automatic washing powder or 1 tbsp. of dishwasher powder and cover filter with water. Bring to the boil and leave to soak for approx. 30 mins. or longer depending on the degree of soiling. Make sure the solution does not boil over as it could mark your hob. Rinse filter in clear water and dry. For light soilage wash in a 65 °C dishwasher programme.
Optional extras

natural_image
Technical diagram of a heat exchanger or cooling unit with vertical fins and mounting brackets (no text or symbols)Additional wire shelf
ET No. 661 307 540
natural_image
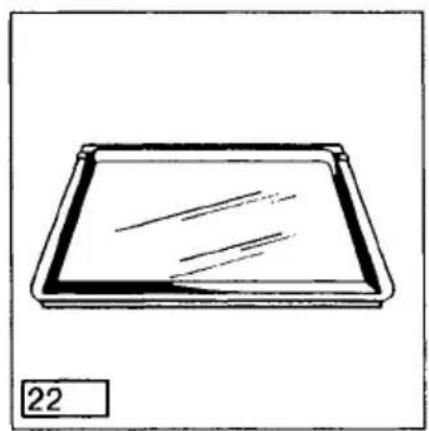
Simple line drawing of a rectangular tray with internal lines, labeled '22' at bottom left (no text or symbols on the tray itself)Baking sheet
E No. 611 898 620
natural_image
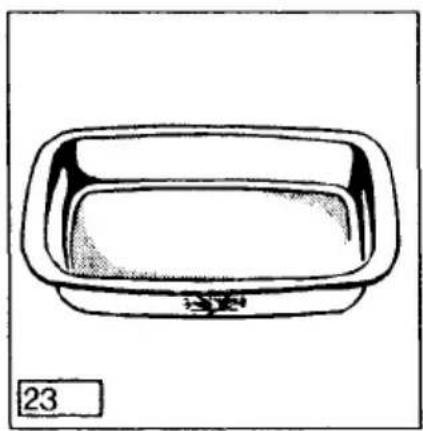
Simple line drawing of a rectangular container with a label '23' at the bottom (no other text or symbols)Ceramic oven dish
E No. 611 899 660

natural_image
Diagram of three open and closed electronic components with a central circular element, labeled '16.1' at bottom (no text or symbols on components)Catalytic set KTSB 2
(4 part set for main oven)
E No. 611 898 609
Optional extras

natural_image
Simple line drawing of three rectangular compartments with circular holes, no text or symbols presentKTKBO
(catalytic set 4 part for secondary oven without lamp)
E No. 611 898 612
What to do if . . . (something goes wrong)?
... the pilot lamps do not show?
... the oven does not heat?
-
You may well have not operated all relevant switches or
-
The fuse in the fuse box has blown.
... the fuses keep blowing?
Please call an approved and qualified electrician.
... the oven lamp fails
See cleaning and care on page 37.
Replacement lamps are not covered by warranty and are not free of charge.
... the oven cannot be switched on?
Check whether
... my time of day is flashing 00:00 or 0:00 in the display! If yes reset my time of day.
... the audible tone of my timer is emitting a continuous tone.
Press the corresponding button to switch it off!
... my timer display does not show, but the pilot lamps of the appliance still show?
... incorrect indications appear in my display!
... duration and end cannot be entered!
My timer has been wrongly operated or there has been a short power cut. Isolate my oven from the power supply, wait 30 seconds and then switch on the power. Reset the time of day on my electronic timer.
Please make sure that you are not able to rectify the fault yourself prior to calling a service engineer in connection with one of the aforementioned problems, as the cost involved will have to be passed on even during the warranty period.
Therefore, follow the instructions in this booklet and any additional information which may accompany this appliance carefully.
AEG electrical appliances comply with current safety regulations. Repairs to these appliances should only be carried out by qualified AEG engineers or AEG appointed service agents.
Repairs carried out by unauthorised personnel could lead to considerable damage and could pose a considerable safety hazard to the user.
Faults you can rectify yourself
Service
Should you be unable to locate the cause of the problem in spite of the above check-list please contact your AEG service department quoting the E and F numbers which you will find on the rating plate (see illustration/arrow).

Please transfer these numbers to the space provided below for your convenience.
These numbers enable the service department to prepare as far as possible any spare parts required to rectify the fault on first call.
This may save you money.
E-No.
F-No.
AEG Hausgeräte AG
Postfach 1036
D-90327 Nürnberg 1
© Copyright by AEG
H 260 209 040 - 03911./01 -
AEG Domestic Appliances Ltd
Customer Care Department
55-77 High Street
Slough
Berkshire SL1 1DZ
Telephone: 08705 350350
Operating instructions



- COMPETENCE 321V
- Contents
- For the electrical installer
- Safety Instructions
- Electrical connection
- WARNING - THIS APPLIANCE MUST BE EARTHED!
- Voltage and current
- For the user
- Appliance description
- First Use
- Operating the control knobs
- Switching on the electronic timer
- Setting the time of day
- You should also be aware of the following:
- Operating the electronic timer
- Setting the minute minder
- How to programme the oven to switch off automatically
- You should be aware of the following:
- My oven is ready to operate manually again.
- The Hob
- Features - Ceramic Hob
- ■ Elongated cooking plate
- ■ Halogen plate
- ■ Residual heat indicators
- Vapour Vent
- General - the correct pans
- Using the automatic cooking plate
- Frying
- Cooking
- Using the non-automatic cooking plate
- Ovens
- Fat filter
- Oven interior light
- Secondary oven
- Main oven
- Both ovens
- With conventional top/bottom heat
- With hot air
- Bakeware
- ■ Baking on one level
- ■ Baking times and temperatures
- ■ Recommendations
- ■ Baking on one or more levels
- Roasting and stewing
- Recommendations
- Cooking temperatures and times
- Ovenware
- Inserting/ removing grill handle
- Warning!
- Inserting the handle
- Removing the handle
- Menu cooking in my main oven
- Bottling in the main oven
- Cleaning and care
- Boiled over food
- Sugar and foodstuffs containing sugar - Plastic materials
- Stains
- Recommended Cleaners
- Before cleaning my ovens
- Cleaning
- Catalytic liners
- Warning! Isolate my oven from supply before replacing my oven lamp(s).
- ■ Thorough cleaning
- Removing the oven door (main and/or secondary ovens)
- ■ Shelf supports
- Cleaning the fat filter
- Optional extras
- What to do if . . . (something goes wrong)?
- Service
Márka : AEG
Modell : Competence 321 V W
Kategória : Sütő