ML2441 - Televízió BENQ - Ingyenes használati útmutató
Találja meg az eszköz kézikönyvét ingyenesen ML2441 BENQ PDF formátumban.

Felhasználói kérdések a következőről ML2441 BENQ
0 kérdés erről a készülékről. Válaszolj azokra, amiket ismersz, vagy tedd fel a sajátod.
Tegyél fel egy új kérdést erről a készülékről
Töltse le az útmutatót a következőhöz Televízió PDF formátumban ingyenesen! Találja meg kézikönyvét ML2441 - BENQ és vegye vissza elektronikus eszközét a kezébe. Ezen az oldalon közzé van téve az eszköze használatához szükséges összes dokumentum. ML2441 márka BENQ.
HASZNÁLATI ÚTMUTATÓ ML2441 BENQ
Benq
ML2241
ML2441
LED Backlight TV
Quick Start Guide/
User Manual
natural_image
Black-and-white image of a desktop computer monitor with 'BENQ' branding and a starry background (no readable text or symbols on screen)Table of Contents
Section 1: Quick Start Guide.... 1
-
Please read these instructions....2
What's in the Quick Start Guide? 2
What's in the User Manual? 2 -
Package contents....2
-
Select and prepare the installation location ....3
-
Installing the Base ....4
-
Disconnecting the base and arm ....5
-
Adjust the viewing angle ....6
-
Connect the antenna cable 6
-
Connect the power cable .....7
-
Activate the remote control ....8
Installing batteries 8
Battery safety notice....8
Using the remote control 9
- Initialize your TV ....10
11.View the TV programs ....10
Care and cleaning information ....11
What's next?......11
Section 2: User Manual....12
Getting to know your TV 13
Front view 13
Rear view 14
Getting to know the remote control ....16
Remote control 16
Using the remote control 20
Power on, off and standby 20
Adjusting sound setting 20
Changing channels 21
Adjusting backlight 22
Adjusting aspect ratio 22
Using the Teletext function 24
Connecting video and audio signals 26
Input options 26
Connecting the Composite Video input 26
Connecting the SCART input....27
Connecting the Component Video input 27
Connecting the S-Video input 28
Connecting the PC input....28
Connecting the DVI input 29
Connecting the HDMI input 29
Connecting the USB input 30
Connecting the headset audio output 30
Connecting to A/V Device with SPDIF input 31
OSD (On-Screen Display) menu 32
OSD structure 32
Navigating the OSD menu 34
Operations in the OSD menu 34
PICTURE menu 35
SOUND menu 38
TIME menu....39
OPTION menu....40
LOCK menu....42
CHANNEL menu....43
Connecting CI(Common Interface) card 44
Media Play - USB Device 45
Precautions when using a USB device 45
Media Screen Display 46
Viewing Photo or Slide Show....47
Playing a Music....48
Playing Movie 50
Display the Text 52
Reference....53
Disclaimer 53
Copyright....53
Dimensions 54
Specifications 55
Supported PC (D-Sub/DVI) input signal resolutions ..... 56
Supported Component Video input signal resolutions....57
Supported HDMI input signal resolutions 57
Setting up appropriate output resolution on PC 58
Troubleshooting....59
WEEE directive 60
CE DOC 60
Benq
ML2241/ML2441 LED Backlight TV
Section 1: Quick Start Guide
Welcome
1. Please read these instructions
Congratulations. You have a state-of-the-art flat widescreen digital LCD TV which should provide you with years of viewing pleasure. Please take a few minutes to read these quick start instructions through before installing and using the TV.
What's in the Quick Start Guide?
Section 1 contains the Quick Start Guide which provides you with enough information to setup the TV. This is section 1.
What's in the User Manual?
Section 2 contains the User Manual which details the features and functions of the TV, and provides product specifications and troubleshooting information for your further assistance. The User Manual also describes how to customise the TV settings so that you can gain the best viewing experience possible to suit your preferences and viewing environment.
2. Package contents
Unpack the TV and check that all the following items are included:

natural_image
Front view of a black CRT television monitor with a blank screen (no text or symbols visible)LCD TV (x1)

Power cord (x1)

User Guide (x1)

Quick Start Guide
(x1)

Service
Information (x1)
AAA battery (x2)

natural_image
Black remote control with black buttons and a red stripe (no visible text or symbols)Remote control (x1)
The type of power cable supplied may differ from that illustrated, dependant upon your region of purchase. If any item is missing or damaged, contact your place of purchase immediately and notify them of the discrepancy. Please keep the product documentation in a safe place for later reference.
Dispose of packaging wisely:
• The cardboard carton can be recycled.
- Do not leave plastic bags within reach of young children or babies.
- Check that you haven't left an accessory inside the packaging, before discarding.
For the primary safety of yourself and others, this TV should be handled with care to avoid damage to it or to persons which come into contact with it.
All LCD screens have a very thin protective layer of glass which is liable to marking or scratching, and cracking if struck or pressured. The liquid crystal substrate is also liable to damage under excessive force or extreme temperatures. Please handle with care.
3. Select and prepare the installation location
In order to prevent potential dangers and prolong the service life of the TV, please observe the following points when installing, operating and cleaning the TV.

Do NOT place the display on an uneven, sloping or unstable surface where it may fall and cause damage to itself or others.
Have a qualified technician secure the display where it is placed in case there is an earthquake.

Do NOT place the display near water, like a spa or pool, or in a position which will allow the splashing or spraying of water onto the display, like in front of an open window where rain water may enter.

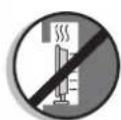
Do NOT place the display near or above sources of heat, such as radiators, heaters, fuel stoves and other heat-generating items (including audio amplifiers).
Otherwise heat may cause damages to the outer casing as well as the components inside.

If wall mounting, allow appropriate space on top for attaching the display to the wall bracket.

If wall mounting, have a suitable qualified and experienced tradesperson mount it safely. Use only a recommended display wall bracket for this model display and ensure that the mounting bracket (optional accessory) is securely screw fixed to the wall structure, and not just the wall render, lining or cladding. Ensure the bracket is level horizontally. Do not glue the bracket to the wall.

Do NOT place the display in an enclosed place without allowing for ventilation.

All Liquid Crystal Display (LCD) screens have a very thin protective layer of glass which is liable to marking or scratching, and cracking if struck or pressured.
The liquid crystal substrate is also liable to damage under excessive force or extreme temperatures. Please handle with care.

Do NOT cover or block the vents and openings while the display is switched on, as the heat may accumulate inside the display and result in danger.

Do NOT place the display in direct sun or where direct sun or spot lighting will shine onto the display, as the heat may damage the display and the bright light will make viewing the display more difficult than necessary.
If recessed into a wall opening, you must leave appropriate free space both top and bottom for mounting and removing the display.
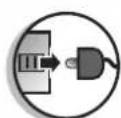
When installing the display, connect the power cord to socket-outlet which must be provided near the display and easily accessible. If a fault should occur during operation of the unit, operate the disconnect device to switch the power supply off, or disconnect the power cord.

Observe all warnings and cautions as labelled on the display.

To prevent the spread of fire, keep candles or other open flames away from this product at all times.
4. Installing the Base
Important safety notes
Please pay attention to the following before installing:
- For safety reasons, it is recommended that the installation be carried out by at least two adult persons.
- The LCD panel of the display is extremely fragile and subject to damages easily. Avoid touching the LCD panel when installing or moving the display, and take precautions not be let any objects come into contact with the panel. It is recommended that you use a soft, clean and lint-free towel to protect the display when installing.
• Pay attention to the stability of the location where the display will be placed.
Follow the instructions below to install the TV stand:
Open the box, and make sure all necessary parts are in the box. The package contains:

- Cover an even stable surface with a soft cloth. Place the LCD TV unit face down on the cloth. Fit the stand onto the bottom of the LCD TV unit as shown:

natural_image
Illustration of a device with a transparent lid and a black mesh cover being held, showing no text or symbols.- Then push until stand into the LCD TV's stand socket.
5. Disconnecting the base and arm
- Cover an even stable surface with a soft cloth. Place the LCD Display unit face down on the cloth. Fit the stand onto the bottom of the LCD Display unit as shown:
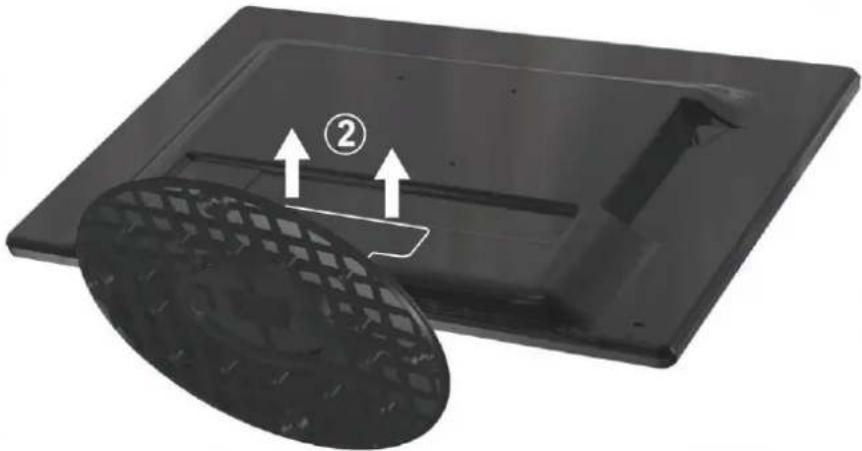
natural_image
3D rendering of a black plastic tray with a circular inset showing a mesh pattern and two arrows labeled ② (no text or symbols on the tray itself)- Pull the hinge cover on the arm upward to remove it, as shown above by (2).
- Remove the 4 screws from the hinge, then pull off the arm slowly, as shown below by (3).
- Removal of the arm from the stand base completed.

natural_image
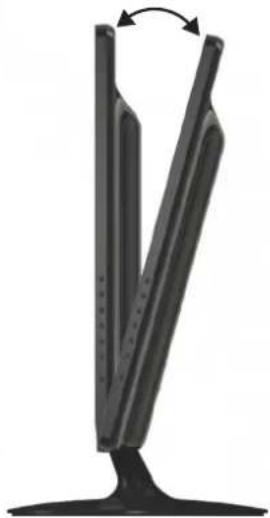
Illustration of hands holding a black plastic tray with arrows indicating movement or force, no text or symbols present.6. Adjust the viewing angle
This display is equipped with a adjustable base. If necessary, turn the display screen to an appropriate angle (maximum 20 degrees up and down) for more comfortable viewing.
natural_image
Black metal stand with a V-shaped cutout and an arrow indicating rotation (no text or symbols)7. Connect the antenna cable
Connect a TV antenna cable fly-lead from your TV antenna system or Cable TV (CATV) to the TV input on the TV. Check to make sure that the cable connection is firmly in place.
- A poor quality TV signal will produce a poor picture and/or sound on your TV. For high quality picture and sound, you will need a high quality TV signal.
Depending upon your location, for best TV signal reception, you should have a properly aligned outdoor TV antenna system. If need be, consult a professional antenna specialist.
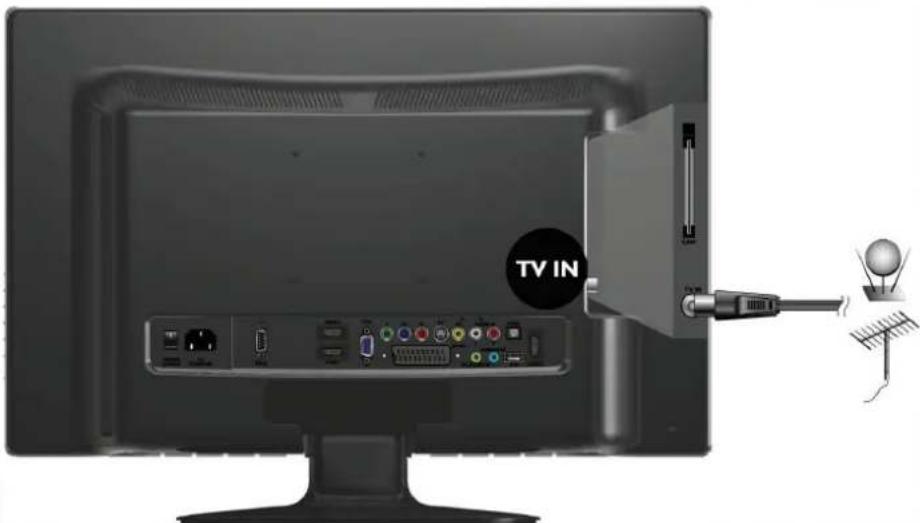
text_image
TV IN8. Connect the power cable
- Locate the power cable from the packaging, and plug the appropriate end into the AC IN socket on the rear of the TV (as illustrated below).
- Connect the other end into an appropriate wall power outlet, and flip the main power switch on the TV to the ON (|) position. The TV will enter standby mode and the power indicator (on the front lower right) will light up orange.
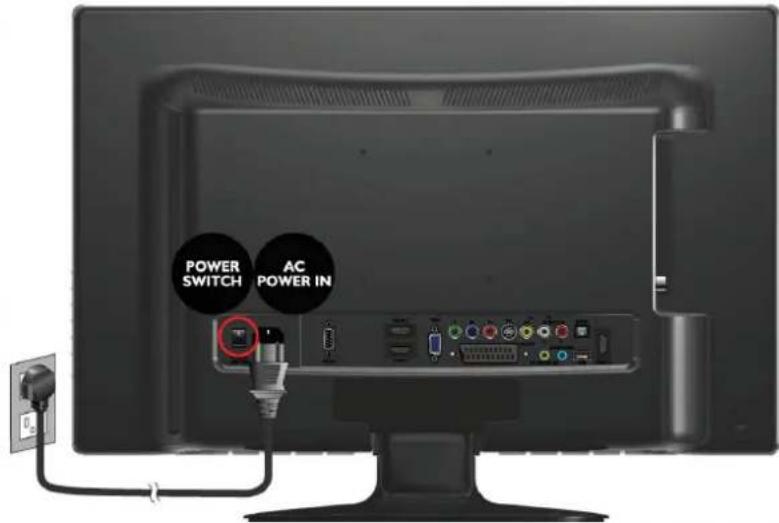
text_image
POWER SWITCH AC POWER IN- The type of power cable plug and socket illustrated may differ from the type used in your region.
- Only use an appropriate power cable for your region. Never use a power cable which appears damaged or frayed. Never change the plug type on a power cable. Be aware of total loading when using extension cords or multiple outlet power boards.
WARNING:
This TV has been engineered and manufactured with the highest priority on safety, however, IMPROPER HANDLING OR USE CAN RESULT IN POTENTIAL ELECTRICAL SHOCK OR FIRE HAZARD. Please handle this TV with care. If damaged, turn off the power and unplug the power cable from the TV. Transport the TV to your nearest BenQ authorised service centre for repair.
9. Activate the remote control
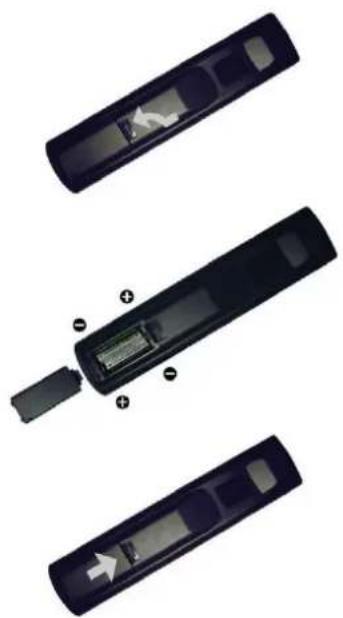
Installing batteries
-
Turn the remote control to reveal its back side, and open the lid of the battery compartment.
-
Insert the batteries (supplied) ensuring that the positive and negative marked battery terminals match the (+) and (-) marks in the battery compartment. Note that these batteries are provided for your convenience so that you can operate the display straight away. You should replace them as soon as possible.
-
Refit the lid of the battery compartment.
natural_image
Three views of a black remote control device showing internal components and a battery inside (no text or symbols visible)Battery safety notice
The use of the wrong type of batteries may cause chemical leaks and/or explosion. Please note the following:
• Always ensure that the batteries are inserted with the positive and negative terminals in the correct direction as shown in the battery compartment.
- Different types of batteries have different characteristics. Do not mix different types.
- Do not mix old and new batteries. Mixing old and new batteries will shorten battery life and/or cause chemical leaks from the old batteries.
- When batteries fail to function, replace them immediately.
• Chemicals which leak from batteries may cause skin irritation. If any chemical matter seeps out of the batteries, wipe it up immediately using a dry cloth.
- Due to varying storage conditions, the battery life for the batteries included with your TV may be shortened. Replace them within 3 months or as soon as you can after initial use.
Using the remote control
- Point and aim the top front of the remote control directly at the display when pressing the buttons.
- The remote control must be held at an angle within 30 degrees of the display's remote control sensor window to function correctly. The distance between the remote control and the sensors should not exceed 5 meters.
- Do not cover the sensor window on the front of the display (below the power indicator lamp), or place objects in front of it which will block the direct line of sight between the remote control and the sensor window on the display.
- Do not let the remote control become wet, or place it in humid environments (like bathrooms.)
- If the remote control sensor window on the display is in direct sunlight or strong light, the remote control may not operate properly. In this situation, change the light source or readjust the angle of your display, or operate the remote control from a location closer to the remote control sensor window on the display.

text_image
30° 30° Benq.10. Initialize your TV
Press Power button on the remote control. the TV will turn on and the power indicator will light up blue. When first turned on (and until tuned), the Initial Menu will display:

text_image
Installation Guide Backlight Home Language English Auto Tuning Backlight Home Language Auto Tuning Please select country first, Then select Start to update info. Country selection Others Start CancelBefore you can use your TV to view TV programs, you need to let it search for and tune TV station programs appropriate to your region. This process only needs to be done when the TV is newly installed, or whenever you install it in OSD menu for convenience of operation.
- When Backlight is highlighted, use the ◀ or ▶ buttons to adjust the backlight.
- Press ▼ button to select Language, use the ◀ or ▶ buttons to select the language displayed on the menu.
- Press ▼ button to select Auto Tuning and press the OK button.
- Press ◀ or ▶ to select the Country where you operate the TV, then select Start and press OK. The Auto Tuning automatically creates a list of receivable channels. Press the BACK button at any time to interrupt the memorization process. (The list cannot be created if interrupted)
11. View the TV programs
- Press PROG▲ or PROG▼ on the remote control to sequentially cycle through your TV channels.
- To select a single- or double-digit channel, press the corresponding channel selection buttons on the remote control. For example, to select channel 8, press 0 and 8 on the remote control.
- Press VOL ^+ or VOL ^- on the remote control to increase volume. The volume indicator will increase in length as volume rises.
- Press ✗ MUTE on the remote control to turn off the sound temporarily. Press ✗ MUTE once more, or press VOL+ to restore the sound level.
- You can press RETURN on the remote control to quickly return to the previous viewed channel.
Care and cleaning information
• Always turn off the display and disconnect it from the mains power before cleaning.
- Do NOT use cream, liquid, aerosol or spray cleaners. Use only a slightly damp well wrung-out (drip-free) and lint-free, clean soft cloth and lightly wipe the display. If necessary, use a pH-neutral liquid dish-washing detergent diluted with water on a separate clean lint-free cloth to remove oil or grease marks. Wipe over again with a cleandry lint-free cloth to remove any smear marks.
- Under close examination and in certain circumstances, you may notice that a few non-active pixels appear on the screen as a fixed point of colour. Please note that this does not affect the performance of your product as it is usually not visible at normal viewing distances.
- If the display is not going to be used for an extended period of time (like when you are going away for holidays), it should be switched off and unplugged from the wall outlet. You should also consider removing the batteries from the remote control (as they may leak)
- LCD (Liquid Crystal Display) screens, like plasma and conventional CRT (Cathode Ray Tube) screens, are also susceptible to 'screen burn-in' or 'image retention' which can be found on the screen as visible fixed lines and shades and can't be removed. If the circumstance is caused due to improper use by the user (such as the left and right straight lines occurred from displaying still pictures for long periods of time, the channel logos, etc.), an appropriate service fee should be charged. To avoid such permanent damage to the screen, it is advisable to take the following preventive actions:
(1) Avoid displaying still (inactive) image s for more than two hours.
(2) Change the screen image aspect ratio from time to time.
(3) If it is necessary to display still images for a long time, lower the contrast and brightness.
(4) The LCD monitor is designed for use in normal home environment, do not use it in any other place, such as public places.
What's next?
You have reached the end of Section 1: Quick Start Guide. By now, you should have a reasonable understanding of your new LCD TV and its controls, know how to install, connect, turn on and how to care for and maintain it.
Should you wish to maximize your viewing experience pleasure, Section 2 of this booklet contains the User Manual which describes how to customise the display settings to suit your preferences and viewing environment. It details the features and functions of the display and provides product specifications and troubleshooting information for your further assistance.
Benq
ML2241/ML2441 LED Backlight TV
Section 2: User Manual
Welcome
Getting to know your TV
Front view

text_image
BenQ 1 2 3 4 5 6 7| No. | Name | Description |
| 1 | Power Indicator | Lights up blue when the diaplay is powered on.Lights up orange when the diaplay is in standby mode. |
| 2 | Remote Control Receiver | Receives command signals from the remote control. Do not obstruct the sensor by placing any objects in front of it, which will hinder the reception of signals. |
| 3 | CH ▲/▼ button | Press these buttons to sequentially change channels.In the OSD menu, moves the selection highlight up or down. |
| 4 | INPUT button | Select input source.In the OSD menu, confirms the selection. |
| 5 | Power/Standby button | Toggles the display between standby mode and on. |
| 6 | MENU button | Displays the OSD (On-Screen Display) menu if not visible, or exits the current menu if displayed. |
| 7 | VOL +/- button | Adjusts the volume level of the speakers.In the OSD menu, moves the selection highlight left or right or changes settings. |
Rear view

text_image
A B CDE F G H I J K LMNO P Q R| No. | Name | Description |
| A | AC Power Switch | Use this switch to turn the main power on/off. |
| B | AC Power Input | Connect to a AC power source. |
| C | RS232 signal input | This port is for the service technician's use. |
| D | YPbPr Component Video Input | Connect to the Component video (Y Pb Pr) output of video devices. |
| E | HDMI2 Input Terminal | Connect to the HDMI digital audio/video output on digital video devices. |
| F | HDMI1 Input Terminal | Connect to the HDMI digital audio/video output or DVI digital video output on digital video devices. |
| G | VGA (PC Video Input) | Connect to the RGB video (D-sub) output of PCs. |
| H | SCART Input | Connect to external equipment with scart socket. This scart input allows audio and CVBS/YC/RGB+CVBS. RGB, S-VIDEO from an external devise to be shown on your TV. |
| I | AV Composite Video Input | Connect to the Composite video (AV) output of video devices. |
| J | PC/DVI Audio In | Connect to the audio output of PCs. This jack is used for PC Audio input, when the picture input is connected to VGA or DVI (via HDMI1 input) on the PC. |
| K | Headphone Jack | Connect to your headphones. |
| L | USB Terminal | Connector for software upgrades and Media Play, etc. |
| M | HDMI3 Input Terminal | Connect to the HDMI digital audio/video output on digital video devices. |
| N | SPDIF Optical output | Connect this port to the SPDIF input of A/V device. |
| O | Audio In L/R | Connect to the left/right audio channel output of video devices. |
| P | S-VIDEO Input | Connect to the S-Video output of video devices. |
| Q | CAM Card Slot | Plug the CAM Card into this slot. |
| R | RF Antenna / Cable TV Input | Connect to RF Cable or CATV cable. |
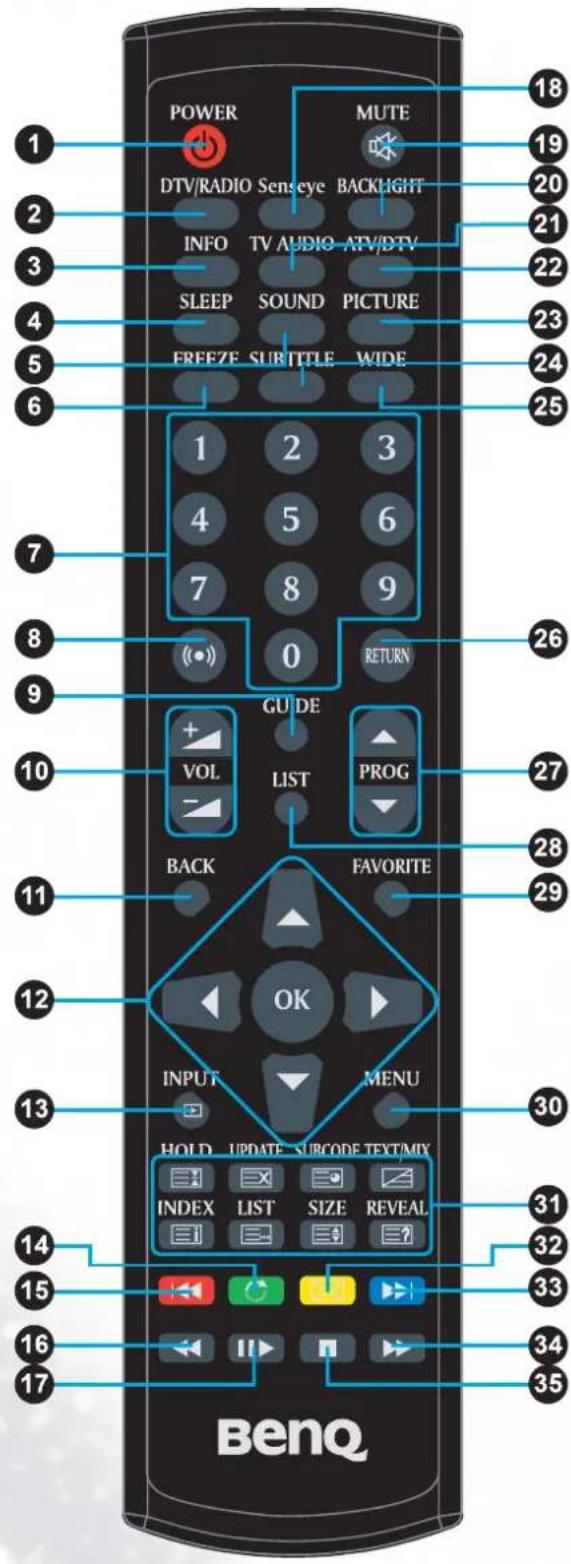
Getting to know the remote control
Remote Control

text_image
POWER MUTE DTV/RADIO Senseye BACKLIGHT INFO TV AUDIO ATV/DTV SLEEP SOUND PICTURE FREEZE SUBTITLE WIDE 1 2 3 4 5 6 7 8 9 0 RETURN GUIDE VOL LIST PROG BACK FAVORITE OK INPUT MENU HOLD UPDATE SUBCODE TEXT/MY INDEX LIST SIZE REVEAL 14 15 16 17 30 31 32 33 34 35 BenQ1. ⏻ POWER
Press this button to power the TV on or put it to the standby mode.
2. DTV/RADIO
Digital TV function. Switch between DTV/RADIO programs.
3. INFO
Press this button to display the input source
4. SLEEP
Press this button to set the automatic shut-off timer.
5. SOUND
To select sound mode from Standard, Music, Movie, Sports, and User.
6. FREEZE
Press this button to freeze the image on the screen.
Press the button again to resume viewing in real time.
7. 0-9 Channel selection
Press these buttons to select the program you wish to view.
8. ((●)) SRS
Press to switch on/off SRS TruSurround HD function.
9. GUIDE
Displays the Electronic Program Guide on the screen in DTV mode. Pressing again to turn Guide off.
10. VOL ^+ / VOL ^-
Press these buttons to raise or lower the volume level. information.
11. BACK
In the OSD menu, press this button to return to the previous menu page.
12. ▲/▼/◄/►/OK
- Press ▲ or ▼ to change TV programs sequentially.
- Press ◀ or ▶ to adjust volume.
When the OSD (On-Screen Display) menu displays on-screen:
- Press ▲ or ▼ to select settings.
- Press ◀ or ▶ to adjust settings.
- Press OK to execute selections, or to enter a submenu you have selected.
13. → INPUT
Press these buttons to sequentially change channels.

text_image
POWER MUTE DTV/RADIO Senseye BACKLIGHT INFO TV AUDIO ATV/DTV SLEEP SOUND PICTURE FREEZE SUBTITLE WIDE 1 2 3 4 5 6 7 8 9 (●) 0 RETURN GU DE VOL LIST PROG BACK FAVORITE OK INPUT MENU HOLD UPDATE SUBCODE TEXT/MY INDEX LIST SIZE REVEAL 14 15 16 17 30 31 32 33 34 35 BenQ14. Green/ Rotate
- Green: Function key for teletext, program edit, or electric program guide.
- Rotate: Rotate the photo 90^ , 180^ , 270^ , 360^ clockwise in Media.
15. Red/ Skip (Backwards)
- Red: Function key for teletext, program edit, or electric program guide.
- Skip: Go to previous chapter/track/file in Media.
16. ◀ Scan (Backwards)
Search backwards in Media.
17. ▶ Play/Pause
Start or pause playback of media files in Media.
18. Senseye
Press this button to display the senseye menu.
19. MUTE
Press this button to mute the sound output. Press it again to restore the sound output.
20. BACKLIGHT
Press this button to adjust your desired screen backlight level.
21. TV AUDIO
- Select sound modulation in ATV.
- Select audio language in DTV.
- Select the Left/Right Audio Channels in other sources (except ATV, DTV, and Media)
22. ATV/DTV
Swap between ATV/DTV. Swap to the last TV source when in other source.
23. PICTURE
Press this button to select a desired preset picture mode: Standard, Mild, User, Dynamic.
24. SUBTITLE
• ATV: Switch between available subtitle languages.
• DTV: Display subtitle language selection box.
25. WIDE
Press this button to adjust the screen image aspect ratio.
26. RETURN
Press to toggle between the current channel and the previous one.
27. PROG▼/▲
Press these buttons to sequentially change channels.
text_image
POWER MUTE DTV/RADIO Sense eye BACKLIGHT INFO TV AUDIO ATV/DTV SLEEP SOUND PICTURE FREEZE SUBTITLE WIDE 1 2 3 4 5 6 7 8 9 0 RETURN GUIDE VOL LIST PROG BACK FAVORITE OK INPUT MENU HOLD UPDATE SURCODE TEXT/MY INDEX LIST SIZE REVEAL 14 15 16 17 30 31 32 33 34 35 BenQ28. LIST
Display channel list.
29. FAVORITE
Press this button to jump to one of the favorite channels you have stored.
30. MENU
Press this button to display the OSD menu for commands and settings. Press it again to close.
31. TELETEXT Function
- ☐ HOLD: Press this button to remove the information from the display and stop the automatic page change which will occur if a teletext page consists of 2 or more sub pages.
- UPDATE: Input a page number, and then press this button. The teletext page will be closed and will show the update symbol+- on the top left corner. When the update symbol changes to the page number, it means the page is complete downloaded.
- SUBCODE: When a selected Teletext page has hidden sub pages or timed pages, these pages can be seen by using sub code function.
- TEXT/MIX:
In TV Mode: Press the TEXT/ MIX button to enter the Teletext mode.
In TELETEXT Mode: Press the button again to superimpose a Teletext broadcast onto the screen of current TV program (mixed Mode).
In MIXED Mode: Press the button again to return back to the normal TV Screen (current program).
- INDEX: Press the Index button to return back to index page.
- LIST: Press this button you force the Teletext to LIST Mode. List the pages that you have previously stored in the memory. Press LIST button again to exit from LIST Mode to Teletext.
- SIZE: Select double height text under Teletext mode for full screen.
- ☐ REVEAL: Press this button to display concealed information, such as solutions of riddles or puzzles. Press this button again to remove the information from the display.

text_image
POWER MUTE DTV/RADIO Sent eye BACKLIGHT INFO TV AUDIO ATV/DTV SLEEP SOUND PICTURE FREEZE SUBTITLE WIDE 1 2 3 4 5 6 7 8 9 0 RETURN GUIDE VOL LIST PROG BACK FAVORITE OK INPUT MENU HOLD UPDATE SUBCODE TEXT/MIX INDEX LIST SIZE REVEAL 14 15 16 17 30 31 32 33 34 35 BenQ32. Yellow/Zoom
- Yellow: Function key for teletext, program edit, or electric program guide.
- Zoom: Magnifies the picture contents horizontally and vertically in Media.
33. Blue/ Skip (Forwards)
- Blue: Function key for teletext, program edit, or electric program guide.
- Skip: Go to next chapter/track/file in Media.
34. ▶▶ Scan (Forwards)
Search forwards in Media.
35. ■ Stop
Stops playback in Media.
Using the remote control
Power on, off and standby
Turning on the TV
After plugging the TV's power cable into a wall outlet, the TV will enter standby mode automatically. The power indicator will light up orange. Press ⚙Power on the remote control. The TV will turn on and the power indicator will change to blue.
Putting the display to standby
Press Power on the remote control again, and the TV will return to standby mode. The power indicator will turn orange.
The display still consumes a very small amount of power (about 0.5W) in standby mode.
Switching inputs
- Turn on all connected equipment or devices before selecting an input.
- Press INPUT on the remote control to view the current selected input. Press INPUT button, use ▲▼ button to select your desired input then press OK button to confirm. You can also press INPUT continuously to switch between different input sources.
- These options will only appear when corresponding signals are connected to the display. - Be aware that HDMI input must be HDCP-compliant to be displayed.
When switching to the HDMI inputs, the display needs several seconds to detect the HDCP information from the signal source and no image will be displayed during this period. This is not a malfunction.

text_image
Input Source DTV ATV SCART YPbPr VGA HDMI1 HDMI2 HDMI3 AV S-Video Media BACK OKAdjusting sound setting
Adjusting volume
- Press VOL ^+ on the remote control to increase volume. The volume indicator increases in length as volume rises.
- Press VOL—on the remote control to decrease volume. The volume indicator decreases in length as volume falls.
Mute setting
Press ⚙ MUTE on the remote control to turn off the sound temporarily.
Press ⚙ MUTE once more, or press VOL ^+ to restore the sound level.
Selecting a TV sound mode
Press TV AUDIO on the remote control to toggle TV sound among available modes. (The modes available will depend on the TV or Video sound system being received).
Selecting a preset audio mode
Press SOUND on the remote control to select a suitable preset audio mode form Standard, Music, Movie, Sports, or User. You can also customise the User mode according to your own preference.
Changing channels
Selecting a channel program directly
To select a program number, press the channel number first using the channel selection buttons, and then press OK.
For example, to select channel 8, press 8, and then OK.
To select channel 28, press ②, ⑧, and then OK.
Changing channels sequentially
Press PROG▲ or PROG▼ on the remote control to sequentially cycle through your TV channels.
Selecting channels from Channel List
Press the OK button and the Channel List will be displayed. Press OK key on the channel you wish to watch, and you can be directed to that channel immediately.
Returning to the previous selected channel
The RETURN button on the remote control allows you to quickly switch between the current selected channel and the previous one.
Selecting favorite channels
Press FAVORITE key to display the favorite channels you've added to the FAVORITE LIST. You can use ▲ or ▼ to select a favourite channel, and then press OK to direct to that channel immediately. To set up favourite channels, select the Program Edit function in CHANNEL menu.
Selecting a picture modes
To select a picture mode, press PICTURE on the remote control. This enables you to select from the following settings:
| Picture mode | Description |
| Standard | Suitable for viewing in environments with normal lighting condition. |
| Mild | Images are displayed with moderate brightness and contrast, making it suitable for prolonged viewing. |
| User | Your own customised picture mode. |
| Dynamic | Suitable for brighter environments. The contrast of the TV display will be adjusted to higher level for better view. |
Using the sleep timer
The sleep timer is useful if you want the display to automatically to go into standby mode after a set period of time. Press SLEEP repeatedly on the remote control to select the sleep timer from Off to 240 minutes.
Using Electronic Program Guide (EPG) function
Press the GUIDE button to display the Electronic Program Guide.
Press the ▲ or ▼ button to scroll up or down the channels, ◀ or ▶ to change time period. To change date, press the Yellow key first, and then select date with ◀ or ▶. You can also pause at a channel and press the INFO key to view the detailed program information, or press OK to switch to that program directly. You can also add a reminder on a program by pressing the Blue button. When the reminder event is about to start, a window will appear to remind you for watching. To check the programs you've added by Reminder, press the Green key to display the SCHEDULE LIST. To delete a Reminder, select with ▲ or ▼ and press the Red key. Press the BACK button to exit Electronic Program Guide.
Adjusting backlight
To adjust the intensity of your TV's backlight system, press BACKLIGHT on the remote control repeatedly to select a suitable level. When viewing the TV in dimly lit rooms it is recommended to reduce the backlight which will reduce the image brightness and make the dark areas of the image darker, thus maintaining a high contrast image in a dark environment.
Freeze image on screen
Press FREEZE once to stop the screen at the current image, and press again to resume the screen playing.
This function allows you to stop the screen at the current image. However the current video will keep running at the background, and the screen will resume playing from the video signal received at the moment you cancel the function, not from the freezed image.
- In order to avoid possible "image retention" or "screen burn-in" on the LCD screen, it is recommended that you change the aspect ratio from time to time, and not to display a still image for more than two hours.
Adjusting aspect ratio
Press WIDE on the remote control to cycle through the aspect ratios. The table below shows the resulting images in relation to the input image when different aspects are selected:
| Aspect ratio | Description and usage | Aspect ratio of input video | |
| 4:3 | 16:9 | ||
 |  | ||
| Full | Stretches a 4:3 image to16:9 aspect proportions.Recommended for use when viewing video sources which are already in 16:9 aspect such as digital TV and most widescreen DVDs. | 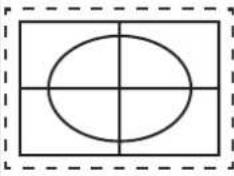 | 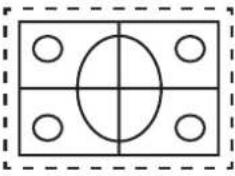 |
| Zoom1 | Stretches a 4:3 image to 16:9 aspect proportions and enlarges the resultant image on the screen. Recommended for use when viewing video sources which are in 4:3 aspect such as analog TV input. |  | 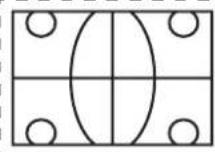 |
| Zoom2 | Stretches a 4:3 image to 16:9 aspect proportions and enlarges the resultant image on the screen. Recommended for use when viewing video sources which are in 4:3 aspect such as analog TV input. |  |  |
| Panorama | Resizes a 4:3 image to 16:9 aspect proportions, and trims off the top and bottom strips. Recommended for use when viewing 4:3 aspect video presenting compressed 16:9 aspect images in a 4:3 aspect frame in a socalled letterbox format (black strips along the top and bottom). |  | /Y6XD/ |
| Auto | Stretches a 4:3 image to the width of a 16:9 aspect image proportions. Recommended for use in filling the screen with a 4:3 aspect image. |  | 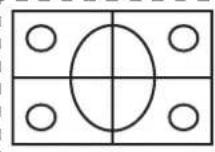 |
| 4:3 | Resizes the image to 4:3 aspect proportions. Recommended for use when viewing video sources which are already in 4:3 aspect such as analog TV and PC videoinput. |  |  |
| Under Scan | Displays the original signals on the screen in 1:1 output.Recommended for use when in HDMI-PC source.The Underscan aspect ratio will only appear when in HDMI input source and the resolution is video timing. |  | 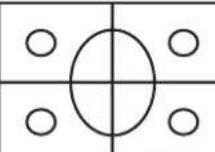 |
- When viewing PC, only "Full" and "4:3" are available for selection.
- To avoid possible "image retention" or "screen burn-in" on the LCD screen, it is recommended that you change the aspect ratio from time to time, and prevent the display from displaying a static image for a prolonged period of time.
Using the Teletext function
Press ☑ TEXT/MIX on the remote control to display Teletext, and again to turn it off. Teletext is only available when ATV is selected as the input source, and a signal which transmits Teletext is currently displayed. Not all TV stations and video signals broadcast Teletext. If in doubt, please contact the TV station.
When Teletext displays on-screen, you can:
TEXT/MIX/PICTURE
- In TV Mode: Press the TEXT/ MIX/ PICTURE button to enter the Teletext mode.
- In TELETEXT Mode: Press the button again to superimpose a Teletext broadcast onto the screen of current TV program (mixed Mode).
- In MIXED Mode: Press the button again to return back to the normal TV Screen (current program).
SUBCODE
When a selected Teletext page with hidden sub pages or timed pages, these pages can be seen by the following manner:
- Press the sub code button. Screen will show « / _ _ ».
- Enter 4 digits number button corresponding to the sub page desired. E.g. 0001 for sub page number 1.
- Wait until the page appears.
UPDATE
- Input a page number, and then press this button. The teletext page will be closed and will show the update symbol+- on the top left corner. When the update symbol changes to the page number, it means the page is complete downloaded.
- Press this button again to open the teletext page.
HOLD
- Press this button to remove the information from the display and stop the automatic page change which will occur if a teletext page consists of 2 or more sub pages.
- To continue press this button again. The number of sub pages and the sub page displayed is, usually, shown on the screen below the time. When this button is pressed the stop symbol is displayed at the left-top corner of the screen and the automatic changing is inhibited.
REVEAL
- Press this button to display concealed information, such as solutions of riddles or puzzles.
- Press this button again to remove the information from the display.
SIZE
Select double height text under Teletext mode for full screen.
- Press this button to enlarge the top half of the page.
- Press this button again to enlarge the bottom half of the page.
- Press this button again to return to the normal display.
LIST
- Press this button you force the Teletext to LIST Mode. It means that row 24 (bottom row of Teletext) will not have transmitting information, only the pages that you have previously stored in the memory.
- Press LIST button again to exit from LIST Mode to Teletext.
i INDEX
- Press the Index button to return back to index page.
When you press this button in Teletext mode, a CURSOR appears. This cursor (rectangular box) contains a page number and you can select the desired page simply by using the four colours.
• RED button: Move cursor down.
• GREEN button: Move cursor up. - YELLOW button: Change from current page to selected page.
- BLUE button: Exit the CURSOR Mode.
Press the appropriate ◀◀ ◯ ● ▶ colour keys to perform corresponding functions.
Press PROG▲ or PROG▼ to go to the previous or next Teletext page, or to move between subpages when selected.
Connecting video and audio signals Input options
This TV supports the simultaneous connection of several different types of signal sources, and permits you to select whichever one of the available sources you wish to view at any time. You can press ⬤INPUT on the remote control to select an input source.
• Before connecting any devices, please turn all equipment off.
- To obtain the most benefit from the digital LCD screen, you should select the connection method which will provide you with the best possible signal.
- Once connected, please ensure that all plugs are fully inserted and firmly seated. Be aware that if incorrect connections are made, picture quality may be adversely affected.
Connecting the Composite Video input
Connect the Composite Video output of your output equipment to the VIDEO and AUDIO L/R terminals on the display using the Composite Video cable as illustrated (not provided). A Composite Video cable consists of three connectors: Yellow (video), White (left channel audio), and Red (right channel audio). Ensure that the colors of the plugs and terminals match when making connection.
To view video image from these inputs, press ⬆INPUT and use ▲▼ button to select AV then press OK button.
Composite Video provides the least optimal image quality. Both S-Video and Component Video provide better quality video signals. SCART supports both Composite Video and SVideo signal inputs. If you use S-Video, you cannot use Composite Video for that input.
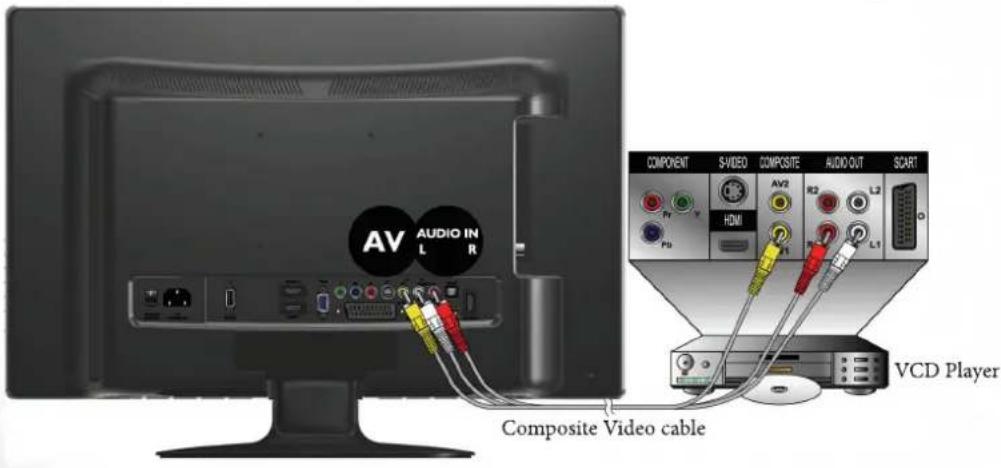
text_image
AV AUDIO IN L R Composite Video cable COMPONENT S-VIDEO COMPOSITE AUDIO-OUT SCART HDMI AV2 L2 P0 R1 R2 L1 VCD PlayerConnecting the SCART input
Connect the SCART of your output equipment to the TV's SCART terminal using a SCART cable (not provided).
To view video image from these inputs, press ⬆INPUT and use ▲▼ button to select SCART then press OK button.

text_image
SCART COMPONENT S-VIDEO COMPOSITE AUDIO OUT SCART AV2 AV1 AV1 AV Equipment SCART cableConnecting the Component Video input
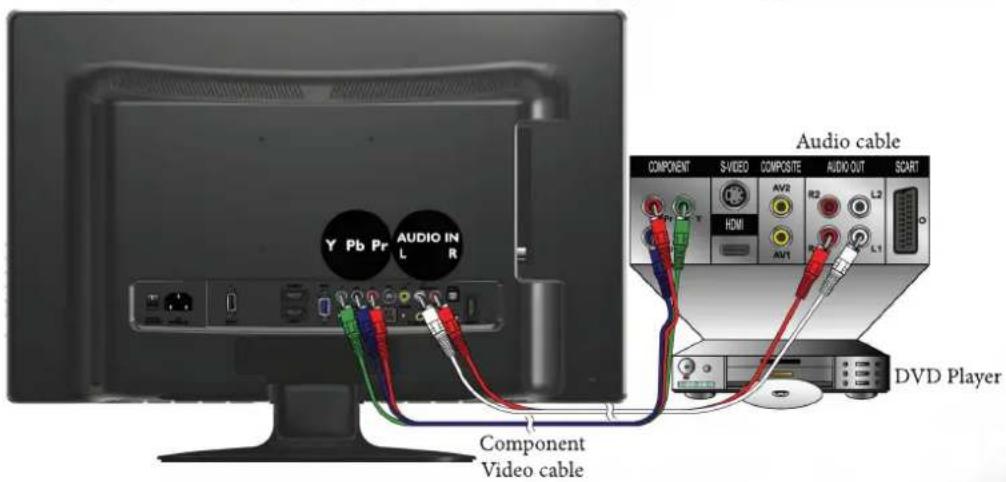
- Connect the Component Video output of your output equipment to the TV's YPbPr IN terminals using a Component Video cable (not provided). A Component Video cable consists of three plugs: Green (Y), Blue (Cb/Pb), and Red (Cr/Pr). Ensure that the colours of the plugs and terminals match when making connection.
- Connect the corresponding audio output of your output equipment to the AUDIO INPUT L/R input terminals on the display using an audio cable (not provided). To view video image from these inputs, press ⬆INPUT and use ▲▼ button to select YPbPr then press OK button.
Of the analog video signal types, Component Video offers the best quality. See "Supported Component Video input signal resolutions" on page 57 for supported resolutions.
text_image
Y Pb Pr AUDIO IN R Component Video cable Audio cable COMPONENT S-VIDEO COMPOSITE AUDIO OUT SCART HDMI AV2 AV1 L2 R2 L1 DVD PlayerConnecting the S-Video input
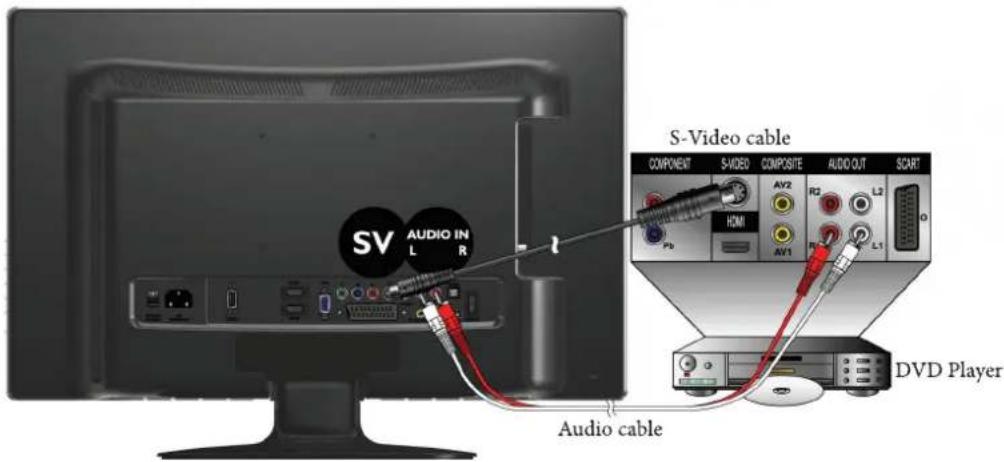
- Connect the S-Video output jack on your output equipment to the S-VIDEO jack on your display using an S-Video cable (not provided). Pay attention to the pins in the plugs when inserting so to keep the pins from bending.
- Connect the S-Video audio output jack of the output equipment to the AUDIO L/R input jacks using a suitable audio cable (or a composite video cable. In this case, the yellow plug will not be used).
To view video image from these inputs, press ⬆INPUT and use ▲▼ button to select S-Video then press OK button.
You should not connect both a composite Video and an S-Video from the same device; just one or the other. If you have the choice, use the S-Video instead of composite Video as an S-video signal provides a higher quality signal to that of composite Video.
text_image
S-Video cable COMPONENT S-VIDEO COMPOSITE AUDIO OUT SCART AV2 R2 L2 HDMI AV1 L1 P0 DVD Player Audio cableConnecting the PC input
- Connect the VGA output of your PC to the VGA IN terminal on the TV using a mini D-Sub (15-pin) cable (not provided).
- Connect the audio output of your PC to the TV's VGA LINE IN terminal using an appropriate 3.5mm-diameter Mini-jack stereo audio cable (not provided).
To view video image from this input, press ⬆INPUT and use ▲▼ button to select VGA then press OK button.
When you connect the display to a PC, you should adjust the resolution in the display properties of the computer to closely match the native resolution of the display (for example, 1680 x 1050 pixels). See "Supported PC (D-Sub/DVI) input signal resolutions" on page 56 on other supported resolutions.

text_image
VGA PC AUDIO IN Mini D-Sub cable PC Audio cableConnecting the DVI input
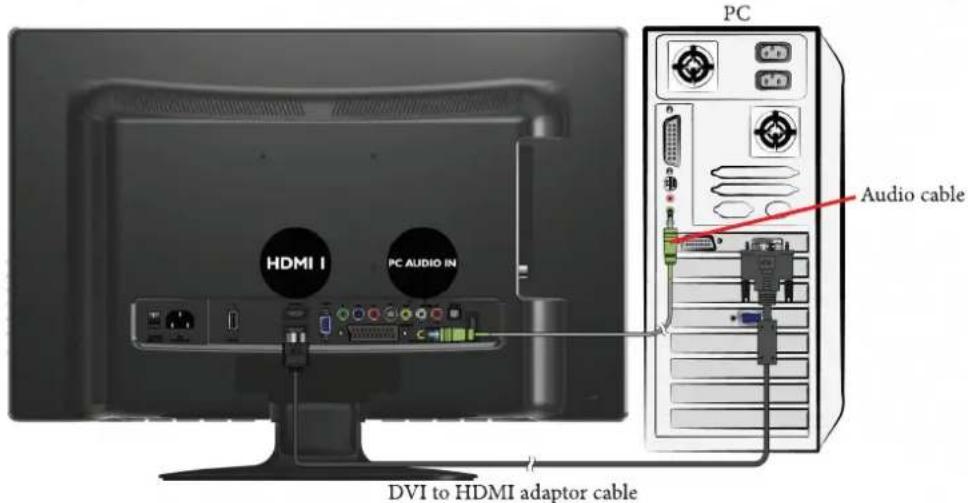
- Connect the digital video output of your output equipment (for example, a PC or digital Set Top Box) to the HDMI1 IN terminal on the TV using a DVI to HDMI adaptor cable (not provided).
- Connect the DVI audio output of your output equipment to the TV's PC AUDIO INPUT input terminals using an appropriate audio cable (not provided).
To view video image from this input, press ⬤INPUT and use ▲▼ button to select HDMI1 then press OK button.
When connected to a PC, you should adjust the resolution in the display properties of the computer to closely match the native resolution of the display (for example, 1024 x 768 pixels). See "Supported PC (D-Sub/ DVI) input signal resolutions" on page 56 on other supported resolutions.
text_image
HDMI I PC AUDIO IN DVI to HDMI adaptor cable PC Audio cableConnecting the HDMI input
Connect the HDMI output of your output equipment to the HDMI1, HDMI2 or HDMI3 IN terminal on the display using an HDMI cable (not provided).
To view video image from this input, press ⬤INPUT and use ▲▼ button to select HDMI1, HDMI2 or HDMI3 then press OK button.
HDMI (High-Definition Multimedia Interface) is an all-digital audio/video interface capable of transmitting uncompressed streams. HDMI provides an interface between anyaudio/video source, such as a set-top box, DVD player, or A/V receiver over a single cable. See “Supported HDMI input signal resolutions” on page 57.

text_image
HDMI 1 OR HDMI 2 OR HDMI 3 HDMI Cable COMPONENT S-VIDEO COMPOSITE AUDIO OUT SCART HDMI AV2 R2 L2 AV1 R1 L1 DVD PlayerConnecting the USB input
Connect the USB device to the USB IN jack on TV.
To view video image from this input, press ⏻INPUT and use ▲▼ button to select Media then press OK button.
This unit can play the media files contained in the USB device.

text_image
USB USB deviceConnecting the headset audio output
This display provides a stereo headset output socket for delivering the audio signal to a stereo headset.
Connect the stereo headset plug (3.5mm Mini-jack type) to the stereo headset output socket on the display using a suitable audio cable.
Once connected, the display speakers will be muted automatically.
Please be aware that excessive and/or extreme volume might damage your hearing ability.

text_image
EARPHONE HeadsetConnecting to A/V Device with SPDIF input
Connect SPDIF optical cable (not provided) from A/V device into the SPDIF output connector of LCD TV.
If you want to enjoy digital broadcasting through your external speakers, connect the SPDIF terminal on the back of TV to a Home Theater (or amp).

text_image
SPDIF SPDIF Optical Cable Audio cable VIDEO AUDIO SPEAKERS A/V Device Stereo System| Input signal type | |||||||||
| DTV | ATV | SCART | YPbPr | HDMI | AV | S-Video | Media | VGA | |
| OPTION | ResetSoftware Update | ||||||||
| LOCK | Lock SystemSet PasswordBlock ProgramParental Guidance | not available | |||||||
| CHANNEL | SelectAuto TuningDTV Manual TuningATV Manual TuningProgram EditCI Information | not available | |||||||
The available menu items are dependent on the input source being selected. Unavailable items will be greyed out or not displayed.
Navigating the OSD menu
You can use the On-Screen Display (OSD) menu to adjust the settings on your display. To display the OSD menu, press MENU on the display:

text_image
PICTURE Picture Mode Dynamic Contrast 70 Brightness 50 Colour 70 Tint 0 Sharpness 70 BACK MENU OKOperations in the OSD menu

text_image
BACK FAVORIT OK INPUT MENU OLD UPDATE SUBCODE TEXTFor example, to adjust picture sharpness:
- Press MENU to display the OSD menu on-screen.
- Press ◀ or ▶ to select your main menu.
- Press OK to enter the submenu.
- Press ▲ or ▼ to make selection.
- Press ◀ or ▶ to make adjustment.
- Press MENU to close the OSD menu.
PICTURE menu
The available menu items are dependent on the input source being selected.
The illustration is for reference only.

text_image
PICTURE Picture Mode Dynamic Contrast 70 Brightness 50 Colour 70 Tint 0 Sharpness 70 BACK MENU OK| Item | Function | Operation | Range |
| Picture Mode | Provides complete preferred setups adjusted for colour, contrast, brightness, tint, and sharpness to suit various viewing situations.If User is selected, you can customize individual picture setting to your satisfaction: Contrast, Brightness, Colour, Sharpness, and Tint. | Press ◀ or ▶ to change selection or make adjustment. | StandardMildUserDynamic |
| Contrast | Adjusts image white level so that whites do not wash out surrounding colors. | 0 to 100 | |
| Brightness | Adjusts image black level, so that detail in the dark areas of an image can be seen. | 0 to 100 | |
| Colour | Adjusts image color intensity. | 0 to 100 | |
| Tint | Controls the difference between the green and red regions of the picture. | R50 to G50 | |
| Sharpness | Adjusts image sharpness level. | 0 to 100 | |
| Colour Temperature | Adjusts color components independently to achieve a warm or cool effect: Normal/ Warm/ User/ Cool.Normal: Increases nature tintWarm: Increases red tintUser: Allows the user to adjust red, green and blue color component levels independentlyCool: Increases blue tint | NormalWarmUserCool | |
| Aspect Ratio | Selects through Wide mode settings. | Press◀or▶to change selection. | FullZoom1Zoom2PanoramaAuto4:3Under Scan |
| HDMI RGB Range | Selects HDMI RBG Range from Full or Standard (Only Under HDMI source with RGB input color space). | FullStandard | |
| Senseye | To set ACE, Noise Reduction, Skin Tone and DCR. | ||
| ACE | Advance contrast enhance. (Standard, Low, Off, High) | Press◀or▶to change selection or make adjustment. | StandardHighOffLow |
| Noise Reduction | Select to reduce the noise level of connected equipment. | AutoOffLowStandardHigh | |
| Skin Tone | Skin Color adjust. (0-10) | 0 to 10 | |
| DCR | To turn Off/ Low/ Middle/ High/ Extra the DCR (Dynamic Contrast Ratio) function. | OffLowMiddleHighExtra | |
| Auto Adjust | Press the OK button to automatically adjust the display settings to optimize performance based on the VGA mode. | Press OK | |
| H-Position | Adjusts the position of the picture left and right in the window based on the VGA mode. | Press◀or▶to change selection. | 0 to 100 |
| V-Position | Adjusts the position of the picture up and down in the window based on the VGA mode. | 0 to 100 | |
| Size | Controls the width of the picture based on the VGA mode. | -30 to +30 | |
| Phase | Controls the signal phase, which can improve focus clarity and image stability based on the VGA mode. | 0 to 100 | |
*Auto Adjust, H-Position, V-Position, Size, and Phase selections will only appear in VGA input source.
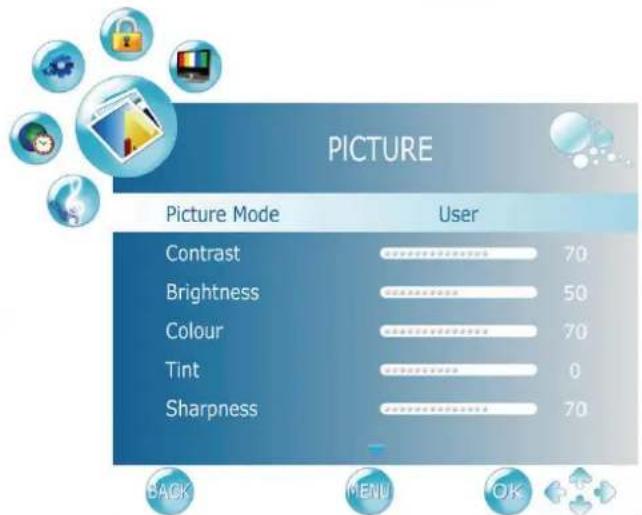
Setting up User Picture mode
You can adjust the settings in the Picture menu and save them as your Personal Picture Mode. You can press PICTURE on the remote control to select these modes directly.
- Press MENU to display the OSD menu on-screen.
- Press ◀ or ▶ to select PICTURE, and then press OK to enter the PICTURE menu.
- Press ▼ to select Picture Mode, and then press ◀ or ▶ to select User.
- Press ▲ or ▼ to select Contrast, Brightness, Colour, Tint, Sharpness and then press ◀ or ▶ to adjust the settings to your satisfaction.
text_image
PICTURE Picture Mode User Contrast 70 Brightness 50 Colour 70 Tint 0 Sharpness 70 BACK MENU OK- Press MENU to save the settings and close the OSD menu.
SOUND menu
The available menu items are dependent on the input source being selected.
The illustration is for reference only.

TruSurround HD, SRS and the symbol are trademarks of SRS Labs, Inc.
TruSurround HD technology is incorporated under license from SRS Labs, Inc.

text_image
SOUND Sound Mode Standard Balance 0 Bass 50 Treble 50 AVC Off Audio Only Off BACK MENU OK| Item | Function | Operation | Range |
| Sound Mode | Selects a sound type when viewing programs or videos that support multiple sounds.If you select the User mode, you can individually set the Bass and Treble. | Press◄or►to change selection or make adjustment. | StandardMusicMovieSportsUser |
| Balance | Adjusts the volume balance of the left or right speaker. | L50 to R50 | |
| Bass | Adjusts bass tones for the User Mode. | 0 to 100 | |
| Treble | Adjusts treble tones for the User Mode. | 0 to 100 | |
| AVC | To turn on/ off AVC (automatic volume control) function. | OnOff | |
| Audio only | To turn off the screen picture but keep the sound on. Press any key except VOL+, VOL- or MUTE to restore. | OnOff | |
| AD Switch | To turn on/off the Audio Descriptor. This function is available only in supported stream in DTV. | OnOff | |
| AD Volume | Adjusts the volume of Audio Descriptor. | 0 to 100 | |
| SRS TruSurround HD | SRS TruSurround HD^TM creates an immersive, feature-rich surround sound experience from two speakers, complete with rich bass, high frequency detail and clear dialog.SRS TruSurround HD is a patented SRS technology that solves the problem of playing 5.1 multi channel content over two speakers.When this selection is On, you are unable to change the sound mode. | OnOff | |
| SPDIF Output | To turn on/off the SPDIF audio output and select the supported system. (in DTV, HDMI and Media) | PCMAC3Off |
TIME menu
The available menu items are dependent on the input source being selected.
The illustration is for reference only.

text_image
TIME Clock 01/Jan 10:10 Off Time Off On Time Off Sleep Timer Off Auto Sleep On Time Zone London GMT BACK MENU OK| Item | Function | Operation | Range |
| Clock | Selects to set the current clock. when in DTV input source, Clock cannot be adjusted. The clock will be synchronized with TV broadcasting. | Press OK, use or to change selection. | DateMonthYearHourMinute |
| Off Time | Allows to set the Off timers that the TV will switch off automatically at the time you select. | RepeatHourMinute | |
| On Time | Allows to set the On timers that the TV will switch on automatically and tune to the mode of your choice at the time you select. | ActivateHourMinuteVolumeMode | |
| Sleep Timer | Set the Sleep Timer to automatically turn off the display. 1 minute before shutdown, a message will display onscreen. At this time, if you wish to cancel the function, press any button on the remote control.Once the time expires, the display will be put to the standby mode automatically. | Press or to change selection. | Off,10 , 20, 30, 60, 90, 120, 180, 240 (minutes) |
| Auto Sleep | Select on, the TV will be automatically turned off when:Input signal is off for 10 minutes.Function keys or remote control is not used for 3 hours. | OnOff | |
| Time Zone | Cycles through the availabletime zones in the country. | Press or to change selection. | |
OPTION menu
The available menu items are dependent on the input source being selected.
The illustration is for reference only.

text_image
OPTION Language English Audio Languages English Subtitle Language English Hearing Impaired Off Country Others OSD Time Out 10 Sec.| Item | Function | Operation | Range |
| Language | Select your desired language for the OSD menu. | Press ◀ or ▶ to change selection. | EnglishEspañolΕλληνικάFrançaisHrvatskiItalianoMagyarNederlandsNorskPolskiРусскийRomâneşteSuomiSvenskaČeskyDanskDeutsch |
| Audio Languages | Select your desired language for audio. (only available in DTV) | PrimarySecondary | |
| Subtitle Language | Allows to display subtitle on the screen. (only available in DTV) | PrimarySecondary | |
| Hearing Impaired | To provide close-captioning function for the hearing impaired, if the program provides it. (only available in DTV) | OnOff | |
| Country | Displays the country you selected before performing Auto Tuning function.The country cannot be selected from here. To change country, go to Auto Tuning in the Channel menu. | ||
| OSD Time Out | Allows selection of the display time of the on-screen menu. | Press ◀ or ▶ to change selection. | Off, 10, 15, 30, 45, 60 (seconds) |
| SCART Input | Allows selection of the SCART signal input. (only available in SCART) | Press ◀ or ► to change selection. | AV / RGBSV |
| Canal+ | To enable SCART connector to support Canal+ Set Top Box (available in French). For normal SCART function, please select OFF. (only available in SCART, AV, S-Video) | OnOff | |
| HDMI Audio | When in HDMI1 input, select where the audio source comes from Auto, PC In, HDMI. | AutoPC InHDMI | |
| Backlight | Adjusting the backlight brightness. | HomeMiddleLowRetail | |
| Reset | Restores factory settings. | Press OK, use ◀ or ► to select "Yes" to confirm. | |
| Software Update | To update the software. (only when software is stored in USB and USB is inserted) | ||
LOCK menu
The available menu items are dependent on the input source being selected.
The illustration is for reference only.
Use the function, must enter a four-digit password. The factory password is 0000.

text_image
LOCK Lock System Off Set Password Block Program Parental Guidance Off| Item | Function | Operation | Range |
| Lock System | Selects to activate the TV Lock programs. | Press ◀ or ▶ to change selection. | • On• Off |
| Set Password | Allows to set the password.Use the function, must enter a four-digit password. The factory password is 0000. | Press OK to enter. | |
| Block Program | Selects to setup the TV Program Lock options. | Press OK to enter. | |
| Parental Guidance | Allows to setup the TV Parental Guidance. | Press ◀ or ▶ to change selection. | 4 to 18 year olds, off |
CHANNEL menu
The available menu items are dependent on the input source being selected.
The illustration is for reference only.

text_image
CHANNEL Select ATV+DTV Auto Tuning DTV Manual Tuning ATV Manual Tuning Program Edit CI Information BACK Mali OK| Item | Function | Operation | Range |
| Select | Selects the Auto Tuning range. | Press ◀ or ▶ to change selection. | • ATV+DTV• ATV only• DTV only |
| Auto Tuning | Press the OK button, the Auto Tuning automatically creates a list of receivable channels. | Press OK to enter Auto Tuning Menu. | |
| DTV Manual Tuning | Allows adjustment manually for the particular channel with optimal reception. | Press OK to enter DTV Manual Tuning Menu. | |
| ATV Manual Tuning | Allows adjustment manually for the particular channel with optimal reception. | Press OK to enter ATV Manual Tuning Menu. | |
| Program Edit | Allows addition/removal/edition of channels on the channel list. | Press OK to enter Programme Edit Menu. | |
| CI Information | Allows to display the CI information. | Press OK to enter CI Information Menu. | |
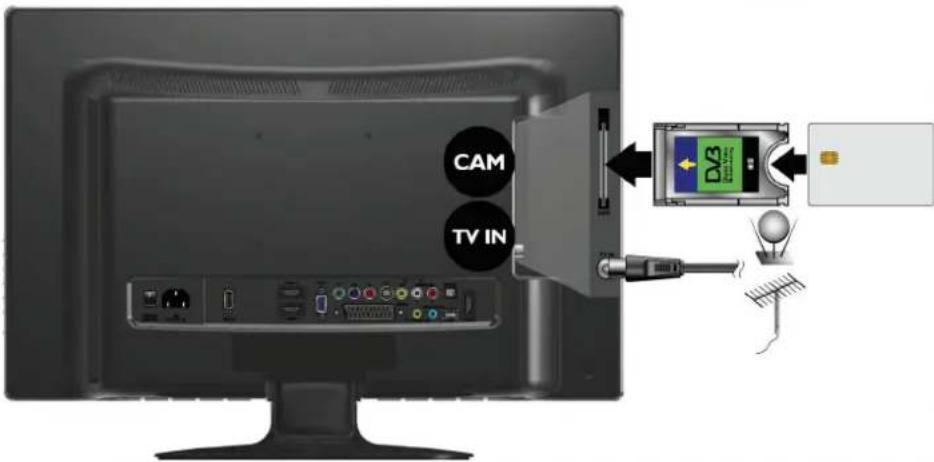
Connecting CI(Common Interface) card
To view the scrambled (pay) services in digital TV mode.
1. TO INSERT A CI CARD
Insert the CI card into the slot in the direction of the arrow until it fits.
text_image
CAM TV IN2. TO REMOVE A CI CARD
When removing the CI card, do not attempt to pull it from its slot. Please push the EJECT button as illustrated below.

natural_image
Illustration of a computer monitor with an open panel and a hand inserting a cable into it (no text or symbols visible)3. This function enables you to watch the scrambled services (pay services) in some channels.
If you remove the CI Module, you can watch the available digital/analogue programme in some channels.
Media Play - USB Device

text_image
USB 14 PHOTO MUSIC MOVE TEXT C 1 Photo Music Movie Text Wait Size: 1/1 EXIT ENTER MEDIAPrecautions when using a USB device
- MTP (Media Transfer Protocol) is not supported.
- This unit supports only USB Flash Drive with FAT32 format. BenQ is not guaranteed the USB Flash Drive with other formats (such as FAT16 or NTFS).
- Certain types of USB Digital camera and audio devices may not be compatible with this TV. Media only guarantees to support USB Flash Drive. Other devices such as flash card reader, USB HDD, USB Digital Camera and audio devices may not be compatible with this TV.
- If a USB device requires high power (more than 500mA or 5V), the USB device may not be supported.
- This TV is not supported the USB device with multiple partitions.
- Please connect directly to the USB port of your TV. If you are using a separate cable connection or through a USB hub, there may be a USB compatibility problem.
- Before connecting your device to the TV, please back up your files to prevent them from damage or loss of data. BenQ is not responsible for any data file damage or data loss.
- The higher the resolution of the image, the longer it takes to display on the screen.
• How fast a USB device is detected differs from device to device. - For unsupported or corrupted files, the "unsupported File" message is displayed.
- MP3 files with DRM that have been downloaded from a non-free site cannot be played. Digital Rights Management (DRM) is a technology that supports the creation of content, the distribution and management of the content in an integrated and comprehensive way, including the protection of the rights and interests of the content providers, the prevention of the illegal copying of contents, as well as managing billings and settlements.
- When moving to a photo, loading may take a few seconds. At this point, the loading icon will appear at the screen.
- If USB card reader is connected, its volume may not be detected.
- If USB device does not function properly, please unplug and reconnect it.
- If verify whether the USB device is functioned properly with your PC.
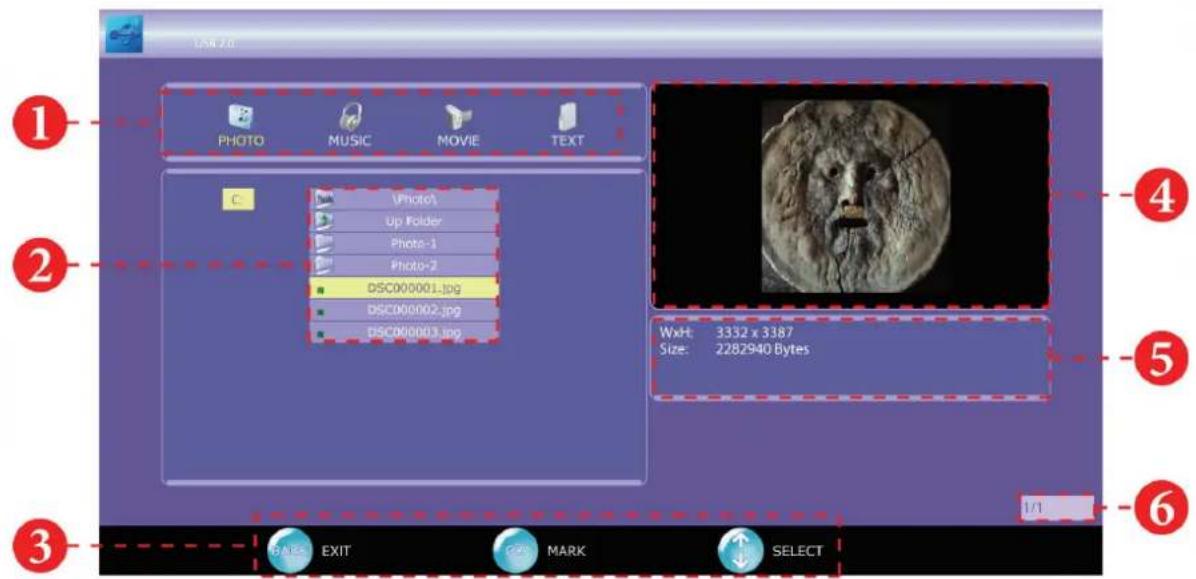
Media Screen Display
text_image
1 PHOTO MUSIC MOVIE TEXT C (Photo) Up Folder Photo-1 Photo-2 DSC000001.jpg DSC000002.jpg DSC000003.jpg 4 5 WxHt: 3332 x 3387 Size: 2282940 Bytes 6 1/1 BANKS EXIT PAGE MARK SELECT① Media List Section: This field shows types of supported Media (Photo, Music, Movie, Text).
② Folder Management Section: Shows the detail information of Folders and File Names.
③ Help Items
- BACK button: Exits the current menu and return back to main menu.
- OK button: Enter the sub-menu or mark (or unmark) the selected files.
- ▲/▼/◄/► button: move the cursor.
4 Preview Section: This field shows the preview of the media file.
⑤ File Information Section: Display the detail information of the media file.
⑥ Item Information Section: Shows the number of pages of available folders and files.
Using the Remote Control Button in Media source
| Button | Operations |
| ▲/▼/◄/► | Move the cursor and select an item. |
| OK | Select the currently selected item. While playing a slide show, movie, or music file. |
| ||► | Play, pause or resume the slide show of photos, music or movie. |
| BACK | Exit the current folder. |
| ■ | Stop the current slide show, Music or Movie file. |
| ◄◄/►► | Forward or rewind the music or movie file. |
| Display next or previous media file. | |
| Rotate the current photo clockwise. 90° → 180° → 270° → 360° (normal). | |
| Zoom in the current photo. Rate is x2 → x4 → x8 → x1/4 → x1/2 → x1 (normal). |
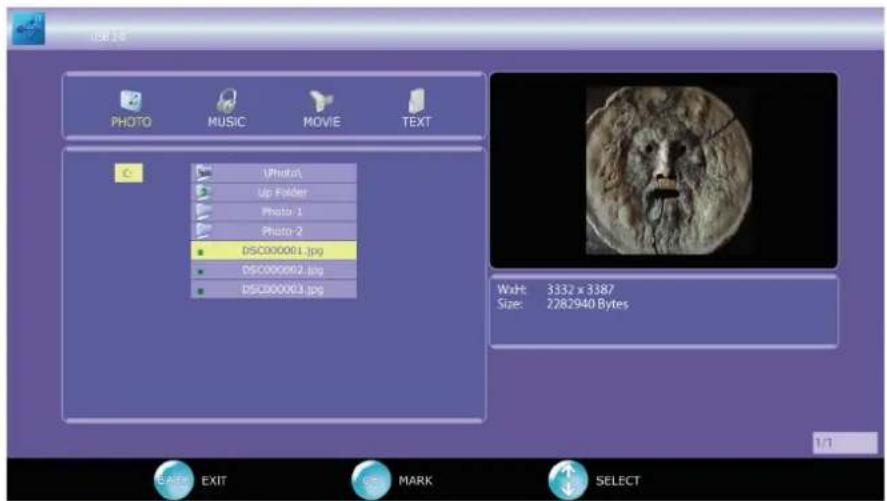
Viewing Photo or Slide Show
text_image
USB 18 PHOTO MUSIC MOVE TEXT C 1Photo\ Up Folder Photo-1 Photo-2 DSC000001.jpg DSC000002.jpg DSC000003.jpg Width: 3332 x 3387 Size: 2282940 Bytes E Active EXIT OK MARK SELECTBasic Operating Instruction
- Press ◀ or ▶ to choose PHOTO icon, then press OK to select.
- Press ▲ or ▼ to choose the sub-folder if necessary, then press OK to enter the folder.
- Press ▲ or ▼ to move the light-bar cursor, the photo preview will be shown.
Supported Media File
This TV can only support JPEG and BMP files for Photo.
Photo with higher resolution (higher than 1920x1080) will be downscaled accordingly.
Play a Slide Show within a folder
- Follow the instruction above to enter the desired sub-folder.
- Press ||► to start the slide show.
- Photos will be changed every 5 seconds.
- After every photo is displayed, the slide show will be resumed and start from the first photo.
- You may start the slide show from your desired photo by moving the light-bar cursor to the desired file then press ▶.
- You may Pause/Resume; Jump to next/previous, Rotate 90° clockwise, Zoom the current displayed photo.
Perform a Slide Show with only selected files
- Follow the instruction above to enter the desired sub-folder.
- Press ▲ or ▼ to choose the photo. Then press OK to select the photo. The ▼ mark will appear to the left of the selected photo.
- Press ▲ or ▼ again to choose another photo. You may repeat this step until all desired photos are selected.
- Press ▲ or ▼ and select "UP Folder" to exit the current folder. You may enter other sub-folders to select photos for the slide show.
- Once all photos are selected, press ||► to start the slide show.
- You may Pause/Resume; Jump to next/previous, Rotate 90° clockwise, Zoom the current displayed photo.
- All selected photos will be unmarked once changing source and turning off the TV.
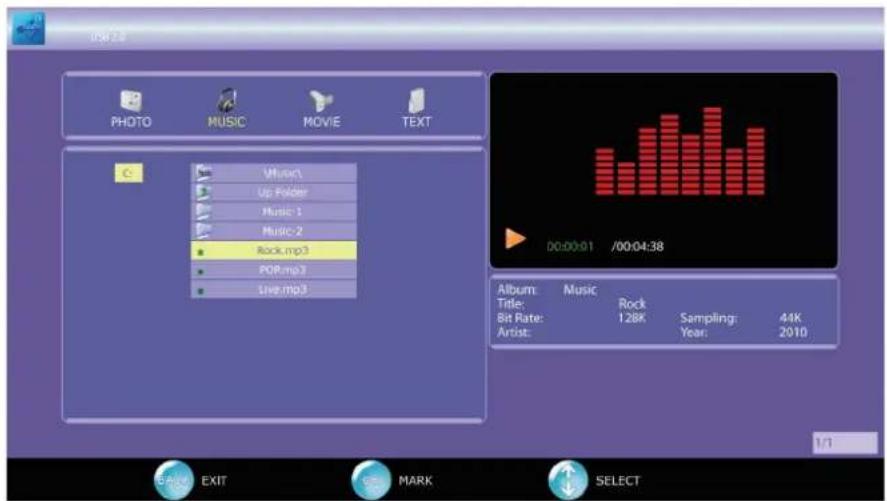
Playing a Music
text_image
USB 2.4 PHOTO MUSIC MOVE TEXT Music\ Up Folder Music 1 Music 2 Rock.mp3 POP.mp3 Live.mp3 00:00:01 /00:04:38 Album: Music Title: Rock Bit Rate: 128K Sampling: 44K Artist: Year: 2010 E-mail EXIT MARK SELECTBasic Operating Instruction
- Press ◀ or ▶ to choose MUSIC icon, then press OK to select.
- Press ▲ or ▼ to choose the sub-folder if necessary, then press OK to enter the folder.
- Press ▲ or ▼ to select the desired media file.
Supported Media File
This TV can only support MP3 files for Music.
Play all Music within same folder
- Follow the instruction above to enter the desired sub-folder.
- Press ||► to start playing the music.
- The TV will play every supported music file in this folder. When the last music file is played, it will return to the first media file on the list.
- You may wish to start the music from your desired music. Simply press ▲ or ▼ to move the light-bar cursor to the desired music file, then press ||► to start the music.
- You may Pause/Resume; Jump to Next/Previous, and Forward/Rewind the current playing music.
- You may also press ▲ and/or ▼ to select the music from the play list.
Play only the selected files
- Follow the instruction above to enter the desired sub-folder.
- Press ▲ or ▼ to choose the music file. Then press OK to select the music. The ▼ mark will appear to the left of the selected music.
- You may repeat step#2 until all desired music files are selected.
- Press ▲ or ▼ and select "UP Folder" to exit the current folder. You may enter other sub-folders to select music for the slide show.
- Once all files are selected, press ||► to start playing.
- You may Pause/Resume; Jump to Next/Previous, and Forward/Rewind the current playing music.
- You may also press ▲ or ▼ to select the music from the play list.
- All selected music will be unmarked once changing source and turning off the TV.
Play as Background Music
- You may choose to "Play only the selected files" or "Play all music within same folder" by following the instruction above.
- Once the music starts playing, press BACK to return to previous menu. You may now select the Photo or Text icon to play the slide show of photos or to read the text file.
- If you wish to stop/pause the music while viewing photos or reading the text, you must return back to Music in order to do so.
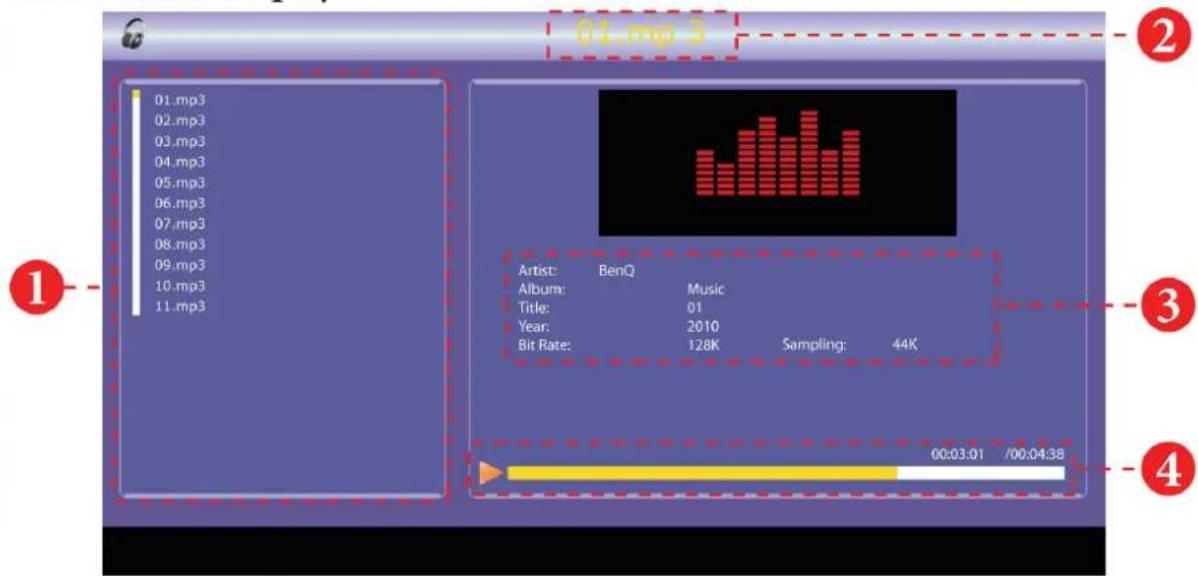
Music Screen Display
text_image
01.mp3 01.mp3 02.mp3 03.mp3 04.mp3 05.mp3 06.mp3 07.mp3 08.mp3 09.mp3 10.mp3 11.mp3 Artist: BenQ Album: Music Title: 01 Year: 2010 Bit Rate: 128K Sampling: 44K 00:03:01 /00:04:38① Playing List: This field shows the playing list of the selected music.
② Title Section: Shows the title of playing music.
③ Media Information Section: This section shows the detailed information (Artis, Album, Title, Year, Bit Rate and Sampling) of playing music.
④ Status Bar: Shows the status of playing music.
Playing Movie
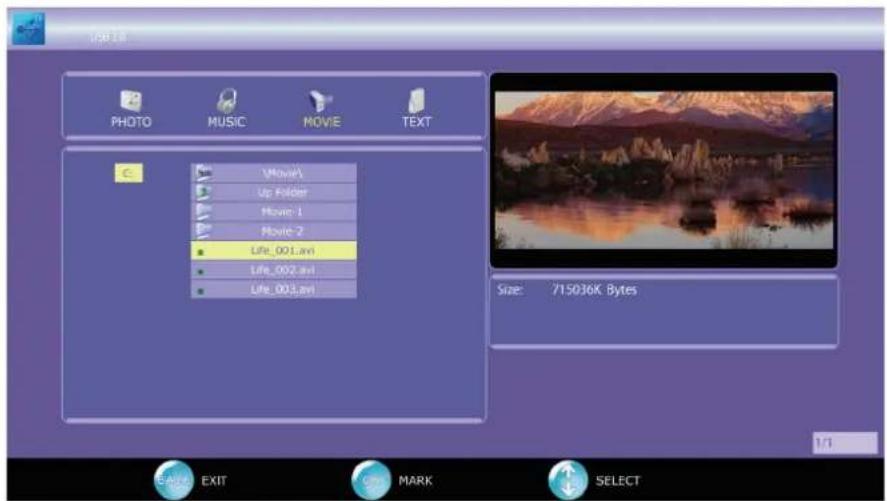
text_image
USB 1.6 PHOTO MUSIC MOVE Electrical C:\Movie\ Up Folder Movie 1 Movie 2 Life_001.avi Life_002.avi Life_003.avi Size: 715036K Bytes E-mail EXIT MARK SELECTBasic Operating Instruction
- Press ◀ or ▶ to choose MOVIE icon, then press OK to select.
- Press ▲ or ▼ to choose the sub-folder if necessary, then press OK to enter the folder.
- Press ▲ or ▼ to select the desired media file.
Supported Media File
| File Extension | Container | Video Codec | Resolution | Bit Rate |
| *.dat, *.mpg, *.mpeg | MPG, MPEG | Mpeg1,2 | up to 1920x1080 @ 30P | 20Mbit/sec |
| *.ts, *.trp, *.tp | MPEG2 -TS, H264-TS | Mpeg2 ,H.264 | up to 1920x1080 @ 30P | 20Mbit/sec |
| *.vob | MPEG2 -PS | Mpeg2 | up to 1920x1080 @ 30P | 20Mbit/sec |
| *.mp4 | AVI, MP4 | MPEG4, Xvid 1.00, Xvid 1.01, Xvid 1.02, Xvid 1.03, Xvid 1.10-beta1/2, H.264 | up to 1920x1080 @ 30P | 20Mbit/sec |
| *.avi | AVI | MJPEG | up to 640x480 @ 30P | 10Mbit/sec |
| *.rmvb, *.rm | RMVB, RM | rm codec | up to 1280x720 @ 30P | 10Mbit/sec |
| *.mkv | MKV | H.264, MPEG-1,2,4 | up to 1920x1080 @ 30P | 20Mbit/sec |
| *.avi | AVI(1.0, 2.0), DMF0,1,2 | MPEG2, MPEG4, Xvid 1.00, Xvid 1.01, Xvid 1.02, Xvid 1.03, Xvid 1.10-beta1/2, H.264 | up to 1920x1080 @ 30P | 20Mbit/sec |
Play all Movies within same folder
- Follow the instruction above to enter the desired sub-folder.
- Press ||► to start movies.
- The TV will play every supported movie in this folder. When the last movie is played, it will return to the first movie on the list.
- You may wish to start the movie from your desired movie. Simply press ▲ or ▼ to move the light-bar cursor to the desired movie, then press ▶ to start movie.
- You may Pause/Resume; Jump to Next/Previous, and Forward/Rewind the current playing movie.
Play only the selected files
- Follow the instruction above to enter the desired sub-folder.
- Press ▲ or ▼ to choose, then press OK to select the movie. The ▼ mark will appear to the left of the selected movie.
- You may repeat step #2 until all desired movies are selected.
- Press ▲ or ▼ and select "UP Folder" to exit the current folder. You may enter other sub-folders to select other movies.
- Once all files are selected, press ||► to start playing.
- You may Pause/Resume; Jump to Next/Previous, and Forward/Rewind the current playing movie.
- All selected movies will be unmarked once changing source and turning off the TV.
Display the Text

text_image
USB 2.4 PHOTO MUSIC MOVE TEXT C (Text) Up Folder Text-1 Text-2 • Note_01.txt • Note_02.txt • Note_03.txt Reference Disclaimer BenQ Corporation makes no representations or warranties, either expressed or implied, with respect to the contents of this document. BenQ Corporation reserves the right to revise this publication and to make changes from time to time in the contents thereof without obligation to notify any person of such revision or changes. Copyright Copyright 2010 BenQ Corporation. All rights reserved. No part of this publication may be reproduced, transmitted, transcribed, stored in a retrieval system or translated into any language or computer language. Size: 12K Bytes E Add EXIT Mark SELECT 1/1Basic Operating Instruction
- Press ◀ or ▶ to choose TEXT icon, then press OK to select.
- Press ▲ or ▼ to choose the sub-folder if necessary, then press OK to enter the folder.
- Press ▲ or ▼ to select the desired media file.
Supported Media File
This TV can only supports .txt formatted files for TEXT.
Display all TEXT files within same folder
- Follow the instruction above to enter the desired sub-folder.
- Press ▶ to start displaying text.
- The TV will play every supported text file in this folder. When the last text file is played, it will return to the first text file on the list.
- You may wish to start from your desired text. Simply press ▲ or ▼ to move the light-bar cursor to the desired text file, then press ||► to display the text.
- You may Jump to Next Page/Previous Page, Go to Next Text File/ Previous Text File.
Play only the selected files
- Follow the instruction above to enter the desired sub-folder.
- Press ▲ or ▼ to choose, then press OK to select the text file. The ⬇ mark will appear to the left of the selected text file.
- You may repeat step #2 until all desired text files are selected.
- Press ▲ or ▼ and select "UP Folder" to exit the current folder. You may enter other sub-folders to select other text files.
- Once all files are selected, press ||► to start playing.
- You may Next Page/Previous Page, Go to Next Text File/ Previous Text File.
- All selected text files will be unmarked once changing source and turning off the TV.
Reference
Disclaimer
BenQ Corporation makes no representations or warranties, either expressed or implied, with respect to the contents of this document. BenQ Corporation reserves the right to revise this publication and to make changes from time to time in the contents thereof without obligation to notify any person of such revision or changes.
Copyright
Copyright 2010 BenQ Corporation. All rights reserved. No part of this publication may be reproduced, transmitted, transcribed, stored in a retrieval system or translated into any language or computer language, in any form or by any means, electronic, mechanical, magnetic, optical, chemical, manual or otherwise, without the prior written permission of BenQ Corporation.
Dimensions
ML2241

ML2441

Specifications
| Model | ML2241 | ML2441 | |
| Weight (Net) | with stand | 3.9 Kg | 4.7 Kg |
| Dimensions(W × H × D) | with stand | 518.2 x 386.6 x 218.2 mm | 563.3 x 413.2 x 218.2 mm |
| without stand | 518.2 x 332.7 x 39.0 mm | 563.3 x 358.2 x 39.0 mm | |
| LCD panel size (LED Backlight) | 54.61 cm (21.5") | 59.94 cm (23.6") | |
| Aspect ratio | 16:9 | ||
| Native resolution | 1920 x 1080 | ||
| Brightness (typical) | 250 nits | 300 nits | |
| Built-in speakers | 3W x 2 | ||
| Signal input | Composite Video (AV) × 1S-Video × 1Component Video (Y Cb/Pb Cr/Pr) × 1Audio × 1SCART × 1USB × 1RS232 × 1HDMI/DVI × 3PC D-Sub × 1HDMI/DVI/PC audio × 1 | ||
| Signal output | Headset × 1SPDIF × 1 | ||
| Power supply | AC 100-240V, 60/50 Hz | ||
| Power consumption | 38W (Max.) | ||
| Operating temperature | 0°C ~ 40°C (at sea level) | ||
| Storage temperature | -20°C ~ +60°C (at sea level) | ||
| Video systems | Supports PAL/SECAM and DVB-T formats | ||
Design and specifications are subject to change without notice.
Supported PC (D-Sub/DVI) input signal resolutions
| Resolution | H-Frequency (KHz) | V-Frequency (Hz) | Clock Frequency (MHz) | Note |
| 720 × 400 | 31.469 | 70.080 | 28.320 | VESA |
| 640 × 480 | 31.469 | 59.940 | 25.175 | VESA |
| 640 × 480 | 37.861 | 72.809 | 31.500 | |
| 640 × 480 | 37.500 | 75.000 | 31.500 | |
| 800 × 600 | 35.156 | 56.250 | 36.000 | VESA |
| 800 × 600 | 37.879 | 60.317 | 40.000 | |
| 800 × 600 | 48.077 | 72.188 | 50.000 | |
| 800 × 600 | 46.875 | 75.000 | 49.500 | |
| 1024 × 768 | 48.363 | 60.004 | 65.000 | VESA |
| 1024 × 768 | 56.476 | 70.069 | 75.000 | |
| 1024 × 768 | 60.023 | 75.029 | 78.750 | |
| 1152 x 864 | 67.500 | 75.000 | 108.000 | VESA |
| 1280 x 960 | 60.000 | 60.000 | 108.000 | VESA |
| 1280 × 1024 | 63.981 | 60.020 | 108.000 | VESA |
| 1280 × 1024 | 79.976 | 75.025 | 135.000 | |
| 1440 x 900 | 55.935 | 59.887 | 106.500 | VESA |
| 1400 x 1050 | 65.316 | 59.900 | 121.750 | VESA |
| 1680 x 1050 | 65.290 | 59.954 | 146.250 | VESA |
| 640 x 480 | 35.000 | 66.667 | 30.240 | Apple MAC |
| 832 x 624 | 49.725 | 74.550 | 57.283 | Apple MAC |
| 1152 x 870 | 68.681 | 75.062 | 100.000 | Apple MAC |
| 1920 x 1080 | 67.500 | 60.000 | 148.500 | CEA861B |
Note: Simultaneously press "MENU" and "CH▼" keys on TV panel to switch between similar PC timings.
Similar PC Timing on list below:
• 1400 x 1050 @ 60Hz and 1680 x 1050 @ 60Hz
• 1152 x 900 @ 60Hz and 1440 x 900 @ 60Hz
• 640 x 400 @ 70Hz and 720 x 400 @ 70Hz
Supported Component Video input signal resolutions
| Resolution | H-Frequency (KHz) | V-Frequency (Hz) | Clock Frequency (MHz) | Note |
| 720 × 480 | 15.735 | 60i | 13.5 | SDTV 480i |
| 720 × 480 | 31.25 | 60p | 27 | EDTV 480p |
| 720 x 576 | 15.625 | 50i | 13.5 | SDTV 576i |
| 720 x 576 | 31.25 | 50p | 27 | EDTV576p |
| 1280 × 720 | 45 | 60p | 74.25 | HDTV 720p |
| 1280 × 720 | 37.5 | 50p | 74.25 | HDTV 720p |
| 1920 × 1080 | 28.13 | 50i | 74.25 | HDTV 1080i |
| 1920 × 1080 | 33.75 | 60i | 74.25 | HDTV 1080i |
| 1920 x 1080 | 27 | 24p | 74.25 | HDTV 1080p |
| 1920 x 1080 | 56.25 | 50p | 148.5 | HDTV 1080p |
| 1920 x 1080 | 67.5 | 60p | 148.5 | HDTV 1080p |
Supported HDMI input signal resolutions
| Resolution | H-Frequency (KHz) | V-Frequency (Hz) | Clock Frequency (MHz) | Note |
| 720 × 480 | 15.735 | 60i | 13.5 | SDTV 480i |
| 720 × 480 | 31.468 | 60p | 27 | EDTV 480p |
| 720 × 576 | 15.625 | 50i | 13.5 | SDTV 576i |
| 720 × 576 | 31.25 | 50p | 27 | EDTV 576p |
| 1280 × 720 | 45 | 60p | 74.25 | HDTV 720p |
| 1280 × 720 | 37.5 | 50p | 74.25 | HDTV 720p |
| 1920 x 1080 | 28.13 | 50i | 74.25 | HDTV 1080i |
| 1920 x 1080 | 33.75 | 60i | 74.25 | HDTV 1080i |
| 1920 x 1080 | 27 | 24p | 74.25 | HDTV 1080p |
| 1920 x 1080 | 28.125 | 25p | 74.25 | HDTV 1080p |
| 1920 x 1080 | 33.75 | 30p | 74.25 | HDTV 1080p |
| 1920 x 1080 | 56.25 | 50p | 148.5 | HDTV 1080p |
| 1920 x 1080 | 67.5 | 60p | 148.5 | HDTV 1080p |
• Resolutions outside of these tables are not recognised and will not be displayed.
- When you connect the display to a PC, you should adjust the resolution in the display properties of the computer to closely match the native resolution of the display (for example, 1920 x 1080 pixels).
- To view the best quality picture when using the PC input, you will then need to instruct the display to calibrate itself to the PC signal timing. To do so, select 'Auto' in the 'Picture' menu. See "Auto Adjust" on page 36.
Setting up appropriate output resolution on PC
Before connecting the display to a PC to display PC video, please follow the instructions below (in Windows XP for example) to setup appropriate output resolution.
- On Windows Desktop, right-click and select Properties from the menu that appears.
- Click the Settings tab in the window that follows.
- Drag the Resolution slider and select a compatible resolution according to "Supported PC (D-Sub/DVI) input signal resolutions" on page 56. If your PC supports it, select 1680 × 1050 as the output resolution for the best result.
- Click OK to save the setting and close the window.
- Press ⬤INPUT on the remote control and use ▲▼ to select the VGA input then press OK.
Troubleshooting
There are many external influences and circumstances beyond the control of BenQ which may be causing problems with your display. Some of the more common and user fixable problems are listed below for your information.
Please check the following list before calling your nearest BenQ Customer Service Center, and attempt the following steps to diagnose and fix the problem yourself:
| Symptoms | Possible causes |
| The display does not turn ON | Check that the power plug is securely inserted into both the AC-IN socket on the display and the wall outlet, and that the wall outlet is switched on (if switched).Check that power is available from the power outlet by trying another known working appliance (e.g. desk lamp) from that same power outlet. |
| There is no picture or sound | Check that the display is turned on (The power indicator should be blue).Try a different input source to confirm if the symptom is still present or whether the source is at fault.Check for mis-connection of cables for that input.Adjust the volume control to check that isn't turned down.Make sure that the Speaker Out option in the Audio menu is not set to Off. |
| Improper screen position or size | Try selecting a different aspect ratio.Try a different input source to confirm if the symptom is still present or whether the source is at fault. |
| The image appears distorted | Ensure the display's aspect ratio is correctly set to suit the image source.Try a different input source to confirm if the symptom is still present or whether the source is at fault. |
| "Not supported" appears | The PC VGA output signal resolution is set too high. 1920 × 1080 @ 60Hz is the highest acceptable PC timing. |
WEEE directive

natural_image
Simple line drawing of a trash bin with crossed lines indicating no waste or restriction (no text or symbols)Disposal of Waste Electrical and Electronic Equipment by users in private households in the European Union. This symbol on the product or on the packaging indicates that this can not be disposed of as household waste. You must dispose of your waste equipment by handling it over to the applicable take-back scheme for the recycling of electrical and electronic equipment. For more information about recycling of this equipment, please contact your city office, the shop where you purchased the equipment or your household waste disposal service. The recycling of materials will help to conserve natural resources and ensure that it is recycled in a manner that protects human health and environment.
CE DOC DECLARATION OF CONFORMITY
CE
This device complies with the requirements set out in the Council Directives on the Approximation of the Laws of the Member States relating Electromagnetic Compatibility (2004/108/EC), Low Voltage Directive (2006/95/EC), the Restriction of The Use of Certain Hazardous Substances in Electrical And Electronic Equipment Directive (2002/95/EC), Turkish EEE Directive, Commission Regulation (EC) No 642/2009 implementing Directive 2005/32/EC of the European Parliament and of the Council with regard to ecodesign requirements for televisions, and the Directive 2009/125/EC of the European parliament and of the council establishing a framework for the setting of ecodesign requirements for energy-related products.
Marking for the content condition of chemicals
| Coarse Classification | Chemical Substance Table | |||||
| Pb | Hg | Cd | Cr6+ | PBBs | PBDEs | |
| Front bezel | ○ | ○ | ○ | ○ | ○ | ○ |
| Back-cover | ○ | ○ | ○ | ○ | ○ | ○ |
| LCD panel | ○ | ○ | ○ | ○ | ○ | ○ |
| Power PCBA | exempted | ○ | ○ | ○ | ○ | ○ |
| Main PCBA | exempted | ○ | ○ | ○ | ○ | ○ |
| Keypad-PCBA | ○ | ○ | ○ | ○ | ○ | ○ |
| Stand | ○ | ○ | ○ | ○ | ○ | ○ |
| Power cord | ○ | ○ | ○ | ○ | ○ | ○ |
| I/O cable | ○ | ○ | ○ | ○ | ○ | ○ |
| *:PWBA consisted of bare printed circuit board, soldering and its surface-mounted elements, such as resistors, capacitors, arrays, connectors, chips, etc.NOTE 1: The “O”indicates that the percentage content of the substance to be calculated is not exceeding the reference percentage content of EU RoHS directive (2002/95/EC).NOTE 2: The “exempted” item means that the specified chemical substance corresponds to the items exempted by the EU RoHS directive (2002/95/EC).NOTE 3: The content of Mercury: none of part exceeding 0.1% | ||||||