GC160A24-R7B - Akkumulátor töltő Mean Well - Ingyenes használati útmutató
Találja meg az eszköz kézikönyvét ingyenesen GC160A24-R7B Mean Well PDF formátumban.

Felhasználói kérdések a következőről GC160A24-R7B Mean Well
0 kérdés erről a készülékről. Válaszolj azokra, amiket ismersz, vagy tedd fel a sajátod.
Tegyél fel egy új kérdést erről a készülékről
Töltse le az útmutatót a következőhöz Akkumulátor töltő PDF formátumban ingyenesen! Találja meg kézikönyvét GC160A24-R7B - Mean Well és vegye vissza elektronikus eszközét a kezébe. Ezen az oldalon közzé van téve az eszköze használatához szükséges összes dokumentum. GC160A24-R7B márka Mean Well.
HASZNÁLATI ÚTMUTATÓ GC160A24-R7B Mean Well


natural_image
Black rectangular electronic device with a connector and cable, no visible text or symbolsGC160 Instruction Manual
GC160 Instruction Manual
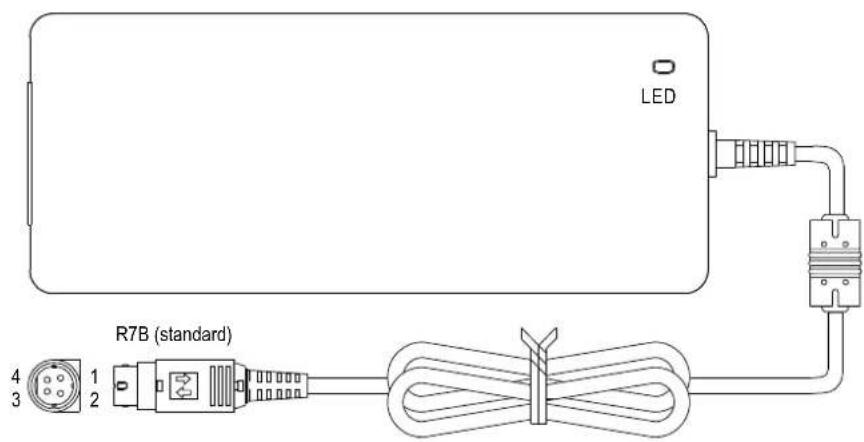
R7B : UL2464 18AWGx4C 1000 50mm AD1 : SJT/SJTW 16AWGx2C 1000 50mm
DC output connector (standard)
| R7B(KYCON KPP-4S or equivalent) | ||
| 4 13 2 | PIN NO. | OUTPUT |
| 1,4 | +V | |
| 2,3 | -V | |
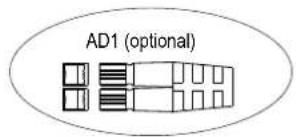
DC output connector (optional)
| AD1[housing: Anderson 1327FP(red), 1327G6FP(black)contacts: Anderson 261G2 (45A) or equivalent] |
| Red(+V) Black(-V) |

Warning : Please make sure the polarity of the battery is connected correctly!
Assembly Procedure :
-
Make sure the charger is shut off and choosing suitable wires to connect the charger and batteries based on the rating of charging current. The polarity must be correct: charger output (+) should be connected to the (+) terminal of batteries and charger output (-) should be connected to the (-) terminal. In no times should the (+) and (-) be short together or the charger and batteries will be damaged.
-
Connect the AC input and check whether the operation of LED is correct. (red : charging ; green : battery is full)
Notes On Operation:
- The charger should be assembled in the place with good ventilation and low moisture. Exposure to the rain or snow is strictly prohibited.
- Wires connecting between the charger and batteries should be as short as possible since the high voltage drop on the wires will increase the time required to fully charge the batteries.
- Make sure the charging voltage and charging current are suitable for the batteries you are using.
- If the batteries need to connect in series for charging, old batteries are not suggested to be used with new ones or the lifetime of batteries may reduce because of the unbalance charging voltage distribution on new and old batteries.
- Please turn off the charger before connecting or disconnecting the wires.
- The charger has a 2-year worldwide warranty, however, damages from misusing the charger will not be included in the coverage of warranty.
Status Under General Operation:
At the beginning stage of operation, the charger provides the largest current with 13.6Vdc of output voltage (for 12V batteries) to charge batteries. The LED indicator will lighten in red. After a period of time (probably a couple of hours, based on the capacity of batteries), the charging current will decrease gradually. After reaching 10% of its maximum value, the charger will go into "floating-charge" stage. The LED indicator will turn to green. The relationship between charging current and charging voltage for each operation stage are shown in the curves below:
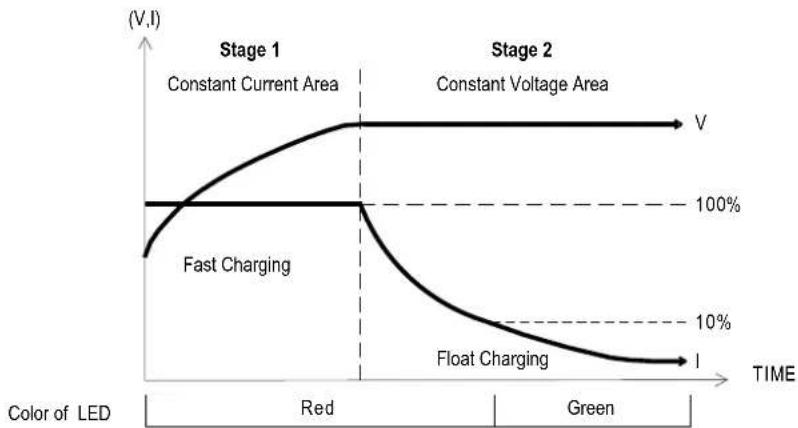
line
| Time | V (I) | Current Area (V) | | :--- | :--- | :--- | | Red | 100% | Constant Current Area | | Green | 10% | Constant Voltage Area | | Red | Fast Charging | Constant Current Area | | Green | Float Charging | Constant Voltage Area | | Red | (V,I) | (V,I) | | Green | (I) | (I) |Charging Current And Ambient Temperature
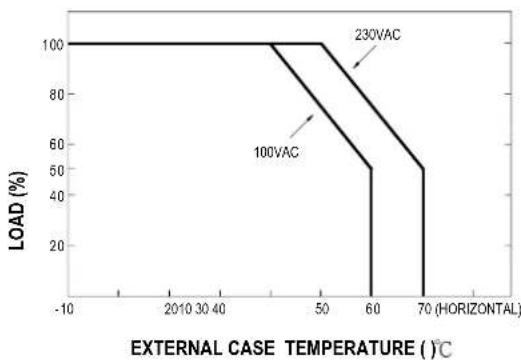
line
| EXTERNAL CASE TEMPERATURE (°C) | LOAD (%) - 100VAC | LOAD (%) - 230VAC | | ----------------------------- | ----------------- | ----------------- | | 50 | 100 | 100 | | 60 | 50 | 100 | | 70 | 50 | 100 |Suggested Battery Capacity:
-
It will not have any problem if the capacity of batteries larger than the suggested value. It just takes more time to make the batteries fully charged!
-
If you have any question about the suitable charging current for the batteries, please refer to the technical data provided by the battery manufacturers or consult the vendor of the batteries.
| Model | Suggested Battery capacity |
| GC160A12 | 60-160Ah |
| GC160A24 | 30-90Ah |
| GC160A48 15 | 5-45Ah |
Notes On Failure Elimination
| Status | Possible Reasons | Ways to Eliminate |
| No output voltage | Wrong polarity of the battery connection | Repair required. Please send it back to us or any of our distributors |
| Can't achieve the FLOAT (green light) stage after long period of charging operation | Replace the batteriesBatterie |
If you still cannot eliminate the failure situation, please consult
MEAN WELL or any of our distributors
IMPORTANT SAFETY INSTRUCTIONS - SAVE THESE INSTRUCTIONS
DANGER - TO REDUCE THE RISK OF FIRE OR ELECTRIC SHOCK. CAREFULLY FOLLOW THESE INSTRUCTIONS.
- This manual contains important safety and operating instructions for battery charger Models GC160A12, GC160A24 and GC160A48.
2.SAVE THESE INSTRUCTIONS This manual contains important safety and operating Instructions for battery charger Models GC160A12, GC160A24 and GC160A48. - Before using battery charger, read all instructions and cautionary markings on battery charger, battery, and product using battery.
- CAUTION - To reduce risk of injury, charge only one, 12V Lead-Acid type rechargeable battery for Model GC160A12; charge only two, 12V Lead-Acid type rechargeable batteries, which were connected in series, for Model GC160A24; charge only four, 12V Lead-Acid type rechargeable batteries, which were connected in series, for Model GC160A48.
- Power Supply Cord:
Power Supply Cord - Cord Type SJT or SVT, rated minimum 105°C, No. 18AWG/3C, provided with a molded-on, grounding type attachment plug with a 15A, 125V(NEMA 5-15p) configuration and a molded-on connector which mates with the appliance inlet, minimum 1.8m and maximum 3m in length.