TF-TV1703 - Televízió COBY - Ingyenes használati útmutató
Találja meg az eszköz kézikönyvét ingyenesen TF-TV1703 COBY PDF formátumban.

Felhasználói kérdések a következőről TF-TV1703 COBY
0 kérdés erről a készülékről. Válaszolj azokra, amiket ismersz, vagy tedd fel a sajátod.
Tegyél fel egy új kérdést erről a készülékről
Töltse le az útmutatót a következőhöz Televízió PDF formátumban ingyenesen! Találja meg kézikönyvét TF-TV1703 - COBY és vegye vissza elektronikus eszközét a kezébe. Ezen az oldalon közzé van téve az eszköze használatához szükséges összes dokumentum. TF-TV1703 márka COBY.
HASZNÁLATI ÚTMUTATÓ TF-TV1703 COBY
[]
WARNING: DO NOT EXPOSE THIS APPLIANCE TO RAIN OR MOISTURE, DUE TO THE HIGH RISK OF FIRE OR yELECTRIC ySHOCK y, yDO yNOT yOPEN yTHE yCABINET yDANGEROUS yHIGH yVOLTAGES yARE yPRESENT INSIDE THE ENCLOSURE ONLY QUALIFIED SERVICE PERSONNEL SHOULD ATTEMPT THIS.
CAUTION: yTO yPREVENT yELECTRIC ySHOCK, yMATCH yWIDE yBLADE yOF yPLUG yTO yWIDE ySLOT, yAND yful INSERT.
ATTENTION: yPOUR yEVITER yLES yCHOCS yELECTRIQUE y, yINTRODUIRE yLA yLAME yLA yPLUSLARGE yDE yL FICHE DANS LA BORNE CORRESPONDANTE DE LA PRISE ET POUSSER JUSQU AU FOUD.
CAUTION: yTO yENSURE yPROPER yUSE yOF yTHIS yPRODUCT y, yPLEASE yREAD yTHIS yOWNER'S yMANUAL CAREFULLY AND RETAIN FOR FUTURE REFERENCE. SHOULD THE UNIT REQUIRE MAINTENANCE, CONTACT AN AUTHORIZED SERVICE LOCATION, ONLY QUALIFIED SERVICE PERSONNEL SHOULD REMOVE THIS COVER.
FCC NOTICE: yTHIS EQUIPMENT HAS BEEN TESTED yAND yFOUND TO yCOMPLY yWITH THE LIMITS FOR yA CLASS B DIGITAL DEVICE. PURSUANT WITH THE FCC RULES, PART 15. THESE LIMIT ARE yDESIGNED yTO yPROVIDE yREASONABLE yPROTECTION yAGAINST yHARMFUL INTERFERENCE IN A RESIDENTIAL INSTALLATION.
WARNING: CHANGES OR MODIFICATIONS MADE TO THIS EQUIPMENT, NOT EXPRESSLY APPROVED BY PARTIES AUTHOTIZED BY WILL VOID ALL THE MANUFACTURE WARRANTIES.
Please carefully study this manual and always keep it available. There are however, some installation and g operation precaution which you should be aware of.
- gRead Instructions – All the safety and operating instructions should be read before the product is operated.
- g gRetain Instructions – The safety and operating instructions should be retained for future reference
- g gHeed warnings – All warnings on the product and in the operating instructions should be adhered to
-
g gFollow Instructions – All operating and use instructions should be followed.
-
. Cleaning – Unplug this from the wall outlet before cleaning. Do not use liquid cleaners or aerosol cleaners. Use a dryer cloth for cleaning.
-
g gAttachments – Do not use attachments not recommended by the product manufacturer as they cause hazards.
-
g gWater and moisture – Do not use this product near water – for example, near a bath tub, wash bowl, kitchen sink, or laundry tub; in a wet basement; or near a swimming pool; and the like.
-
Accessories – Do not place this product on an unstable cart, stand, tripod, bracket, or table. The product may fall. Causing series injury to a child or adult, and serious damage to the product. Use only with a cart, stand, tripod, bracket, or table commended by the manufacturer, or sold with the product. Any mounting of the product should follow the manufacturer's instructions, and should use a mounting accessory recommended by the manufacturer.
- g gA product and cart combination should be moved with care. Quick stops, excessive force, and uneven surface may cause the product and cart combination to overturn. g
- gPower Sources – This product should be operated only from the type of power source indicated on the marking label. If you are not sure of the type of power supply to your home, consult your product dealer or local power company. For products intended to operate from battery power, or other sources, refer to the operating instructions.
- Grounding or Polarization – Do not defeat the safety purpose of the polarized or grounding-type plug. This product may be equipped with a polarized alternation – current line plug (a plug having one blade – wider than the other). A grounding type plug has two blades and a third grounding prong. The wide blade or the third prong are provided for your safety. This plug will fit into the power outlet only one way. If you are not unable to insert the plug fully into the outlet, try reversing the plug. If the plug should still fail to fit, contact your electrician to replace your obsolete outlet. g
- gPower - cord Protection – Power-supply cords should be routed so that they are not likely to be walked on or pinched by items placed upon or against them, paying particular attention to cords at plugs, convenience receptacles, and the point where they exit from the product.
- Protective Attachment Plug – The product is equipped with an attachment plug having overload protection. This is a safety feature. See instruction manual for replacement or resetting of protective device. If replacement of the plug is required, be sure the service technician has used a replacement plug specified by the manufacture that has the same overload protection as the original plug.
- gPower line – An outside antenna system should not be located in the vicinity of overload power lines or g gother electric light or power circuits, or where it can fall into such power lines or circuits. When installing an outside antenna system, extreme care should be taken to keep from touching such power lines or circuits as contact with them might be fatal.
- Overloading – Do not overload wall outlets, extension cords, or integral convenience receptacles as this can result in a risk of fire or electric shock.
-
gServicing – Do not attempt to service this product yourself as opening or removing covers may expose you to dangerous voltage or other hazards. Refer all servicing to qualified service personnel.
-
Damage Requiring Service – Unplug this product from the wall outlet and refer servicing to qualified service personnel under the following conditions:
a. gWhen the power-supply cord or plug is damaged.
b. glf liquid has been spilled, or objects have fallen into the product.
c. glf the product has been exposed to rain or water.
d. gIf the product does not operate normally by following the operating instructions. Adjust only those controls that are covered gby the operating ginstructions as an improper adjustment of other controls may result gin damage and will often require extensive work by a qualified technician to restore the product to its normal operation.
e. glf the product has been dropped or damaged in any way, and g
f. gWhen the product exhibits a distinct change in performance – this indicates a need for service.
-
gReplacement gParts g– gWhen greplacement gparts gare grequired g, gbe gsure gthe gservice gtechnician ghas gused replacement gparts gspecified gby gthe gmanufacture gor ghave gthe gsame gcharacteristics gas gthe goriginal gpart g. Unauthorized substitutions may result in fire, electric shock, or hazards.
-
Safety Check – Upon completion of any service or repairs to this product, ask the service technician to perform safety checks to determine that the product is in proper operating condition.
-
gHeat – The products should be situated away from heat sources such as radiators, heat registers, stoves or other products (including amplifiers) that produce heat.
-
gDo not expose this apparatus to rain or moisture.
-
gUnplug this apparatus during lighting storms or when unused for long period of time.
-
gDo not block any ventilation openings. Install in accordance with the manufacturer's instructions.
UNPACKING
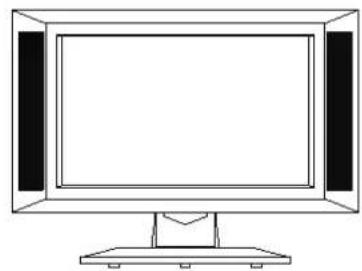
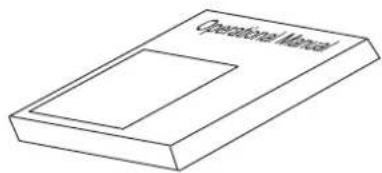
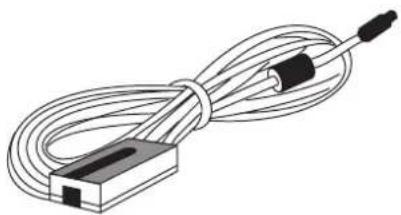
Please make sure the following items are included with your LCD TV/monitor. If any items are missing, contact your dealer.
natural_image
Line drawing of a flat-screen computer monitor with front and back panels (no text or symbols)TFT-LCD monitor
natural_image
Simple line drawing of a rectangular block with a recessed top and a small cutout on the side (no text or symbols)Operational Manual
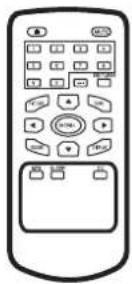
Remote Control
natural_image
Illustration of a coiled cable with a black connector and a rectangular base (no text or symbols)DC Adapter
natural_image
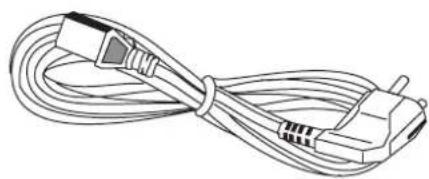
Line drawing of a USB cable with multiple connectors (no text or symbols)Power Cord

natural_image
Illustration of bundled cables with black bands and connectors (no text or symbols)RCA Cable
Table of contents
□
I. BViews of the monitor
II. BRemote control unit reference guide
(1) BRemote control unit function
(2) BRemote control battery installation and cautions
III. BInstallation and connecting
IV. BTV/display screen operation
(1) BBasic operation
(2) BViewing the TV Functions
(3) BViewing the AV signal sources such as DVD\VCR\CAMCORDER
V. BMenu settings and adjustments
(1) BBasic setting
- BImage setting
- BSound setting
- BConfiguration setting
(2) BTV channel setting
Channel Setting
V-Chip Settings
VI. BInspection and troubleshooting
VII. Specifications
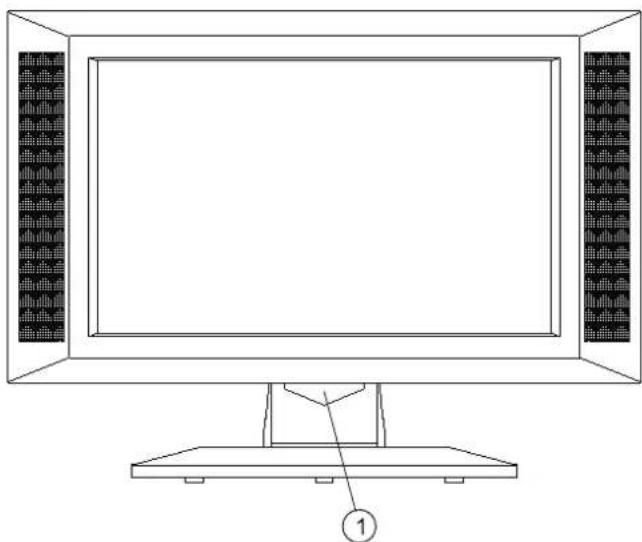
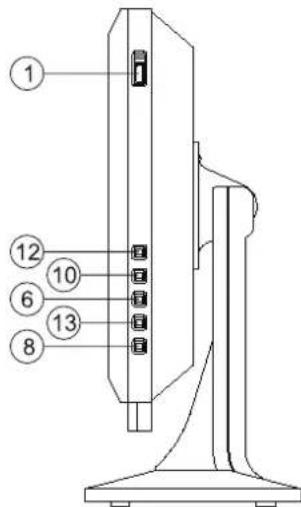
I. Views of the monitor
Front View
natural_image
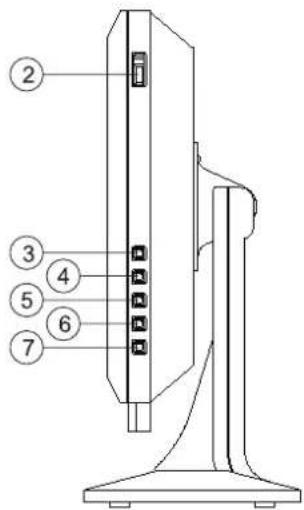
Line drawing of a computer monitor with front panel and base mount (no text or symbols)Left Side View
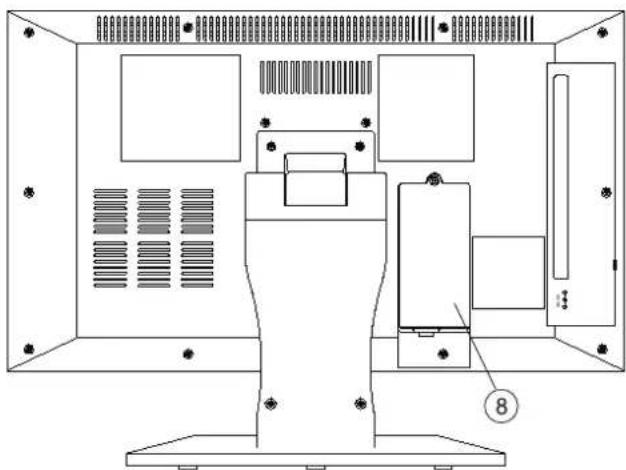
Back View
natural_image
Technical line drawing of a mechanical or electronic component with no visible text, numbers, or symbols.Right Side View
- REMOTE CONTROL SIGNAL SENSOR
- POWER SWITCH and INDICATOR
- MENU button
- DOWN button
- UP button
- VOLUME (-) and LEFT button
- VOLUME (+), ENTER and RIGHT button
- TV signal input
- Cr video input
- Cb video input
- Y video input
- S-video input
- RCA video Line-out
- Audio Line-out "L"
- Audio Line-out "R"
- RCA video input
- Audio input "L"
- Audio input "R"
- Headphone output jack
- AC power input (+12V,4A)
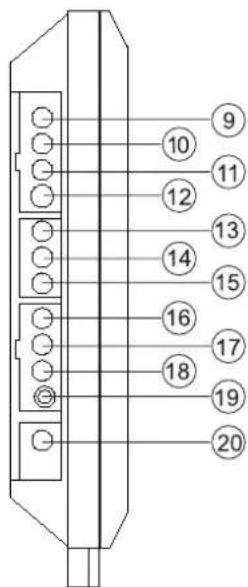
II. REMOTE CONTROL UNIT REFERENCE GUIDE
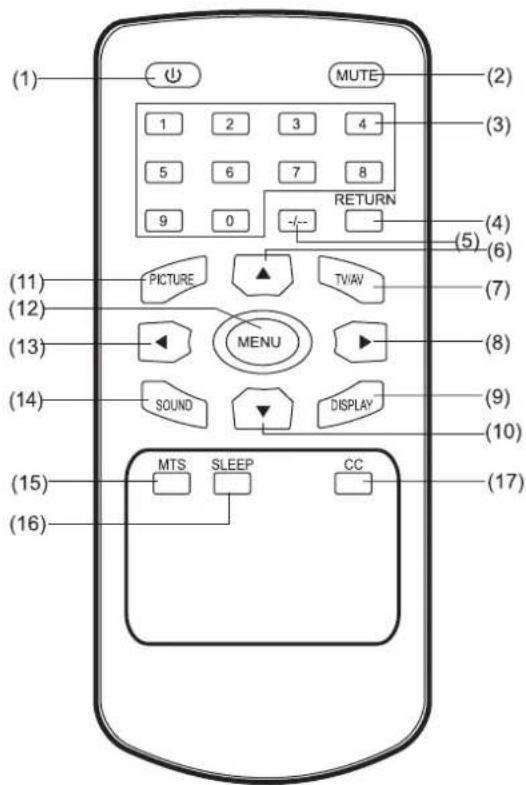
(1) Remote control unit function
- POWER button
- MUTE button
- “0 – 9” Number buttons
- RETURN button
- DIGITS button
- UP button
- TV/AV button
- VOLUME (+), ENTER and RIGHT button
- DISPLAY button
- DOWN button
- PICTURE button
- MENU button
- VOLUME (-) and LEFT button
- SOUND MODE button
- MTS button
- SLEEP button
- CC button

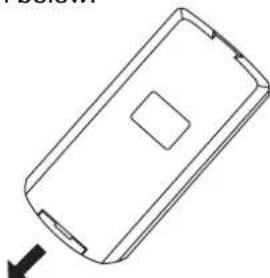
(2) Remote control battery installation and cautions
Replace battery by following the steps below:
Requires a CR2025 battery
- Pull in the direction as shown below.
natural_image
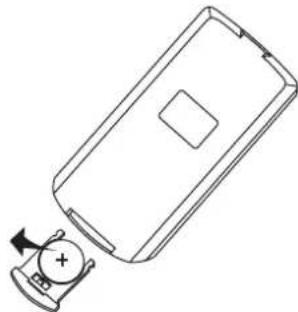
Line drawing of a rectangular electronic device with a square cutout and an arrow pointing to it (no text or symbols)- Install the battery in the battery tray. ( confirm that the positive pole marked “ +” is facing up )
natural_image
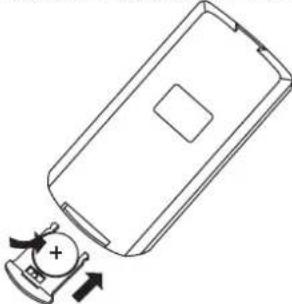
Line drawing of a mobile phone casing with a battery and indicator lights (no text or symbols)- Replace the tray and slide back the latch until it snaps in place.
natural_image
Line drawing of a mobile phone casing with a plus button and directional arrows indicating action (no text or symbols)CAUTION:
Keep batteries out of children's reach. If batteries are swallowed, contact a physician immediately.
NOTES:
-
Do not drop, apply shock or step on the remote control.
-
Do not spill water on the remote control.
-
Do not use remote controls for other equipments at the same time.
-
If the TV does not operate even when operating the remote control from a close range, replace the battery (product number: CR2025).
Refer to the label on back of the remote control for directions on replacing battery.
III. Installation and connecting
Connecting your LCD TV / monitor
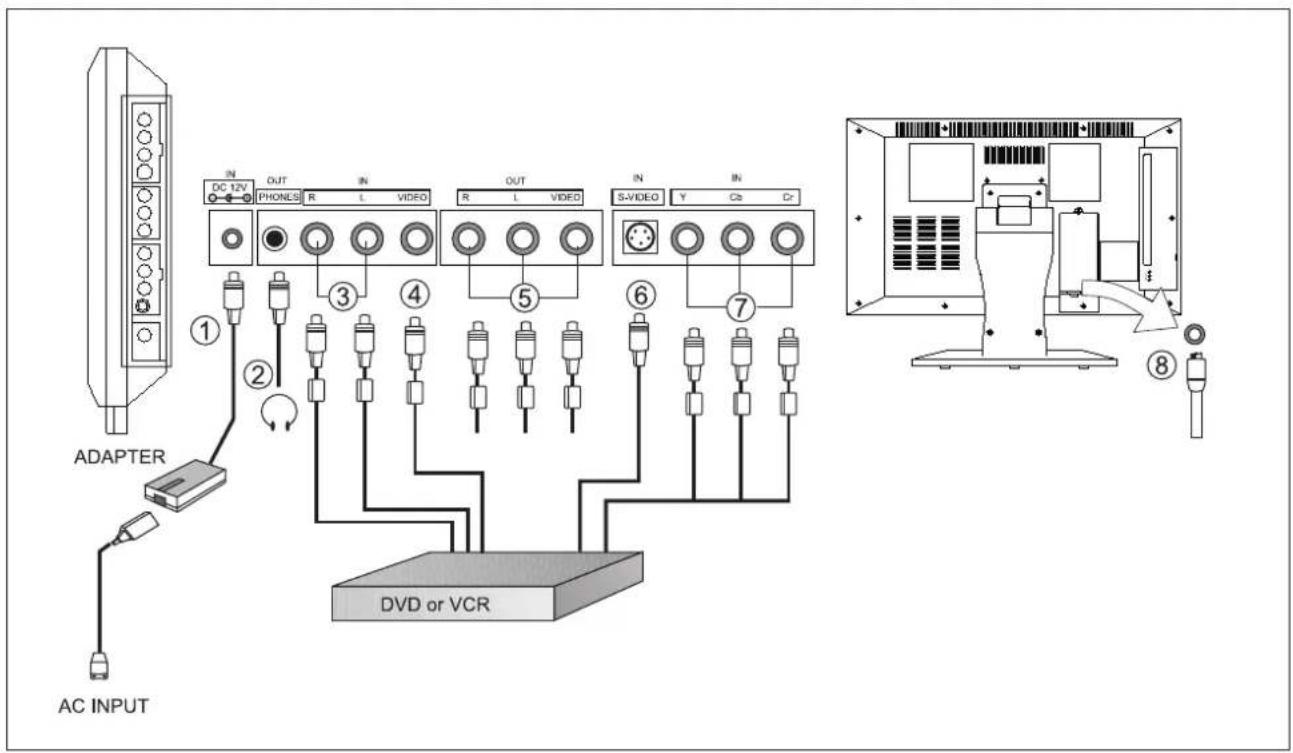
Figure Cable connections
- Inset the AC power to the DC adapter, then connect 12v input port of the Display to its DC output port.
- Connect the ear piece to the "phone" port.
- Connect audio sources (including DVD\VCR\CAMCORDER) to the proper audio input ports "L" and "R" by RCA cable.
- Connect video sources (DVD\VCR\CAMCORDER) to the "VIDEO" port by RCA cable.
- Connect the audio or video's circuit output with your VCR\TV's relevant circuit input by RCA cable. It can record your audio or video signal.
- Connect video sources (DVD\VCR\CAMCORDER) to the "S-VIDEO" port by S-VIDEO cable.
- If your DVD, VCR or CAMCORDER has YCrCb output jack, you can connect it to the "YCrCb" port by RCA cable.
- Connect TVRF sources to antenna port. TVRF signal including: receiving antenna /CATV net. You can use 75Ω coaxial cable to connect outdoor antenna.
NOTE: Please be advised you can only hook up one video connection at a time.
IV. TV/Display Screen Operations
Remote control
Main unit
NOTE: BUnless Bother Bnoted, Bthe Bsame buttons Bon Bboth Bthe Bmain Bunit Band Bthe remote indicate the same function.
(1) BBasic operation
-
BPress (1) on the main unit to switch the power ON. The indicator will display yellow when there is a signal. If there is no signal the indicator will be red. Press (1) again to switch OFF the power.
-
BUnder Bthe Bmodes Bof B"AV" Band B"TV", Bthe Bpower Bwill Bbe Bswitched Boff Bautomatically Bwhen Bth shows no signal for half an hour. Press (1) to switch on the power.
-
BImage setup \ sound setup \ previous channel can be memorized before you switch off the TV. The movie will re-start under the previous state when you switch on the TV again.
-
BDisconnecting the power cord will cut Bthe power supply completely and all previous settings will be lost.
-
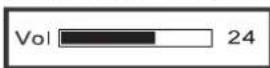
Press (8) or (13) to change the volume. Press (8) continuously to increase volume. Press (13) continuously to decrease volume. The volume can be changed from 0 to 60. The screen indicates:
(2) BViewing the TV Functions
-
BPress (7) to select from one of the 8 types of signal input modes. In the initial state,"1" will appear in the top right corner of the TV screen.
-
BPress the (6) up or (10) down to change channels or press (3) the numeric buttons to enter a channel directly. To select channels from 10 to 199 press the (5) button until “- -”or “- - -” appears, then press the numeric buttons to select the channel.
-
BPress the (4) button to select the present channel information.
-
Press the (11) button to select from 4 types of image modes:

flowchart
graph LR
    A["Soft"] --> B["Vivie"]
    B --> C["Normal"]
    C --> D["User Define"]
    D --> E["End"]
    E --> A
- Press the (14) button to select from 4 types of sound modes:

flowchart
graph LR
    A["Music"] --> B["Speech"]
    B --> C["Normal"]
    C --> D["User Define"]
    D --> E["End"]
    E --> A
- Press (2) button to ute the sound, press again to activate sound..
- Press (9) button to display present channel information.
- Press (15) button to select the different kinds of sound.

flowchart
graph TD
    A["MONO"] --> B["Stereo"]
    B --> C["SAT"]
    C --> D["End"]
    A -->|Feedback| B
- Press (16) button to set up the sleep time to shut down your monitor.
You can select 0 minute, 15 minutes, 30 minutes, 60 minutes, 90 minutes and 120 minutes circulative by press the SLEEP button continuous.
- Insure your TV signal has Close Caption information, adjust the TV to this channel, press (17) button

flowchart
graph TD
    A["CC1"] --> B["CC2"]
    B --> C["CC3"]
    C --> D["CC4"]
    E["OFF"] <--_F["T3"]
    F <--_G["T4"]
    G <--_H["T2"]
    H <--_I["T1"]
There are different information channel, when you select one the matched information will be displayed on the screen. You can select OFF to close it.
(3) Viewing the AV signal sources such as DVD\VCR\CAMCORDER
Press the (7) button continuously to view the 5 types of Input modes:

flowchart
graph LR
    TV --> VIDEO
    VIDEO --> $-VIDEO
    $-VIDEO --> YCrCb
    YCrCb --> TV
Select the suitable input to pickup the AV signal.
V. Menu setting and adjustments
(1) BBasic setting B
1. BImage setting
a. BPress the Menu button on the remote to enter into Set Up Menu
b. BPress the (8) or (13) button to select the TV Image menu
c. Press the (6) or (10) button to enter the sub-menu
d. BPress the (13) or (8) button to change the Options shown in Table 1. B
e. BPress Bthe B“c” and B“d” Bsteps Bto Bcontinuously Bchange Bthe options for optimum viewing
f. BPress BMENU Bbutton Bagain Bto Bexit. BThe Bmenu Bwill Bdisappear Bautomatically B20 Bseconds Ba stopping operation.
| Image | |
| H/V Ratio | Model 1 |
| Bright | 30 |
| Contrast | 30 |
| Color | 30 |
| Sharpness | 30 |
| HUE | 0 |
| Program BAdjust range BInstruction | ||
| H/V Ratio BModel 1~3 BAdjust | Bthe Bthree BHorizontal/vertical Bmodes Bto Byour satisfaction | |
| Bright B0~60 BAdjust the bright to your satisfaction | ||
| Contrast | 0~60 BAdjust the contrast to your satisfaction | |
| Color | 0~60 BAdjust the color to your satisfaction | |
| *Sharpness | 0~60 BAdjust the Sharpness to your satisfaction | |
| HUE | -30~+30 | Adjust the HUE to your satisfaction |
Table 1
*NOTE: The "Sharpness" item can only be displayed in the TV mode.
2. BSound Setting
a. BPress the Menu button to enter ithe Set Up Menu
b. BPress the (8) or (13) button to select the Sound Menu
c. Press the (6) (10) (8) or (13) buttons to select and change the Options as show in Table 2, until you have the unit set for optimum sound
d. BPress BMENU Bbutton Bagain Bto Bexit. BThe Bmenu Bwill Bdisappear Bautomatically B20 Bseconds B stopping operation. B
| Sound | |
| Bass | 30 |
| Treble | 30 |
| Balance | 0 |
| Program | Adjust range B | Instruction |
| Bass | 0~60 | B Bto your satisfaction |
| Trable | 0~60 | to your satisfaction |
| Balance | -30~0~+30 | Indicates weather the L/R audio output is balance, the middle amount is zero B |
Table 2
3. BConfig. Setting B
a. BPress the Menu button to enter the Set Up Menu
b. BPress the (8) or (13) button to select the Config. Menu
c. Press Bthe B(6) B(10) B(8) Bor B(13) Bbuttons Bto Bselect change the Options as show in Table 3
c. Press BMENU Bbutton Bagain Bto Bexit. BThe Bmenu Bwill disappear automatically 20 seconds after stopping operation.
| Config | ||
| Input | Video | |
| Language | English | |
| Lock | ||
| Reset | ||
| Color Temp | 9300 | |
| PROGRAM B$ELECT OR IDENTIFY BINSTRUCTION | ||
| INPUT | TV→VIDEO→S-VIDEO→YCrCb→TV | Before inputting reference setting, you must select the correct input mode.(You must select the TV mode before searching for a channel) |
| LANGUAGE | 1→2→3→4→5→6→7→8→······→1 | Menu language setup |
| LOCK | Press (8) button to enter into lock mode | All buttons on the main unit will not function when the screen appears “LOCK”.Press Bany Bbutton Bon Bthe Bremote Bcontrol Bto cancel the function. |
| RESET | Press (8) button on the remote to return Bto Bthe Binitial Bsetting Bby Bthe factory. (press (8) on the main unit will not function) | If you select the RESET, each function setting returns to the initial status setting by the factory. |
| Color Temp | Press (8) or (13) button to select the Color Temp 8500 or 9300 | Select different Color Temp depending on your favor. |
Table 3
(2) TV Channel Setting and Sorting
Channel setting B
a. BEnter into Menu and select TV mode. The program will display 3 B separate contents.
| PROGRAM | SELECT OR IDENTIFY | INSTRUCTION |
| CHANGE CODE | Select four digits as your code | The code is used to unlock the ratings Bmenu. B(The default password Bof the Bsystem Bis 1111) |
| CCO/TEXT | Select CC1~CC4 T1~T4 OFF | You can select eight channels or turn it off. |
| BLUE BACK | Press (8) button to select on or off | When there is no signal, close or open the blue back. |
| Config | ||
| Input | Video | |
| Language | English | |
| Lock | ||
| Reset | ||
| Color Temp | 9300 | |
| Config | |
| Input | TV |
| Language | English |
| Lock | |
| Reset | |
| Change Code | ---- |
| CCO/Text | T1 |
| Blue Back | ON |
| Color Temp | 9300 |
| Channel | ||
| Auto Search | ||
| Fine Tune | ||
| Skip | OFF | |
| Antenna | CATV | |
Table 4
V-Chip Settings
Some TV programs and movies include signals that classify the contents of the program. B BThe V-CHIP control feature in the TV detects the signals and blocks the programs according to your selections. B B. B BThe password to enter the system is 1111. If changed, please keep a copy of it in a safe place. If the password is lost, the defaults setting will not revert to the original password. To use this feature, perform the following set up
Press MENU
Scroll right to Config. Set Up B
Scroll down to Change password
Enter the password to access the V-CHIP menu
(If you are using the unit for the first time the password is 1111)
Scroll right to select the rating system of TVPG or MPAA
Use the CH+/CH- to select the rating level
Use the VOL+/VOL- to select U(Unblocked) or B(Blocked)
There are two Rating systems MPAA for movies and TVPG for broadcasters.
MPAA
G- General audience B
PG- Parental guidance suggested
TVPG
Y - A I I c h i l d r e n
Y7- For children age 7 and above
PG13- Not intended for ages under 13 B B BPG- Parental guidance suggested
NC17- Not intended for ages under 17 B B B14-Not intended for ages under 14
R - R e s t r i c t e d
M A -
X- For adults only
There are sub-categories within these ratings. As the rating increases so does the intensity of the sub-category.
(ie.) Under PG, V would be moderate violence. Under MA, V would be graphic violence
D-Suggestive dialogue
L-Indecent language
S-Sexual situations
V-Violence
b. Select the channel mark B
c. Use (6) (10) (8) (13) cursor buttons to select the options of channel, then identify the options.(Table 5)
d. Press MENU button again to exit. The menu will disappear automatically 20 seconds after stopping operation.
| PROGRAM | SELECT OR IDENTIFY | INSTRUCTION |
| Auto search | Press (8) button to enter into search mode | Search the channels from low to high and reserve the channels automatically. Press the MENU button on the remote control to stop searching. |
| Fine tune BPress | (8) button to increase fine tunePress B(13) Bbutton Bto Bdecrease Bfine tune | In order to improve the picture and sound, you can Buse Bthe Bfunction Bto Badjust Bthe Breceived program, Bthen Bpress BSAVE Bbutton Bto Reserve the program. |
| Skip BPress B(8) | Bor B(13) Bbuttons, Bthe Bscreen appears :ON←>OFF | When Breceiving Ba Bchannel, Bset BSKIP Bto BON and Bthe Bchannel Bwill Bdisappear. BSet BSKIP Bto Off and the channel will be restored. B |
| Antenna BPress | B(8) Bor B(13) Bbuttons Bto Bselect CATV←>AIR | You can select an outer antenna or the cable TV. |
Table 5
NOTE: The image and sound setting under TV mode is the same as the instructions of "BASIC SETTING".
VI. Inspection and troubleshooting
| Symptom | Remedy |
| No power ● Inspect whether power plug is connected properly.● Pull the plug, wait 60 seconds, reinsert plug and turn unit ON | |
| No picture ● Inspect whether antenna is connected properly● Try another channel● Change length and contrast setting● Ensure that the AV picture input cable is connected properly | |
| No sound | ● Increase the volume, and press the MUTE button on the remote● Inspect the sound system setting● Ensure that the AV audio signal input cable is connected properly |
| Color is distorted | ● Ensure that the equipment is connected properly● Ensure that the AV video signal input cable is connected properly |
| Picture and sound distortion | ● Inspect that the equipment is connected properly● If using antenna, adjust the antenna |
| No operations can be performed with the remote- | ● Turn the TV on manually● Check the batteries are installed with the correct polarities● Clean the remote sensor● Ensure that there is no foreign object between remote control and sensor● Operate the remote control at a distance of not more than 6 meters from the remote sensor |
remote
VII. Specifications
| TFT Panel characteristic | Size B17" | ||
| Resolution B1280X768 | |||
| Pixel pitch B0.291mm | X0.291mm | ||
| Typical Bwhite Luminance | 450 B B B[cd/m2] | ||
| Contrast ratio B400 : 1 | |||
| Viewing angle B176°/176° B B(H/V) | |||
| Backlight B6xCCFLs | |||
| TV characteristic | TV system BNTSC M/N | ||
| Channel received | VHF-L B48.2 | 5~160.00MHz | |
| VFH-H B160. | 00~442.00MHz | ||
| UHF B442.00 | ~863.25MHz | ||
| Intermediate frequencies | Picture IF B3 | 8.9MHz | |
| Color | 34.47MHz | ||
| Sound B32.4 | MHz,32.9MHz | ||
| Scanning | Horizontal | 15625Hz | |
| Vertical | 50Hz | ||
| Antenna impedance | 75 ohm unbalance | ||
| Tuning system BFS with PLL | |||
| Pre-set channel | 200 | ||
| Standard | AC/DC Adapt | AC input | 100~240V 50/60Hz |
| DC output | +12V 4A | ||
| Power consumption | On working | 48W B | |
| Standing | ≤2W | ||
| Speaker | 2 X (4Ω, 2W) | ||
| Operating temperature range | 10°C~40°C | ||
| Operating humidity Range | 40%~80% | ||
| Dimension B525(W)×390(H)×170(D) | |||
| weight | 7.2kg (set) | ||
Note : design and specifications are subject to change without notice.
Weight and Dimensions shown are approximate.