
SHF 2000GR - Párásító SENCOR - Ingyenes használati útmutató
Találja meg az eszköz kézikönyvét ingyenesen SHF 2000GR SENCOR PDF formátumban.


Felhasználói kérdések a következőről SHF 2000GR SENCOR
0 kérdés erről a készülékről. Válaszolj azokra, amiket ismersz, vagy tedd fel a sajátod.
Tegyél fel egy új kérdést erről a készülékről
Töltse le az útmutatót a következőhöz Párásító PDF formátumban ingyenesen! Találja meg kézikönyvét SHF 2000GR - SENCOR és vegye vissza elektronikus eszközét a kezébe. Ezen az oldalon közzé van téve az eszköze használatához szükséges összes dokumentum. SHF 2000GR márka SENCOR.
HASZNÁLATI ÚTMUTATÓ SHF 2000GR SENCOR
Air Humidifier
User's manual
Z
natural_image
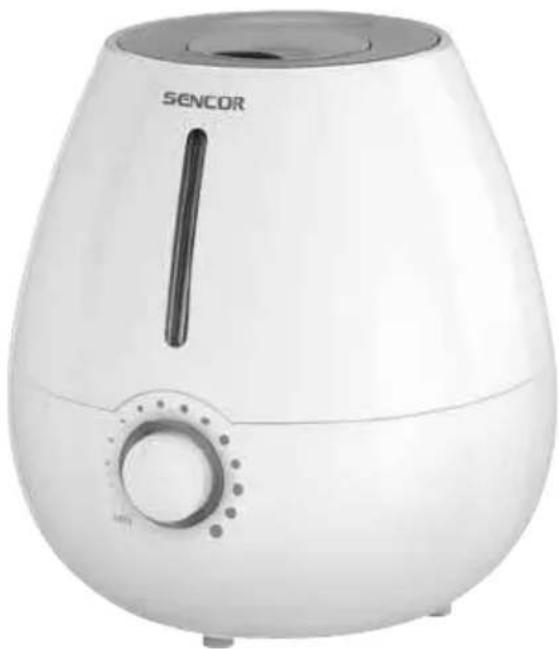
White SENCOR air fryer with control knob (no visible text or symbols)SENCOR®
SHF 2000BL
SHF 2001GR
Prior to using this appliance, please read the user's manual thoroughly, even in cases where owners have previously familiarised themselves with using similar types of appliances. Only use the appliance in the manner described in this user manual. Keep this manual for future use.
Save the original shipping box, packaging material, purchase receipt and warranty card for the duration of the warranty. In the event of shipping, pack the appliance using the original packaging materials only.
EN-1
CONTENTS
IMPORTANT SAFETY INSTRUCTIONS....3
DESCRIPTION OF THE HUMIDIFIER 5
USING THE HUMIDIFIER....6
REPLACING THE FILTRATION UNIT 7
CLEANING AND MAINTENANCE 7
TROUBLESHOOTING....8
TECHNICAL SPECIFICATIONS 9
INSTRUCTIONS AND INFORMATION REGARDING THE DISPOSAL OF USED PACKAGING MATERIALS . 10
DISPOSAL OF USED ELECTRICAL AND ELECTRONIC EQUIPMENT 10
IMPORTANT SAFETY INSTRUCTIONS
- This appliance may be used by children 8 years of age and older and by persons with physical or mental impairments or by inexperienced persons if they are properly supervised or have been informed about how to use of the product in a safe manner and understand the potential dangers.
- Do not allow children to play with the appliance. Cleaning and maintenance performed by the user must not be performed by unsupervised children.
IMPORTANT SAFETY INSTRUCTIONS
READ CAREFULLY AND STORE FOR FUTURE USE.
- Before connecting the appliance to a power socket, check that the technical details on the rating label of the appliance match the electrical voltage in the socket.
- The appliance is designed for use in households, offices and similar types of areas. Do not use it in rooms with a high level of dustiness or humidity, e.g. in laundries, bathrooms, etc.
• Do not place the appliance in the vicinity of an open flame or appliances that are sources of heat.
• Do not expose the appliance to direct sunlight.
• Install the appliance on an even, dry and stable surface. Do not place it in the near vicinity of materials that are sensitive to moisture, electric or electronic devices so that they are not damaged by the effects of increased humidity.
• To prevent potential injury by electric shock, do not submerge any part of the base of the appliance in water or any other liquid.
• Do not replace any part of this appliance with parts or accessories from another manufacturer.
• Only fill the tank with clean cold water without any additions. - Before putting the appliance into operation, check that it is properly assembled and that the water tank is filled.
• If the appliance is in operation, do not cover it with any items. - Ensure that while the appliance is in operation that the steam is not directed at furniture or items sensitive to humidity.
- As a result of increased humidity in the room, water may condensate on window panes or interior furnishings. If this situation arises, turn the appliance off.
- Do not touch the converter (surfaces for the condensation of water) with sharp objects in order not to damage it.
• Always turn off the appliance and disconnect it from the power socket, before installing, removing, moving or cleaning it. - Do not disconnect the appliance from the power socket by pulling on the power cord. This could damage the power cord or the power socket. Disconnect the cord from the power socket by gently pulling the plug of the power cord.
- It is forbidden to use the appliance if it has a damaged power cord or plug. If the power cord is damaged, have it replaced at a professional service centre.
- Do not use the appliance if it is not working correctly, if it has been damaged or has been submerged in water. To avoid the danger of injury by electrical shock, do not repair the appliance yourself or make any adjustments to it. Have all repairs or adjustments of the appliance performed at an authorised service centre. Tampering with the appliance during the warranty period may void the warranty policy.
DESCRIPTION OF THE HUMIDIFIER
A
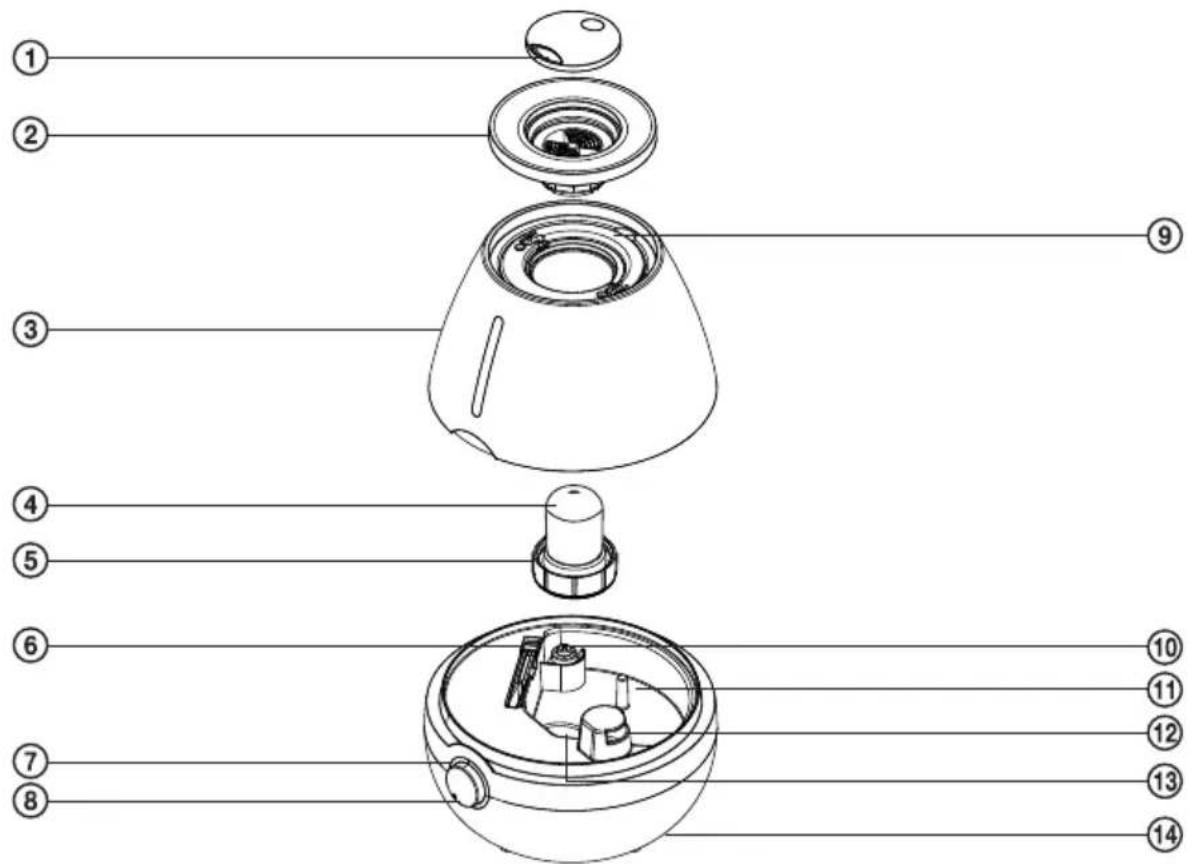
① Steam exhaust nozzle
② Water tank cover determines the direction of the steam
③ Water tank with a capacity of 3 l with a transparent viewing window
④ Filtration unit
⑤ Plug of the water tank filling opening with a water release switch
⑥ Cleaning brush
⑦ Indicator light
⑧ Steam emission control dial
⑨ Folding handle
⑩ Water level sensor
⑪ Water receptacle
Water is pumped into the water receptacle from the water tank.
⑫ Air exhaust opening
⑬ Converter
A surface where water is converted into cold steam (fog).
⑭ Base
USING THE HUMIDIFIER
1) Locate the humidifier on an even, dry and stable surface, at least 60 cm above the level of the floor at a distance of at least 30 cm from a wall or walls of furniture.
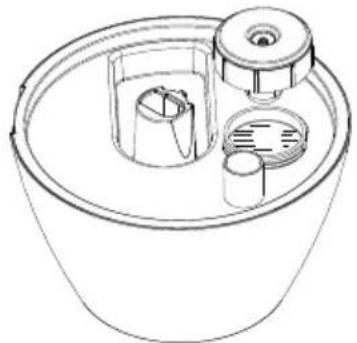
2) Check that the humidifier is turned off and disconnected from the el. power socket. From the top part of the tank A③ remove the nozzle A① and the cover A②. Take hold of the handle A⑨ and pull the tank A③ out of the base A⑭. Turn it upside down and anticlockwise unscrew the plug of the filling opening of the water tank A⑤. Fill the water tank A③ with clean cold tap water.
B
natural_image
Line drawing of a bucket with internal compartments and a lid (no text or symbols)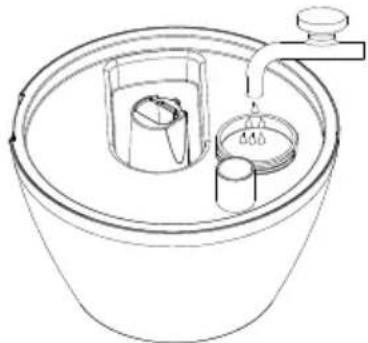
natural_image
Line drawing of a bucket with a water tap and two cylindrical objects inside (no text or symbols)
Attention:
Fill the tank A③ with water that has a max. temperature of 40 °C. Do not fill it up with water that is hotter.
The water tank A③ has a maximum capacity of 3 litres of water.
After filling up the water tank A③, firmly screw in the plug A⑤ clockwise. Turn the water tank A③ upside down and place it back on to the base A⑭ so that both parts fit into each other. After placing the water tank A③ on to the base A⑭, water will start to flow over into the water receptacle A⑪ in the base A⑭. On to the water tank A③ place the cover A② and nozzle A①.
3) Connect the power cord to an el. power socket. Turn the control dial A⑧ to the required steam emission level. The indicator light A⑦ will be lit red. After a few moments the humidifier will start producing cold steam and the indicator light A⑦ will be lit blue. Turn the nozzle A① so that the steam is directed away from the furniture or walls. Turn the control dial A⑧ to gradually decrease or increase steam emission during operation. The water level can be checked at any time through the transparent viewing window. If you fill the tank A③ all the way to the edge, the expected operating time is 12 hours depending on the steam emission intensity setting.

Attention:
Use the humidifier at an ambient temperature of 5 to 40°C and at a relative humidity of up to 80%. In the event that the ambient temperature falls below 5°C, turn the humidifier off and remove the water inside the water tank A③ and the water receptacle A⑪, to prevent it from being damaged.
During operation, do not remove the water tank A③ or touch the converter A⑬. If the water tank A③ is removed during operation, steam will stop being produced and the indicator light A⑦ will be lit red.
4) If the water level in the water receptacle A⑪ falls below a certain level, the humidifier will automatically stop producing steam and the indicator light A⑦ will be lit red. This is a protective feature that prevents damaging the converter A⑬ when there is an insufficient amount of water in the water receptacle A⑪.
If necessary, fill up the water and start the humidifier again according to the instructions contained in paragraph 2) and 3) of this chapter.
5) To turn off the humidifier, turn the control dial A⑧ towards the left until you hear a click and the indicator light A⑦ turns off. Disconnect the humidifier from the el. power socket and clean it out according to the instructions contained in the chapter Cleaning and maintenance.
REPLACING THE FILTRATION UNIT
- The humidifier is equipped with a special filtration unit A④ containing granules which absorb magnesium and calcium oxides contained in water and thereby significantly limits the formation of mineral deposits around the converter A⑬. The use of the filtration unit A④ has a positive effect on the performance and lifetime of the humidifier. We recommend that you replace the filtration unit A④ every 6 months during normal frequency of use, in the following manner:
- Check that the humidifier is turned off and disconnected from the el. power socket. From the top part of the tank A③ remove the nozzle A① and the cover A②. Take hold of the handle A⑨ and pull the tank A③ out of the base A⑭. Turn the water tank A③ upside down. Screw out the plug of the filling opening of the water tank A⑤ by turning it anticlockwise. The filtration unit A④ is screwed to the inside part of the plug A⑤. Screw out the used filtration unit A④ and replace it with a new one. Screw in the plug A⑤ clockwise and return the water tank A③ back into the base A⑭.
• You can purchase spare filtration units from your vendor under the part number SHX 002 Sencor.

Attention:
Do not disassemble the filtration unit or throw it into a fire. Always store spare filtration units out of reach of children.

Important health notice:
In the event that the granules are accidentally ingested, immediately seek for medical help.
CLEANING AND MAINTENANCE
- Before cleaning the humidifier, turn it off and disconnect it from the el. power socket. Please adhere to the follow the instructions relating to the cleaning and maintenance of the humidifier. Otherwise its performance may be negatively affected and undesirable microorganisms may multiply inside the humidifier.
Clean after every use
- From the water tank A③ remove the nozzle A① and the cover A②. Take the water tank A③ to a kitchen sink. Turn it upside down and screw out the plug A⑤. Remove any remaining water from the water tank A③ and rinse it out with clean water. Screw on the plug A⑤.
- Remove the water from the water receptacle A ^11 and wipe it dry using a fine clean cloth.
Thorough cleaning (once a week)
- Remove water from the water tank A③ and the water receptacle A⑪.
- Pour approximately 200 ml of vinegar into the water receptacle A ^11 and allow it to act for 15 minutes. Using a cleaning brush A ^6 , remove the water scale deposits from the water receptacle A ^11 and from the converter A ^13 . Then clean out the scale and vinegar from the water receptacle A ^11 using a cloth dampened in clean water. Then wipe everything dry.

Attention:
Do not leave water in the water tank A③ or in the water receptacle A⑪ for longer than a week. Do not submerge the base A⑭ in water or rinse it under running water.
- Clean the outer surface of the humidifier as required using a fine clean cloth lightly dampened in lukewarm water.
- For cleaning, do not use abrasive cleaning products and solvents as this could damage the surface of the appliance.
TROUBLESHOOTING
| Problem | Possible cause | Solution |
| The indicator light A7is not lit and the humidifier is not producing steam. | The humidifier is not connected to the el. power socket. | Connect the humidifier to a power socket and use the control dial A8to set the required steam intensity. |
| The control dial A8is set in the off position. | Turn the control dial A8to the right and set the required steam intensity. | |
| The indicator light A7is lit red. | There is insufficient water inside the water receptacle A11or no water at all. | Fill up the water tank A3with cold clean water. |
| The water tank A3is not correctly located in the base. | Place the water tank A3on to the base A14so that both parts fit together properly. | |
| An odour can be sensed in the steam. | The odour may be sensed when the appliance is used for the first time. | Open the water tank plug A5and allow the water tank A3to ventilate for at least 12 hours. |
| Inside the water tank A3/ water receptacle A11there is dirty water or you have left water in the water tank A3/ water receptacle A11for too long. | Remove the water from the water tank A3and from the water receptacle A11. Fill up the water tank A3again with cold clean water. | |
| The indicator light A7is lit blue but the humidifier is not producing steam. | There is too much water in the water receptacle A11. | Remove a part of the water from the water receptacle A11and make sure that the water tank plug A5is closed tightly. |
| The humidifier is producing an insufficient amount of steam. | The converter A13is clogged with mineral deposits. | Clean out the converter A13according to the instructions in chapter Cleaning and maintenance. |
| Inside the water tank A3/ water receptacle A11there is dirty water or you have left water in the water tank A3/ water receptacle A11for too long. | Remove the water from the water tank A3and from the water receptacle A11. Fill up the water tank A3again with cold clean water. | |
| An unusual sound can be heard during operation. | There is not enough water inside the water tank A3. | Add water to the water tank A3. |
| The humidifier is located on an unstable surface. | Move the humidifier to a stable, even surface. |
TECHNICAL SPECIFICATIONS
Nominal voltage range 220-240 V
Nominal frequency....50 Hz
Rated power input 30 W
Safety class (for electric shock protection)....II
Water tank capacity....31
Humidifier output....250 ml/h
Operating time when water tank is filled to max. level.... 12 h
Noise level.... 30 dB (A)
The declared noise emission level of the appliance is 30 dB (A), which represents a level A of acoustic power with respect to a reference acoustic power of 1 pW.
Glossary of technical terms
Safety class for electric shock protection:
Class II – Electric shock protection is provided by double or heavy-duty insulation.
We reserve the right to change text and technical specifications.
INSTRUCTIONS AND INFORMATION REGARDING THE DISPOSAL OF USED PACKAGING MATERIALS
Dispose of used packaging material at a site designated for waste in your municipality.
DISPOSAL OF USED ELECTRICAL AND ELECTRONIC EQUIPMENT
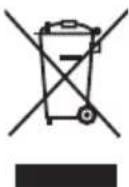
This symbol on products or original documents means that used electric or electronic products must not be added to ordinary municipal waste. For proper disposal, renewal and recycling hand over these products to determined collection points. Or as an alternative in some European Union states or other European countries you may return your products to the local retailer when buying an equivalent new product. Correct disposal of this product helps save valuable natural resources and prevents damage to the environment caused by improper waste disposal. Ask your local authorities or collection facility for more details. In accordance with national regulations penalties may be imposed for the incorrect disposal of this type of waste.
For business entities in European Union states
If you want to dispose of electric or electronic appliances, ask your retailer or supplier for the necessary information.
Disposal in other countries outside the European Union
This symbol is valid in the European Union. If you wish to dispose of this product, request the necessary information about the correct disposal method from the local council or from your retailer.

This product meets all the basic requirements of EU directives that apply to it.


- Air Humidifier
- User's manual
- SENCOR®
- CONTENTS
- IMPORTANT SAFETY INSTRUCTIONS
- READ CAREFULLY AND STORE FOR FUTURE USE.
- DESCRIPTION OF THE HUMIDIFIER
- USING THE HUMIDIFIER
- Attention:
- REPLACING THE FILTRATION UNIT
- Important health notice:
- CLEANING AND MAINTENANCE
- Clean after every use
- Thorough cleaning (once a week)
- TECHNICAL SPECIFICATIONS
- Glossary of technical terms
- INSTRUCTIONS AND INFORMATION REGARDING THE DISPOSAL OF USED PACKAGING MATERIALS
- DISPOSAL OF USED ELECTRICAL AND ELECTRONIC EQUIPMENT
- For business entities in European Union states
- Disposal in other countries outside the European Union
Márka : SENCOR
Modell : SHF 2000GR
Kategória : Párásító