
Favorit 875 I B - Mosogatógép AEG - Ingyenes használati útmutató
Találja meg az eszköz kézikönyvét ingyenesen Favorit 875 I B AEG PDF formátumban.


Felhasználói kérdések a következőről Favorit 875 I B AEG
0 kérdés erről a készülékről. Válaszolj azokra, amiket ismersz, vagy tedd fel a sajátod.
Tegyél fel egy új kérdést erről a készülékről
Töltse le az útmutatót a következőhöz Mosogatógép PDF formátumban ingyenesen! Találja meg kézikönyvét Favorit 875 I B - AEG és vegye vissza elektronikus eszközét a kezébe. Ezen az oldalon közzé van téve az eszköze használatához szükséges összes dokumentum. Favorit 875 I B márka AEG.
HASZNÁLATI ÚTMUTATÓ Favorit 875 I B AEG
ÖKO\_FAVORIT 875 i electronic
Dishwasher
Read this instruction booklet and keep in a safe place
The dishwasher must only be installed and connected by a specialist fitter. Our special notes for installation are given on pages 21-23.
The instructions in this book will enable you to use all the features on the machine to your best advantage, and if you spend a little time in following the instructions, your dishwasher will reward you with superb results. If you do call out a service engineer in connection with any user information contained in this booklet this call will not be free of charge even during the guarantee period.
Contents
| Illustrations (unfold pages for easy reference) | 3-5 | Programmes | 14/15 |
| Cleaning and care | 17 | ||
| Guide to machine | 6-8 | If you think your machine is not working properly | 18/19 |
| General advice on dishwashing | 8 | ||
| Safety information | 9 | Service | 20 |
| Setting the water hardness | 10/11 | For the plumber/electrician (Installation, water and electrical connections, anti-flood system) | 21-23 |
| Adding dishwasher salt | 10/11 | ||
| Filling the rinse aid container | 11 | ||
| Setting the rinse aid dosage | 12 | ||
| Adding detergent before every programme | 12 | Technical data | 24 |
| Loading the diswasher | 13 | Loading diagrams | 5 and 24 |
| Switching on | 16 | ||
| Switching off | 17 | ||
| Unloading the diswasher | 17 |

1

2
3
4

natural_image
Illustration of a hand pouring liquid into a funnel with a coin partially visible (no text or symbols)5

natural_image
Mechanical assembly diagram showing a tool interacting with a central component (no text or symbols present)6
natural_image
Hand inserting a device into a control panel with directional arrows (no text or symbols)7

8
natural_image
Hand using a sewing machine to adjust the rotary knob (no text or symbols visible)9

10

11

natural_image
Illustration of a food delivery box with layers of dishes and a basket filled with vegetables (no text or symbols)12

natural_image
Line drawing of a multi-compartment kitchen appliance with cutlery and fixtures (no text or symbols)13

natural_image
Technical illustration of a hand using a tool to adjust or install a component, with no visible text or symbols.14

natural_image
Illustration of a hand using a tool to press down a gas stove burner (no text or symbols present)15
natural_image
Line drawing of hands holding a small electronic device with a connector (no text or symbols visible)16

17
Guide to machine
For illustrations see pages 3, 4, 5
Control panel
Fig. 1
| I | On/off, start and programme selector buttons |
| la | Indicators for depressed buttons |
| II | Door handle |
| III | Programme sequence indicator |
| IV | Function indicators |
| V | Delay Timer |
Interior
without baskets
Fig. 2
| A | Lower spray arm |
| B | Salt container |
| C | Water hardness selector |
| D | Detergent dispenser |
| E | Rinse aid container |
| F | Filters |
| G | Rating plate(with E & F numbers) |
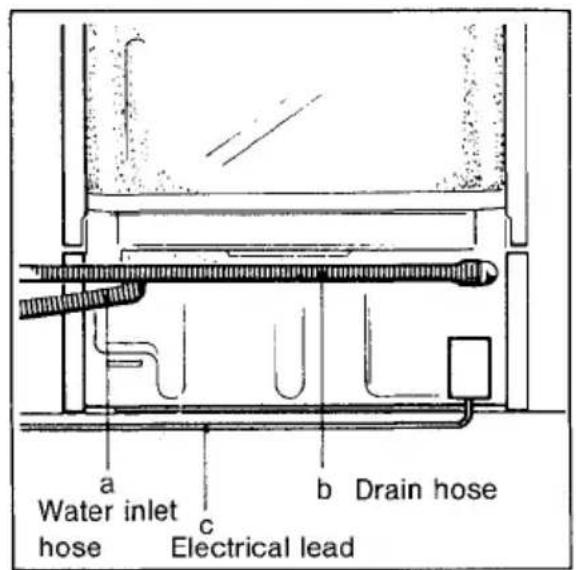
Rear
Fig. 3
| a) | Water inlet hose |
| b) | Drain hose |
| c) | Electrical lead |
On/off, start and programme selector buttons (fig. 1/I and la)

Off and cancel button
|
On button with illuminated "on" indicator
Rinse and hold

70irc
Intensive programme 70°C (temperature cannot be reduced to 65°C)

50irc
BIO
Universal BIO programme 50°C (Can be combined with temperature increase button 65°C)
Guide to machine
| 50°BIO | Economy BIO programme 50°C(Can be combined with temperature increase button 65°C) |
| 50° | Quick wash 50°C(Can be combined with temperature increase button 65°C) |
| 65° | Temperature increase button from 50°C to 65°C |
| Start button | |
| Programme sequence indicator (fig. 1/III) | |
| Pre-wash | |
| Wash | |
| Intermediate rinsing | |
| Final rinse | |
| Hot air drying | |
| End of programme | |
Guide to machine
Function indicators (fig. 1/IV)

Close the door
Open the water tap

Replenish the rinse aid container

Replenish the salt container
Crockery baskets
The baskets are protected with polystyrene during transportation. Remove all polystyrene parts before using the machine.
General advice on dishwashing
● Economical dishwashing:
Collect the dirty dishes and stack them in your dishwasher. Only select a full wash programme when both baskets are full. A rinse and hold programme can be selected during the day to prevent food soil from drying on before a full load has been collected. Always select the programme according to the degree of soiling (see chart on pages 14/15).
- "On glaze" decorations may fade if washed frequently in the dishwasher over a long period of time. Check earthenware for "dishwasher proof" descriptions.
● Aluminium articles have a tendency to discolour when machine washed.
- Some glassware may not be suitable for machine washing. Etching could occur leaving the glasses dull and opaque in appearance.
- Clean food residues on silver dishes and silver cutlery if you do not run a wash programme after the meal (some food such as egg white, egg yolk, mustard, etc., cause stains and discolouration).
● Unsuitable articles:
Wooden chopping boards, heat sensitive plastic articles, pewter, crockery repaired with glue, cracked china, old cutlery, steel knives sensitive to rust, cutlery with wood, bone, chine and mother-of-pearl handles.
- If in doubt about an article check with the manufacturer of the article where possible. Failing this, wash valuable items by hand.
- When buying new china look out for dishwasher suitable crockery, cutlery and glasses. Buy articles which have straight and smooth sides, large openings avoiding deep indentations on the base of the crockery.
Safety Information
- This is a domestic dishwasher for domestic use only. It must only be used for washing articles recommended by the manufacturer for dishwashing by machine and then following the instructions contained in this booklet. The machine must be installed and cared for and maintained as instructed in this instruction booklet, any installation instructions and any supplementary instructions supplied with the machine. Any other use, installation, maintenance may lead to damage to the machine, persons or property for which the manufacturer of the machine does not accept any responsibility.
- Do not stack plastic articles over the heating element. When stacking lightweight plastic articles weigh them down with other heavier items to prevent them from being shifted and falling on to the heating element.
- Do not touch the heating element immediately after a wash cycle is completed.
● Only use dishwasher detergents which are recommended for domestic dishwashers. -
Store dishwasher detergents in a safe place – away from children. These detergents can cause serious injuries to the throat or can lead to suffocating when swallowed. Keep children away from dishwashers, detergent residues may still be in the machine.
-
Do not use any solvents in the dishwasher - risk of explosion.
● The water in the dishwasher is not drinking water.
● Children cannot foresee the consequences of tampering with electrical appliances. Do not leave children unsupervised when machines are in operation.
● Children must not play inside the dish-washer. - Do not sit or stand on the open door of the dishwasher. The machine may tip over.
● The water inlet hose with a plastic container at the water feed end contains an electrical lead for a valve. Do not cut the hose. Do not dip this container into water. - In case of a fault, turn off the water supply tap and switch off the appliance and pull the plug out of the electrical supply socket.
- When this appliance is finally replaced by a new one, destroy the lock of this machine, cut off the electrical lead and dispose of it safely to prevent children playing with the machine and endangering their lives.
Setting the water hardness – adding dishwasher salt
Your dishwasher is equipped with a water softener which transforms the "hard" water into "soft" water required for washing. To regenerate the water softener the salt container in the bottom of the wash tub (fig. 2/B) must contain dishwasher salt at all times except for water hardness area I – see below. At the end of each programme the water softener is automatically re-generated using some of the salt from the salt container.
For economical reasons and to protect the environment do not use more salt than necessary.
Please also make reference to special instructions found on the detergent packaging.
Set the water hardness selector (fig. 2/C and fig. 4) to the correct setting using a coin.
Your local Water Authority will quote the water hardness in English or Clarke Degrees or parts per million (ppm).
| Water hardness | Setting of the water hardness selector | ||
| Water hardness area | English or Clarke Deg. | PPM | |
| IV | 42-49 | 610-720 |  *) *) |
| 33-42 | 490-600 | 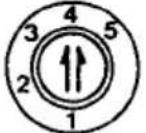 | |
| 26-33 | 380-480 |  | |
| III | 17-26 | 267-373 |  |
| II | 10-17 | 142-249 |  |
| I | Below 10 | Below 142 |  No salt required No salt required |
*) Factory set
Setting the water hardness - adding dishwasher salt
The salt you require is special salt suitable for domestic dishwashers. On no account should table salt, cooking salt, road salt or processed sea salt be used, because they contain substances adversely affecting the water softener.
Important! Detergents and salt are very often available in very similar looking packaging. Take care that you DO NOT fill the salt container with detergent, IT RENDERS THE WATER SOFTENER INEFFECTIVE. The salt container filler neck is situated on the right hand side on the bottom of the wash tub (fig. 2/B). To fill the container – open the door, lift out the lower basket, unscrew the cap marked ⚪ and place the funnel supplied with the machine over the opening (fig. 5).
Before the first use only, pour 1.5 to 2 litres (3-4 pints) of water into the salt container.
Then add the salt until it is visible at the top of the container (capacity approx. 1.5 Kg). During the filling process, some water is displaced. Remove any spilled salt from the filler neck and replace the cap firmly. Replace the lower basket.
Important!
To prevent salt from entering the washing cycle close the cap to the salt container firmly. Cloudy glassware may result from salt getting into the washing water. No salt residues must be left on the bottom of the tub. To ensure that all salt residues are removed, select a rinse and hold programme or, a complete wash programme if you have enough dirty crockery, after the salt container has been filled.
To replenish the salt container
Replenish the salt container when the lamp above Symbol on the control panel (fig. 1/IV) is on.
Please note
For water hardness area I – see page 9, no salt is required and symbol Ⓧ will light up every time the machine is switched on. Please ignore the light in this particular instance.
Filling the rinse aid container
Rinse aid is dispensed automatically during the final hot rinse. It prevents water drops from clinging to the crockery and gives the final sparkle to the china and glassware.
Important!
To prevent damage to the machine use only rinse aids suitable for domestic dishwashers – we recommend Finish.
Never use normal washing up liquids. These have high sudsing properties and are unsuitable for dishwashers.
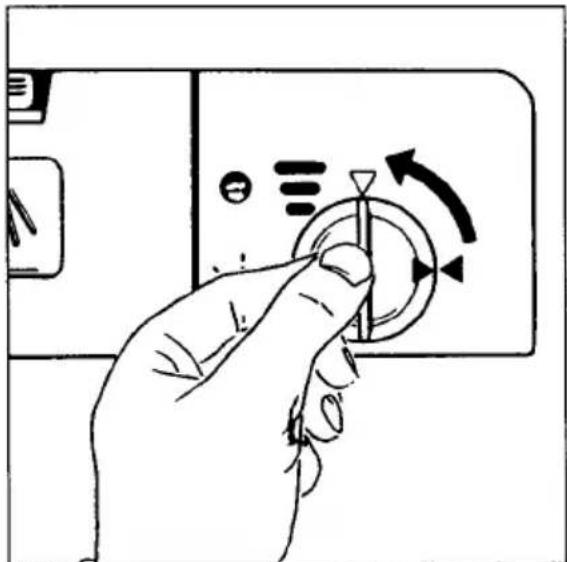
You will find the rinse aid container on the inside of the door (fig. 2/E). Open the container by turning the lid a quarter turn to the left (fig. 7/arrow) and slowly pour rinse aid into the filler neck up to the dotted line (fig. 8). Replace the lid and close by turning it clockwise. The container will take approx. 150 cc, which will last for approx. 50 programmes.
Wipe off any spilled rinse aid to prevent excess foaming during the next wash cycle.
Rinse aid refill indicator
Replenish the rinse aid container when the light next to the symbol 📋 on the refill indicator (fig. 1/IV) comes on.
Adjusting the rinse aid dosage
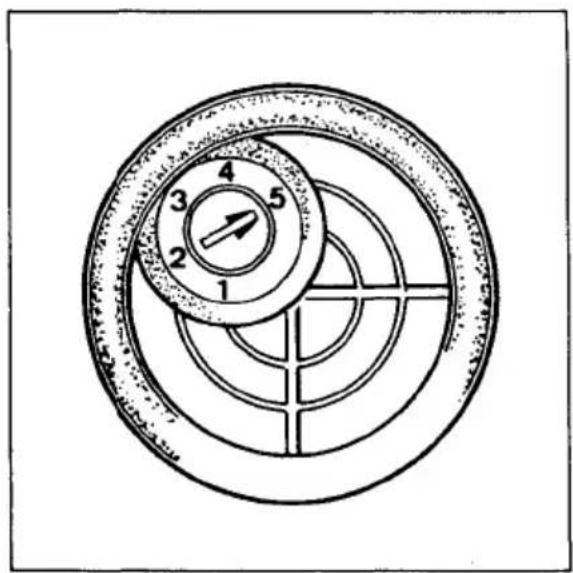
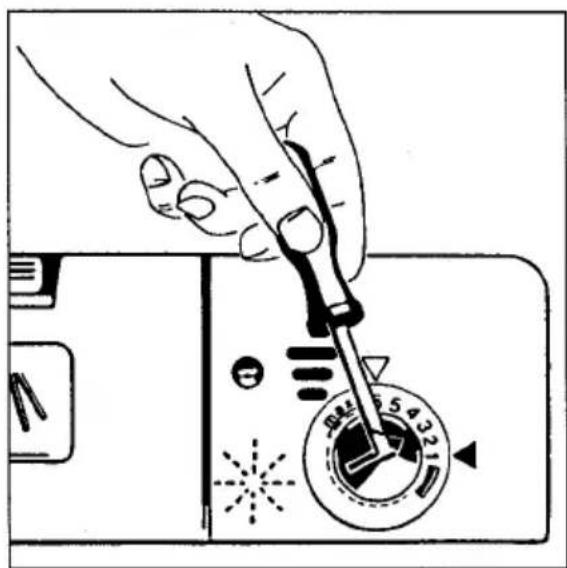
The adjuster to alter the quantity of rinse aid being dispensed is located in the filler neck (fig. 9). The quantity can be varied from 1-6 cc and the corresponding numbers are shown on the adjuster.
To alter the setting, move the arrow to another setting using a screwdriver or coin.
The machine is set to dispense 3 cc rinse aid (arrow is set to "3") automatically during the final rinse. Do not alter the setting unless it becomes necessary (see page 18/19 "If you think your machine is not working properly...").
Add dishwasher detergent before every wash programme
Before you start a wash programme (except rinse and hold programme) fill detergent dispenser with detergent (fig. 2/D). If the dispenser is closed, push the locking catch (fig. 10/a) and the lid springs open. The amount of detergent to use depends on the degree of soiling of the utensils to be washed.
For light soiling you will require approx. 20 ml, for normal to heavy soiling approx. 30 ml. When using liquid detergents use approx. 30 ml and 40 ml respectively.
To help you use the correct amount of detergent the dispenser is marked "Min" (approx. 20 ml) and "Max" (approx. 30 ml) (fig. 11).
Close the lid of the dispenser and press until it snaps shut. The detergent is automatically dispensed at the correct stage of the programme.
We would recommend filling the compartment in the lid (fig. 10/b) level to the top with detergent for all programmes which include a pre-wash.
As effectiveness of detergents differs from one make to another, follow also the recommendations of the detergent manufacturers closely.
Useful hints:
The "Min" and "Max" markings in the detergent dispenser apply to full loads which is the most economical way of machine washing.
If you want to wash smaller loads, 15 ml of detergent (approx. 25 ml liquid detergent) is sufficient to obtain an excellent wash result.
Important!
- Only use detergents for domestic dish-washers. Never use washing up liquids (they cause excessive foaming and the dishes are not cleaned).
● Always close the detergent pack and store in a dry place (lumpy detergent has lost its cleaning power).
● Always use the recommended amount of detergent. If you use too little, starch deposits will remain on the dishes which can only be rubbed off by hand.
There are two types of dishwasher detergents on the market, the conventional type and the ultra compact cleaners.
When using an ultra compact cleaner we recommend you select a BIO 50°C programme. This BIO programme was specially developed for the compact cleaners.
The cleaning effect of the Universal BIO 50°C or the Economy 50°C BIO programme using ultra compact cleaners can be compared to using the Universal 65°C or Economy 65°C programme with conventional detergents. The BIO programme has the added benefit that your crockery is treated in a gentler fashion due to the lower wash temperature and the absence of corrosive substances.
Loading the machine
Before you load the machine remove any remaining food and bones from the plates and soak saucepans with burnt on food as you would when washing up by hand. The easiest way to load a basket is from back to front.
Lower basket (fig. 12):
Large heavily soiled dishes are best cleaned in the lower basket. Pull out the lower basket as far as the stops and stack it with large items: plates, serving dishes, serving plates and saucepans as illustrated.
Cutlery basket:
Arrange the cutlery as follow:
- Distribute the unsorted cutlery loosely in all basket compartments so that each item is reached by the wash water.
● Knife, fork and spoon handles down for best results.
● Make sure spoons and forks do not stick together. Use the special holder for tea and coffee spoons. - Lay long handled utensils such as a soup ladle flat in the top basket to avoid blocking the upper spray arm.
Top basket (fig. 13):
Smaller, more fragile items are washed gently in the top basket. Pull out the top basket as far as the stop to arrange the smaller items such as saucers, cups and glasses as illustrated. You can also use the fold down racks to load extra cups.
Important!
By arranging the dishes correctly you will ensure a satisfactory wash result.
- Stack cups, glasses, saucepans, etc., upside down so that the water can run off freely.
● Thick and curved plates and similar items should be placed in the bottom basket on the left where the racks are wider so that each item is reached by the wash water.
● Bowls, saucepans and frying pans are well positioned upside down over the short racks in the lower basket. - Load glasses so that they do not touch each other (to prevent stains and breakages).
- When stacking items under the folding racks in the upper basket make sure that the water sprays can reach both layers.
Top basket - height adjustment
The height of the top basket is adjustable. Top basket in top position: Loading height in top basket: 20 cm, lower basket: 29 cm. Top basket in lower position: Loading height in top basket: 25 cm, lower basket: 24 cm. The top basket has been slotted into the top position at the factory. If you wish to adjust the height of the top basket proceed as follows:
- Pull the top basket forward to the stop position.
- Remove the basket retainers (fig. 14) at the front of the basket rails.
- Remove the basket from the machine.
- Insert the upper or the lower rollers into the rails (upper rollers = lower position of top basket, lower rollers = top position of top basket).
- Refit the basket retainers.
Programme chart
| Programmes | Suitable for: | Setting the programmePress onprogramme and startbuttons | |
| Rinse and hold | Rinsing heavily soiled items which are not washed immediately |  |  |
| Intensive 70°C | Heavily soiled china and and saucepans with dried on food deposits (particularly protein anc starch) |  |  |
| 70° | |||
| Universal 65°C | Normally to heavily soiled china and saucepans with dried on food deposits (particularly vegetables such as spinach, carrots, starch, etc.) |  |  |
| 50°BIO |  | ||
| Universal BIO 50°C | Normally soiled crockery and temperature sensitive items (e.g. glass, plastic ware).Recommended for use with Ultra Compact cleaners to achieve the optimum cleaning result. | [7C8S] |  |
| 50°BIO | |||
| Economy wash 65°C | Normally tc lightly soiled crockery |  |  |
| 50°BIO |  | ||
| Economy BIO wash 50°C | Normally tc lightly soiled crockery and glasses. Recommended for use with Ultra Compact cleaners to achieve the optimum cleaning result. |  |  |
| 50°BIO | |||
| Quick wash 65°C | Lightly soiled crockery |  |  |
| 50°BIO |  | ||
| Quick wash 50°C | Lightly soiled coffee and dessert dishes and glasses |  |  |
| 50° | |||
| Programme corrections |  |  | |
| 50°simultaneously | |||
Programme chart
| Programme Sequence | Programme duration in minutes on cold water supply | Energy consumption (kWh) on cold water supply | Water consumption in litres |
| Pre-rinse | 9 | 0.1 | 6 |
| Pre-wash, wash, 2 intermediate rinses, final rinse, drying | 81 | 1.8 | 25 |
| Pre-wash, wash, intermediate rinsing, final rinse, drying | 73 | 1.6 | 20 |
| Pre-wash, wash, intermediate rinsing, final rinse, drying | 65 | 1.4 | 20 |
| Wash, intermediate rinsing, final rinse, drying | 66 | 1.6 | 15 |
| Wash, intermediate rinsing, final rinse, drying | 53 | 1.3 | 15 |
| Wash, intermediate rinsing, final rinse, drying | 40 | 1.6 | 15 |
| Wash, intermediate rinsing, final rinse, drying | 29 | 0.9 | 15 |
| Quick programme advance, returning to start position |
Switching on
(Programme chart - see previous page)
1. Fully open the water tap.
Important: If the dishwasher was started but the water tap had not been opened, switch off the machine, fully open the water tap, switch on the machine and start the programme again.
2a) Using the machine without the Delay Timer
- Press machine "on" button Machine "on" and "End of programme" lights are on.
- Select the programme required, press temperature increase button if used. The indicators above the selected programme buttons light up in red.
- Press start button; "End of programme" light goes out and the programme starts.
2b) Using the Delay Timer (fig. 1/V)
Using the delay timer you can delay the start of the wash by 1 to 19 hours.
To do this press the button next to the indicator window until the required delay is selected. You can only delay the start by complete hours rather than minutes.
Example: you are loading the machine at 7 pm and do not wish the machine to start until 10 pm, select "3" on the delay timer.
The machine will now start the programme at 10 pm.
A light is flashing to the right under the indicator window to show that the delay timer is in operation.
If you press the delay timer and it goes passed the 19 hours, then the flashing light goes out and the delay timer has been cancelled. By pressing the delay timer again you can re-set the delay timer.
Note: When using the delay timer the indicator for "open the water tap" is not in operation.
Programme sequence indicator (fig. 1/III)
After the machine has been started the programme indicator passes through the various stages automatically, indicating each stage reached by a light symbol.
Programme or delay timer correction
If you have selected the wrong programme or the wrong time by mistake you can correct this by switching the machine off and on again.
Note: If more than 60 seconds have gone by after pressing the start button then the programme can only be corrected by pressing buttons and →-1 simultaneously. 50°
The programme moves quickly through the various stages returning to the re-start position. This takes approx. 3 minutes and you can make your re-selection.
Switching off – unloading the machine
When the programme is finished the light next to the symbol →| will come on.
- Press the off button. The machine "on" light goes out.
- Wait approx. 15 minutes before unloading the machine to allow everything to dry completely. If the crockery is not removed at that stage, open the dishwasher door and leave it slightly ajar. To speed up the drying phase, you can open the door completely and then leave it slightly ajar (steam will escape from the machine). This is only recommended if the underside of your worktop has been protected with the aluminium foil strip supplied with the machine.
● Empty the lower basket first and then the upper basket. This prevents any water which may have collected in recessed or curved items in the upper basket from dripping onto crockery in the lower basket.
- Check the filters after every programme. If they are dirty clean them as per instructions on this page.
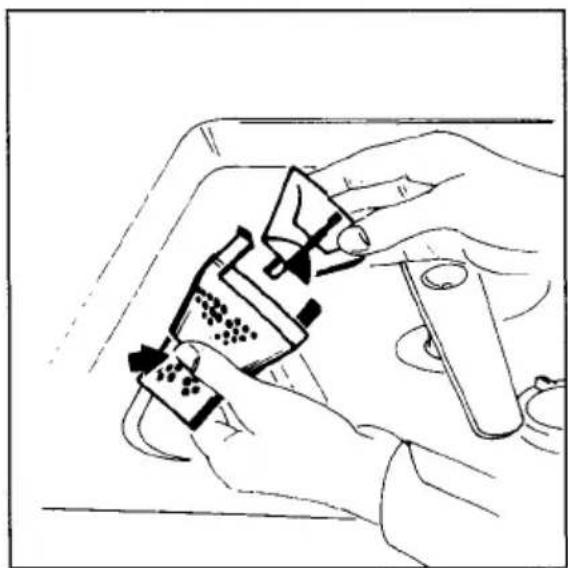
Cleaning the filters
Coarse filter (fig. 15)
Remove the coarse filter and brush it clean under running water. Check the lower half of this filter also and remove the food residues which may be trapped there. Note that the upper cylindrical section of the coarse filter can be lifted out (fig. 16).
When replacing ensure that the upper section sits straight and tight before re-inserting the coarse filter.
Fine filter (fig. 17)
Clean the fine filter and microfilter as and when necessary. To remove the fine filter turn it anticlockwise. Clean it thoroughly. When replacing the fine filter make sure that the edge of the filter forms a proper seal with the bottom of the tub. Then turn it clockwise. Never carry out a wash programme without a filter.
Maintenance
Fascia panels and controls must not be cleaned with abrasive cleaning materials or furniture polish. Should cleaning be necessary use lukewarm water only.
If you think your machine is not working properly
Before you call out a service engineer check the following points carefully, it will save you the cost of the engineer calling on you.
A continuous hum can be heard?
(even when the machine is switched off)
● The anti-flood system has been activated (see page 23).
- First close the water tap, then switch off at the power socket and remove the plug.
● To rectify the problem, call AEG Service.
The programme does not start?
● Are the fuses in working order?
- Is the door closed properly?
If the door is not closed properly, the light above the symbol ]/ on the control panel (fig. 1/IV) will come on.
- Check the delay timer.
The machine is not taking in any water?
● Have you turned on the tap? If the water tap is not turned on, the light above the symbol (open water tap) on the control panel (fig. 1/IV) will come on.
- Check the water inlet hose (it must not be kinked).
The start/indicator switch stops at the beginning of the wash ( ) or final rinse ( ) cycle?
● Have you opened the water tap fully? (See page 16.)
- Is the filter in the inlet hose blocked? The filter is located where the hose attaches to the tap. Unscrew the hose and clean the filter under running water.
- Check the water pressure. It must be at least 1 bar (15 lb/sq. inch) – see page 21.
The dishes are not clean?
● Did you select the correct programme?
The programme has to be chosen according to the degree of soiling.
- Did you stack the dishes according to our recommendations? The water sprays must have access to the dishes from all sides – the baskets must not be overloaded.
- Were the spray arms able to rotate freely? When the upper spray arm is stationery it rests at an angle to allow the remaining water to drain off at the end of a programme. During the programme it will automatically return to a horizontal position.
● Are the filters clean? Have you inserted the filters properly after cleaning?
● Did you use the correct amount of detergent? - Check that the drain hose has been installed according to our instructions on page 21-23.
If you think your machine is not working properly
- If the machine is connected to a hot fill supply (max. 60°C) – only economical if hot water is available “nearly free of charge” – do not use 50°C programmes to allow detergent sufficient time to work.
- Did you top up the salt container? If the water hardness in your area is over 10 degrees and your dishwasher is operated without salt, the result may be affected adversley and white and yellow chalk deposits will remain on your dishes.
- Did you select the correct degree of water hardness according to the information of your local Water Authority? (See also page 10.)
The dishes are not dry and sparkling?
● Did you use a rinse aid recommended by us?
● Did you fill up the rinse aid container?
● Is the correct quantity of rinse aid being dispensed?
Overdosing of rinse aid:
If too much rinse aid is used opaque or bluish smears will appear. Reduce the output.
Underdosing of rinse aid:
If too little rinse aid is used white/grey dried-on water marks will appear. Increase the output.
There are rust spots in the machine?
● The stainless steel tub, the inner door and the filters cannot rust. If you find rust spots, these are introduced with the water or due to rust on cutlerly, saucepans, etc. Did you select a rinse and hold programme or a complete wash programme after filling the salt container? Remove such stains with a stainless steel cleaner.
Symbol S is illuminated
Unless you live in water hardness area I, the salt container needs to be replenished. For water hardness area I the light will be on every time the machine is switched on. No salt is required for water hardness area I – see page 10.
Service
Use our check list on pages 18/19 to make sure you cannot rectify the fault yourself.
- If you call out a service engineer in connection with one of the problems listed the cost involved will have to be passed on to you even during the warranty period. The same applies to wrong usage or misuse of the machine.
● Therefore, follow the instructions in this booklet and any other of our recommendations closely.
● Should you be unable to locate the cause of the problem in spite of the check-list please contact your AEG Service Department and do not carry out any repairs particularly electrical ones yourself.
- Our appliances comply with the relevant safety regulations. Repair of electrical appliances must only be carried out by specialists. Repairs carried out by any other personnel present considerable safety hazards to the user.
● The machine must not be used - if the electrical flex is damaged - if damage has occurred to the control panel, worktop or plinth area.
When calling for a service engineer please quote the model number and the serial number of your machine.
These numbers are printed on the rating plate (fig. 2/G).
Fill in these numbers for your future reference
E-No. (E.-No.)
and the
Serial-No. (F-No.)
These numbers enable our Service Department to prepare spare parts to repair the machine on first call wherever possible to save you money.
AEG Service Locations in the United Kingdom
AEG UK Limited
Head Office
217 Bath Road
Slough, Berks. SL1 4AW
Tel: 0753 872506
Telex: 847541
Telefax: 0753 512271
AEG Northern Service Centre
Unit 20, Haigh Park
Haigh Avenue
Stockport
Gt. Manchester SK4 1QR
Tel: 061 487 22 05
Telefax: 061 474 1191
AEG Scottish Service Centre
Block 11, Unit 1
Dundyvan Industrial Estate
Coatbridge
Lanarkshire ML5 4AQ
Tel: 0236 440387
Telefax: 0236 440256
Service Appointments
Bristol (call diverted to Slough)
Norfolk (call diverted to Slough)
0272 252880
06 03 76 55 15
Information for the installer
Installation
The following sections deal with basic installation details, for comprehensive information see separate installation instruction booklet supplied with the integrated machines.
Water supply
This dishwasher is equipped with an anti-flood device to be fitted to the water tap - AQUA-LOCK (see also page 23). To ensure the correct operation of this anti-flood device it is imperative that the double-skin inlet hose is connected to the water supply in a particular way.
Please see separate installation instructions supplied with the machine.
To protect the drinking water supply system your dishwasher is fitted with an anti-syphon.
A connection to a hot water supply up to a maximum of 60°C with a minimum pressure of 1 bar is possible, although the machine must not be connected to single outlet instantaneous electric or gas heaters.
Please ensure you comply with the drinking water regulations of your local Water Bord.
The high pressure hose with 3/4" hose coupling complete with sealing washers is supplied. We recommend not to use other washers which may be of inferior quality. It is sufficient to tighten the nuts by hand.
The machine may be connected:
a) directly to a tap with 34 " BSP thread termination
b) to a T-junction on your existing tap, or preferably
c) to a completely separate water supply in order to avoid interference with the kitchen water supply during operation of the machine.
Minimum water pressure: approx. 1 bar pressure above atmospheric pressure (1 atu = approx. 1 kp/cm² = approx. 10 N/cm², 100 kPa). For less than one bar of pressure above atmospheric pressure, consult the AEG Technical Department. Maximum permissible water pressure: approx. 10 bars. For over 10 bars excess pressure, connect a pressure relief valve (obtainable through your installer).
If a longer water supply hose is needed it should be the one available from AEG Spare Parts Department. Never add extensions to hoses.
Turn off the water tap if the machine is not in use. A rigid copper pipe connection (diameter 8-10 mm) can be used as extensions for machines fitted with AQUA-LOCK.
Information for the installer
Water discharge
At the rear of the machine the drain hose is secured with plastic straps which must be removed. Route the drain hose along the recess provided at the rear of the dishwasher (fig. 3/b). The outlet end of the hose is 19 mm diameter and should fit any available sink trap connections and is secured by means of the hose clip supplied.
Should you wish to hook the drain hose onto a sink use the plastic hose holder supplied with the machine. See illustration this page. The holder has a hole to enable you to secure the holder to the wall if the sink edge is too wide. In this case thread a piece of string through the hole and secure to the tap or wall above the sink.
Your dishwasher is fitted with a water pump, controlled by the programme to pump off the water up a height of 1 m. Should it become necessary to extend the drain hose, use only original extension hoses. These are available in length of 2.70 m and 4.0 m as spares from your AEG Spare Parts Department. The pump is capable of pumping water to a distance of 3 m horizontally, at a height of max. 85 cm above floor level. The minimum height above the base of the machine must always be 30 cm.
The internal diameter of the extension hoses must be 19 mm to allow the machine to function correctly.
The recess at the back of the machine offers sufficient space to accommodate the drain hose for installation to the left or right of the machine.
Important
When connecting the drain hose make sure that it lies freely in the recess at the back of the machine and is neither kinked nor twisted. The drain hose can be hooked into a separate stand pipe.
When connecting the drain hose to a sink trap the internal diameter of the connection must be 15 mm minimum.
Warning! The outlet hose must not be connected to a waste disposal unit.
The drain hose must be at least 30 cm above the base of the machine before it is connected to any drainage system.


natural_image
Technical line drawing of a mechanical component with threaded fastener and base (no text or symbols)Information for the installer
Anti-flood system
The dishwasher is equipped with anti-flood devices.
The machine has an overflow protection which prevents excess water from entering the machine and a leakage protection underneath the machine (a float in the base of the machine). The float is activated by leakage from the appliance. In both cases the water supply to the machine is shut off and the drain pump is switched on.
Flooding from the machine through leakage or overflowing has thus been eliminated. Any remaining water in the machine is automatically pumped away.
The fault can be recognised by the continuous operation of the pump. In this case first turn off the water tap, then switch off at the power socket and remove the plug.
ELECTRICAL CONNECTION
Please note! (For users in the UK)
WARNING -
THIS APPLIANCE MUST BE EARTHED.
Please ensure that the voltage and current indicated on the rating plate agrees with the voltage of your electricity supply.
220/240 volts - (i.e., 220/240 V AC).
If your appliance has been equipped with a mains lead with a moulded-on type plug, you must comply with the following regulations:
The plug moulded on to the cord incorporates a fuse. For replacement, use a 13 amp BS 1362 fuse. Only ASTA approved or certified fuses should be used. The fuse cover/carrier must be replaced in the event of changing the fuse. The plug must not be used if the fuse cover/carrier is lost. A replacement cover/carrier must be obtained from an electrical goods retailer. If the socket outlets in your home are not suitable for the plug fitted to the appliance, then the plug must be cut off and an appropriate one fitted. When fitting the plug please note the following points:
IMPORTANT
THE WIRES IN THE MAINS LEAD ARE COLOURED IN ACCORDANCE WITH THE FOLLOWING CODE:
GREEN and YELLOW - EARTH
BLUE - NEUTRAL
BROWN - LIVE
As the colours of the wires in the mains lead of this appliance may not correspond with the coloured markings identifying the terminals in your plug proceed as follows:
- The wire which is coloured GREEN and YELLOW must be connected to the EARTH terminal in your plug, which is marked with the letter E or by the earth symbol 12 or coloured GREEN, or GREEN and YELLOW.
- The wire which is coloured BROWN must be connected to the LIVE terminal which is marked with the letter L or coloured RED.
- The wire which is coloured BLUE must be connected to the NEUTRAL terminal which is marked with the letter N or coloured BLACK.
When wiring the plug, ensure that all strands of wire are securely retained in each terminal. Do not forget to tighten the mains lead clamp on the plug.
Warning! A cut off plug inserted into a 13 amp socket is a serious safety (shock) hazard. Ensure that the cut off plug is disposed of safely.
Voltage 220/240 V AC
Fuse rating 13 amps
See rating plate for further information.
Technical data
Capacity according to IEC publ. 436:
12 place settings including serving dishes.
Water pressure 1 to 10 bar.
The dishwasher complies with the radio interference requirements of the
EEC Directives 82/499/EEC and the standard
EN 60 555 part 1-3/DIN VDE 0838 part 1-3.
June 1987.
The consumption values quoted in the product information refer to the normal 65°C programme.
Detergent dosage: 5 ml for pre-wash
(IEC-detergent) 25 ml for main wash
Decor panel dimensions for "U" appliance
Height 590 x Width 587 mm, Max. thickness of panel into decor frame: 4 mm, Max. thickness of panel 8 mm.
Loading example for 12 place settings including serving dishes according to IEC Publ. 463
12 place settings:
12 soup dishes, dia. approx. 24 cm
12 dinner plates, dia. approx. 24 cm
12 dessert plates, dia. approx. 19 cm
12 tea cups, dia. approx. 9 cm
12 saucers, dia. approx. 14.5 cm
12 tumblers, dia. approx. 7 cm approx. 14 litres size
12 knives
12 forks
12 spoons
12 teaspoons
12 dessert spoons
Serving setting:
1 oval platter, approx. 37.5 x 26 cm
1 round bowl, dia. approx. 21.5 cm, height approx. 10 cm
1 round bowl, dia. approx. 17 cm, height approx. 7.8 cm
1 fruit dish, dia. approx. 15 cm
1 serving fork
2 serving spoons
1 gravy spoon


- ÖKO\_FAVORIT 875 i electronic
- Read this instruction booklet and keep in a safe place
- Guide to machine
- Control panel
- Interior
- Rear
- Function indicators (fig. 1/IV)
- Crockery baskets
- General advice on dishwashing
- ● Economical dishwashing:
- ● Unsuitable articles:
- Safety Information
- Setting the water hardness – adding dishwasher salt
- Setting the water hardness - adding dishwasher salt
- Important!
- To replenish the salt container
- Please note
- Filling the rinse aid container
- Rinse aid refill indicator
- Adjusting the rinse aid dosage
- Add dishwasher detergent before every wash programme
- Useful hints:
- Loading the machine
- Lower basket (fig. 12):
- Cutlery basket:
- Top basket (fig. 13):
- By arranging the dishes correctly you will ensure a satisfactory wash result.
- Top basket - height adjustment
- Switching on
- (Programme chart - see previous page)
- Fully open the water tap.
- 2a) Using the machine without the Delay Timer
- 2b) Using the Delay Timer (fig. 1/V)
- Programme sequence indicator (fig. 1/III)
- Programme or delay timer correction
- Switching off – unloading the machine
- Cleaning the filters
- Coarse filter (fig. 15)
- Fine filter (fig. 17)
- Maintenance
- If you think your machine is not working properly
- A continuous hum can be heard?
- The programme does not start?
- The machine is not taking in any water?
- The start/indicator switch stops at the beginning of the wash ( ) or final rinse ( ) cycle?
- The dishes are not clean?
- The dishes are not dry and sparkling?
- Overdosing of rinse aid:
- Underdosing of rinse aid:
- There are rust spots in the machine?
- Symbol S is illuminated
- Service
- Information for the installer
- Installation
- Water supply
- Water discharge
- Important
- Anti-flood system
- ELECTRICAL CONNECTION
- Technical data
- Loading example for 12 place settings including serving dishes according to IEC Publ. 463
- place settings:
- Serving setting:
Márka : AEG
Modell : Favorit 875 I B
Kategória : Mosogatógép