
SVC 1011BL FORTE - Porszívó SENCOR - Ingyenes használati útmutató
Találja meg az eszköz kézikönyvét ingyenesen SVC 1011BL FORTE SENCOR PDF formátumban.


Felhasználói kérdések a következőről SVC 1011BL FORTE SENCOR
0 kérdés erről a készülékről. Válaszolj azokra, amiket ismersz, vagy tedd fel a sajátod.
Tegyél fel egy új kérdést erről a készülékről
Töltse le az útmutatót a következőhöz Porszívó PDF formátumban ingyenesen! Találja meg kézikönyvét SVC 1011BL FORTE - SENCOR és vegye vissza elektronikus eszközét a kezébe. Ezen az oldalon közzé van téve az eszköze használatához szükséges összes dokumentum. SVC 1011BL FORTE márka SENCOR.
HASZNÁLATI ÚTMUTATÓ SVC 1011BL FORTE SENCOR
Vacuum Cleaner
User's manual
Z
natural_image
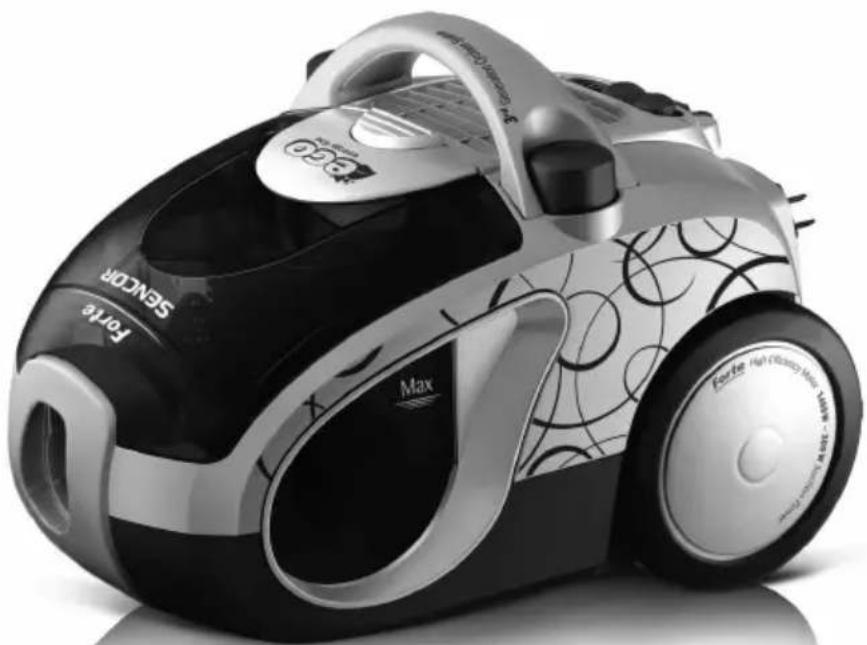
Black and white photo of a Bruker vacuum cleaner with visible branding and branding (no text or symbols on body)SENCOR®
SVC 1010 / 1011BL / 1011GR (Forte)
Before first use, please read all instructions contained in this user manual carefully, even if you are already familiar with using similar products. Only use this product in accordance with the instructions described in the user manual. Keep the user manual in a safe place for future use.
Save the original packaging, material, warranty card and proof of purchase receipt, at least for the duration of the warranty policy. If you need to ship this product back, pack it in the original cardboard box to ensure maximum protection during shipping or transport (e.g. when moving or when you need to send this product for repair).
EN-1
CONTENTS
IMPORTANT SAFETY NOTICE....2
DESCRIPTION 5
ASSEMBLY 6
USING YOUR VACUUM CLEANER....6
USING YOUR ACCESSORIES 7
STORAGE OF VACUUM CLEANER 8
CLEANING AND MAINTENANCE 8
TROUBLE-SHOOTING 12
TECHNICAL SPECIFICATIONS....12
INSTRUCTIONS AND INFORMATION REGARDING THE DISPOSAL OF USED PACKAGING MATERIALS ..... 13
DISPOSAL OF USED ELECTRICAL AND ELECTRONIC APPLIANCES 13
IMPORTANT SAFETY NOTICE
1) Carefully unpack the product, and take care not to throw away any part of the packaging material before you have found all parts of the product.
2) This product may not be used by any persons (including children) with mental disabilities, weak strength or by inexperienced persons, unless they have been properly trained or schooled in the safe use of the product, or unless they are properly supervised by a qualified person who is responsible for their safety.
3) Children must be supervised to ensure that they do not play with the product.
4) Before connecting this product to the socket outlet, make sure the voltage stated on the label of the product corresponds to the voltage in your wall socket.
5) Never use the accessories not supplied with this product or not designed for use with this product.
6) Do not place the electric cord near hot surfaces, or over sharp objects. Do not place heavy objects on the power cable. Position the cable so that it will not be stepped on or tripped over. Make sure the power cord is not touching a hot surface.
7) If the product's power cord is damaged, have an authorised service or qualified person replace it, in order to prevent hazards. It is forbidden to use the product if it has a damaged electric cord or electric cord plug.
8) Do not disconnect the electrical plug from the wall outlet by pulling on the cord.
9) Under no circumstances should you repair or alter the product yourself, as this may cause injury by electric shock! Entrust all repairs and adjustments to a specialised company/service. Tampering with the product during the guarantee period may invalidate the guarantee.
10) Never touch or use the product if you have wet hands or feet.
11) Store and use the product away from flammable or volatile materials and solutions.
12) This appliance is designed for household use. Do not use in industrial surroundings or outdoors!
13) Do not use the product for any other purposes than those intended.
14) Do not spray the product with water or any other liquid. Do not pour water or any other liquids into the product. Do not submerge the product in water or in any other liquid.
15) Make sure the product does not come in contact with water. Never use the product near a bathtub, wash basin or any other container filled with water.
16) If you are not using your machine, disconnect the power cord from the socket.
17) If the product is not used, turn it off and disconnect the supply cable from the wall outlet. Prior to cleaning, proceed in the same manner.
18) Never leave the product switched on without supervision.
19) In order to avoid deformation or a fire in the plastic components of the vacuum cleaner, do not expose the vacuum to direct sunlight, do not place it close to heaters, open fires or other sources of heat and do not leave the vacuum cleaner operating for too long, if the air input is blocked.
20) Do not use the product in an environment with excessive dust.
21) Use extra care if the product is used near children. Always place the product out of their reach.
22) If the product is being used, do not block its air input and output openings. Blocked air vents may cause overheating and motor damage.
23) Vacuuming objects mentioned below may damage your product or cause injuries to the operating person:
• wet floors, water or other liquids,
• any type of sharp objects such as broken glass or ceramics, needles, pins, etc.
- burning cigarettes, or smouldering pieces, matches or any other flammable or volatile liquids (e.g. gasoline, paint thinners, etc.)
• flour, cement, plaster (i.e. dust from holes drilled in walls)
24) In order to avoid damage to furniture or injuries to persons, hold the power cord in your hands as it winds up.
25) Do not vacuum large pieces of paper or plastic bags. They may easily clog the pipe or hose. If the product becomes clogged for any reason, turn it off by removing it from the electric socket and clean the pipe or hose.
26) In order to avoid damage to the hose, do not step on it or forcefully bend it. Do not use the vacuum cleaner if the hose is bent or damaged in any way.
27) Do not move over the power cord with the vacuum cleaner.
28) Never use the vacuum cleaner without the protective motor filter, the output filter, the dust container or the HEPA filter.
29) Do not place the vacuuming hose, inlet nozzle or vacuuming accessories near to your eyes or ears.
30) Vacuuming of some types of floors or floor tiles can create a static electricity charge, which is not dangerous for the user.
The manufacturer is not responsible for damages caused by incorrect use of this appliance or its accessories. Such damages include food spoilage, injuries, burns, scalding, fire, etc.
DESCRIPTION
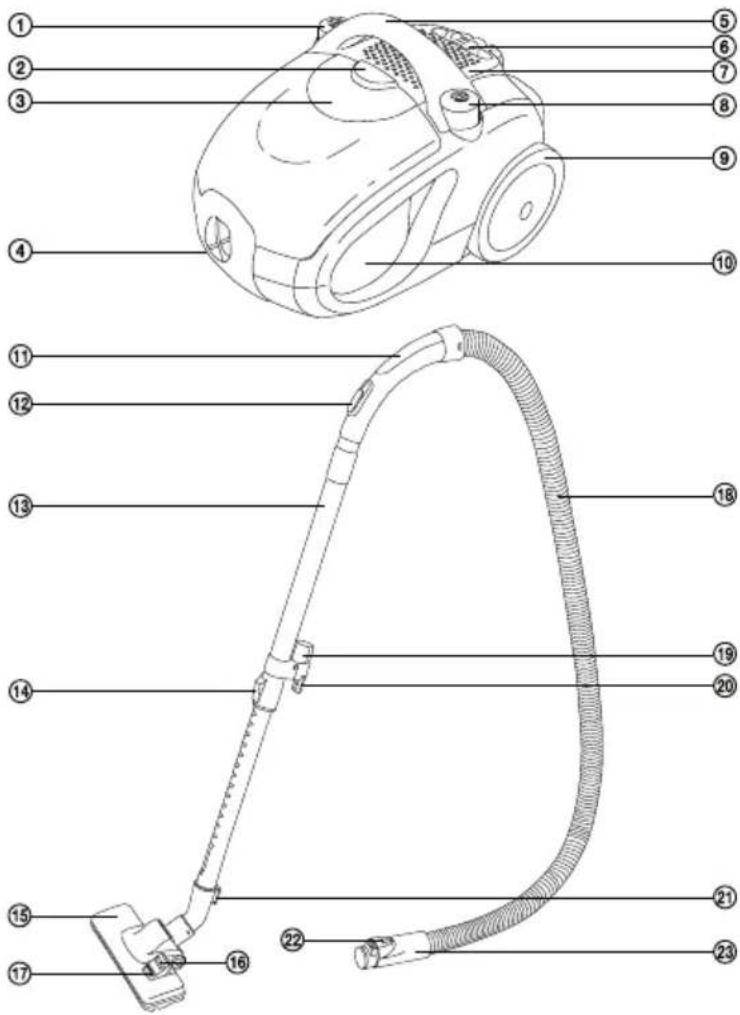
A
① START / STOP button
② Safety lock for the dust container
③ Dust container handle
④ Vacuuming hose connection hole
⑤ Vacuum cleaner handle
⑥ Motor power output control
⑦ Cover of the input micro-filter
⑧ Cable winding button
⑨ Wheel with rubber rim
⑩ Dust container
⑪ Handle
⑫ Sliding knob for air suction
⑬ Telescopic tube
⑭ Safety lock for the telescopic tube
⑮ Floor inlet nozzle
⑯ Flap position for vacuuming carpets
⑰ Flap position for vacuuming hard (smooth) floors
⑱ Hose
⑲ Accessory holder
⑳ Stopper for the vertical parking position
②1 Stopper for the horizontal parking position
②2 Safety lock
②3 Hose end
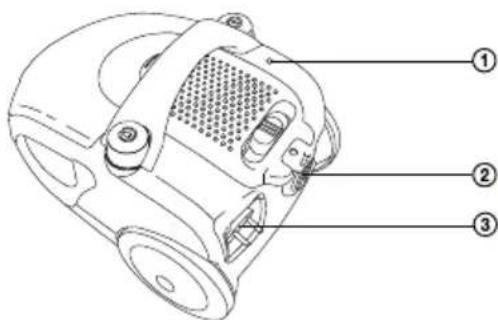
B
① Bag full indicator
② Horizontal parking position
③ Power cord
EN-5
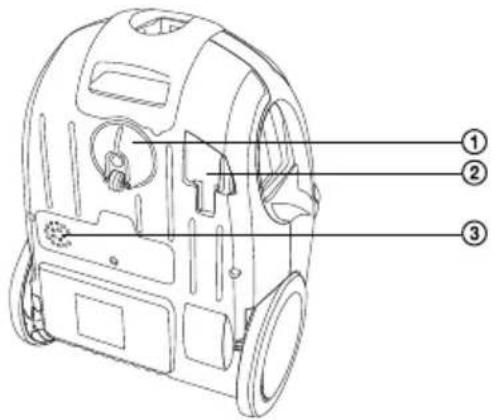
C
① Front wheel mechanism
② Vertical parking position
③ Suction of the motor (serves as protection against burning the motor in the case that the vacuum tube becomes blocked).
ASSEMBLY
Inserting the hose into the air suction hole on the vacuum cleaner:
Press the safety button on the hose end and insert the hose end into the air suction hole on the vacuum cleaner until you hear „click”. The hose is now secured in the correct position.
Attach the holder to the telescopic tube:
Make sure to place the holder with the hose on the wider part of the telescopic tube.
Attach the floor inlet nozzle to the telescopic tube:
Make sure to install the floor nozzle on the narrower part of the telescopic tube.
Adjust the length of the telescopic tube:
Adjust the length of the telescopic tube as follows: Move and hold the button on the tube forward as shown the by arrows and adjust the length of the tube as required. Then, release the safety lock and move the tube slightly forward until you hear a „click“. The telescopic tube is now securely set in position.
USING YOUR VACUUM CLEANER
Connecting your vacuum cleaner to power source - wall outlet
Pull the plug of the supply cable from the vacuum cleaner until the desired length of the cable is out of the appliance. Insert the plug into the socket.

Caution:
The yellow marking on the power cord tells you that the cord is close to its end. Do not pull the cord further than the red marking.
Adjusting the floor inlet nozzle according to the floor surface.
You can set the inlet nozzle according to the floor surface by adjusting the inlet flap:
- If you want to vacuum carpets, close the bristles of the inlet inside the inlet nozzle, by turning the flap accordingly.
- If you want to vacuum hard and smooth surfaces, move the bristles out of the nozzle, by turning the flap accordingly.
Turning your vacuum cleaner on and off
To switch your machine on or off, press the START / STOP button on the vacuum cleaner body.
Adjusting the suction strength
The suction strength may be adjusted by moving the rider on the vacuum cleaner body (small range) or by the moveable rider on the hose handler.

Tip
- Use the maximum suction strength when vacuuming carpets or floors with a hard surface. Use the reduced strength when vacuuming upholstery, window curtains, etc.
- If the hose holder becomes blocked when vacuuming, disconnect it from the telescopic tube and also disconnect the hose from the vacuum cleaner body. Then place the holder inside the suction hole on the vacuum cleaner body and vacuum the stuck dirt out.
Temporary interruption of the vacuuming process
If you want to stop vacuuming for a short time, you may use one of the parking positions:
• for the horizontal parking position use the lug at the end of the floor nozzle,
• for the vertical parking position use the lug on the telescopic tube.

Caution:
Do not move the vacuum cleaner from place to place if the hose is in the parked position! It may break or the lugs for the floor nozzle or telescopic tube may break off.
USING YOUR ACCESSORIES
D
① Slot nozzle for vacuuming in hard to reach places (e.g. windows, corners, book shelves, areas between mattresses, upholstery, etc.)
② Upholstery nozzle
③ Brush nozzle (by turning the brush part it is possible to use it for vacuuming hard to reach places)
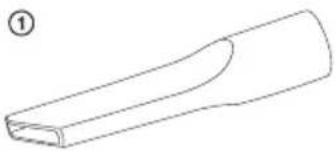
natural_image
Simple line drawing of a curved, elongated object with a flat base and rounded top (no text or symbols)③
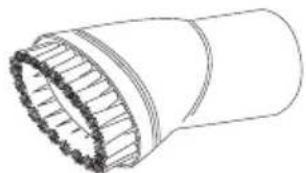
natural_image
Technical line drawing of a cylindrical mechanical component with textured outer edge and internal grooves (no text or symbols)②
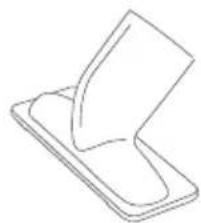
natural_image
Simple line drawing of a folded paper or sheet with a curved edge (no text or symbols)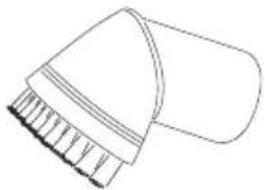
natural_image
Line drawing of a handheld device with a curved handle and ribbed base (no text or symbols)
Tip:
If during vacuuming you use an accessory very often, you may attach it to the special holder on the telescopic tube.
Ending the vacuuming process
When you finish vacuuming, switch the vacuum cleaner off by pressing the START / STOP button and then disconnect the supply cable plug from the socket.
To wind the power cord back to the vacuum cleaner, press and hold the winding button with one hand. Hold the cord with your other hand to protect the vacuum cleaner input area from damage.

Tip:
If the winding process stops and part of the power cord is still outside, release the winding button and pull the cable out again by about 50 cm and press the winding button again and repeat the winding process.
Carrying your vacuum cleaner
If you need to carry the vacuum cleaner, hold it only by the handle.

Caution:
Never try to carry your vacuum cleaner by holding the dust container handle!
STORAGE OF VACUUM CLEANER
Before storage you can disassemble your appliance to each individual part or you can store it assembled with the telescopic tube stored in one of the parking positions.
CLEANING AND MAINTENANCE

Caution:
Before cleaning disconnect this product from the power source.
Emptying the dust container
Empty the dust container as soon as the full container warning light comes on; otherwise the air flow and the suction strength will be reduced.
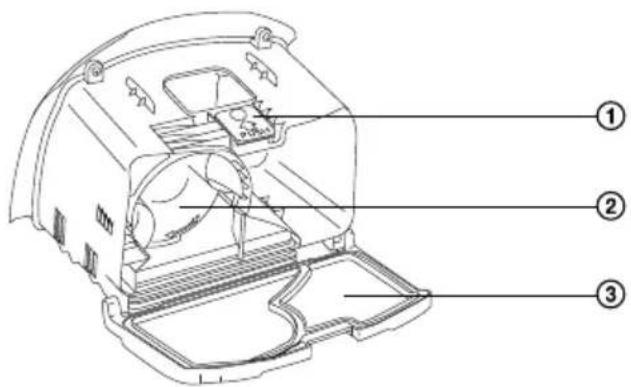
E
① Safety lock of the bottom hatch
② Plastic conical filter
③ Bottom hatch
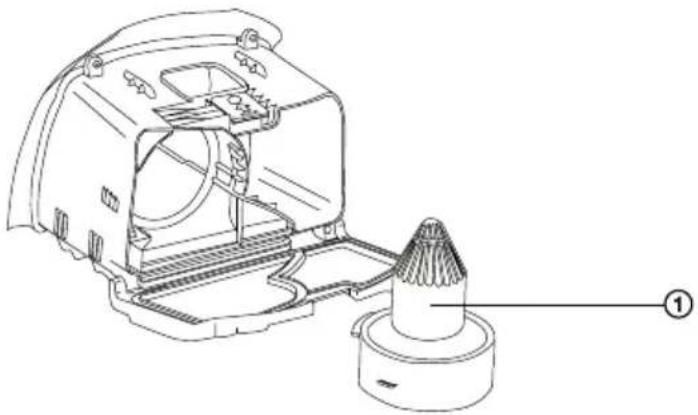
F
① Plastic conical filter
natural_image
Technical line drawing of a mechanical device with internal components and a base component (no text or symbols)1) Press the safety lock and pull the container handle up to remove the dust container from the vacuum cleaner.
2) Place the dust container above a waste bin
3) Press the safety notch on the dust container and the bottom of the container will open.
4) By turning in the anti-clockwise direction remove the plastic conical filter from the container, tip out the dust and if necessary wash under running lukewarm water.
5) In the same way tip out the dust and dirt from the container into standard household waste. If the container is heavily soiled you may wash the entire container under lukewarm running water. However, before doing so, it is necessary to remove the H.E.P.A filter and its foam pre-filter from the container!
6) Then insert the plastic conical filter back into the dust container and lock by turning in the clockwise direction.
7) Close the bottom lid of the container. Make sure the safety lock button is engaged.
8) Place the dust container back into the vacuum cleaner.

Caution:
Before replacing the dust container and the plastic conical filter back into the vacuum cleaner, make sure that all parts are completely dry.
Changing and cleaning the H.E.P.A. filter and the foam pre-filter
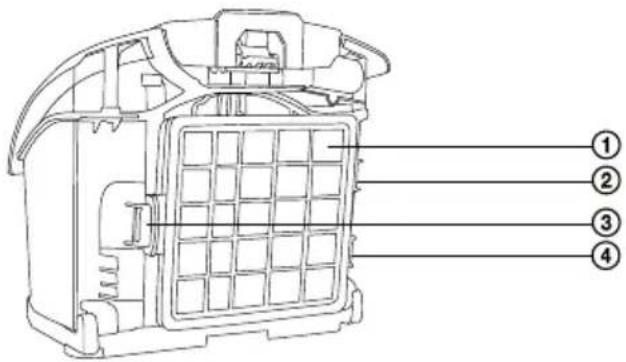
G
① H.E.P.A. filter
② Lug for the hinge of the dust container
③ Safety lock for the H.E.P.A. filter
④ Lug for the hinge of the dust container
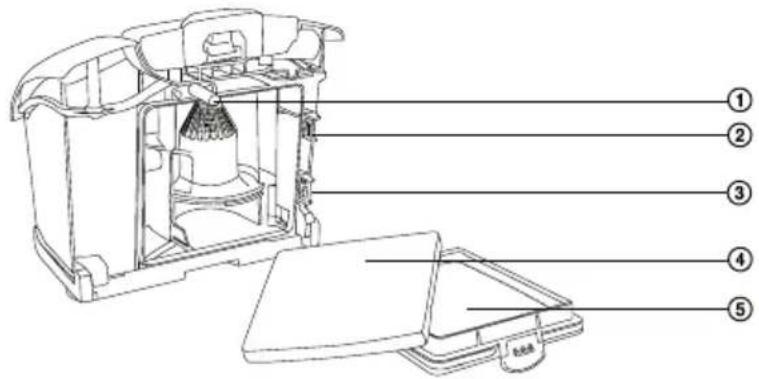
H
① Safety lock
② Hinge for the H.E.P.A filter
③ Hinge for the H.E.P.A filter
④ Foam pre-filter
⑤ H.E.P.A. filter
1) Press the safety lock and pull the container handle up to remove the dust container from the vacuum cleaner.
2) By pressing the safety lock on the plastic frame of the H.E.P.A. filter remove it from the dust container and from behind it also remove the foam pre-filter.
3) Wash both filters under running lukewarm water or if necessary replace with new ones.
4) Then first insert the foam pre-filter and afterwards the H.E.P.A. filter.
5) First insert the H.E.P.A. filter with two lugs into the hinges in the dust container and close it until the safety lock clicks into position.
6) Place the dust container back into the vacuum cleaner.

Caution:
Never place the filters back into the vacuum cleaner if they are wet or damp! Always wait until they are thoroughly dry. The dust container is equipped with a safety lock (see. pic. H ①), which if the H.E.P.A. filter is not present will prevent the insertion of the dust container into the vacuum cleaner.
Changing the outlet filter
|
① Inflow micro-filter
② Cover for the inflow microfilter
③ Cover lock
④ Cover lock
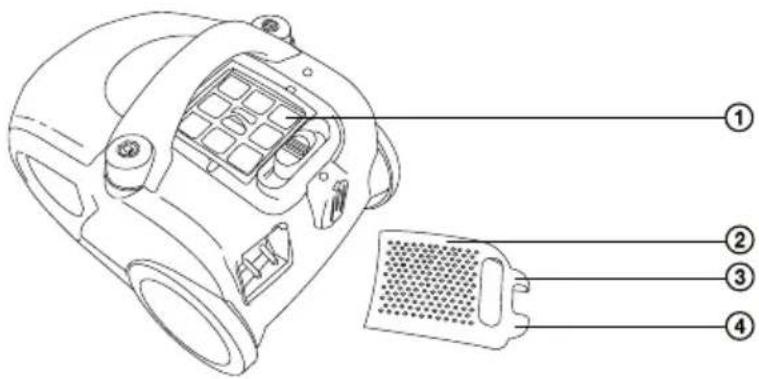
EN-10
J
① Cover of the outflow microfilter
② Guide lug
③ outflow micro-filter
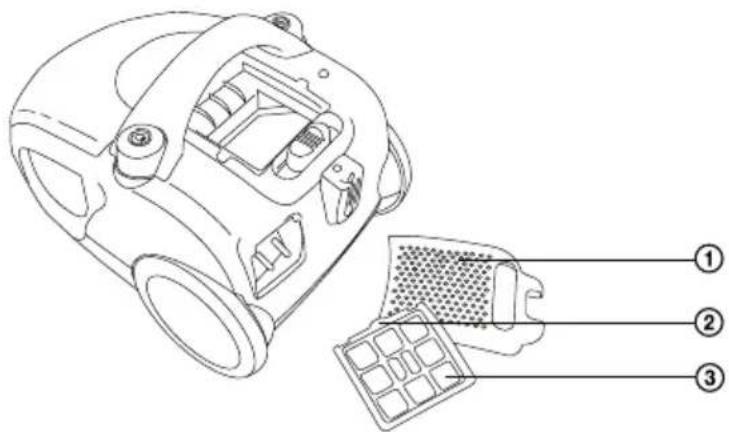
1) First remove the grill of the inflow filter by pulling upwards in the place of both safety locks.
2) Then remove the outflow filter and replace with a new one.
3) Insert the new output filter back into the vacuum cleaner so that the lug fits into the slit for the filter in the vacuum cleaner and cover with the grill (first insert the grill in the backward direction and then click in both safety locks).

Caution:
Insert the outflow filter into the vacuum cleaner with the plastic grill facing out!
Cleaning your vacuum cleaner
To clean the outer parts of the product, use a soft cloth dipped in lukewarm water. Do not use aggressive cleaning agents, paint thinners or solvents. Using these solutions could damage the surface of the product.
TROUBLESHOOTING:
Before you decide to contact an authorized service centre, please read these following tips in the troubleshooting chart:
| Problem | Possible cause | Recommended action |
| Motor does not turn on | - Power cord is not firmly inserted into the mains power socket- Mains power socket is damaged- The vacuum cleaner is not switched on | - Insert the power plug firmly into the mains power socket- Check the mains power socket- Turn on the product |
| Suction power is weak | - The product is clogged- The dust filter needs to be cleaned- The dust container is not in the correct position- Filter is clogged | - Remove the clogged material- Clean the dust filter- Close the dust container- Clean the filter |
| Cord is not fully wound up | While winding the cord might have become dislodged from the winding wheel | While winding up hold the cord slightly tensioned |
| Cord cannot be pulled out | The cord wound up incorrectly | Press the cord self winding button and try again |
| Speed regulation does not function | The product is malfunctioning | Have the product repaired (only by a qualified technician) |
| Power cord winds back when not desired | The wind up mechanism is damaged | Have the product repaired (only by a qualified technician) |
| Dust container cannot be closed | The dust filter is not in the correct position | Attach the dust filter and try again |
TECHNICAL SPECIFICATIONS
| Voltage | 230 V AC |
| Nominal frequency | 50 Hz |
| Suction output | 300 W |
| Rated power input | 1400 W |
| Maximum input | 1600 W |
| Safety class (with regard to electric shock protection) | II |
| Noise level | < 73 dB(A) |
| Power cord length | 5 m |
| Operational range | 7,5 m |
| Dust container capacity | 1,6 l |
| Dimensions (length x width x height) | 360 x 265 x 255 mm |
| Weight | 4.4 kg |
The declared noise emission level for this appliance is < 73 dB(A), which represents level A of the acoustic power relative to the reference acoustic power of 1 pW.
Amendments to text and technical parameters are reserved.
INSTRUCTIONS AND INFORMATION REGARDING THE DISPOSAL OF USED PACKAGING MATERIALS
Dispose of packaging material at a public waste disposal site.
DISPOSAL OF USED ELECTRICAL AND ELECTRONIC APPLIANCES
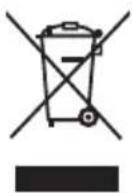
The meaning of the symbol on the product, its accessory or packaging indicates that this product shall not be treated as household waste. Please, dispose of this product at your applicable collection point for the recycling of electrical & electronic equipment waste. Alternatively in some states of the European Union or other European states you may return your products to your local retailer when buying an equivalent new product. The correct disposal of this product will help save valuable natural resources and help in preventing the potential negative impact on the environment and human health, which could be caused as a result of improper liquidation of waste. Please ask your local authorities or the nearest waste collection centre for further details. The improper disposal of this type of waste may fall subject to national regulations for fines.
For business entities in the European Union
If you wish to dispose of an electrical or electronic device, request the necessary information from your seller or supplier.
Disposal in other countries outside the European Union
If you wish to dispose of this product, request the necessary information about the correct disposal method from local government departments or from your seller.

This product meets all the basic EU regulation requirements that relate to it.
Changes to the text, design and technical specifications may occur without prior notice and we reserve the right to make these changes.
EN-13
NOTES:
EN-14


- Vacuum Cleaner
- User's manual
- SENCOR®
- EN-1
- CONTENTS
- IMPORTANT SAFETY NOTICE
- DESCRIPTION
- A
- B
- C
- ASSEMBLY
- Inserting the hose into the air suction hole on the vacuum cleaner:
- Attach the holder to the telescopic tube:
- Attach the floor inlet nozzle to the telescopic tube:
- Adjust the length of the telescopic tube:
- USING YOUR VACUUM CLEANER
- Connecting your vacuum cleaner to power source - wall outlet
- Caution:
- Adjusting the floor inlet nozzle according to the floor surface.
- Turning your vacuum cleaner on and off
- Adjusting the suction strength
- Tip
- Temporary interruption of the vacuuming process
- USING YOUR ACCESSORIES
- D
- Tip:
- Ending the vacuuming process
- Carrying your vacuum cleaner
- STORAGE OF VACUUM CLEANER
- CLEANING AND MAINTENANCE
- Emptying the dust container
- E
- F
- Changing and cleaning the H.E.P.A. filter and the foam pre-filter
- G
- H
- Changing the outlet filter
- |
- EN-10
- J
- Cleaning your vacuum cleaner
- TROUBLESHOOTING:
- TECHNICAL SPECIFICATIONS
- INSTRUCTIONS AND INFORMATION REGARDING THE DISPOSAL OF USED PACKAGING MATERIALS
- DISPOSAL OF USED ELECTRICAL AND ELECTRONIC APPLIANCES
- For business entities in the European Union
- Disposal in other countries outside the European Union
- NOTES:
Márka : SENCOR
Modell : SVC 1011BL FORTE
Kategória : Porszívó