
Q-Line BDL5535QL - Teler PHILIPS - Tasuta kasutusjuhend
Leidke seadme juhend tasuta Q-Line BDL5535QL PHILIPS PDF-formaadis.


Kasutajate küsimused teemal Q-Line BDL5535QL PHILIPS
0 küsimus selle seadme kohta. Vastake nendele, mida teate, või esitage oma.
Esita uus küsimus selle seadme kohta
Laadige alla juhend oma Teler PDF-formaadis tasuta! Leidke oma juhend Q-Line BDL5535QL - PHILIPS ja võtke oma elektrooniline seade uuesti kätte. Sellel lehel on avaldatud kõik teie seadme kasutamiseks vajalikud dokumendid. Q-Line BDL5535QL kaubamärgi PHILIPS.
KASUTUSJUHEND Q-Line BDL5535QL PHILIPS
www.philips.com/welcome
User Manual (English)
Safety Instructions
Warnings and Precautions
KNOW THESE SAFETY SYMBOLS

CAUTION: TO REDUCE THE RISK OF ELECTRIC SHOCK, DO NOT REMOVE COVER (OR BACK). NO USER-SERVICEABLE PARTS INSIDE. REFER SERVICING TO QUALIFIED SERVICE PERSONNEL.
CAUTION: TO REDUCE THE RISK OF ELECTRIC SHOCK, DO NOT REMOVE COVER (OR BACK). NO USER SERVICEABLE PARTS INSIDE. REFER SERVICING TO QUALIFIED SERVICE PERSONNEL.
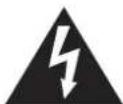
This symbol indicates high voltage is present inside. It is dangerous to make any kind of contact with any inside part of this product.

This symbol alerts you that important literature concerning operation and maintenance has been included with this product.
CAUTION: FCC/CSA regulations state that any unauthorized changes or modifications to this equipment may void the user's authority to operate it.
CAUTION: To prevent electric shock, match the wide blade of plug to the wide slot, and fully insert the plug.
TO PREVENT DAMAGE WHICH MAY RESULT IN FIRE OR ELECTRIC SHOCK HAZARD, DO NOT EXPOSE THIS APPLIANCE TO RAIN OR MOISTURE.
The Socket-outlet should be installed near the apparatus and be easily accessible.

Read and follow these instructions when connecting and using your Public Information Display:
- Unplug the display if you are not going to use it for an extensive period of time.
- Unplug the display if you need to clean it with a slightly damp cloth. The screen many be wiped with a dry cloth when the power is off. However, never use alcohol, solvents or ammonia-based liquids.
- Consult a service technician if the display does not operate normally when you have followed the instructions in this manual.
- The casing cover should be opened only by qualified service personnel.
- Keep the display out of direct sunlight and away from stoves or any other heat sources.
- Remove any object that could fall into the vents or prevent proper cooling of the display's electronics.
• Do not block the ventilation holes on the cabinet. - Keep the display dry. To avoid electric shock, do not expose it to rain or excessive moisture.
- If turning off the display by detaching the power cable, wait for 6 seconds before re-attaching the power cable for normal operation.
• To avoid the risk of shock or permanent damage to the set do not expose the display to rain or excessive moisture. - When positioning the display, make sure the power plug and outlet are easily accessible.
- IMPORTANT: Always activate a screen saver program during your application. If a still image in high contrast remains on the screen for an extended period of time, it may leave an 'after-image' or 'ghost image' on the front of the screen. This is a well-known phenomenon that is caused by the shortcomings inherent in LCD technology. In most cases the afterimage will disappear gradually over a period of time after the power has been switched off. Be aware that the after-image symptom cannot be repaired and is not covered under warranty.
Important Safety Instructions
- Read these instructions.
- Keep these instructions.
- Heed all warnings.
- Follow all instructions.
- Do not use this apparatus near water.
- Clean only with dry cloth.
- Do not block any ventilation openings. Install in accordance with the manufacturer's instructions.
-
Do not install near any heat sources such as radiators, heat registers, stoves, or other apparatus (including amplifiers) that produce heat.
-
Do not defeat the safety purpose of the polarized or grounding-type plug. A polarized plug has two blades with one wider than the other. A grounding type plug has two blades and a third grounding prong. The wide blade or the third prong are provided for your safety. If the provided plug does not fit into your outlet, consult an electrician for replacement of the obsolete outlet.
-
Protect the power cord from being walked on or pinched particularly at plugs, convenience receptacles, and the point where they exit from the apparatus.
-
Only use attachments/accessories specified by the manufacturer.
-
Use only with the cart, stand, tripod, bracket, or table specified by the manufacturer, or sold with the apparatus. When a cart is used, use caution when moving the cart/apparatus combination to avoid injury from tip-over.

-
Unplug this apparatus during lightning storms or when unused for long periods of time.
-
Refer all servicing to qualified service personnel. Servicing is required when the apparatus has been damaged in any way, such as power-supply cord or plug is damaged, liquid has been spilled or objects have fallen into the apparatus, the apparatus has been exposed to rain or moisture, does not operate normally, or has been dropped.
WARNING: TO REDUCE THE RISK OF FIRE OR ELECTRIC SHOCK, DO NOT EXPOSE THIS APPARATUS TO RAIN OR MOISTURE.
WARNING: Apparatus shall not be exposed to dripping or splashing and no objects filled with liquids, such as vases, shall be placed on the apparatus.
WARNING: The batteries (batteries installed) shall not be exposed to excessive heat such as sunshine, fire or the like.
WARNING: The mains plug or appliance coupler is used as the disconnect device, the disconnect device shall remain readily operable.
WARNING: To prevent the spread of fire, keep candles or other open flames away from this product at all times.

WARNING: To prevent injury, this apparatus must be securely attached to the floor/wall in accordance with the installation instructions.
CAUTION: These servicing instructions are for use by qualified service personnel only. To reduce the risk of electric shock, do not perform any servicing other than that
contained in the operating instructions unless you are qualified to do so.
CAUTION: Excessive sound pressure from earphones and headphones can cause hearing loss. Adjustment of the equalizer to maximum increases the earphone and headphone output voltage and the sound pressure level. Therefore, to protect your hearing, adjust the equalizer to an appropriate level.
For UL/CUL application: For use only with UL Listed Wall Mount Bracket with minimum weight/load: 16.0 Kg
For CB application: Unit without base weight: 16.0 Kg. The equipment and its associated mounting means still remain secure during the test. (Used wall mounting kit: 400x400 mm and 400x200mm distance by using M6 screws of 10 mm long plus the thickness of the mounting bracket.
IMPORTANT INFORMATION
If a television is not positioned in a sufficiently stable location, it can be potentially hazardous due to falling. Many injuries, particularly to children, can be avoided by taking simple precautions such as:
• Using cabinets or stands recommended by the manufacturer of the television.
• Only using furniture that can safely support the television.
- Ensuring the television is not overhanging the edge of the supporting furniture.
- Not placing the television on tall furniture (for example, cupboards or bookcases) without anchoring both the furniture and the television to a suitable support.
• Not standing the televisions on cloth or other materials placed between the television and supporting furniture.
• Educating children about the dangers of climbing on furniture to reach the television or its controls.
Regulatory Information
CE Declaration of Conformity
This device complies with the requirements set out in the Council Directive on the Approximation of the Laws of the Member States relating to Electromagnetic Compatibility (2014/30/EU), Low-voltage Directive (2014/35/EU) and RoHS directive (2011/65/EU).
This product has been tested and found to comply with the harmonized standards for Information Technology Equipment, these harmonized standards published under Directives of Official Journal of the European Union.
Warning:
This equipment is compliant with Class A of EN55032/CISPR 32. In a residential environment this equipment may cause radio interference.
| Information for EAC |  |
| Month and year of manufacturing | please refer information in Rating label. |
| Name and location of manufacturer | ООО “Профтехника”Адрес: 3-й Проезд Марьиной рощи, 40/1 офис 1. Москва, 127018, Россия |
| Importer and information | Наименование организации: ООО“Профтехника”Адрес: 3-й Проезд Марьиной рощи, 40/1 офис 1. Москва, 127018, РоссияКонтактное лицо: Наталья Астафьева,+7 495 640 20 20nat@profdisplays.ru |
Federal Communications Commission (FCC) Notice (U.S. Only)

Note: This equipment has been tested and found to comply with the limits for a Class A digital
device, pursuant to part 15 of the FCC Rules. These limits are designed to provide reasonable
protection against harmful interference when the equipment is operated in a commercial
environment. This equipment generates, uses, and can radiate radio frequency energy and, if
not installed and used in accordance with the instruction manual, may cause harmful
interference to radio communications. Operation of this equipment in a residential area is
likely to cause harmful interference in which case the user will be required to correct the
interference at his own expense.

Changes or modifications not expressly approved by the party responsible for compliance could void the user's authority to operate the equipment.
Use only an RF shielded cable that was supplied with the display when connecting this display to a computer device.
To prevent damage which may result in fire or shock hazard, do not expose this appliance to rain or excessive moisture.
This device complies with Part 15 of the FCC Rules. Operation is subject to the following two conditions: (1) this device may not cause harmful interference, and (2) this device must accept any interference received, including interference that may cause undesired operation.
Polish Center for Testing and Certification Notice
The equipment should draw power from a socket with an attached protection circuit (a three-prong socket). All equipment that works together (computer, display, printer, and so on) should have the same power supply source.
The phasing conductor of the room's electrical installation should have a reserve short-circuit protection device in the form of a fuse with a nominal value no larger than 16 amperes (A).
To completely switch off the equipment, the power supply cable must be removed from the power supply socket, which should be located near the equipment and easily accessible.
A protection mark "B" confirms that the equipment is in compliance with the protection usage requirements of standards PN-93/T-42107 and PN-89/E-06251.
Wymagania Polskiego Centrum Badań i Certyfikacji
Urządzenie powinno być zasilane z gniazda z przylączonym obwodem ochronnym (gniazdo z kolkiem). Współpracujące ze sobą urządzenia (komputer, monitor, drukarka) powinny być zasilane z tego samego źródła.
Instalacja elektryczna pomieszczenia powiana zawierać w przewodzie fażowym rezerwową ochronę przed zwarciami, w postaci bezpieczmika o wartości znamionowej nie większej niż 16A (amperów). W celu całkowitego wyłączenia urządzenia z sieci zaslania, należy wyjąć wy multiczę kabla zasilającego z gniażka, które powinno znajdować się w pobliżu urządzenia i być łatwo dostępne. Znak bezpieczeństwa "B" potwierdza zgodność urządzenia z wymaganiami bezpieczeństwa użytkowania zawartymi w PN-93/4-42107 i PN-89-E-06251.
Pozostałe instrukcje bezpieczeństwa
- Nie należy używać wtyczek adapterowych lub usuwać kolka obwodu ochronnego z wtyczki. Jeżeli koniecznie jest użycie przedłużacza to należy użyć przedłużacza 3-żylowego z prawidłowo połączonym przewodem ochronnym.
- System komputerowy należy zabezpieczyć przed nagłymi, chwilowymi wzrustami lub spadkami napięcia, używające eliminatora przepięć, urządzenia dopasowującego lub bezzakłócenienowego źródła zasilania.
- Należy upewnić się, aby nie nie leżalo na kabłach systemu komputerowego, oraz aby kable nie były umieszczone w miejscu, gdzie można byłoby na nie nadeptywać lub potykać się o nie.
- Nie należy rozlewać napojów ani innych płynów na system komputerowy.
- Nie należy wpychać żadnych przedmiotów do otworów systemu komputerowego, gdyż może to spowodować pozar lub porażenie prądem, poprzez zwarcie elementów wewnętrznych.
- System komputerowy powinien znajdować się z dala od grzejników i źródeł ciepła. Ponadło, nie należy blokować otworów wentylacyjnych. Należy unikać kładzenia lużnych papierów pod komputer oraz umieszczania komputera w ciasnym miejscu bez możliwości cyrkulacji powietrza wokół niego.
Electric, Magnetic and Electronmagnetic Fields ("EMF")
- We manufacture and sell many products targeted at consumers, which, like any electronic apparatus, in general have the ability to emit and receive electromagnetic signals.
- One of our leading Business Principles is to take all necessary health and safety measures for our products, to comply with all applicable legal requirements and to stay well within the EMF standards applicable at the time of producing the products.
- We are committed to develop, produce and market products that cause no adverse health effects.
- We confirm that if its products are handled properly for their intended use, they are safe to use according to scientific evidence available today.
- We play an active role in the development of international EMF and safety standards, enabling us to anticipate further developments in standardization for early integration in its products.
Information for U.K. only WARNING – THIS APPLIANCE MUST BE EARTHED.
Important:

This apparatus is supplied with an approved moulded 13A plug. To change a fuse in this type of plug proceed as follows:
- Remove fuse cover and fuse.
- Fit new fuse which should be a BS 1362 5A,A.S.T.A. or BSI approved type.
- Refit the fuse cover
If the fitted plug is not suitable for your socket outlets, it should be cut off and an appropriate 3-pin plug fitted in its place.
If the mains plug contains a fuse, this should have a value of 5A. If a plug without a fuse is used, the fuse at the distribution board should not be greater than 5A.
NOTE: The severed plug must be destroyed to avoid a possible shock hazard should it be inserted into a 13A socket elsewhere.
How to connect a plug

natural_image
Diagram of a battery pack with colored wires (green, blue, red) and connectors (no text or symbols)The wires in the mains lead are coloured in accordance with the following code:
BLUE - "NEUTRAL" ("N")
BROWN - "LIVE" ("L")
GREEN & YELLOW - "EARTH" ("E")
- The GREEN & YELLOW wire must be connected to the terminal in the plug which is marked with the letter "E" or by the Earth symbol or coloured GREEN or GREEN & YELLOW.
- The BLUE wire must be connected to the terminal which is marked with the letter "N" or coloured BLACK.
- The BROWN wire must be connected to the terminal which marked with the letter "L" or coloured RED.
Before replacing the plug cover, make certain that the cord grip is clamped over the sheath of the lead – not simply over the three wires.
China RoHS
根据中国大陆《电子电气产品有害物质限制使用标识要求》,以下部分列出了本产品中可能包含的有害物质的名称和含量。
| 零部件名称 | 有害物质 | ||||||
| 铅(Pb) | 汞(Hg) | 镉(Cd) | 六价铬(Cr(VI)) | 多溴联苯(PBB) | 多溴二苯醚(PBDE) | ||
| 塑料外框 | ○ | ○ | ○ | ○ | ○ | ○ | |
| 后壳 | ○ | ○ | ○ | ○ | ○ | ○ | |
| LCD panel | CCFL | × | × | ○ | ○ | ○ | ○ |
| LED | × | ○ | ○ | ○ | ○ | ○ | |
| 电路板组件* | × | ○ | ○ | ○ | ○ | ○ | |
| 底座 | ○ | ○ | ○ | ○ | ○ | ○ | |
| 电源线 | × | ○ | ○ | ○ | ○ | ○ | |
| 其他线材 | × | ○ | ○ | ○ | ○ | ○ | |
| 遥控器 | × | ○ | ○ | ○ | ○ | ○ | |
| *:电路板组件包括印刷电路板及其构成的零部件,如电阻、电容、集成电路、连接器等。 | |||||||
| 本表格依据SJ/T 11364的规定编制。○:表示该有害物质在该部件所有均质材料中的含量均在GB/T 26572 标准规定的限量要求以下。×:表示该有害物质至少在该部件的某一均质材料中的含量超出 GB/T 26572 标准规定的限量要求。上表中打“×”的部件中,应功能需要,部分有害物质含量超出GB/T 26572规定的限量要求,但是符合欧盟RoHS法规要求(属于豁免部分)。 | |||||||
备注:上表仅做为范例,实际标示时应依照各产品的实际部件及所含有害物质进行标示。

环保使用期限
在产品本体上标示的该标志表示环境保护使用期限为10年。
电子信息产品的环境保护使用期限是指电子信息产品中所含的有毒有害物质或元素不会向外部泄漏或出现突然变异,并且电子信息产品的用户在使用该电子信息产品时也不会对环境造成严重污染或对人体、财产带来严重损害的期限。
在环境保护期限中,请按照使用说明书使用本产品。
本环境保护使用不覆盖易损件:电池。
《废弃电子产品回收处理管理条例》提示性说明
为了更好地关爱及保护地球,当用户不再需要此产品或产品寿命终止时,请遵守国家废弃电器电子产品回收处理相关法律规定,将其交给当地具有国家认可的回收处理资质的厂商进行回收处理。
警告
此为A级产品。在生活环境中,该产品可能会造成无线电干扰。在这种情况下,可能需要用户对干扰采取切实可行的措施。

仅适用于非热带气候条件下安全使用:
| 汉文 | 仅适用于非热带气候条件下安全使用。 |
| 蒙古文 | |
| 藏文 | “‘र्क बरिंशागुण्ण कृत्र वर्षिक्ष विद्य रूक्ति ून्दिक्ष अन्दिक्ष अन्दिक्ष अन्दिक्ष अन्दिक्ष अन्दिक्ष अन्दिक्ष अन्दिक्ष अन्दिक्ष अन्दिक्ष अन्दिक्ष अन्दिक्ष अ |
| 维文 | غیری تسیسق بهایاع هاژا کیلمماني شارائشیدلا بخفتر نستلەتکلی بولندو |
| 壮文 | Dan hab yungh youq gij dienheiq diuzgen mbouj dwg diegndat haenx ancienz sawjyungh. |

仅适用于海拔2000m以下地区安全使用:
| 汉文 | 仅适用于海拔2000m以下地区安全使用。 | ||
| 蒙古文 | 《2000m مز/ ١٠٠٠٠٠٠٠٠٠٠٠٠٠٠٠٠٠٠٠٠٠٠٠٠٠٠٠٠٠٠٠٠٠٠٠٠٠٠٠٠٠٠٠٠٠٠٠٠٠٠٢٠٠٠٠٠٠٠٠٠٠٠٠٠٠٠٠٠٠٠٠٠٠٠٠٠٠٠٠٠٠٠٠٠٠٠٠٠٠٠٠٠٠٠٠٠٠٠٠٠١٠٠٠٠٠٠٠٠٠٠٠٠٠٠٠٠٠٠٠٠٠٠٠٠٠٠٠٠٠٠٠٠٠٠٠٠٠٠٠٠٠٠٠٠٠٠٠٠٢١٠٠٠٠٠٠٠٠٠٠٠٠٠٠٠٠٠٠٠٠٠٠٠٠٠٠٠٠٠٠٠٠٠٠٠٠٠٠٠٠٠٠٠٠٠٠٠٠١٢١٠٠٠٠٠٠٠٠٠٠٠٠٠٠٠٠٠٠٠٠٠٠٠٠٠٠٠٠٠٠٠٠٠٠٠٠٠٠٠٠٠٠٠٠٠٠٠٢٢١٠٠٠٠٠٠٠٠٠٠٠٠٠٠٠٠٠٠٠٠٠٠٠٠٠٠٠٠٠٠٠٠٠٠٠٠٠٠٠٠٠٠٠٠٠٠٠١٢٢١٠٠٠٠٠٠٠٠٠٠٠٠٠٠٠٠٠٠٠٠٠٠٠٠٠٠٠٠٠٠٠٠٠٠٠٠٠٠٠٠٠٠٠٠٠٠٢٢٢٢٢٢٢٢٢٢٢٢٢٢٢٢٢٢٢٢٢٢٢٢٢٢٢٢٢٢٢٢٢٢٢٢٢٢٢٢٢٢٢٢٢٢٢٢٢٢٣٢٢٢٢٢٢٢٢٢٢٢٢٢٢٢٢٢٢٢٢٢٢٢٢٢٢٢٢٢٢٢٢٢٢٢٢٢٢٢٢٢٢٢٢٢٢٢٢٢٦٢٢٢٢٢٢٢٢٢٢٢٢٢٢٢٢٢٢٢٢٢٢٢٢٢٢٢٢٢٢٢٢٢٢٢٢٢٢٢٢٢٢٢٢٢٢٢٢٢٩٢٢٢٢٢٢٢٢٢٢٢٢٢٢٢٢٢٢٢٢٢٢٢٢٢٢٢٢٢٢٢٢٢٢٢٢٢٢٢٢٢٢٢٢٢٢٢٢٢٤٢٢٢٢٢٢٢٢٢٢٢٢٢٢٢٢٢٢٢٢٢٢٢٢٢٢٢٢٢٢٢٢٢٢٢٢٢٢٢٢٢٢٢٢٢٢٢٢٢٨١٢٢٢٢٢٢٢٢٢٢٢٢٢٢٢٢٢٢٢٢٢٢٢٢٢٢٢٢٢٢٢٢٢٢٢٢٢٢٢٢٢٢٢٢٢٢٢٢٢١٢٢٢٢٢٢٢٢٢٢٢٢٢٢٢٢٢٢٢٢٢٢٢٢٢٢٢٢٢٢٢٢٢٢٢٢٢٢٢٢٢٢٢٢٢٢٢٢٣١٢٢٢٢٢٢٢٢٢٢٢٢٢٢٢٢٢٢٢٢٢٢٢٢٢٢٢٢٢٢٢٢٢٢٢٢٢٢٢٢٢٢٢٢٢٢٢٢٦١٢٢٢٢٢٢٢٢٢٢٢٢٢٢٢٢٢٢٢٢٢٢٢٢٢٢٢٢٢٢٢٢٢٢٢٢٢٢٢٢٢٢٢٢٢٢٢٢٩١٢٢٢٢٢٢٢٢٢٢٢٢٢٢٢٢٢٢٢٢٢٢٢٢٢٢٢٢٢٢٢٢٢٢٢٢٢٢٢٢٢٢٢٢٢٢٢٢٥١٢٢٢٢٢٢٢٢٢٢٢٢٢٢٢٢٢٢٢٢٢٢٢٢٢٢٢٢٢٢٢٢٢٢٢٢٢٢٢٢٢٢٢٢٢٢٢٢١١٢٢٢٢٢٢٢٢٢٢٢٢٢٢٢٢٢٢٢٢٢٢٢٢٢٢٢٢٢٢٢٢٢٢٢٢٢٢٢٢٢٢٢٢٢٢٢٢٧. | “اللهاللهاللهاللهاللهاللهاللهاللهاللهاللهاللهاللهاللهاللهاللهاللهاللهاللهاللهاللهاللهاللهاللهاللهاللهاللهاللهاللهاللهاللهاللهاللهاللهاللهاللهاللهاللهاللهاللهاللهاللهاللهاللهاللهاللهاللهاللهاللهاللهاللهال Milkال Milkال Milkال Milkال Milkال Milkال Milkال Milkال Milkال Milkال Milkال Milkال Milkال Milkال Milkال Milkال Milkال Milkال Milkال Milkال Milkال Milkال Milkال Milkال Milkال Milkال Milkال Milkال Milkال Milkال Milkال Milkال Milkال Milkال Milkال Milkال Milkال Milkال Milkال Milkال Milkال Milkال Milkال Milkال Milkال Milkال Milkال Milkال Milkال Milkال milkال Milkال Milkال Milkال Milkال Milkال Milkال Milkال Milkال Milkال Milkال Milkال Milkال Milkال Milkال Milkال Milkال Milkال Milkال Milkال Milkال Milkال Milkال Milkال Milkال Milkال Milkال Milkال Milkال Milkال Milkال Milkال Milkال Milkال Milkال Milkال Milkال Milkال Milkال Milkال Milkال Milkال Milkال Milkال Milkال Milkال Milkال Milkال Milkال Milkالilkال Milkال Milkال Milkال Milkال Milkال Milkال Milkال Milkال Milkال Milkال Milkال Milkال Milkال Milkال Milkال Milkال Milkال Milkال Milkال Milkال Milkال Milkال Milkال Milkال Milkال Milkال Milkال Milkال Milkال Milkال Milkال Milkال Milkال Milkال Milkال Milkال Milkال Milkال Milkال Milkال Milkال Milkال Milkال Milkال Milkال Milkال Milkال Milkال Milkال乳血血血血血血血血血血血血血血血血血血血血血血血血血血血血血血血血血血血血血血血血血血血血血血血血血血血血血血血血血血血血血血血血血血血血血血血血血血血血血血血血血血血血血血血血血血血血血血血血血血血血心血血血血血血血血血血血血血血血血血血血血血血血血血血血血血血血血血血血血血血血血血血血血血血血血血血血血血血血血血血血血血血血血血血血血血血血血血血血血血血血血血血血血血血血血血血血血血血血血血血血白血血血血血血血血血血血血血血血血血血血血血血血血血血血血血血血血血血血血血血血血血血血血血血血血血血血血血血血血血血血血血血血血血血血血血血血血血血血血血血血血血血血血血血血血血血血血血血血血血血血电血血血血血血血血血血血血血血血血血血血血血血血血血血血血血血血血血血血血血血血血血血血血血血血血血血血血血血血血血血血血血血血血血血血血血血血血血血血血血血血血血血血血血血血血血血血血血血血血血血血色血血血血血血血血血血血血血血血血血血血血血血血血血血血血血血血血血血血血血血血血血血血血血血血血血血血血血血血血血血血血血血血血血血血血血血血血血血血血血血血血血血血血血血血血血血血血血血血血血血血血液血血血血血血血血血血血血血血血血血血血血血血血血血血血血血血血血血血血血血血血血血血血血血血血血血血血血血血血血血血血血血血血血血血血血血血血血血血血血血血血血血血血血血血血血血血血血血血血血血血血出血血血血血血血血血血血血血血血血血血血血血血血血血血血血血血血血血血血血血血血血血血血血血血血血血血血血血血血血血血血血血血血血血血血血血血血血血血血血血血血血血血血血血血血血血血血血血血血血血血血血 |
| 壮文 | “Gij mizsienq vangjloz denhsen ciephaeuj bonj sezbi daeuj haenx itdingh aeu caeuq gij ciepdieg baujhoh doxliz, mboujne aiq miz gij yungyiemj dawzfeiz daengj!” |
North Europe (Nordic Countries) Information
Placering/Ventilation
WARNING:
FÖRSÄKRA DIG OM ATT HUVUDBRYTARE OCH UTTAG ÄR LÄTÄTKOMLIGA, NÄR DU STÄLLER DIN UTRUSTNING PÅPLATS.
Placering/Ventilation
ADVARSEL:
S∅RG VED PLACERINGEN FOR, AT NETLEDNINGENS STIK OG STIKKONTAKT ER NEMT TILGÆNGELIGE.
Paikka/Ilmankierto
VAROITUS:
SIJOITA LAITE SITEN, ETTÄ VERKKOJOHTO VOIDAAAN TARVITTAESSA HELPOSTI IRROTTAA PISTORASIASTA.
Plassering/Ventilasjon
ADVARSEL:
NÅR DETTE UTSTYRET PLASSERES, MÅ DU PASSE PÅ AT KONTAKTENE FOR STÖMTILF∅RSEL ER LETTE Å NÅ
End-of-Life Disposal
Your new Public Information Display contains materials that can be recycled and reused. Specialized companies can recycle your product to increase the amount of reusable materials and to minimize the amount to be disposed of.
Please find out about the local regulations on how to dispose of your old display from your local philips dealer.
(For customers in Canada and U.S.A.)
This product may contain lead and/or mercury. Dispose of in accordance to local-state and federal regulations. For additional information on recycling contact www.eia.org (Consumer Education Initiative)
Waste Electrical and Electronie Equipment-WEEE
Attention users in European Union private households

This marking on the product or on its packaging illustrates that, under European Directive 2012/19/EU governing used electrical and electronic appliances, this product may not be disposed of with normal household waste. You are responsible for disposal of this equipment through a designated waste electrical and electronic equipment collection. To determine the locations for dropping off such waste electrical and electronic, contact your local government office, the waste disposal organization that serves your household or the store at which you purchased the product.
End of Life Directives-Recycling

Your new Public Information Display contains several materials that can be recycled for new users.
Please dispose of according to all Local, State, and Federal laws.

As an ENERGY STAR Partner, we have determined that this product meets the ENERGY STAR guidelines for energy efficiency.
Restriction on Hazardous Substances statement (India)
This product complies with the "E-Waste (Management) Rules, 2016" CHAPTER V, rule 16, sub-rule (1). Whereas New Electrical and Electronic Equipment and their components or consumables or parts or spares do not contain Lead, Mercury, Cadmium, Hexavalent Chromium, polybrominated biphenyls and polybrominated diphenyl ethers beyond a maximum concentration value of 0.1% by weight in homogenous materials for lead, mercury, hexavalent chromium, polybrominated biphenyls and polybrominated diphenyl ethers and of 0.01% by weight in homogenous materials for cadmium, except of exemptions set in Schedule 2 of the Rule.
E-Waste Declaration for India

This symbol on the product or on its packaging indicates that this product must not be disposed of with your other household waste. Instead it is your responsibility to dispose of your waste equipment by handing it over to a designated collection point for the recycling of waste electrical and electronic equipment. The separate collection and recycling of your waste equipment at the time of disposal will help to conserve natural resources and ensure that it is recycled in a manner that protects human health and the environment. For more information about E-waste please visit http://www.india.philips.com/about/sustainability/recycling/index.page and to know where you can drop off your waste equipment for recycling in India please contact on below given contact details.
Helpline number: 1800-425-6396 (Monday to Saturday, 9 a.m. to 5:30 pm)
Centralized E-waste collection center
Address: TPV Technology India Private Limited,
59, Maheswari Nagar, 1st Main Road, Mahadevapura Post.
Whitefield Road
Bangalore, Karnataka, PIN: 560048, Tel: 080-3023-1000
E-mail: india.callcentre@tpv-tech.com
Batteries

For EU: The crossed-out wheeled bin implies that used batteries should not be put to the general household waste! There is a separate collection system for used batteries, to allow proper treatment and recycling in accordance with legislation.
Please contact your local authority for details on the collection and recycling schemes.
For Switzerland: The used battery is to be returned to the selling point.
For other non-EU countries: Please contact your local authority for correct method of disposal of the used battery.
According to EU directive 2006/66/EC, the battery can't be disposed improperly. The battery shall be separated to collect by local service.
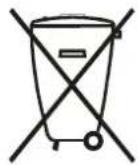
Após o uso, as pilhas e/ou baterias deverão ser entregues ao estabelecimento comercial ou rede de assistência técnica autorizada.
Turkey RoHS:
Türkiye Cumhuriyeti: EEE Yönetmeliğine Uygundur
Ukraine RoHS:
Обладнання відповідає вимогам Технічного регламенту щодо обмеження використання деяких небезпечних речовин в електричному та електронному обладнанні, затвердженого постановою Кабінету Міністрів України від 3 грудня 2008 № 1057
Table Of Contents
1. Unpacking and Installation....1
1.1. Unpacking....1
1.2. Package Contents....1
1.3. Installation Notes....1
1.4. Mounting on a Wall 2
1.4.1. VESA Grid 2
1.5. Using of Remote sensor and power indicator.....3
2. Parts and Functions....4
2.1. Control Panel 4
2.2. Input/Output Terminals....5
2.3. Remote Control....6
2.3.1. General functions 6
2.3.2. ID Remote Control....7
2.3.3. Inserting the batteries in the remote control....8
2.3.4. Handling the remote control....8
2.3.5. Operating range of the remote control.....8
3. Connecting External Equipment....9
3.1. Connecting External Equipment (DVD/VCR/VCD)9
3.1.1. Using COMPONENT video input....9
3.1.2. Using Video Source input....9
3.1.3. Using HDMI video input 10
3.2. Connecting a PC....10
3.2.1. Using VGA input....10
3.2.2. Using DVI input....10
3.2.3. Using HDMI input....11
3.3. Connecting Audio Equipment....11
3.3.1. Connecting an external audio device.....11
3.4. Connecting Multiple Displays in a Daisy-chain Configuration....12
3.4.1. Display control connection....12
3.5. IR Pass-through Connection....12
3.6. Wire-connecting to Network....13
4. Operation....14
4.1. Watch the Connected Video Source....14
4.2. Change Picture Format....14
4.3. Play multimedia files via Local Area Network.....14
4.3.1. Set up the network....14
4.3.2. How to use DLNA-DMP....14
4.3.3. How to use DLNA-DMR from PC.....15
4.4. Play multimedia files from USB device....15
4.5. Play options....16
4.5.1. Playing music files 16
4.5.2. Playing movie files....16
4.5.3. Playing photo files 16
4.6. How to use Opera browser (HTML5)....16
5. Change your settings....18
5.1. Settings....18
5.1.1. Picture 18
5.1.2. Sound....19
5.1.3. Ambilight 19
5.1.4. Tiling....19
5.1.5. Network....20
5.1.6. Storage 21
5.1.7. General settings....21
5.1.8. Web control.....24
6. USB device compatibility....28
7. Input Mode....30
8. Pixel Defect Policy....31
8.1. Pixels and Sub-Pixels....31
8.2. Types of Pixel Defects + Dot Definition 31
8.3. Bright Dot Defects....31
8.4. Dark Dot Defects....32
8.5. Proximity of Pixel Defects 32
8.6. Pixel Defect Tolerances 32
8.7. MURA 32
9. Cleaning and Troubleshooting....33
9.1. Cleaning 33
9.2. Troubleshooting....34
10. Technical Specifications 35
1. Unpacking and Installation
1.1. Unpacking
• This product is packed in a carton, together with the standard accessories.
• Any other optional accessories will be packed separately.
• Due to the size and weight of this display it is recommended for two people to move it.
• After opening the carton, ensure that the contents are complete and in good condition.
1.2. Package Contents
Please verify that you received the following items with your package content:
- LCD display
- Quick start guide
• Remote control with AAA batteries
Power cord - RS232 cable
• RS232 daisy-chain cable - Logo Guider
• Philips Logo

natural_image
Blank whiteboard with a thin black border and a small black square at the bottom right corner (no text or symbols)* The supplied power cord varies depending on destination.

Power Cord

RS232 daisy-chain cable

Quick start guide
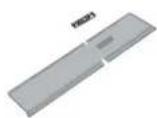
Logo guider

Remote Control and AAA Batteries

RS232 Cable
NOTES:
- For all other regions, apply a power cord that conforms to the AC voltage of the power socket and has been approved by and complies with the safety regulations of the particular country.
• You might like to save the package box and packing material for shipping the display.
1.3. Installation Notes
- Due to the high power consumption, always use the plug exclusively designed for this product. If an extended line is required, please consult your service agent.
- The product should be installed on a flat surface to avoid tipping. The distance between the back of the product and the wall should be maintained for proper ventilation. Avoid installing the product in the kitchen, bathroom or any other places with high humidity so as not to shorten the service life of the electronic components.
• The product can normally operate only under 3000m in altitude. In installations at altitudes above 3000m, some abnormalities may be experienced.
1.4. Mounting on a Wall
To mount this display to a wall, you will have to obtain a standard wall-mounting kit (commercially available). We recommend using a mounting interface that complies with TUV-GS and/or UL1678 standard in North America.

- Lay a protective sheet on a table, which was wrapped around the display when it was packaged, beneath the screen surface so as not to scratch the screen face.
- Ensure you have all accessories for mounting this display (wall mount, ceiling mount, table stand, etc).
- Follow the instructions that come with the base mounting kit. Failure to follow correct mounting procedures could result in damage to the equipment or injury to the user or installer. Product warranty does not cover damage caused by improper installation.
- For the wall-mounting kit, use M6 mounting screws (having a length 10 mm longer than the thickness of the mounting bracket) and tighten them securely.
- Unit without base weight=16.0 kg. The equipment and its associated mounting means still remain secure during the test. For use only with UL Listed Wall Mount Bracket with minimum weight/load: 16.0 kg.
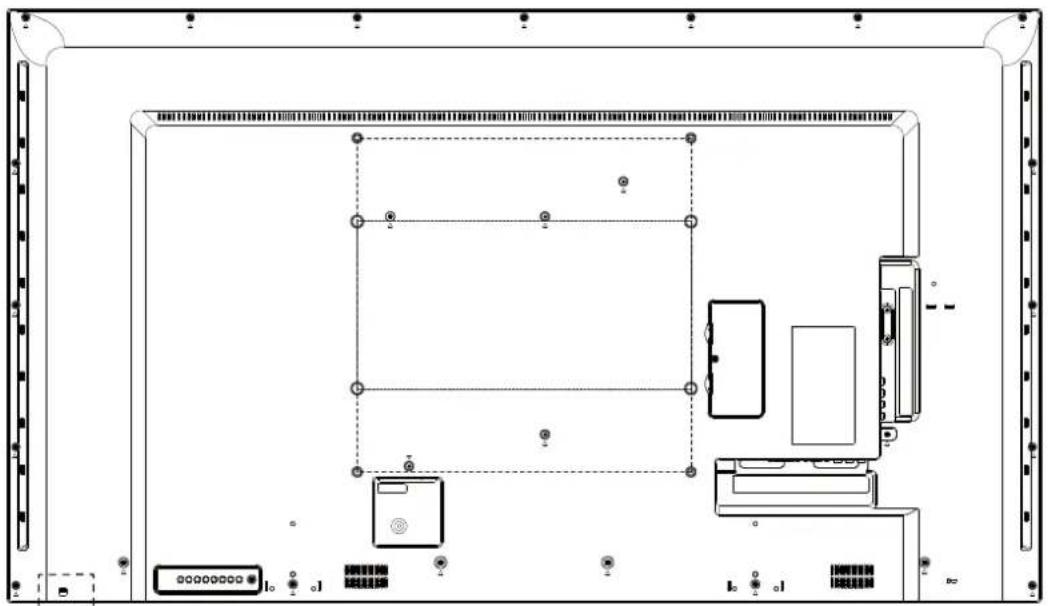
1.4.1. VESA Grid
| BDL5535QL | 400(H) × 400(V)mm400(H) × 200(V)mm |
Caution:
To prevent the display from falling:
- For wall or ceiling installation, we recommend installing the display with metal brackets which are commercially available. For detailed installation instructions, refer to the guide received with the respective bracket.
- To lessen the probability of injury and damage resulting from fall of the display in case of earthquake or other natural disaster, be sure to consult the bracket manufacturer for installation location.
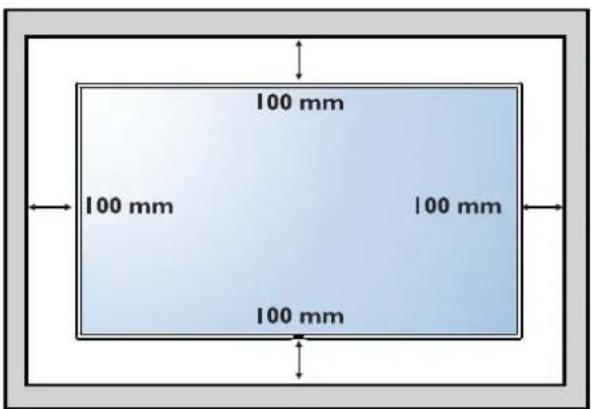
Ventilation Requirements for enclosure locating
To allow heat to disperse, leave space between surrounding objects as shown in the diagram below.
1.5. Using of Remote sensor and power indicator
- Pull left the lens to have better remote control performance and easy to observe the light information of power status
- Push right the lens before mounting the display for video wall application
- Pull/Push the lens until hearing the click sound

natural_image
Simple diagram showing a device with an upward arrow, enclosed in a dashed border (no text or symbols)Push up to collapse the lens

natural_image
Simple line drawing of a box with a downward arrow above it, enclosed in a dashed border (no text or symbols)Push down to extend the lens
natural_image
Technical line drawing of a server room layout with monitor, tower, and keyboard (no text or symbols)2. Parts and Functions
2.1. Control Panel

① [⏻] button
Use this button to turn the display on or put the display to standby.
② [MUTE] button
Switch the audio mute ON/OFF.
③ [INPUT] button
Choose the input source.
• Used as [OK] button in the On-Screen-Display menu.
④ [+] button
Increase the adjustment while OSD menu is on, or increase the audio output level while OSD menu is off.
⑤ [—] button
Decrease the adjustment while OSD menu is on, or decrease the audio output level while OSD menu is off.
⑥ [▲] button
Move the highlight bar up to adjust the selected item while OSD menu is on.
⑦ [▼] button
Move the highlight bar down to adjust the selected item while OSD menu is on.
⑧ [MENU] button
Return to previous menu while OSD menu is on, or to activate the OSD menu when OSD menu is off.
2.2. Input/Output Terminals

① MAIN POWER SWITCH
Switch the main power on/off.
② AC IN
AC power input from the wall outlet.
③ PC LINE IN
Audio input from VGA source (3.5mm stereo phone).
④ HDMI IN
HDMI video / audio input.
⑤ DVI-D IN
DVI-D video input.
⑥ VGA IN (D-Sub)
VGA video input.
⑦ Y/CVBS
Video source input.
⑧ Security Lock
Used for security and theft prevention.
⑨ AUDIO IN
Audio input from external AV device (RCA).
⑩ AUDIO OUT
Audio output to external AV device.
⑪ IR OUT/⑫ IR IN
IR signal output /input for the loop-through function.
NOTES
- This display's remote control sensor will stop working if the jack [IR IN] is connected.
• To remotely control your A/V device via this display, refer to page 12 for IR Pass Through connection.
⑬ RJ-45
LAN control function for the use of remote control signal from control center:
⑭ RS232 OUT / ⑮ RS232 IN
RS232C network output / input for the loop-through function.
⑯ USB PORT
Connect your USB storage device.
2.3. Remote Control
2.3.1. General functions

① [⏻] POWER button
Turn the display on or put the display to standby.
② [PLAY] buttons
Control playback of media files.
③ [→] SOURCE button
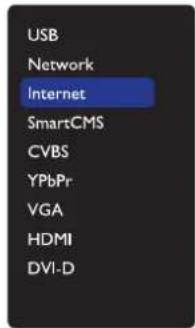
Choose input source. Press [1] or [7] button to choose from USB. Network. Internet, SmartCMS, CVBS, YPbPr, VGA, HDMI and DVI-D. Press [OK] button to confirm and exit.
④ [♠] HOME button
Access the OSD menu.
⑤ LIST button
No function.
⑥ [1] [1] [→] [→] NAVIGATION buttons
Navigate through menus and choose items.
⑦ [OK] button
Confirm an entry or selection.
⑧ [11] ADJUST button
Access currently available options, picture and sound menus.
⑨ [OK] MUTE button
Press to turn the mute function on/off.
⑩ [—] [—] [—] [—] COLOR buttons
Choose tasks or options.
⑪ [Number/ ID SET/ ENTER] button
Enter text for network setting. Press to set the display ID. Refer to 2.3.2. ID Remote Control for more detail.
⑫ [C] FORMAT button
Change picture format.
⑬ [←] BACK button
Return to the previous menu page or exit from the previous function.
⑭ [i] INFO button
Display information about current activity.
⑮ [☐] OPTIONS button
Access currently available options, picture and sound menus.
⑯ [—] [+] VOLUME button
Adjust volume.
2.3.2. ID Remote Control
You can set the remote control ID when you want to use this remote control on one of several different displays.

Press [ID] button. The red LED blinks twice.
- Press [ID SET] button for more than 1 second to enter the ID Mode. The red LED lights up. Press the [ID SET] button again will exit the ID Mode. The red LED lights off.
Press the digit numbers [0] \~ [9] to select the display you want to control.
For example: press [0] and [1] for display No.1, press [1] and [1] for display No.11.
The numbers available are from [01] \~ [255].
- Not pressing any button within 10 seconds will exit the ID Mode.
- If an error pressing of buttons other than the digits occurred, wait 1 second after the red LED lights off and then lights up again, then press the correct digits again.
- Press [ENTER] button to confirm. The red LED blinks twice and then lights off.
NOTE:
- Press [NORMAL] button. The green LED blinks twice, indicating the display is in normal operation.
- It is necessary to set up the ID number for each display before selecting its ID number.
2.3.3. Inserting the batteries in the remote control
The remote control is powered by two 1.5V AAA batteries.
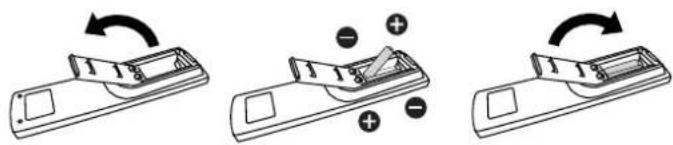
To install or replace batteries:
- Press and then slide the cover to open it.
- Align the batteries according to the (+) and (−) indications inside the battery compartment.
- Replace the cover:
natural_image
Three-step diagram showing a device with rotating buttons and positive charges, no text or symbols present.Caution:
The incorrect use of batteries can result in leaks or bursting. Be sure to follow these instructions:
- Place "AAA" batteries matching the (+) and (−) signs on each battery to the (+) and (−) signs of the battery compartment.
• Do not mix battery types. - Do not combine new batteries with used ones. It causes shorter life or leakage of batteries.
- Remove the dead batteries immediately to prevent them from liquid leaking in the battery compartment. Don't touch exposed battery acid, as it can damage your skin.
NOTE: If you do not intend to use the remote control for a long period, remove the batteries.
2.3.4. Handling the remote control
• Do not subject to strong shock.
- Do not allow water or other liquid to splash the remote control. If the remote control gets wet, wipe it dry immediately.
- Avoid exposure to heat and steam.
• Other than to install the batteries, do not open the remote control.
2.3.5. Operating range of the remote control
Point the front of the remote control toward this display's remote control sensor when pressing a button.
Use the remote control within a distance of less than 5m/16ft from this display's sensor, and a horizontal and vertical angle of less than 30 degrees.
NOTE: The remote control may not function properly when the remote control sensor on this display is under direct sunlight or strong illumination, or when there is an obstacle in the path of signal transmission.

3. Connecting External Equipment
3.1. Connecting External Equipment (DVD/VCR/VCD)
3.1.1. Using COMPONENT video input
![Audio Out COMPONENT OUT (YPbPr) DVD / VCR / VCD [AUDIO IN] [COMPONENT IN] (YPbPr) PC Line IN HDMI IN DVI IN VGA IN COMP NENT IN](/content/2026/05/1095226/images/9c63c921fe00afe776dd1060319d3fba7e074458015fdc370288701e4b62f322.jpg)
3.1.2. Using Video Source input
![Y/CVBS Out DVD / VCR / VCD [AUDIO IN] [Y/CVBS IN] PC Line IN HDMI IN DVI IN VGA IN COMPONENT IN](/content/2026/05/1095226/images/36fe85630f69ab80903f6b8eb61c33d90719c4ac8629d2f04ab7a4bee63ac330.jpg)
3.1.3. Using HDMI video input
![AC IN HDMI Out DVD / VCR / VCD [HDMI IN] PC Line IN HDMI IN DVI IN VGA IN COMPONENT IN](/content/2026/05/1095226/images/7b592e4622c26c541887d4e453a20b2a3d0b994edf2a8c03d8b991ff4dbd87c7.jpg)
3.2. Connecting a PC
3.2.1. Using VGA input
![VGA Out D-Sub 15 pin PC Audio Out [VGA IN] [VGA AUDIO IN] PC Link IN HDMI IN DVII IN VGA IN COMPONENT IN](/content/2026/05/1095226/images/a6f23c61340bc8ebd00c7a17835af895696e631042e18850771d030e45751ada.jpg)
3.2.2. Using DVI input
![DVI Out PC Audio Out [DVI IN] [VGA AUDIO IN] PC Link IN HDMI IN DV LIN VGA IN COMPONENT IN](/content/2026/05/1095226/images/bb7c87493fc557ad17f915f981b754fd1f303a46dce09b58d6ab4374c0ffa37a.jpg)
3.2.3. Using HDMI input
![AC IN HDMI Out [HDMI IN] PC Line IN HDMI IN DVI IN VGA IN COMPONENT IN PC](/content/2026/05/1095226/images/55598e9c0387f1f9c4749bb97323b3ee6442aecf6cb279de323ca8d649a89dee.jpg)
3.3. Connecting Audio Equipment
3.3.1. Connecting an external audio device

3.4. Connecting Multiple Displays in a Daisy-chain Configuration
You can interconnect multiple displays to create a daisy-chain configuration for applications such as a video wall.
3.4.1. Display control connection
Connect the [RS232C OUT] connector of DISPLAY 1 to the [RS232C IN] connector of DISPLAY 2.

flowchart
graph LR
    PC["PC"] -->|[RS-232C]| A["Switch"]
    A --> B["RS-232C IN"]
    B --> C["DISPLAY 1"]
    C --> D["DISPLAY 2"]
    D --> E["RS-232C OUT"]
    E --> F["RS-232C IN"]
3.5. IR Pass-through Connection

flowchart
graph TD
    A["Remote Control"] -->|IR OUT| B["DVD / VCR / VCD"]
    A -->|IR IN| C["+"]
3.6. Wire-connecting to Network
If you connect this display to a home network, you can play photos, music and videos from your computer. See Play multimedia files via Local Area Network (Page 14) for more detail.

flowchart
graph TD
    PC["PC"] -->|RJ-45| Router["Router"]
    Router -->|RJ-45| Internet["INTERNET"]
    Router -->|RJ-45| Tablet["Computer"]
To setup the network:
- Switch on the router and switch on its DHCP setting.
- Connect the router to this display with an Ethernet cable.
- Press [♠] HOME button on the remote control, then select Setup.
- Select Connect to network, then press [OK] button.
- Follow the on-screen instructions to install the network.
- Wait for this display to find the network connection.
- If you are prompted, agree to the "End User Licence Agreement".
NOTE: Connecting with a shielded CAT-5 Ethernet cable to comply with the EMC directive.
4. Operation
NOTE: The control button described in this section is mainly on the remote control unless specified otherwise.
4.1. Watch the Connected Video Source
See page 9 for external equipments connection.
-
Press [→] SOURCE button.
-
Press [1] or [7] button to choose a device, then press [OK] button.
4.2. Change Picture Format
You can change the picture format to suit the video source. Each video source has its available picture formats.
The available picture formats depend on the video source:
-
Press [FORMAT button.
-
Press [1] or [7] button to choose a picture format, then press [OK] button.
-
(Auto zoom): Enlarge the picture to fill the screen. Recommended for minimal screen distortion but not for HD or PC.
• {Movie expand 16:9}: Scale 4:3 format to 16:9. Not recommended for HD or PC. - {Wide screen}: Shows wide screen format content unstretched. Not recommended for HD or PC.
- {Unscaled}: Provide maximum detail for PC. Only available when PC mode is selected in the {Picture} menu.
• {4:3}: Display the classic 4:3 format.
4.3. Play multimedia files via Local Area Network
To play files via Local Area Network, you will need:
- A wired home network, connected with a Universal Plug and Play (uPnP) router.
- Optional: A LAN cable that connects your display to your home network.
• A media server running on your computer. - Appropriate settings on your computer firewall to allow you to run the media server.
4.3.1. Set up the network
- Connect your display and the computer to the same home network. See illustration below to connect your display to a network.
- Switch on your computer and the router.
• Single display setup:
![PC [RJ-45] RJ-45](/content/2026/05/1095226/images/fd0a6b7ce72f71cb1fba5b82b58d6f91cb8a0230ab983e41288cae5436ea2af7.jpg)
• Multiple display setup:

flowchart
graph LR
    PC["PC"] -->|RJ-45| Router1["Router"]
    Router1 -->|RJ-45| Switch1["Switch"]
    Switch1 -->|RJ-45| Display1["Display 1"]
    Switch1 -->|RJ-45| Display2["Display 2"]
NOTE: If the apparatus does not return to DLNA mode due to external electrical disturbances (e.g. electrostatic discharge), user intervention is required.
Set up media sharing
- Install a media server on your computer to share media files. These are some media servers:
• For PC: Windows Media Player 11 (or higher) or Tversity
• For Mac:Twonky - Switch on media sharing on your computer using the media server. For more information on how to set up the media server, refer to the website of the media server.
4.3.2. How to use DLNA-DMP
Ensure you have connected to the network.
You can press ⓘ button to display the connection of the network.
| HDMI 1 1080p60 | 26/09/2014 Friday 09:32:00 | |
| Picture format | Wide screen | |
| Picture style | Standard | |
| Sound style | Personal | |
| Smart power | Off | |
| Volume | 0 | |
| Monitor group | 1 | |
| Monitor ID | 1 | |
| Model name | BDL5535QL | |
| SWVersion | 1.51 | |
| Serial no | ||
| Temperature | 25°C | |
| Network configuration | DHCP & Auto IP | |
| IP address | 192.168.1.116 | |
| Netmask | 255.255.255.0 | |
| Gateway | 192.168.1.1 | |
| Network name | BDL5535QL | |
| Ethernet MAC address | FF:FF:FF:FF:FF:FF: | |
Play files from display
- Press [→] SOURCE button, choose Network and press [OK] button.
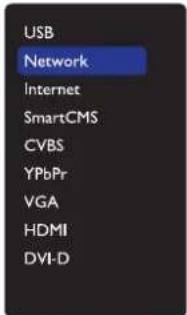
- Now, you can see all the PC's connected to the same router on the screen. Choose the right one.
- Press [1] and [→] to choose the directory and files to play.
- You can connect up to 4 displays to the same PC and play same media stream.
4.3.3. How to use DLNA-DMR from PC
- Press [♠] HOME button, choose Network and press [OK] button.
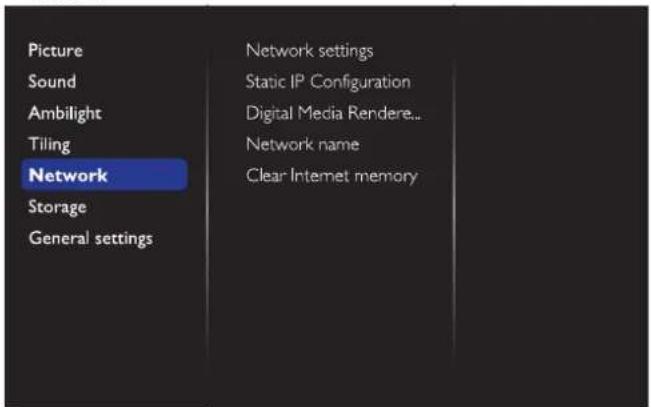
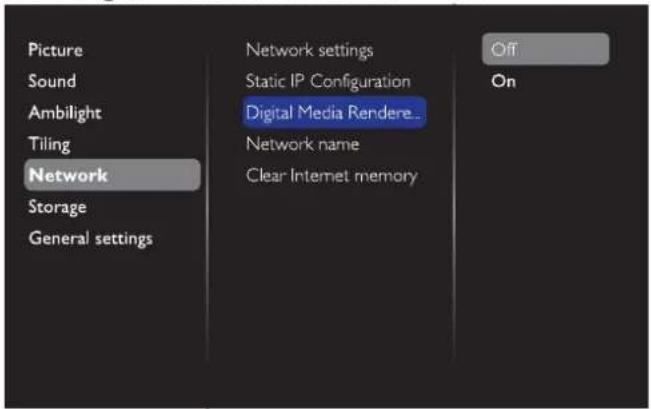
- Set Digital Media Renderer DMR as ON.
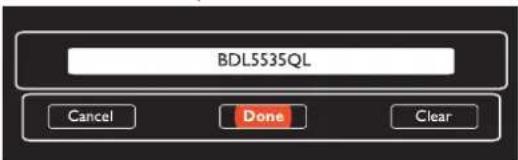
- Set the name of your display.

- Press [↑] HOME button to exit the OSD menu..
- On your PC, go to Network and Sharing Center, and click Choose homegroup and sharing options.
- Check the media formats. Then, click Choose media streaming options.....
-
Go to Advanced sharing settings, and check Turn on network discovery.
-
Now, go to the directory of your media files. Choose the media file by right click. On the submenu from Play To, You can find all displays connected to your network. Choose the display, and click the media file to play.
Play files
- Press [→] SOURCE button.
- Choose Network, and press [OK] button.
- Choose a file from the content browser, and press [OK] button to start playing.
- Press the [PLAY] buttons on the remote control to control playing.
Tips:
- Choose the top bar to filter your files by type.
- Choose Sort to arrange the files by album name, artist, or other fields.
- To clear the list of offline media servers, press [☐] OPTIONS button. Then, choose Clear offline servers and press [OK] button.
4.4. Play multimedia files from USB device
- Connect your USB device to the USB port on the display.

- Press [→] SOURCE button, choose USB, and press [OK] button.

- The connected USB device is detected automatically for all its playable files, which will be automatically sorted into 3 types:
Music, Movie, and Photo.
- Press [→] BACK button to go up to the top layer in the screen. Press [→] or [→] button to choose the file type. Press [OK] button to enter its play list.
- Choose the file you want. Press [OK] button to start playing.
- Follow the on-screen instruction to control the play option.
- Press [PLAY] buttons (■ II ◀◀ ▶ ▶▶) to control playing.
Note: When you are playing multimedia files from USB device and turn the display off, it will set input source to the last real input source, such
as CVBS, YPbPr, VGA, HDMI and DVI-D when you turn the display on next time
4.5. Play options
4.5.1. Playing music files
- Choose 🎶 Music in the top bar.

- Choose one music track, and press [OK] button.
• To play all the tracks in a folder, choose one music file. Then, press [—] to Play All.
• To skip to the next or previous track, press [1] or [7] button.
• To pause the track, press [OK] button. Press [OK] button again to resume playback.
- To skip backward or forward 10 seconds, press [←] or [→] button.
- To search backward or forward, press [◀◀] or [▶▶] button, press repeatedly to toggle between different speeds.
• To stop the music, press [■] button.
Music options
While you play music, press [☐] OPTIONS button, then press [OK] button to choose an option:
• {Shuffle}: Enable or disable random play of tracks.
- {Repeat}: Choose {Repeat} to play a track or an album repeatedly, or choose {Play once} to play a track once.
NOTE: To view information about a song (for example, title, artist or duration), choose the song, then press [i] INFO button. To hide the information, press [i] INFO button again.
4.5.2. Playing movie files
- Choose □ Movie in the top bar:

-
Choose a video, and press [OK] button.
-
To play all the videos in a folder, choose one video file. Then, press [—] to Play All.
• To pause the video, press [OK] button. Press [OK] button again to resume playback. - To skip backward or forward 10 seconds, press [→] or [→] button.
- To search backward or forward, press [◀◀] or [▶▶] button, press repeatedly to toggle between different speeds.
• To stop the video, press [■] button.
Movie options
While playing video, press [☐] OPTIONS button, then press [OK] button to choose an option:
• {Subtitles}: Choose the available subtitle settings.
• {Subtitle language}: Choose the language for subtitles if available.
• {Shuffle}: Enable or disable random play of video files.
- {Repeat}: Choose {Repeat} to play the video file repeatedly or {Play once} to play the video file once.
- {Status}: To view information about a video (for example, played position, duration, title, or date).
4.5.3. Playing photo files
- Choose 📄 Photo in the top bar.

- Choose a photo thumbnail, then press OKJ button.
Start a slideshow
If there are multiple photos in a folder, choose a photo. Then, press
[—] to Play All.
- To skip to the previous or next photo, press [→] or [→] button, and then press [OK] button.
• To stop the slideshow, press [■] button.
Slideshow options
While you play a slideshow, press [☐] OPTIONS button, then press [OK] button to choose an option:
• {Shuffle}: Enable or disable random display of pictures in the slideshow.
- {Repeat}: Choose {Repeat} to watch a slideshow repeatedly or {Play once} to watch once.
- {Slideshow Time}: Choose the displaying time for each photo in the slideshow.
- {Slideshow Transitions}: Choose the transition from one photo to the next.
4.6. How to use Opera browser (HTML5)
- Press Source button, and choose Internet and press [OK] button.
- Move the cursor to URL address bar. Press [OK] button and it will pop out the on-screen keyboard. You can move the cursor to enter the URL address. After finishing the URL address, choose Done
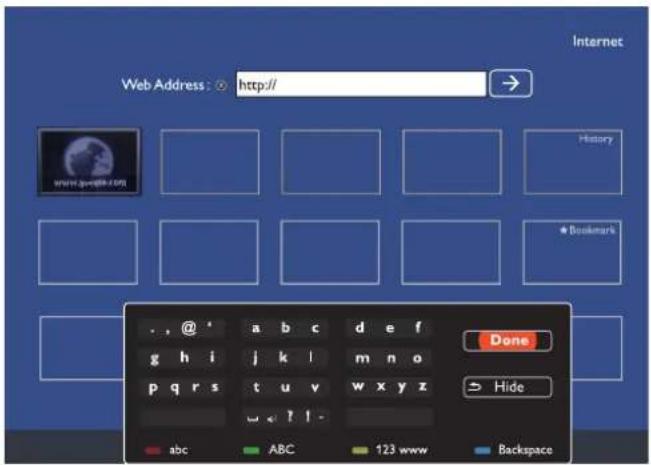
- Move the cursor to "→" icon and press [OK] button.

- Now, you can see the web page.

NOTES:
• The Opera browser does not support FLASH format.
- Before using the browser, please set up network first. Please refer to 5.1.5. Network to set your network settings..
5. Change your settings
Using the remote control:
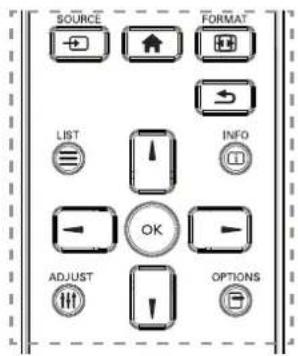
- Press [▲] HOME button to display the OSD menu.
- Press [A] [T] [→] or [→] button to choose its menu item or to adjust its value. Press [OK] button to confirm.
- Press [→] BACK button to go back to the previous menu layer.
- Press [↑] HOME button to exit the OSD menu.
Using the display's control buttons
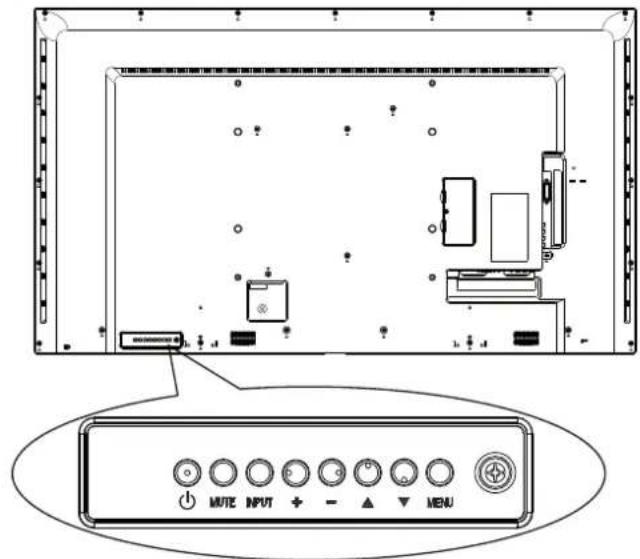
- Press [MENU] button to display the OSD menu.
- Press [▲] [▼] [+] or [−] button to choose menu item or adjust its value.
- Press [INPUT] button to confirm menu selection and enter its submenu.
- Press [MENU] button to exit the OSD menu.
5.1. Settings
Press [↑] HOME button.
5.1.1. Picture
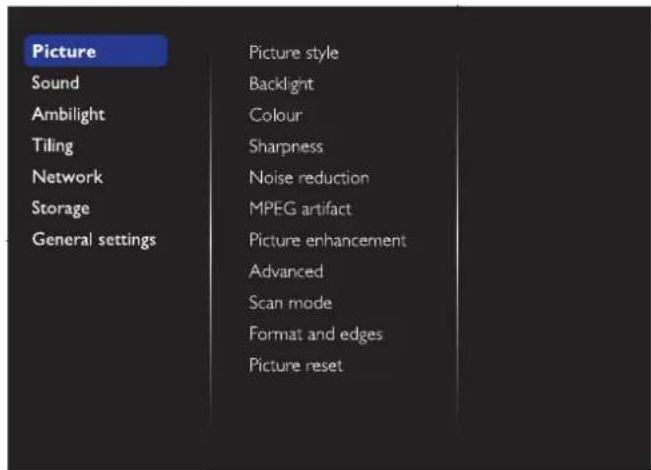
Picture style
Choose a predefined picture setting.
Backlight
Adjust the brightness of this display's backlight.
Colour
Adjust the colour saturation of the picture.
Sharpness
Adjust the sharpness of the picture.
Noise reduction
Choose the amount of noise reduction for the picture.
MPEG artifact
Smoothen transitions and haziness in the digital picture.
Picture enhancement
Fine-tune each pixel to match surrounding pixels and produce a brilliant, high-definition image.
- (Advanced sharpness): Enable superior sharpness, especially on lines and contours in the picture.
• {Dynamic contrast}: Dynamically enhance the details in the dark, medium and light areas of the picture. - (Colour enhancement): Dynamically enhance the vividness and details of colours.
Advanced
Access advanced settings such as gamma, tint, video contrast and so on.
• (Gamma): Adjust the non-linear setting for picture luminance and contrast.
• {Tint}: Change the colour balance.
- {Custom tint}: Customise colour balance setting. Only available if {Tint} → {Custom} is chosen.
• {Video contrast}: Adjust video contrast.
• {Brightness}: Adjust screen brightness.
• {Hue}: Adjust screen hue.
Scan mode
Change the display area of the image.
Format and edges
• (Picture format): Change the picture format.
See page 14 for the descriptions about Picture format.
Input resolution
Set the resolution of the VGA input. This is only required when the display is unable to detect the VGA input resolution correctly.
Auto adjust
Use this function to automatically optimize the display of VGA input image.
NOTE: This item is functional for VGA input only.
Picture reset
Reset all your picture settings to the factory defaults.
5.1.2. Sound

Sound style
Access predefined sound settings.
Bass
Adjust to increase or decrease lower-pitched sounds.
Treble
Adjust to increase or decrease higher-pitched sounds.
Balance
Adjust to emphasize left or right audio output balance.
Volume
Adjust to increase or decrease the volume.
Minimum volume
Set the Minimum volume.
Maximum volume
Set the Maximum volume.
Surround mode
Set surround effects for audio performance.
Audio Out (line out)
Adjust audio output volume.
Advanced
Access advanced settings to enhance your audio experience.
• {Auto volume leveling}: Enable the reduction of sudden volume changes.
• {Speaker settings}: Turn on or off the internal speakers.
• {Clear sound}: Enhance sound quality.
• {Audio out format}: Choose the type of audio output through the digital audio output connector: (HDMI only)
• {Audio out delay}: Automatically sync the image on this display to the audio from a connected home theatre.
- {Audio out offset}: Adjust the setting for audio output delay. Available if {Audio out delay} is switched on.
Sound reset
Reset to default setting.
5.1.3. Ambilight
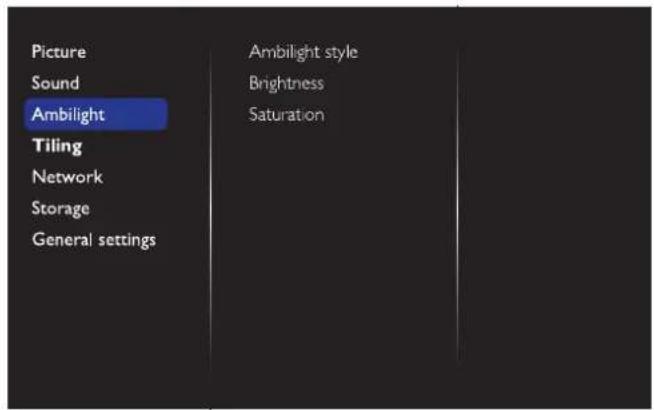
Ambilight style
Choose a predefined ambilight style.
Brightness
Adjust ambilight brightness.
Saturation
Adjust the color saturation of the ambilight.
NOTE: For thermal dissipation concern, please do not use this display in portrait mode with ambient light enabled.
5.1.4. Tiling

With this function you can create a single large-screen matrix (video wall) that consists of up to 225 sets of this display (up to 15-sets on the vertical and 15-sets on the horizontal sides).
Enable
Choose to {On} or {Off} the Tiling function. If {On}, the display will apply the settings in {H monitors}, {V monitors}, {Position}, and {Frame comp.}.
H monitors
Adjust displays on the horizontal side.
V monitors
Adjust displays on the vertical side.
Position
Adjust the position of this display in the screen matrix.
Example: 2 x 2 screen matrix (4 displays)
H monitors = 2 displays
V monitors = 2 displays

Example: 5 x 5 screen matrix (25 displays)
H monitors = 5 displays
V monitors = 5 displays

Frame comp.
Choose to turn the frame compensation function on or off. If selected {On}, the display will adjust the image to compensate for the width of the display bezels in order to accurately display the image.
{On}

{Off}

NOTE: You need to enter factory mode to set up the compensation width
Switch on delay
Adjust the power-on delaying time (in seconds) allows a sequential powering-on for each display by their ID number when multiple displays are connected.
5.1.5. Network
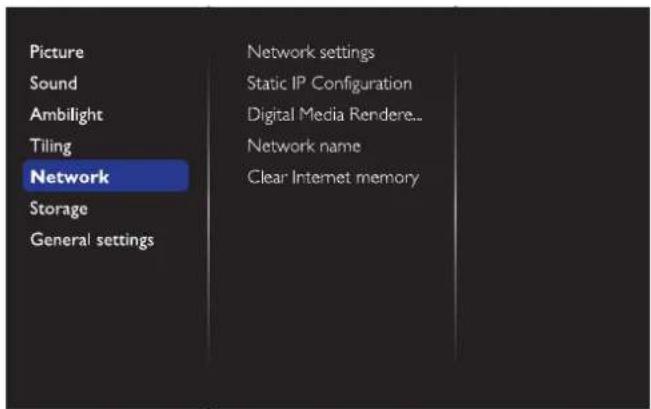
Network settings
(Network configuration): Choose how this display should assign addresses to the network resources.
The user can choose {DHCP & Auto IP} (suggested) or {Static IP}.
Static IP Configuration
{Static IP} is chosen. Define {IP address}, {Netmask}, {Gateway}, {DNS1}, and {DNS2} for this display. If {Network settings}
Digital Media Renderer - DMR
Receive multimedia files from the connected device by your network.
Network name
In the multiple-display connection, you can rename each display for easy identification.
Use the on-screen keyboard or the remote control keypad to enter the name.
Clear Internet memory
Clear all the cookies, bookmarks, history list and text used for auto fill.
Notes:
- Before using import function of USB copying for AutoPlay, create a new folder and name it "philips". Put all media files into the specific folder for AutoPlay.
5.1.6. Storage

SmartCMS
Select default storage location of contents for SmartCMS.
• {Internal}: Set internal storage as default.
• {External}: Set external storage as default.
USB AutoPlay
Select default storage location of contents for USB AutoPlay.
• {Internal}: Set internal storage as default.
• {External}: Set external storage as default.
USB copying
- USB copying is able to transfer media files between internal memory and USB flash device. In addition, it provides you an easy way to import the URL for internet.
- {Import}: Import media files and URL list from USB flash device to internal memory.
- {Export}: Export media files and URL list from internal memory to USB flash device.
USB cloning
Import/Export user settings.
• {Import}: Import user settings from USB flash device.
• {Export}: Back up user settings to USB flash device.
Clear Internet memory
Clear all the cookies, bookmarks, history list and text used for auto fill. Notes:
- Before using import function of USB copying for AutoPlay, create a new folder and name it "philips". Put all media files into the specific folder for AutoPlay.
- Before using import function of USB copying for URL, create a new text document and name it "url_schedulinglist.txt". When entering a URL, the format must follow the format below: "Scheduling Number; URL address."
- For example, Set URL of schedule 1 and schedule 2 to www.google.com and tw.yahoo.com, respectively. 1, www.google.com 2, tw.yahoo.com
5.1.7. General settings

Menu language
Choose language used for OSD menus.
Monitor group
Adjust the group range between 1 to 255. The default setting is 255.
Monitor ID
Adjust the ID number for controlling the display via the RS232C connection. Each display must have a unique ID number when multiple sets of this display are connected. Monitor ID number range is between 1 to 255. The default setting is 1.
Auto search
Choose to let this display detect and display available signal sources automatically.
Clock
Set the current date and time for the display's internal clock.
Scheduling
This function allows you to program up to 7 different scheduled time intervals for this display to activate.
You can set:
- Which input source the display will use for each scheduled activation period.
• The time for the display to turn on and turn off.
• The days in a week for the display to activate.
NOTES:
• We recommend you to set up current date and time in the {Clock} menu before using this function.
• After changing the {Clock} option in the {General settings} menu, you need to set this {Scheduling} again.
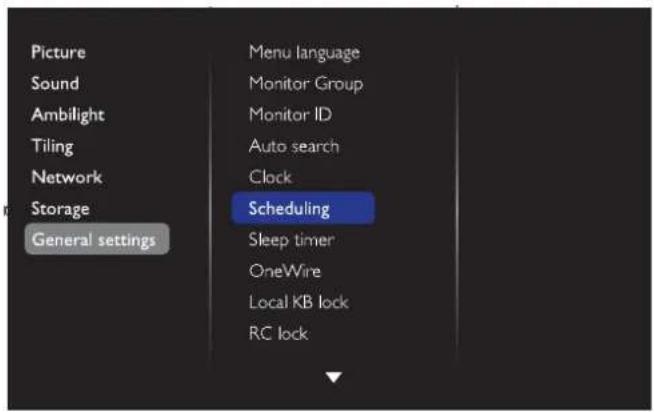
- There are 7 schedule can be set. Go to Status and choose On.
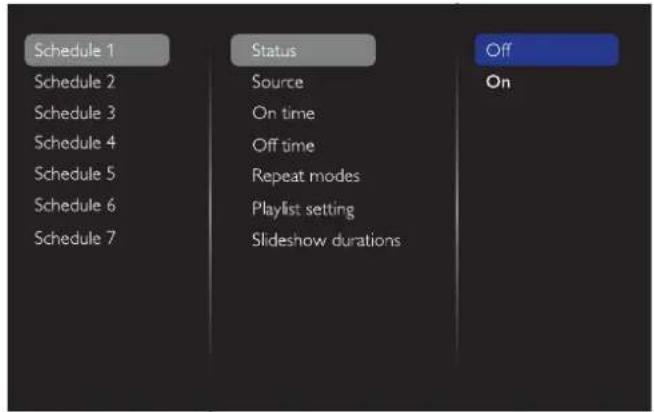
- Go to Source and choose input source.
If {Source} → {USB playlist} is chosen. You need to set playlist.
If {Source} → {Internet} is chosen. You need to set URL address.
If {Source} → {USB AutoPlay} is chosen. You need to create a folder named "philips" in the USB and put all media files into the specific folder for auto play.

- Set On time.

- Set Off time.
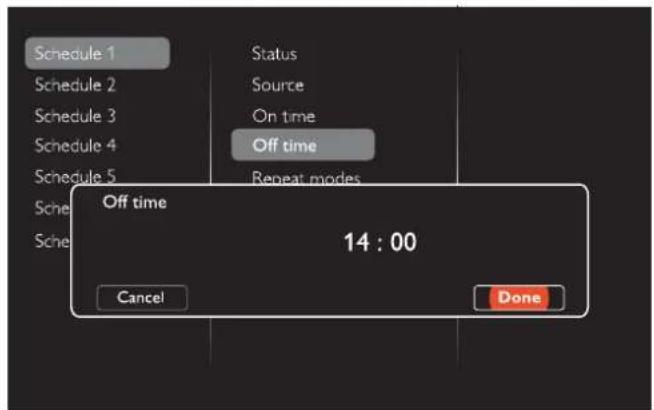
- Go to Repeat modes and choose.
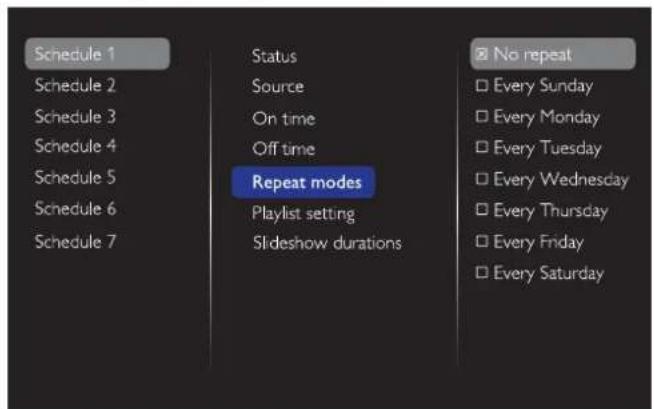
- If {Source} → {USB} is chosen. Go to Playlist setting.

- Press [1] [7] buttons to choose files.
- Press [◀] [▶] buttons to switch Playlist and File Manager.
- Press [OK] button to set or clear the playlist.
- To save the playlist, press [—] and choose Save list.
![Movie.avi Sort Media Type Recursive Parser Save list Options Imedialphoto 0004/0004 [-] Photo](/content/2026/05/1095226/images/c4095f6476ec38485c098f3299712e0331b3a7af861d99ac504144491d3f09ea.jpg)
NOTES:
• Each Playlist supports up to 30 files.
- Playlist will not be cleared after {Factory settings}. You have to manually remove the files or delete usb_schedulinglist.txt in the USB.
Sleep timer
Switch off this display after a specified time.
OneWire
Connect and control your HDMI-CEC compliant devices through HDMI port to this display with the same remote control.
Local KB lock
Choose to enable or disable the keyboard (control buttons) function of the display.
• {Unlock}: Enable the keyboard function.
• {Lock all}: Lock all keyboard function,
- {Lock but volume}: Disable all the keyboard function except the [—] and [+] button.
- {Lock but power}: Disable all the keyboard function except the [⏻] button.
- {Lock all expect volume and power}: Disable all the keyboard function except the [—], [+] and [⏻] button:
RC lock
Choose to enable or disable the button function of the remote control.
• {Unlock}: Enable the keyboard function.
• {Lock all}: Lock all keyboard function.
- {Lock but volume}: Disable all the keyboard function except the [—] and [+] button.
- {Lock but power}: Disable all the keyboard function except the [⏻] POWER button.
- {Lock all expect volume and power}: Disable all the keyboard function except the [—] [+] and [○] POWER button:
NOTES:
• To disable the lock function from Local KB lock or RC lock item, press buttons [♠] and 1 9 9 8 on the remote control
- Before using USB AutoPlay, create a new folder and name it "philips". Put all media files into the specific folder for AutoPlay.
Pixel shift
For video input sources, you may choose {On} to move the screen image automatically to protect the display from "burn-in" or "after-image" symptoms 30 seconds after not operating the display.
Smart power
Choose a backlight level to optimise dynamic power consumption and picture contrast.
The options are: {Off}, {Standard}, {Medium}, {High}.
Wake on Ian
Choose {On} and you can turn on the display by network.
Switch on state
Choose the display status used for the next time you connect the power cord.
- {On} - The display will turn on when the power cord is connected to a wall outlet.
- {Standby} - The display will remain Standby when the power cord is connected to a wall outlet.
- {Last status} - The display will return to the previous power status (on/off/standby) when removing and replacing the power cord.
Power LED Light
Choose {Off} to turn off the indicator.
Logo
Choose {Off} and the display will not display the PHILIPS logo when you switch on.
Advanced power management
Choose {On}. Then, when no signal, the display will automatically turn off.
Source notification
When you press [↓] POWER button to turn on the display from standby mode or change the input signal, the information OSD is displayed on the upper left corner of the screen.
Choose {Off} to turn off this function.
Factory settings
Reset all your customized settings to the factory defaults.
5.1.8. Web control
- Ensure you have connected to the network. You can press INFO button to display the connection of the network.

- From the computer connected to the PD, first open your Web browser; Then enter the PD's address for network administration in the web address field and hit enter to reach the home page of Web Control.
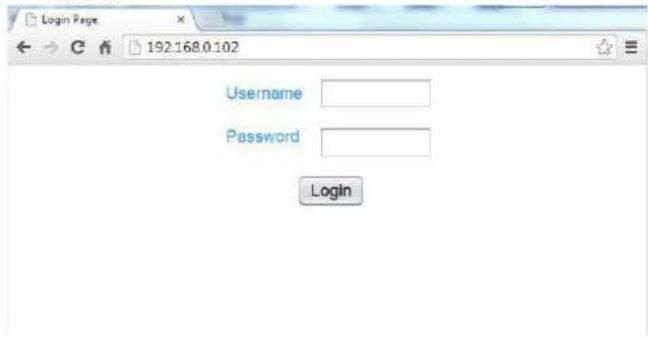
Note: Default Username is admin with Password 1234.
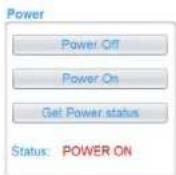
- The default Main Page of Web Control is Power Page. It provides you an easy way to turn the display on or put the display to standby.

PHILIPS
• Power
- Video
- Audio
• Color
- Tiling
- Date and Time
- Schedule
- Security
- Advanced Settings
• Network Settings
• System Information
Vw.0.103
This site best viewed with Microsoft Internet Explorer @ 1920 x 1080 screen size.
Power Off: Put the display to standby.
Power On: Turn the display on.
Get Power status: Click this button to get the display status.
Note: Power On function only supported after setting Eco mode to Normal.
- Click on video to switch to Video Page. It provides you an easy way to adjust video settings.

PHILIPS
Power
- Video
- Audio
• Color
- Tiling
- Date and Time
- Schedule
- Security
- Advanced Settings
• Network Settings
- System Information

Var.0,163
This site best viewed with Microsoft Internet Explorer © 1520 x 1080 screen size.
Brightness: Adjust the overall image brightness by changing the intensity of the LCD panel's backlight, 0(minimum) to 100(maximum).
Video contrast: Adjust to sharpen the picture quality. The black portions of the picture become richer in darkness and the white become brighter. 0(minimum) to 100(maximum).
Color: Adjust to increase or decrease the intensity of colors in the image. 0(minimum) to 100(maximum).
Sharpness: Adjust to improve image detail. 0(minimum) to 100(maximum).
Hue: Adjust screen hue. -50(minimum) to 50(maximum).
Backlight: Adjust the brightness of the display's backlight. 0(minimum) to 100(maximum).
Gamma: Adjust the non-linear setting for picture luminance and contrast. 1(minimum) to 4(maximum).
Noise Reduction: Adjust to remove the noise in the image. You can select a suitable noise reduction level. Choose from: Off/Low/Medium/High
Picture Format: Change the display area of the image. You can select a suitable format. Choose from: Auto zoom/Movies expand 16:9/Wide screen/Unsealed/4:3
Video Source: Choose input source. Choose from USB/Network/Internet/SmartCMS/CVBS/YPbPr/VGA/HDMI/DVI-D
Auto Adjust: Use the auto adjust function to automatically to optimize the display of the image position.
- Click Audio to switch to Audio Page. It provides you an easy way to adjust audio settings.

PHILIPS
- Power
- Video
• Audio
• Color - Tiling
- Date and Time
- Schedule
- Security
• Advanced Settings
• Network Settings
• System Information

Var.0,183
This site best viewed with Microsoft Internet Explorer © 1920 x 1980 screen size.
Volume: Adjust to increase or decrease the volume. 0(minimum) to 60 (maximum).
Treble: Adjust to increase or decrease higher-pitched sounds.
-8(minimum) to 8(maximum).
Bass: Adjust to increase or decrease lower-pitched sounds. -8(minimum) to 8(maximum).
- Click on Color to switch to Color Page. It provides you an easy way to adjust color settings.

PHILIPS
• Power
- Video
• Audio
• Color
- Tiling
- Date and Time
- Schedule
- Security
- Advanced Settings
• Network Settings
- System Information

Mar.8.123
This site best viewed with Microsoft Internet Explorer @ 1920 x 1000 across sizes.
Tint: Change the color balance. Choose from Cool/Normal/Warm/Custom
Custom tint: With this function you can adjust the color tones of the image precisely by changing the R(Red), G(Green) and B(Blue) settings, respectively.
Note: Custom tint only available when Tint is set to Custom.
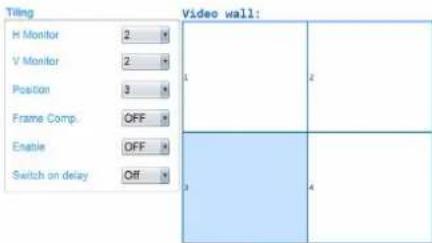
- Click on Tiling to switch to Tiling Page. With this function you can create a single large-screen matrix (video wall) that consists of up to 225 sets of this display (up to 15-sets on the vertical and 15-sets on the horizontal sides).

PHILIPS
• Power
• Video
- Audio
• Color
- Tiling
- Date and Time
- Schedule
- Security
- Advanced Settings
• Network Settings
- System Information
Ver 2183
This site best signed with Microsoft Internet Explorer @ 1920 a 1000 screen size.
H Monitor: Adjust displays on the horizontal side.
V Monitor: Adjust displays on the vertical side.
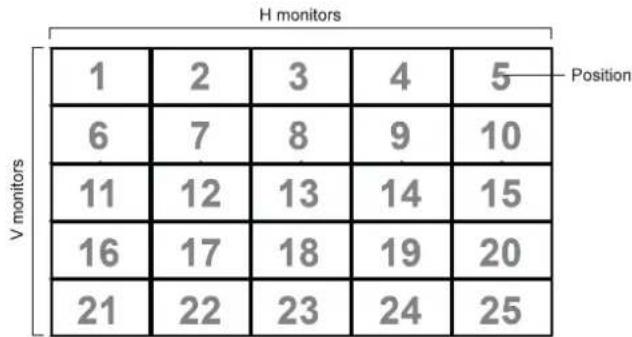
Position: Adjust the position of this display in the screen matrix.
Frame Comp.: Choose to turn the frame compensation function on or off.
Enable: Choose to {On} or {Off} the Tiling function.
Switch on delay: Adjust the power-on delaying time allows a sequential powering-on for each display
Note:
Example: 2 x 2 screen matrix (4 displays)
H monitors = 2 displays
V monitors = 2 displays

Example: 5 x 5 screen matrix (25 displays)
H monitors = 5 displays
V monitors = 5 displays
heatmap
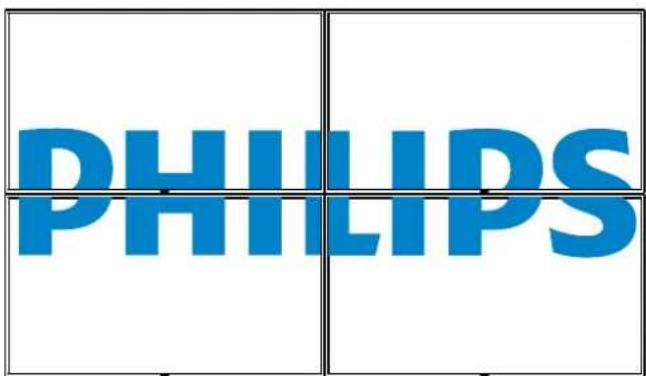
H monitors | Position | V monitors | H monitor | | :--- | :--- | :--- | | 1 | 6 | 1 | | 1 | 11 | 2 | | 1 | 16 | 3 | | 1 | 21 | 4 | | 2 | 6 | 5 | | 2 | 11 | 6 | | 2 | 16 | 7 | | 2 | 21 | 8 | | 3 | 6 | 9 | | 3 | 11 | 10 | | 3 | 16 | 11 | | 3 | 21 | 12 | | 4 | 6 | 13 | | 4 | 11 | 14 | | 4 | 16 | 15 | | 4 | 21 | 16 | | 5 | 6 | 19 | | 5 | 11 | 20 | | 5 | 16 | 21 | | 5 | 21 | 22 | | Position: Values range from 5 to 25.Frame comp. {On}

Frame comp. {Off}
- Click on Date and Time to switch to Date and Time Page. It provides you an easy way to set date and time for the display's internal clock.

PHILIPS
Power
• Video
• Audio
• Color
- Tiling
- Date and Time
- Schedule
- Security
- Advanced Settings
• Network Settings
- System Information
Date and Time
| Year | 2015 |
| Month | 3 |
| Day | 6 |
| Hour | 9 |
| Minute | 54 |
Ves 581
This site best viewed with Microsoft Internet Explorer @ 1929 x 1000 screen skin.
- Click on Schedule to switch to Schedule Page. The function allows you to program up to 7 different scheduled time intervals for this display to activate.

PHILIPS
• Power
- Video
- Audio
• Color
- Tiling
- Date and Time
- Schedule
- Security
- Advanced Settings
• Network Settings
- System Information
Schedule

Note: See scheduling on Page 21 for the detail descriptions about Scheduling setting.
- Click Security to switch to Security Page. It provides you an easy way to change your username and password.
Enter your new Username and Password into the Username and Password fields and then click on the Set button to set your new username and password.

PHILIPS
• Power
• Video
• Audio
• Color
- Tiling
- Date and Time
- Schedule
- Security
- Advanced Settings
• Network Settings
- System Information

Vev.8.103
This site best viewed with Microsoft Internet Explorer @ 1925 a 1060 screen size.
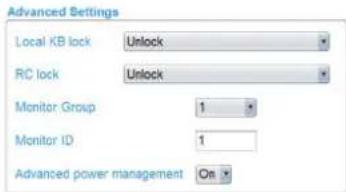
- Click on Advanced Setting to switch to Advanced Settings Page.

PHILIPS
Power
- Video
• Audio
• Color
- Tiling
- Date and Time
- Schedule
- Security
- Advanced Settings
• Network Settings
- System Information
Var.8.103
This site best viewed with Microsoft Internet Explorer @ 1520 x 1060 screen size.
Local KB lock: Choose to enable or disable the keyboard (control buttons) function of the display
RC lock: Choose to enable or disable the button function of the remote control.
Monitor Group: Adjust the group range between 1 to 255. The default setting is 1
Monitor ID: Adjust the ID number for controlling the display via the RS232C connection. Each display must have a ID number when multiple sets of this display are connected. Monitor ID number range is between 1 to 255. The Default setting is 1.
- Click on Network Setting to switch to Network Setting Page.

PHILIPS
• Power
• Video
• Audio
• Color
- Tiling
- Date and Time
- Schedule
- Security
- Advanced Settings
• Network Settings
• System Information
Network Settings
| Host Name | BDL3230QL | |||
| DHCP | On | |||
| IP address | 192 | 168 | 0 | 102 |
| Subset mask | 255 | 255 | 255 | 0 |
| Default gateway | 192 | 168 | 0 | 1 |
| Set | ||||
Vec:8103
This site best viewed with Microsoft Internet Explorer @ 1920 x 1000 screen size.
Host Name: In the multiple-display connection, you can rename each display for easy identification.
DHCP: Choose how this display should assign address to the network resource. (On: DHCP & Auto IP, Off: Static IP). If DHCP is set to On, device will request and be assigned an address every time it's booted up. Otherwise, you need to ask your network administrator for the appropriate IP settings.
- Click on System information to switch to System information Page. Getting the display information. Such as Serial number, running time and Temperature via the RS232/Network.

PHILIPS
• Power
- Video
- Audio
• Color
- Tiling
- Date and Time
- Schedule
- Security
- Advanced Settings
• Network Settings
- System Information
System information
| Serial no: | |
| Run Time Hours: | 212 Hours |
| Temperature °C: | 34 |
V=8.903
This site best viewed with Microsoft Internet Explorer @ 1920 a 1000 screen size.
Note:
- Some browser issues may be caused by the browser itself. For optimal viewing and security we recommend that you keep your browser up to date.
- We recommend that you use IE for optimal performance with Web Control.
6. USB device compatibility
USB Video Subtitle Formats (for language subtitles, etc.)
| File Extensions | Container | Video codec | Maximum resolution | Max.Frame Rate (fps) | Max.Bit Rate (Mbps) | Audio codec |
| .mpgmpeg.vob | PS | MPEG-1 | 1920x1080 | 25p,30p,50i,60i | 30 | MPEG-1(L1&L2),MPEG-1,2,2.5 L3,AAC/HE-AAC(v1&v2),DVD-PCM,AC3 |
| MPEG-2 | 1920x1080 | 25p,30p,50i,60i | 30 | |||
| MPEG-4 ASP | 1920x1080 | 25p,30p,50i,60i | 30 | |||
| H.264 | 1920x1080 | 25p,30p,50p,60p,60i | 30 | |||
| .ts | TS | MPEG-2 | 1920x1080 | 25p,30p,50i,60i | 30 | MPEG-1(L1&L2),MPEG-1,2,2.5 L3,AAC/HE-AAC (v1&v2),AC3,E-AC3,Dolby Pulse |
| MPEG-4 ASP | 1920x1080 | 25p,30p,50i,60i | 30 | |||
| H.264 | 1920x1080 | 25p,30p,50p,60p,60i | 30 | |||
| MVC | 1920x1080@field rate=50, 60Hz1920x1080p@frame rate=24, 25,30Hz1280x720p@frame rate=50, 60Hz | - | 30 | |||
| .ts.m2ts.mts.mt2 | MaTSTTS | MPEG-2 | 1920x1080 | 25p,30p,50i,60i | 30 | MPEG-1(L1&L2),MPEG-1,2,2.5 L3,AAC/HE-AAC (v1&v2),AC3,E-AC3,Dolby Pulse |
| MPEG-4 ASP | 1920x10B0 | 25p,30p,50i,60i | 30 | |||
| H.264 | 1920x1080 | 25p,30p,50p,60p,60i | 30 | |||
| MVC | 1920x1080 @ field rate=50, 60Hz1920x1080p @ frame rate=24, 25,30Hz1280x720p @ frame rate=50, 60Hz | - | 30 | |||
| .ts.m2ts.mts | AVCHD | MPEG-2 | 1920x1080 | 25p,30p,50i,60i | 30 | MPEG-1(L1&L2),MPEG-1,2,2.5 L3,AAC/HE-AAC (v1&v2),AC3,E-AC3,Dolby Pulse |
| MPEG-4 ASP | 1920x108O | 25p,30p,50i,60i | 30 | |||
| H.264 | 1920x1080 | 25p,30p,50p,60p,60i | 30 | |||
| .ts.m2ts.mts | AVCHD | MVC | 1920x1080@field rate=50, 60Hz1920x1080p@frame rate=24, 25,30Hz1280x720p @ frame rate=50, 60Hz | - | 30 | MPEG-1(L1&L2),MPEG-1,2,2.5 L3,AAC/HE-AAC (v1&v2),AC3,E-AC3,Dolby Pulse |
| .m4v | M4V | H.264 | 1920x1080 | 25p,30p,50p,60p,60i | 30 | AAC |
| .ism/Manifest.mpd | frag MP4 | H.264 | 1920x1080 | 25p,30p,50p,60p,60i | 30 | AAC/HE-AAC(v1&v2),AC3,E-AC3,WMA,WMA-PRO |
| MVC | 1920x1080@field rate=50, 60Hz1920x1080p@frame rate=24, 25,30Hz1280x720p @ frame rate=50, 60Hz | - | 30 | |||
| .mp4 | MP4 | MPEG-4 ASP | 1920x1080 | 25p,30p,50i,60i | 30 | AAC/HE-AAC(v1&v2),AC3,E-AC3,WMA,WMA-PRO |
| H.264 | 1920x1080 | 30 | ||||
| MVC | 1920x1080@field rate=50, 60Hz1920x1080p@frame rate=24, 25,30Hz1280x720p @ frame rate=50, 60Hz | - | 30 | |||
| WMV9/VC1 | 1920x1080 | 30p,60i | 30 | |||
| .mkv.mk3d | MKV | MPEG-4 ASP | 1920x1080 | 25p,30p,50i,60i | 30 | MPEG-1(L1&L2),MPEG-1,2,2.5 L3,AAC/HE-AAC (v1&v2),AC3,E-AC3,WMA,WMA-PRO |
| H.264 | 1920x1080 | 30 |
USB Multimedia Formats
| File Extensions | Container | Video codec | Maximum resolution | Frequency (kHz) | Max.Bit Rate (Mbps) | Audio codec |
| .mp3 | MP3 | - | - | 48 | 384 | MPEG-1,2,2.5 L3 |
| .wma.asf | WMA(V2 up to V9.2) | - | - | 48 | 192 | WMA |
| .wma | WMA Pro | - | - | 96 | 768 | WMA,WMA Pro |
| .wav(PC) | LPCM | - | - | 192 | 768 | LPCM |
| .aif(mac).aiff(mac) | LPCM | - | - | 192 | 768 | LPCM |
| .aac.mp4.m4a | AAC | - | - | 48 | 1024 | AAC,HE-AAC(v1&v2) |
| .pls.m3u | Playlists | - | - | - | - | - |
| .m4a | M4A | - | - | 48 | 1024 | AAC,HE-AAC(v1&v2) |
USB Photo Formats
| File Extensions | Container | Video codec | Maximum Resolution | Frequency | Max.Bit Rate | Audio codec |
| jpg/jpeg | JPEG | baseline: color mode = 444, size <=32768x16128 color mode = 422v, size <= 16384x16128 color mode = other, not support | - | - | - | |
| bmp | BMP | 4096x3072_4bit, 2730x2500_8bit, 2048x1536_16bit, 1500x1200_32bit | - | - | - | |
| png | PNG | 4096x3072_4bit, 2730x2500_8bit, 2048x1536_16bit, 1500x1200_32bit | - | - | - | |
| gif | GIF | 4096x3072_4bit, 2730x2500_8bit, 2048x1536_16bit, 1500x1200_32bit | - | - | - |
NOTES:
• Sound or video may not work if the contents have a standard bit rate/frame rate above the compatible Frame/sec listed in the table above.
• Video content with a Bit rate or Frame rate larger than the rate specified in the table above can cause choppy video during playback.
7. Input Mode
VGA Resolution:
| Standard Resolution | Active Resolution | Refresh Rate | Pixel Rate | Aspect Ratio | Stand for Mode | |
| H Pixels | V Lines | |||||
| VGA | 640 | 480 | 60 Hz | 25.175 MHz | 4:3 | Video Graphic Array |
| 72 Hz | 31.5 MHz | |||||
| 75 Hz | 31.5 MHz | |||||
| WVGA | 720 | 400 | 70 Hz | 33.75 MHz | 16:9 | Wide Video Graphic Array |
| SVGA | 800 | 600 | 60 Hz | 40 MHz | 4:3 | Super VGA |
| 75 Hz | 49.5 MHz | |||||
| XGA | 1024 | 768 | 60 Hz | 65 MHz | 4:3 | Extended Graphic Array |
| 75 Hz | 78.75 MHz | |||||
| WXGA | 1280 | 768 | 60 Hz | 79.5 MHz | 5:3 | Wide XGA |
| WXGA | 1280 | 800 | 60 Hz | 79.5 MHz | 16:10 | Wide XGA |
| SXGA | 1280 | 960 | 60 Hz | 108 MHz | 4:3 | Super XGA |
| SXGA | 1280 | 1024 | 60 Hz | 108 MHz | 5:4 | Super XGA |
| WXGA | 1360 | 768 | 60 Hz | 85.5 MHz | 16:9 | Wide XGA |
| WXGA | 1366 | 768 | 60 Hz | 85.5 MHz | 16:9 | Wide XGA |
| UXGA | 1600 | 1200 | 60 Hz | 162 MHz | 4:3 | Ultra XGA |
| HD1080 | 1920 | 1080 | 60 Hz | 148.5 MHz | 16:9 | HD1080 |
SDTV Resolution:
| Standard Resolution | Active Resolution | Refresh Rate | Pixel Rate | Aspect Ratio | Stand for Mode | |
| H Pixels | V Lines | |||||
| 480i | 720 | 480 | 29.97 Hz | 13.5 MHz | 4:3 | Modified NTSC Standard |
| 480p | 59.94 Hz | 27 MHz | ||||
| 576i | 720 | 576 | 25 Hz | 13.5 MHz | 4:3 | Modified PAL Standard |
| 576p | 50 Hz | 27 MHz | ||||
HDTV Resolution:
| Standard Resolution | Active Resolution | Refresh Rate | Pixel Rate | Aspect Ratio | Stand for Mode | |
| H Pixels | V Lines | |||||
| 720p | 1280 | 720 | 50 Hz | 74.25 MHz | 16:9 | Normally DVB Mode |
| 60 Hz | ||||||
| 1080i | 1920 | 1080 | 25 Hz | 74.25 MHz | 16:9 | Normally ATSC Mode |
| 30 Hz | ||||||
| 1080p | 1920 | 1080 | 50 Hz | 148.5 MHz | 16:9 | Normally ATSC Mode |
| 60 Hz | ||||||
• The PC text quality is optimum in HD 1080 mode (1920 × 1080, 60Hz).
- Your PC display screen might appear different depending on the manufacturer (and your particular version of Windows).
- Check your PC instruction book for information about connecting your PC to a display.
- If a vertical and horizontal frequency-select mode exists, select 60Hz (vertical) and 31.5KHz (horizontal). In some cases, abnormal signals (such as stripes) might appear on the screen when the PC power is turned off (or if the PC is disconnected). If so, press the [INPUT] button to enter the video mode. Also, make sure that the PC is connected.
- When horizontal synchronous signals seem irregular in RGB mode, check PC power saving mode or cable connections.
• The display settings table complies to the IBM/VESA standards, and based on the analog input.
• The DVI support mode is regarded as same to the PC support mode.
• The best timing for the vertical frequency to each mode is 60Hz.
8. Pixel Defect Policy
We strive to deliver the highest quality products and use some of the industry's most advanced manufacturing processes whilst practicing stringent quality control. However, pixel or sub-pixel defects on the PDP / TFT panels used in Plasma- & LCD- displays are sometimes unavoidable. No manufacturer can guarantee that all panels will be free from pixel defects, but philips guarantees that any Plasma- & LCD- displays with an unacceptable number of defects will be repaired during the warranty period in line with your local guarantee conditions.
This notice explains the different types of pixel defects and defines the acceptable defect level for the LCD screen. In order to qualify for repair under warranty, the number of pixel defects must exceed a certain level as shown in the reference table. If the LCD screen is within specification a warranty exchange / claim back will be refused. Additionally, because some types or combinations of pixel defects are more noticeable than others, philips sets even higher quality standards for those.
8.1. Pixels and Sub-Pixels
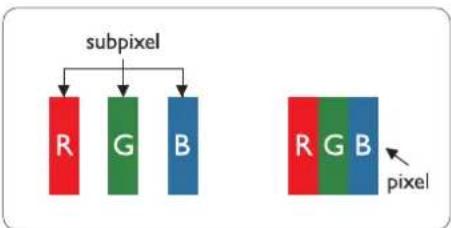
flowchart
graph TD
    A["subpixel"] --> B["R"]
    A --> C["G"]
    A --> D["B"]
    E["pixel"] --> F["R"]
    E --> G["G"]
    E --> H["B"]
A pixel, or picture element, is composed of three sub-pixels in the primary colors of red, green and blue. Many pixels together form an image. When all sub-pixels of a pixel are lit, the three colored sub-pixels together appear as a single white pixel. When all are dark, the three colored sub-pixels together appear as a single black pixel. Other combinations of lit and dark sub-pixels appear as single pixels of other colors.
8.2. Types of Pixel Defects + Dot Definition
Pixel and sub-pixel defects appear on the screen in different ways. There are three categories of pixel defects and several types of sub-pixel defects within each category.
Dot definition = What is a defective "Dot"? :
One or more defective, adjacent sub-pixel are defined as one "dot". The no. of defective sub-pixels are not relevant to define a defective dot. This means that a defective dot can consist of one, two or three defective sub-pixels which can be dark or lit.
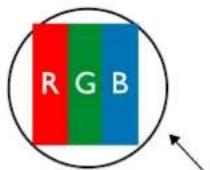
One dot = One Pixel; consists of three sub-pixels of Red, Green, and Blue.
8.3. Bright Dot Defects
Bright dot defects appear as pixels or sub-pixels that are always lit or "on". These are the examples of bright dot defects:
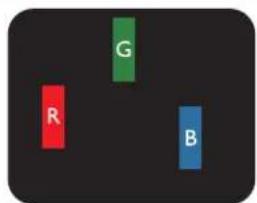
One lit red, green or blue sub pixel

Two adjacent lit sub pixels:
$$ \text { Red } + \text { Blue } = \text { Purple } $$
$$ \text { Red } + \text { Green } = \text { Yellow } $$
$$ \text { Green } + \text { Blue } = \text { Cyan (Light Blue) } $$

natural_image
Solid black rectangle with a vertical white bar labeled 'W' in the center (no additional text or symbols)Three adjacent lit sub pixels (one white pixel)
8.4. Dark Dot Defects
Black dot defects appear as pixels or sub-pixels that are always dark or "off". These are the examples of black dot defects:
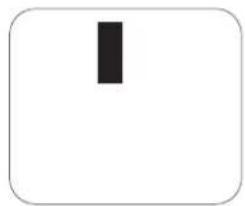
natural_image
Simple black vertical rectangle on white background, no text or symbols presentOne dark dot

natural_image
Simple black square centered within a white rounded rectangle (no text or symbols)Two adjacent dark dots = 1 pair of dark dots

flowchart
graph TD
    A[" "] --> B[" "]
Two dark dots, specifications defines the minimum distance between dark dots
8.5. Proximity of Pixel Defects
Because pixel and sub-pixels defects of the same type that are nearby one another may be more noticeable, philips also specifies tolerances for the proximity of pixel defects. In the table below you can find specifications about:
- Allowed amount of adjacent dark dots = (adjacent dark dots = 1 pair of dark dots)
• Minimum distance between dark dots
• Total no. of all defective dots
8.6. Pixel Defect Tolerances
In order to qualify for repair due to pixel defects during the warranty period, a PDP / TFT panel in a philips Plasma / LCD- display must have pixel or subpixel defects exceeding the tolerances listed in the following table.
| BRIGHT DOT EFFECT | ACCEPTABLE LEVEL |
| 1 lit sub pixel | 2 |
| BLACK DOT EFFECT | ACCEPTABLE LEVEL |
| 1 dark sub pixel | 10 |
| TOTAL DOT DEFECTS OF ALL TYPES | 12 |
NOTE: * 1 or 2 adjacent sub pixel defects = 1 dot defect
8.7. MURA
Dark spots or patches may occasionally appear on some liquid crystal display (LCD) panels. This is known within the industry as Mura, which is a Japanese term for "unevenness." It is used to describe an irregular pattern or area in which uneven screen uniformity appears under certain conditions. Mura is a result of the deterioration of the liquid crystal alignment layer and is most commonly caused by long-term operation under high ambient temperatures. It is an industry-wide phenomenon and Mura is not repairable. It is also not covered by our warranty terms.
Mura has been around since the introduction of LCD technology and with screens getting bigger and in operation 24/7, many displays are running in low light conditions. This all adds to the possibility of Mura affecting displays.
HOW TO SPOT MURA
There are many symptoms of Mura and also multiple causes. Several of these are listed below:
• Impurities or foreign particles in the crystal matrix
• Uneven distribution of LCD matrix during manufacturing
• Non-uniform luminance distribution of the backlight
• Panel assembly induced stress
• Flaws within the LCD cells
• Thermal induced stress - high temperature operation over long periods of time
HOW TO AVOID MURA
Although we can not guarantee the complete eradication of Mura every time, in general the appearance of Mura can be minimized by these methods:
• Lower the backlight brightness
• Use a screen saver
- Reduce the ambient temperature around the unit
9. Cleaning and Troubleshooting
9.1. Cleaning
Caution When Using the Display
- Do not bring your hands, face or objects close to the ventilation holes of the display. The top of the display is usually very hot due to the high temperature of exhaust air being released through the ventilation holes. Burns or personal injuries may occur if any body parts are brought too close. Placing any object near the top of the display could also result in heat related damage to the object as well as the display itself.
- Be sure to disconnect all cables before moving the display. Moving the display with its cables attached may damage the cables and thus cause fire or electric shock.
- Disconnect the power plug from the wall outlet as a safety precaution before carrying out any type of cleaning or maintenance procedure.
Front Panel Cleaning Instructions
• The front of the display has been specially treated. Wipe the surface gently using only a cleaning cloth or a soft, lint-free cloth.
- If the surface becomes dirty, soak a soft, lint-free cloth in a mild detergent solution. Wring the cloth to remove excess liquid. Wipe the surface of the display to remove dirt. Then use a dry cloth of the same type to dry.
- Do not scratch or hit the surface of the panel with fingers or hard objects of any kind.
- Do not use volatile substances such as insert sprays, solvents and thinners.
Cabinet Cleaning Instructions
• If the cabinet becomes dirty, wipe the cabinet with a soft, dry cloth.
- If the cabinet is extremely dirty, soak a lint-free cloth in a mild detergent solution. Wring the cloth to remove as much moisture as possible. Wipe the cabinet. Use another dry cloth to wipe over until the surface is dry.
- Do not allow any water or detergent to come into contact with the surface of the display. If water or moisture gets inside the unit, operating problems, electrical and shock hazards may result.
• Do not scratch or hit the cabinet with fingers or hard objects of any kind.
• Do not use volatile substances such as insert sprays, solvents and thinners on the cabinet.
- Do not place anything made from rubber or PVC near the cabinet for any extended periods of time.
9.2. Troubleshooting
| Symptom | Possible Cause | Remedy |
| No picture is displayed | 1. The power cord is disconnected.2. The main power switch on the back of the display is not switched on.3. The selected input has no connection.4. The display is in standby mode. | 1. Plug in the power cord.2. Make sure the power switch is switched on.3. Connect a signal connection to the display. |
| Interference displayed on the display or audible noise is heard | Caused by surrounding electrical appliances or fluorescent lights. | Move the display to another location to see is the interference is reduced. |
| Color is abnormal | The signal cable is not connected properly. | Make sure that the signal cable is attached firmly to the back of the display. |
| Picture is distorted with abnormal patterns | 1. The signal cable is not connected properly.2. The input signal is beyond the capabilities of the display. | 1. Make sure that the signal cable is attached firmly.2. Check the video signal source to see if it is beyond the range of the display. Please verify its specifications with this display's specification section. |
| Display image doesn't fill up the full size of the screen | 1. The zoom mode is not set correctly.2. Scan Mode may be set incorrectly to underscan.3. If the image exceeds the screen size, Scan Mode may need to be set to Underscan. | Use the Zoom mode or Custom zoom function in the Screen menu to fine tune display geometry and time frequency parameter. |
| Can hear sound, but no picture | Improperly connected source signal cable. | Make sure that both video inputs and sound inputs are correctly connected. |
| Can see picture but no sound is heard | 1. Improperly connected source signal cable.2. Volume is turned all the way down.3. (Mute) is turned on.4. No external speaker connected. | 1. Make sure that both video inputs and sound inputs are correctly connected.2. Press [+] or [-] button to hear sound.3. Switch MUTE off by using the [×] button.4. Connect external speakers and adjust the volume to a suitable level. |
| Some picture elements do not light up | Some pixels of the display may not turn on. | This display is manufactured using an extremely high level of precision technology: however, sometimes some pixels of the display may not display. This is not a malfunction. |
| After-Images can still be seen on the display after the display is powered off. (Examples of still pictures include logos, video games, computer images, and images displayed in 4:3 normal mode) | A still picture is displayed for an over extended period of time | Do not allow a still image to be displayed for an extended period of time as this can cause a permanent after-image to remain on the display. |
10. Technical Specifications
Display:
| Item | Specifications |
| Screen Size (Active Area) | 1209.6(H) × 680.4(V) |
| Aspect Ratio | 16:9 |
| Number of pixels | 1920 (H) × 1080 (V) |
| Pixel pitch | 0.63(H) × 0.63(V) |
| Displayable colors | 16.7M |
| Brightness (typical) | 350 cd/m2 |
| Contrast ratio (typical) | 1200:1 |
| Viewing angle | 178 degrees |
In/Out Terminals:
| Item | Specifications | |
| Speaker Output | Internal Speakers | 10W (L) + 10W (R) [RMS]/16Ω1 Way 1 Speaker System82 dB/W/M/160 Hz ~ 13 KHz |
| Audio Output | RCA Jack x 2 | 0.5V [rms] (Normal) / 2 Channel (L+R) |
| Audio Input | RCA Jack x 23.5mm phone jack x 1 | 0.5V [rms] (Normal) / 2 Channel (L+R) |
| RS232C | 2.5mm Phone jack x 2 | RS232C in/RS232C out |
| RJ-45 | RJ-45 Jack x 1 (8 pin) | 10/100 LAN Port |
| HDMI Input | HDMI Jack x 1(Type A) (19 pin) | Digital RGB:TMDS (Video + Audio)MAX: Video - 720p, 1080p, 1920 x 1080/60 Hz (WUXGA)Audio - 48 KHz/ 2 Channel (L+R)Supports LPCM only |
| DVI-D Input | DVI-D jack | Digital RGB:TMDS (Video) |
| VGA Input | D-Sub Jack x 1 (15 pin) | Analog RGB: 0.7V [p-p] (75Ω), H/CS/V:TTL (2.2kΩ), SOG: 1V [p-p] (75Ω)MAX: 720p, 1080p, 1920 x 1080/60 Hz (WUXGA) |
| Component Input | RCA Jack x 3 | Y: 1V [p-p] (75Ω), Pb: 0.7V [p-p] (75Ω), Pr: 0.7V [p-p] (75Ω)MAX: 480i, 576i, 480p, 576p, 720p, 1080i, 1080p |
| Video Input | RCA x 1 (Share with Component_Y) | Composite 1V [p-p] (75Ω) |
General:
| Item | Specifications |
| Internal memory | 4GB eMMC |
| Power Supply | AC 100 - 240V, 50 - 60Hz |
| Power Consumption (Max) | 179 W |
| Power Consumption (typ.) | 141 W |
| Power Consumption (Standby & Off) | <0.5 W (RS232 in active) |
| Dimensions (With Stand) [W x H x D] | 1238.6(W)x751.7(H)x329.6(D) |
| Dimensions (Without Stand) [W x H x D] | 1238.6(W)x711.1(H)x59.9(Rear Cover)/61.7(Wall Mount) |
| Weight (With Stand) | 17.87 Kg |
| Weight (Without Stand) | 16.0 Kg |
| Gross Weight (Without Stand) | 23.0 Kg |
Environmental Condition:
| Item | Specifications | |
| Temperature | Operational | 0 ~ 40°C |
| Storage | -20 ~ 60°C | |
| Humidity | Operational | 20 ~ 80% RH (No condensation) |
| Storage | 5 ~ 95% RH (No condensation) | |
| Altitude | Operational | 0 ~ 3,000 m |
| Storage / Shipment | 0 ~ 9,000 m | |
Internal Speaker:
| Item | Specifications |
| Type | 1 Way 1 Speaker |
| Input | 10 W (RMS) |
| Impedance | 16Ω |
| Output Sound Pressure | 82 dB/W/M |
| Frequency Response | 160 Hz ~ 13 KHz |

2015 © Koninklijke Philips N.V. All rights reserved.
Philips and the Philips Shield Emblem are registered trademarks of Koninklijke Philips N.V. and are used under license from Koninklijke Philips N.V.
Specifications are subject to change without notice.

- Safety Instructions
- Warnings and Precautions
- Read and follow these instructions when connecting and using your Public Information Display:
- Important Safety Instructions
- IMPORTANT INFORMATION
- Regulatory Information
- CE Declaration of Conformity
- Warning:
- Federal Communications Commission (FCC) Notice (U.S. Only)
- Polish Center for Testing and Certification Notice
- Wymagania Polskiego Centrum Badań i Certyfikacji
- Pozostałe instrukcje bezpieczeństwa
- Electric, Magnetic and Electronmagnetic Fields ("EMF")
- Information for U.K. only WARNING – THIS APPLIANCE MUST BE EARTHED.
- Important:
- How to connect a plug
- China RoHS
- 环保使用期限
- 《废弃电子产品回收处理管理条例》提示性说明
- 警告
- North Europe (Nordic Countries) Information
- ADVARSEL:
- VAROITUS:
- End-of-Life Disposal
- (For customers in Canada and U.S.A.)
- Waste Electrical and Electronie Equipment-WEEE
- End of Life Directives-Recycling
- Restriction on Hazardous Substances statement (India)
- E-Waste Declaration for India
- Batteries
- Turkey RoHS:
- Ukraine RoHS:
- Table Of Contents
- Unpacking and Installation....1
- Parts and Functions....4
- Connecting External Equipment....9
- Operation....14
- Change your settings....18
- USB device compatibility....28
- Input Mode....30
- Pixel Defect Policy....31
- Cleaning and Troubleshooting....33
- Technical Specifications 35
- Unpacking and Installation
- Unpacking
- Package Contents
- NOTES:
- Installation Notes
- Mounting on a Wall
- VESA Grid
- Caution:
- Ventilation Requirements for enclosure locating
- Using of Remote sensor and power indicator
- Parts and Functions
- Control Panel
- Input/Output Terminals
- NOTES
- Remote Control
- ID Remote Control
- NOTE:
- Inserting the batteries in the remote control
- Handling the remote control
- Operating range of the remote control
- Connecting External Equipment
- Connecting External Equipment (DVD/VCR/VCD)
- Using COMPONENT video input
- Using Video Source input
- Using HDMI video input
- Connecting a PC
- Using VGA input
- Using DVI input
- Using HDMI input
- Connecting Audio Equipment
- Connecting an external audio device
- Connecting Multiple Displays in a Daisy-chain Configuration
- Display control connection
- IR Pass-through Connection
- Wire-connecting to Network
- To setup the network:
- Operation
- Watch the Connected Video Source
- Change Picture Format
- Play multimedia files via Local Area Network
- Set up the network
- Set up media sharing
- How to use DLNA-DMP
- Play files from display
- How to use DLNA-DMR from PC
- Play files
- Play multimedia files from USB device
- Play options
- Playing music files
- Music options
- Playing movie files
- Movie options
- Playing photo files
- Start a slideshow
- Slideshow options
- How to use Opera browser (HTML5)
- Change your settings
- Settings
- Picture
- Picture style
- Backlight
- Colour
- Sharpness
- Noise reduction
- MPEG artifact
- Picture enhancement
- Advanced
- Scan mode
- Format and edges
- Input resolution
- Auto adjust
- Picture reset
- Sound style
- Bass
- Treble
- Balance
- Volume
- Minimum volume
- Maximum volume
- Surround mode
- Audio Out (line out)
- Sound reset
- Ambilight style
- Brightness
- Saturation
- Enable
- H monitors
- V monitors
- Position
- Frame comp.
- Switch on delay
- Network
- Network settings
- Static IP Configuration
- Digital Media Renderer - DMR
- Network name
- Clear Internet memory
- Storage
- SmartCMS
- USB AutoPlay
- USB copying
- USB cloning
- General settings
- Menu language
- Monitor group
- Monitor ID
- Auto search
- Clock
- Scheduling
- Sleep timer
- OneWire
- Local KB lock
- RC lock
- Pixel shift
- Smart power
- Wake on Ian
- Switch on state
- Power LED Light
- Logo
- Advanced power management
- Source notification
- Factory settings
- Web control
- PHILIPS
- USB device compatibility
- Input Mode
- Pixel Defect Policy
- Pixels and Sub-Pixels
- Types of Pixel Defects + Dot Definition
- Dot definition = What is a defective "Dot"? :
- Bright Dot Defects
- Dark Dot Defects
- Proximity of Pixel Defects
- Pixel Defect Tolerances
- MURA
- HOW TO SPOT MURA
- HOW TO AVOID MURA
- Cleaning and Troubleshooting
- Cleaning
- Caution When Using the Display
- Front Panel Cleaning Instructions
- Cabinet Cleaning Instructions
- Technical Specifications
Kaubamärk : PHILIPS
Mudel : Q-Line BDL5535QL
Kategooria : Teler