FL-OSP-600 - Kategooriata Osprey - Tasuta kasutusjuhend
Leidke seadme juhend tasuta FL-OSP-600 Osprey PDF-formaadis.

Kasutajate küsimused teemal FL-OSP-600 Osprey
0 küsimus selle seadme kohta. Vastake nendele, mida teate, või esitage oma.
Esita uus küsimus selle seadme kohta
Laadige alla juhend oma Kategooriata PDF-formaadis tasuta! Leidke oma juhend FL-OSP-600 - Osprey ja võtke oma elektrooniline seade uuesti kätte. Sellel lehel on avaldatud kõik teie seadme kasutamiseks vajalikud dokumendid. FL-OSP-600 kaubamärgi Osprey.
KASUTUSJUHEND FL-OSP-600 Osprey
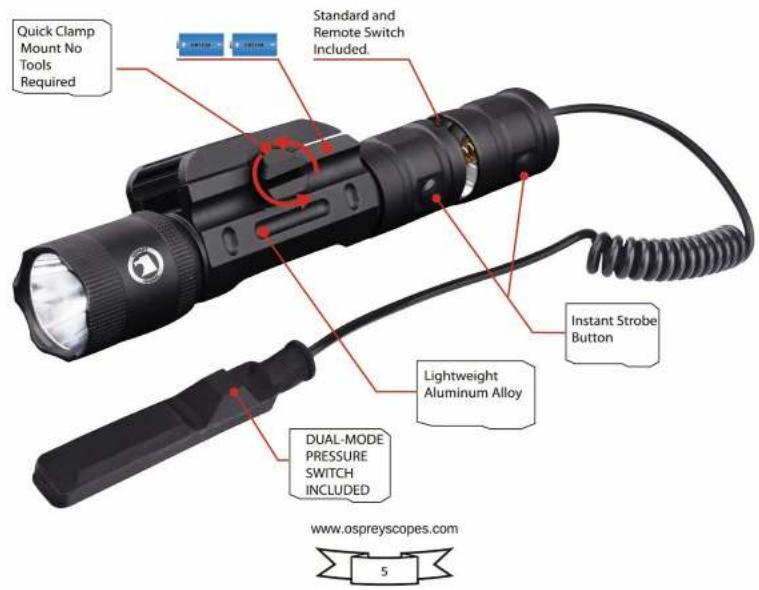
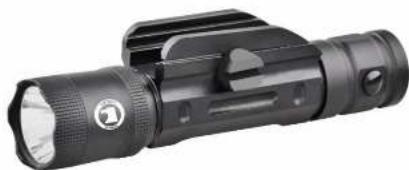
Rifle Tactical Light Manual
Please read this user manual carefully before using the Rifle tactical flashlight

www.ospreyscopes.com

Production Specifications:
• Model No.: FL-OSP-600
• Size: 1.02 * 1.50 * 5.63 inch
• Unit Weight: 5.43 OZ including battery
● Light: 1 * CREE XML U2 LED (10 wattage)
● Power: 2 * CR123A non-rechargeable battery
• Brightness: 600 lumens
• Light Distance: 300 meters
• Modes: high, medium, low, strobe
Run Time: 40 minutes for high mode
80 minutes for medium mode
3.5 hours for low mode
Production Features:
- Aircraft aluminum alloy with black anodized finish
- Securely fits on most long guns without need for tools
- IPX 4 rated design, dust and water resistant (not to be submerged)
www.ospreyscopes.com

Battery Installation
Always remove unit from firearm to change batteries or to perform any maintenance.
1) To open light battery compartment, unscrew the end cap / pressure switch end cap or the head of the light, either end can access battery compartment.
2) Remove old batteries and dispose of properly. Insert new batteries making sure that the negative end(-) is facing the spring. Light uses 2 cr123a batteries.
3) Reattach end cap / pressure switch end cap or head by turning clockwise.
Mounting Instructions
Caution: make sure that the firearm has the safety on and is unloaded to avoid misfiring.
1) Turn slotted thumb lever screw (counter-clockwise) to widen adjustable rail mount
2) Press down on both thumb levers to depress spring tension locking plate.
3) Slide onto rail until securely locked, turn slotted thumb lever screw clockwise, Make sure mount is secure and test your gun flashlight for functionality.
www.ospreyscopes.com

Operating Switch
A standard end cap is provided for normal flashlight use. The end cap feature 2 buttons to control the light modes.
1) Push rear button to control on / off.
2) Rear button memorizes previous mode when turned on.
3) When rear button is on for continuous use, also push the side button for 3 different light settings.
4) Push side button with option to strobe when rear button is off
5) Remote pressure switch has same functionality.
natural_image
Black handheld flashlight with light bulb and handle (no visible text or symbols)www.ospreyscopes.com