AXAMP-TY3 - Kategooriata AXESS - Tasuta kasutusjuhend
Leidke seadme juhend tasuta AXAMP-TY3 AXESS PDF-formaadis.

Kasutajate küsimused teemal AXAMP-TY3 AXESS
0 küsimus selle seadme kohta. Vastake nendele, mida teate, või esitage oma.
Esita uus küsimus selle seadme kohta
Laadige alla juhend oma Kategooriata PDF-formaadis tasuta! Leidke oma juhend AXAMP-TY3 - AXESS ja võtke oma elektrooniline seade uuesti kätte. Sellel lehel on avaldatud kõik teie seadme kasutamiseks vajalikud dokumendid. AXAMP-TY3 kaubamärgi AXESS.
KASUTUSJUHEND AXAMP-TY3 AXESS
natural_image
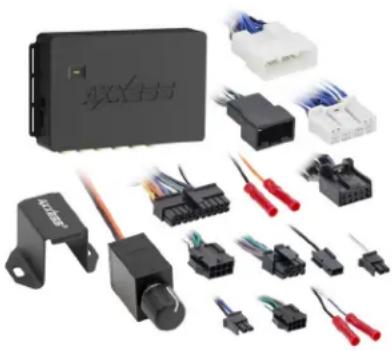
Collection of various electronic components and connectors, including a black rectangular device and multiple black/red terminal blocks (no visible text or symbols)INTERFACE COMPONENTS
- AXAMP-TY3 Amplifier Integration interface
- AXAMP-TY3 interface harness
- AXAMP-TY3 vehicle T-harness
- Bass knob
APPLICATIONS
Visit AxxessInterfaces.com for current application list
Amplifier Integration Interface
Fits Toyota 2016-2023
INTERFACE FEATURES
- Designed for amplified and non-amplified models
- Provides 6 channels of 5-volt RMS audio
• Non-fading full range output (Channels 5 & 6) - Includes plug-n-play harnessing
- Simple behind the radio installation
- No programming required
- Dual-colored LED
- Input: 50 Watts per channel
- Amp turn-on trigger (DC) 250mA
- 2 channel S/PDIF out (Front)
For Dash Disassembly Instructions, refer to metraonline.com. Enter the year, make, and model of the vehicle in the Vehicle Fit Guide for Radio Install kits.
www.MetraOnline.com

TABLE OF CONTENTS
Installation & Installation Options....2
Adding Amp/Amps to a Factory System
Non-amplified....3
Amplified 4
Troubleshooting....6
TOOLS & INSTALLATION ACCESSORIES REQUIRED
- Crimping tool and connectors, or solder gun, solder, and heat shrink
- Tape
- Wire cutter
- Zip-ties
- Multimeter
Visit AxxessInterfaces.com for more detailed information about the product and up-to-date vehicle specific applications.
ATTENTION: With the key out of the ignition, disconnect the negative battery terminal before installing this product. Ensure that all installation connections, especially the air bag indicator lights, are plugged in before reconnecting the battery or cycling the ignition to test this product.
NOTE: Refer also to the instructions included with the aftermarket accessory before installing this device.
INSTALLATION OPTIONS INSTALLATION
Adding a full-range amp and subwoofer to a factory system:
This feature offers the ability to add a full-range amp and sub to a factory system, whether amplified* or non-amplified. (Refer to Page 3)
* For amplified models the amp must be bypassed/unplugged. Refer to metraonline.com for vehicle specific amplifier bypass harness.
Note: The interface provides a 12-volt 1-amp output to turn on aftermarket amp(s). If installing multiple amps, an SPDT automotive relay will be required if the amp turn-on current of all amps combined exceeds 1-amp. Use Metra part number E-123 (sold separately) for best results.
- Disassemble the dash, unplug all connectors, and then remove the factory radio.*
- Install the AXAMP-TY3 vehicle T-harness to the vehicle and make all necessary connections, but leave the amp turn-on wire disconnected.
- Plug the AXAMP-TY3 vehicle T-harness to the AXAMP-TY3 interface.
- Plug the AXAMP-TY3 interface harness to the AXAMP-TY3 interface.
- Connect the amp turn-on wire.
- Adjust your aftermarket amplifier to a desired listening level.
- The Bassknob is used to adjust the output of channels 5 & 6 of the AXAMP. Adjustment is as follows:
Counterclockwise turn lowers the volume of channels 5 & 6. Clockwise turn raises the volume of channels 5 & 6.
* For dash disassembly instructions, refer to metraonline.com. Enter the year, make, and model of the vehicle in the Vehicle Fit Guide and find instructions under Metra Radio Install kits.
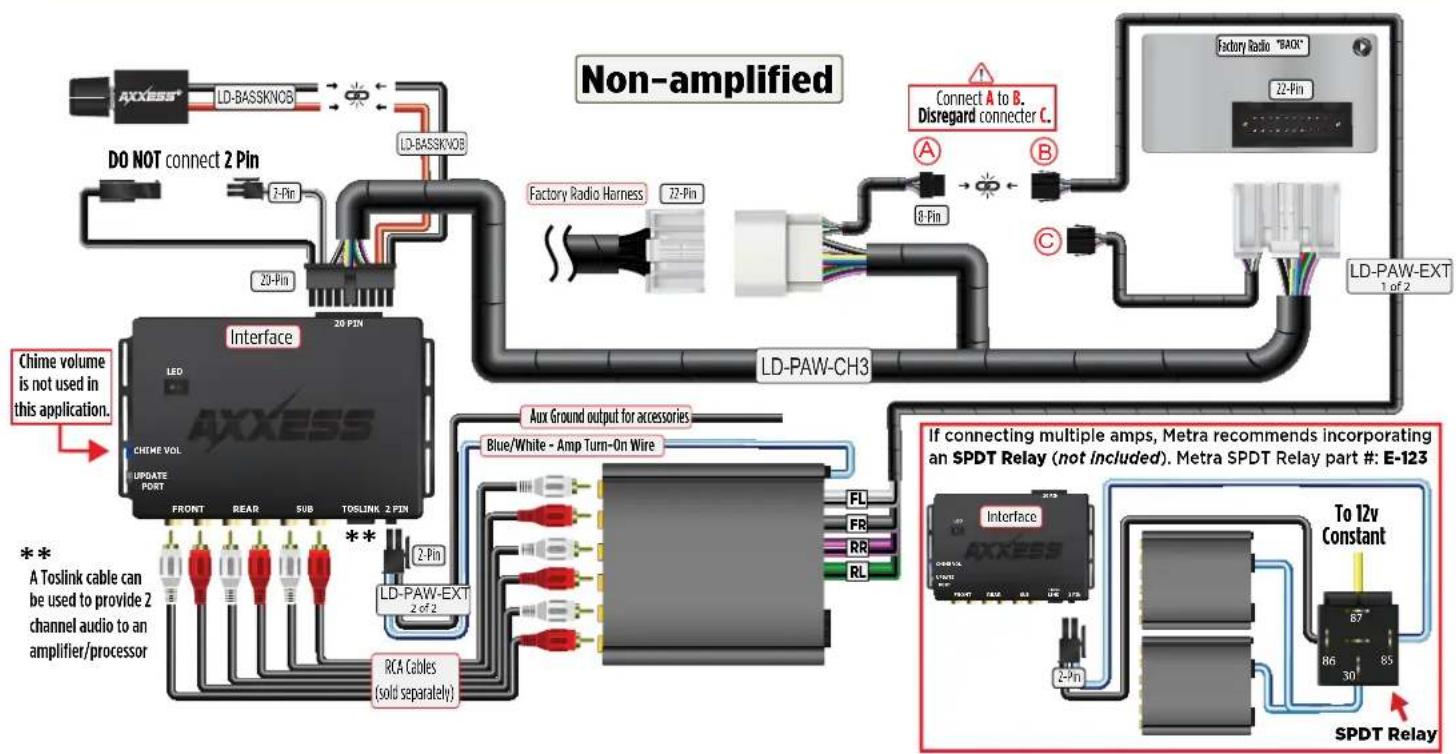
ADDING AMPLIFIER/AMPLIFIERS TO A FACTORY SYSTEM
flowchart
graph TD
    A["AXXESS"] -->|LD-BASSKVOB| B["Interface"]
    B -->|20 PIN| C["Chime volume is not used in this application."]
    B -->|2 Pin| D["Factory Radio Harness"]
    B -->|29 Pin| E["Factory Radio Harness"]
    B -->|2 Pin| F["Factory Radio Harness"]
    B -->|2 Pin| G["Factory Radio Harness"]
    B -->|2 Pin| H["Factory Radio Harness"]
    B -->|2 Pin| I["Factory Radio Harness"]
    B -->|2 Pin| J["Factory Radio Harness"]
    B -->|2 Pin| K["Factory Radio Harness"]
    B -->|2 Pin| L["Factory Radio Harness"]
    B -->|2 Pin| M["Factory Radio Harness"]
    B -->|2 Pin| N["Factory Radio Harness"]
    B -->|2 Pin| O["Factory Radio Harness"]
    B -->|2 Pin| P["Factory Radio Harness"]
    B -->|2 Pin| Q["Factory Radio Harness"]
    B -->|2 Pin| R["Factory Radio Harness"]
    B -->|2 Pin| S["Factory Radio Harness"]
    B -->|2 Pin| T["Factory Radio Harness"]
    B -->|2 Pin| U["Factory Radio Harness"]
    B -->|2 Pin| V["Factory Radio Harness"]
    B -->|2 Pin| W["Factory Radio Harness"]
    B -->|2 Pin| X["Factory Radio Harness"]
    B -->|2 Pin| Y["Factory Radio Harness"]
    B -->|2 Pin| Z["Factory Radio Harness"]
    B -->|2 Pin| AA["Factory Radio Harness"]
    B -->|2 Pin| AB["Factory Radio Harness"]
    B -->|2 Pin| AC["Factory Radio Harness"]
    B -->|2 Pin| AD["Factory Radio Harness"]
    B -->|2 Pin| AE["Factory Radio Harness"]
    B -->|2 Pin| AF["Factory Radio Harness"]
    B -->|2 Pin| AG["Factory Radio Harness"]
    B -->|2 Pin| AH["Factory Radio Harness"]
    B -->|2 Pin| AI["Factory Radio Harness"]
    B -->|2 Pin| AJ["Factory Radio Harness"]
    B -->|2 Pin| AK["Factory Radio Harness"]
    B -->|2 Pin| AL["Factory Radio Harness"]
    B -->|2 Pin| AM["Factory Radio Harness"]
    B -->|2 Pin| AN["Factory Radio Harness"]
    B -->|2 Pin| AO["Factory Radio Harness"]
    B -->|2 Pin| AP["Factory Radio Harness"]
    B -->|2 Pin| AQ["Factory Radio Harness"]
    B -->|2 Pin| AR["Factory Radio Harness"]
    B -->|2 Pin| AS["Factory Radio Harness"]
    B -->|2 Pin| AT["Factory Radio Harness"]
    B -->|2 Pin| AU["Factory Radio Harness"]
    B -->|2 Pin| AV["Factory Radio Harness"]
    B -->|2 Pin| AW["Factory Radio Harness"]
    B -->|2 Pin| AX["Factory Radio Harness"]
    B -->|2 Pin| AY["Factory Radio Harness"]
    B -->|2 Pin| AZ["Factory Radio Harness"]
    B -->|2 Pin| BA["Factory Radio Harness"]
    B -->|2 Pin| BB["Factory Radio Harness"]
    B -->|2 Pin| BC["Factory Radio Harness"]
    B -->|2 Pin| BD["Factory Radio Harness"]
    B -->|2 Pin| BE["Factory Radio Harness"]
    B -->|2 Pin| BF["Factory Radio Harness"]
    B -->|2 Pin| BG["Factory Radio Harness"]
    B -->|2 Pin| BH["Factory Radio Harness"]
    B -->|2 Pin| BI["Factory Radio Harness"]
    B -->|2 Pin| BJ["Factory Radio Harness"]
    B -->|2 Pin| BK["Factory Radio Harness"]
    B -->|2 Pin| BL["Factory Radio Harness"]
    B -->|2 Pin| BM["Factory Radio Harness"]
    B -->|2 Pin| BN["Factory Radio Harness"]
    B -->|2 Pin| BO["Factory Radio Harness"]
    B -->|2 Pin| BP["Factory Radio Harness"]
    B -->|2 Pin| BPB["Factory Radio Harness"]

    subgraph Non-amplified
        direction TB
        A1((A))
        A1a((A))
        A1b((A))
        A1c((A))
        A1d((A))
        A1e((A))
        A1f((A))
        A1g((A))
        A1h((A))
        A1i((A))
        A1j((A))
        A1k((A))
        A1l((A))
        A1m((A))
        A1n((A))
        A1o((A))
        A1p((A))
        A1q((A))
        A1r((A))
        A1s((A))
        A1t((A))
        A1u((A))
        A1v((A))
        A1w((A))
        A1x((A))
        A1y((A))
        A1z((A))
        A1t(Out)(Out)
        A1t(Out)(Out)
        A1t(Out)(Out)
        A1t(Out)(Out)
        A1t(Out)(Out)
        A1t(Out)(Out)
        A1t(Out)(Out)
        A1t(Out)(Out)
        A1t(Out)(Out)
        A1t(Out)(Out)
        A1t(Out)(Out)
        A1t(Out)(Out)
    end

    subgraph Non-amplified
        direction TB
        A1a((A))
        A1a1((A))
        A1a(b)(A)
        A1a(b)(A)
        A1a(b)(A)
        A1a(b)(A)
        A1a(b)(A)
        A1a(b)(A)
        A1a(b)(A)
        A1a(b)(A)
        A1a(b)(A)
        A1a(b)(A)
        A1a(b)(A)
        A1a(b)(A)
        A1a(b)(A)
        A1b((A))
        A1b(a)(A)
        A1b(b)(A)
        A1b(b)(A)
        A1b(b)(A)
        A1b(b)(A)
        A1b(b)(A)
        A1b(b)(A)
        A1b(b)(A)
        A1b(b)(A)
        A1b(b)(A)
        A1b(b)(A)
        A1b(b)(A)
        A1b(b)(A)
        A1b(b)(A)
      30-35-35-35-35-35-35-35-35-35-35-35-35-35-35-35-35-35-35-35-35-35-35-35-35-35-35-35-35-35-35-35-35-35-35
    40-45-45-45-45-45-45-45-45-45-45-45-45-45-45-45-45-45-45-45-45-45-45-45-45-45-45-45
    80-85-80-80-80-80-80-80-80-80-80-80-80-80-80-80-80-80-80-80-80-80-80
    67-67-67-67-67-67-67-67-67-67-67-67-67-67-67-67-67
    86/86/86/86/86/86/86/86/86/86/86/86/86/86/86/86/86/86/86/86/86/86/86/86/86/86/86/86/86/86/86/86/86/86/ 87/87/87/87/87/87/87/87/87/87/87/87/87/87/87/87/ 87/87/87/87/87/87/87/87/87/87/ 87/ 87/ 87/ 87/ 87/ 87/ 87/ 87/ 87/ 87/ 87/ 87/ 87/ 87/  87/ 87/ 87/ 87/ 87/ 87/ 87/ 87/ 87/  87/ 87/ 87/ 87/ 87/ 87/  87 / 87 / 87 / 87 / 87 / 87 /  87 /  87 /  87 /  87 /  87 /  87 /  87 /  87 /  87 /  87 /  87 /  0
    end

    subgraph Non-amplified
        direction TB
        C1((C))
        C1a((C))
        C1b((C))
        C1c((C))
        C1d((C))
        C1e((C))
        C1f((C))
        C1g((C))
        C1h((C))
        C1i((C))
        C1j((C))
        C1k((C))
        C1l((C))
        C1m((C))
        C1n((C))
        C1o((C))
        C1p((C))
        C1q((C))
        C1r((C))
        C1s((C))
        C1t((C))
        C1u((C))
        C1v((C))
        C1w((C))
        C1w1((C))
        C1w2((C))
        C1w3((C))
        C1w4((C))
        C1w5((C))
        C1w6((C))
        C1w7((C))
        C1w8((C))
        C1w9((C))
        C1w10((C))
        C1w10a((C))
        C1w10b((C))
        C1w10c((C))
        C1w10d((C))
        C1w10e((C))
        C1w10f((C))
        C1w10g((C))
        C1w10h((C))
        C1w10i((C))
        C1w10j((C))
        C1w10k((C))
        C1w10k+ (C)
       |
       |
       |
       |
       |
       |
       |
       |
       |
       |
       |
       |
       |
       |
       |
       |
       |
       |
       |
       |
       |
       |
       |
       |
       |
       |
       |
       |
       |
       |
       |
       |
       |
       |
       |
       |
       |
       |
       |
       |
       |
       |
       |
       |
       |
       |
       |
       |
       |
       |
       |
       |
       |
       |
       |
       |
       |
       |
       |
       |
       |
       |
       |
       |
       |
       |
       |
       |
       |
       |
       |
       |
       |
       |
       |
       |
       |
       |
       |
       |
       |
       |
       |
       |
       |
       |
       |
       |
       |
       |
       |
       |
       |
       |
       |
       |
       |
       |
       |
       |
      |
       |
       |
       |
       |
       |
       |
       |
       |
       |
       |
       |
       |
       |
       |
       |
       |
       |
       |
       |
       |
       |
       |
       |
       |
       |
       |
       |
       |
       |
       |
       |
       |
       |
       |
       |
       |
       |
       |
       |
       |
       |
       |
       |
       |
       |
       |
       |
       |
       |
       |

Non-amplified
            Non-amplified
            Connect A to B.
            Disregard connector C.
            LD-PAW-ENDCH3
            LD-PAW-ENDCH3
            LD-PAW-ENDCH3
            LD-PAW-ENDCH3
            LD-PAW-ENDCH3
            LD-PAW-ENDCH3
            LD-PAW-ENDCH3
            LD-PAW-ENDCH3
            LD-PAW-ENDCH3
            LD-PAW-ENDCH3
            LD-PAW-ENDCH3
            LD-PAW-ENDCH3
            LD-PAW-ENDCH3
            LD-PAWSEXT
            LD-PAWSEXT
            LD-PAWSEXT
            LD-PAWSEXT
            LD-PAWSEXT
            LD-PAWSEXT
            LD-PAWSEXT
            LD-PAWSEXT
            LD-PAWSEXT
            LD-PAWSEXT
            LD-PAWSEXT
            LD-PAWSEXT
            LD-PAWSEXT
            LD-PAWSEXT
            LD-PAWSEXT
            LD-PAWSEXT
            LD-PAWSEXT
            LD-FAW-ENDCH3
            LD-FAW-ENDCH3
            LD-FAW-ENDCH3
            LD-FAW-ENDCH3
            LD-FAW-ENDCH3
            LD-FAW-ENDCH3
            LD-FAW-ENDCH3
            LD-FAW-ENDCH3
            LD-FAW-ENDCH3
            LD-FAW-ENDCH3
            LD-FAW-ENDCH3
            LD-FAW-ENDCH3
            LD-FAW-ENDCH3
            LD-PAWEXT
            LD-FAWEXT
            LD-FAWEXT
            LD-FAWEXT
            LD-FAWEXT
            LD-FAWEXT
            LD-FAWEXT
            LD-FAWEXT
            LD-FAWEXT
            LD-FAWEXT
            LD-FAWEXT
            LD-FAWEXT
            LD-FAWEXT
            LD-FAWEXT
            LD-FAWEXT
            LD-FAWEXT
            LD-FAWEXT
            LD-FAWEXT
          side_text<|ref_end|><|rotate_up|>
    end
ADDING AMPLIFIER/AMPLIFIERS TO A FACTORY SYSTEM CONT.
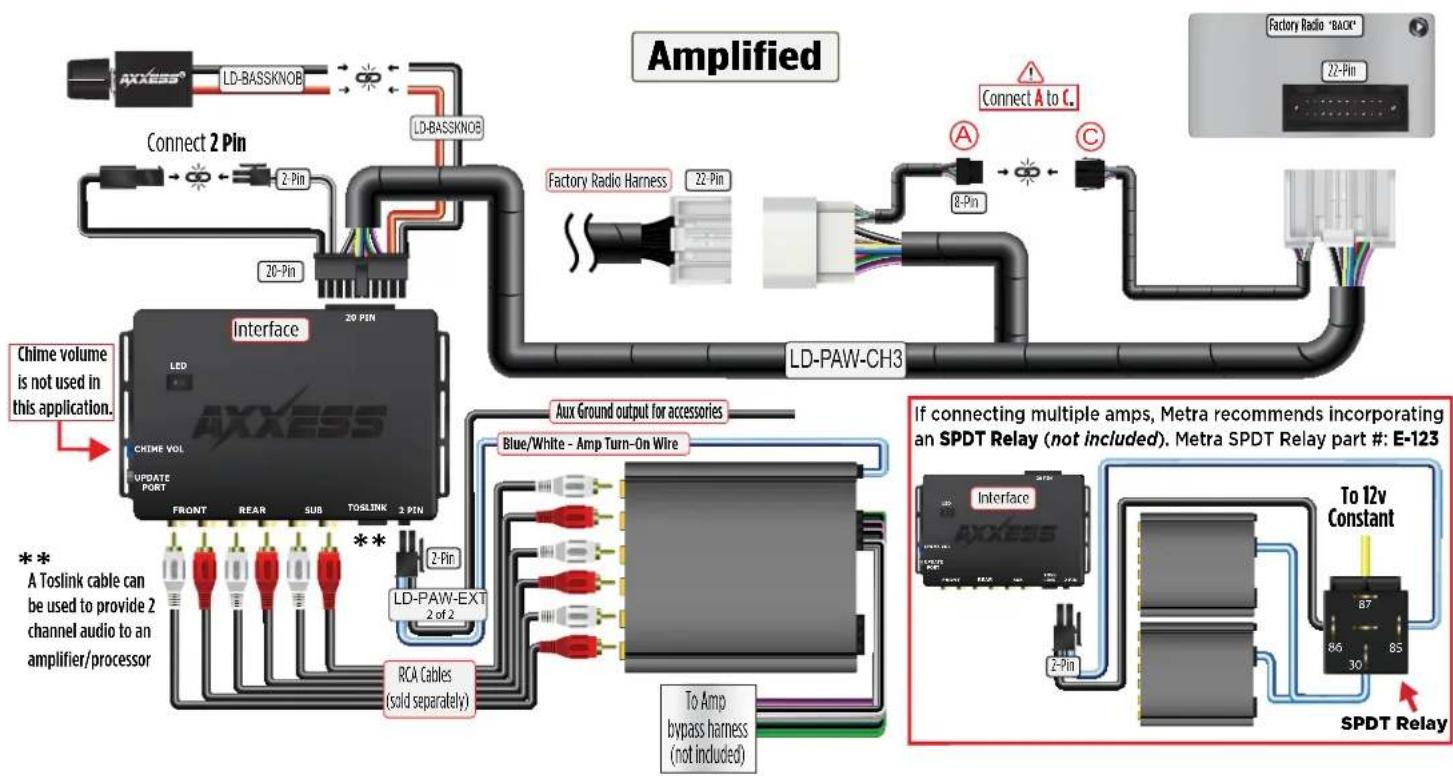
flowchart
graph TD
    A["AMplified"] --> B["Factory Radio Harness"]
    B --> C["LD-PAW-CH3"]
    C --> D["SPDT Relay"]
    D --> E["Interface"]
    E --> F["Chime volume is not used in this application."]
    E --> G["Aux Ground output for accessories"]
    G --> H["Blue/White - Amp Turn-On Wire"]
    H --> I["RCA Cables (sold separately)"]
    I --> J["LD-PAW-EXT 2 of 2"]
    J --> K["Factory Radio Harness"]
    K --> L["LD-BASSKNOB"]
    L --> M["Connect 2 Pin"]
    M --> N["20-Pin"]
    N --> O["Chime volume can be used to provide 2 channel audio to an amplifier/processor"]
    style A fill:#f9f,stroke:#333
    style B fill:#ccf,stroke:#333
    style C fill:#cfc,stroke:#333
    style D fill:#fcc,stroke:#333
    style E fill:#cff,stroke:#333
    style F fill:#ffc,stroke:#333
    style G fill:#cfc,stroke:#333
    style H fill:#cfc,stroke:#333
    style I fill:#cfc,stroke:#333
    style J fill:#cfc,stroke:#333
    style K fill:#cfc,stroke:#333
    style L fill:#cfc,stroke:#333
    style M fill:#cfc,stroke:#333
    style N fill:#cfc,stroke:#333
    style O fill:#cfc,stroke:#333
    style P fill:#cfc,stroke:#333
    style Q fill:#cfc,stroke:#333
    style R fill:#cfc,stroke:#333
    style S fill:#cfc,stroke:#333
    style T fill:#cfc,stroke:#333
    style U fill:#cfc,stroke:#333
    style V fill:#cfc,stroke:#333
    style W fill:#cfc,stroke:#333
    style X fill:#cfc,stroke:#333
    style Y fill:#cfc,stroke:#333
    style Z fill:#cfc,stroke:#333

AXAMP-TY3 INSTALLATION INSTRUCTIONS
TROUBLESHOOTING
Final LED Feedback
At the end of programming the LED will turn Solid Green which indicates programming was successful. If the LED didn't turn Solid Green, reference the list below to understand which programming section the problem may stem from.
Blink Rate Condition/Status
| Solid Green | All Good | |
| Solid Red | Missing Can Frames | |
| Blink Red | Clipping Output | |
| Green/Red | Missing Adv. (Comm Frames) |
Scan QR Code

Further troubleshooting steps and
information can be located at:
axxessinterfaces.com/product/AXAMP-TY3
Having difficulties? We're here to help.
Contact our Tech Support line at: 386-257-1187
Or via email at: techsupport@metra-autosound.com
Tech Support Hours (Eastern Standard Time)
Monday - Friday: 9:00 AM - 7:00 PM
Saturday: 10:00 AM - 5:00 PM
Sunday: 10:00 AM - 4:00 PM

Metra recommends MECP certified technicians