0070-24128 - Monitor Ernitec - Tasuta kasutusjuhend
Leidke seadme juhend tasuta 0070-24128 Ernitec PDF-formaadis.

Kasutajate küsimused teemal 0070-24128 Ernitec
0 küsimus selle seadme kohta. Vastake nendele, mida teate, või esitage oma.
Esita uus küsimus selle seadme kohta
Laadige alla juhend oma Monitor PDF-formaadis tasuta! Leidke oma juhend 0070-24128 - Ernitec ja võtke oma elektrooniline seade uuesti kätte. Sellel lehel on avaldatud kõik teie seadme kasutamiseks vajalikud dokumendid. 0070-24128 kaubamärgi Ernitec.
KASUTUSJUHEND 0070-24128 Ernitec
0070-24128

Surveillance Monitor
USER MANUAL

- Please read this manual carefully before operating your set.
- Retain it for future reference.
- Record model number and serial number of the set.
• See the label attached on the back cover and quote this information to you r dealer when you require service.
TROUBLE SHOOTING
NOTE: Problem & possible solutions. (Only applied to VGA mode)
| PROBLEM | POSSIBLE SOLUTION |
| The signal is out of range | -Adjust resolution, horizontal frequency, or vertical frequency.-Check it whether the signal cable is connected or loose.-Check to see if the signal cable is connected or loose. |
| Vertical bar or stripe on screen, horizontal noise or incorrect position | -Work the auto configure or adjust clock, phase, or H/V position. |
| Screen color is unstable or single color | -Check the signal cable.-Reinstall the PC video card. |
4. Maintenance
Ensure power is removed from the monitor before performing any maintenance.
Cleaning the screen
Wipe the screen with a soft, damp, lint-free cloth. Allow the screen to dry before applying power. Do not use abrasive cleaners.
Cleaning the cabinet
Wipe the cabinet with a soft, dry, lint-free cloth. Do not use a wet cloth or abrasive cleaners.
Extended Storage

If you anticipate to store the monitor for extended periods of time or otherwise not turning the monitor on, disconnect the monitors power cable.
TABLE OF CONTENTS
TABLE OF CONTENTS 1
WARNING 2
SAFETY INSTRUCTIONS 3
- INTRODUCTION 5
1.1 CONTROLS 5
1.2 ACCESSORIES 5
1.3 OPTIONS 6
2.BASIC OSD SETUP 7
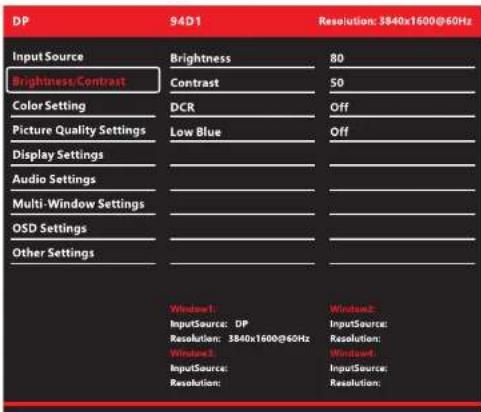
2.1 OSD "Brightness/contrast" Menu 7
2.2 OSD "Color setting" Menu 8
2.3 OSD "Input source" Menu 8
2.4 OSD "Input source" Menu 9
2.5 OSD "Display setting" Menu 9
2.6 OSD "Other settings"" Menu....10
2.7 OSD "Display information" Menu 10
2.8 OSD "Automatic adjustment" Menu....11
-
TROUBLE SHOOTING 11
-
Maintenance 12
WARNING
WARNING


WARNING
TO REDUCE THE RISK OF ELECTRIC SHOCK DO NOT REMOVE COVER (OR BACK). NO USER SERVICEABLE PARTS INSIDE. REFER TO QUALIFIED SERVICE PERSONNEL.

The lightning flash with arrowhead symbol, within an equilateral triangle, is intended to alert the user to the presence of uninsulated "dangerous voltage" within the products enclosure that may be of sufficient magnitude to constitute a risk of electric shock to persons.

The exclamation point within an equilateral triangle is intended to alert the user to the presence of important operating and maintenance (servicing) instructions accompanying the appliance.
REGULATORY INFORMATION
This equipment generates, uses and can radiate radio frequency energy and, if not installed and used in accordance with the instructions, it may cause harmful interference to radio communications however, there is no guarantee that interference will not occur in a particular installation. If this equipment does cause harmful interference to radio or television reception, which can be determined by turning the equipment off and on, the user is encouraged to try to correct the interference by one or more of the following measures:
-Increase the separation between the equipment and receiver.
-Connect the equipment into an outlet on a circuit different from that to which the receiver is connected.
-Consult the dealer or experienced radio/monitor technician for help.
Any changes or modifications not expressly approved by the party responsible for compliance could void the users authority to operate the equipment.
CAUTION
Do not attempt to modify this product in any way without authorization from Ernitec Technical Support. Unauthorized modification will void the products warranty.
PRODUCT CRITERIA
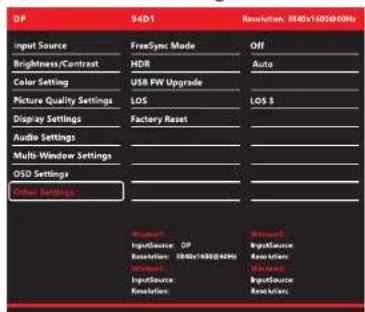
2.8 OSD "Other Settings" Menu
3. Troubleshooting
When experiencing problems, consult the following before contacting your dealer or Ernitec Technical Support
| PROBLEM | POSSIBLE SOLUTION |
| No sound picture | - Check that the monitor's power connection is secure.- Press the POWER button on the front of the monitor.- Adjust the picture quality settings. |
| Normal picture but no sound | - Check the volume setting- Check the Monitor's audio connection is secure |
| Power is suddenly turned off | - Ensure the sleep timer function is not set.- Check that the monitor's power connection is secure.- Check that the monitor's input connection is secure. |
| Picture appears slowly after switching on | - Normal operation as monitor warms up. |
| Poor color or picture quality | - Adjust picture quality settings.- Check that the monitor's input connection is secure. |
| Horizontal/vertical bars or picture shaking | -Check for local interference such as an electrical appliance or power tool. |
| No output from one of the speakers | - Adjust audio balance. |
Basic OSD setup
2.6 OSD "Multi-Window Settings" Menu
| DP | 94D1 | Resolution: 3840x1600@60Hz |
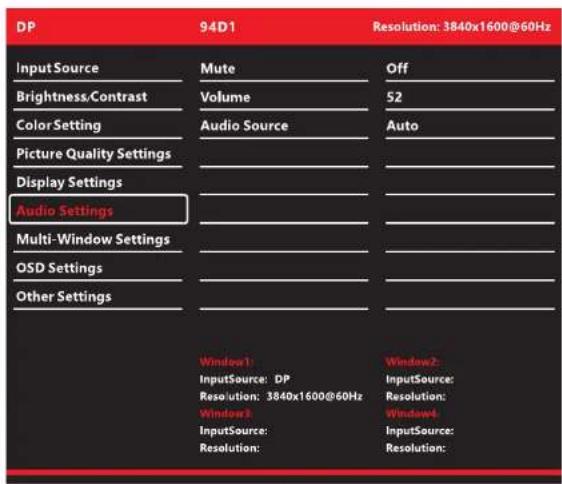
| Input Source | Multi-Window | Off |
| Brightness/Contrast | Sub Win2 Input | |
| Color Setting | Sub Win3 Input | |
| Picture Quality Settings | Sub Win4 Input | |
| Display Settings | PIP Size | |
| Audio Settings | PIP Position | |
| Multi-Window Settings | Swap | |
| OSD Settings | ||
| Other Settings |
2.7 OSD "OSD Settings" Menu
| DP | 94D1 | Resolution: 3840x1600@60Hz |
| Input Source | Language | English |
| Brightness/Contrast | Menu Transparency | 0 |
| Color Setting | OSD H Position | 50 |
| Picture Quality Settings | OSD V Position | 50 |
| Display Settings | OSD Timer | 10 |
| Audio Settings | Menu Rotation | 0 |
| Multi-Window Settings | ||
| OSD Settings | ||
| Other Settings | ||
| Window1: | Window2: | |
| InputSource: DP | InputSource: | |
| Resolution: 3840x1600@60Hz | Resolution: | |
| Windows3: | Windows4: | |
| InputSource: | InputSource: | |
| Resolution: | Resolution: | |
SAFETY INSTRUCTIONS
Safety instructions
WARNING:
To reduce the risk of fire or electric shock, do not expose the monitor to rain or moisture.
Do not operate the monitor in wet environments. Do not place drinks or other liquids on or near the monitor.
IMPORTANT SAFETY INSTRUCTIONS
Read these instructions and keep them for future reference.

Do no install the monitor near any significant sources of heat.
Do not use the monitor near water.
Disconnect power if the monitor will not be used for long periods of time.
Clean the cabinet only with a dry cloth.
Ensure all cables are properly stowed and not pinched anywhere.

Provide adequate ventilation around the proximity of the monitor.
Only use attachments and accessories specified by Ernitec.
SAFETY INSTRUCTIONS
When the unit requires repairs, please contact your vendor or Ernitec Technical Support.

Note
- The monitor may "flicker" momentarily when turned on while cold. This is normal.
- Pixel errors in the form of tiny red, green or blue dots may appear on the screen, these do not adversely affect the monitors performance.
On Disposal
Under the Directive 2012/19/EU on waste electrical and electronic equipment (WEEE), product(s) used electrical and electronic equipment (WEEE) should not be mixed with general household waste.
For proper treatment, recovery and recycling, please take this product(s) to designated collection points where it will be accepted free of charge.
Disposing of this product correctly will help save valuable resources and prevent any potential negative effects on human health and the environment, which could otherwise arise from inappropriate waste handling.
Please contact your local authority for further details of your nearest designated collection point. Penalties may be applicable for incorrect disposal of this waste, in accordance with your national legislation.
Basic OSD setup
2.4 OSD "Input source" Menu
Input source

DP
HDMI 1
HDMI 2
HDMI 3
2.5 OSD "Brightness" Menu
Basic OSD setup
2.2 OSD "Color setting" Menu

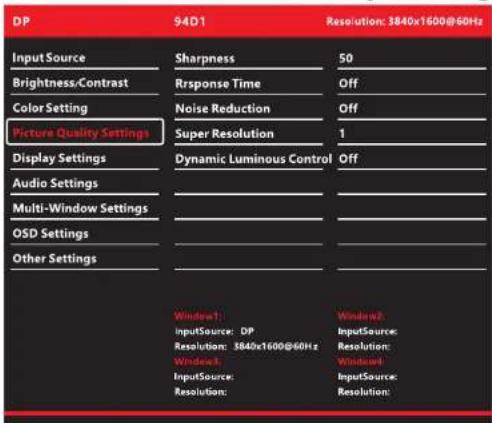
2.3 OSD "Picture Quality Settings" Menu
INTRODUCTION
1. Introduction
1.1 Controls
-Simplified control panel
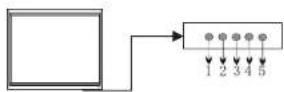
| ITEM | BUTTON NAME | FUNCTION DESCRIPTION |
| 1 | AUTO | Press to select the input source and make menu selections. |
| 2 | - | Lower audio volume. |
| 3 | + | Increase audio volume. |
| 4 | MENU | Press to enter and exit the monitor's configuration menu. |
| 5 | POWER | Press to turn the monitor on and off. |
1.2 Accessories
The following accessories are included with the monitor:
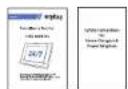
User manual Safety instructions
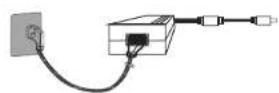
Power adapter
INTRODUCTION
1.3 Connection Options
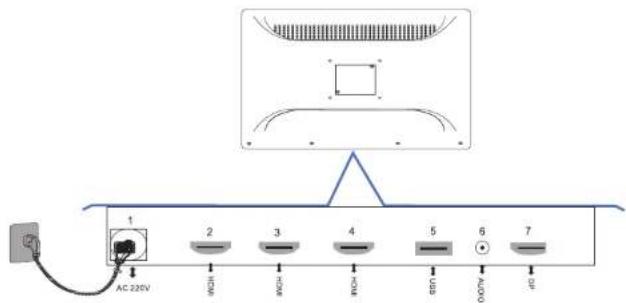
| ITEM | NAME | DESCRIPTION |
| 1 | AC 220V | POWER SUPPLY INPUT |
| 2 | 3pcs HDMI | HDMI VIDEO INPUT,2pcs HDMI 1,4 and 1pc HDMI 2,0 |
| 3 | USB | USB FOR SOFTWARE UPDATE |
| 4 | AUDIO | AUDIO INPUT |
| 5 | DP | DP VIDEO INPUT |
Basic OSD setup
Button OSD Function:
● "Power": Turn on/off Device
● "Menu": (1) Open Menu OSD
(2) Come back last Menu
● "AUTO": select the input source
● “+”: (1) Confirm Menu Selection
(2) Adjust Option "1-100" Selection
● “-”: (1) Adjust Menu Selection
(2) Adjust Selection
2.1 OSD "Audio Settings" Menu