Classic RE-AW0003S - Montre-bracelet Orient Star - Manual de uso y guía de instrucciones gratis
Encuentra gratis el manual del aparato Classic RE-AW0003S Orient Star en formato PDF.


Preguntas de los usuarios sobre Classic RE-AW0003S Orient Star
0 pregunta sobre este aparato. Responde a las que conoces o haz la tuya.
Hacer una nueva pregunta sobre este aparato
Descarga las instrucciones para tu Montre-bracelet en formato PDF gratis! Encuentra tus instrucciones Classic RE-AW0003S - Orient Star y toma tu dispositivo electrónico nuevamente en la mano. En esta página están publicados todos los documentos necesarios para el uso de su dispositivo. Classic RE-AW0003S de la marca Orient Star.
MANUAL DE USUARIO Classic RE-AW0003S Orient Star
ENGLISH
MECHANICAL WATCH WITH POWER RESERVE INDICATOR AUTOMATIC & HAND WINDING
INSTRUCTION MANUAL
Thank you for choosing our product. To ensure prolonged use and optimum performance, please read this instruction manual carefully and familiarize your-self with the terms of the guarantee.
Please keep this Instruction Manual handy for future reference.
◆ SAFETY PRECAUTIONS
Make absolutely sure to observe the demarcated contents indicated below to prevent any possible physical danger and property damage to you as well as other people concerned.
... A demarcation with this symbol represents the contents assuming possibility for death or serious injury when the product is used in any manner different from given instructions.
... A demarcation with this symbol represents the contents assuming possibility of causing human injury or material damage only when a product is used in any manner different from given instructions.
◆ IN HANDLING THE WATCH
(1) Water-resistance
| Type\Conditions of use | Underwater operation of crown and operation of crown with drops of water on it | Exposure to small amounts of water (face-washing, rain, etc.) | Water sports (swimming, etc.), frequent contact with water (car-washing, etc.) | Skin diving (air tanks are not used) | Scuba diving (air tanks are used) | Mixed-gas Diving (using helium gas) | ||
| Non water resistant | Without WATER RESISTANT (WATER RESIST) | × × | × × | × × | ||||
| Water resistant watches | Water resistant for daily life | WATER RESISTANT (WATER RESIST) | × | ○ | × × × × | |||
| Reinforced water resistance for daily life I | WATER RESISTANT (WATER RESIST) 50m (5bar) | × | ○ | ○ | × × × | |||
| Reinforced water resistance for daily life II | WATER RESISTANT (WATER RESIST) 100m (10bar) 200m (20bar) | × | ○ | ○ ○ | × | × | ||
| Diver's watches | Diver's watch for Air Diving | AIR DIVER'S 100m / 150m 200m | × | ○ | ○ ○ | ○ | × | |
| Diver's watch for Mixed-gas Diving | He-GAS DIVER'S 200m / 300m /... | × | ○ | ○ ○ | ○ | ○ | ||
* It is recommended that you use the watch correctly following the above-mentioned scope of usage after ascertaining water resistance precautions marked on the dial or caseback.
CAUTION
① A watch with water resistance for daily life 30m (3 bar) can be used during face-washing, etc. but cannot be used in an environment in which it will be submerged in water.
② A watch with reinforced water resistance for daily life I 50m (5 bar) can be used while swimming, etc. but cannot be used during any type of diving including skin diving.
③ A watch with reinforced water resistance for daily life II 100m or 200m (10 or 20 bar) can be used while skin diving, but cannot be used while scuba diving using oxygen tanks or saturation diving using helium gas, etc.
④ Keep the crown pushed in at all times (in the normal position) while using the watch. If the crown is the screwed-down type, check that it is securely screwed down.
⑤ Do not operate the crown underwater, or while the watch is wet. Water may enter the interior of the watch and defeat the water resistance.
⑥ If your watch is non-water resistant, beware of splashes of water (during face washing, rain, etc.) and sweat. If the watch becomes wet from water or sweat, wipe the moisture off with a dry, soft cloth.
⑦ Even with a water resistant watch for everyday use, avoid directing strong jets of mains water onto the watch. Water pressure above the limit can apply, which may defeat the water resistance.
⑧ With a water resistant watch for everyday use, rinse sea water off the case after exposure, then wipe it thoroughly to avoid corrosion and other effects.
⑨ The interior of the watch contains some amount of moisture, which may cause fogging on the inside of the glass when the outside air is cooler than the internal temperature of the watch. If the fogging is temporary it causes no harm inside the watch, but if prolonged, or if water enters the watch, consult your place of purchase and do not leave the problem untreated.
(2) Shock
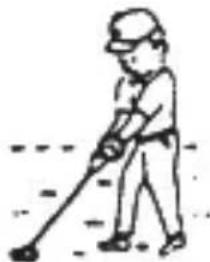
① Be sure not to carry the watch when you engage in strenuous sports, whereas playing such light sports as golf, etc., will not adversely influence the watch.
② Avoid a violent shock such as dropping the watch on the floor.
(3) Magnetism
① If the watch is left at a location with strong magnetism for an extended period of time, the components may be magnetized, resulting in malfunction. Be careful.
② The watch may temporarily speed up or slow down when exposed to magnetism. Precision is restored when placed away from magnetism. In such a case, reset the time.
(4) Vibration
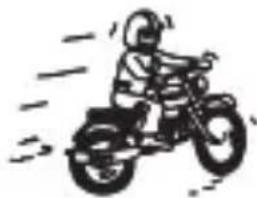
The watch may lose precision if subjected to strong vibrations such as from riding motorcycles, using jackhammers, chain saws, etc.
natural_image
Simple line drawing of a person using a tool to clean or dig (no text or symbols)(5) Temperature
natural_image
Simple line drawing of a person riding a three-wheeled motorcycle with motion lines indicating speed (no text or symbols)In environments below and above normal temperatures ( 5^ C- 35^ C), the watch may malfunction and stop.
Do not use the watch at high temperatures, such as in a sauna. The watch may heat and cause burns.
(6) Chemicals, Gases, etc.
Utmost caution must be exercised when coming into contact with gases, mercury, chemicals (paint thinner, gasoline, various solvents, detergents containing such components, adhesives, paint, drugs, perfumes, cosmetics, etc.), and so forth. Such may cause discoloration of the watchcase, watchband, and dial face. Discoloration, deformation, and damage to various resin-based component parts may also occur.
(7) About accessory parts
CAUTION
Do not attempt to disassemble or modify this product.
WARNING
Store the bracelet/strap pin and other small parts out of the reach of children.
If any small parts are swallowed, immediately contact a doctor.
(8) Allergic reactions
CAUTION
If you develop a skin rash or your skin becomes abnormally irritated due to contact with the watch or strap, stop wearing the watch immediately and consult a doctor.
(9) About "luminous light"
Some watch have luminous light on the hands and dial.
The luminous light is a safe paint that stores sunlight and artificial light without using any radioactive material, and emits that light in a dark setting. As the paint discharges the stored light, it will become dimmer over time. The amount of light emitted and the time that light is emitted depends on various factors when the light is stored, such as the shape of the glass, the thickness of the paint, surrounding brightness level, the distance from the watch to the light source, and the light absorption level. Please note that when not enough light energy is stored, the watch may emit weak light or emit light for only a short time.
(10) Water resistant watchband
Some products employ leather and nylon bands on which a special treatment to resist perspiration and water absorption have been applied. Please understand that the water resisting effect of this watchband can be lost depending on the period and conditions of use.
◆ HOW TO IDENTIFY THE CALIBER NUMBER
Check the caliber number by referring to the model number of your watch or the case code on the watch's case back.
1. Searching by 13-digit model number
Check the 13-digit model number on the guarantee supplied with your watch. You can also see the number on the product tag put on the watch. Its fourth and fifth digits indicate the caliber number of your watch.
Example: If the model number is "RE-AT0001L00B", the caliber number is "AT".
2. Searching by the case code
See the case code on the case back of your watch like XXXX-XXXX.
The first three digits indicate the caliber number.
Example : When the case code is "F6R4-UAA0", the caliber number is "F6R".
* The place of case code may vary and its letter size may be small and difficult to see depending on the characteristics of watches.
* The pictures and illustrations on this manual may differ from the actual appearance of your watch but the function and operation procedures are the same.
◆ SPECIFICATIONS
| Caliber Number of jewels Date | Second hand halt mechanism | ||
| AT F6R 22 | - | ○ | |
| AU F6N 22 | ○ | ○ | |
| AV F6F 24 | - | ○ | |
| AW F6G 24 | ○ | ○ | |
(1) Vibrations : 21,600 vibrations / hour
(2) Daily accuracy: +25sec. to -15 sec.
(3) Drive system : Mainspring Winding (Hand-winding)
(4) Running time : At least 50 hours
The stated daily accuracy is in the following conditions:
• After 24 hours at room temperature with the mainspring wound fully and the dial facing up.
- Due to the characteristics of the automatic winding watch, the time may deviate from the stated “daily accuracy” depending on the following conditions: amount of time the watch is worn each day, position of the watch, movement of your arm, winding condition of the mainspring.
- Determine the deviation from not just a day but a period of about a week.
Product specifications may change without notice, for improvement.
◆ NAMES AND FUNCTIONS OF INDIVIDUAL COMPONENT PARTS
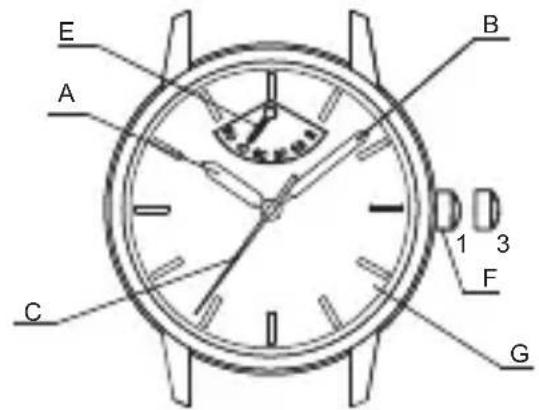
A: Hour hand E: Power reserve hand 1. Normal position
B: Minute hand F: Crown 2. First click: Calendar setting
C: Second hand G: Dial 3. Second click: Time setting
D: Date
text_image
E A B 1 3 C F G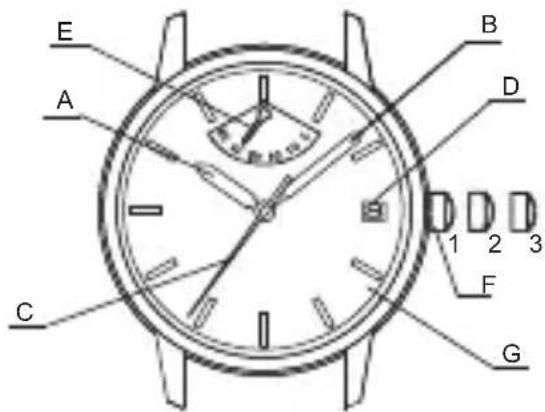
text_image
E A B D 1 2 3 C F G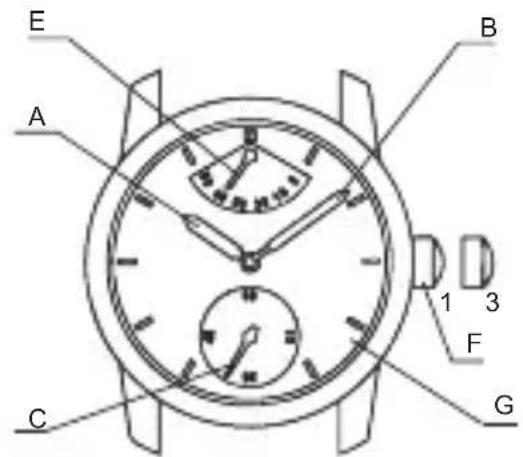
text_image
E A B 1 3 F C G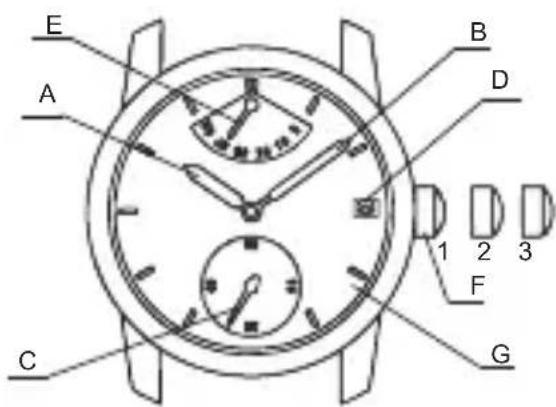
text_image
E A B D 1 2 3 F C G* The position of the crown and power reserve indicator hand, may differ depending on the model.
◆ AUTOMATIC AND HAND WINDING MECHANISM
(1) This is an automatic winding mechanical watch (with a hand winding mechanism).
(2) The mainspring is wound by natural movements of your arm when wearing the watch on your wrist.
In addition, you can also wind the mainspring by turning the crown.
natural_image
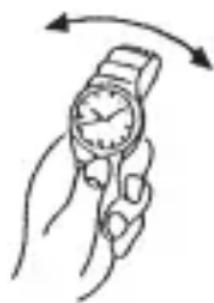
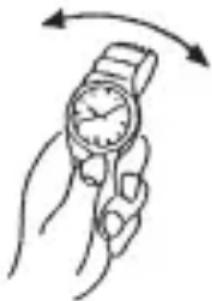
Illustration of a hand holding a wristwatch with motion arrows indicating rotation (no text or symbols)(3) If your watch stops, either swing the watch back and forth ten or more times or turn the crown to wind the mainspring in order to restart the second hand.
After it starts moving, set the calendar and time.
(4) When winding the mainspring, slowly turn the crown to the right (clockwise) while in its normal position.
Turning the crown to the left (counterclockwise) merely turns the crown uselessly and does not wind the mainspring.
You can wind the mainspring fully by turning the crown to the right about 30 times from a stopped position.
The crown can still be turned after the mainspring is fully wound. Either use the above count or use the markings on the power reserve indicator when winding the watch.
(5) Even if the mainspring is fully wound, it will not be over-wound due to the slip mechanism.
(6) This watch will run approximately 50 hours after it is fully wound. If it is not wound enough, the watch may lose accuracy. In order to maintain the watch's accuracy, we recommend wearing the watch at least 8 hours a day.
◆ MODELS WITH SCREWED-DOWN CROWN
Depending on the model, you may not be able to pull the crown out without unscrewing it (models with screwed-down crown).
Operate this type of watch as follows:
(1) Before setting the date and time, first turn the crown counterclockwise to loosen the screw lock.
(2) After setting the date and time, turn the crown clockwise while pressing in, until it stops turning to securely tighten the screw.
◆ HOW TO SET THE TIME & DATE [AU (F6N)][AW (F6G)] [How to set the time]
(1) Pull out the crown to the second click when the second hand reaches the 12 o'clock position. (The second hand stops.)
![Orient Star Classic RE-AW0003S - ◆ HOW TO SET THE TIME & DATE [AU (F6N)][AW (F6G)] [How to set the time] - 1](/content/2026/05/799093/images/5a19b1561863986fc1ac7a0cf7b4d82f92cf6b8f7b73c498f55074b937ea7f0f.jpg)
text_image
![Orient Star Classic RE-AW0003S - ◆ HOW TO SET THE TIME & DATE [AU (F6N)][AW (F6G)] [How to set the time] - 2](/content/2026/05/799093/images/0da96431bd24536a7b959fb54240046f9dee93977c6b6678b99a90effb5189dd.jpg)
text_image
45 51 03(2) Turn the crown counterclockwise and set the current time.
* When setting the time, first bring the hand back slightly earlier than the actual time and then move it forward to the actual time.
* For the watch with a calendar, make sure that you set either a.m. or p.m. without fail. The date changes at [twelve o'clock midnight].
![Orient Star Classic RE-AW0003S - ◆ HOW TO SET THE TIME & DATE [AU (F6N)][AW (F6G)] [How to set the time] - 3](/content/2026/05/799093/images/7e718e6283e214171bff7ca751425b65eb9c616a631e5cf6127c9db1901c2e34.jpg)
text_image
Turn counterclockwise(3) Press the crown in to the normal position.
![Orient Star Classic RE-AW0003S - ◆ HOW TO SET THE TIME & DATE [AU (F6N)][AW (F6G)] [How to set the time] - 4](/content/2026/05/799093/images/9fb713a271118a2db9d1826605a1379230ec4a4b843ac3168f8cbcab1313f7f2.jpg)
text_image
![Orient Star Classic RE-AW0003S - ◆ HOW TO SET THE TIME & DATE [AU (F6N)][AW (F6G)] [How to set the time] - 5](/content/2026/05/799093/images/59869940a9368bbece03d4efb835308ff7a67038cb845b4178d24f1ed26e5ac8.jpg)
text_image
45° 60 51 05[How to set the date]
![Orient Star Classic RE-AW0003S - [How to set the date] - 1](/content/2026/05/799093/images/1afe13c781db239c57d3ef5e0405d2f82e48b5314e5b1c356fcb932299191dde.jpg)
CAUTION
Avoid setting the date between 8:00 p.m. and 2:00 a.m. since the calendar changes during this time. If the date is set during this time period, the date may not change or the watch may malfunction. Be sure to move the hour and minute hands away from this time period when setting the date.
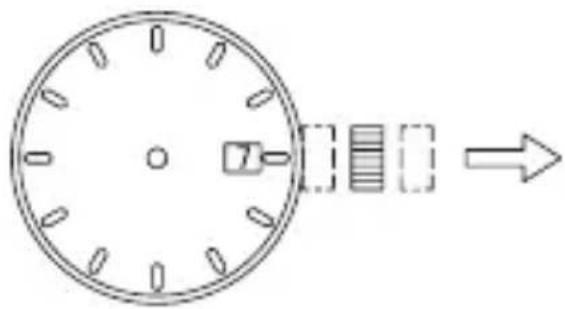
(1) Pull the crown out to the first click.
* The crown on this watch can be pulled out to either of two clicks.
natural_image
Diagram of a circular object with internal components and an arrow indicating direction (no text or symbols)(2) Turn the crown clockwise, and set the date to that for the current day.
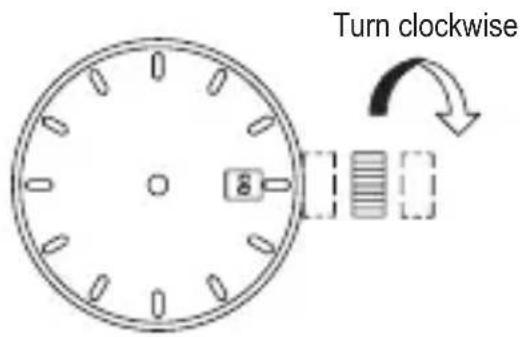
text_image
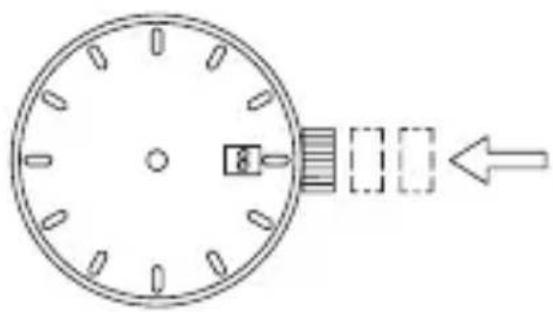
Turn clockwise(3) Push the crown back to the normal position.
natural_image
Diagram of a circular dial with internal components and an arrow pointing to it (no text or symbols)◆ HOW TO SET THE TIME [AT (F6R)] [AV (F6F)]
[How to set the time]
(1) Pull out the crown to the first click when the second hand reaches the 12 o'clock position. (The second hand stops.)
![Orient Star Classic RE-AW0003S - [How to set the time] - 1](/content/2026/05/799093/images/aeea24aa8b608f7e02fb6d73e7e7cd3e6477ff9ff1177ccad3408dbc8c95836b.jpg)
text_image
![Orient Star Classic RE-AW0003S - [How to set the time] - 2](/content/2026/05/799093/images/62c079971a8223140c42e46ad919f2e8755e061f305dbc6c692415f6dadd0f67.jpg)
text_image
50 45 50 DE(2) Turn the crown counterclockwise and set the current time.
* When setting the time, first bring the hand back slightly earlier than the actual time and then move it forward to the actual time.
![Orient Star Classic RE-AW0003S - [How to set the time] - 3](/content/2026/05/799093/images/0dcb89a44da8e5af7eb2c0b9767d0e3582fd5324e09fb7a10267e82e3e61885a.jpg)
text_image
Turn counterclockwise(3) Press the crown in to the normal position.
![Orient Star Classic RE-AW0003S - [How to set the time] - 4](/content/2026/05/799093/images/23b24c7196b2d703fa27f799daef402d8b75e9df7a67b3f820cb66de4e0abda9.jpg)
text_image
![Orient Star Classic RE-AW0003S - [How to set the time] - 5](/content/2026/05/799093/images/aae32ec91457f4abab8c00696e7ffaee9412830b0ab62aa479d514386dc14a10.jpg)
text_image
60 45 51 03◆ POWER RESERVE INDICATOR
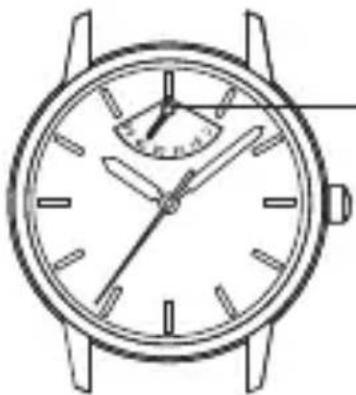
The power reserve indicator shows how much the watch is wound, allowing you to see how much longer the watch will run at a glance. The time pointed to by the power reserve hand is the remaining time.
When the power reserve hand indicates the 50 or F mark, the mainspring is fully wound.
natural_image
Line drawing of a wristwatch with analog dial and frame (no text or symbols)Power reserve indicator hand
* The remaining time shown is only an approximation. The time shown may be different from actual remaining time.
This product is also equipped with an automatic winding function. When it is worn on the wrist, the movement of the arm will wind the mainspring.
The amount that the mainspring is wound will depend on the movement of the arm.
If you do not wind, the power reserve hand will move toward zero as time passes.
◆ USING THE ROTATING INDICATOR RING
Please notice that some models come with a rotating indicator ring, which should be used properly.
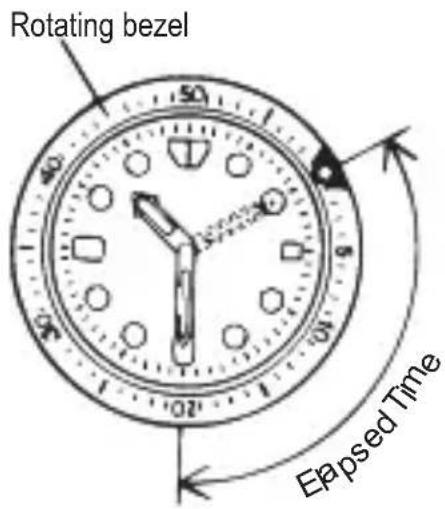
Turn the ring by pointing the ▽ mark to the minute-hand. While certain time goes by, you can measure the elapsed time from the distance between minute-hand and figures on the rotating indicator ring. You can also set the ▽ mark as a desired time to remind you how long time is still remain for an appointment.
You cannot turn the ring reversely since it comes with a protection mechanism for preventing wrong operation by force or shock. Figures on the ring could also help you to read the current time easily.
text_image
Rotating bezel Eapsed Time* Depending on design, anti-reversely and 1 minute “click” sound mechanism on rotating indicator ring does not apply to some models.
◆ HOW TO USE THE INTERNAL ROTATING INDICATOR RING
Please notice that some models come with an internal rotating indicator ring, which should be used properly.
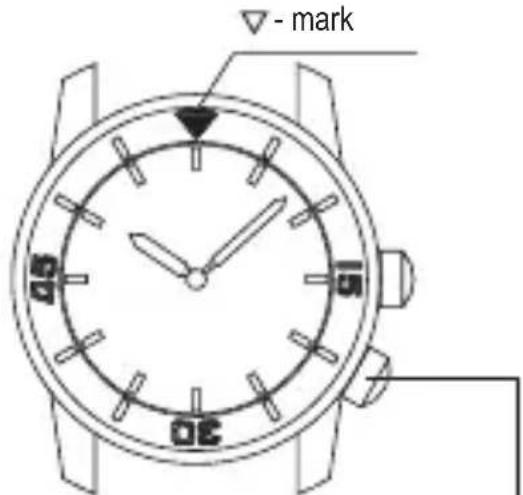
Turn the crown for the internal rotating indicator ring to set the ▽ - mark to the position of the minute hand.
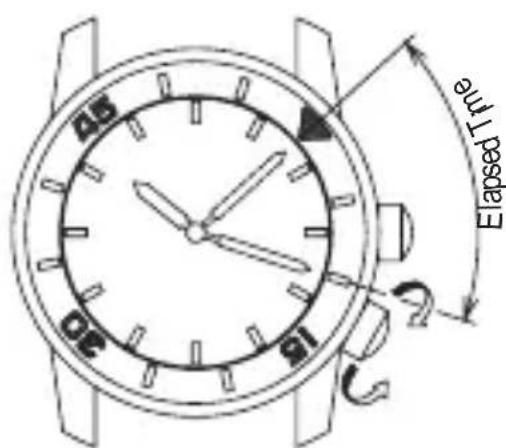
The position of the internal rotating indicator ring to which the minute hand is pointing after some time has elapsed indicates the elapsed time.
Setting the mark to the desired time also allows you to know the remaining time.
text_image
- mark 05 06Crown for the internal rotating indicator
text_image
45 02 91 e up 1 per secondThe above figure shows that 10 minutes have elapsed since 10:08.
* The positions of the crown and the appearance of the internal rotating indicator ring may differ depending on the model.
DEUTSCH
MECHANISCHE UHR MIT GANGRESERVEZEIGER UND AUTOMATISCHEM SOWIE HANDAUFZUG
BEDIENUNGSANLEITUNG
Wir danken Ihnen für den Kauf unseres Erzeugnisses. Bitte lesen Sie diese Bedienungsanleitung sorgfältig durch und befolgen Sie die Anweisungen, um dieses Produkt lange Zeit und mit optimaler Leistung verwenden zu können. Bitte bewahren Sie diese Bedienungsanleitung für spätere Bezugnahme gut auf.
◆ Sicherheitsmaßnahmen
Um zu verhindern, dass Sie oder andere Personen sich verletzen oder Sachschäden entstehen, lesen Sie die Anweisungen, die mit den nachfolgenden Symbolen gekennzeichnet sind, sorgfältig durch und befolgen diese.
... Die Missachtung dieser Anweisung kann zum Tod oder zu schweren Verletzungen führen.
... Die Missachtung dieser Anweisung kann zu Verletzungen oder Schäden an der Uhr führen.
♦ HANDHABUNG DER UHR
(1) Wasserbeständigkeit
| Typ\Verwendungsbedingungen | Betätigung der Krone unter Wasser oder mit anhaftenden Wasser-tropfen | Spritz-wasser (Waschen des Gesichts, Regen usw.) | Wassersport (Schwimmen usw.), häufiger Kontakt mit Wasser (Autowäsche usw.) | Sporttau-chen ohne Sauerstoff-tank (ohne Sauerstoff-flasche) | Sporttau-chen (mit Sauerstoff-flasche) | Mischgas-Tauchen (mit Helium-gas) | ||
| Nicht wasserbeständig | Ohne WATER RESISTANT (WATER RESIST) | × × × × | × × | |||||
| Wasserbeständige Uhren | Wasserbeständig für das tägliche Leben | WATER RESISTANT (WATER RESIST) | × | ○ | × × | × × | ||
| Verstärkte Wasserbeständigkeit I für das tägliche Leben | WATER RESISTANT (WATER RESIST) 50m (5bar) | × | ○ | ○ | × × × | |||
| Verstärkte Wasserbeständigkeit II für das tägliche Leben | WATER RESISTANT (WATER RESIST) 100m (10bar) 200m (20bar) | × | ○ | ○ ○ | × | × | ||
| Taucheruhren | Taucheruhr für das Tauchen mit Sauerstoff-tank | AIR DIVER'S 100m / 150m 200m | × | ○ | ○ ○ | ○ | × | |
| Taucheruhr für das Mischgas-Tauchen | He-GAS DIVER'S 200m / 300m /... | × | ○ | ○ ○ | ○ | ○ | ||
* Es wird empfohlen die Uhr entsprechend des oben beschriebenen Gebrauchsumfangs korrekt zu verwenden, nachdem Sie die Wasserbeständigkeits-Vorsichtsmaßnahmen auf dem Ziffernblatt oder der Gehäuserückseite ermittelt haben.
ACHTUNG
① Eine Uhr mit Wasserfestigkeit für täglichen Gebrauch 30m (3 Bar) kann beim Gesichtwaschen usw. verwendet werden, ist aber nicht dafür geeignet, in Wasser getaucht zu werden.
② Eine Uhr mit gesteigerter Wasserfestigkeit für täglichen Gebrauch I 50m (5 Bar) kann beim Schwimmen usw. verwendet werden, ist aber nicht zum Tauchen, einschließlich Tauchen ohne Geräte, geeignet.
③ Eine Uhr mit gesteigerter Wasserfestigkeit für täglichen Gebrauch II 100m oder 200m (10 oder 20 Bar) kann beim Tauchen ohne Geräte verwendet werden, ist aber nicht zum Scuba-Tauchen mit Sauerstoffflaschen oder Sättigungstauchen mit Heliumgas usw. geeignet.
④ Lassen Sie die Krone beim Gebrauch der Uhr immer eingedrückt (in Normalposition). Wenn die Krone als Schraubensperrtyp ausgelegt ist, stellen Sie sicher, dass sie sicher eingeschraubt ist.
⑤ Betätigen Sie die Krone nicht unter Wasser oder bei nasser Uhr. Dabei kann trotz Wasserbeständigkeit Wasser kann in die Uhr eindringen.
⑥ Wenn Ihre Uhr nicht wasserbeständig ist, achten Sie auf Wasserspritzer (beim Gesichtwaschen, Regen usw.) und Schweiß. Wenn die Uhr durch Wasser oder Schweiß nass wird, wischen Sie die Feuchtigkeit mit einem trockenen, weichen Lappen ab.
⑦ Auch bei einer für täglichen Gebrauch wasserfesten Uhr vermeiden Sie es, direkte starke Wasserstrahlen auf die Uhr auftreffen zu lassen. Bei Wasserdruck über dem Grenzwert kann trotz Wasserbeständigkeit Wasser in die Uhr eindringen.
⑧ Bei einer für täglichen Gebrauch wasserbeständigen Uhr wischen Sie Meerwasser sofort von der Uhr ab und wischen Sie sie dann gründlich ab, um Korrosion und andere Auswirkungen zu vermeiden.
⑨ Das Innere der Uhr enthält eine geringe Menge Feuchtigkeit, die zu Beschlag innen auf dem Deckglas führen kann, wenn die Außenluft kälter als die Innentemperatur der Uhr ist. Wenn der Beschlag kurzzeitig ist, werden keine Schäden in der Uhr verursacht, aber wenn der Zustand länger anhält oder falls Wasser in die Uhr eindringt, wenden Sie sich an das Geschäft in dem die Uhr gekauft wurde und ignorieren Sie das Problem nicht.
(2) Stöße
① Tragen Sie die Uhr nicht bei harten sportlichen Aktivitäten; bei relativ sanften sportlichen Aktivitäten wie Golf usw. kann die Uhr aber getragen werden.
② Vermeiden Sie starke Stöße, wie z. B. Herunterfallen auf den Fußboden.
(3) Magnetismus
① Wenn die Uhr längere Zeit starkem Magnetismus ausgesetzt wird, werden die einzelnen Teile magnetisiert, wodurch Störungen verursacht werden können. Bitte lassen Sie Vorsicht walten.
② Wenn die Uhr Magnetismus ausgesetzt wird, kann sie zeitweilig vor- oder nachgehen, aber wenn sie nicht mehr dem Magnetismus ausgesetzt ist, geht sie wieder mit ihrer ursprünglichen Genauigkeit. Stellen Sie in einem solchen Fall die Uhr auf die richtige Zeit.
(4) Vibration
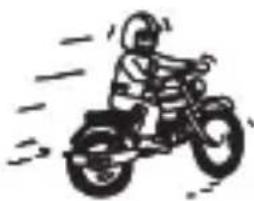
Wenn die Uhr starken Vibrationen ausgesetzt ist, wie z. B. beim Fahren auf einem Motorrad oder bei Verwendung eines Presslufthammers oder einer Motorsäge, kann sie zeitweilig nachgehen.
natural_image
Cartoon illustration of a person riding a tricycle with motion lines indicating speed (no text or symbols)(5) Temperatur
In Umgebungen unter oder über Normaltemperaturen (5°C - 35°C) kann die Uhr Fehlfunktionen aufweisen und stoppen.
ACHTUNG
Tragen Sie die Armbanduhr nicht an Orten mit sehr hohen Temperature, wie etwa in einer Sauna. Die Uhr kann sehr heiß werden und Hautverbrennungen verursachen.
(6) Chemikalien, Gase usw.
Bei Kontakt mit Gasen, Quecksilber, Chemikalien (Verdünnungsmittel, Benzin, Lösungsmittel, Reinigungsmittel mit solchen Bestandteilen, Klebstoffe, Farben, Medikamente, Parfüme, Kosmetika usw.) usw. ist äußerste Vorsicht erforderlich. Solcher Kontakt kann Verfärbung des Uhrgehäuses, des Armbands bzw. des Zifferblatts verursachen. Es kann auch zu Verfärbung, Verformung oder Beschädigung der verschiedenen auf Harz basierenden Bestandteile kommen.
(7) Über Zubehörteile
Versuchen Sie nicht dieses Produkt auseinanderzubauen oder zu modifizieren.

Legen Sie den Armbandstift und andere kleine Teile außer Reichweite kleiner Kinder ab.
Falls kleine Teile verschluckt werden, suchen Sie sofort einen Arzt auf.
(8) Allergische Reaktionen
Falls Sie einen Hautausschlag bekommen oder Ihre Haut durch Berührung mit der Uhr oder dem Armband gereizt wird, nehmen Sie die Uhr sofort ab und suchen einen Arzt auf.
(9) Über „Fluoreszierende stoffe“
Einige Produkte verfügen über leuchtende Zeiger bzw. Ziffernblatt. Das Leuchten entsteht durch eine fluoreszierende Sicherheitsfarbe, die Sonnenlicht und Kunstlicht speichert, ohne den Einsatz von radioaktivem Mate-rial, und gibt dieses Licht in dunkler Umgebung ab. Da die Farbe das gespeicherte Licht allmählich abgibt, wird das Leuchten mit der Zeit immer dunkler. Die Intensität und Dauer der Lichtabgabe hängt von verschiedenen Faktoren bei der Lichtspeicherung ab, wie der Form des Glases, der Dicke der Farbe, der Helligkeit der Umgebung, der Entfernung der Uhr zur Lichtquelle und der Lichtaufnahme. Bitte beachten Sie, dass bei einer ungenügenden Lichtspeicherung die Uhr nur schwach oder nur für kurze Zeit leuchtet.
(10)WasserbeständigesArmband
Einige Produkte verwenden Leder- und Nylonarmbänder, die besonders behandelt wurden, um die Aufnahme von Ausdünstungen und Wasser zu verhindern. Der wasserbeständige Effekt dieses Armbands kann allerdings abhängig von Art und Dauer der Verwendung verloren gehen.
♦ IDENTIFIZIEREN DER KALIBER-NUMMER
Prüfen Sie die Kaliber-Nummer entsprechend der Modellnummer Ihrer Uhr oder dem Gehäusecode auf der Gehäuserückseite der Uhr.
1. Suchen nach der 13-stelligen Modellnummer
Prüfen Sie die 13-stellige Modellnummer auf der der Uhr beiliegenden Garantiekarte. Sie können die Nummer auch auf dem Produktaufkleber auf der Uhr prüfen. Die vierte und fünfte Stelle gibt die Kalibernummer Ihrer Uhr an.
Beispiel: Wenn die Modellnummer „RE-AT0001L00B“ ist, ist die Kaliber-Nummer „AT“.
2. Suchen nach dem Gehäusecode
Suchen Sie den Gehäusecode auf der Gehäuserückseite der Uhr, wie z. B. XXXX-XXXX.
Die ersten drei Stellen geben die Kalibernummer an.
Beispiel: Beträgt der Gehäusecode „F6R4-UAA0“, dann ist die Kaliber-Nummer „F6R“.
* Die Lage des Gehäusecodes kann sich unterscheiden, und die Buchstabengröße kann klein und schwer lesbar sein, je nach Auslegung der Uhr.
* Die Bilder und Abbildungen in dieser Bedienungsanleitung können sich von dem tatsächlichen Aussehen Ihrer Armbanduhr unterscheiden, aber die Funktionen und Bedienverfahren sind gleich.
♦ TECHNISCHE DATEN
| Kaliber | Anzahl der Lagersteine | Datum | Sekundenzeiger-Haltemechanismus | |
| AT F6R 22 | - | ○ | ||
| AU F6N 22 | ○ | ○ | ||
| AV F6F 24 | - | ○ | ||
| AW F6G 24 | ○ | ○ | ||
(1) Oszillationen: 21.600 Oszillationen/Stunde
(2) Tägliche Genauigkeit: +25 Sek. bis -15 Sek.
(3) Antriebsvorrichtung: Hauptfederaufzug (Handaufzug)
(4) Laufzeit: Mindestens 50 Stunden
Die angegebene tägliche Genauigkeit ist unter den folgenden Bedingungen korrekt:
- Bei normaler Raumtemperatur mit einer voll aufgezogenen Hauptfeder, mit dem Zifferblatt nach oben nach Ablauf von 24 Stunden.
- Wegen der Charakteristiken von Uhren mit automatischem Aufzug kann die angegebene „tägliche Genauigkeit“ unter den folgenden Bedingungen abweichen: die tägliche Tragedauer der Uhr, die Armbewegungen und der Aufzugzustand der Hauptfeder.
• Die Abweichung sollte nicht basierend auf einem Tag sondern einem Zeitraum von etwa einer Woche bestimmt werden.
Änderungen der technischen Daten zum Zweck der Verbesserung bleiben jederzeit vorbehalten.
♦ NAMEN UND FUNKTIONEN DER EINZELTEILE
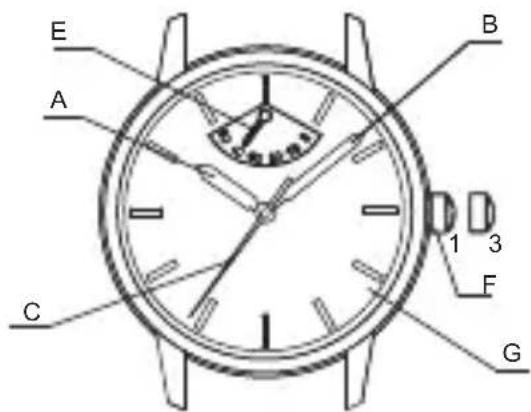
A: Stundenzeiger E: Kraftreserveanzeiger 1. Normalposition
B: Minutenzeiger F: Krone 2.
Erste Stufe: Kalender- einstellung
C: Sekundenzeiger G: Ziffernblatt
D: Datum 3. Zweite Stufe: Uhrzeit-
einstellung
text_image
E A B 1 3 C F G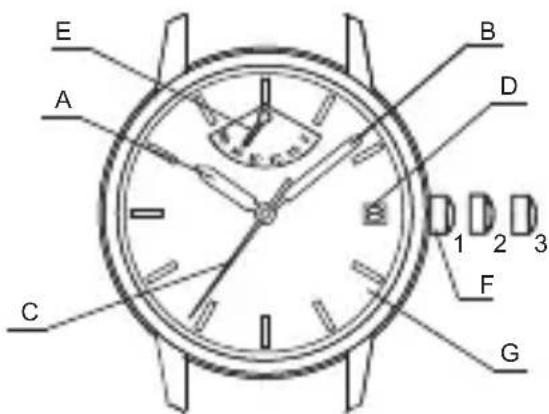
text_image
E A B D 1 2 3 C F G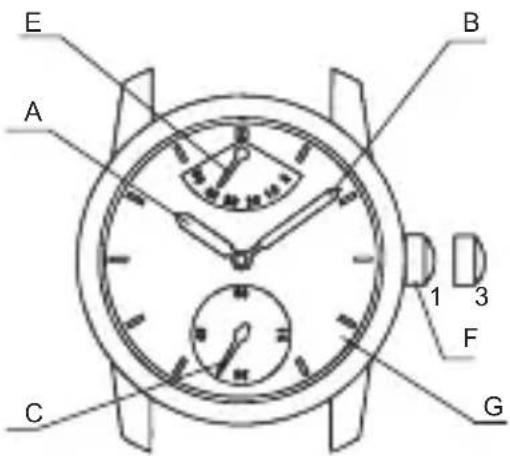
text_image
E A B 1 3 F C G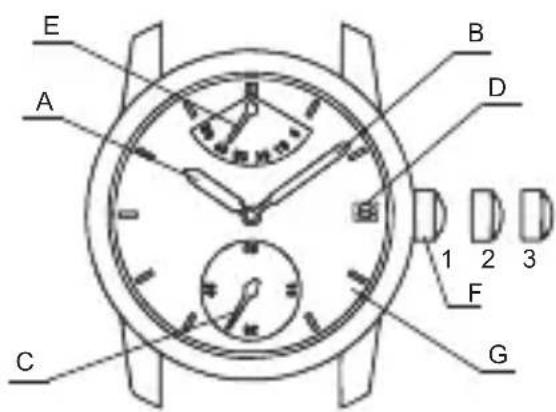
text_image
E A B D 1 2 3 C F G* Die Position von Krone und Kraftreserveanzeiger kann je nach Modell variieren.
♦ AUTOMATISCHER UND HANDAUFZIEHMECHANISMUS
(1) Dies ist eine mechanische Uhr mit automatischem Aufzug (mit Handaufzugsmechanismus).
(2) Die Hauptfeder wird durch die natürliche Bewegung Ihres Armes beim Tragen der Uhr am Handgelenk aufgezogen. Darüber hinaus kann die Hauptfeder auch durch Drehen der Krone aufgezogen werden.
(3) Wenn Ihre Uhr stehen bleibt, so schwenken Sie die Uhr mindestens zehn Mal hin und her oder drehen Sie die Krone zum Aufziehen der Hauptfeder, um die Bewegung des Sekundenzeigers zu starten. Nach Beginn der Bewegung stellen Sie Datum und Zeit ein.
(4) Drehen Sie die Krone in der Normalposition beim Aufziehen der Hauptfeder langsam nach rechts (im Uhrzeigersinn).
Das Drehen der Krone nach links (entgegen dem Uhrzeigersinn) hat keinen Effekt und zieht die Hauptfeder nicht auf.
Die Hauptfeder lässt sich vollständig aufziehen, indem die Krone aus einer gestoppten Position etwa 30 Mal nach rechts gedreht wird. Die Krone lässt sich auch nach dem vollständigen Aufziehen der Hauptfeder weiterhin drehen. Richten Sie sich beim Aufziehen der Uhr entweder an die oben genannte Zahl oder an die Gangreserveanzeige.
(5) Aufgrund eines Gleitmechanismus kann eine vollständig aufgezogene Uhr nicht zu weit aufgezogen werden.
(6) Diese Uhr läuft etwa 50 Stunden, wenn sie voll aufgezogen ist. Wenn die Uhr nicht ausreichend aufgezogen ist, kann sie ihre Ganggenauigkeit verlieren. Wir empfehlen, dass Sie die Uhr täglich mindestens acht Stunden tragen, um die Genauigkeit der Uhr zu erhalten.
◆ MODELLE MIT VERSCHRAUBBARER KRONE
Abhängig vom Modell müssen Sie die Krone erst losschrauben, bevor Sie sie herausziehen können (Modell mit verschraubbarer Krone).
Verfahren Sie bei diesem Uhrentyp wie folgt:
(1) Vor dem Einstellen von Datum und Zeit drehen Sie die Krone nach links, um die Verschraubung zu lösen.
natural_image
Illustration of a hand holding a wristwatch with a curved arrow indicating rotation (no text or symbols)(2) Drehen Sie die Krone nach dem Einstellen von Datum und Uhrzeit unter Druck nach innen nach rechts bis zum Anschlag. Hierdurch wird die Krone sicher verschraubt.
◆ EINSTELLEN VON UHRZEIT und DATUM [AU(F6N)] [AW(F6G] [Einstellen der Uhrzeit]
(1) Ziehen Sie die Krone bis zur zweiten Stufe heraus, wenn der Sekundenzeiger die 12-Uhr-Position erreicht hat. (Der Sekundenzeiger hält an.)
![Orient Star Classic RE-AW0003S - ◆ EINSTELLEN VON UHRZEIT und DATUM [AU(F6N)] [AW(F6G] [Einstellen der Uhrzeit] - 1](/content/2026/05/799093/images/f61e56045ebd6a2ea6bfdc0f8585c04b001af1d738c12d8403b19c957b92c310.jpg)
text_image
(2) Drehen Sie die Krone gegen den Uhrzeigersinn und stellen Sie die aktuelle Uhrzeit ein.
* Setzen Sie beim Einstellen der Uhrzeit den Zeiger zuerst etwas hinter die aktuelle Uhrzeit zurück, d. h. zu einem früheren Zeitpunkt, und bewegen Sie ihn dann zur korrekten Zeit hin.
* Stellen Sie bei einer Uhr mit Kalender zuerst sicher, dass entweder vormittags „a.m.“ bzw. nachmittags „p.m.“ richtig eingestellt ist. Das Datum ändert sich um Mitternacht.
![Orient Star Classic RE-AW0003S - ◆ EINSTELLEN VON UHRZEIT und DATUM [AU(F6N)] [AW(F6G] [Einstellen der Uhrzeit] - 2](/content/2026/05/799093/images/07aeda3b893199a7ec5936bf9f865fc3d7f2211647a6780a4b3c05db94e5d538.jpg)
text_image
Gegen den Uhrzeigersinn drehen(3) Drücken Sie die Krone nach innen zur normalen Position.
![Orient Star Classic RE-AW0003S - ◆ EINSTELLEN VON UHRZEIT und DATUM [AU(F6N)] [AW(F6G] [Einstellen der Uhrzeit] - 3](/content/2026/05/799093/images/52dc39811538a75da5818cdde8832f351df7e3920f5d0f7aee28191e73d454d7.jpg)
text_image
[Einstellen der Datum]
 Vermeiden Sie Einstellung des Datums während des Zeitraums von 8 Uhr abends bis 2 Uhr morgens, da der Kalender während dieses Zeitraums umgeschaltet wird. Wenn das Datum während dieses Zeitraums umgeschaltet wird, ändert es sich möglicherweise am nächsten Tag nicht oder es kann zu einer Fehlfunktion der Uhr kommen. Achten Sie darauf, die Zeiger aus diesem Bereich zu bewegen, wenn Sie das Datum einstellen. (1) Ziehen Sie die Krone bis zur ersten Stufe heraus. \* Die Krone dieser Uhr kann in zwei Raststellungen herausgezogen werden. natural_image
Diagram of a circular object with internal components and an arrow indicating direction (no text or symbols)text_image
Im Uhrzeigersinn drehen◆ EINSTELLEN DER UHRZEIT [AT(F6R)] [AV(F6F)] [Einstellen der Uhrzeit]
(1) Ziehen Sie die Krone bis zur ersten Stufe heraus, wenn der Sekundenzeiger die 12-Uhr-Position erreicht. (Der Sekundenzeiger hält an.) text_image
Gegen den Uhrzeigersinn drehentext_image
◆ GANGRESERVEANZEIGE
Die Gangreserveanzeige zeigt den Aufzug der Hauptfeder als Zeit an, so dass Sie sofort sehen können, wie lange die Uhr noch laufen wird. Der Aufzugreservezeiger zeigt die Aufzugmenge an. Diese entspricht der verbleibenden Laufzeit der Uhr. Wenn der Gangreservezeiger auf 50 oder der F-Markierung steht, ist die Hauptfeder vollständig aufgezogen. natural_image
Line drawing of a wristwatch with analog dial and frame (no text or symbols)◆ VERWENDEN DER EINER DREHBAREN ANZEIGE-LÜNETTEG
Bitte beachten Sie, dass einige Modelle mit einer internen rotierenden Ringanzeige ausgestattet sind, die ordnungsgemäß verwendet werden sollte. Drehen Sie die Lünette indem Sie die Markierung ▽ auf den Minutenzeiger weisen lassen. Während verschiedene Zeiten durchlaufen werden, können Sie die vergangene Zeit am Abstand zwischen dem Minutenzeiger und den Angaben auf der Anzeige-Lünette messen. Sie können auch die Markierung ▽ auf eine gewünschte Zeit einstellen, um Sie daran zu erinnern, wieviel Zeit bis zu einer wichtigen Verabredung verbleibt. text_image
Drehbare Lünette Verstrichene Zeit◆ VERWENDEN DER INTERNEN ROTIERENDEN RINGANZEIGEG
Bitte beachten Sie, dass einige Modelle mit einer internen rotierenden Ringanzeige ausgestattet sind, die ordnungsgemäß verwendet werden sollte. Drehen Sie die Krone für die interne rotierende Ringanzeige, um die Markierung „∇“ auf die Position des Minutenzeigers zu setzen. Die Position der internen rotierenden Ringanzeige, auf die der Minutenzeiger nach einiger Zeit zeigt, verweist auf die bisher verstrichene Zeit. Indem die Markierung auf die gewünschte Zeit gestellt wird, kann ebenfalls die bis dahin verbleibende Zeit angezeigt werden. text_image
- Markierung Krone für die interne rotierende Ringanzeigetext_image
Verstrichene Zeit 05 06 07 08ITALIANO
OROLOGIO MECCANICO CON INDICATORE CARICA RESIDUA E RICARICA AUTOMATICA E MANUALE
MANUALE DI ISTRUZIONI
Grazie di aver acquistato il nostro prodotto. Per garantire un uso prolungato e le migliori prestazioni, leggere con attenzione questo Manuale di istruzioni e familiarizzarsi con le clausole della garanzia. Tenere questo Manuale di istruzioni a portata di mano e consultarlo nel momento di bisogno.◆ PRECAUZIONI PER LA SICUREZZA
Osservare con la massima attenzione quanto specificato dai contrassegni sotto indicati per evitare qualsiasi pericolo di danneggiare cose e di ferire voi stessi e altre persone.  ... Questo simbolo indica la possibilità di causare morte o ferite gravi quando il prodotto viene utilizzato in modo diverso rispetto alle istruzioni fornite.  ... Questo simbolo indica la possibilità di ferire persone o danneggiare cose quando il prodotto viene utilizzato in modo diverso rispetto alle istruzioni fornite.◆ CURA DELL'OROLOGIO
(1) Resistenza all'acqua
| Tipo\Condizioni di impiego | Utilizzo della corona con l'orologio bagnato o immerso in acqua | Sport acquatici (nuoto, ecc.) e frequenti contatti con l'acqua (lavaggio dell'auto, ecc.) | Immersioni in apnea (senza bombola d'aria) | Immersioni con respi-ratore (con bombola d'aria) | Utilizzo della corona con l'orologio bagnato o immerso in acqua | Immersioni con miscele di gas (uso di gas d'elio) | ||
| Non resistente all'acqua | Senza WATER RESISTANT (WATER RESIST) | × × × × | × × | |||||
| Orologi resistenti all'acqua | Resistente all' acqua per l'uso giornaliero. | WATER RESISTANT (WATER RESIST) | × | ○ | × × | × × | ||
| Resistente all'acqua rinforzato per l'uso giornaliero I | WATER RESISTANT (WATER RESIST) 50m (5bar) | × | ○ | ○ | × × × | |||
| Resistente all'acqua rinforzato per l'uso giornaliero II | WATER RESISTANT (WATER RESIST) 100m (10bar) 200m (20bar) | × | ○ | ○ ○ | × | × | ||
| Orologi per immersioni | Orologio per immersioni con aria compressa | AIR DIVER'S 100m / 150m 200m | × | ○ | ○ ○ | ○ | × | |
| Orologio per immersioni con miscele di gas | He-GAS DIVER'S 200m / 300m /... | × | ○ | ○ ○ | ○ | ○ | ||
ATTENZIONE
① I comuni orologi impermeabili resistenti sino alla profondità di 30 metri (3 bar) possono essere usati a contatto con l'acqua, ad esempio quando ci si lava il viso, ma non dovrebbero essere impiegati in immersione. ② I comuni orologi impermeabili rinforzati per profondità sino a 50 metri (5 bar) possono essere usati durante il nuoto ma non dovrebbero essere impiegati in alcun tipo d'immersione, compresa quella in apnea. ③ I comuni orologi impermeabili rinforzati per profondità sino a 100-200 metri (10-20 bar) possono essere usati durante le immersioni in apnea ma non dovrebbero essere impiegati durante quelle con respiratore e ossigeno o o in saturazione d'elio. ④ Mantenere sempre la corona premuta (in posizione normale) quando si utilizza l'orologio. Se la corona è del tipo a vite ci si deve accertare che sia ben serrata. ⑤ Non utilizzare la corona con l'orologio immerso in acqua o bagnato. L'acqua potrebbe penetrare all'interno dell'orologio e comprometterne la resistenza all'acqua. ⑥ Se il modello non è impermeabile, fare attenzione agli spruzzi d'acqua (durante le abluzioni, la pioggia, ecc.) e al sudore. Se l'orologio si bagna con acqua o sudore, asciugarlo con un panno soffi ce e asciutto. ⑦ Anche con orologi resistenti all'acqua per uso normale, evitare forti getti o fl ussi diretti d'acqua verso l'orologio. Potrebbe essere applicata una pressione dell'acqua superiore al limite, che potrebbe comprometterne la resistenza all'acqua. ⑧ Con orologi resistenti all'acqua per uso normale, asciugare con cura l'acqua di mare dalla cassa dopo l'esposizione, per evitare corrosione e altri effetti indesiderati. ⑨ L'interno dell'orologio contiene una certa quantità di umidità, che potrebbe provocare formazione di condensa all'interno del vetro, quando l'aria esterna diventa più fredda della temperatura interna dell'orologio. Se la formazione di condensa è temporanea, non provoca danni all'interno dell'orologio, altrimenti, se prolungata o se all'interno dell'orologio penetra acqua, rivolgersi al rivenditore per risolvere il problema quanto prima possibile.(2) Urti
① Si raccomanda di togliere l'orologio dal polso durante la pratica di sport pesanti, mentre la pratica di quelli leggeri, ad esempio il golf, non v'influisce negativamente. ② Evitare urti violenti, come il lasciare cadere l'orologio per terra. natural_image
Simple line drawing of a person sweeping or cleaning a surface (no text or symbols)(3) Magnetismo
① Qualora l'orologio venga lasciato nelle vicinanze di un forte magnetismo per un tempo più o meno lungo, le parti componenti possono rimanere magnetizzate fino al punto di causare malfunzionamenti. È opportuno prestare la dovuta attenzione. ② L'orologio può temporaneamente andare avanti o indietro mentre rimane esposto al magnetismo, ma quando viene allontanato dal magnetismo esso riprende il suo funzionamento con la precisione originale. In questo caso correggere l'ora.(4) Vibrazioni
L'orologio può risultare meno preciso se esposto a forti vibrazioni, come in caso di guida di motociclette, o per l'uso di martelli pneumatici, seghe a catena, ecc. natural_image
Cartoon illustration of a person riding a motorcycle with motion lines indicating speed (no text or symbols)(5) Temperatura
Alle temperature inferiori o superiori a quelle normali (5-35°C) l'orologio potrebbe non funzionare correttamente o addirittura arrestarsi.  Non utilizzare l'orologio alle alte temperature, come ad esempio nelle saune. Potrebbe infatti riscaldarsi eccessivamente a causare ustioni.(6) Prodotti chimici, gas, ecc.
Prestare la massima cautela in caso di contatto con gas, mercurio, prodotti chimici (diluenti, benzina, solventi vari, detergenti contenenti tali componenti, prodotti adesivi, vernici, medicine, profumi, cosmetici) e così via. In questi casi si potrebbe verificare lo scolorimento della cassa dell'orologio, del cinturino e del quadrante. Si potrebbe anche verificare lo scolorimento, la deformazione e il danneggiamento di vari componenti a base di resina.(7) Informazioni sugli accessori
 Non tentare di disassembrare o modificare il prodotto.  Conservare perni e altri elementi di piccole dimensioni fuori dalla portata dei bambini. In caso di ingestione accidentale di piccoli pezzi, chiamare immediatamente un medico.(8) Reazioni allergiche
 In caso di arrossamento cutaneo, o se la pelle dovesse presentare irritazioni anomale causate dal contatto con l'orologio o con il cinturino, toglierlo immediatamente e consultare un medico.(9) Vernice luminescente
Le lancette e il quadrante di alcuni prodotti sono ricoperti da una vernice luminescente. Tale vernice, di tipo sicuro poiché non radioattiva, immagazzina la luce del sole e quella artificiale restituendola quindi al buio. Via via che libera la luce l'intensità luminosa si riduce gradualmente. La quantità di luce emessa e la durata dell'emissione dipendono dai vari fattori in atto nel periodo d'immagazzinamento, tra i quali la forma del vetro, lo spessore della vernice stessa, il livello di luminosità circostante, la distanza dell'orologio dalla sorgente luminosa e il livello di assorbimento. Va infine notato che quando la quantità di energia luminosa immagazzinata è insufficiente l'orologio ne potrebbe emettere poca, oppure per un tempo limitato.(10) Cinturino impermeabile
Alcuni prodotti impiegano cinturini di pelle e nylon sottoposti a uno speciale trattamento per renderli impermeabili e resistenti alla traspirazione. La durata dell'effetto di resistenza all'acqua dipende dal periodo e dalle condizioni di utilizzo del cinturino.◆ COME IDENTIFICARE IL CALIBRO DELL'OROLOGIO
Il calibro va ricavato dal nome di modello dell'orologio o dal codice impresso sul fondello della cassa.1. Individuazione dal nome del modello a 13 cifre
Il nome del modello a 13 cifre è ricavabile dalla scheda di garanzia fornita con l'orologio. È altresì ricavabile dall'etichetta che appare sull'orologio stesso. La quarta e la quinta cifra ne indicano, appunto, il calibro. Esempio: Se il nome del modello è "RE-AT0001L00B" il calibro è "AT".2. Individuazione dal codice della cassa
Il codice della cassa, ad esempio XXXX-XXXX, è riportato sul fondello dell'orologio. Le prime tre cifre indicano il calibro. Esempio: Se il nome del codice della cassa è "F6R4-UAA0" il calibro è "F6R". \* L'ubicazione del codice della cassa può cambiare, e i relativi caratteri essere più piccoli e pertanto difficili da leggere, a seconda delle caratteristiche dell'orologio. \* Le immagini e le illustrazioni riportate nel manuale potrebbero differire dall'aspetto effettivo dell'orologio in proprio possesso, pur rimanendo identiche le funzioni e le procedure d'uso. ♦ DATI CARATTERISTICI| Calibro | Numero di rubini Data | Meccanismo di arresto della lancetta dei secondi | ||
| AT F6R | 22 | - | ○ | |
| AU F6N | 22 | ○ | ○ | |
| AV F6F | 24 | - | ○ | |
| AW F6G | 24 | ○ | ○ | |
♦ NOME E FUNZIONI DELLE PARTI
A: Lancetta delle ore E: Lancetta della carica residua B: Lancetta dei minuti F: Corona C: Lancetta dei secondi G: Quadrante D: Data 1 Posizione normale 2 Primo clic: Impostazione del calendario 3 Secondo clic: impostazione dell'oratext_image
E A B 1 3 C F Gtext_image
E A B D 1 2 3 C F Gtext_image
E A B 1 3 C F Gtext_image
E A B D 1 2 3 C F G◆ MECCANISMO DI RICARICA AUTOMATICA E MANUALE
(1) Questo è un orologio meccanico a caricamento automatico. (provvisto di un meccanismo di carica manuale). (2) La molla principale viene caricata dai movimenti naturali del braccio mentre si porta l'orologio sul polso. Inoltre, è anche possibile caricare la molla principale ruotando la corona. (3) Se l'orologio si ferma, far oscillare l'orologio avanti indietro dieci o più volte o ruotare la corona per caricare la molla principale in modo da riavviare la lancetta dei secondi. Dopo l'avvio del movimento si può impostare la data e l'ora. (4) Quando si carica la molla principale, ruotare lentamente la corona verso destra (in senso orario) mentre si trova nella sua posizione normale. La rotazione della corona verso sinistra (in senso antiorario) non ha alcun effetto sulla carica della molla principale. È possibile ricaricare completamente la molla principale girando la corona a destra per circa 20 volte da una posizione di fermo. È possibile ruotare la corona anche se la molla principale è completamente carica. Durante la carica dell'orologio, usare il conteggio indicato sopra o i segni sull'indicatore della carica residua. (5) Anche se la molla principale viene caricata completamente, non verrà ricaricata eccessivamente a causa del meccanismo di scivolamento. (6) Con un caricamento completo, l'orologio funziona per circa 50 ore. Se non ha abbastanza carica, l'orologio potrebbe ritardare. Per mantenere la precisione dell'orologio si raccomanda d'indossarlo almeno 8 ore al giorno. natural_image
Illustration of a hand holding a wristwatch with an arrow indicating rotational motion (no text or symbols)◆ MODELLO DI TIPO CON CORONA AD AVVITAMENTO
A seconda del modello, potrebbe non essere possibile estrarre la corona senzasvitarla (Modello di tipo con corona ad avvitamento). Azionare questo tipo di orologio nel modo descritto di seguito: (1) Prima di impostare data e ora, ruotare la corona verso sinistra per allentarel'avvitamento. (2) Dopo aver impostato data e ora, ruotare la corona verso destra, mentre la si tiene premuta, fino a quando smette di ruotare. In questo modo la vite sarà avvitata saldamente.◆ IMPOSTAZIONE DELL'ORA E DELLA DATA [AU(F6N)] [AW(F6G)] [Impostazione dell'ora]
(1) Estrarre la corona fino al secondo clic quando la seconda lancetta raggiunge le 12. (La seconda lancetta si ferma.)text_image
[Impostazione della data]
ATTENZIONE
Evitare di impostare la data tra le 8:00 p.m. e le 2:00 a.m., poiché in questo periodo è situato il cambio di data. Se si imposta la data in questo periodo di tempo, la data potrebbe non cambiare sul giorno successivo oppure l'orologio potrebbe non funzionare correttamente. Quando si imposta la data, accertarsi di spostare la lancetta lontano da questo periodo di tempo. (1) Estrarre la corona fino al primo clic. \* La corona di questo orologio può essere estratta al primo o al secondo clic. natural_image
Diagram of a circular dial with internal components and an arrow indicating direction (no text or symbols)text_image
Girare in senso orario ITALIANO◆ IMPOSTAZIONE DELL'ORA [AT(F6R)] [AV(F6F)]
[Impostazione dell'ora]
(1) Estrarre la corona fino al primo clic quando la seconda lancetta raggiunge le 12. (La seconda lancetta si ferma.) text_image
Ruotare in senso antiorariotext_image
◆ INDICATORE DELLA CARICA RESIDUA
L'indicatore della carica residua mostra la quantità di carica dell'orologio sotto forma di quantità di tempo, in modo che si possa verificare subito per quanto tempo funzionerà ancora l'orologio. Quando la manina della riserva di carica indica 50 o F, la molla principale è completamente carica. natural_image
Line drawing of a wristwatch with analog face and minute hand (no text or symbols)◆ COME UTILIZZARE LA LUNETTA ROTANTE CON INDICATORE
Alcuni modelli sono dotati di un anello indicatore rotante interno che deve essere in modo adeguato. Ruotare la lunette sino a far coincidere il simbolo ▽ con la lancetta dei minuti. È così possibile misurare il tempo trascorso osservando la distanza angolare tra la lancetta dei minuti e le cifre riportate sulla lunetta rotante. Ruotando lo stesso simbolo ▽ sul punto desiderato si può inoltre ottenere l'indicazione del tempo residuo. Essendo provvista di un meccanismo di protezione che ne impedisce la rotazione a forza o per impatto, la lunetta non può essere ruotata al contrario. Le cifre disposte sulla lunetta facilitano infine la lettura dell'ora attuale. text_image
Lunetta rotante con indicatore Tempo trasc orso◆ COME UTILIZZARE L'ANELLO INDICATORE ROTANTE INTERNO
Alcuni modelli sono dotati di un anello indicatore rotante interno che deve essere in modo adeguato. Ruotare la corona per l'anello indicatore rotante interno sino a far coincidere il simbolo ▽ - con la posizione della lancetta dei minuti. La posizione dell'anello indicatore rotante interno su cui punta la lancetta dei minuti indica il tempo trascorso. Ruotando lo stesso simbolo sull'ora desiderata, è possibile anche sapere il tempo residuo. text_image
- simbolo Corona per l'indicatore rotante internotext_image
45 91 Tempo trasc αsESPAÑOL
RELOJ MECÁNICO AUTOMÁTICO Y DE CUERDA MANUAL CON INDICADOR DE RESERVA DE ENERGÍA
MANUAL DE INSTRUCCIONES
Gracias por adquirir un producto de nuestra compañía. Lea cuidadosamente este manual de instrucciones para familiarizarse con la operación y los términos de la garantía. Guarde este manual a mano para futuras consultas.◆ PRECAUCIONES DE SEGURIDAD
Asegúrese absolutamente de observar los contenidos demarcados indicados abajo para evitar de antemano ocasionar daños materiales, o personales a usted u otras personas involucradas.  ... Un contenido demarcado con este símbolo indica peligro de muertte o de sufrir graves daños personales si el producto no es usado como se especifica en las instrucciones suministradas.  ... Un contenido demarcado con este símbolo indica la posibilidad de ocasionar solamente daños personales o materiales si el producto no es usado como se especifica en las instrucciones suministradas.◆ ACERCA DEL MANEJO DEL RELOJ
(1) Resistencia al agua
| Tipo\Condiciones de uso | Operación de la corona bajo el agua con gotas de agua sobre ella | Exposición a pequeñas cantidades de agua (lavarse las manos, lluvia, etc.) | Deportes acuáticos (natación, etc.), contacto frecuente con agua (lavado de autos, etc.) | Buceo sin botellas de aire (no se utilizan tanques de aire) | Buceo con botellas de aire (se utilizan tanques de aire) | Buceo con aire mixto (con helio) | ||
| No resistente al agua | Sin WATER RESISTANT (WATER RESIST) | × × × × | × × | |||||
| Relojes resistentes al agua | Resistente al agua para uso diario normal | Con WATER RESISTANT (WATER RESIST) | × | ○ | × × | × × | ||
| Resistente al agua reforzado para uso diario normal I | Con WATER RESISTANT (WATER RESIST) 50 m (5 bar) | × | ○ | ○ | × × × | |||
| Resistente al agua reforzado para uso diario normal II | Con WATER RESISTANT (WATER RESIST) 100 m (10 bar) 200 m (20 bar) | × | ○ | ○ ○ | × | × | ||
| Relojes para buceadores | Reloj para buceo con botellas de aire | AIR DIVER'S 100 m / 150 m 200 m | × | ○ | ○ ○ | ○ | × | |
| Reloj para buceo con gas mixto | He-GAS DIVER'S 200 m / 300 m /... | × | ○ | ○ ○ | ○ | ○ | ||
PRECAUCIÓN
① Un reloj de uso diario, con estanqueidad para 30 m (3 bar), puede usarse para el lavado diario de la cara, etc., pero no podrá sumergirse en agua. ② Un reloj con estanqueidad reforzada para uso diario I 50 m (5 bar) puede utilizarse para practicar natación, etc., pero no puede utilizarse para practicar buceo, inclusive buceo libre. ③ Un reloj con estanqueidad reforzada de uso diario II, 100 m o 200 m (10 ó 20 bar) puede utilizarse para practicar buceo libre, pero no puede utilizarse para practicar buceo de profundidad, con tanques de oxígeno, ni buceo de saturación que utilice gas helio, etc. ④ Mantenga siempre la corona hacia adentro (en la posición normal) mientras lleva puesto el reloj. Si la corona es del tipo de bloqueo por rosca, compruebe que esté firmemente enroscada. ⑤ No opere la corona bajo el agua o cuando el reloj esté mojado. El agua podría entrar en el interior del reloj y dañar la resistencia al agua. ⑥ Si su reloj no es resistente al agua, cuídese de las salpicaduras de agua (durante el lavado de cara, lluvia, etc.) y del sudor. Si el reloj llegara a mojarse con agua o sudor, séquelo con un paño suave y seco. ⑦ Incluso con un reloj resistente al agua para el uso diario, evite poner el reloj debajo de un chorro fuerte de agua. Podría aplicarse una presión de agua por encima del límite, y dañar la resistencia al agua. ⑧ Con un reloj resistente al agua para el uso diario, limpie la caja si ha estado expuesto al agua del mar, y a continuación séquelo por completo para evitar la oxidación y otros efectos perjudiciales. ⑨ El interior del reloj contiene una cierta cantidad de humedad, la cual podría causar el empañamiento sobre el lado interior del cristal cuando la temperatura del aire exterior esté por debajo de la temperatura interna del reloj. Si el empañamiento es temporal, no causará ningún daño en el interior del reloj, pero si es prolongado, o si penetrara agua en el reloj, no deje este problema sin tratar, póngase en contacto con el vendedor.(2) Golpes
① Asegúrese de quitarse el reloj cuando participe en deportes extenuantes, aunque el uso del reloj para un deporte ligero como el golf, etc., no tendrá efectos perjudiciales. ② Evite los impactos fuertes, como dejarlo caer al suelo.(3) Magnetismo
natural_image
Simple line drawing of a person using a tool to clean or dig (no text or symbols)(4) Vibraciones
El reloj puede retrasarse temporalmente si se expone a vibraciones fuertes, como al conducir una moto o al utilizar martillos mecánicos, sierras de cadena, etc. natural_image
Simple line drawing of a person riding a motorcycle with motion lines indicating speed (no text or symbols)(5) Temperaturas
En ambientes por debajo o por encima de la gama de temperaturas normales (5°C a 35°C), el reloj puede funcionar defectuosamente y detenerse.  No utilice el reloj a altas temperaturas, por ejemplo, en un sauna. El reloj podría calentarse y causarle quemaduras.(6) Sustancias químicas, gases, etc.
Preste suma atención al entrar en contacto con gases, mercurio, sustancias químicas (diluyente, gasolina, diversos disolventes, detergentes que contengan tales componentes, adhesivos, pinturas, medicinas, perfumes, cosméticos, etc.), y otros productos similares. El contacto con tales sustancias podrá ocasionar la decoloración de la caja del reloj, la correa y la esfera. También podrán decolorarse, deformarse y dañarse varios componentes fabricados a base de resinas.(7) Acerca de los accesorios
 No intente desmontar o modificar este producto.  Guarde el broche de la pulsera/correa y otras piezas pequeñas fuera del alcance de los niños. Si se ingiere accidentalmente alguna pieza pequeña, consulte inmediata- mente a un médico.(8) Reacciones alérgicas
 Si ha experimentado irritación en la piel o ha sufrido una irritación anormal a causa del contacto con el reloj o la correa, deje de usar el reloj inmediatamente y consulte a un médico.(9) Sobre la "luz luminosa"
En algunos relojes se iluminan las manecillas y la esfera. La luz luminosa es una pintura segura que almacena luz solar y luz artificial, sin hacer uso de ningún material radioactivo, y que emite luz en lugares oscuros. La luminosidad se desvanece gradualmente, a medida que la pintura descarga la luz almacenada. La cantidad de luz emitida y su duración dependen de varios factores vinculados al almacenamiento de la luz, por ejemplo la forma del cristal, el espesor de la pintura, el nivel de brillo circundante, la distancia entre el reloj y la fuente de luz, y el nivel de absorción de luz. Por favor tenga en cuenta que cuando no se almacene suficiente energía lumínica, el reloj podría emitir una luz débil o emitirla sólo por un tiempo breve.(10) Correa resistente al agua
Algunos productos emplean correas de cuero y nilón que han recibido un tratamiento especial para resistir la transpiración y la absorción de agua. Tenga en cuenta que el efecto de resistencia al agua de esta correa se puede perder, dependiendo de los periodos y condiciones de uso.◆ CÓMO IDENTIFICAR EL NÚMERO DE CALIBRE
Compruebe el número de calibre consultando el número de modelo del reloj o el código de caja en la parte posterior de la caja del reloj.1. Búaqueda por número de modelo de 13 dígitos
Compruebe el número de modelo de 13 dígitos en la garantía suministrada con su reloj. Asimismo el número podrá encontrarse en la etiqueta del producto que viene con el reloj. Los dígitos cuarto y quinto indican el número de calibre de su reloj. Ejemplo: Si el número de modelo es "RE-AT0001L00B", el número de calibre será "AT".2. Búsqueda por código de la caja
Vea el código de la caja en la parte posterior de su reloj como XXXX-XXXX. Los tres primeros dígitos indican el número de calibre. Ejemplo: Si el código de la caja es "F6R4-UAA0", el número de calibre será "F6R". \* Dependiendo de las características del reloj, el lugar en que está inscrito el código de la caja puede variar y sus letras pueden ser pequeñas y difíciles de leer. \* La apariencia de su reloj puede diferir de aquella en las fotos e ilustraciones de este manual, pero las funciones y los procedimientos operativos son los mismos. ◆ ESPECIFICACIONES| Calibre | Número de joyas Fecha | Mecanismo de deten-ción de la manecilla de los segundos | ||
| AT F6R | 22 | - | ○ | |
| AU F6N | 22 | ○ | ○ | |
| AV F6F | 24 | - | ○ | |
| AW F6G | 24 | ○ | ○ | |
◆ PARTES COMPONENTES Y SUS FUNCIONES
A: Manecilla de la hora E: Manecilla de reserva de energía B: Manecilla de los minutos F: Corona C: Manecilla de los segundos G: Dial D: Fecha 1 Posición normal 2 Primera posición: Configuración de calendario 3 Segunda posición: ajuste de la horatext_image
E A B 1 3 C F Gtext_image
E A B D 1 2 3 C F Gtext_image
E A B 1 3 C F Gtext_image
E A B D 1 2 3 C F G◆ MECANISMO AUTOMÁTICO Y DE CUERDA MANUAL
(1) Este es un reloj mecánico con mecanismo de cuerda automático. (con mecanismo de cuerda manual). (2) Lo que le da cuerda al muelle principal son los movimientos naturales del brazo mientras lleva el reloj en su muñeca. También puede dar cuerda al muelle principal girando la corona. (3) De pararse el reloj, agítelo en un vaivén unas diez veces o más o gire la corona para darle cuerda y restablecer el segundoo. natural_image
Illustration of a hand holding a wristwatch with an arrow indicating rotational motion (no text or symbols)◆ MODELO CON CORONA DEL TIPO DE BLOQUEO POR ROSCA
Dependiendo del modelo, es posible que no pueda extraer la corona sin desenroscarla (modelo con corona del tipo de bloqueo por rosca). Si su reloj es de este tipo, proceda de la siguiente manera: (1) Cuando desee ajustar la fecha y la hora, primero gire la corona hacia la izquierda para aflojar la rosca. (2) Después de ajustar la fecha y la hora, gire la corona hacia la derecha mientras la presiona hacia adentro, hasta que deje de girar. La rosca quedará firmemente apretada.♦ COMO ESTABLECER LA HORA Y LA FECHA [AU(F6N)] [AW(F6G)]
[Cómo ajustar la hora]
(1) Saque la corona hasta la segunda posición de chasquido cuando la manecilla de segundos haya alcanzado la posición de las 12 en punto. (La manecilla de segundos se detiene) text_image
Gire hacia la izquierdatext_image
[Ajuste de la fecha]
PRECAUCIÓN
Evite ajustar la fecha entre las 8:00 p.m. y las 2:00 a.m., debido a que en esta zona se efectúa el cambio de calendario. Si ajusta la fecha en esta zona horaria, puede suceder que no cambie de fecha al día siguiente, o que el reloj funcione de manera incorrecta. Cuando efectúe el ajuste de la fecha, asegúrese de mover la manecilla fuera de esta zona. (1) Saque la corona hasta la primera posición de chasquido. \* La corona de este reloj cuenta con dos posiciones de chasquido, primera y segunda. (2) Gire la corona en sentido horario y ajuste la fecha al día actual. (3) Devuelva la corona hasta la posición normal. natural_image
Diagram of a circular object with internal components and an arrow indicating direction (no text or symbols)text_image
Gire hacia la derechanatural_image
Diagram of a circular dial with a pointer and dashed rectangular segments, no text or symbols present◆ CÓMO AJUSTAR LA HORA [AT(F6R)] [AV(F6F)] [Cómo ajustar la hora]
(1) Saque la corona en el primer chasquido cuando la manecilla de segundos haya alcanzado la posición de las 12 en punto. (La manecilla de segundos se detiene) text_image
60 45 51 DEtext_image
Gire hacia la izquierdatext_image
text_image
60 15 20 08◆ INDICADOR DE RESERVA DE MARCHA
El indicador de reserva de marcha muestra el grado de cuerda del reloj en términos de tiempo, para permitirle saber la autonomía del reloj, a simple vista. La manecilla de reserva de marcha indica la marcha restante. Cuando la manecilla de reserva de energía indica la marca 50 o F, el muelle principal estará completamente enrollado. natural_image
Line drawing of a wristwatch with analog clock face and wrist strap (no text or symbols)◆ CÓMO USAR EL BISEL INDICADOR GIRATORIO
Tenga en cuenta que algunos modelos vienen con un anillo indicador giratorio interior, que debe utilizarse debidamente. Gire el bisel dirigiendo la marca ▽ hacia la manecilla de minutos. Después de un cierto tiempo, podrá medir el tiempo transcurrido a partir de la distancia entre la manecilla de minutos y las cifras del bisel giratorio. Asimismo podrá ajustar la marca ▽ a una hora dada, como un recordatorio del tiempo que le falta para un compromiso. text_image
Bisel giratorio Tempo trasciso◆ CÓMO USAR EL ANILLO INDICADOR GIRATORIO INTERIOR
Tenga en cuenta que algunos modelos vienen con un anillo indicador giratorio interior, que debe utilizarse debidamente. Gire la corona para el anillo indicador giratorio interior para ajustarlo en la ▽ - marca en la posición de la manecilla de minutos. La posición del anillo indicador giratorio interior a la que apunta la manecilla de minutos después de haber transcurrido cierto tiempo indica el tiempo transcurrido. El ajuste de la marca en la hora deseada le permite saber también el tiempo restante. text_image
- marca Corona para el indicador giratorio interiortext_image
05 08 19 Tempo trascot 50РУССКИЙ
МЕХАНИЧЕСКИЕ ЧАСЫ С ИНДИКА ТОРОМ ЗАПАСА ХОДА И АВТОМАТИЧЕСКИМ И РУЧНЫМ ЗАВОДОМ
ИНСТРУКЦИЯ ПО ЭКСПЛУАТАЦИИ
Благодарим Вас за то, что Вы выбрали наше изделие! Для длительного и эффективного пользования изделием прочитайте данную инструкцию и ознакомьтесь с условиями гарантии. Сохраните эту инструкцию для использования в дальнейшем.◆ МЕРЫ ПРЕДОСТОРОЖНОСТИ
Строго соблюдайте приведенные ниже инструкции для предотвращения любого ущерба здоровью и повреждения Вашего имущества и имущества других лиц.  ... Данный символ означает возможность летального исхода или серьезных травм в случае, если данный продукт будет использоваться любым способом, отличным от приведенных инструкций.  ... Данный символ означает возможность серьезных травм или материального ущерба только в том случае, если данный продукт будет использоваться любым иным способом, отличным от приведенных инструкций.◆ ПРИ ОБРАЩЕНИИ С ЧАСАМИ
(1) Водонепроницаемость| Тип\Условия эксплуатации | Работа головки под водой и работа головки с каплями воды на ней | Воздействие небольших количеств воды (умывание, дождь и т. д.) | Водные виды спорта (плавание и т. п.), частые контакты с водой (мойка автомобиля и т. п.) | Подводное плавание (без использования кислородных баллонов) | Подводное плавание (с использованием кислородных баллонов) | Погружение с дыхательной смесью (с использованием гелия) | ||
| Водопроницаемые | Без маркировки WATER RESISTANT (WATER RESIST) | × × × × | × × | |||||
| Водонепроницаемые часы | Водонепроницаемые для повседневного использования | WATER RESISTANT (WATER RESIST) | × | ○ | × × | × × | ||
| Усиленная водонепрницаемость класса I для повседневного использования | WATER RESISTANT (WATER RESIST) 50m (5bar) | × | ○ | ○ | × × × | |||
| Усиленная водонепрницаемость класса II для повседневного использования | WATER RESISTANT (WATER RESIST) 100m (10bar) 200m (20bar) | × | ○ | ○ | ○ | × | × | |
| Дайверские часы | Дайверские часы для погружений с аквалангом | AIR DIVER'S 100m / 150m 200m | × | ○ | ○ | ○ | × | |
| Дайверские часы для погружений с дыхательной смесью | He-GAS DIVER'S 200m / 300m /... | × | ○ | ○ | ○ | ○ | ||
ВНИМАНИЕ
① Часы с водонепроницаемостью для повседневного использования 30 м (3 бар) могут использоваться во время умывания и т. п., но не могут использоваться в условиях, при которых они будут погружаться в воду. ② Часы с усиленной водонепроницаемостью для повседневного использования класса I 50 м (5 бар) могут использоваться во время плавания и т. п., но не могут использоваться во время ныряния или подводного плавания. ③ Часы с усиленной водонепроницаемостью для повседневного использования класса II 100 м или 200 м (10 или 20 бар) могут использоваться во время ныряния или подводного плавания, но не могут использоваться во время подводного плавания с кислородным баллоном или выполнения водолазных работ с автономными дыхательными аппаратами на гелии. ④ При эксплуатации часов головка должна находиться в утопленном (нормальном) положении. Если головка относится к типу завинчивающихся, то она должна быть плотно завинчена. ⑤ Не используйте головку под водой или если на часах имеется влага. Вода может проникнуть внутрь корпуса часов и нарушить их герметичность. ⑥ Если Ваши часы не являются водонепроницаемыми, то не допускайте попадания на них водяных брызг (во время умывания, в дождливую погоду и т. д.), а также запотевания. При попадании на часы воды или при запотевании удалите влагу с помощью сухой мягкой ткани. ⑦ Даже если Ваши часы, предназначенные для повседневного использования, обладают водонепроницаемостью, не допускайте воздействия на них сильной струи воды. При превышении допустимого уровня давления воды может быть нарушена герметичность часов. ⑧ При попадании на Ваши водонепроницаемые часы, предназначенные для повседневного использования, морской воды, стряхните воду и протрите корпус насухо, чтобы не допустить возникновения коррозии или иных негативных последствий. ⑨ Внутри корпуса часов содержится небольшое количество влаги. Поэтому когда температура окружающего воздуха ниже температуры воздуха внутри корпуса часов, на внутренней поверхности стекла может образовываться запотевание. Если запотевание носит временный характер, то это не наносит вреда часам. Однако если запотевание остается на стекле продолжительное время или если в часы попала вода, проконсультируйтесь по месту приобретения часов и не оставляйте эту проблему без внимания.(2) Ударопрочность
① Снимайте часы во время занятий энергичными видами спорта, однако, занятие такими видами спорта, как гольф и т. д., не окажет негативного воздействия на состояние часов. ② Избегайте сильного удара типа падения часов на пол.(3) Воздействие магнитных полей
natural_image
Simple line drawing of a person using a tool to clean or dig (no text or symbols)(4) Вибрация
Часы могут потерять точность, если будут подвержены сильной вибрации, например, вызываемой поездкой на мотоцикле, использованием отбойного молотка, цепной пилы и т. д. natural_image
Simple line drawing of a person riding a motorcycle with motion lines indicating speed (no text or symbols)(5) Температура
Часы могут идти неправильно или остановиться при температурах ниже или выше нормального диапазона (5°C – 35°C). ВНИМАНИЕ
Не пользуйтесь часами при высокой температуре (например, в сауне). Часы могут нагреваться и вызывать ожоги.(6) Химические вещества, газы и т.п.
Следует соблюдать максимальную осторожность при контакте с газами, ртутью, химическими веществами (разбавителем для краски, бензином, различными растворителями, моющими средствами, содержащими такие вещества, клеями, красками, лекарственными препаратами, парфюмерией, косметикой и пр.) и т.п. Эти вещества могут изменить цвет корпуса часов, браслета/ремешка и циферблата. Возможны также изменение цвета, деформация и повреждение полимерных компонентов.(7) Дополнительные детали
 Не пытайтесь разбирать или вносить изменения в конструкцию изделия.  Не давайте шпильки браслета/ремешка и другие мелкие детали детям. В случае проглатывания мелкой детали немедленно обратитесь к врачу.(8) Аллергические реакции
 Боли после контакта с браслетом на коже появляется сыпь или раздражение, прекратите носить часы и незамедлительно обратитесь к врачу.(9) Люминесцентное покрытие
На некоторых часах имеется люминесцентное покрытие на стрелках и ци- ферблате. Оно выполнено из безопасной нерадиоактивной краски, накапливающей солнечный и искусственный свет и отдающей его в темноте. Отдавая накопленный свет, покрытие постепенно становится более тусклым. Количество отдаваемого света и время свечения зависят от различных факторов: формы стекла, толщины слоя краски, уровня яркости окружающей среды, расстояния от часов до источника света и степени поглощения света. Помните, что если накоплено немного света, часы будут светиться слабо или недолго.(10) Водонепроницаемый браслет
В некоторых моделях используются кожаные и нейлоновые ремешки, подвергнутые специальной обработке для защиты от потоотделения и воздействия воды. Свойство водонепроницаемости данного браслета может быть потеряно в зависимости от периода и условий эксплуатации.◆ ОПРЕДЕЛЕНИЕ НОМЕРА КАЛИБРА
Проверьте номер калибра Ваших часов по номеру модели часов или коду корпуса на задней крышке корпуса часов.1. Поиск по 13-значному номеру модели
Проверьте 13-значный номер модели на гарантийном талоне, прилагаемом в комплекте поставки часов. Вы также можете найти номер на этикетке изделия, прикрепленной к часам. Четвертый и пятый знак номера указывают номер калибра ваших часов. Пример: Если номер модели представляет собой "RE-AT0001L00B", то номер калибра — "АТ".2. Поиск по коду корпуса
Найдите код корпуса, указанный как XXXX-XXXX, на задней крышке корпуса Ваших часов. Первые три цифры соответствуют номеру калибра. Пример : Если код корпуса "F6R4-UAA0", то номер калибра — "F6R". \* В зависимости от характеристик часов расположение кода корпуса может отличаться, его знаки могут иметь маленький размер и быть трудно различимыми. \* Рисунки и иллюстрации в данной инструкции могут отличаться от реального вида Ваших часов, однако функции и рабочие процедуры остаются неизменными. ◆ ТЕХНИЧЕСКИЕ ХАРАКТЕРИСТИКИ| Калибр | Количество камней Дата | Механизм остановки секундной стрелки | ||
| AT F6R | 22 | – | ○ | |
| AU F6N | 22 | ○ | ○ | |
| AV F6F | 24 | – | ○ | |
| AW F6G | 24 | ○ | ○ | |
◆ НАЗВАНИЯ И НАЗНАЧЕНИЕ КОМПОНЕНТОВ
A: Часовая стрелка E: Стрелка индикатора завода В: Минутная стрелка F: Головка C: Секундная стрелка G: Циферблат D: Дата 1 Нормальное положение 2 Второй щелчок: установка календаря 3 Первый щелчок: установка датыtext_image
text_image
E A B D 1 2 3 C F Gtext_image
E A B 1 3 F C Gtext_image
E A B D 1 2 3 C F G◆ МЕХАНИЗМ АВТОМАТИЧСЕКОГО И РУЧНОГО ЗАВОДА
(1) Данные часы - механические, они оснащены функцией автоматического завода. (с механизмом ручного подзавода). (2) При ношении часов на запястье пружина заводится от естественных движений руки. Основную пружину можно также завести с помощью головки. (3) Если часы остановились, покачайте их из стороны в сторону более десяти раз, либо заведите основную пружину с помощью головки, чтобы запустить секундную стрелку. После того, как стрелка будет запущена, установите дату и время. (4) При заводе основной пружины медленно поворачивайте головку вправо (по часовой стрелке) до стандартного положения. При повороте влево (против часовой стрелки) головка прокручивается и основная пружина не заводится. Ходовую пружину можно завести, повернув головку из положения остановки по часовой стрелке около 20 раз. Головку можно поворачивать дальше, даже если пружина полностью заведена. При заводе часов ориентируйтесь на количество оборотов, указанное выше, либо на показания индикатора запаса хода. (5) Даже при полном заводе пружины ее нельзя перетянуть благодаря предохранительному механизму. (6) С полным заводом часы будут идти приблизительно 50 часов. Если часы заведены недостаточно, точность хода может отличаться от заявленной. Для обеспечения точности хода часы рекомендуется носить не менее 8 часов в день. natural_image
Illustration of a hand holding a wristwatch with an arrow indicating rotational motion (no text or symbols)◆ МОДЕЛИ С ЗАВИНЧИВАЮЩЕЙСЯ ГОЛОВКОЙ
В некоторых моделях Вы не сможете вытянуть головку, не выкрутив ее (модели с завинчивающейся головкой). Для эксплуатации часов данного типа: (1) Перед установкой даты и времени поверните головку против часовой стрелки, чтобы разблокировать винт. (2) Установив дату и время, нажмите на головку и поверните ее по часовой стрелке до упора, чтобы заблокировать винт.◆ КАК УСТАНОВИТЬ ВРЕМЯ И ДАТУ [AU(F6N)] [AW(F6G)] [Установка времени]
(1) Вытяните головку до второго щелчка, когда секундная стрелка будет на цифре 12. (Секундная стрелка остановится.) text_image
Поворачивайте против часовой стрелкиtext_image
[Установка даты]
ВНИМАНИЕ
Не рекомендуется корректировать дату в промежутке от 20:00 до 2:00, поскольку в это время меняется дата. При установке даты в этот промежуток времени она может не смениться вовремя, либо может возникнуть сбой в работе часов. При установке даты обязательно переведите часовую и минутную стрелку на другой промежуток времени. (1) Вытяните головку до первого щелчка. \* На данных часах головку можно выдвигать до первого и второго щелчка. natural_image
Diagram of a circular object with internal components and an arrow indicating direction (no text or symbols)text_image
Поверните по часовой стрелкеnatural_image
Diagram of a circular dial with tick marks and a pointer, showing directional arrows (no text or symbols)◆ КАК УСТАНОВИТЬ ВРЕМЯ [AT(F6R)] [AV(F6F)]
[Установка времени]
(1) Вытяните головку до первого щелчка, когда секундная стрелка будет на цифре 12. (Секундная стрелка остановится.) text_image
50 60 51 30 →text_image
Поворачивайте против часовой стрелкиtext_image
◆ ИНДИКАТОР ЗАПАСА ХОДА
Индикатор запаса хода показывает уровень завода часов, позволяя с одного взгляда оценить, сколько еще времени часы будут идти. Если стрелка индикации запаса хода показывает на отметку 50 или F, ходовая пружина заведена полностью. natural_image
Line drawing of a wristwatch with analog face and minute hand (no text or symbols)◆ ИСПОЛЬЗОВАНИЕ ВРАЩАЮЩЕГОСЯ КОЛЬЦА ИНДИКАТОРА
Обратите внимание, что некоторые модели оснащены вращающимся кольцом индикатора, которое следует использовать надлежащим образом. Поверните кольцо таким образом, чтобы совместить метку ▽ с минутной стрелкой. При прохождении определенного времени Вы можете измерить истекшее время по расстоянию между минутной стрелкой и цифрами на вращающемся кольце индикатора. Вы также можете установить метку ▽ на желаемое время, чтобы напоминать себе, сколько времени остается до условленного времени. text_image
Вращающееся кольцо Истежшее время◆ РАБОТА С ВНУТРЕННИМ ВРАЩАЮЩИМСЯ КОЛЬЦОМ
Обратите внимание, что некоторые модели оснащены внутренним вращающимся кольцом, которое следует использовать надлежащим образом. Поверните головку, чтобы внутреннее вращающееся кольцо было установлено на отметку ▽ - относительно положения минутной стрелки. Положение вращающегося кольца, на которое минутная стрелка будет указывать через некоторое время, показывает, сколько времени прошло с момента установки. Установив отметку на нужное время, вы сможете определить, сколько времени осталось. text_image
- Metka 05 06text_image
Истекisée варяж中文
带动力存储指示
自动 / 手动上弦的机械表
使用说明书
感谢您购买本公司产品。为了保证您能长期使用本产品并确保最佳性能,请仔细阅读本说明书并熟悉相关保修条款。 请将本说明书置于便于取阅之处,以便需要时及时查阅。◆ 安全注意事项
为避免您或他人受到人身伤害或财产损失,请务必阅读并遵循标有以下符号的说明事项。  ... 本符号代表的内容含义为本产品的使用方式与说明书不符时可能造成的死亡或严重伤害。  ... 本符号代表的内容含义为本产品的使用方式与说明书不符时可能造成的人员伤害或材料损伤。◆ 使用手表的注意事项
(1) 防水| 类型\使用环境 | 在水下或水迹未干的情形下操作把头 | 暂时性的水滴(洗脸、雨淋等) | 水上运动(游泳等)、经常接触水的工作(洗车等) | 浮潜(不使用氧气瓶) | 水肺潜水(使用氧气瓶) | 混合气潜水(使用氦气) | ||
| 不防水型 | 未刻WATER RESISTANT(WATER RESIST) | ×××× | ×× | |||||
| 防水型手表 | 日常防水型 | WATER RESISTANT(WATER RESIST) | × | ○ | ×× | ×× | ||
| 日常增强防水I型 | WATER RESISTANT(WATER RESIST)50m (5bar) | × | ○ | ○ | ××× | |||
| 日常增强防水II型 | WATER RESISTANT(WATER RESIST)100m (10bar)200m (20bar) | × | ○ | ○○ | × | × | ||
| 潜水表 | 空气潜水用潜水表 | AIR DIVER'S 100m / 150m 200m | × | ○ | ○○ | ○ | × | |
| 混合气潜水用潜水表 | He-GAS DIVER'S 200m / 300m /... | × | ○ | ○○ | ○○ | |||
| *建议您从表盘表面或表壳背面了解手表的防水能力后,在上述使用范围内正确使用手表。 | ||||||||
小心
① 具有日常防水功能的 30m(3bar)手表可以在洗脸等时使用,但是不能用于浸入水中的环境。 ② 日常增强防水功能 I 型的手表 50m(5bar)可在游泳等时使用,但不能用于包括浮潜在内的各种潜水。 ③ 日常增强防水功能 II 型的手表 100m 或 200m (10bar 或 20bar) 可在浮潜时使用, 但不能用于使用氧气瓶的水肺潜水或使用氦气的饱和潜水等。 ④ 任何时候都要将把头推进(正常位置)。如果把头为螺丝锁紧型,检查是否已将把头牢固锁紧。 ⑤ 在水下时或未将手表拭干之前请勿操作把头。否则可能会有水进入手表内部,破坏其防水性能。 ⑥ 如果您的手表不具备防水功能,则要提防溅水(洗脸、下雨等)或汗水。如果因接触有水环境或出汗导致手表受潮,请使用干的软布将水分擦干。 ⑦即使手表具有日常防水功能,也请避开强烈的自来水水流直冲手表。因为这样手表所承受的水压可能会超过极限值而破坏其防水性能。 ⑧具有日常防水功能的手表在接触于海水后,请冲洗掉表壳上的海水,然后彻底擦干,以避免腐蚀和其他影响。 ⑨手表内部含有一些潮气,外部的空气较表内温度低时,可能会导致镜面内部出现水雾。暂时的水雾不会对手表内部造成伤害,但如果持续很长时间或者水进入表内,请与购表处联络,不要置之不理。(2) 撞击
①千万不要佩带手表从事剧烈运动,而诸如高尔夫球等轻度运动则不会对手表造成有害影响。 ② 请避免将手表掉落在地等剧烈撞击。 natural_image
Simple line drawing of a person using a tool to dig or walk (no text or symbols)(3) 磁化
①如果手表长期接触于强磁力环境中,零部件可被磁化,造成失灵。请注意这一点。 ② 当手表接触于磁力环境中,可能会暂时变快或变慢,但离开磁场后即可恢复至原来的精度。此时,请校对时间。(4) 震动
手表受到强烈震动(比如,骑摩托车、使用手提钻或链锯等)时可能会暂时变慢。 natural_image
Cartoon illustration of a person riding a motorcycle with motion lines indicating speed (no text or symbols)(5) 温度
将手表置于低于或高于正常温度范围(5°C-35°C)的环境时,手表可能会失灵或停止走动。  请勿在桑拿浴室等高温环境下使用手表。否则手表会变热而导致灼伤。(6) 化学品、气体等
千万小心不要让手表接触各种有害气体、水银和化学品(稀释剂、汽油、各种溶剂、含该类成分的洗涤剂、粘合剂、涂料、药物、芳香剂及化妆品等)等。这类接触可能会导致表壳和表盘表面变色。各种含树脂成分的元件也会发生变色、变形及损坏。(7) 商品及配件
 请不要拆卸和改造手表。  表链、表带销和其它小配件要放置在儿童接触不到的地方。 如果发生误食,请立即去看医生。(8) 过敏反应
 如果接触手表或表带后产生皮疹或皮肤异常瘙痒不适,请立即停止使用并咨询专业医生。(9) “夜光”
部分型号的指针和表盘涂抹有夜光涂层。 本型号使用的夜光涂层采用非放射性物质的安全涂料,可以储存日光和人造光能量,在黑暗环境下会释放光能。随着涂料缓慢释放储存的光能,夜光会逐渐变暗。夜光涂层在储存光能时,镜面形状、涂层厚度、周围亮度等级、光源距离和光吸收水平等各类因素都会对发光量和发光时间产生影响。如果光能储存不足,手表可能只会发出微弱的夜光或短暂发光,敬请注意。(10) 防水表带
部分型号采用的皮革或尼龙表带都已经过特殊的防水和防汗处理。根据佩戴时间和使用条件,表带的防水效果可能会变差,敬请谅解。◆ 机芯编号识别方法
根据您的手表型号数字或表壳后盖的代码可确认手表的机芯编号。1. 通过 13 位数的型号数字查找
确认您手表保修单上所提供的 13 位数的型号数字。在产品标签上您也可以找到该数字。其第四位和第五位数字代表手表的机芯编号。 例如:型号数字若为“RE-AT0001L00B”,则机芯编号就为“AT”。2. 通过表壳代码查找
手表的表壳后盖上刻有表壳代码,格式为XXXX-XXXX。 头三位数字代表机芯编号。 例如:表壳代码若为 “F6R4-UAA0”,则机芯编号就为 “F6R”。 中文 \* 因各类手表的特性不同,故表壳代码位置不定,且文字也可能较小而不易查看。 \* 本手册上的图片和插图可能会同您的手表实际外观有所不同,但是功能和操作过程相同。◆ 规格
| 机芯 钻数 | 日期指示 秒针停止机构 | |||
| ATF6R 22 | - | ○ | ||
| AU F6N 22 | ○ | ○ | ||
| AVF6F 24 | - | ○ | ||
| AWF6G 24 | ○ | ○ | ||
◆ 各部件名称及功能
A: 时针 E: 动力存储指针 1. 正常位置 B: 分针 F: 把头 2. 第一档 : 日历调整 C: 秒针 G: 表盘 3. 第二档 : 时间调整 D: 日期 $$ < \mathrm{AT} (\mathrm{F6R}) > < \mathrm{AU} (\mathrm{F6N}) > $$ text_image
E A B 1 3 C F Gtext_image
E A B D 1 2 3 C F Gtext_image
E A B 1 3 F C Gtext_image
E A B D 1 2 3 C F G◆ 自动上弦(付加手动上弦)
(1) 本款手表属于自动上弦(手动上弦)机械表。 (2) 当手表佩戴在手腕上时,借助手臂的自然运动,发条即可自动上弦。也可通过转动把头上弦。 (3) 如果手表停止走动,可通过转动把头拧紧发条上弦或者将手表来回晃动十几次,秒针即可重新开始走动。开始走动后,再设置时间及日期。 (4) 为发条上弦时,让把头保持在正常位置,慢慢向右(顺时针)旋转。 向左(逆时针)旋转把头无实际作用,并不能为发条上弦。 将把头从停止位置开始向右旋转约 30 次即可为发条上满弦。 发条上满弦后,把头仍可拧转。为手表上弦时,可使用上述计数方式,也可通过动力存储指示上的标记进行判断。 natural_image
Illustration of a hand holding a wristwatch with an arrow indicating rotational motion (no text or symbols)◆ 螺丝锁紧型把头的手表款式
某些款式需要先松开钮锁后才能拉出把头(螺丝锁紧型把头的手表款式)。 本款手表的操作方式如下: (1) 设置日期、时间或旋转图案前,先要向左转动把头松开钮锁。 (2) 设置日期、时间或旋转图案后,向右转动按入把头,直到不能转动,以确保螺钮拧紧。◆ 时间和日期月的设置方法 [AU (F6N)] [AW (F6G)]
[时间的设置方法]
(1) 当秒针到达 12 点钟位置时, 将把头拉出。 (秒针停止。) text_image
逆时针转动text_image
[日期的设置方法]
小心
请避免在夜间 8:00 至次日凌晨 2:00 之间进行日期调整,因为日历在该时间段会进行日期变更操作。如果在此期间进行日期调整,日期可能不会变更,或造成手表故障。进行日期调整时,务必将时针和分针移到在此期间外之后再进行操作。 (1) 将把头向外拉到第一档。 \* 此手表的把头分为档。 text_image
2 7text_image
顺时针转动natural_image
Diagram of a circular mechanical component with a central shaft and directional arrow (no text or symbols)◆ 时间的设置方法 [AT(F6R)] [AV(F6F)] [时间的设置方法]
(1) 当秒针到达 12 点钟位置时, 将把头拉出。(秒针停止。) text_image
逆时针转动text_image
◆ 动力存储指示
本型号带有具动力存储指示功能的自动上弦系统。动力存储指针所指向的时间就是手表剩余可走动时间。 当动力存储指针指向50或F标记时,表示发条已上满弦。 natural_image
Line drawing of a wristwatch with analog dial and frame (no text or symbols)◆ 旋转指示外环的使用方法
提醒注意的是,部分手表型号带有旋转指示外环,请采用正确方式使用。 转动指示外环使▽三角记号指向分针位置。经过一段时间后,转动指示外环数字位置与分针位置之间的时间差即为实际经过的时间。你也可以将▽三角记号放置在预设时间位置来提醒自己距离约定还剩多长时间。 旋转指示外环 text_image
经过的时间◆ 旋转内环的使用方法
请注意,部分型号配有旋转内环,请正确使用。转动旋转内环的把头,将▽ - 记号设置于分针位置。 经过一段时间后,分针指向的旋转环位置即为实际经过的时间。 将记号放置在预设时间位置即可掌握剩余时间。 text_image
- 记号 用于旋转内环的把头 经过的时间◆ كيفية استخدام حلقة المؤشر الدوار الداخلي
يرجى ملاحظة أن بعض الطerez تسوفر بحلقة مؤشر دوار داخلي، يجب استخدامها بشكل صحيح. أدر زر الضبط لحلقة المؤشر الدوار信息公开ي للعيني العلامة – على وضع ع Courب الدقائق. وضع حلقة المؤشر الدوار信息公开ي التي يشير إلىها ع Courب الدقائق بعد انقصاء بعض الوقت يشير إلى الوقت المن苛سي. يسمح تعيين العلامة على الوقت المرغوب بمعرفة الوقت المتبقي. text_image
علامة الز ر ضبط للالمؤشر الدوار الداخليtext_image
AB 91 ← ← ← ← ← ← ← ← ← ← ← ← ← ← ← ← ← ← ← ← ← ← ← ← ← ← ← ← ← ← ← ← ← ← ← ← ← ← ← ← ← ← ← ← ← ← ← ← ← ← →text_image
الحاثية الدوّارة (٥٠٤٥٣١) ٢٠٠٩◆ كيفية استعمال حاشية المؤشر الدوار
يرجى ملاحظة أن بعض الطرز تتوفر بحلقة مؤشر دوار، يجب استخدامها بشكل صحیح. أدر الحاشية بتوجيه العلامة ▽ إلى عقرب الدقائق. أثناء مروره بوقت معين، يمكن قياس الوقت المنquistى من المسافة بين عقرب الدقائق والأرقام الموجودة على حاشية المؤشر الدوّار. كما يمكنك ضبط العلامة ▽ على وقت مطلوب لتدكيرك بطول المدة المتبقية على موعد معين. لا يمكن إدارة الحاشية عكسيّاً؛ lainها تأتي مصحوبة بالية حماية لمع التشغيل الخاصة بالقوة أو بفعل الصدمات. كما يمكن أن تساعدك الأرقام الموجودة على الحاشية على قراءة الوقت الحالي بسهولة. \* بناءً على تصميم الطراز، لا تنطبق آلية عدم الدوران عكسيّا و"نقرة" دقبقة واحدة على حاشية المؤشر الدوار على بعض الموديلات. natural_image
Line drawing of a wristwatch with analog dials and frame (no text or symbols)[AV (F6F)] [AT (F6R)] كيفية ضبط التوقيت ◆ [كيفية ضبط الوقت]
(1) اسب زر الضبط للخارج حتىarseم الطقطقة الأولى entد وصول عقرب الثواني إلى وضع Csاعة ١٢ (يとうق عقب الثواني). text_image
natural_image
Simple line drawing of a clock face with hour and minute hands, showing time near 10:30 (no text or symbols)text_image
أدر يعكس اتجاه عقارب الساعةtext_image
natural_image
Simple line drawing of an analog clock face with hands and a battery, next to a separate hand pointing left (no text or symbols)natural_image
Diagram of a circular dial with a small square labeled '7' and an arrow pointing right (no text or symbols beyond basic diagram)text_image
أدير اتجاه عقارب levagestext_image
5 8[AW (F6G)][AU (F6N)] كيفية ضبط التوقيت والتقويم
[كيفية ضبط الوقت]
(1) اسب زر الضبط للخارج حتىarseمع الطقطقة الثانية عند وصول عقرب الثواني إلى وضع lrساعة ١٢. (ي Coordف ع справ الثاني. text_image
20 45 51 80text_image
Diagram showing a clock face with hour and minute hands, followed by a segmented rectangular block and an arrow indicating direction.text_image
ر بعكس اتجاه عقارب Satisfactiontext_image
60 45 51 08natural_image
Simple analog clock face with hour and minute hands, no text or symbols presentnatural_image
Illustration of a hand holding a wristwatch with an arrow indicating rotational motion (no text or symbols)◆ alkalية التعبئة الأوتوماتيكية واللف اليدوي
(1) هذه عبارة عن ساعة آلية تُعَبًا أوتوماتيكياً (لف الياي الرئيسي). (٢) نثم تعبئة النابض الرئيسي بفعل الحركات الطبيعية لذرا Elk عندما تكون مرتدياً الساعة على معصdek. بال-Assافة إلى ذلك، يمكنك أيضاً لف الياي الرئيسى بتدوير زر الضبط. (3) إذا توقفت ساعتك، سواء تدوريل Satisfaction لل clarف أو للأمام عشر مرات أو أكثر أو تدورير زر الضبط للف الياي الرئيس ل ereادة بدة عقرب الثوانى. بعد بدء الحركة، اضبط التقويم والوقت. (٤) عند لف الياي الرئيسي، أدر زر الضبط ببطء إلى اليمين (في اتجاه عقارب الساعة) مع وجوده في وضعه العادي. تؤدي إدارة زر الضبط إلى اليسار (في عكس اتجاه عقارب Satisfaction) فقط إلى تدورير زر الضبط بدون فائدة ولا تلف الباي. يمكنّك لف الياي الرئيسي بالكامل بتدوير زر الضبط لليمين ٣٠ مرة تقريبًا منunded التوف. ما زال以便 bekannt تدوير زر الضبط بعد لف الياي الرئيسي بالكامل. استخدام إلا العد أعلاه أو استخدام العلامات على مؤشر القدرة الإحتياطية عند لف lrساعة. (٥) حتى إذا تم لف الياي الرئيسي بالكامل، فلن يحدث لف زائد بسبب آلية الإinzلاق. (٢) هذه Satisfaction Team: ٥ ساعة تقريرابع، تعвитها بالكامل. إذا لم تنتم تعвитها بال Natur الكافي ققد تقدم Satisfaction دقتها. للhfاظ على دقة Satisfaction، نوصي بارتدئها ۸ ساعات يوميا على الأقل.◆ الموديلات التي تحتوي على تاج مثبّ بوسطة برغي
قد لا نثمكن من سحب التاج إلى الخارج دونFK البرعي (الموديلات التي تحتوي على تاج مثبت واسطة برغي) ذلك تبعاللموديل. قم بتشغيل هذا الطراز كما يلي: (1) قبل تعيين الوقت والتاريخ، أدر زر الضبط أولاً في عكس اتجاه عقارب Satisfaction لREVIR قفل المسمار. (٢) بعد تعبين الوقت والتاريخ، أدر زر الضبط في اتجاه عقارب Satisfaction مع الضغط عليه، حتى يتوقف عن الدوران لربط المسمار在一جksam.  ◆ أسماء ووظapest قطع المكونات الفردية A: مؤشرKBSAOBA E: عقب مؤشر KBDRDA EAHCTYAPIL1.الوضع العادي B: مؤشر الدقائق : Fortune 2. أول comptقة: ضبط التقويم G المينا 3. ثاني comptقة: ضبط الوقت C: مؤشر الثوان التاريخ : Dtext_image
E A B D 1 2 3 C F Gtext_image
E A B 1 3 C F Gtext_image
E A B D 1 2 3 F C Gtext_image
E A B 1 3 C F G| اللية إيقاف العقب الثاني | لعبار عدد الجواهر تاريخ | |||
| ○ | - | 22F6RAT | ||
| ○ | ○ | 22F6NAU | ||
| ○ | - | 24F6FAV | ||
| ○ | ○ | 24F6GAW | ||
◆ كيفية تحديد رقم العيار
افحص رقم العيار بمراجعة رقم الموديل الخاصة بساعتك أو رمز هيكل Satisfaction联合国 بالجزء الخلفي لهيكال lrساعة. 1. البحث برقم الموديل المكون من ١٣ أرقام قم براجعة رقم молодيل المكون من ١٣ أرقام، والوجود على الضمان المزود مع lrساعة. كما يمكنك الاطلاع على الرقم على م{lصق المنتج الموجود على Satisfaction. يشير الرقمان الرابع والخامس إلى رقم العيار الخاص بالساعة. مثال: إذا كان رقم الموديل "RE-AT0001L00B" ، ف هذا يعني أن رقم العيار هو "AT". ٢. البحث برمز هيكل lrساعة . XXXX-XXXX . اطّع على رمز هيكال Satisfactionce LinkedIn بالجزء الخلفي لهيكال Satisfaction، مثل أول رقمين - أو ثلاثة أرقام مثال: عندما يكون رمز هيكال Satisfaction "F6R4-UAA0", يكون رقم العيار هو "F6R" \* قد يختلاف مكان رمز هيكل Satisfaction وقد يكون حجم الخط المكتوب به صغيرّا ومن الصعب رؤيته، وفقاً لخصائص الساعات. \* قد تختلاف الصور والتوضیحات الواردة بها الدليل عن الشكل الفعلي لساعتك، ولكن الوظitaف وإجراءات التشغيل كما هي. (٧) فيما يتعلق بقطع الملحقات  لا تحاولFK هذا المنتج أو تعديله.  (cm بtcخزين إبرة السوار/الرباط والأجزاء الصغيرة الأخرى بعيداً عن متناول الأطفال، إذا تم ابتداع أية) قطع صغيرة، فاتصل بطيب على الفور. (٨) استجابات الحساسية  إذا لاحظت وجود طفح جلدي أو تهيّج جللك化妆品 غير طبيعية; نتيجة للمس Satisfaction أو الرباط، فت十四五 عن ارتداء Satisfaction على الفور واستشر طيبيا. (٩) فيما يتعلق "باللمعان الضوني" تشتمل بعض المنتجات على مصباح+: م (((ي) عقارب والمينا). اللمعان الضوئي هو طلاة: آمن يحتفظ (+ضوع الشمس والضوع الصناعي (+دون استخدام) موا د (\*شعة، ويشع هذا ضوع في ظروف الإضاءة الخافتة). وحيت يعمل الطلاة على تفريع الضوع المختزن، سي Hadح خافثا: أكثر بمرور (الوقت). يعتمّد مقدار الضوع الناتج ووقت إشاع العض وع امل متعددة، عندا يتم تحزين الضوع، مثل: شكل رزجاج وسمك الطلاة ومستوى السطوع المحيط والمسافة بين Satisfaction وMpoudر الضوع ومستوى امتصالض الضوع. الرجاء العلم آنه عند تخزين طاقه ضوع كافية، قد تشّع Satisfaction ضوعا ضعيفّ أو تشّع ضوعا لفترة قصيرة فقط. (١٠) سوار ساعة مقاومة للماء بعض المنتجات يُ سxtخدم فيها أoczمة من الجلد والنايلون مغطة بطبقة معايجة خاصة مقاومة لامتصاص العراق والماء. يُ رجى أخذ العلم أن مقاومة مثل هذا نوع من لسوار الساعات للماء يمكن أن تفقد تأثيرها وذلك تبعً لمدة وظروف الاستعمال.  natural_image
Simple line drawing of a person using a golf club to brush (no text or symbols)natural_image
Cartoon illustration of a person riding a three-wheeled vehicle with motion lines indicating speed (no text or symbols)| غوص Tank بنا مخليت (باستخام) (غاز الهيليوم) | الغوص بستعمل لياس الغوص واسطوانه | الغوص المتعري يدن استخدام أسطوانه | الرياضات المائية (السياحة وغيرها، الملاسمة المباشرة للماء (كغسيل surveillance) وغيره) | التعويض الحراوي قطرات من الماء (غسل الوجه، المطر، إلى-acherence) | استعمال التاح تحت الماء واستعمال التاح وعليه قطرات ماء | CALLات الإستخدام | |
| ×× | يدن WATER RESISTANT (WATER RESIST) | غير مICOLOM | |||||
| × | × | × | × | ○ | × | WATER RESISTANT (WATER RESIST) | مICOLOM للامعاليومی |
| × | × | × | ○ | ○ | × | WATER RESISTANT (WATER RESIST) 50m (5bar) | مICOLOM لامعاليومی |
| × | × | ○ | ○ | ○ | × | WATER RESISTANT (WATER RESIST) 100m (10bar) 200m (20bar) | مICOLOM لامعاليومی |
| × | ○ | ○ | ○ | ○ | × | AIR DIVER'S 100m / 150m 200m | ساعة الغواصين للتحlíق في الهواع |
| ○○○○○ | He-GAS DIVER'S 200m / 300m /... | ساعة غوص للغوص مختلاطالغازات | |||||