
24" Electric Range - DANBY - Manual de uso y guía de instrucciones gratis
Encuentra gratis el manual del aparato 24" Electric Range DANBY en formato PDF.


Preguntas de los usuarios sobre 24" Electric Range DANBY
0 pregunta sobre este aparato. Responde a las que conoces o haz la tuya.
Hacer una nueva pregunta sobre este aparato
Descarga las instrucciones para tu en formato PDF gratis! Encuentra tus instrucciones 24" Electric Range - DANBY y toma tu dispositivo electrónico nuevamente en la mano. En esta página están publicados todos los documentos necesarios para el uso de su dispositivo. 24" Electric Range de la marca DANBY.
MANUAL DE USUARIO 24" Electric Range DANBY
OWNER'S MANUAL MANUAL DEL PROPIETARIO
24" ELECTRIC RANGE
Owner's Manual....1 - 22
24" COCINA ELÉCTRICA
Manual del propietario......23 - 44
MODEL * MODELO
DER24V1B
DER24V1BSS
DER24V1W
Danby Products Limited, Guelph, Ontario, Canada N1H 6Z9
Danby Products Inc. Findlay, Ohio, U.S.A. 45840
www.danby.com
f in X
Printed in Turkey | Impreso en Turquía
Welcome to the Danby family.
We are proud of our quality products and we believe in dependable service. We suggest that you read this owner's manual before plugging in your new appliance as it contains important operation information, safety information, troubleshooting, and maintenance tips to ensure the reliability and longevity of your appliance.
You are entitled to the warranty coverage as described in the owner's manual provided with your new appliance.
-
Please write down your appliance information below. You must keep the original proof of purchase receipt to validate and receive warranty services.
-
Register your product online and receive a FREE 2 MONTH WARRANTY EXTENSION after filling out a product survey, at www.danby.com/support/product-registration/
Model Number:
Serial Number:
Date of Purchase:
Need Help?
-
Read your Owner's Manual for installation help, troubleshooting, and maintenance assistance.
-
Visit www.Danby.com to access self-service tools, FAQs and much more by searching your model number in the search bar.
-
For the Quickest Customer Service, please fill out the web form at www.danby.com/support. Your submission will go directly to an expert on your particular appliance. Our average response times are between 20 minutes and 2 hours, during EST business hours.
-
Call 1-800-263-2629 - please note that during peak hours, hold times can exceed one hour.
WARNING - TIP OVER HAZARD
• A child or adult can tip the appliance and be killed
- Verify the anti-tip bracket has been properly installed to the floor
- Ensure the anti-tip bracket is re-engaged when the range is moved
- Do not operate the range without the anti-tip bracket in place and engaged
- Failure to follow these instructions can result in death or serious burns to children or adults
ANTI-TIP DEVICES
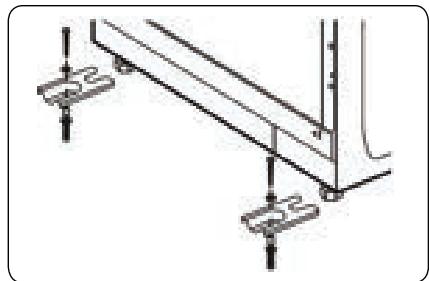
To reduce the risk of the appliance tipping by abnormal usage or improper door loading, the appliance must be secured by installing anti-tip devices. There are two anti-tip devices that must be installed to ensure the appliance is safe.
Note: If the range is ever relocated both anti-tip devices must be removed and installed at the new location.
ANTI-TIP BRACKET
Installed on either the left or the right rear leg. To install the anti-tip bracket:
- Place the anti-tip bracket (1) on the floor where the range will be installed.
- Mark the location of the hole in the anti-tip bracket.
- Use a 5/16" (8mm) drill bit to drill a hole in the floor and insert the provided screw (2) to secure the anti-tip brackets to the floor
- Then install the anti-tip chain
ANTI-TIP CHAIN
- Use a wall plug to fasten the hook (3) to the kitchen wall
- With the help of the locking mechanism (4), connect the safety chain (5) to the hook
INSTALL BOTH ANTI-TIP DEVICES
- Slide the range back and into position, ensuring that the anti-tip bracket is positioned over the rear foot of the appliance
- Using the screw attachment (6), tightly fix the chain to the back of the range (7)
- Remember the safety chain should be as short as practically possible to avoid the appliance from tilting forward, so the range should be very close to the back wall (8)




NOTICE - BEFORE FIRST TIME USE
The heating elements have a protective coating on them which must be burned off before use. To do this:
- Open the oven door and set the temperature control knob to 450°F.
- Turn the function selector to the bake element and the broil element separately for approximately 15 minutes.
- It is important to ensure adequate ventilation during this period.
WARNING - HEATING ELEMENTS
- Heating elements on the surface or in the interior of the appliance may be hot even though they appear cool
- Areas near the heating elements may become hot enough to cause burns
- Do not touch or let clothing or other flammable materials touch/contact heating elements or areas near them during or after use (they must have sufficient time to cool)
- Surfaces of the appliance may become hot enough to cause burns: these areas include oven vent openings, surfaces near these openings, oven doors and oven windows
DANGER - GREASE FIRES
- When heating fat or grease, do not leave it unattended as it could catch fire
- Never pick up a flaming pot or pan
- Do not use water or flour on grease fires
- In the event of a grease fire, turn off burner - if it is safe to do so - and extinguish the fire with a dry chemical or foam-type extinguisher
- You may also smother the fire with a tight fitting pot lid, cookie sheet, flat tray, or baking soda
- If there is a fire in the oven during baking, smother the fire by closing the oven door and turn the oven off
DANGER - FIRE RISK
- It is recommended that this appliance be connected to a separate circuit that is not shared with any other appliance.
- Never clean the appliance or appliance parts with flammable fluids, as these fumes can create a fire hazard and/or explosion
- Before cleaning or servicing this appliance, unplug the appliance completely from the electrical outlet or disconnect the range power supply at the household distribution panel by removing the fuse or switching off the circuit breaker. Failure to do so can result in electrical shock or death
• Always disconnect the electrical supply to the appliance before servicing - Do not attempt to repair or replace any part of your appliance unless it is specifically recommended in this manual. All other servicing should be referred to a qualified service technician
- This appliance should never be used as a source of heat to warm or heat a room - using this appliance as a space heater can lead to overheating of the appliance and/or carbon monoxide poisoning
- The stove top elements should not be operated without proper cookware
- All openings in the wall behind the appliance and the floor under the appliance shall be sealed
- Do not obstruct the flow of air around the appliance
- Keep the area around the appliance clear and free of combustible materials, gasoline and other flammable vapors
• Always keep combustible wall coverings, curtains or drapes a safe distance from the range - Never use or store gasoline or other flammable vapors or liquids inside or in the proximity of this appliance, failing to do so may result in a fire hazard or explosion
IMPORTANT
COLDER TEMPERATURES CAN DAMAGE THE ELECTRONIC CONTROL OF THE APPLIANCE
If the appliance has not been used for an extended period of time
- Be sure the appliance has been in temperatures above 32° F ( 0° C) for at least three (3) hours before turning on the power to the appliance
MODIFICATIONS
- Never modify or alter the construction of the appliance by removing the leveling legs, panels, wire covers, anti-tip brackets/screws, or any other part of the appliance
WARNINGS
STORAGE IN OR ON THE APPLIANCE
- Flammable materials should not be stored in an oven or microwave, near surface burners or elements, or in the storage or warmer drawer (this includes paper, plastic, and cloth items like cookbooks, plastic ware, and towels)
- Do not store explosives, such as aerosol cans, on or near the appliance
MOVING THE APPLIANCE
If you need to move the appliance:
- Do not move the appliance when it is in use, or still hot (to reduce the risk of burns)
- To reduce the risk of injury due to tipping of the appliance, verify the re-installation of this appliance into the anti-tipping device provided after returning the appliance to the original installed position
DISPOSING OF THE APPLIANCE
To avoid the possibility of child entrapment please take the following precautions before throwing out the appliance:
- Remove the oven door completely
- Never allow children to operate, play with or crawl inside the electric range
CAUTION - POWER FAILURES
Do not attempt to operate the appliance during a power failure. If the power fails:
• Turn the appliance off right away
- If power is restored and the surface element has not been turned off, the element will turn back on as soon as the power is restored
- This may result in ignition of items on or near the cook-top, leading to serious injury or death
WARNING
The manufacturer declines all liability for injury to persons or damage to property cause by incorrect or improper use of the range
GENERAL SAFETY REQUIREMENTS
- Ensure the appliance is properly installed and grounded by a qualified technician
- To eliminate the risk of burns or fire by reaching over heated surface units, cabinet storage space located above the surface units should be avoided. If cabinet storage is to be provided, the risk can be reduced by installing a range hood that projects horizontally a minimum of 5 inches (12.7 cm) beyond the bottom of the cabinets
- Loose fitting or hanging garments should never be worn while using the appliance
- Only use dry pot holders (do not use a towel or other bulky cloths) - moist or damp pot holders on hot surfaces may result in burns from steam
- Do not let the pot holder touch hot heating elements
- Do not heat unopened food containers - build-up of pressure may cause container to burst and result in injury
- Children should not be left alone or unattended in the area where the appliance is in use
- Children should never be allowed to sit or stand on any part of the appliance (this includes the storage drawer, lower broiler drawer, warner drawer, or lower double oven)
- Do not store items of interest to children in the cabinets above the appliance or on the back-guards of ranges (Children climbing on or near the appliance to reach items could be seriously injured)
- Do not allow children to climb or play around the appliance, as the weight of a child on an open oven door may cause the appliance to tip, resulting in serious burns or other injury
• An open drawer, when hot, may cause burns - Stepping, leaning, or sitting on the door or drawers of this appliance can result in serious injuries and also cause damage to the appliance
- Never cover any slots, holes or passages in the oven bottom or cover an entire rack with materials such as aluminum foil (doing so blocks air flow through the oven and may cause carbon monoxide poisoning. Aluminum foil linings may also trap heat, causing a fire hazard)
- To avoid the possibility of a burn or an electric shock, always be certain that the controls for all surface elements are at the OFF position, and that all coils are cool before attempting to lift or remove a coil cooking element.
- This range is designed and manufactured solely for the cooking of domestic (household) food and is not suitable for any non domestic application and therefore should not be used in a commercial environment. The range warranty will be void if the range is used within a non domestic environment.
GROUNDING INSTRUCTIONS
This appliance must be properly grounded. Grounding reduces the risk of electrical shock by providing an escape wire for the electrical current.
INSTALLATION
- Be sure your appliance is properly installed and grounded by a qualified technician
Do not connect this appliance to the same wall outlet as another appliance. Do not connect it to an extension cord or an adapter plug. Failure to follow this warning may cause serious injury, fire, or death.
Note: Turning the appliance off does not disconnect the appliance from the power supply.
It is recommended that the power cord and the plug be placed parallel with the floor so that the cord runs parallel with the floor.
CAUTION - RISK OF ELECTRICAL SHOCK
If the cord or plug becomes damaged, disconnect the appliance from the power supply and replace with a cord or plug of the same type.
RADIANT COOK-TOP SAFETY
Know which knob or key controls each surface heating area
- Place cookware with food on the cooking area before turning it on
- Turn the cooking area off before removing the cookware
Cookware handles should be turned inward and not extend over adjacent surface elements
- This will reduce the risk of burns, ignition of flammable materials, and spillage due to unintentional contact with the utensil
Use the proper pan size: The appliance is equipped with four burners of different sizes
- Select cookware with flat bottoms that match the surface unit size
- The use of undersized cookware can expose a portion of the heating element to direct contact and may result in ignition of clothing
- Proper sizing of the cookware to cook-top will improve cooking efficiency
- If using a griddle or long pan, do not use it on more than one burner at once
Ensure reflector pans or drip bowls are in place:
Absence of these pans or bowls during cooking may subject wiring components to damage
Use the appropriate type of cooking utensils:
- Only certain types of glass, ceramic, earthenware or other glazed utensils are suitable for range top service without breaking due to sudden change in temperature
- Check the manufacturers recommendations for cook-top use
Never leave appliance unattended while in use:
- Boil over can cause smoking and greasy spills can ignite
- A pan that has boiled dry could also be damaged and may end up damaging the cook-top
Never leave oil unattended while frying:
- If oil is heated beyond its smoking point it may ignite, resulting in fire that may spread to surrounding cabinets
- Use a deep fat thermometer whenever possible to monitor oil temperature
To avoid oil spillover and fire:
- Use a minimum amount of oil when shallow pan-frying
- Avoid cooking frozen foods with excessive amounts of ice
The searing grill is not designed for use on the cook-top:
- Doing so may result in a fire
Remember to turn on the fan when you are flaming foods under a ventilating hood
GLASS AND CERAMIC COOK-TOP SAFETY
Do not clean or operate a broken cook-top: If the cook-top should break, cleaning solutions and spill overs may penetrate the broken cook-top and create a risk of electric shock
- Contact a qualified technician immediately
Clean a glass cook-top with caution:
- If a wet sponge or cloth is used to wipe spills on a hot cooking area, be careful to avoid a potential steam burn
- Some cleaners may produce harmful fumes if applied to a hot surface
- Avoid scratching the cook-top glass with sharp objects
OVEN SAFETY
Protective liners: Do not use aluminum foil, aftermarket liners, or ant other materials or devices to line oven bottom, oven racks, or any other part of the appliance
- Only use aluminum as recommended for baking, such as lining cookware or as a cover placed on food
- Any other use of protective liners or aluminum foil may result in a risk of electric shock, fire, or a short circuit
Use care when opening the door:
- Stand to the side of the appliance when opening the door of a hot oven
- This will allow hot air or steam to escape before removing or replacing food
Never cover or place anything on or near the top of the oven vent, especially plastic or heat-sensitive items: These items can melt or ignite
Always place oven racks in desired location while the oven is cool: If the rack must be moved while the oven is hot:
- Remove all cookware and utensils before moving the rack
- Use potholders and grasp the rack with both hands to reposition
- Do not let potholder come into contact with a hot burner or element in the oven
Do not use a broiler pan without an insert:
- Broiler pans and inserts allow dripping fat to drain away from the high heat of the broiler
- Do not cover the broiler insert with aluminum foil - exposed fat and grease could ignite
Do not place shelves, pans, baking trays, broil trays, or other cooking utensils in the bottom of the oven chamber
• Always place on an oven shelf
Do not cook food on the bottom of the oven:
- Always cook in the proper cookware and always use an oven rack
Do not use the oven if a heating element develops a glowing spot during use or shows other signs of damage: A glowing spot indicates the heating element may fail and present a potential burn, fire, or shock hazard
• Turn the oven off immediately
- Contact a qualified service technician to have the heating element replaced
Never clean the oven with any high pressure steam cleaning devices
Keep oven vents unobstructed
INSTALLATION INSTRUCTIONS
BEFORE INSTALLATION
- Make sure there are no flammable or combustible materials in the vicinity (curtains, oil, cloth, etc) which may catch fire
- The worktop and furniture surrounding the appliance must be made of materials resistant to temperatures above 215°F (100 °C)
- The appliance should not be installed directly above a dishwasher, fridge, freezer, washing machine or clothes dryer
- The appliance can be placed close to other furniture on the condition that, in the area where the appliance is set up, the furniture's height does not exceed the height of the cooktop
- To eliminate the risk of burns or fire when reaching over a hot surface element, cabinet storage space above the cooktop should be avoided. If cabinet storage space is to be provided above the cooktop, the risk can be reduced by installing a range hood that protrudes at least 5" (127 mm) beyond the front of the cabinets. Cabinets installed above a cooktop may be no deeper than 13" (330 mm)
WARNING FOR INSTALLATION AND PREPARATION FOR USE
The appliance must be installed by an authorized service person or qualified technician
- Incorrect installation may cause harm and damage for which the manufacturer accepts no responsibility and the warranty will not be valid
- Prior to installation, ensure that the local distribution conditions (electricity voltage and frequency and/or nature of the gas and gas pressure) and the adjustments of the appliance are compatible. The adjustment conditions for this appliance are stated on the label
- Ensure the laws, ordinances, directives and standards in force in the country of use are to be followed (safety regulations, proper recycling in accordance with the regulations, etc.).
INSTALLATION INSTRUCTIONS
IMPORTANT - UNPACKING YOUR APPLIANCE
Please read and follow the following instructions and precautions for unpacking, installing and servicing your appliance:
- Remove all tape and packaging before using the appliance
- Dispose of the carton and plastic bags after unpacking the appliance
- Never allow children to play with packaging material
- Do not remove the wiring label and other literature attached to the appliance
- Do not remove model/serial number plate
INSTALLATION OF THE COOKER
- The worktop and furniture surrounding the appliance must be made of materials resistant to temperatures above 215°F (100 °C)
- If the kitchen furniture is higher than the cooktop, the kitchen furniture must be at least 13/32" (10 cm) away from the sides of the appliance for air circulation
- If a cooker hood or cupboard is to be installed above the appliance, the safe distance between the cooktop and any cupboard/cooker hood should be as shown:
| A (Cupboard) | 16.5" (420 mm) |
| B (Cooker hood) | 25.5"/27.5" (650mm/700mm) |
| C | Product width |
| D | 2" (50 mm) |

LEVELING INSTRUCTIONS
The appliance must be level to operate safely and properly. There are four leveling legs located at the corners of the bottom of the appliance. Adjust the leveling legs until the appliance is level. Use a carpenter's level to confirm.

INSTALLATION INSTRUCTIONS
POWER CORD STRAIN RELIEF INSTALL
Only a 4-conductor power-supply cord kit rated 240 volts, 40 amperes and marked for use with ranges must be used. Assemble the strain relief in the hole. Insert the power cord through the strain relief and tighten. Allow enough slack to easily attach the cord terminals to the connector block. If tabs are present at the end of the winged strain relief, they can be removed for better fit.
Note: Do not install the power cord without a strain relief. The strain relief bracket should be installed before reinstalling the rear range wiring cover.

3-WIRE POWER CORD INSTALLATION
WARNING
The neutral or ground wire of the power cord must be connected to the neutral terminal located in the center of the connector block. The power leads must be connected to the outside (brass colored) terminals.
Remove the 3 wire terminal screws from the connector block.
Insert screws through each power cord terminal ring and into the connector block until the screws engage the nuts. Be certain that the center wire is connected to the center screw of the connector block.
Tighten screws securely.
Do NOT remove ground strap connection.

INSTALLATION INSTRUCTIONS
4-WIRE POWER CORD INSTALLATION
WARNING
The neutral wire of the supply circuit is connected to the neutral terminal located in the center of the connector block. The power leads must be connected to the outside (brass coloured) terminals. The 4th grounding lead must be connected to the frame of the range with the grounding plate and grounding screw.
- Remove the 3 screws from the connector block.
- Remove the grounding screw and strap from the connector block middle location and the screw connection to the frame of the range.
- Insert screws through each power cord terminal ring and into the connector block until the screw engages the nut. Be certain that the center wire is connected to the center screw of the connector block. Tighten the screws securely.
- Attach the ground wire to the frame of the range.
- Replace the terminal block access plate.
Before
After


INSTALLATION INSTRUCTIONS
PRODUCT FEATURES
- Cooktop
- Control panel
- Oven door handle
- Oven door
- Adjustable feet

CONTROL PANEL
- Oven Timer Control Knob
- Oven Function Control Knob
- Oven Thermostat Knob
- Oven Indicator Light
- Surface Cooking Knob
- Surface Cooking Light

OPERATING INSTRUCTIONS
CERAMIC HEATER CONTROLS
• Ceramic heat is controlled by a 6 position knob
- To turn on, turn the control knob to the required setting
- By the control knobs will be a symbol that indicates the heater that is controlled by that knob
- The ON/OFF light on the control panel will show if any of the ceramic heaters are in use

| Knob Position | Function |
| 0 | Off |
| MIN | Keep warm |
| 3-5 | Heating at low heat |
| 7-9 MAX | Cooking, roasting and boiling |
RESIDUAL HEAT INDICATOR (if available)
- After using the ceramic heater there will be heat stored in the vitro ceramic glass, called residual heat
- If the residual heat level is greater than +140 °F (60 °C), the residual heat indicator will be active for the cooking zone that is above this temperature
- If the power supply to the hob is disconnected while the residual heat indicator is on, the warning light will flash when the power is reconnected
- The display will flash until the residual heat has decreased or until one of the cooking zones is activated
COOKWARE
WARNING: Never operate the hob without pans on the cooking zone
• If possible, always place lids on the pans
- Do not use cookware with jagged edges or a curves base

- Ensure the base of your cookware is smooth, sits flat against the glass, and is the same size as the cooking zone - always center your cookware on the element.
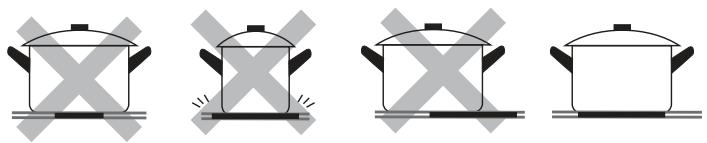
- When removing cookware from the ceramic surface, always lift it - do not slide it, as it may scratch the glass

IMPORTANT
- The temperature of accessible parts may become high while the appliance is operating. Keep children and animals away from the ceramic heater during operation until it has fully cooled after operation
- If you notice a crack on the cooktop, switch it off immediately and contact an authorized service provider to get it replaced
OPERATING INSTRUCTIONS
OVEN FUNCTION CONTROL KNOB
Turn the knob to the corresponding symbol of the desired cooking function.

OVEN THERMOSTAT KNOB
After a cooking function has been selected, turn this knob to set the desired temperature. The oven thermostat light will illuminate whenever the oven is heating up or still hot.

OVEN FUNCTIONS
NOTE: It is recommended to preheat oven for 10 minutes for best use
Bake

The oven's thermostat and warning lights will switch on, and the lower and upper heating elements will begin operating. The Bake function emits heat, ensuring even cooking of food.
Ideal for making:
- Pastries
- Cakes
- Baked pasta
- Lasagna
- Pizza
Broil Low

The oven's thermostat and warning lights will switch on, and the broil heating element will begin operating. This function is used for broiling or toasting foods on the upper shelves of the oven.
- Always place a tray beneath the food to catch any drips of oil or fat
Broil High

The oven's thermostat and warning lights will switch on, and the broil and upper heating elements will begin operating. This function is used for faster broiling and for broiling food with a larger surface area, like meat.
- Always place a tray beneath the food to catch any drips of oil or fat
OPERATING INSTRUCTIONS
OVEN TIMER CONTROL KNOB
For your enhanced safety, our oven has been designed to operate with a timer.

To set the timer, turn the knob clockwise to your desired amount of time. Once the timer reaches 0, the oven will turn off.
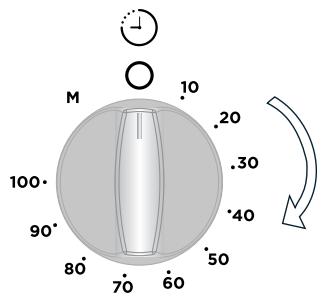
If you prefer to use the oven without the timer, simply turn the timer knob counterclockwise to the M (manual), and the oven will stay on continuously.

ACCESSORIES
The EasyFix Wire Rack
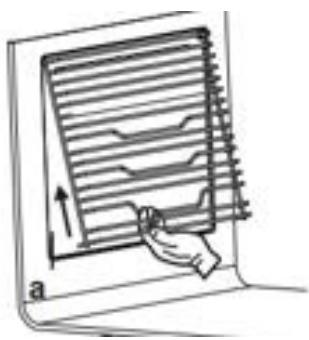
- To remove the wire rack, pull the wire rack as shown below to release it from the clips (a). After releasing it from the clips, lift it up.

The Four Wheel Guided Drawer
- Your appliance includes a drawer for storage of accessories - trays, shelves, grids, and small pots and pans

WARNING: The inner surface of the drawer may become hot during use. Do not store any food, plastic or flammable materials in the drawer.
The Splashback
- The splashback is attached to the cooktop with two screws

The Wire Grid
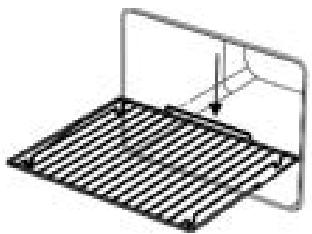
WARNING: When placing the grid, ensure the rear is correctly positioned before pushing it into the oven.
CARE & MAINTENANCE
GENERAL CLEANING INSTRUCTIONS
WARNING: Switch off the appliance and allow it to cool before cleaning
- Ensure cleaning materials are appropriate and recommended by the manufacturer before using on the appliance
- Use smooth cream or liquid cleaners - make sure it does not have any particles in them
- Do not use corrosive creams, abrasive cleaning powder's, rough wire wool or hard tools as they may damage the cooker surfaces
For everyday cleaning of marks, fingerprints and non-sugary spillovers, apply a ceramic cooktop cleaning product. Rinse and wipe dry with a clean cloth or paper towel.
Cleaning the Inside of the Oven
• Best cleaned while oven is warm
- Recommended to do after each use of the oven
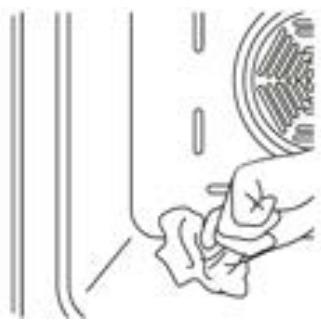
- Wipe the oven with a soft cloth soaked in soapy water
- Then wipe oven again with a wet cloth and dry it

Cleaning the Ceramic Glass
WARNING: If the surface is cracked, switch off appliance immediately to avoid the possibility of an electric shock. Call right away to have it replaced.
- Use a cream or liquid cleaner to clean the vitroceramic glass
- Rinse and dry glass thoroughly with a dry cloth
- Remember: do not use cleaning materials meant for steel, as they may damage the glass
If substances with a low melting point are used in the cookware's base or coatings, they can damage the glass-ceramic cooktop.
For boil overs, melts and hot sugary spills on the cooktop, remove the spill or food item immediately with a ceramic cooktop razor but beware hot cooking surfaces. Hold the razor at a 45-degree angle and scrape the spilled food to a cool area of the cooktop, then clean it up with a dish cloth or paper towel. Large spills should be removed immediately to ensure they do not bake onto the surface of the cooktop.
Any changes in colour to the ceramic glass will not affect the structure or durability of the ceramic and is not due to a change in the material. The colour may change for a number of reasons:
- Spilt food has not been cleaned off the surface
- Incorrect dishes are being used, which can erode the surface
- The wrong cleaning materials are being used
CARE & MAINTENANCE
Cleaning Glass Parts
- Clean glass parts of your appliance on a regular basis
- Use a glass cleaner to clean the inside and outside of the glass parts
- Rinse and dry them thoroughly with a dry cloth
Cleaning the Enameled Parts
- Clean enameled parts of your appliance on a regular basis
- Wipe the enameled parts with a soft cloth soaked in soapy water
- Then wipe them over again with a wet cloth and dry them
IMPORTANT
Do not clean the enameled parts while they are still hot from cooking
Do not leave vinegar, coffee, milk, salt, water, lemon, or tomato juice on the enamel for long periods of time
Cleaning Stainless Steel Parts (if available)
- Clean stainless steel parts of your appliance on a regular basis
- Wipe the stainless steel parts with a soft cloth soaked in water only
- Then dry them thoroughly with a dry cloth
IMPORTANT
Do not clean the stainless steel parts while they are still hot from cooking
Do not leave vinegar, coffee, milk, salt, water, lemon, or tomato juice on the enamel for long periods of time
Cleaning Painted Surfaces (if available)
- Spots of tomato, tomato paste, ketchup, lemon, oil derivatives, milk, sugary foods, sugary drinks and coffee should be cleaned with a cloth dipped in warm water immediately
- If these are not cleaned and end up drying on the surfaces, they should not be rubbed with hard objects (pointed objects, steel and plastic scouring wires, surface-damaging dish sponge) or cleaning agents containing high levels of alcohol, stain removers, degreasers, surface abrasive chemicals. Otherwise, corrosion may occur on the powder painted surfaces, and stains can occur.
NOTE: The manufacture will not be held responsible for any damage caused by the use of inappropriate cleaning products or methods
CARE & MAINTENANCE
Removal of the Inner Glass
You must remove the oven door glass before cleaning, as shown below:
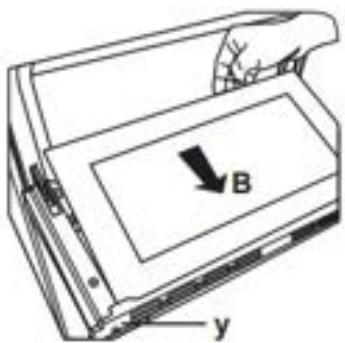
- Push the glass in the direction of B and release from the location bracket (x). Pull the glass out in the direction of A.

To replace the inner glass:
- Push the glass towards and under the location bracket (y) in the direction of B.

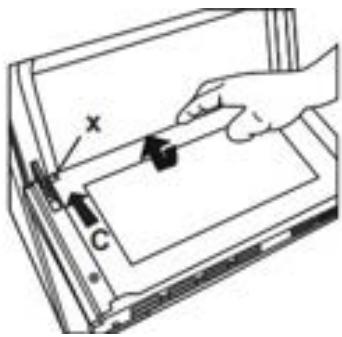
- Place the glass under the location bracket (x) in the direction of C.

NOTE: If the oven door is a triple glass oven door, the third glass layer can be removed the same way as the second glass layer.
Removal of the Oven Door
NOTE: The oven door is removable but it is heavy. It is recommended that at least two people work together to remove it.
Remove the oven door before cleaning the oven door glass, as shown below:
- Open the oven door

- Open the locking catch (a) (with the aid of a screwdriver) up to the end position.

- Close the door until it almost reaches the fully closed position and remove the door by pulling it towards you.

Removal of the Wire Shelf
To remove the wire rack, pull the wire rack as shown in the figure. After releasing it from the clips (a), lift it up.
Oven Light Replacement
Warning: The maintenance of this appliance should be carried out by an authorized service person or qualified technician only
Important
- Before replacing the oven light bulb, make sure the electrical power is disconnected from the appliance. Failure to do so may result in electric shock or burn
- Be sure to let the light cover and bulb cool completely before replacing
- Removing the oven door can make this process easier.
To replace the light bulb:
- Remove the glass lens, then remove the bulb
- Insert the new bulb (resistant to 600°F or 315°C) to replace the bulb that you removed (240 V, 15-25 Watt, Type E14)
- Replace the glass lens, then your oven is ready to be used
Notes:
The product contains a light source of energy efficiency class G
The included light source is not intended for use in other applications - it is designed specifically for use in household cooking appliances. It is not suitable for household room illumination
TROUBLESHOOTING
| Areas of Concern | Possible Cause | Solutions |
| The cooking zones cannot be switched on | There is no power supply | Check household fuse for the applianceDouble check the circuit breaker to see if it was trippedEnsure the plug is fully inserted into the wall outletCheck if there is a power failure by testing other electronic appliances |
| Oven does not turn on | Power is switched off | Check whether there is power being supplied to the applianceCheck if other kitchen appliances are functioning |
| There is no heat, or the oven is not warming up | Oven temperature control is set incorrectlyOven door has been left openThere is no power | Check the oven temperature to ensure it has been set correctlyEnsure there is sufficient power to the appliance |
| Cooking is uneven within the oven | Oven shelves are not positioned correctlyTemperature is not set properlyShelf position is incorrectOven was not preheatedCookware is not suitable for baking or roasting | Check that the recommended temperatures and shelf positions are being used - adjust accordinglyConfirm the cookware is suitable for baking or roastingDo not frequently open the door unless you are cooking items that need to be turned. If you open the door often, the interior temperature will be lower, which could affect the results of your cooking |
| Oven light (if available) is not on | The bulb is looseThe oven light has burnt outThe electrical supply is switched off or has disconnectedThe light switch is malfunctioning | Double check the bulb is not looseReplace the lamp as per the instructionsEnsure the electrical supply is switched on at the wall socket outlet |
| Oven fan (if available) is noisy | Oven shelves are vibrating | Check that the oven is levelCheck to see if the shelves and any bake ware are vibrating or in contact with the oven back panel |
Limited "In-Home" Warranty
This quality product is warranted to be free from manufacturer's defects in material and workmanship, provided that the unit is used under the normal operating conditions intended by the manufacturer. This warranty is available only to the person to whom the unit was originally sold by Danby Products Limited (Canada) or Danby Products Inc. (U.S.A.) (hereafter “Danby”) or by an authorized distributor of Danby, and is non-transferable.
Terms of Warranty
Plastic parts are warranted for thirty (30) days from the date of purchase, with no extensions provided.
First 24 months
During the first twenty four (24) months, any functional parts of this product found to be defective, will be repaired or replaced, at warrantor's option, at no charge to the original purchaser.
To obtain service
Contact the dealer where the unit was purchased, or contact the nearest authorized Danby service depot, where service must be performed by a qualified service technician. If service is performed on the unit by anyone other than an authorized service depot, all obligations of Danby under this warranty shall be void.
Boundaries of in-home service
Danby reserves the right to limit the boundaries of “In Home Service” to the proximity of an authorized service depot. Any appliance requiring service outside the limited boundaries of “In Home Service”, will be the consumer’s responsibility to transport at their own expense to the original point of purchase or a service depot for repair. If the appliance is installed in a location that is 100 kilometers (62 miles) or more from the nearest service center, it must be delivered to the nearest authorized Danby Service Depot by the purchaser.
Transportation charges to and from the service location are not protected by this warranty and are the responsibility of the purchaser.
Exclusions
Save as herein provided, by Danby, there are no other warranties, conditions, representations or guarantees, express or implied, made or intended by Danby or its authorized distributors and all other warranties, conditions, representations or guarantees, including any warranties, conditions, representations or guarantees under any Sale of Goods Act or like legislation or statute is hereby expressly excluded. Save as herein provided, Danby shall not be responsible for any damages to persons or property, including the unit itself, howsoever caused or any consequential damages arising from the malfunction of the unit and by the purchase of the unit, the purchaser does hereby agree to indemnify and hold harmless Danby from any claim for damages to persons or property caused by the unit.
General Provisions
No warranty or insurance herein contained or set out shall apply when damage or repair is caused by any of the following:
- Power failure.
- Damage in transit or when moving the appliance.
- Improper power supply such as low voltage, defective house wiring or inadequate fuses.
-
Accident, alteration, abuse or misuse of the appliance such as inadequate air circulation in the room or abnormal operating conditions (ie. extremely high or low room temperature).
-
Use for commercial or industrial purposes (ie. If the appliance is not installed in a domestic residence).
-
Fire, water damage, theft, war, riot, hostility, acts of God such as hurricanes, floods etc.
-
Service calls resulting in customer education.
-
Improper Installation (ie. Building-in of a free standing appliance or using an appliance outdoors that is not approved for outdoor application, including but not limited to: garages, patios, porches or anywhere that is not properly insulated or climate controlled).
Proof of purchase date will be required for warranty claims; retain bills of sale. In the event that warranty service is required, present the proof of purchase to our authorized service depot.
Bienvenido a la familia Danby.
Estamos orgullosos de nuestros productos de calidad y creemos en un servicio confiable. Le sugerimos que lea este manual del propietario antes de enchufar su nuevo electrodoméstico, ya que contiene información importante de funcionamiento, información de seguridad, solución de problemas y consejos de mantenimiento para garantizar la confiabilidad y longevidad de su electrodoméstico.
Tiene derecho a la cobertura de la garantía como se describe en el manual del propietario que se proporciona con su nuevo electrodoméstico.
-
Escriba la información de su aparato a continuación. Debe conservar el comprobante de compra original para validar y recibir los servicios de garantía.
-
Registre su producto en línea y reciba una EXTENSIÓN DE GARANTÍA GRATUITA DE 2 MESES después de completar una encuesta sobre el producto, en www.danby.com/support/product-registration/
Número de modelo: ____
Número de serie: ____
Fecha de compra: ____
Necesitas ayuda?
-
Lea el manual del propietario para obtener ayuda con la instalación, resolución de problemas y asistencia de mantenimiento.
-
Visite www.Danby.com para acceder a herramientas de autoservicio, preguntas frecuentes y mucho más buscando su número de modelo en la barra de búsqueda.
-
Para obtener el servicio al cliente más rápido, complete el formulario web en www.danby.com/support. Su envío irá directamente a un experto en su dispositivo en particular. Nuestros tiempos de respuesta promedio son entre 20 minutos y 2 horas, durante el horario comercial EST.
-
Llame al 1-800-263-2629; tenga en cuenta que durante las horas pico, los tiempos de espera pueden exceder una hora.
ADVERTENCIA - RIESGO DE VOLCADURA
- Un niño o adulto puede volcar el aparato y ser fatal.
- Verifique que el soporte anticaída haya sido instalado correctamente al suelo.
- Asegúrese de que el soporte anticaída esté reactivado cuando se mueva la estufa.
- No opere la estufa sin que el soporte anticaída esté colocado y activado.
- No seguir estas instrucciones puede resultar en la muerte o quemaduras graves a niños o adultos.
DISPOSITIVOS ANTICAÍDA
Para reducir el riesgo de que el aparato se vuelque debido a un uso anormal o una carga incorrecta de la puerta, el aparato debe asegurarse instalando dispositivos anticaída. Hay dos dispositivos anticaída que deben instalarse para garantizar que el aparato sea seguro.
Nota: Si la estufa se traslada, ambos dispositivos anticaída deben ser retirados e instalados en la nueva ubicación.
SOPORTE ANTICAÍDA
Se instala en la pierna trasera izquierda o derecha.
Para instalar el soporte anticaída:
- Coloque el soporte anticaída (1) en el suelo donde se instalará la estufa.
- Marque la ubicación del orificio en el soporte anticaída.
- Use una broca de 5/16" (8 mm) para perforar un agujero en el suelo e inserte el tornillo proporcionado para asegurar los soportes anticaída al suelo.
- Luego, instale la cadena anticaída.
CADENA ANTICAÍDA
- Use un tapón de pared para fijar el gancho (3) a la pared de la cocina.
- Con la ayuda del mecanismo de bloqueo (4), conecte la cadena de seguridad (5) al gancho.
INSTALAR AMBOS DISPOSITIVOS ANTICAÍDA
- Deslice la estufa hacia atrás y colóquela en posición, asegurándose de que el soporte anticaída este sobre la pierna trasera del aparato.
- Usando el accesorio con tornillo (6), fije firmemente la cadena a la parte trasera de la estufa (7).
- Recuerde que la cadena de seguridad debe ser lo más corta posible para evitar que el aparato se incline hacia adelante, por lo que la estufa debe estar muy cerca de la pared trasera (8).


AVISO - ANTES DEL PRIMER USO
Los elementos calefactores llevan una capa protectora que debe quemarse antes de utilizarlos. Para ello:
- Abra la puerta del horno y ajuste la perilla de control de temperatura a 450°F
- Gire el selector de función hacia el elemento hornear y el elemento asar por separado durante aproximadamente 15 minutos
- Es importante asegurar una ventilación adecuada durante este período
ADVERTENCIA - ELEMENTOS CALEFACTORES
- Los elementos calefactores de la superficie o del interior del aparato pueden estar calientes aunque parezcan fríos
- Las zonas cercanas a los elementos calefactores pueden calentarse lo suficiente como para causar quemaduras
- No toque ni deje que la ropa u otros materiales inflamables toquen/estén en contacto con los elementos calefactores o las zonas cercanas a ellos durante o después del uso (deben tener tiempo suficiente para enfriarse)
- Las superficies del aparato pueden calentarse lo suficiente como para causar quemaduras: estas áreas incluyen las aberturas de ventilación del horno, las superficies cercanas a estas aberturas, las puertas y las ventanas del horno
PELIGRO - INCENDIOS PROVOCADOS POR LA GRASA
- Cuando caliente grasa, no la deje desatendida, ya que podría incendiarse.
- No recoja nunca una olla o sartén en llamas
- No utilice agua ni harina para apagar un incendio provocado por grasa.
- En caso de incendio por grasa, apague el quemador -si puede hacerlo sin peligro- y apague el fuego con un extintor de polvo químico o de espuma.
- También puede sofocar el fuego con una tapa de olla bien ajustada, una bandeja de horno, una bandeja plana o bicarbonato sódico
- Si se produce un incendio en el horno durante la cocción, sofoque el fuego cerrando la puerta y apagando el horno
PELIGRO - RIESGO DE INCENDIO
- Se recomienda conectar este aparato a un circuito independiente que no esté compartido con ningún otro aparato
- No limpie nunca el aparato o sus piezas con líquidos inflamables, ya que los vapores pueden crear peligro de incendio y/o explosión
- Antes de limpiar o reparar este aparato, desenchúfelo completamente de la toma de corriente o desconecte el suministro eléctrico de la cocina en el panel de distribución doméstico quitando el fusible o desconectando el disyuntor. De lo contrario, puede sufrir una descarga eléctrica o la muerte
- Desconecte siempre la alimentación eléctrica del aparato antes de repararlo
- No intente reparar o sustituir ninguna pieza del aparato a menos que se recomiende específicamente en este manual. Cualquier otra reparación debe ser realizada por un técnico cualificado
- Este aparato no debe utilizarse nunca como fuente de calor para calentar o caldear una habitación - el uso de este aparato como calefactor puede provocar el sobrecalentamiento del aparato y/o la intoxicación por monóxido de carbono
- Los elementos de la encimera de la estufa no deben funcionar sin los utensilios de cocina adecuados
- Todas las aberturas en la pared detrás del aparato y el suelo debajo del aparato deben estar selladas
- No obstruya el flujo de aire alrededor del aparato
- Mantenga la zona alrededor del aparato despejada y libre de materiales combustibles, gasolina y otros vapores inflamables
- Mantenga siempre los revestimientos de paredes, cortinas o cortinajes combustibles a una distancia segura de la cocina
- Nunca utilice o almacene gasolina u otros vapores o líquidos inflamables dentro o cerca de este aparato; de lo contrario, podría producirse un incendio o una explosión
IMPORTANTE
LAS BAJAS TEMPERATURAS PUEDEN DAÑAR EL CONTROL ELECTRÓNICO DEL APARATO
Si el aparato no se ha utilizado durante un largo período de tiempo:
- Asegúrese de que el aparato haya estado a temperaturas superiores a 32°F (0°C) durante al menos tres (3) horas antes de encenderlo
MODIFICACIONES
- Nunca modifique ni altere la construcción del aparato quitando las patas niveladoras, los paneles, las cubiertas de los cables, los soportes/tornillos antivuelco ni ninguna otra pieza del aparato
ADVERTENCIAS
ALMACENAMIENTO EN O SOBRE EL APARATO
- No almacene materiales inflamables en el horno o microondas, cerca de quemadores o elementos de superficie, o en el cajón de almacenamiento o calentador (esto incluye artículos de papel, plástico y tela como libros de cocina, vajilla de plástico y toallas)
- No guarde explosivos, como latas de aerosol, en el aparato o cerca de él
TRASLADO DEL APARATO
Si necesita mover el aparato:
- No mueva el aparato cuando esté en uso, o todavía caliente (para reducir el riesgo de quemaduras)
- Para reducir el riesgo de lesiones debidas al vuelco del aparato, verifique la reinstalación de este aparato en el dispositivo antivuelco suministrado después de volver a colocar el aparato en la posición de instalación original
ELIMINACIÓN DEL APARATO
Para evitar la posibilidad de que los niños queden atrapados, tome las siguientes precauciones antes de desechar el aparato:
• Retire completamente la puerta del horno
- Nunca permita que los niños operen, jueguen o gateen dentro de la cocina eléctrica
PRECAUCIÓN - CORTES DE CORRIENTE
No intente utilizar el aparato durante un corte de corriente. Si se produce un corte de corriente:
- Apague el aparato inmediatamente
- Si se restablece la corriente y no se ha apagado el elemento de superficie, éste volverá a encenderse en cuanto se restablezca la corriente
- Esto puede provocar la ignición de objetos situados sobre o cerca de la placa de cocción, causando lesiones graves o la muerte
ADVERTENCIA
El fabricante declina toda responsabilidad por daños personales o materiales causados por un uso incorrecto o inadecuado de la cocina
REQUISITOS GENERALES DE SEGURIDAD
- Asegúrese de que el aparato esté correctamente instalado y conectado a tierra por un técnico cualificado.
- Para eliminar el riesgo de quemaduras o incendios por alcanzar las unidades de superficie calientes, debe evitarse el espacio de almacenamiento en armarios situado por encima de las unidades de superficie. Si es necesario colocar armarios, el riesgo puede reducirse instalando una campana extractora que sobresalga horizontalmente un mínimo de 5 pulgadas (12,7 cm) por encima de la parte inferior de los armarios
- Nunca se deben llevar prendas sueltas o colgantes mientras se utiliza el aparato
- Utilice sólo agarraderas secas (no utilice toallas u otros paños voluminosos); las agarraderas húmedas o mojadas sobre superficies calientes pueden provocar quemaduras por el vapor
- No deje que el agarrador toque los elementos calefactores calientes
- No caliente recipientes de alimentos que no estén abiertos: la presión acumulada puede hacer que revienten y provocar lesiones
- No deje a los niños solos o desatendidos en la zona donde se utiliza el aparato
- No se debe permitir que los niños se sienten o se pongan de pie sobre ninguna parte del aparato (esto incluye el cajón de almacenamiento, el cajón inferior de la parrilla, el cajón del calentador o el horno doble inferior)
- No guarde objetos de interés para los niños en los armarios situados encima del aparato o en la parte trasera de las cocinas (los niños que se suban o se acerquen al aparato para alcanzar objetos podrían sufrir lesiones graves)
- No permita que los niños trepen o jueguen alrededor del aparato, ya que el peso de un niño sobre la puerta abierta del horno puede hacer que el aparato vuelque, provocando quemaduras graves u otras lesiones
- Un cajón abierto, cuando está caliente, puede causar quemaduras
- Pisar, apoyarse o sentarse en la puerta o en los cajones de este aparato puede provocar lesiones graves y dañar el aparato
- Nunca cubra ninguna ranura, orificio o paso del fondo del horno ni cubra una rejilla entera con materiales como papel de aluminio (al hacerlo se bloquea el flujo de aire a través del horno y puede provocar intoxicación por monóxido de carbono. Los revestimientos de papel de aluminio también pueden atrapar el calor, provocando un riesgo de incendio)
- Para evitar la posibilidad de una quemadura o una descarga eléctrica, asegúrese siempre de que los controles de todos los elementos de superficie estén en la posición OFF, y de que todos los serpentines estén fríos antes de intentar levantar o retirar un elemento de cocción de serpentin
- Esta cocina ha sido diseñada y fabricada exclusivamente para cocinar alimentos domésticos y no es adecuada para aplicaciones no domésticas, por lo que no debe utilizarse en un entorno comercial. La garantía de la cocina quedará anulada si se utiliza en un entorno no doméstico
INSTRUCCIONES DE CONEXIÓN A TIERRA
Este aparato debe estar correctamente conectado a tierra. La conexión a tierra reduce el riesgo de descarga eléctrica al proporcionar un cable de escape para la corriente eléctrica.
INSTALACIÓN
- Asegúrese de que su aparato está correctamente instalado y conectado a tierra por un técnico cualificado
No conecte este aparato a la misma toma de corriente que otro aparato. No lo conecte a un alargador o a un enchufe adaptador. El incumplimiento de esta advertencia puede causar lesiones graves, incendios o la muerte.
Nota: Apagar el aparato no lo desconecta de la red eléctrica
Se recomienda colocar el cable de alimentación y el enchufe paralelos al suelo, de forma que el cable discurra paralelo al suelo
PRECAUCIÓN - RIESGO DE DESCARGA ELÉCTRICA
Si se daña el cable o el enchufe, desconecte el aparato de la red eléctrica y sustitúyalo por un cable o enchufe del mismo tipo
SEGURIDAD DE LA PLACA DE COCCIÓN RADIANTE
Sepa qué mando o tecla controla cada zona de calentamiento de la superficie
- Coloque los utensilios de cocina con los alimentos en la zona de cocción antes de encenderla
- Apague la zona de cocción antes de retirar los utensilios de cocina
Los mangos de los utensilios de cocina deben girarse hacia dentro y no extenderse sobre los elementos de la superficie adyacente
- Esto reducirá el riesgo de quemaduras, ignición de materiales inflamables y derrames debidos al contacto involuntario con el utensilio
Utilice el tamaño de cacerola adecuado: El aparato está equipado con cuatro quemadores de diferentes tamaños
- Seleccione utensilios de cocina con fondos planos que coincidan con el tamaño de la unidad de superficie
- El uso de ollas de tamaño inferior puede exponer una parte del elemento calefactor al contacto directo y puede provocar la ignición de la ropa
- El tamaño adecuado de la batería de cocina mejorará la eficiencia de la cocción
- Si utiliza una plancha o una sartén larga, no la utilice en más de un quemador a la vez
Asegúrese de que las bandejas reflectoras o los recipientes de goteo están colocados: La ausencia de estos recipientes durante la cocción puede dañar los componentes del cableado
Utilice el tipo adecuado de utensilios de cocina:
- Sólo ciertos tipos de utensilios de vidrio, cerámica, loza u otros vidriados son adecuados para el servicio de la encimera sin romperse debido al cambio repentino de temperatura
- Compruebe las recomendaciones del fabricante para el uso de la placa de cocción
Nunca deje el aparato desatendido mientras esté en uso:
- Los hervores pueden provocar humo y los derrames de grasa pueden incendiarse
- Una sartén que haya hervido en seco también podría dañarse y acabar estropeando la placa de cocción
Nunca deje el aceite desatendido mientras fríe:
- Si el aceite se calienta más allá de su punto de humeo, puede inflamarse y provocar un incendio que puede propagarse a los armarios circundantes
- Siempre que sea posible, utilice un termómetro para controlar la temperatura del aceite.
Para evitar derrames de aceite e incendios:
- Utilice una cantidad mínima de aceite al freír a poca profundidad
- Evite cocinar alimentos congelados con cantidades excesivas de hielo
El grill no está diseñado para ser utilizado sobre la encimera de cocción:
- Puede provocar un incendio
Recuerde encender el ventilador cuando flamee alimentos bajo una campana de ventilación
SEGURIDAD DE LAS PLACAS DE VITROCERÁMICA
No limpie ni utilice una encimera de cocción rota: Si la encimera de cocción se rompe, las soluciones de limpieza y los derrames pueden penetrar en la encimera de cocción rota y crear un riesgo de descarga eléctrica
- Contacte inmediatamente con un técnico cualificado
Limpie la encimera de cristal con precaución:
- Si se utiliza una esponja o paño húmedo para limpiar derrames en una zona de cocción caliente, tenga cuidado para evitar una posible quemadura por vapor
- Algunos limpiadores pueden producir vapores nocivos si se aplican sobre una superficie caliente
- Evite arañar el cristal de la encimera con objetos afilados
SEGURIDAD EN EL HORNO
Revestimientos protectores: No utilice papel de aluminio, revestimientos posventa ni ningún otro material o dispositivo para forrar el fondo del horno, las rejillas del horno o cualquier otra parte del aparato
- Útilice el aluminio sólo como se recomienda para hornear, por ejemplo, para forrar utensilios de cocina o para cubrir alimentos
- Cualquier otro uso de revestimientos protectores o papel de aluminio puede provocar riesgo de descarga eléctrica, incendio o cortocircuito
Tenga cuidado al abrir la puerta:
- Colóquese a un lado del aparato cuando abra la puerta de un horno caliente
- Esto permitirá que salga el aire caliente o el vapor antes de retirar o volver a colocar los alimentos
Nunca cubra ni coloque nada encima o cerca de la parte superior de la rejilla de ventilación del horno, especialmente objetos de plástico o sensibles al calor: Estos objetos pueden derretirse o incendiarse
Coloque siempre las rejillas del horno en el lugar deseado mientras el horno esté frío:
Si es necesario mover la rejilla mientras el horno está caliente
- Retire todos los utensilios de cocina antes de mover la rejilla
- Utilice agarraderas y sujete la rejilla con ambas manos para cambiarla de posición
- No deje que la agarradera entre en contacto con un quemador o elemento caliente del horno
No utilice una sartén de asar sin un inserto:
- Las sartenes de asar y los insertos permiten que la grasa que gotea se escurra del alto calor de la parrilla
- No cubra la bandeja con papel de aluminio, ya que la grasa podría prenderse fuego
No coloque estantes, sartenes, bandejas de hornear, bandejas de asar u otros utensilios de cocina en el fondo de la cámara del horno
- Colóquelos siempre en un estante del horno
No cocine alimentos en la parte inferior del horno:
- Cocine siempre en la batería de cocina adecuada y utilice siempre una rejilla para horno
No utilice el horno si un elemento calefactor presenta un punto brillante durante el uso o muestra otros signos de daños: Un punto brillante indica que el elemento calefactor puede fallar y presentar un riesgo potencial de quemadura, incendio o descarga eléctrica
- Apague el horno inmediatamente
- Póngase en contacto con un técnico cualificado para que sustituya la resistencia
No limpie nunca el horno con aparatos de limpieza de vapor a alta presión
No obstruya los orificios de ventilación del horno
INSTRUCCIONES DE INSTALACIÓN
ANTES DE LA INSTALACIÓN
- Asegúrese de que no haya materiales inflamables o combustibles en las proximidades (cortinas, aceite, telas, etc.) que puedan incendiarse
- La encimera y los muebles que rodean el aparato deben ser de materiales resistentes a temperaturas superiores a 215°F (100 °C)
- El aparato no debe instalarse directamente encima de un lavavajillas, frigorífico, congelador, lavadora o secadora de ropa
- El aparato puede colocarse cerca de otros muebles a condición de que, en la zona donde se instale el aparato, la altura de los muebles no supere la altura de la placa de cocción
- Para eliminar el riesgo de quemaduras o incendio al pasar la mano por encima de un elemento de superficie caliente, debe evitarse colocar armarios encima de la placa de cocción. Si es necesario colocar armarios encima de la placa de cocción, el riesgo puede reducirse instalando una campana extractora que sobresalga al menos 127 mm (5") de la parte frontal de los armarios. Los armarios instalados encima de una placa de cocción no deben tener más de 330 mm (13") de profundidad
ADVERTENCIA PARA LA INSTALACIÓN Y PREPARACIÓN PARA EL USO
El aparato debe ser instalado por un servicio técnico autorizado o un técnico cualificado
- Una instalación incorrecta puede causar daños de los que el fabricante no se hace responsable y la garantía no será válida
- Antes de la instalación, asegúrese de que las condiciones locales de distribución (tensión eléctrica y frecuencia y/o naturaleza del gas y presión del gas) y los ajustes del aparato son compatibles. Las condiciones de ajuste de este aparato se indican en la etiqueta
- Asegúrese de que se respetan las leyes, ordenanzas, directivas y normas vigentes en el país de utilización (normas de seguridad, reciclaje correcto de acuerdo con la normativa, etc.)
INSTRUCCIONES DE INSTALACIÓN
IMPORTANTE - DESEMBALAJE DEL APARATO
Lea y siga las siguientes instrucciones y precauciones para desembalar, instalar y realizar el mantenimiento de su aparato:
- Retire toda la cinta adhesiva y el embalaje antes de utilizar el aparato
- Deseche la caja y las bolsas de plástico después de desembalar el aparato
- No permita que los niños jueguen con el material de embalaje
- No retire la etiqueta de cableado ni otros folletos adheridos al aparato
- No retire la placa con el número de modelo/serie
INSTALACIÓN DE LA COCINA
- La encimera y los muebles que rodean el aparato deben ser de materiales resistentes a temperaturas superiores a 215 °F (100 °C)
- Si los muebles de la cocina son más altos que la encimera, los muebles de la cocina deben estar a una distancia mínima de 10 cm (13/32") de los lados del aparato para que circule el aire
- Si se va a instalar una campana extractora o un armario encima del aparato, la distancia de seguridad entre la placa de cocción y cualquier armario/campana extractora debe ser la indicada:
| A (Armario) | 16.5" (420 mm) |
| B (Campana extractora) | 25.5"/27.5" (650mm/700mm) |
| C | Anchura del producto |
| D | 2" (50 mm) |

INSTRUCCIONES DE NIVELACIÓN
El aparato debe estar nivelado para funcionar correctamente y con seguridad. Hay cuatro patas de nivelación situadas en las esquinas de la parte inferior del aparato. Ajuste las patas de nivelación hasta que el aparato esté nivelado. Utilice un nivel de carpintero para confirmarlo.

INSTRUCCIONES DE INSTALACIÓN
INSTALACIÓN DEL ALIVIO DE TENSIÓN DEL CABLE DE ALIMENTACIÓN
Sólo debe utilizarse un cable de alimentación de 4 conductores de 240 voltios, 40 amperios y marcado para su uso con cocinas. Coloque el protector contra tirones en el orificio. Inserte el cable de alimentación a través del aliviador de tensión y apriételo. Deje suficiente holgura para fijar fácilmente los terminales del cable al bloque conector. Si hay lengüetas en el extremo del aliviador de tensión con alas, pueden retirarse para un mejor ajuste
Nota: No instale el cable de alimentación sin un aliviador de tensión. El soporte de alivio de tensión debe instalarse antes de volver a instalar la cubierta del cableado de la gama trasera.

INSTALACIÓN DEL CABLE DE ALIMENTACIÓN DE 3 HILOS
ADVERTENCIA
El conductor neutro o de tierra del cable de alimentación debe conectarse al terminal neutro situado en el centro del bloque de conectores. Los cables de alimentación deben conectarse a los terminales exteriores (de color latón)
Retire los 3 tornillos de los terminales del bloque de conectores.
Inserte los tornillos a través de cada anillo terminal del cable de alimentación y en el bloque conector hasta que los tornillos encajen en las tuercas. Asegúrese de que el cable central está conectado al tornillo central del bloque conector.
Apriete bien los tornillos.
NO retire la conexión del cable de tierra

INSTRUCCIONES DE INSTALACIÓN
INSTALACIÓN DEL CABLE DE ALIMENTACIÓN DE 4 HILOS
ADVERTENCIA
El hilo neutro del circuito de alimentación se conecta al terminal neutro situado en el centro del bloque de conectores. Los cables de alimentación deben conectarse a los terminales exteriores (de color latón). El cuarto cable de conexión a tierra debe conectarse al bastidor de la cocina con la placa de conexión a tierra y el tornillo de conexión a tierra
- Retire los 3 tornillos del bloque de conexión.
- Retire el tornillo y la correa de puesta a tierra de la ubicación central del bloque de conectores y la conexión atornillada al bastidor de la cocina.
- Inserte los tornillos a través de cada anillo terminal del cable de alimentación y en el bloque conector hasta que el tornillo encaje en la tuerca. Asegúrese de que el cable central esté conectado al tornillo central del bloque conector. Apriete bien los tornillos.
- Conecte el cable de tierra al bastidor de la cocina.
- Vuelva a colocar la placa de acceso al bloque de terminales.

INSTRUCCIONES DE INSTALACIÓN
CARACTERÍSTICAS DEL PRODUCTO
- Placa de cocción
- Panel de mandos
- Asa de la puerta del horno
- Puerta del horno
- Pies regulables

PANEL DE CONTROL
- Perilla de control del temporizador del horno
- Botón de control de las funciones del horno
- Mando del termostato del horno
- Indicador luminoso del horno
- Botón de cocción en superficie
- Luz de cocción en superficie

CONTROLES DEL CALENTADOR CERÁMICO
- El calor cerámico se controla mediante un mando de 6 posiciones
- Para encenderlo, gire el mando de control hasta la posición deseada
- Junto a los mandos de control habrá un símbolo que indica el calefactor que está controlado por ese mando
- La luz ON/OFF del panel de control indicará si se está utilizando alguna de las resistencias cerámicas.

| Posición del mando | Función |
| 0 | Apagado |
| MIN | Mantener caliente |
| 3-5 | Calentar a fuego lento |
| 7-9 MAX | Cocinar, asar y hervir |
INDICADOR DE CALOR RESIDUAL (si está disponible)
- Después de usar el calentador cerámico habrá calor almacenado en el vidrio vitrocerámico, llamado calor residual
- Si el nivel de calor residual es superior a +140 °F (60 °C), el indicador de calor residual estará activo para la zona de cocción que esté por encima de esta temperatura
- Si se desconecta la alimentación de la placa de cocción mientras el indicador de calor residual está encendido, la luz de advertencia parpadeará cuando se vuelva a conectar la alimentación
- El indicador parpadeará hasta que el calor residual haya disminuido o hasta que se active una de las zonas de cocción
UTENSILIOS DE COCINA
ADVERTENCIA: No utilice nunca la placa de cocción sin ollas en la zona de cocción
- Si es posible, coloque siempre tapas en las ollas
- No utilice utensilios de cocina con bordes dentados o una base curvada


- Asegúrese de que la base de su batería de cocina es lisa, se asienta plana contra el cristal y tiene el mismo tamaño que la zona de cocción - centre siempre su batería de cocina en el elemento


- Cuando retire la batería de cocina de la superficie cerámica, levántela siempre, no la deslice, ya que podría rayar el cristal


IMPORTANTE
- La temperatura de las partes accesibles puede elevarse durante el funcionamiento del aparato. Mantenga a los niños y a los animales alejados de la placa vitrocerámica durante el funcionamiento hasta que se haya enfriado completamente después del mismo
- Si observa una grieta en la placa de cocción, apáguela inmediatamente y póngase en contacto con un servicio técnico autorizado para que se la cambien
INSTRUCCIONES DE USO
MANDO DE CONTROL DE LAS FUNCIONES DEL HORNO
Gire el mando hasta el símbolo correspondiente a la función de cocción deseada.

MANDO DEL TERMOSTATO DEL HORNO
Después de seleccionar una función de cocción, gire este mando para ajustar la temperatura deseada. La luz del termostato del horno se iluminará siempre que el horno se esté calentando o todavía esté caliente.

FUNCIONES DEL HORNO
NOTA: Se recomienda precalentar el horno durante 10 minutos para un mejor uso.
Hornear

El termostato y las luces de aviso del horno se encenderán, y las resistencias inferior y superior comenzarán a funcionar. La función Hornear emite calor, asegurando una cocción uniforme de los alimentos.
Ideal para hacer:
- Bollería
- Pasteles
- Pasta al horno
- Lasaña
- Pizza
Asado Bajo

El termostato del horno y las luces de advertencia se encenderán, y la resistencia de asar comenzará a funcionar. Esta función se utiliza para asar o tostar alimentos en los estantes superiores del horno
- Coloque siempre una bandeja debajo de los alimentos para recoger cualquier goteo de aceite o grasa
Asar Alto

El termostato del horno y las luces de aviso se encenderán, y las resistencias superior y de asado comenzarán a funcionar. Esta función se utiliza para asar más rápidamente y para asar alimentos con una superficie mayor, como la carne
- Coloque siempre una bandeja debajo de los alimentos para recoger cualquier goteo de aceite o grasa
INSTRUCCIONES DE USO
MANDO DE CONTROL DEL TEMPORIZADOR DEL HORNO
Para su mayor seguridad, nuestro horno ha sido diseñado para funcionar con un temporizador.

Para ajustar el temporizador, gire el mando en el sentido de las agujas del reloj hasta la cantidad de tiempo que desee. Una vez que el temporizador llegue a 0, el horno se apagará.

Si prefiere utilizar el horno sin el temporizador, simplemente gire el mando del temporizador en sentido contrario a las agujas del reloj hasta la M (manual), y el horno permanecerá encendido continuamente.

ACCESORIOS
La rejilla EasyFix
- Para retirar la rejilla, tire de ella como se muestra a continuación para soltarla de los clips (a). Después de soltarla de los clips, levántela

El cajón guiado por cuatro ruedas
- Su aparato incluye un cajón para guardar accesorios - bandejas, estantes, rejillas y ollas y sartenes pequeñas

ADVERTENCIA: La superficie interior del cajón puede calentarse durante su uso. No guarde alimentos, plásticos o materiales inflamables en el cajón
El protector contra salpicaduras
- El protector contra salpicaduras se fija a la placa de cocción con dos tornillos

La rejilla de alambre

ADVERTENCIA: Cuando coloque la rejilla, asegúrese de que la parte trasera está correctamente colocada antes de introducirla en el horno
INSTRUCCIONES GENERALES DE LIMPIEZA
ADVERTENCIA: Apague el aparato y deje que se enfríe antes de limpiarlo
- Asegúrese de que los materiales de limpieza son los adecuados y recomendados por el fabricante antes de utilizarlos en el aparato
- Utilice cremas o limpiadores líquidos suaves; asegúrese de que no contengan partículas.
- No utilice cremas corrosivas, polvos de limpieza abrasivos, lana de alambre áspera o herramientas duras, ya que pueden dañar las superficies de la cocina.
Para la limpieza diaria de marcas, huellas dactilares y salpicaduras no grasas, aplique un producto de limpieza para vitrocerámica. Aclare y seque con un paño limpio o una toalla de papel
Limpieza del interior del horno
- Se limpia mejor mientras el horno está caliente
- Se recomienda hacerlo después de cada uso del horno
- Limpie el horno con un paño suave empapado en agua jabonosa
- A continuación, vuelva a limpiar el horno con un paño húmedo y séquelo
Limpieza del cristal cerámico
ADVERTENCIA: Si la superficie está agrietada, apague inmediatamente el aparato para evitar la posibilidad de una descarga eléctrica. Llame inmediatamente para que se la cambien
- Utilice un limpiador en crema o líquido para limpiar el cristal vitrocerámico
- Aclare y seque bien el cristal con un paño seco
- Recuerde: no utilice materiales de limpieza destinados al acero, ya que pueden dañar el cristal
Si se utilizan sustancias con bajo punto de fusión en la base o en los revestimientos de la batería de cocina, pueden dañar la vitrocerámica.
En caso de derrames, derretimientos y salpicaduras de azúcar caliente sobre la encimera de cocción, retire inmediatamente el derrame o el alimento con una cuchilla para vitrocerámica, pero tenga cuidado con las superficies de cocción calientes. Sujete la cuchilla en un ángulo de 45 grados y raspe el alimento derramado hacia una zona fría de la encimera, luego límpielo con un paño de cocina o papel de cocina. Los derrames grandes deben retirarse inmediatamente para evitar que se cocinen en la superficie de la placa de cocción.
Cualquier cambio en el color de la vitrocerámica no afectará a la estructura o durabilidad de la vitrocerámica y no se debe a un cambio en el material. El color puede cambiar por varias razones:
- Los alimentos derramados no se han limpiado de la superficie
- Se está utilizando una vajilla incorrecta, que puede erosionar la superficie
- Se utilizan materiales de limpieza inadecuados
CUIDADO Y MANTENIMIENTO
Limpieza de las piezas de cristal
- Limpie regularmente las partes de cristal de su electrodoméstico
- Utilice un limpiacristales para limpiar el interior y el exterior de las piezas de cristal
- Aclárelas y séquelas bien con un paño seco
Limpieza de las piezas esmaltadas
- Limpie regularmente las partes esmaltadas de su aparato
- Limpie las partes esmaltadas con un paño suave empapado en agua jabonosa
- A continuación, vuelva a limpiarlas con un paño húmedo y séquelas
IMPORTANTE
No limpie las piezas esmaltadas cuando aún estén calientes después de cocinar
No deje vinagre, café, leche, sal, agua, limón o zumo de tomate sobre el esmalte durante mucho tiempo
Limpieza de las piezas de acero inoxidable (si existen)
- Limpie regularmente las piezas de acero inoxidable de su aparato
- Limpie las piezas de acero inoxidable sólo con un paño suave empapado en agua
- A continuación, séquelas bien con un paño seco
IMPORTANTE
No limpie las piezas de acero inoxidable cuando aún estén calientes después de cocinar
No deje vinagre, café, leche, sal, agua, limón o zumo de tomate sobre el esmalte durante mucho tiempo
Limpieza de superficies pintadas (si existen)
- Las manchas de tomate, pasta de tomate, ketchup, limón, derivados del petróleo, leche, alimentos azucarados, bebidas azucaradas y café deben limpiarse con un paño humedecido en agua tibia inmediatamente
- Si no se limpian y acaban secándose en las superficies, no deben frotarse con objetos duros (objetos puntiagudos, estropajos de acero y plástico, esponjas para vajilla que dañen la superficie) ni con productos de limpieza que contengan altos niveles de alcohol, quitamanchas, desengrasantes, productos químicos abrasivos para superficies. De lo contrario, puede producirse corrosión en las superficies pintadas con pintura en polvo y pueden aparecer manchas.
NOTA: El fabricante no se hace responsable de los daños causados por el uso de productos o métodos de limpieza inadecuados
CUIDADO Y MANTENIMIENTO
Retirada del cristal interior
Debe retirar el cristal de la puerta del horno antes de limpiarlo, como se muestra a continuación:
- Empuje el vidrio en la dirección de B y libérelo del soporte de fijación (x). Tire del vidrio en el sentido de A.

Para sustituir el vidrio interior:
- Empuje el cristal hacia y por debajo del soporte de colocación (y) en la dirección de B
- Coloque el cristal debajo del soporte de ubicación (x) en la dirección de C
NOTA: Si la puerta del horno es de vidrio triple, la tercera capa de vidrio puede retirarse de la misma manera que la segunda capa de vidrio
Extracción de la puerta del horno
NOTA: La puerta del horno es desmontable pero pesada. Se recomienda que al menos dos personas trabajen juntas para retirarla
Retire la puerta del horno antes de limpiar el cristal de la puerta del horno, como se muestra a continuación:
- Abra la puerta del horno

- Abra el pestillo de bloqueo (a) (con la ayuda de un destornillador) hasta la posición final.

- Cierre la puerta hasta casi alcanzar la posición de cierre total y retire la puerta tirando de ella hacia usted.

CUIDADO Y MANTENIMIENTO
Extracción de la rejilla de alambre
Para retirar la rejilla de alambre, tire de ella como se muestra en la figura. Después de soltarla de los clips (a), levántela.

Sustitución de la luz del horno
Advertencia: El mantenimiento de este aparato debe ser realizado únicamente por un servicio técnico autorizado o un técnico cualificado
Importante
- Antes de sustituir la bombilla del horno, asegúrese de que la alimentación eléctrica esté desconectada del aparato. De lo contrario, podría sufrir una descarga eléctrica o quemaduras
- Asegúrese de dejar que la cubierta de la luz y la bombilla se enfríen completamente antes de sustituirlas
- Quitar la puerta del horno puede facilitar este proceso
Para sustituir la bombilla:
- Retire la lente de cristal y, a continuación, la bombilla
- Inserte la nueva bombilla (resistente a 600 °F o 315 °C) para reemplazar la bombilla que retiró (240 V, 15-25 vatios, tipo E14)
- Vuelva a colocar la lente de vidrio y su horno estará listo para ser utilizado
Notas:
El producto contiene una fuente de luz de clase de eficiencia energética G
La fuente de luz incluida no está diseñada para su uso en otras aplicaciones - está diseñada específicamente para su uso en aparatos de cocina domésticos. No es adecuada para la iluminación de habitaciones domésticas
SOLUCIÓN DE PROBLEMAS
| Áreas de preocupación | Posible Causa | Soluciones |
| No se pueden encender las zonas de cocción | No hay suministro eléctrico | Compruebe el fusible del aparatoCompruebe el disyuntor para ver si se ha disparado.Asegúrese de que el enchufe está bien insertado en la toma de corrienteCompruebe si hay un corte de corriente probando otros aparatos electrónicos |
| El horno no se enciende | La alimentación está desconectada | Compruebe si el aparato recibe alimentación eléctricaCompruebe si los demás aparatos de cocina funcionan |
| No hay calor o el horno no se calienta | El control de temperatura del horno está mal ajustadoLa puerta del horno se ha quedado abiertaNo hay corriente | Compruebe que la temperatura del horno es la correctaAsegúrese de que el aparato tiene suficiente potencia |
| La cocción es desigual dentro del horno | Los estantes del horno no están colocados correctamenteLa temperatura no está ajustada correctamenteLa posición de los estantes es incorrectaEl horno no se ha precalentadoLos utensilios de cocina no son adecuados para hornear o asar | Compruebe que se están utilizando las temperaturas y posiciones de estante recomendadas - ajustelas según correspondaCompruebe que los utensilios de cocina son adecuados para hornear o asarNo abra la puerta con frecuencia a menos que esté cocinando alimentos que deban girarse. Si abre la puerta con frecuencia, la temperatura interior será más baja, lo que podría afectar a los resultados de la cocción |
| La luz del horno (si está disponible) no está encendida | La bombilla está sueltaLa luz del horno se ha fundidoEl suministro eléctrico está apagado o desconectadoEl interruptor de la luz funciona mal | Compruebe que la bombilla no esté sueltaSustituya la lámpara siguiendo las instruccionesAsegúrese de que la alimentación eléctrica está conectada en la toma de corriente |
| El ventilador del horno (si está disponible) es ruidoso | Los estantes del horno vibran | Compruebe que el horno está niveladoCompruebe si los estantes y cualquier utensilio para hornear vibran o están en contacto con el panel posterior del horno. |
Garantía limitada “a domicilio”
Este producto de calidad está garantizado contra defectos de fabricación, incluyendo partes y mano de obra, siempre y cuando la unidad se utilice bajo las condiciones normales de funcionamiento para las que fue diseñado. Esta garantía está solamente disponible para la persona que haya comprado originalmente esta unidad directamente de Danby Products Limited (Canada) o Danby Products Inc. (U.S.A.) (en adelante “Danby”) o uno de sus distribuidores autorizados, y no es transferible.
Condiciones
Las piezas plásticas, se autorizan por treinta (30) días solamente a partir de la fecha de la compra, sin las extensiones proporcionadas.
Primeros 24 meses
Durante los primeros veinticuatro (24) meses, cualquier parte en buen estado de este producto que resulte defectuosa, incluyendo cualquier sistema sellado, será reparado o reemplazado, a opción del fabricante, sin cargo para el comprador original.
Para obtener servicio
Comuníquese con el distribuidor donde haya comprado la unidad, o llame al Taller de Servicio Autorizado más cercano, donde debe ser reparada por un técnico calificado. Si esta unidad es reparada en otro lugar que no sea un Taller de Servicio Autorizado, o si la unidad se utiliza para aplicaciones comerciales, Danby no se hará responsable de ninguna forma y la garantía será anulada.
Límites del servicio técnico a domicilio
Danby se reserva el derecho de limitar la cobertura de "Servicio en Domicilio" sujeto a la proximidad de un Taller de Servicio Autorizado. Para todo artefacto que requiera servicio fuera del área limitada de "Servicio en Domicilio", el cliente será responsable por transportar dicho artefacto hasta el Taller de Servicio Autorizado mas cercano. Si el electrodoméstico está instalado en un lugar que se encuentra a 100 kilómetros (62 millas) o más del centro de servicios más cercano, se debe llevar la unidad al Centro de servicios Danby autorizado más cercano, ya que dicho servicio sólo puede realizarlo un técnico calificado y certificado por Danby para prestar servicios de garantía. Los cargos por transporte desde y hacia el lugar en que se efectúe el servicio técnico no están cubiertos por esta garantía y son de responsabilidad del comprador.
Exclusions
Salvo lo aquí indicado por Danby, no existen otras garantías, condiciones o representaciones, explícitas o implícitas, concretas o intencionales por parte de Danby o sus distribuidores autorizados y todas las demás garantías, condiciones o representaciones, incluyendo cualquier garantía, condiciones o representaciones bajo cualquier Acta de Venta de Productos o legislación o estatuto similar, quedan de esta forma expresamente excluidas. Salvo lo aquí indicado, Danby no serán responsables por ningún daño a personas o bienes, incluyendo la propia unidad, sin importar su causa, o de ningún daño indirecto causado por el desperfecto de la unidad, y al comprar esta unidad, el comprador acepta por la presente, indemnizar y proteger a Danby contra cualquier reclamo por daños a personas o bienes causados por la unidad.
Disposiciones generales
No se considerará ninguna de estas garantías o seguros cuando el daño o la necesidad de reparación sea el producto de los siguientes casos:
- Falla del suministro eléctrico.
- Daños en tránsito o durante el transporte de la unidad.
- Alimentación incorrecta, como bajo voltaje, instalación eléctrica defectuosa o fusibles inadecuados.
- Accidente, modificación, abuso o uso incorrecto del artefacto, tal como insuficiente ventilación del ambiente o condiciones de operación anormales (temperatura ambiente extremadamente alta o baja).
- Utilización comercial o industrial (v.g., si el electrodoméstico no está instalado en una vivienda particular).
- Incendio, daños por agua, robo, guerra, disturbios, hostilidades, actos de fuerza mayor como huracanes, inundaciones, etc.
- Pedidos de servicio debido a desinformación del usuario.
- Instalación inadecuada (v.g., instalación empotrada de un electrodoméstico diseñado como unidad independiente o uso de un electrodoméstico al aire libre que no esté aprobado para dicho fin, incluyendo pero no limitado a: garajes, patios, porches o en cualquier lugar que no esté bien aislado o controlado por el clima).
Se requerirá una prueba de la fecha de compra para las reclamaciones de garantía; conserve las facturas de venta. En caso de que se requiera servicio de garantía, presente la prueba de compra en nuestro centro de servicio autorizado.
NOTES / NOTAS :
NOTES / NOTAS :
Danby Products Limited, Guelph, Ontario, Canada N1H 6Z9
Danby Products Inc. Findlay, Ohio, U.S.A. 45840
www.danby.com
- OWNER'S MANUAL MANUAL DEL PROPIETARIO
- WELCOME TO THE DANBY FAMILY
- NEED HELP
- WARNING - TIP OVER HAZARD
- ANTI-TIP DEVICES
- ANTI-TIP BRACKET
- ANTI-TIP CHAIN
- INSTALL BOTH ANTI-TIP DEVICES
- NOTICE - BEFORE FIRST TIME USE
- WARNING - HEATING ELEMENTS
- DANGER - GREASE FIRES
- DANGER - FIRE RISK
- IMPORTANT
- COLDER TEMPERATURES CAN DAMAGE THE ELECTRONIC CONTROL OF THE APPLIANCE
- MODIFICATIONS
- WARNINGS
- STORAGE IN OR ON THE APPLIANCE
- MOVING THE APPLIANCE
- DISPOSING OF THE APPLIANCE
- CAUTION - POWER FAILURES
- WARNING
- GENERAL SAFETY REQUIREMENTS
- GROUNDING INSTRUCTIONS
- INSTALLATION
- CAUTION - RISK OF ELECTRICAL SHOCK
- RADIANT COOK-TOP SAFETY
- KNOW WHICH KNOB OR KEY CONTROLS EACH SURFACE HEATING AREA
- COOKWARE HANDLES SHOULD BE TURNED INWARD AND NOT EXTEND OVER ADJACENT SURFACE ELEMENTS
- ENSURE REFLECTOR PANS OR DRIP BOWLS ARE IN PLACE
- USE THE APPROPRIATE TYPE OF COOKING UTENSILS
- NEVER LEAVE APPLIANCE UNATTENDED WHILE IN USE
- NEVER LEAVE OIL UNATTENDED WHILE FRYING
- TO AVOID OIL SPILLOVER AND FIRE
- THE SEARING GRILL IS NOT DESIGNED FOR USE ON THE COOK-TOP
- REMEMBER TO TURN ON THE FAN WHEN YOU ARE FLAMING FOODS UNDER A VENTILATING HOOD
- GLASS AND CERAMIC COOK-TOP SAFETY
- CLEAN A GLASS COOK-TOP WITH CAUTION
- OVEN SAFETY
- USE CARE WHEN OPENING THE DOOR
- DO NOT USE A BROILER PAN WITHOUT AN INSERT
- DO NOT COOK FOOD ON THE BOTTOM OF THE OVEN
- INSTALLATION INSTRUCTIONS
- BEFORE INSTALLATION
- WARNING FOR INSTALLATION AND PREPARATION FOR USE
- IMPORTANT - UNPACKING YOUR APPLIANCE
- INSTALLATION OF THE COOKER
- LEVELING INSTRUCTIONS
- POWER CORD STRAIN RELIEF INSTALL
- WIRE POWER CORD INSTALLATION
- PRODUCT FEATURES
- CONTROL PANEL
- OPERATING INSTRUCTIONS
- CERAMIC HEATER CONTROLS
- RESIDUAL HEAT INDICATOR (IF AVAILABLE)
- COOKWARE
- OVEN FUNCTION CONTROL KNOB
- OVEN THERMOSTAT KNOB
- OVEN FUNCTIONS
- BAKE
- BROIL LOW
- BROIL HIGH
- OVEN TIMER CONTROL KNOB
- ACCESSORIES
- THE EASYFIX WIRE RACK
- THE FOUR WHEEL GUIDED DRAWER
- THE SPLASHBACK
- THE WIRE GRID
- CARE & MAINTENANCE
- GENERAL CLEANING INSTRUCTIONS
- CLEANING THE INSIDE OF THE OVEN
- CLEANING THE CERAMIC GLASS
- CLEANING GLASS PARTS
- CLEANING THE ENAMELED PARTS
- CLEANING STAINLESS STEEL PARTS (IF AVAILABLE)
- CLEANING PAINTED SURFACES (IF AVAILABLE)
- REMOVAL OF THE INNER GLASS
- REMOVAL OF THE OVEN DOOR
- REMOVAL OF THE WIRE SHELF
- OVEN LIGHT REPLACEMENT
- TO REPLACE THE LIGHT BULB
- NOTES
- LIMITED "IN-HOME" WARRANTY
- TERMS OF WARRANTY
- FIRST 24 MONTHS
- TO OBTAIN SERVICE
- BOUNDARIES OF IN-HOME SERVICE
- EXCLUSIONS
- GENERAL PROVISIONS
- BIENVENIDO A LA FAMILIA DANBY
- NECESITAS AYUDA
- ADVERTENCIA - RIESGO DE VOLCADURA
- DISPOSITIVOS ANTICAÍDA
- SOPORTE ANTICAÍDA
- CADENA ANTICAÍDA
- INSTALAR AMBOS DISPOSITIVOS ANTICAÍDA
- AVISO - ANTES DEL PRIMER USO
- ADVERTENCIA - ELEMENTOS CALEFACTORES
- PELIGRO - INCENDIOS PROVOCADOS POR LA GRASA
- PELIGRO - RIESGO DE INCENDIO
- IMPORTANTE
- LAS BAJAS TEMPERATURAS PUEDEN DAÑAR EL CONTROL ELECTRÓNICO DEL APARATO
- MODIFICACIONES
- ADVERTENCIAS
- ALMACENAMIENTO EN O SOBRE EL APARATO
- TRASLADO DEL APARATO
- ELIMINACIÓN DEL APARATO
- PRECAUCIÓN - CORTES DE CORRIENTE
- ADVERTENCIA
- REQUISITOS GENERALES DE SEGURIDAD
- INSTRUCCIONES DE CONEXIÓN A TIERRA
- INSTALACIÓN
- PRECAUCIÓN - RIESGO DE DESCARGA ELÉCTRICA
- SEGURIDAD DE LA PLACA DE COCCIÓN RADIANTE
- SEPA QUÉ MANDO O TECLA CONTROLA CADA ZONA DE CALENTAMIENTO DE LA SUPERFICIE
- LOS MANGOS DE LOS UTENSILIOS DE COCINA DEBEN GIRARSE HACIA DENTRO Y NO EXTENDERSE SOBRE LOS ELEMENTOS DE LA SUPERFICIE ADYACENTE
- UTILICE EL TAMAÑO DE CACEROLA ADECUADO: EL APARATO ESTÁ EQUIPADO CON CUATRO QUEMADORES DE DIFERENTES TAMAÑOS
- ASEGÚRESE DE QUE LAS BANDEJAS REFLECTORAS O LOS RECIPIENTES DE GOTEO ESTÁN COLOCADOS: LA AUSENCIA DE ESTOS RECIPIENTES DURANTE LA COCCIÓN PUEDE DAÑAR LOS COMPONENTES DEL CABLEADO
- UTILICE EL TIPO ADECUADO DE UTENSILIOS DE COCINA
- NUNCA DEJE EL APARATO DESATENDIDO MIENTRAS ESTÉ EN USO
- NUNCA DEJE EL ACEITE DESATENDIDO MIENTRAS FRÍE
- PARA EVITAR DERRAMES DE ACEITE E INCENDIOS
- EL GRILL NO ESTÁ DISEÑADO PARA SER UTILIZADO SOBRE LA ENCIMERA DE COCCIÓN
- RECUERDE ENCENDER EL VENTILADOR CUANDO FLAMEE ALIMENTOS BAJO UNA CAMPANA DE VENTILACIÓN
- SEGURIDAD DE LAS PLACAS DE VITROCERÁMICA
- NO LIMPIE NI UTILICE UNA ENCIMERA DE COCCIÓN ROTA: SI LA ENCIMERA DE COCCIÓN SE ROMPE, LAS SOLUCIONES DE LIMPIEZA Y LOS DERRAMES PUEDEN PENETRAR EN LA ENCIMERA DE COCCIÓN ROTA Y CREAR UN RIESGO DE DESCARGA ELÉCTRICA
- LIMPIE LA ENCIMERA DE CRISTAL CON PRECAUCIÓN
- SEGURIDAD EN EL HORNO
- TENGA CUIDADO AL ABRIR LA PUERTA
- COLOQUE SIEMPRE LAS REJILLAS DEL HORNO EN EL LUGAR DESEADO MIENTRAS EL HORNO ESTÉ FRÍO
- NO UTILICE UNA SARTÉN DE ASAR SIN UN INSERTO
- NO COCINE ALIMENTOS EN LA PARTE INFERIOR DEL HORNO
- INSTRUCCIONES DE INSTALACIÓN
- ANTES DE LA INSTALACIÓN
- ADVERTENCIA PARA LA INSTALACIÓN Y PREPARACIÓN PARA EL USO
- IMPORTANTE - DESEMBALAJE DEL APARATO
- INSTALACIÓN DE LA COCINA
- INSTRUCCIONES DE NIVELACIÓN
- INSTALACIÓN DEL ALIVIO DE TENSIÓN DEL CABLE DE ALIMENTACIÓN
- INSTALACIÓN DEL CABLE DE ALIMENTACIÓN DE 3 HILOS
- INSTALACIÓN DEL CABLE DE ALIMENTACIÓN DE 4 HILOS
- CARACTERÍSTICAS DEL PRODUCTO
- PANEL DE CONTROL
- CONTROLES DEL CALENTADOR CERÁMICO
- INDICADOR DE CALOR RESIDUAL (SI ESTÁ DISPONIBLE)
- UTENSILIOS DE COCINA
- INSTRUCCIONES DE USO
- MANDO DE CONTROL DE LAS FUNCIONES DEL HORNO
- MANDO DEL TERMOSTATO DEL HORNO
- FUNCIONES DEL HORNO
- HORNEAR
- ASADO BAJO
- ASAR ALTO
- MANDO DE CONTROL DEL TEMPORIZADOR DEL HORNO
- ACCESORIOS
- LA REJILLA EASYFIX
- EL CAJÓN GUIADO POR CUATRO RUEDAS
- EL PROTECTOR CONTRA SALPICADURAS
- LA REJILLA DE ALAMBRE
- INSTRUCCIONES GENERALES DE LIMPIEZA
- LIMPIEZA DEL INTERIOR DEL HORNO
- LIMPIEZA DEL CRISTAL CERÁMICO
- CUIDADO Y MANTENIMIENTO
- LIMPIEZA DE LAS PIEZAS DE CRISTAL
- LIMPIEZA DE LAS PIEZAS ESMALTADAS
- LIMPIEZA DE LAS PIEZAS DE ACERO INOXIDABLE (SI EXISTEN)
- LIMPIEZA DE SUPERFICIES PINTADAS (SI EXISTEN)
- RETIRADA DEL CRISTAL INTERIOR
- EXTRACCIÓN DE LA PUERTA DEL HORNO
- EXTRACCIÓN DE LA REJILLA DE ALAMBRE
- SUSTITUCIÓN DE LA LUZ DEL HORNO
- PARA SUSTITUIR LA BOMBILLA
- NOTAS
- GARANTÍA LIMITADA “A DOMICILIO
- CONDICIONES
- PRIMEROS 24 MESES
- PARA OBTENER SERVICIO
- LÍMITES DEL SERVICIO TÉCNICO A DOMICILIO
- DISPOSICIONES GENERALES
- NOTES / NOTAS
Marca : DANBY
Modelo : 24" Electric Range