SDT8000 - Receptor Sveon - Manual de uso y guía de instrucciones gratis
Encuentra gratis el manual del aparato SDT8000 Sveon en formato PDF.


| Tipo de producto | Receptor de TV digital / Decodificador |
| Marca | Sveon |
| Modelo | SDT8000 |
| Dimensiones (An x Pr x Al) | Aprox. 200 x 150 x 40 mm |
| Peso | Aprox. 0.5 kg |
| Alimentación | 5V DC, 1A (a través de USB o adaptador externo) |
| Salida de video | HDMI, Compuesto (RCA) |
| Salida de audio | HDMI, Óptico, Estéreo analógico |
| Tipo de sintonizador | DVB-T2/T, DVB-S2 (si aplica) o DVB-C |
| Formatos de video compatibles | MPEG-2, MPEG-4, H.264, H.265 (HEVC) |
| Funciones principales | Recepción de TV digital, Guía electrónica de programas (EPG), Reproducción de medios USB, Time Shift, Control parental |
| Conectividad | Puerto(s) USB 2.0, Ethernet (opcional), Wi-Fi (si está integrado) |
| Control remoto | Control remoto infrarrojo con pilas incluidas |
| Accesorios incluidos | Control remoto, adaptador de corriente, cable AV, manual de usuario |
| Cuidado y limpieza | Limpiar con paño suave y seco. No usar líquidos ni limpiadores. Mantener alejado del polvo y la humedad. |
| Precauciones de seguridad | Usar solo el adaptador de corriente suministrado. No abrir la cubierta. Mantener ventilado. Evitar la exposición al agua. |
| Disponibilidad de piezas de repuesto | Control remoto y adaptador de corriente disponibles por separado en Sveon o en tiendas en línea. |
| Reparabilidad | Reparable por el usuario: las únicas piezas reemplazables son el control remoto y el adaptador de corriente. Para reparaciones internas, contacte a un técnico calificado. |
| Información general | Compatible con sistemas de TV estándar. Actualizaciones de firmware vía USB o OTA (si es compatible). |
Preguntas frecuentes - SDT8000 Sveon
Preguntas de los usuarios sobre SDT8000 Sveon
0 pregunta sobre este aparato. Responde a las que conoces o haz la tuya.
Hacer una nueva pregunta sobre este aparato
Descarga las instrucciones para tu Receptor en formato PDF gratis! Encuentra tus instrucciones SDT8000 - Sveon y toma tu dispositivo electrónico nuevamente en la mano. En esta página están publicados todos los documentos necesarios para el uso de su dispositivo. SDT8000 de la marca Sveon.
MANUAL DE USUARIO SDT8000 Sveon
Sintonizador/Grabador TDT de Alta Definición y Reproductor Multimedia MKV (H.264)
Manual de usuario (3)
User Guide (32)
SDT8ooo Manual de usuario
Índice
- Bienvenido. Pág. 4
- Instrucciones de seguridad. Pág. 4
- Características. Pág. 4
- Contenido del pack. Pág. 5
- Hardware. Pág. 5
- Conexiones. Pág. 6
- Mando a distancia. Pág. 8
7.1 Instalación de las baterías. Pág. 9 - Primer uso de la unidad. Pág. 9
8.1 Búsqueda automática de canales. Pág. 9
8.2 Búsqueda manual de canales. Pág. 10 - Menú Principal. Pág. 10
9.1 Menú Programa. Pág. 10
9.2 Menú Imagen. Pág. 17
9.3 Búsqueda de canales. Pág. 18
9.4 Hora. Pág. 18
9.5 Opción. Pág. 18
9.6 Sistema. Pág. 18
9.7 USB. Pág. 19 - Calendario de grabaciones y grabación directa. Pág. 20
10.1 Grabación modo TimeShift. Pág. 21
10.2 Grabaciones en segundo plano. Pág. 22 - Configuración de fábrica. Pág. 22
- Radio. Pág. 22
- Multimedia. Pág. 22
- Ver canales TV. Pág. 24
14.1 Información. Pág. 25
14.2 Cambiar canal. Pág. 25
14.3 Volumen. Pág. 25
14.4 Lista de canales. Pág. 25
14.5 Audio. Pág. 26
14.6 Teletexto. Pág. 26
14.7 EPG. Pág. 27
1.8 Función Sleep. Pág. 27 - Actualizar sistema. Pág. 27
- Solución de problemas. Pág. 28
- Especifiaciones técnicas. Pág. 28
- Advertencia. Pág. 28
- Declaración de conformidad CE. Pág. 28
APÉNDICE 1: Información de archivos. Pág. 29
1. Bienvenido
Gracias por elegir el receptor TDT de Alta Definición, grabador y reproductor multimedia SDT8000 de Sveon, con el que podrá disfrutar de la señal de televisión digital de Alta Definición, grabar sus emisiones y reproducir imágenes, música y vídeos en formato MPEG4-H264 desde cualquier dispositivo USB.
A través de este manual le mostraremos cómo conectar y utilizar adecuadamente este receptor para obtener el máximo rendimiento.
2. Instrucciones de seguridad
Para garantizar su seguridad y la de los demás lea detenidamente estas instrucciones antes de utilizar este producto.
Seguridad
- Coloque los cables donde no se puedan pisar, pinchar o cortar.
- No exponga el aparato a la lluvia.
- No conecte la unidad en lugares húmedos como en el baño, piscina.
- No coloque objetos con agua como floreros, vaso de agua, en la parte superior del SDT8000.
- No coloque fuentes de llama, como velas cerca de la SDT8000.
- No desmonte el producto.
- No permita que los niños introduzcan nada por los orificios de ventilación.
Ventilación
- No tape la unidad ni la coloque en lugares no ventilados.
- No coloque la unidad en lugares irregulares como cama, sofá.
- No exponga la unidad al frío o luz solar
- Deje 10cm como mínimo entre el receptor y otros aparatos.
- No coloque ningún objeto encima del receptor.
Mantenimiento
- EI SDT8000 no necesita mantenimiento.
- Desconecte el receptor antes de limpiarlo.
- No utilice líquidos o aerosoles.
- Límpielo con una bayeta suave y húmeda (no mojada).
- Nunca deseche las baterías tirándolas como residuos domésticos (consulte con la autoridad local sobre la normativa de residuos).
3. Características
- Receptor TDT de Alta Definición, grabador y Reproductor de archivos multimedia.
- Grabador y reproductor desde el puerto USB 2.0 Host.
- Menú de control OSD de fácil uso.
- Guía de programación semanal electrónica o EPG (sujeto a disponibilidad del canal).
- Búsqueda automática y manual de canales.
- Múltiples conexiones: Euroconector, vídeo componente, vídeo AV, HDMI.
-
Control parental.
-
Teletexto y subtítulos (sujeto a disponibilidad del canal o del archivo).
- Permite grabar un canal mientras ve otro (dentro la misma frecuencia).
- Grabación directa desde EPG (Guía Electrónica de Canales).
- Grabación directa solo pulsando un botón.
- Función Timeshift o pausa en vivo.
- Reproduce música, fotos y videos desde su puerto USB Host frontal.
- Capacidad de disco máxima soportada hasta 3TB (a través de USB Host).
- Formato de subtítulos soportados: Srt, Sub, Smi, UTF-8.
- Soporta particiones FAT, FAT32, NTFS
- Archivos soportados: VCD, SVCD, KVCD, MPEG-4, VOB, XVID, AVI, MPEG-4 HD, MP@HL 1080i, MPEG-4, AVC-HD, M2TS, MP4, MKV, (H264HL@4.0).
- Archivos de audio: WMA, MP3, AC3, E-AC3.
- Archivos de fotos: JPG, BMP, PNG.
- Software Actualizable por USB.
4. Contenido del pack
- Sintonizador de Alta Definición SDT8000
- Mando a distancia
- Manual de usuario
5. Hardware

Panel frontal
- Receptor infrarrojos
- LED estado
- Puerto USB Host
Panel trasero
- Conexión de antena doméstica
- Conexión de antena a TV/VCR
- Conexión Coaxial
- Conexión HDMI
- Conexión euroconector TV
- Conexión de corriente

6. Conexiones
Conexión Toma de Corriente
- Una vez establecidas las conexiones de audio/video pertinentes, enchufe la unidad a la toma de corriente. La unidad se encenderá automáticamente.
Conexión Antena In/Out
- Conexión de antena al receptor. Para recibir la señal de TDT debe conectar la toma de antena doméstica al con- nector "RF IN" del panel trasero de la unidad. Para ello necesitará un cable de antena.
- El conector de antena "RF Out"le permitirá sacar la señal de TV a otro aparato tal como un vídeo doméstico u otro receptor. Si deseara utilizar esta opción necesitará otro cable de antena.
Conexión por Euroconector
- Conecte la unidad a la pantalla de TV a través de la conexión de Euroconector (cable no incluido).
- Conecte la unidad a la toma de corriente, la unidad se encenderá automáticamente.
- Seleccione la entrada de Euroconector en su TV y espere mientras se realiza la carga del sistema.
Conexión HDMI
- Conecte la unidad a su TV a través de la salida HDMI.
- Conecte la unidad a la toma de corriente, la unidad se encenderá automáticamente.
- Seleccione la entrada HDMI en su TV.
Importante: La conexión HDMI incluye señal de audio y vídeo en el mismo cable, por lo que no es necesario realizar más conexiones para disfrutar de ambas señales.
Conexión Coaxial
Si quiere disfrutar de sonido envolvente 5.1 conecte con un cable coaxial su SDT8000 a un sistema de audio que decodifique la señal 5.1(cable coaxial no incluído)

Conexión USB Host
- Conecte un dispositivo de almacenamiento USB (stick de memoria o disco duro externo) al puerto USB Host de la unidad.
- Encienda el dispositivo de almacenamiento (si fuera necesario) y espere durante la lectura de contenidos (si la unidad de almacenamiento requiere de alimentación externa no olvide conectar el adpatador de corriente de la misma una vez conectada a SDT8000).
- Acceda al menú principal de la unidad y seleccione el menú USB para reproducir los archivos almacenados en la unidad extraíble.
DESCONEXIÓN
Antes de desconectar un dispositivo de almacenamiento externo USB de la unidad asegúrese de no estar reproduciendo ningún archivo almacenado en dicha unidad.
7. Mando a distancia
- MUTE: Activa/desactiva el sonido.
- FAV: Pulse para acceder a la lista de favoritos.
- SUB-T: Cambia entre los subtítulos disponibles del canal.
- TECLADO NUMÉRICO: Selección de canales.
- MENU: Acceso al Menú Principal de configuración.
- IZQUIERDA/DERECHA/ARRIBA/ABAJO: Curso de dirección para desplazarse por las pantallas del menú.
-
EPG: Muestra la programación electrónica de los canales (sujeto a disponibilidad).
-
PAGE DOWN: Retrocede página en el apartado multimedia y lista de canales.
-
VOL+ / VOL-: Aumenta / Disminuye el volumen del audio
-
FB/FF: Reproducción rápida hacia adelante/atrás a velocidades x2, x4, x8, x16, x32.
-
SIGUIENTE/ANTERIOR: Pulse para pasar o retroceder de pista.
-
PLAY: En Modo Reproducción, reanuda la acción.
-
PAUSA: En Modo Reproducción, paraliza la acción.
-
REC: Pulse para iniciar una grabación manualmente.
-
TIMESHIFT: Activa la función de grabación en pausa.
-
BOTÓN ROJO/ZOOM: Tecla roja, para acciones en Teletexto y función aumentar/reducir visualización imágenes.
-
BOTÓN VERDE / ASPECT: Tecla verde para acciones en Teletexto. Aspect: Pulse para cambiar los formatos de imagen (Auto, 4:3 Completa, 4:3 Pan & Scan, 4:3 Formato buzón, 16:9 Pantalla panorámica
-
POWER : Pulse para encender/apagar (modo Standby) la unidad.
-
TTX: Muestra el Teletexto (sujeto a disponibilidad).
-
INFO: Muestra la información del canal actual o información adicional del archivo
-
RECALL: Vuelve a la pantalla anterior.
-
LIST: En modo TDT, muestra la lista de canales de TV o Radio.
-
EXIT: Vuelve al menú anterior.
-
OK: Confirma una selección en un menú.
-
GO TO: Búsqueda por tiempo en reproducción.
-
PAGE UP: Avance de página en el apartado multimedia y lista de canales.
-
CH+ / CH-: Avance / Retroceda una canal.
-
LANG: Pulse para cambiar de audio (sujeto a disponibilidad).
-
STOP: Detiene una reproducción.
-
REPEAT: En Reproducción seleccione reproducir los archivo "1 vez" "Continua" o "Aleatorio"
-
TV/RADIO: Cambia entre los canales de TV y Radio.
-
BOTÓN AZUL / TIMER: Tecla azul para acciones en Teletexto. Timer: Habilita la función de encendido/apagado automático.
33.BOTÓN AMARILLO / V-Format: Tecla amarilla, para acciones en Teletexto.V-Format: Pulse para cambiar la resolución de pantalla (576i, 576p, 720p, 1080i).

Importante: La disponibilidad de funciones como subtítulos, Teletexto o audio dependen de la emisión del canal.
7.1 Instalación de las baterías
- Retire la tapa, coloque las pilas AAA en el sentido correcto +/- y cierre la tapa.
- La siguiente imagen le indica la forma correcta de insertar las pilas:
I. Abrir la tapa
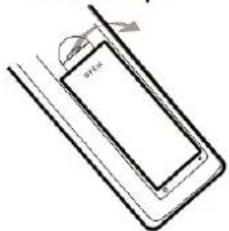
- Instalar pilas

- Para utilizar el mando a distancia, diríjalo hacia el panel frontal del receptor.
- El mando a distancia tiene un alcance de 5 metros desde el receptor y un ángulo de hasta 60 grados.
8. Primer uso de la unidad
La primera vez que se conecta el SDT8000 mostrara automáticamente la pantalla de configuración.
- Idioma OSD: Ajuste el idioma que se muestran los textos del OSD (en pantalla).
- País: Ajuste el país de localización.
- Búsqueda de canales: Realiza la búsqueda automática de canales.

8.1 Búsqueda automática de canales
- Para realizar la búsqueda automática de canales pulsa el botón "OK".
- La función "Búsqueda de canales" borrará toda la base de datos y hará una búsqueda de canales en las frecuencias del país seleccionado.
- La función "Búsqueda Automática" requiere un cierto tiempo, por favor espere.
- Una vez finalizada la búsqueda se guardará automáticamente la lista de canales y el sistema mostrará el primer canal encontrado.


8.2 Búsqueda manual de canales
- Para realizar la búsqueda manual por frecuencias pulse el botón "Menu". Utilice el botón de flecha derecha del mando a distancia para seleccionar el menú "Búsqueda de canales" y seleccione la opción "Búsqueda Manual".
- La función "Búsqueda Manual" no buscará los canales automáticamente. El usuario tiene que conocer la frecuencia y ancho de banda que le interesa escanear. Cuando se explora una banda de frecuencias, los canales almacenados de esa banda se borrarán para poder guardar el resultado de la búsqueda más reciente.


9. Menú Principal
Al finalizar la búsqueda de canales y pulsar el botón "Menú" aparecerá la siguiente pantalla:
- Programa
- Imagen
• Búsqueda de canales
• Hora - Opción
- Sistema
• USB

9.1 Menú Programa
En el apartado "Programa" aparecerán las siguientes opciones:
• EPG
- Clasificar
• LCN
- Editar programa
Editar programa
- En la opción "Editar programa" es posible ordenar la lista de canales, saltar canales, bloquear, borrar, añadir a la lista de favoritos y renombrar.
- Al pulsar la opción "Editar canales" la contraseña de seguridad será solicitada, por defecto esta contraseña es "000000".
- Una vez introducida correctamente la clave aparecerá la siguiente pantalla.

Ordenar canales
- Para ordenar los canales o mover los canales por numeración, desactive la opción "LCN" del Menú "Programa".
- Una vez desactivada la opción "LCN" pulse sobre la opción "Editar canales" e introduzca la clave de seguridad.
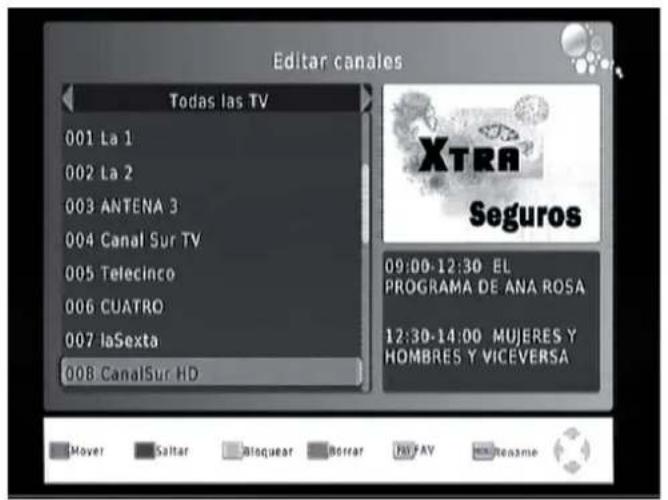
- Sitúese sobre el canal que desee mover y pulse el botón rojo, sitúelo en la posición deseada con los cursores del mando a distancia arriba/abajo, para deseleccionarlo pulse el botón "OK".


- Para que le resulte más cómoda la localización de canales, ordénelos de arriba a abajo.
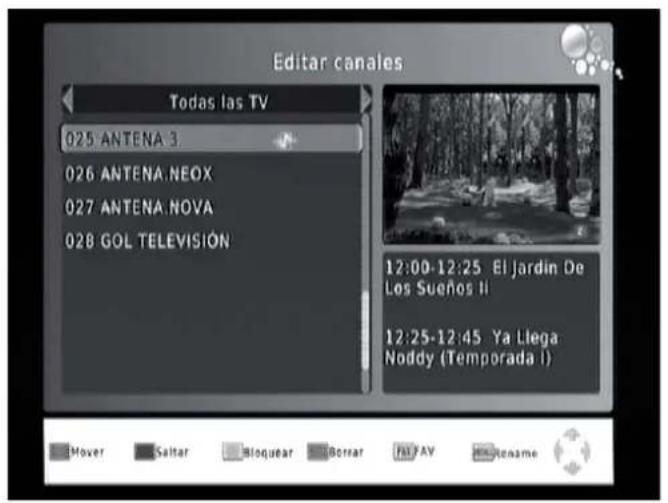

- Una vez ordenados los canales pulse el botón "Exit", aparecerá un mensaje en pantalla de "Guardando..." y volverá a la lista de canales con su orden establecido.


Saltar canales
La opción "Saltar" le permite tener el canal en la lista pero al pasar canales con los cursores arriba/abajo, saltará el canal marcado como "Skip".
- Para seleccionar el salto de un canal, sitúese sobre el canal deseado y pulse el botón verde, marcándose con el nombre "Skip".
- Una vez seleccionados los canales que desea saltar pulse "Exit"; en pantalla aparecerá el mensaje "Guardando".

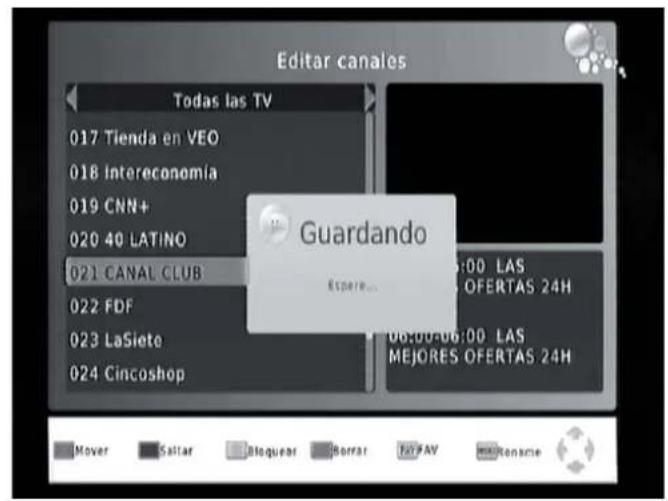
- Al pulsar "OK" aparecerá la lista de canales con el símbolo "Skip".

Bloquear canales
La opción "Bloquear" hace posible añadir una contraseña a un canal determinado. Los canales bloqueados sólo pueden visualizarse introduciendo una contraseña.
- Para bloquear un canal, sitúese sobre el canal deseado y pulse el botón amarillo. Éste se marcará con el símbolo de un candado.
- Una vez seleccionados los canales que desea bloquear pulse "Exit". Aparecerá en pantalla el mensaje "Guardando".


- Al pulsar "OK" aparecerá la lista de canales y los canales bloqueados.
- Para desbloquear el canal, introduzca la clave de seguridad.


- Una vez introducida la contraseña, el canal será visible y no será necesario introducir de nuevo la contraseña hasta que la unidad se apague o se deje en Stand-by* (modo ahorro de energía).
* Se denomina Stand-by al estado en que queda la unidad al apagarla presionando el botón "Power" del mando a distancia o de la unidad. Durante este estado, la unidad está conectada a la corriente y a la espera de recibir órdenes, con un consumo mínimo.
Borrar canales
La opción "Borrar" le permite borrar canales no deseados.
- Para "Borrar" un canal sitúese sobre el canal deseado y pulse el botón azul; aparecerá un aviso de confirmación.
- Si desea recuperar un canal eliminado tendrá que realizar una búsqueda manual o automática.
Nota: Si realiza una búsqueda Automática borrará la lista y orden que tenga almacenada anteriormente en su unidad.
![Editar canales Todas las TV 025 Disney Channel 026 ANTENA.NEOX 027 ANTENA.NOVA 028 GOL TELEVISION Información ¿Desea eliminado? [OK] SuperV2 [EXIT] Cancelar Mover Saltar Bloquear Rorrar FUTAV Mueipame](/content/2026/05/1081634/images/1da4cdd3de36e10dc16e80c7a3edf79b8cb3fcd945fd9ea667506d4041d934da.jpg)
Lista de favoritos
La opción "FAV" le permite crear listas de canales preferidos (Película, Noticias, Deportes, Música).
- Para crear una lista de favoritos sitúese sobre el canal deseado y pulse el botón "FAV" del mando a distancia. Aparecerá una lista de las categorías disponibles, pulse "OK" sobre la categoría deseada; para seleccionar otro canal pulse "Exit". Seleccione "Deshabilitar" para cancelar la elección.

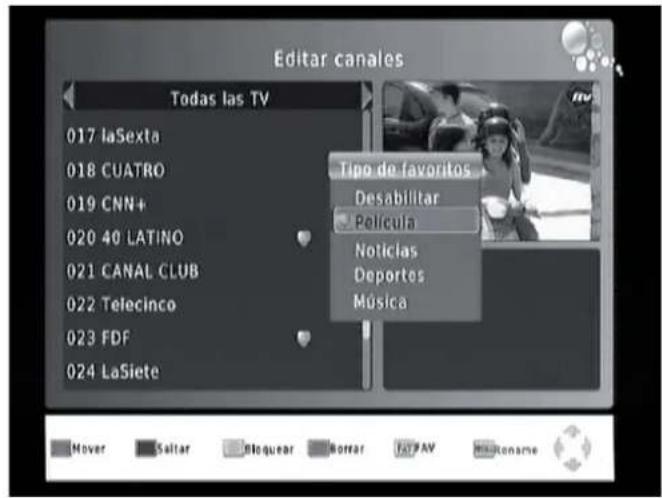
- Una vez creada la lista de favoritos pulse "Exit". Aparecerá en pantalla el mensaje "Guardando".


- Al pulsar el botón "OK" del mando a distancia se muestra la lista de canales. Pulse "FAV" para ver las categorías seleccionadas y utilice las teclas de dirección izquierda y derecha del mando para mover el cursor a través de la lista de favoritos.


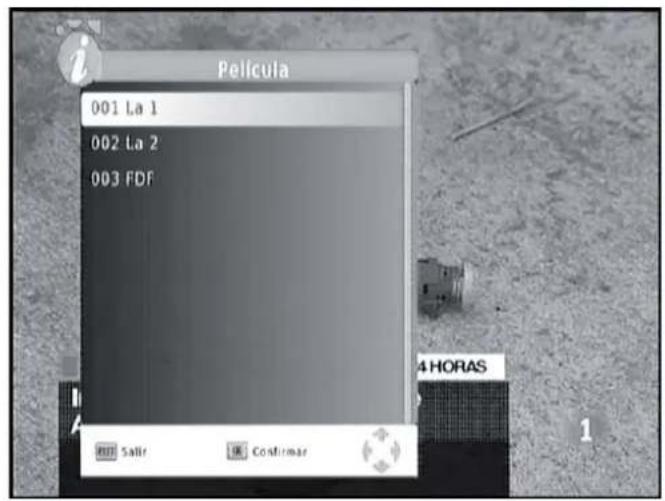
Renombrar canales
La opción "Recall" le permite renombrar los canales. Para renombrar un canal selecciónelo y pulse el botón "RECALL", a continuación le mostrara un teclado en pantalla donde podrá introducir el nuevo nombre para el canal.

Guía de TV (EPG)
Seleccionando la opción EPG podrá obtener información sobre la guía de programas de los canales sintonizados, consultar la programación y añadir acciones al calendario de grabaciones.
- Pulse el botón "EPG" (Electronic Program Guide), utilice los botones de dirección izquierda/derecha para seleccionar el canal y arriba/abajo para seleccionar el evento, la información se mostrará a la derecha de la pantalla.


LCN
La opción LCN permite activar o desactivar el sistema LCN (Local Channel Number). Nota: LCN es un número que identifica de forma exclusiva un canal, se usa en algunos países europeos como Reino Unido y Francia. Esta función está activada por defecto; desactivela para ordenar la lista de canales.9.2 Menú Imagen
En el apartado Imagen podemos ajustar el formato, resolución y salida de vídeo de la unidad SDT8000.- Relación de presentación
- 4:3 (Completa): Para una TV convencional 4:3. - 4:3 PS (PanScan): para una TV convencional 4:3 corta los bordes izquierdo y derecho para ajustar la imagen a una TV normal. - 4:3 Formato de Buzon: Adapta las emisiones a formato 16:9. - 16:9 Para TV panorámicas 16:9.- Resolución
\- Selecciona la resolución de salida para su TV (576i, 576p, 720p, 1080i) Nota: Si desea grabar usando la salida VCR, seleccione resolución 576i.- Formato TV
\- Seleccione el sistema de TV.- Salida de Vídeo
\- Establece el modo de salida RGB cuando se usa la salida HDMI. 9.3 Búsqueda de canales
En el siguiente apartado podemos configurar las siguientes opciones: -Búsqueda automática: Realiza la búsqueda automática de todos los canales. \- Búsqueda manual: Realiza la búsqueda de un MUX determinado. \- País: Seleccione el País en que se encuentre. \- Alimentación de antena: Active esta opción si necesita autoalimentar la antena.  Nota: La función "Búsqueda Manual" no buscará los canales automáticamente. El usuario tiene que conocer la frecuencia y ancho de banda que le interesa escanear. Cuando se explora una banda de frecuencias, los canales almacenados de esa banda se borran para poder guardar los resultados de la búsqueda más reciente.9.4 Hora
En el apartado "Hora" podemos ajustar los parámetros de la hora de nuestro SDT8000. \- Compensación Horaria: Seleccione el modo de actualización de la zona horaria entre Auto y Manual. Cuando está activado, la información se actualiza con la señal TDT. \- Apagado: Configure si desea que se encienda o apague automáticamente el receptor Nota: Algunos países están cubiertos por más de una zona horaria. ESPAÑA usa GMT+1 (excepto Canarias que usa GMT). 9.5 Opción
En el apartado "Opción", podemos ajustar los parámetros del idioma y subtítulos. \- OSD Lenguaje: Seleccione el idioma en que se muestran los textos del OSD (en pantalla). \- Idioma de subtítulos: Ajuste el idioma de subtítulos pre- determinado. \- Idioma de audio: Ajuste el idioma de audio predeterminado. \- Salida digital: Seleccione RAW para que la señal de audio salga en su formato original y PCM para convertir el audio a los conectores de salida. 9.6 Sistema
En el apartado "Sistema" es posible ajustar los parámetros del control paterno, contraseña y ajustes de fábrica del SDT8000. - Control paterno: Establece una contraseña para poder visualizar un canal. La contraseña por defecto es "000000". - Establecer contraseña: Esta opción le permite cambiar la contraseña por defecto por una diferente. Si desea activar el cambio de contraseña utilice las teclas <0-9> para introducir la contraseña antigua y dos veces la nueva (para evitar posibles errores). - Restablecer valores predeterminados: Reinicie la configuración a su estado de fábrica. Tenga en cuenta que perderá toda la configuración anteriormente guardada. - Información: Pulse para ver la versión de software que contiene su SDT8000. - Actualización del software: Permite acrualizar el firmware de su unidad. Para más información ir al punto 15 del presente manual.   Nota: La información de clasificación por edades del programa es emitida por la cadena sintonizada y su funcionamiento depende del canal.9.7 USB
El menú "USB" es el usado para el apartado multimedia de la unidad y la configuración de visualización de imágenes, videos y las opciones de grabación del SDT8100. - Multimedia: Panel principal de las funciones multimedia para reproducir, música, foto, películas y gestionar las grabaciones (PVR). - Configuración de imágenes: Ajuste del tiempo de presentación entre las imágenes (de 5 a 20 segundos), el modo de presentación y el tamaño de las imágenes. - Configuración de vídeos: Ajuste del tamaño, fondo y color de los subtítulos que contengan sus vídeos. - Configurar PVR: Ajuste el dispositivo donde realizará la grabación (si dispone de varias particiones) y en caso necesario darle formato FAT32/NTFS. 10.Calendario de grabaciones y Grabación Directa
Puede añadir tareas de grabaciones manualmente a través de la Guía de TV/Radio o pulsando directamente el botón REC (grabación).- Establecer grabaciones manualmente
\- Para añadir una grabación manualmente pulse el botón azul del mando a distancia y a continuación el botón rojo; aparecerá una ventana con el tipo de grabación "TV/RADIO", el canal, nombre del canal, fecha de inicio de grabación, hora de inicio/fin y la frecuencia con la que quiere realizar esta grabación. Cuando llega la fecha y hora de una grabación, el SDT8000 muestra un mensaje en pantalla y cambia automáticamente al canal programado. Si desea modificar un evento seleccione el evento y pulse el botón rojo del mando a distancia. \- Una vez realizada la grabación la unidad SDT8000 se apagará automáticamente (modo Stand-by).    Nota: Para asegurar una correcta programación de grabaciones, configure grabaciones con un intervalo mínimo de dos minutos entre eventos. \- Si desea eliminar un evento, sitúese sobre el evento que desea borrar y pulse el botón azul del mando a distancia. Aparecerá un mensaje de confirmación: pulse OK para confirmar o "Salir" para cancelar la acción. Nota: El evento se puede eliminar siempre que no se haya activado y esté en funcionamiento; una vez comenzado tendremos que pulsar el botón "Stop" para cancelar la grabación.  \- Establecer grabaciones con el EPG (Guía Electrónica de Canales) - Para establecer grabaciones desde la Guía Electrónica pulse el botón "EPG" del mando a distancia. A continuación seleccione el canal y programa que desee grabar usando los cursores derecha/izquierda y presione el botón "OK". Automáticamente aparecerá una ventana con información detallada del evento a grabar. - Para confirmar la grabación pulse "OK" y automáticamente se introducirá en el calendario de grabaciones.   \- Realizar grabaciones directamente pulsando el botón REC \- Para realizar grabaciones directamente pulse el botón "REC" del mando a distancia y aparecerá el siguiente mensaje en pantalla: "Comenzando grabación". Para cancelar la grabación pulse el botón "Stop" (confirme la acción en la ventana de confirmación).10.1 Grabación en modo TimeShift (Pausa en vivo)
\- La unidad SDT8000 incluye la función Timeshift o pausa de la programación en vivo, para evitar que el usuario se pierda sus programas favoritos por una interrupción. \- Cuando la opción Timeshift está activa, el programa guarda la grabación como un archivo de grabación temporal. Gracias a esto, puede acceder a los minutos perdidos de la programación y seguir viendo su programa favorito justo donde lo dejó. \- Para utilizar la función Timeshift, pulse el botón "TIMESHIFT" del mando a distancia. La imagen que ve en pantalla se pausará y aparecerá una barra de información con el tiempo transcurrido desde que pulsó el botón "TIMESHIFT" Para retomar la visualización del programa desde el punto en que lo dejó pulse el botón "Play". \- Para cancelar la función Timeshift pulse una vez la tecla "Stop". Pulse el botón dos veces para cancelar la grabación. Nota: La capacidad de la función Timeshift dependerá de la capacidad de almacenamiento del dispositivo que se use para la grabación y no podrá ser modificado por el usuario. 10.2 Grabación en segundo plano
\- La unidad SDT8000 permite crear un calendario de grabaciones que se activa automáticamente cuando la unidad está en modo ahorro de energía (o Standby); esto permite ahorrar un máximo de energía manteniendo la unidad en estado de espera en los períodos entre grabaciones. Para ello, pulse el botón "Power" tras añadir un evento. La unidad se encenderá un minuto antes de la hora de inicio del evento y seleccionará automáticamente el canal del evento a grabar. Cuando finalice la grabación, la unidad se apagará automáticamente (modo Standby). \- El dispositivo permite grabar un canal mientras se visualiza otro diferente, siempre y cuando sean canales dentro del mismo rango. Pulse el botón "OK" del mando a distancia durante la grabación y seleccione el canal que desea ver. Si el canal seleccionado no se encuentra en el mismo rango de frecuencia que el canal que se está grabando se mostrará el mensaje "Grabando otro canal". En este caso, busque los canales disponibles dentro del mismo rango. Ejemplo: Los canales TVE1, TVE2, 24Horas, Clan, emiten en el mismo MUX, en este caso podemos grabar uno de ellos y ver otro.11. Restaurar configuración por defecto
Restaura la configuración del SDT8000 a sus valores de fábrica. Todas las opciones modificadas por el usuario se restaurarán a los valores por defecto y la base de datos de canales será borrada.12. Radio
El funcionamiento de la lista y guía (EPG) de Radio es similar al de TV. Para más información, consulte la sección 9 de este manual (página 9).13. Multimedia
Para usar el menú "Multimedia" es necesario conectar un dispositivo USB externo al puerto USB Host frontal de la unidad; si no hay ningún dispositivo conectado aparecerá el mensaje "No se encuentra ningún dispositivo USB". \- Al conectar un dispositivo de almacenamiento se muestra el mensaje "Dispositivo USB insertado", esto significa que la unidad externa ha sido detectada y ya puede acceder a los archivos almacenados. Pulse el botón "Menú" del mando a distancia, seleccione el menú "USB" utilizando los botones de dirección derecha e izquierda. A continuación seleccione el apartado "Multimedia".  \- El menú "Multimedia" contiene cuatro exploradores para los diferentes tipos de archivos multimedia: Música, Foto, Película, PVR (grabaciones). Realice la selección en función al archivo que desee ver. Para volver a ver los canales de televisión TDT seleccione la opción "DTV"• Música
\- La unidad soporta los formatos mas populares, como MP3/WMA/AC3/E-AC3. Durante la reproducción de archivos de música se muestra la información de tiempo transcurrido, tiempo total e información ID. \- Para desplazarse por carpetas y ficheros utilice las teclas- Foto
- La unidad soporta los formatos de imagen JPEG/BMP/PNG. - El nombre, resolución y tamaño de la imagen seleccionada se muestran en la parte inferior derecha. - Para desplazarse por carpetas y ficheros utilice las teclas- Película
- La unidad SDT8000 reproduce la mayoría de archivos multimedia, incluso MKV H264 (HL@ 4.0). - Para desplazarse por carpetas y ficheros utilice las teclas• PVR
- Dentro de "Opciones PVR", puede ver los programas grabados. - El sistema crea automáticamente una carpeta con el nombre "HBPVR" la primera vez que realice una grabación en un dispositivo USB. En esta carpeta se guardarán las grabaciones. - El nombre del archivo grabado esta compuesto por el nombre del canal, el mes del año, día del mes, el año y la hora de la grabación con la extensión .MTS 14. Ver canales TV
Una vez realizada la búsqueda de canales ya es posible disfrutar de toda la programación de televisión y radio digital.  natural_image
Black-and-white aerial view of a cityscape with dense urban buildings and forested hills, no visible text or symbols.14.1 Información
Pulse el botón "INFO" una vez para visualizar la barra de información. La barra de información muestra el número y nombre de canal, fecha y hora actual, programa actual y próximo programa.14.2 Cambiar Canal
Si desea cambiar de canal pulse las tecla14.3 Volumen
Para ajustar el volumen pulse los botones "VOLUME +/-" del mando a distancia. Pulse el botón "Mute" para silenciar el volumen por completo. El modo "Mute" o silencio se desactiva al pulsar los botones de volumen.14.4 Lista de canales
Para mostrar la lista de canales pulse "List" en el mando a distancia y seleccione el canal con los cursores14.5 Audio
Algunos programas de televisión tienen disponibles 2 idiomas; para cambiar de idioma pulse el botón "LANG" del mando a distancia y seleccione el canal de audio con los cursores14.6 Teletexto
Pulse el botón "TTX" del mando a distancia para acceder a la información de Teletexto del canal en que se encuentra. Tenga en cuenta que esta información está sujeta a la disponibilidad del canal.  Nota: La función Teletexto y subtítulos estarán disponibles en los canales de TV que ofrezcan el servicio y que cuenten con una recepción de señal óptima (el Teletexto es un servicio de cada canal, por lo que a veces es posible que no esté disponible).  14.7 EPG
Para detalles acerca del EPG, ver el apartado 9.1 de este manual (página 15).14.8 Función Sleep
Puede activar el Modo Sleep desde el menú principal "Hora" y en "Modo Sleep", especifique desde 1-12 horas para el apagado.15. Actualizar sistema
La unidad SDT8000 permite la actualización de software para gestionar mejoras de funcionamiento. Para actualizar el firmware de la unidad copie el archivo de actualización en una memoria USB, conéctela al puerto USB Host de la unidad. Vaya al apartado "Sistema" del menu principal y elija la opción "Actualización soft- ware" Pulse "OK" y seleccione la opción "Seleccionar USB actualización" en la ventana que aparece a continuación. Espere hasta que termine completamente el proceso de actualización. Importante. El apagado de la unidad o la desconexión de la memoria USB durante el proceso de actualización puede causar daños irreversibles en la unidad. Si tiene alguna duda póngase en contacto con el servicio de asistencia de SVEON a través del teléfono (902 402 503) o del correo electrónico soporte@sveon.com Descargue las actualizaciones de la unidad únicamente desde nuestra web oficial www.sveon.com. 16. Solución de problemas
Si tiene problemas o encuentra alguna dificulad en el uso de la unidad SDT8000 o su instalación, lea detenidamente los capítulos del manual que hagan referencia a esos términos o póngase en contacto con el departamento técnico de Sveon 902 402 503.17. Especificaciones técnicas
- Sintonizador TDT de Alta definición MPEG4-H264. - Auto instalación - Instalación en múltiples idiomas: Español, Ingles, Frances, Alemán, Italiano, Portugués. - Reproductor Multimedia de alta definición. - Resoluciones disponibles: 576i, 576p, 720p, 1080i (1920x1080). - Salidas Vídeo: Scart (Euroconector), HDMI v1.3. - Salidas de audio: Scart (Euroconector), HDMI v1.3 (multicanal 5.1) y Coaxial. - Puerto USB 2.0 reproducción/grabación. - Soporta hasta 2TB a través de USB Host. - Soporta particiones FAT, FAT32 y NTFS (en lecturas y grabación). - Guía de programación EPG (Electronic Program Guide). - Teletexto. - Códecs de vídeo soportados: VCD, SVCD, KVCD, MP@HL 720p, MP@HL 4.0 1080i, MPEG4, MPEG4-HD, MPEG4-AVC-HD. - Contenedores soportados: AVI, XVID, MP4, M2TS, MKV(H264 Profile@ 4.0). - Subtítulos soportados: SRT, SUB, SSA, SMI, UTF-8. - Códecs de audio soportados: MP3, WMA, Ac3, E-AC3. - Formatos de imágenes soportados: Jpg, bmp, png. - Software Actualizable. - Frecuencia: VHF-H 174-230MHz, UHF 470-860MHz. - Nivel de señal: -78dBm - 20dBm18. Advertencia: Reciclaje de baterías
natural_image
Symbol of a trash bin crossed with diagonal lines, no text or labels present19. Declaración de conformidad CE
Sveon declara que su modelo SDT8000 cumple con los requisitos esenciales y cualesquiera otras disposiciones aplicables o exigibles de la Directiva 1999/5/CE.de la Directiva 2004/108/CE, Directiva 2006/95/CE y Directiva 2009/125/CE. Para más información vaya a la página 31 del presente manual.APÉNDICE 1: Información de archivos
Gracias al software MediaInfo podemos obtener toda la información sobre un archivo de vídeo o audio, incluído el códec utilizado. MedialInfo es un software libre (gratuito y de libre acceso al código fuente), que proporciona información técnica sobre un archivo de vídeo o audio determinado, mostrando los codec utilizados, características de vídeo y audio (bitrate, framerate, frecuencia ...). Esta información nos permitirá conocer los datos de un archivo y así saber el tipo de MKV compatible con el sintonizador Sveon SDT8000. La unidad SDT8000 es compatible con la mayoría de códecs multimedia y archivos MKV (Matroska) en alta definición H.264, soportando los códec profile High@4.0 (los códec profile High@5.0, High@5.1 no están soportados). A continuación le mostramos cómo usar la aplicación MedialInfo para conocer qué archivos MKV son compatible con la SDT8000 y cuales no.MedialInfo
Puede obtener el software MedialInfo a través de su sitio Web oficial. Está disponible para los sistemas operativos más habituales (Windows, Mac, Linux ..). Web oficial: http://mediainfo.sourceforge.net/es MediaInfo para Windows: http://downloads.sourceforge.net/mediainfo/MediaInfo\_GUI\_0.7.30\_Windows\_i386.exe MedialInfo para Mac: http://mediainfo.sourceforge.net/es/Download/Mac\_OS MediaInfo para Linux: http://mediainfo.sourceforge.net/es/Download Una vez descargado e instalado en su ordenador el software MediaInfo, puede acceder a la aplicación desde el menú de inicio o pulsando con el botón derecho del ratón sobre el archivo multimedia. \- Desde inicio:  \- Pulsando el botón derecho del ratón sobre el archivo multimedia: Archivos High@4.0
En la siguiente imagen, la aplicación MedialInfo muestra la siguiente información del archivo. 1. Archivo, códec, tamaño, tiempo, 1 pista de video, 2 pistas de audio, 2 pistas de subtitulos. 2. Codec Profile High@4.0 (archivo soportado por la SDT8000). 3. Idioma y formato de la primera pista de audio, información de la segunda pista de audio, información de la primera pista de substituto, información de la segunda pista de substituto. En este caso es un archivo MKV con 2 pistas de audio (DTS-AC3) y dos pistas de subtítulos UTF-8 (Inglés-Español). Este archivo es reproducido por la SDT8000 con el audio AC-3. Nota: Los archivos con audio DTS (Digital Theater System/ Sound/ Sorround) pueden ser reproducidas pero no decodificadas. Archivos High@5.0/5.1
En la siguiente imagen, la aplicación MedialInfo muestra la siguiente información del archivo. 1. Archivo, codec, tamaño, tiempo, 1 pista de video, 2 pistas deaudio, 2 pistas de subtítulos. 2. Codec Profile High@5.1 (Archivo NO soportado por la SDT8000). 3. Idioma y formato de la primera pista de audio, información de la segunda pista de audio, información de la primera pista de substituto, información de la segunda pista de substituto. En este caso es un archivo MKV con 2 pistas de audio (AC3-DTS) y dos pistas de subtítulos ASS (español-Ingles). Este archivo NO es reproducido por la SDT8000. CE
DECLARACIÓN DE CONFORMIDAD
Nombre del emisor AG Sistemas Informáticos 1973, S.L.U. C/ La Boheme n°29 P.I. Alameda 29006 Málaga Tel: 952 040 500 Fax: 952 041 397 CIF: B29887908 Declaramos que bajo nuestra exclusiva responsabilidad la conformidad del producto:Sintonizador/Grabador TDT y Reproductor Multimedia
Marca: SVEON Modelo: SDT8000 Fabricado en China al que se refiere esta declaración con la(s) norma(s) u otro(s) documento(s) normativo(s) Directiva 2004/108/CE sobre la Compatibilidad Electromagnética (EMC) Norma Edición / Fecha de emisión EN 55013 2001+A1:2003+A2:2006 EN 55020 2007 EN 61000-3-2 2006+A1:2009+A2:2009 EN 61000-3-3 2008 Directiva 2006/95/CE sobre Bajo Voltaje (LVD) Norma Edición / Fecha de emisión EN 60065:2002 2002+A1:2006+A11:2008+A2 2010+A12: 2011 Directiva 2009/125/CE sobre los requerimientos de ecodesign para el consumo eléctrico en los modos stanby y apagado Norma Edición / Fecha de emisión Ecodesign Regulation (EC) No. 1275/2008 Málaga a 1 de Septiembre de 2012 SDT8000 User Guide
Index
1. Welcome. Pg. 33 2. Safety Instructions. Pg. 33 3. Features. Pg. 33 4. Content. Pg. 34 5. Hardware. Pg. 34 6. Connections. Pg. 35 7. Remote control. Pg. 37 7.1 Batteries installation. Pg. 38 8. First time usage. Pg. 38 8.1 Auto channel scan. Pg. 38 8.2 Manual channel scan. Pg. 39 9. Main Menu. Pg. 39 9.1 Program Menu. Pg. 39 9.2 Pictures Menu. Pg. 46 9.3 Channel scan. Pg. 47 9.4 Time. Pg. 47 9.5 Option. Pg. 47 9.6 System. Pg. 48 9.7 USB. Pg. 48 10. Schedule recordings and direct recording. Pg. 49 10.1 TimeShifting. Pg. 50 10.2 Background recordings. Pg. 51 11. Restore default values. Pg. 51 12. Radio. Pg. 51 13. Multimedia. Pg. 51 14. Watch TV channels. Pg. 53 14.1 Information. Pg. 54 14.2 Change the channel. Pg. 54 14.3 Volume. Pg. 54 14.4 Channel list. Pg. 54 14.5 Audio. Pg. 55 14.6 Teletext. Pg. 55 14.7 EPG. Pg. 56 1.8 Sleep function. Pg. 56 15. System upgrading. Pg. 56 16. Trouble shooting. Pg. 57 17. Technical specifications. Pg. 57 18. Warning. Pág. 57 19. 19. CE Declaration of Conformity. Pg.57 APENDIX 1:MedialInfo application. Pg. 581. Welcome
Thanks for choosing the high definition DVB-T Tuner/Recorder and media player SDT8000 from Sveon. This device will allow you to enjoy the high definition TV signal, record your favourite programs and play pictures, music and video files (MPEG4-H.264 supported) through any USB storage device thanks to its integrated USB Host port. Through this user guide we will show you how to connect and use properly the device to get the best performance.2. Safety instructions
Security
- Place the wires when they can not be damaged. - Do not expose the device to the rain. - Do not connect the device in damp places. - Do not place objects with water (like a glass of water) on top of the device. - Do not place fire sources, like a candle, near the device. - Do not open the device. - Do not allow the entering of objects in the air flow holes.Ventilation
- Do not cover the device. Do not place the device in places where the air flow is not enough. - Do not place the device in non-stable surfaces (like a bed or a sofa). - Do not expose the device to the heat or to the cold. - Leave at least 10cm between the device and another devices. - Do not place anything on top of the device.Maintenance
- The device doesn't need any special maintenance. - Disconnect the devie before cleaning it. - Do not use chemicals to clean the device. - Wipe the device using a clean and damp cloth. - Do not dispose the device batteries to the trash.3. Features
• High definition DVB-T Tuner/Recorder and multimedia player. • Records and plays files through its USB Host port. - Easy to use OSD management menu. - Electronic Program Guide function (subject to channel availability). • Auto and manual channel scan functions. - Great conectivity: Scart, YPbPr, AV and HDMI. - Parental control. - Teletext and Subtitles (subject to availability). - Allows you to record a channel while you are watching another one (the channels must be in the same frequency range). - Direct recording function from EPG (Electronic Program Guide). - Direct recording function pressing a button. - TimeShift function. - Plays music, picture and video files through its frontal USB Host port. • Maximum hard disk capacity: up to 3TB (through USB Host). - Subtitles format supported: Srt, Sub, Smi, UTF-8. • Partitions supported: FAT, FAT32, NTFS - Video files supported: VCD, SVCD, KVCD, MPEG-4, VOB, XVID, AVI, MPEG-4 HD, MP@HL 1080i, MPEG-4, AVC-HD, M2TS, MP4, MKV, (H264HL@4.0). • Audio files supported: WMA, MP3, AC3, E-AC3. • Picture files supported: JPG, BMP, PNG. - Upgradeable software through USB Host.4. Content
- High Definition TV tuner - Remote control - User guide 5. Hardware
Frontal panel
1. Infrared receiver 2. Status LED 3. USB Host portRear panel
1. Home antenna connection 2. Antenna connection to the TV/VCR 3. Coaxial connection 4. HDMI connection 5. Scart connection 6. Power connection 6. Connections
Power connection
\- Once video and audio connections are settled, please plug SDT8000 in power socket. The device will automatically turn on.Antenna In/Out connection
\- Antenna connection to the device. To receive Digital TV signal you must connect the home antenna to the "RF IN" connector located in the rear panel of the device. You need one antenna cable to make this connection. \- Device connection to the VCR. Connect one end of the antenna cable to the device antenna output ("RF OUT") and the other end to the VCR. You need an extra antenna cable to make this connection.Scart connection
1. Connect the device to your TV screen through Scart connection (cable not included). 2. Connect the device to the power socket, it will turn on automatically. 3. Select the Scart option in the TV input menu and wait while system loading process.HDMI connection
1. Connect the device to your TV screen through HDMI connection. 2. Connect the device to the power socket, it will turn on automatically. 3. Select the HDMI option in the TV input menu and wait during system loading process. Important: The HDMI connection includes audio and video signal through the same cable with a great quality; you don't need to do more connections to enjoy both signals.Coaxial connection
If you want to enjoy surround sound 5.1 connect SDT8000 to an audio system that can decode 5.1 audio signal with a coaxial cable (coaxial cable not included) USB Host connection
1. Connect an USB external storage device to the frontal USB Host port of the device (USB stick or external hard disk). 2. Turn the USB storage device on and wait while system loading process. If the external mass storage unit needs extra power supply do not forget to connect its power adapter once connected to SDT8000 and before turning it on. 3. Go to the device Main Menu and select "USB" section to play the media files saved on the external storage device.HOW TO DISCONNECT
Before disconnecting the external storage device from the USB Host port please make sure there is not any file being played from the external storage unit.7. Remote control
1. MUTE: Enables/dispables audio signal. 2. FAV: Press to display the favourite channels list. 3. SUB-T: Press to choose between the available subtitles of the channel. 4. NUMERIC PAD: Channels selection. 5. MENU: Direct access to the Main setup menu. 6. LEFT/RIGHT/UP/DOWN: Arrow buttons to move the highlight. 7. EPG: Displays the EPG information (subject to channel availability). 8. PAGE DOWN: Press to go to the previous page (multimedia menu and channel list). 9. VOL+ / VOL-: Increases / Decreases the volume of audio. 10.FB/FF: Fast playback (backward or forward) at different speeds x2, x4, x8, x16, x32. 11. NEXT/PREV: Press to go to the next or to the previous file. 12. PLAY: Start the playback (in playback mode). 13. PAUSE: Pause the playback (in playback mode). 14. REC: Press to start a recording. 15. TIMESHIFT: Enables Timeshift option. 16. RED BUTTON / ZOOM: Teletext red button and to increase/decrease the size of pictures and videos. 17. GREEN BUTTON / ASPECT: Teletext green button. Aspect: Press to change between the different screen formats (Auto, 4:3 Complete, 4:3 Pan & Scan, 4:3, 16:9 Wide screen). 18. POWER : Press to turn the device On/Off (Standby) 19.TTX: Displays Teletext (subject to channel availability). 20. INFO: Displays channel info or file info. 21. RECALL: Press to go to previous screen. 22. LIST: in DVB-T mode, it shows the TV or Radio channel list. 23. EXIT: Go to the previous menu. 24. OK: Press to confirm. 25. GO TO: Search by time when playing mode. 26. PAGE UP: Press to go to the next page (multimedia menu and channel list). 27. CH+ / CH-: press these buttons to change channel forward / backward. 28. LANG: Press to change the audio track (subject to channel availability). 29. STOP: Stops a playback. 30. REPEAT: while playing files, press this button to play files "Once" "Continuous" or "Random" 31. TV/RADIO: Press to choose between TV and Radio channel lists. 32. BLUE BUTTON / TIMER: In TV Mode, press to access to the schedule recording; in playback mode, enables "GoTo" function; Teletext blue button.TIMER: Enables auto power On/Off. 33. YELLOW BUTTON / V-Format: Teletext yellow button. V-Format: Press to change the screen resolution (576i, 576p, 720p, 1080i). Important: There are some functions like Subtitles, Teletext, EPG or audio tracks which are provided by the channels and are subject to the channel's availability. 7.1 Batteries installation
- Remove the lid, install the AAA batteries in its correct position (+/-) and close the lid. • The following picture shows you how to install the batteries: I.Open the cover natural_image
Simple line drawing of a rectangular object with an arrow indicating rotation, no text or symbols present.natural_image
Diagram of a car interior with cylindrical components and an arrow indicating direction (no text or symbols)8. First time usage
The very first time you connect the device, the unit displays automatically the setup window: - OSD language: Set the OSD language (language used to display the different menus). • Country: Set your country. - Channel scan: Start the auto channel scan. 8.1 Auto channel scan
- Press "OK" button to start the auto channel scan. - The option "Channel scan" deletes all the database and starts a channel scan in the selected country. - The auto channel scan takes some minutes, please wait while the function is running. - When the channel scan finishes, the channel list is saved automatically and the system displays the first found channel of the list.  8.2 Manual channel scan
- You can search the channels by frequencies by pressing "Menu" button. Press the right arrow button to select the option "Channel search" and select the option "Manual channel scan". - This option doesn't search the channels automatically. The user must know the frequency and the bandwidth of the channels he wants to scan. When a frequency band is scanned, the channels in this frequency band are deleted to save the new searching.  9. Main Menu
When the channel scan finishes you can press "Menu" button of the remote control to access to the device Main menu. The following window is displayed: - Program - Picture - Channel scan • Time - Option - System • USB 9.1 Program Menu
This section includes the following options: - Edit channels • EPG - Sort • LCNEdit channels
- This option allows you to sort the channel list, skip channels, lock channels, delete channels, rename channels or add channels to the favourite list. - This option is protected under password. Select it and enter the correct password (the password by default is "000000"). \- When the correct password is entered, the following window is displayed: Sort channels
\- If you want to sort the channels or move them in the list, please disable "LCN" option in "Program" menu. \- When the "LCN" option is disabled, press the option "Edit channels" and enter the password. \- Select the channel you want to move and press the red button. Then use the arrow buttons up and down to move the channel, press OK to confirm the new position in the list.   \- We suggest you sort the channels from up to down to make easier the channel searching.   \- When the channels are sorted, press "Exit" button and the message "Recording..." will be displayed. Then, the new channel list will appear.   Skip channels
The "Skip" option allows you to select a channel, shown in the list with "Skip" icon; when you move the highlight through the channel list, this channel can not be selected and is skipped. - To select a skipped channel select it and press the green button. The "Skip" icon will appear near the channel name. - You can choose several skipped channels. Once you have selected them, press "Exit" to save the changes. The message "Saving" is displayed onscreen.   \- Press "OK" button; the channel list will appear with "Skip" icon near the skipped channels. Lock channels
The "Lock" option allows you to protect under password a selected channel. The locked channels only can be watched by entering the password. - If you want to lock a channel, select it and press the yellow button of the remote control. A lock icon will appear near the channel name. - You can lock several channels. Once selected, press "Exit" button to save the changes. The message "Saving" will appear onscreen.   - Press "OK" button to display the channel list with locked channels. - To un-lock a channel enter the security password.   \- When the correct password is written, the channel can be watched. You don't need to write again the password until the device is powered off or in Standby mode. \* The Standby mode is a low-consumption mode which allows you to save energy when the device is not on usage. When you turn the device off by pressing the "Power" button, the device enters in "Standby" mode: is still connected to the power outlet and is ready to be used but with a minimum power consumption.Delete channels
The "Delete" option allows you to delete channels from the channel list: - If you want to delete a channel, select it and press the blue button. A warning message appears to confirm the action. - If you want to restore a deleted channels, you have to scan again the channels. Note: When you arrange a new channel scan, the current channel list and order will be deleted. Favourite channels list
The "FAV" option allows you to create a list with your favourite channels and sort them in different categories (films, news, sport, music). \- How to create a favourite channels list: Select the channel you want to add and press "FAV" button of the remote control. A categories list will appear, press OK over the wished category. Press "Exit" to select another channel or "Unable" to cancel the selection.   \- Press "Exit" to save the changes. The message "Saving" appears onscreen.   \- When you press "OK" button of the remote control, the channel list is displayed onscreen. Press "FAV" button to display the available channel categories and press the arrow buttons (left and right) to move the highlight through the favourite channels list.   Rename channels
The option "Recall" allows you to rename the channels. If you want to change the name of a channel, select it and press "RECALL" button. Then, a virtual keyboard appears where you can write the new name for the selected channel. TV Guide (EPG)
The EPG option allows you to get information about the channels, check the TV programs and also add actions in the schedule of recordings. \- Press "EPG" button and use the arrow buttons right and left to select the channel and up and down to select the action. The information will appear in the right of the screen.   \- If you want to add a recording from EPG, select the program you want to record and press "OK" button. A window appear which shows the information of the new action, press "OK" button to confirm. LCN
This option allows you to enable or disable LCN system (Local Channel Number). Note: LCN is a number which indentifies a channel, this function is used in some countries like United Kingdom or France. This option is enabled by default, please disable it to sort the channels.9.2 Picture menu
In the "Picture" menu you can setup the format, resolution and video output of SDT8000:- Aspect Ratio
- 4:3 (Full): Select if you use a 4:3 TV screen. - 4:3 PS (PanScan): Select to adjust a wide image to a 4:3 screen. - 4:3: Select to adjust the image to a 16:9 screen format. - 16:9 Select if you use a wide TV screen.- Resolution
\- Select the output resolution for your TV (576i, 576p, 720p, 1080i) Note: If you want to record using VCR output you must select 576i of resolution.• TV Format
\- Select the TV system.- Video Output
\- Select the output mode RGB when you use HDMI. 9.3 Channel scan
This section allows you to setup the following values: - Auto channel scan: Select to start an auto channel scan (all the channels). - Manual channel scan: Select to start a channel scan in the selected frequency range. - Country: Select the country. - Antenna signal: Enable this option if you need to enlarge the antenna signal.  Note: The option "Manual channel scan" doesn't scan automatically all the channels. The user must know the frequency and the bandwidth of the channel he wants to find. When a frequency band is scanned, all the saved channels in this band are deleted to save the new found channels.9.4 Time
This section allows you to adjust the Time parameters of the device: \- Time: Select the way to update the time information between Auto and Manual mode. When the option is enabled, the Time information is updated using the TV signal information. \- Turn Off: Set if you want to turn the on or off the device automatically. Note: There are some countries which use more than one Time Zone. Spain uses GMT+1 (but in Canary Islands, which uses GMT). 9.5 Option
Select this section to adjust language and subtitle values. - OSD Language: Select the language you want to use for OSD menu. - Subtitles language: Select the default subtitles language. - Audio language: Select the default audio language. - Digital output: Select "RAW" option to keep the original format of audio signal and "PCM" to adjust the audio signal to the output connectors. 9.6 System
System section allows you to adjust the following values: parental control, password or default values of the device. - Parental control: Sets the channel to protect by password. The default password is "000000". - Restore password: Select this option to change the default password. To enable the password change press the number buttons to enter the old password and, then, to write twice the new one. - Default values: Reboot the default values of the device. Note you will delete all the saved changes. - Info: Press to display the software version of the device. Note: The classification by ages in the programs are provided by each channel.  9.7 USB
The USB menu allows you to enjoy the multimedia functions of the device. Access to this menu to setup the options of multimedia files playback and to setup the recording options. - Multimedia: Select to play music, picture or video files and to manage the recordings (PVR). - Pictures setup: Select the interval time between pictures during slide show function (from 5 to 20 seconds), the slide show mode and the pictures size. - Video setup: Select the size, background and subtitles colour. - PVR setup: Select the devie where the recordings are going to be saved (if the external storage unit has more than one partition) or, if it doesn't, to format the device in FAT32/NTFS format. 10.Schedule Recordings and Direct Recording
You can add recording tasks through TV or Radio Guide or by pressing the "REC" button of the remote control.- Manual recording
If you want to add a manual recording task follow these steps: 1. Press the blue button of the remote control. 2. Then press the red button of the remote control. A window will appear with the type of recording you want to arrange "TV/Radio", the channel, the channel name, the start date, the start/end time and the frequency. When the date of the recording task is coming, a message appears onscreen and the device changes the channel automatically. 3. If you want to modify a task, select it and press the red button of the remote control.    4. When the task finishes, the device is turned off automatically (Standby mode). Note: To assure a correct task operation, please do not program tasks with less than 2 minutes between them. If you want to delete a recording task, select it and press the blue button of the remote control. A confirmation message will appear: press OK to confirm or "Exit" to cancel. Note: When a recording task is running, you can not delete it. It is necessary to press "Stop" button to stop the recording to delete it. • Record through EPG (Electronic Program Guide)
Follow these steps to record through the EPG: 1. Press "EPG" button of the remote control. Then select the channel and the program you want to record using the right and left arrow buttons. 2. Press the "OK" button of the remote control. A window will appear with information about the recording task. Press "OK" to confirm; the new task will be included in the schedule recording.  - Direct recordings: REC button
You can record a channel directly by pressing the "REC" button of the remote control. The following message will appear onscreen when you press this button "Starting recording". You can cancel the recording by pressing "Stop" button (the action must be confirmed in the confirmation button).10.1 Time Shift
The TV Tuner SDT8000 includes Time Shifting function to avoid the user can lost his favourite program because of an interruption, for example a phone call. When this option is enabled, the program is saved as a temporary file. Thanks to this, you can continue watching the program without loosing anything, in the same point you left it. If you want to enjoy this function, press "Timeshift" button of the remote control. A bar is displayed onscreen with the elapsed time. If you want to resume press "Play" Press "Stop" button to cancel the function. Press it twice to cancel the recording.  Note: The capacity for Timeshifting function depends on the free available space in the storage device. This value can not be modified by the user.10.2 Background recording
SDT8000 allows you to create a schedule recording, which is enabled automatically when the device is in Standby mode. This function guarantees a low power consumption when the device is not in use; you only have to press "Power" button after setting a recording task. When the recording task is close, the device powers on automatically and also searches the channel automatically. When the recording finishes, the device turns off (Standby mode) again automatically. You can record a channel while you are watching another channel, but both channels must be in the same range. Press "OK" button of the remote control during the recording and select the channel you want to watch. If the selected channel is not available in this frequency the following message appears "Recording other channel"; look for another available (in the same range). Example: TV1, TV2, 24Horas and Clan channels are in the same range. It means you can record TV1 and watch TV2 channel at the same time.11. Restore default values
Select to restore the device default values. All the modified options will be restored and the channels data base will be deleted.12. Radio
The channel list and EPG for radio stations work like the ones for TV channels. Please read the section 9 of this user guide.13. Multimedia
The device includes multimedia functions. To access to the "Multimedia" menu it is necessary you to connect an external USB storage device to the unit through the front USB Host port. If there isn't any device connected, a warning message will appear. When an external device is connected, the device shows the message "USB device connected", it means the external device has been detected and you can access to the files saved inside. Press "Menu" button of the remote control, select "USB" option and then, select "Multimedia" section. The "Multimedia" menu includes four options to choose the type of file you want to play: Music, Pictures, Movie, PVR (recordings). Select the type of file you want to play  To go back to DVB-T menu please select icon "DTV"• Music
- The device supports the most common formats like MP3/WMA/AC3/E-AC3. During a files playback the screen shows the elapsed time, the total time of the file and ID information. - To navigate between folders and files you can use the arrow buttons up and down. Press "OK" button of the remote control to play the selected file. - You can also play music files while you are playing picture files. Select the audio track you want to play and then press "Exit" button to access to the picture files. - Press "Recall" button to move the highlight up in the files directory.  - Pictures
- The device supports some picture formats: JPEG/BMP/PNG. - The name, resolution and size of the selected picture are shown in the screen. - To navigate between folders and files use the arrow buttons up and down and press "OK" button to display the selected picture. - Press "Play" button to play the picture files in Slide Show mode. - Press "Play"/"Pause" buttons to pause or resume the playback. - Press the red button of the remote control to use Zoom option in the picture and enlarge it. - Press the yellow button to rotate the picture. - Press "Recall" button to move the highlight up in the files directory.  - Movie
- The device supports the most multimedia formats, even MKV H264 (HL@ 4.0). - Use the arrow buttons up and down to navigate between folders and files. Press "OK" to play the selected file. - Press "Play" button to play the file in full screen mode. - Press "Recall" button to move the highlight up in the files directory. - Press "Pause"/"Play" to pause or resume the playback. - Press "FF" button for fast forward in the playback (available speeds: x2/x4/x8x/x16/x32). Press "FB" for fast backward (available speeds: x2/x4/x8x/x16/x32). - Resume function supported: Press "Stop" button during a playback and the next time you play the file, you will be able to resume the playback in the same point you left it. The system gives two options: you can resume or select "Cancel" to play the file since the beginning. - Press "Go To" button to go to a point in the timeline of the file.  • PVR
- Select "PVR" to watch the recordings. - The system creates automatically a folder in the USB external device, where all the recordings are saved, this folder is called "HBPVR". - The name of the recording includes: channel name, month, day, year and the time of the recording. The end of the file is .MTS.  14. Watch TV channels
When the channel scan finishes you are able to enjoy TV and Radio signal. natural_image
Black-and-white aerial view of a cityscape with dense urban buildings and forested hills, framed by tree branches (no visible text or symbols)14.1 Info
Press "Info" button once to display the information bar. This bar shows the channel number, channel name, date and current time, current program and next program.14.2 Change channel
Press the buttons Channel+/- to change between channels. You can also enter directly the channel number using the number keypad of the remote control; if the entered channel number doesn't exist, the device will not do anything.14.3 Volume
Press the buttons Volume+/- to increase or decrease the volume level. Press "Mute" button to disable audio signal; press again any volume button to enable the audio signal.14.4 Channel list
Press "List" button to display the channel list. Use the arrow buttons up and down to select the channel you want to watch. 14.5 Audio
There are some TV programs which include two languages; if you want to change the language press "LANG" button of the remote control and select the audio channel using the arrow buttons up and down. Note: This option is subject to channel availability.14.6 Teletext
Press "TTX" button of the remote control to access to Teletext information of the current channel. Please note this info is provided by the channel and may be not available.   Note: There are functions like Teletext which are subject to the channel availability.  14.7 EPG
For further information about EPG function please go to the 9.1 section of this user guide.14.8 Sleep function
You can enable the Sleep Mode from the menu "Time" (enter in "Sleep Mode" section the value for auto turned off option).15. System upgrading
The device allows you to upgrade its software to include improvements. Please follow these steps to upgrade the software of your device: 1. Copy the upgrading file in an external USB device and connect the device to the unit through its USB Host port. 2. Go to "System" in main menu, select the option "Software upgrade", press "OK" and then select "USB Upgrade" in the window appearing. Wait until the upgrading process has completed. Important. During software upgrading the device can not be disconnected from the power outlet and the USB device can not be unplugged; it may cause several damages to the device.  Don't hesitate to contact with our Technical Department by phone (+34 902 402 503) or by email: soporte@sveon.com. Download the upgrades only from our official website: www.sveon.com.16. Trouble shooting
If you find problems during the usage of the device please read carefully the user guide or contact with our Technical Department (+34 902 402 503).17. Technical Specifications
- High definition DVB-T Tuner (MPEG4-H.264). - Auto-Installation function. - Multiple OSD languages: Spanish, English, French, German, Italian, Portuguese. - High definition multimedia player. - Available resolutions: 576i, 576p, 720p,1080i (1920x1080). - Video outputs: Scart, HDMI v1.3. - Audio outputs: Scart, HDMI v1.3 (multichannel 5.1) and Coaxial. - USB 2.0 Host port (playback and recording). - Supports up to 2TB through USB Host port. - Partitions supported: FAT, FAT32 and NTFS (playback and recording). - EPG (Electronic Program Guide). - Teletext. - Supported video codecs: VCD, SVCD, KVCD, MP@HL 720p, MP@HL 4.0 1080i, MPEG4, MPEG4-HD, MPEG4-AVC-HD. - Supported codecs: AVI, XVID, MP4, M2TS, MKV(H264 Profile@ 4.0). - Subtitles supported: SRT, SUB, SSA, SMI, UTF-8. - Supported audio codecs: MP3, WMA, Ac3, E-AC3. - Supported picture codecs: Jpg, bmp, png. - Upgradeable software. - Frequency: VHF-H 174-230MHz, UHF 470-860MHz. - Signal level: -78dBm - 20dBm18. Warning: Disposal of waste batteries
natural_image
Symbol of a trash bin crossed out by two crossed lines, no text or labels present19. CE Declaration of Conformity
Sveon declares that his product SDT8000 is in compliance with the essential requirements and other relevant provisions of Directive 2004/108/EC, Directive 2006/95/EC and Directive 2009/125/EC. For more information go to page 31.APENDIX 1: MediaInfo Application
Thanks to the MediaInfo software you can obtain a complete information about a video or audio file, even the used codec. MedialInfo is a free software which provides technical information about a video or audio file: indicates the used codec, the video and audio features (bitrate, framerate, frequency...). This detailed information allows you to know the type of MKV file you are using and, if it your Sveon SDT8000 supports it. The device SDT8000 supports the great most multimedia codecs and also MKV files (Matroska) in high definition H.264. It supports the profile High@4.0 but it doesn't support the profile High@5.0, High@5.1. Through this guide we will show you how to use the MediaInfo application, to obtain further info about your MKV files and detect if they are supported by your SDT8000 or not.MedialInfo
You can download the MediaInfo software in the official website. It is available for different OS: Official website: http://mediainfo.sourceforge.net/es For Windows: http://downloads.sourceforge.net/mediainfo/MediaInfo\_GUI\_0.7.30\_Windows\_i386.exe For MAC: http://mediainfo.sourceforge.net/es/Download/Mac\_OS For Linux: http://mediainfo.sourceforge.net/es/Download Download and install the application. Then, you can access to the program through the Start menu or by right clicking over the multimedia file you want to check. \- Start Menu:  \- Right clicking over the file: High@4.0
In the following window you can check the information provided by MediaInfo application: 1. File, codec, size, time, video tracks, audio tracks, subtitle tracks. 2. Codec Profile High@4.0 (this profile is supported by SDT8000 unit). 3. Language and format of the first audio track, information about the second audio track, information about the first track of subtitles, information about the second track of subtitles. The example shows the information of a MKV file with two audio tracks (DTS-AC3) and two subtitle tracks UTF-8 (in English and Spanish). This file is played by SDT8000 using the audio track AC-3. Note: The files with DTS audio (Digital Theater System/ Sound/ Sorround) can be played but the device can not decode them. High@5.0/5.1 files
In the following window you can check the information provided by MediaInfo application: 1. File, codec, size, time, video tracks, audio tracks, subtitle tracks. 2. Codec Profile High@5.1 (this kind of files are not supported by SDT8000). 3. Language and format of the first audio track, information about the second audio track, information about the first subtitle track and information about the second subtitle track. The example shows a MKV file with two audio tracks (AC3-DTS) and two subtitle tracks ASS (in English and Spanish). This kind of files are not supported by the device SDT8000. 
- SDT8ooo Manual de usuario
- Índice
- Bienvenido
- Instrucciones de seguridad
- Seguridad
- Ventilación
- Mantenimiento
- Características
- Contenido del pack
- Hardware
- Panel frontal
- Panel trasero
- Conexiones
- Conexión Toma de Corriente
- Conexión Antena In/Out
- Conexión por Euroconector
- Conexión HDMI
- Conexión Coaxial
- Conexión USB Host
- DESCONEXIÓN
- Mando a distancia
- Instalación de las baterías
- Primer uso de la unidad
- Búsqueda automática de canales
- Búsqueda manual de canales
- Menú Principal
- Menú Programa
- Editar programa
- Ordenar canales
- Saltar canales
- Bloquear canales
- Borrar canales
- Lista de favoritos
- Renombrar canales
- Guía de TV (EPG)
- LCN
- Menú Imagen
- - Relación de presentación
- - Resolución
- - Formato TV
- - Salida de Vídeo
- Búsqueda de canales
- Hora
- Opción
- Sistema
- USB
- 10.Calendario de grabaciones y Grabación Directa
- - Establecer grabaciones manualmente
- Grabación en modo TimeShift (Pausa en vivo)
- Grabación en segundo plano
- Restaurar configuración por defecto
- Radio
- Multimedia
- • Música
- - Foto
- - Película
- • PVR
- Ver canales TV
- Información
- Cambiar Canal
- Volumen
- Lista de canales
- Audio
- Teletexto
- EPG
- Función Sleep
- Actualizar sistema
- Solución de problemas
- Especificaciones técnicas
- Advertencia: Reciclaje de baterías
- Declaración de conformidad CE
- APÉNDICE 1: Información de archivos
- MedialInfo
- Archivos High@4.0
- Archivos High@5.0/5.1
- CE
- DECLARACIÓN DE CONFORMIDAD
- Sintonizador/Grabador TDT y Reproductor Multimedia
- SDT8000 User Guide
- Index
- Welcome
- Safety instructions
- Security
- Ventilation
- Maintenance
- Features
- Content
- Frontal panel
- Rear panel
- Connections
- Power connection
- Antenna In/Out connection
- Scart connection
- HDMI connection
- Coaxial connection
- USB Host connection
- HOW TO DISCONNECT
- Remote control
- Batteries installation
- First time usage
- Auto channel scan
- Manual channel scan
- Main Menu
- Program Menu
- Edit channels
- Sort channels
- Skip channels
- Lock channels
- Delete channels
- Favourite channels list
- Rename channels
- TV Guide (EPG)
- Picture menu
- - Aspect Ratio
- - Resolution
- • TV Format
- - Video Output
- Channel scan
- Time
- Option
- System
- 10.Schedule Recordings and Direct Recording
- - Manual recording
- • Record through EPG (Electronic Program Guide)
- - Direct recordings: REC button
- Time Shift
- Background recording
- Restore default values
- • Music
- - Pictures
- - Movie
- Watch TV channels
- Info
- Change channel
- Volume
- Channel list
- Teletext
- Sleep function
- System upgrading
- Trouble shooting
- Technical Specifications
- Warning: Disposal of waste batteries
- CE Declaration of Conformity
- APENDIX 1: MediaInfo Application
- High@4.0
- High@5.0/5.1 files
Marca : Sveon
Modelo : SDT8000
Categoría : Receptor