
Fence Guard - Security management software AXIS - Free user manual and instructions
Find the device manual for free Fence Guard AXIS in PDF.


| Product Type | Security Management Software |
| Brand | Axis |
| Model | Fence Guard |
| Category | Security Management |
| User Rating | 6.5/10 |
| Manual Format | |
| Manual Pages | 14 |
| Language Options | Over 40 languages via translation request |
| AI Question Support | Yes (AI-powered question answering) |
| Download | Free PDF download available |
| User Community | Q&A forum for user questions |
| System Requirements | Internet connection and modern web browser |
| Deployment | Cloud-based, no physical installation |
| Key Functions | Intrusion detection, real-time monitoring, alert management |
| Integration | Compatible with Axis cameras |
| Updates | Automatic updates via cloud service |
| Security | Encrypted communication |
| Support | Email support and online documentation |
Frequently Asked Questions - Fence Guard AXIS
User questions about Fence Guard AXIS
0 question about this device. Answer the ones you know or ask your own.
Ask a new question about this device
Download the instructions for your Security management software in PDF format for free! Find your manual Fence Guard - AXIS and take your electronic device back in hand. On this page are published all the documents necessary for the use of your device. Fence Guard by AXIS.
USER MANUAL Fence Guard AXIS
TrademarkAcknowledgments
AXISCOMMUNICATIONS, AXIS, ETRAX, ARTPECandVAPIXare registeredtrademarksortrademarkapplicationsofAxisABinvarious jurisdictions. All other company names and products are trademarksor registeredtrademarksof their respective companies.
Apple,Boa,Apache,Bonjour,Ethernet,InternetExplorer,Linux,Microsoft,Mozilla,Real,SMPTE,QuickTime,UNIX,Windows,Windows VistaandWWWareregisteredtrademarksoftherespectiveholders. JavaandallJava-basedtrademarksandlogosaretrademarkor registeredtrademarksofOracleand/oritsaffiliates.UPnP TM ia certificationmarkoftheUPnP TM ImplementersCorporation.
ContactInformation
AxisCommunicationsAB
Emdalavägen14
22369Lund
Sweden
Tel:+46462721800
Fax:+4646136130
www.axis.com
Support
Should you require any technical assistance, please contact your Axis reseller. If your questions cannot be answered immediately, your reseller will forward your queries through the appropriate channel to ensure a rapid response. If you are connected to the Internet, you can:
- downloaduserdocumentationandsoftwareupdates
•findanswerstoresolvedproblemsintheFAQdatabase.Search byproduct, category, orphrase
• reportproblemstoAxissupportstaffbyloggingintoyourprivate supportarea
- chatwithAxissupportstaff
- visitAxisSupportatwww.axis.com/techsup/
LearnMore!
VisitAxislearningcenterwww.axis.com/academy/forusefultrainings, webinars,tutorialsandguides.
ApplicationOverview......4
Requirements......4
Considerations....4
InstallApplication....5
InstallLicense....5
StartandStoptheApplication....5
ConfiguretheApplication....7
Profiles......7
MultichannelProducts....7
AXISFenceGuardSetup....8
TheVirtualFence....8
VirtualFenceRecommendations....9
SmallObjects....10.
Short-LivedObjects....12.
VisualConfirmation....12.
UsingtheApplicationinanActionRule....13
ApplicationOverview
AXISFenceGuardmonitorsavirtualfenceandsendsanalarmifapersonorobjectcrossesthefence.ThealarmcanbeusedbyAxis networkcamerasandvideoencoders,andbythird-partysoftware,to,forexample,recordvideoandalertsecuritystaff.Toreduce falsealarms,usefilterstoignoreobjectssuchassmallanimals,lightbeamsfrompassingcarsandquicklymovingshadows.
TouseAXISFenceGuard, the application must be uploaded to an Axis network camera or video encoder, the license must be installed and the application must be started. To configure the application, use AXISFenceGuard Setup which is started automatically if the application is not yet configured. Use profile to create multiple configurations, for example for daytime and nighttime or with different virtual fences. Each profile has its own settings and generates its own alarms.
Requirements
TheapplicationcanbeinstalledinAxisnetworkcamerasandvideoencodersthatsupportAXISCameraApplicationPlatform.A completelistofcompatibleproductsandfirmwareversionsisavailableatwww.axis.com/applications
Forfullfunctionality, InternetExplorer and AXISMediaControl(AMC) are required when configuring the application and when using visual confirmation.
Considerations
Beforeusingtheapplication,takethefollowingintoconsideration:
- Positionthecamerasothatthevirtualfenceisnottooclosetotheimageedges.Theapplicationmustbeabletodetectobjectsonbothsidesoftheline.
- Touse perspectivewhenthemonitoredareahassignificantdifferencesinelevation,createmultipleprofilesandconfigure perspectiveineachprofile.SeeProfiles.
- Smallanddistantobjectsmightnotbedetected.
- Detection accuracy may be affected by weather conditions such as heavy rainorsnow.
- MakesurethatthelightingconditionsarewithintheAxisproduct'sspecification.Useadditionallightingifneeded.
- Makesurethatthecameraisnotsubjecttoexcessivevibrations.Vibrationsmightcausefalsedetections.
InstallApplication
To download the application to www axis.com/applications there are two installation packages:
- Applicationonly.SelectthisoptioniftheapplicationistobeconfiguredfromacomputerwithInternetaccess.
- Stand-aloneinstallercontainingtheapplicationandAXISMediaControl(AMC)installer.Selectthisoptionifthe applicationistobeconfiguredfromacomputerwithoutInternetaccess.
AXISMediaControlisasoftwarecomponentforviewingvideoinInternetExplorer.Forfullfunctionality,AXISMediaControls requiredwhenconfiguringtheapplication.IftheapplicationisconfiguredfromacomputerwithInternetaccess,AXISMediaControl isdownloadedandinstalledautomatically.
If the application is configured from a computer without Internet access, AXISMediaControl must be installed separately. Select the stand-alone installer package, unzip the file and run the AXISMediaControl installer. Install the application as described below.
ToinstalltheapplicationinanAxisnetworkcameraorvideoencoder, followthesesteps:
-
Download the application as described above.
-
GotoSetup>ApplicationsintheAxisproduct'swebpages.
UndeUploadApplicationclicBrowseLocattheapplicationfileandherclicUploadPackage.
The application appears under installed applications in the Application page and under Overviewth menu.
Note
Uploadingapplicationsrequiresadministratorrights.
InstallLicense
Tostarttheapplication, a license key file is required. The license key is uniqueto the Axis product and is based on the product's serial number.
If the Axis network camera or video encoder is connected to an network with Internet access, the license key file can be requested directly from the product's web pages.
- GotoApplications>AXISFenceGuard>License.
AutomationinstallationappearsorthwebpageEntetherequiredinformation.
3.ClickInstall.
Alternativemethod: If the camera is connected to an network without Internet access, the key must first be retrieved from www.axis.com
Go@www.axis.com/applications&licLicensKeyRegistrationSelectapplicationandentethAxisproduct's serialnumber(S/N).
- Savethelicensekeyfile.
OpertheAxiproduct'swebpagesanddoApplicationsAXIFenceGuardLicense.
LundeManualInstallationclicBrowseandrowsethicenskeyfile.
5.ClickInstall.
StartandStoptheApplication
TostartheapplicationselectrthInstalledApplicationsisbrtheApplicationpagandliclStart.
Tostoptheapplication,selectitinthelistandclickStop.
ConfiguretheApplication
The application is available from SetupApplicationsAXISFencGuardGoSettingsandherelclickMain Main Main page to open the application'swebpage.
AXIFenceGuardSetupstartsautomaticallyifthapplicationisnotconfiguredOncethapplicationisconfiguredthapplication'smainpagecanbeusedforvisualconfirmationandtomodifysettings.
Forinformationaboutvisualconfirmation,seeVisualConfirmation.
Forinformationaboutprofiles,seeProfiles.
TæditettingsfirstselectheprofilfromtheProfilesandherselectheappropriatesetting:
TohangthevirtuafenceclicEdifenceSeeThevirtuaFence.
Tohangtheshort-livedobjectfilterclickShort-livedobjectSeeShort-LivedObjects.
TohangethsmalobjectfilterclickSmalobjectsSeeSmalObjects.
Profiles
Profilesmakeitpossibletocreatemultipleconfigurations,forexampleoneconfigurationfordaytimeandonefornighttimeor configurationswithdifferentvirtualfences.Eachprofiletriggersitsownalarmsandhasitsownsettings.Axiscamerasand third-partysoftwarethatlistentoalarmsfromtheapplicationcanbeconfiguredtoresponddifferentlywhenreceivingalarms fromdifferentprofiles.
Forexample,touseoneconfigurationfordaytimeandonefornighttime,createtwoprofileswithdifferentsettings.IntheAxis product,createoneactionruleforeachprofileandusedaytimeandnighttimeschedulesasadditionalconditions.
If the cameramonitors an area with differences in elevation, profiles can be used to create configurations with different perspectives, setup make it possible to set them small objects with perspective filter. Divide the area contains regions without significant elevation differences and create one profile for each region. In each profile, setup a virtual fence and calibrate perspectives in the region instead of the whole image.
Toswitchbetweenprofiles,selecttheprofilefromthedrop-downlistinthemainpage.
Create, Edit and Delete Profiles
The first profile is created automatically. Addition profiles are created by selecting SaveContinuingAXISFenceGuardSetup by selecting Profiles. New profile from the main page to simplify configuration new profiles and based existing profiles. Select Copysettings from profile and then select the profile photocopy.
Toeditanexistingprofile,click StarStart application setplicist the mainpagetorestartAXISFenceGuardSetup.Alternatively,selectthe profileinthemainpageandthenselectthesettingtochange.
ToenameleteareexistingprofileselecProfilesManagprofilesithemairpage.
Note
Ifdeletingaprofilethatisusedbyanactionruleorbythird-partysoftware,alsodeleteorreconfiguretheactionruleor third-partysoftware.
MultichannelProducts
Formultichannelproductssuchasvideoencodersandcameraswithmultiplecameraheads,theapplicationcanbeusedonallchannels.Eachchannelhasitsownsettings.
Note
FosomeideencoderstapplicationcanonlybusedronchanneltimeGowww.axis.com/applicationforlistofcompatibleproducts.
Tousetheapplicationonamultichannelproduct, theapplicationmustbeenabledandconfiguredforeachcamera.
- Toswitchbetweencameras, clickonthetabsbelowthevideoimage.
- To enable the application on an acamera, switch to that camera and click Enable.
When configuring the application using AXISFenceGuardSetup, select the camera configuration. Greepcheckmark indicates that the cameras is configured. A red checkmark indicates that the camera has been configured but need to be reconfigured, for example because the image has been rotated.
AXISFenceGuardSetup
AXISFenceGuardSetupstartAutomaticallytheapplicationisnotconfiguredSetupincludesthfollowingsteps:
-
Configurethevirtualfence.
3.Configurethesmallobjectfilter.
4.Configuretheshort-livedobjectfilter.
5.Savetheprofile. -
Select the profile to configure (not available when running Setup for the first time).
To continue configuring another profile select Save Continue to close Setup and return them in pages select Save Close.
TorestartAXISFenceGuardSetup,clickthelinkStart Start application setup application'smainpage.Allcurrentlyconfigured valueswillbekeptwhensetupisrestarted.
Note
PerspectiveconfigurationisonlyavailablethroughAXISFenceGuardSetup.
TheVirtualFence
Thefenceisavirtuallineintheimage.Theapplicationcansendalarmswhenobjectspassthelineinonedirectionorinboth directions.Thearrowsonthelineshowthecurrentdirection.Alarmsaretriggeredwhenobjectscrossthelineinthedirection indicatedbythearrows.
Objectsthatonlytouchthelinedonottriggeralarms.Totriggeranalarmtheobjectmustpasstheline.Anobjectisconsideredto havepassedthelinewhenthelerpartoftheobjecthaspassed.Thisisillustratedintheimagebelow.Thegreenmanwithone footacrossthelinedoesnottriggeranalarmasheonlytouchestheline.Theredmanhastriggeredanalarmashislowerbodyhas passedtheline.Thegreenwomandoesnottriggeranalarmassheonlyhaspassedwithlinewithherheadandupperbody.
See also Virtual Fence Recommendations.

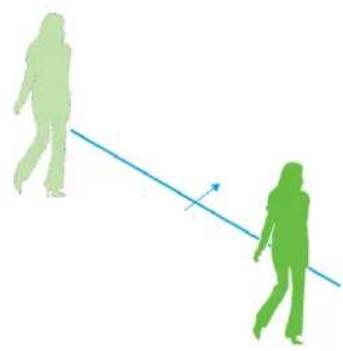
The green man and the green woman and the trigger alarms as they haven not passed the line. The red man has passed the line and triggered an alarm.
The virtuafencisetup whethapplicationconfigured using AXISFenceGuardSetupChangethfenceclicEdit fenceinthemainpage.
Toeditthevirtualfence:
- Use themousetomovethefence. Clickonthelinetoaddmosegments. Right-clickonacornertoremoveasegment.
Dehangthelarmdirectionclic|ChangdirectionTharrowsortheineshowtheurrentdirectionAlarmare triggeredwhenobjectscrossthelineinthedirectionindicatedbythearrows.
VirtualFenceRecommendations
Configure the virtual fences that objects cannot enter the protected area without passing the line and so that the application is able to detect objects before they cross the line. If possible, use an one-way alarm direction or create one profile for each alarm direction. This reduces false alarms.
Theimagesbelowillustratethreeinstallationscenarios.

ScenarioA: Cameramonitorsafence.
InscenarioA, the cameramonitorsafencewhere a container is placed just inside the defence. Draw the line inside the defence, on the ground and closet of the defence. The distance between the container and the lines should be larger than the distance between the defence and the line. If the line is drawn to a closet of the container, a person hidden by the container might be able to enter the protected area without triggering an alarmsthe application would not detect the intruder until the person is already inside the area.
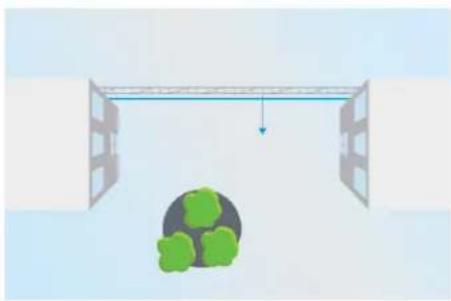
ScenarioB:Bird'seyeview.Thecameramonitorsanareabetweentwobuildings.Theareaisprotectedbyafence.
InscenarioB, thecamera has as abird'seyewiew and monitors an area between two buildings. Draw the line closet of the fence and extend the line onto the building walls and to the image edge gessothat objects cannot enter the protected area without crossing the line. If using these small object filter, select small object without perspective.

ScenarioC: Cameramonitors adelivery area.
InscenarioC, the cameramonitors a door at ad elivery area. The applications should generate alarms if some on triesto access the door. Draw the lines o that a protected area is created in front of the door. Here, the line is also extended to the wall. Makesure that the protected area is large enough so that people have top as the line in order to access the door. If the line is drawn close to or acrosst hedor, only person sentering or exiting through the door trigger alarms. In scenario C, the line is drawn so that all persons approaching and touching the door trigger alarms.
SmallObjects
Thesmallobjectfilterreducesfalsealarmsbyignoringobjectsthataresmall,forexamplesmallanimals.Thefilterisappliedtoall objectstirthecendThefiltersetupwherthapplicationisconfiguredusingAXISenceGuardSetupChangethefilter, clickSmallobjectsinthemainpage.
Supportedsmallobjectfilters:
Smallobjectfilterwithperspectiveprovidethebesfalsalarmreductionandrecommendedomostinstallations. Selectthisoptionwhentheimagehasasignificantdepth,thatis,whenobjectsfarfromthecameraappearsmallerthan objectsclosetothecamera.SeeSmallObjectswithPerspective.
Smallobjectfilterwithouperspectivesrecommendedthereononlysmaldepthirthemagandsituations whereperspectivecannotbeused,forexampleifthecamerahasabird's-eyeviewormonitorsanareawithsignificant differencesinelevation.SeeSmallObjectswithoutPerspective.
SmallObjectswithPerspective
WherSmalobjectwithperspectiviselectedthsmalbjectfiltersizeshsizeofphysicabbjectrthetupwindowthe filterisvisualizedasarectangle.Objectsthatfitinsidetherectangleareignored.Whendraggedanddroppedatdifferentscene locations,therectanglesizeisadaptedtoreflecthowobjectsappearatdifferentdistancesfromthecamera.
PerspectivesetupwherconfiguringheapplicationusingAXISFencGuardSetupSeePerspectiveCalibrationTorestartetup, clickonthelinkStaStatapplicationsetupcontrolmainpage.
Toeditthefilter:
1.ClickEnabletoenablethefilter.
2.Entertheobjectheightandwidthinthefields. Smallerobjectsare ignored and donottriggeralarms. Tobe ignored, objectsmustbesmallerthanbothvalues.
PerspectiveCalibration
Perspectiveneedstobecalibratediftheimagehasasignificantdepth,thatis,ifobjectsfarfromthecameraappearsmallerthan objectsclosetothecamera.Duringcalibration,theapplicationcomparesobjectheightsastheyappearintheimagewiththe heightsofthecorrespondingphysicalobjects.Aftercalibration,theapplicationusesthecalibratedperspectivetocalculatethe objectsizebeforeapplyingthesmallobjectfilter.
Perspectiveiscalibratedbypositioningverticalbarsintheimage.Thebarsrepresentphysicalobjectsatdifferentdistancesfromthe camera.Useleasttwobars.Addingadditionalbarsimprovescalibration.
Tocalibrateperspective:
- Placethebarsatobjectsofknownheights.Useobjectsthatstandontheground,forexamplehumansorfencepoles.
- Modify the height of each bartomatch the height of the object as it appears in the image.
- Foreachbar, enter the corresponding object's height in the field. Use centimeters or feet and inches.
4.ClickAddbartoaddadditionalbars.
Example: If monitoring a fence with 2 meter high poles, position the bars at the fence poles, adjust their heights and center 200 cm (6ft7in) in the fields.
PerspectiveonlycalibratedusingAXISfencGuarSetupRoestartsetupclickorthainStart Start Start application setupsetup themainpage.
SmallObjectswithoutPerspective
If the option small object filter with ouperspective selected the filter size the sizeof object appears in the image.
Take into consideration that an object far from the camera appear smaller than an object closet to the camera. In the setup window, the filter is visualized as a rectangle. Object that fits sidether rectangle are ignored.
Toeditthefilter:
- ClickEnabletoenablethefilter.
- Use themousetoresizethefilter.Objectsthatfitinsidetherectangleareignored. The filterdisplayed in the image can be moved to make it easier to compare the filters size with the sizeof objects in the image. The filter is applied to all objects in the image, also to object that are not located at the position of the displayed filter.
The filtersizearalsdesebyenteringhewidththeighirthfieldsThewidththeightare measuredrpercentofthimage widthandheight. Smallerobjectsareignoredandonottriggeralarms. Tobeignored, anobjectmustbesmallerthanbothvalues.
Short-LivedObjects
The short-lived object filter reduces false alarms by ignoring object that only appear in the image for a short time, for example light beams from passing cars and quickly moving shadows. The filter is applied to all objects in the scene. The filter setup when the application is configured using AXIFencGuardSetupTo change the filter click short-lived objects there main page.
When using the short-lived object filter, alarms are not triggered until the time has passed, that is all alarms are delayed by the time. If the alarm is used to start a recording, configure the pre-trigger times that there are cording also include the time the object moved in the sequence before the alarm was triggered.
Toeditthefilter:
- ClickEnabletoenablethefilter.
2.Enterthetimeinsecondsinthefield.
Thetimeistheminimumtimeobjectsthatcrossthevirtualfencemustremainintheimagetotriggeranalarm. Thetimeis countedfromthemomenttheapplicationdetectstheobject.
VisualConfirmation
Visualconfirmationisusedtovalidatethatthesettingsarecorrect,thatis,thatalobjectsthatshouldbedetectedaredetectedand triggeralarms.
Note
Tousevisualconfirmation, Internet Explorer and AXIS Media Control (AMC) must be used.
When visual confirmation is enabled, all moving objects found by the application are encircled and followed by rectangles.
• Red: The objecthastriggeredanalarm.
- Yellow: Theobjectisignoredbecauseofanignorefilter.
- Green: Theobjectisfoundbuthasnottriggeredanalarmbecauseithasnotcrossedthevirtualfence.
Tenablevisuaconfirmation,cliclorthVisuaconfirmationsliderSwitchbetweenprofiles,selectethoprofilfromthedrop-downlist.
Note
- Therectanglesmaysometimeslagbehindthemovingobjects. Thelagisonlyinvisualconfirmation; itdoesnotaffectthe application'sdetectionefficiency.
- Visualconfirmationisdisabledafter15minutes.
- Enablingvisualconfirmationmayintroducevideolatency.
UsingtheApplicationinanActionRule
Usingactionrules,Axisnetworkcamerasandvideoencoderscanbeconfiguredto,forexample,recordvideoorsendanotification whenAXISFenceGuardtriggersanalarm,thatis,whentheapplicationdetectsthatsomeonecrossesthevirtualfence.
The following examples show to configure an Axiscameratore record video on SD cardornetwork share when the application sends an alarm. Ford detailed information about the different settings, see the Axis product's online help or User Manual.
InsertarSCardtheAxisproductgdaSetupSystemOptionsStoragertheAxisproduct'swebpagesand configuretheproducttouseanetworkshare.
- InstallandconfigureAXISFenceGuard.
OptionallygdSetupVidedAudioStreamProfilesandcreatestreamprofileusforecording.
AddSetupEventsActionRulesandClickAddcreatenewactionrule.
Bonth Triggeredrop-downlistselectApplicationsandtheselectbneFenceGuarprofile.
Configure the settings required. For example, only record video during certain time periods select Schedule.
UndeActionsselectRecordVidedfromthTypdrop-downlist.
-
Selectthestreamprofileandstoragedevicetouseandconfigurethepre-andpost-triggertimes.
-
MakesurethattheruleisenabledandthenclickOK.
Ifusing multiple profiles, create one action rule to foreach profile.
Note
To appear the Triggerist the application must start and start status must be done. Running.
- TRADEMARKACKNOWLEDGMENTS
- CONTACTINFORMATION
- SUPPORT
- LEARNMORE
- APPLICATIONOVERVIEW
- REQUIREMENTS
- CONSIDERATIONS
- INSTALLAPPLICATION
- NOTE
- INSTALLLICENSE
- STARTANDSTOPTHEAPPLICATION
- CONFIGURETHEAPPLICATION
- PROFILES
- CREATE, EDIT AND DELETE PROFILES
- MULTICHANNELPRODUCTS
- AXISFENCEGUARDSETUP
- THEVIRTUALFENCE
- VIRTUALFENCERECOMMENDATIONS
- SMALLOBJECTS
- SMALLOBJECTSWITHPERSPECTIVE
- PERSPECTIVECALIBRATION
- SMALLOBJECTSWITHOUTPERSPECTIVE
- SHORT-LIVEDOBJECTS
- VISUALCONFIRMATION
- USINGTHEAPPLICATIONINANACTIONRULE
Brand : AXIS
Model : Fence Guard
Category : Security management software