
2 Xperience Acryl 2M - DJ Equipment PRO-JECT - Free user manual and instructions
Find the device manual for free 2 Xperience Acryl 2M PRO-JECT in PDF.


| Product Type | Turntable |
| Drive System | Belt drive |
| Platter Material | Acrylic |
| Cartridge | Ortofon 2M Red |
| Speed Settings | 33 1/3 and 45 RPM |
| Speed Control | Electronic |
| Tonearm Type | Straight, gimbal bearing |
| Effective Tonearm Length | 9 inches |
| Dimensions (W x H x D) | 450 x 130 x 350 mm |
| Weight | 7 kg |
| Power Supply | AC adapter, 15V DC, 500mA |
| Supplied Accessories | Dust cover, platter felt mat, RCA cables, power supply, counterweight |
| Isolation Feet | Sorbothane damping feet |
| Anti-skating | Yes, adjustable |
| VTA Adjustment | No (fixed) |
| Cleaning Instructions | Use a soft, lint-free cloth; avoid liquids. Clean stylus with a brush. |
| Safety Warnings | Do not expose to moisture or extreme temperatures. Unplug when not in use. |
| Spare Parts Availability | Stylus (Ortofon 2M Red), drive belt, counterweight |
| Warranty | 2 years |
Frequently Asked Questions - 2 Xperience Acryl 2M PRO-JECT
User questions about 2 Xperience Acryl 2M PRO-JECT
0 question about this device. Answer the ones you know or ask your own.
Ask a new question about this device
Download the instructions for your DJ Equipment in PDF format for free! Find your manual 2 Xperience Acryl 2M - PRO-JECT and take your electronic device back in hand. On this page are published all the documents necessary for the use of your device. 2 Xperience Acryl 2M by PRO-JECT.
USER MANUAL 2 Xperience Acryl 2M PRO-JECT
Pro-Ject AUDIO SYSTEMS
INSTRUCTIONS FOR USE Pro-Ject 2 Xperience Acryl Pro-Ject 2 Xperience Classic
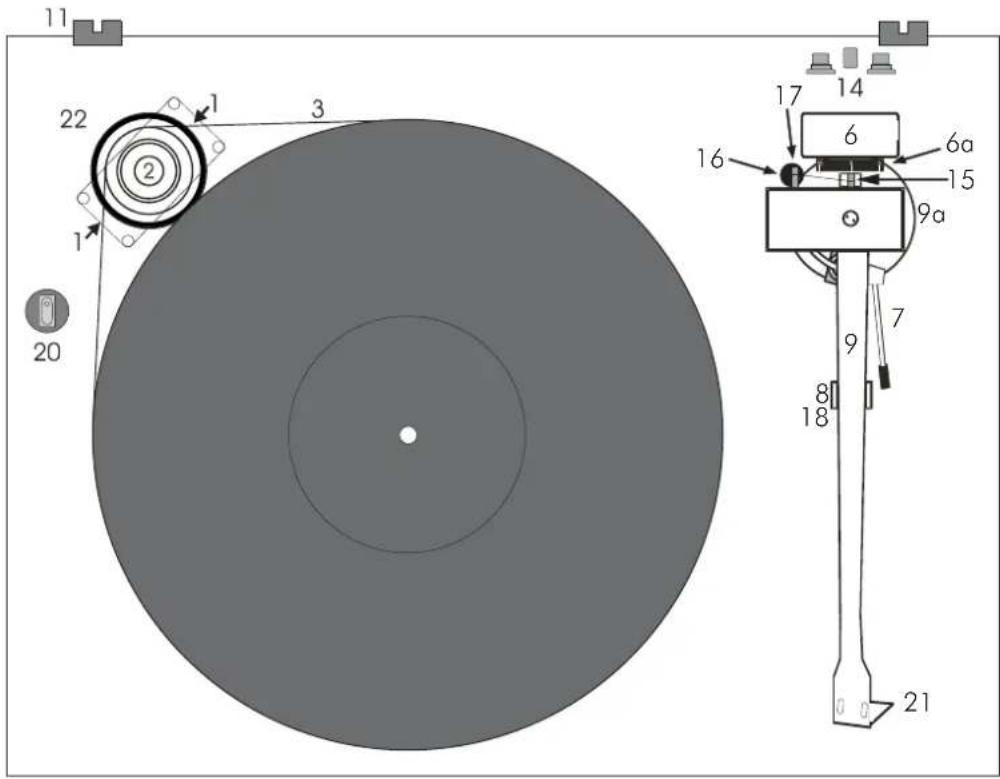
PRO-JECT 2 Xperience Acryl / Classic
Controls, features and connections
1 Motor transport locks
2 Stepped drive pulley
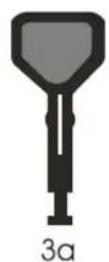
3 Drive belt * 3a Hook *
5 Sandwich platter *
6 Tonearm counterweight * 6a Downforce scale
7 Tonearm lift lever
8/18 Tonearm rest and removable transport lock
9 Tonearm tube 9a Tonearm base
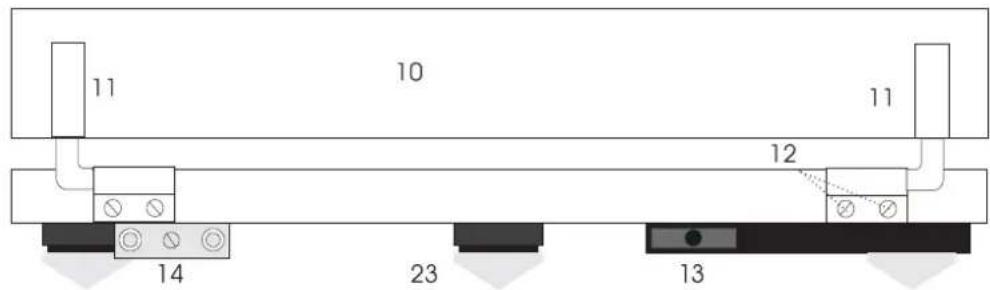
10 Lid *
11 Lid hinges
12 Hinge fasteners
13 Power supply socket
14 Phono output sockets and earth connection
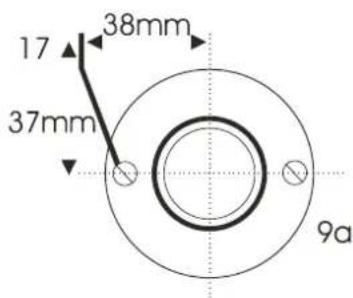
15 Anti-skating weight adjustment scale
16 Anti-skating weight *
17 Anti-skating weight support hoop
20 Power switch
22 Motor
23 Adjustable tip-toe feet with anti-scratch cups *
Screw-down record clamp (not shown) *
Connection cable (not shown) *
Power supply (not shown) *
Single adapter (not shown) *
21 Headshell with finger lift and optional fitted cartridge Ortofon 2M Red
Dear music lover,
thank you for purchasing a PRO-JECT AUDIO record player.
In order to achieve maximum performance and reliability with this record player you should study these instructions for use carefully.

Warning of a hazard for the user, the unit or possible misuse.

Important notice.
The record player is supplied with a factory fitted and adjusted cartridge as an option.
** The following instructions for adjusting the cartridge are provided in case the cartridge is replaced by a different model at a later date.
During assembly and adjustment of the deck small parts could be lost if not carefully placed in a suitable receptacle. Before starting assembly make yourself acquainted with the parts listed above and correspondingly numbered in the technical drawings above. Separately packed items are marked with an asterisk *.
Set-up
Screw the three feet (23) onto the threaded bolts located on the underside of the plinth. Make sure the surface you wish to use the turntable on is level (use a spirit level) before placing the turntable on it.
Remove the two red transport screws (1) which secure the motor (22) during transportation. Carefully place the platter bearing housing over the bearing axle. Level the plinth using a spirit level and the adjustable feet (23).
Fit the drive belt (3) around the platter (5) and the smaller diameter part of the motor pulley (2). Avoid getting sweat or grease on the belt as these will deteriorate the performance and reduce the belt's lifespan. Use absorbent kitchen paper to remove any oil or grease from the outer edge of the platter and the belt.
Remove the transport lock (18) from the tonearm. Store it together with the two motor transport locks (1) in the original packaging so they are available for any future transportation.
Cartridge downforce adjustment
The counterweight (6) supplied is suitable for cartridges weighing between 6 - 10g. Alternative counterweights for cartridges weighing between 11 - 15g, 8 - 11g or 5 - 8g are available as accessory parts. Adjust the downforce prior to installing the anti-skating weight.
Pushing carefully, turn the counterweight (6) onto the rear end of the tonearm tube (9), so that the downforce scale (6a) shows towards the front of the player. Lower the armlift and position the cartridge in the space between arm rest and platter. Carefully rotate the counterweight (6) until the armtube balances out. The arm should return to the balanced position if it is moved up or down. This adjustment must be done carefully. Do not forget to remove the cartridge protection cap if fitted.
Once the arm is correctly balanced return it to the rest. Hold the counterweight (6) without moving it, and gently revolve the downforce scale ring (6a) until the zero is in line with the anti-skating prong (15). Check whether the arm still balances out.
Rotate the counterweight counter clockwise (seen from the front) to adjust the downforce according to the cartridge manufacturer's recommendations. One mark on the scale represents 1 mN (= 0,1g / 0,1 Pond) of downforce.
Adjusting the vertical tracking angle (vta)
** Put a record and the record weight on the platter. When the needle is lowered into the record groove and the tonearm is not resting on the lift arm, the tube of the tonearm should be parallel to the surface of the record.
If it is not loosen both hexagon screws in the tonearm base just enough to allow vertical movement of the arm pillar without force and slide the arm up or down until it is parallel.
Carefully retighten the hexagon screws without applying excessive force (which would deform the arm pillar) – finger tight is quite sufficient.
Adjusting the azimuth
** The cartridge needle must be vertical in the record groove in order to trace the groove wall modulations correctly.
A small screw at the bearing end of the arm allows incorrect azimuth to be corrected if your needle is not mounted exactly perpendicular to the cartridge body (which is often the case).
Slacken off the screw just enough to be able to revolve the arm tube without applying force. Please note: do not remove the screw completely!
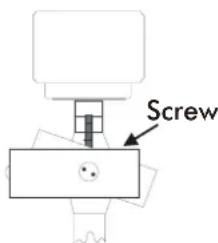
With the aid of a good magnifying glass adjust the needle until it is vertical in the groove (i.e. perpendicular to the record's surface). Ideally this should correspond to the top surface of the cartridge body being parallel to the record surface.
When you are satisfied that the needle is vertical retighten the screw carefully.

Under no circumstances should the arm tube be adjusted with the needle still in the record groove! Irreparable damage may be caused to the cantilever suspension! The arm must be lifted to make each adjustment and lowered afterwards to check it.
Anti-skating force adjustment
The anti-skating force must be adjusted corresponding to the downforce as follows:
| Downforce | Groove in the stub (15) | ||||
| 10 - 14mN | 1 | st from bearing rings | |||
| 15 - 19mN | 2 | nd | II | II | II |
| 20mN and bigger | 3 | rd | II | II | II |
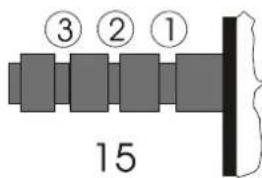
Hang the loop of the thread of the anti-skating weight in the groove of the anti-skating stub (15) corresponding to the downforce applied to your cartridge and feed the thread through the loop of the wire support (17).
Connection to the amplifier
The PRO-JECT 2 Xperience has gold plated female RCA phono sockets (14) so you can substitute the interconnect cables supplied with those of your choice for connection to the amplifier if you wish. Your dealer can advise you on alternative cables. Use the Phono input (sometimes labelled gram, disc or RIAA) on your amplifier. Make sure that the phono input offers correct matching and amplification for the type of cartridge used. Line inputs (such as CD, Tuner, Tape or Video) are not suitable.
Take care to connect the left and right channels correctly. The right channel is usually marked red, the left channel black or white. Check the manual supplied with your amplifier for relevant information. An earthing wire may be connected to the screw terminal between the sockets if you encounter hum problems when using the record player.
If your amplifier does not have an input suitable for phono cartridges you will require a separate phono amplifier stage for MM or MC cartridges such as the PRO-JECT PHONO BOX or the PRO-JECT TUBE BOX which is then connected between the record player and a free line level input of the amplifier.
For detailed product information please refer to the Pro-Ject web site www.project-audio.com.
Mains power connection
The turntable is supplied with a power supply suitable for your country's mains supply. Check the label before connecting to ensure compliance with the mains rating in your house.
Connect the low voltage plug from the power supply to the socket (13) on the rear of the record player before connecting the power supply to the mains.
Fitting the lid
Fit the lid (dust cover 10) carefully over the hinge prongs and adjust the screws (12) until the lid stays open where you want it to without being too stiff to open or close.
Switching on and off
Pressing the power switch (20) alternately starts or stops the motor.
Changing replay speed
To play records at 45 r.p.m. first remove the platter (5). Using the accessory tool provided (3a), hook the belt (3) over the larger diameter part of the motor pulley (2). Refit the platter. To revert to 33,33 r.p.m. repeat the proceedings using the smaller step on the pulley.

When the Pro-Ject Speed Box ore the Speed Box SE are used speed change between 33 and 45 r.p.m. is electronic. There is no need to move the belt manually.
For detailed product information please refer to the Pro-Ject web site www.project-audio.com.
Maintenance and cleaning
Your record player requires little or no regular maintenance. Remove dust with a slightly moistened antistatic cloth. Never use a dry cloth because this will create static electricity which attract more dust! Antistatic cleaning fluids are available at specialist stores but must be applied sparingly to avoid damage to rubber parts. It is recommended to fit the needle cover before cleaning or maintenance is carried out to avoid damage.
If the player is not used over a long period of time the drive belt can be removed to prevent unequal stretching.

Always disconnect the record player from the mains power supply as a precaution before maintenance!
Fitting and connecting the cartridge
** All cartridges with half inch mounting holes can be fitted. Leaving the needle's protection cover on, fit the cartridge to the headshell using the screws supplied with the cartridge by passing one screw through each slot in the headshell (21). Do not tighten the nuts yet.
Connect the tonearm wires to the cartridge pins as follows:
white left channel positive (L+)
red right channel pos. (R+)
green right channel return (R -)
blue left channel return (L-)
The full sound quality of the record player can only be achieved if the cartridge is correctly adjusted. Particular tools like the PRO-JECT alignment tool are required to accomplish this job properly.
If you are not well acquainted with the adjustment of cartridges you are advised to call upon the willing help of your PRO-JECT dealer to accomplish this task for you.

The finger lift (21) must be fitted on top of the headshell under the cartridge fixing bolts or nuts - not between headshell and cartridge body.
Please note: adjusting a cartridge and tonearm calls for the greatest care in order to avoid damaging the cartridge or tonearm bearings. Leave this work to your dealer if you are in any way unsure of the necessary steps and precautions to be taken.
Useful tips
The lid is not only a dust cover but also a resonant structure likely to be excited by, and to pass into the plinth, the acoustic energy emanating from your loudspeakers during replay. It is therefore recommended that the lid be removed for optimum sound quality.
The record player should be positioned on a low-resonance surface such as wood or multiple layer ply board to avoid structural vibrations disturbing replay.
Technical specifications PRO-JECT 2 Xperience Acryl / Classic
Nominal speeds 33,33/45,11 r.p.m.
Speed variance ±0,5%
Wow and flutter ±0,08 %
Signal to noise -70dB
Downforce range 10-30mN
Effective tonearm length 9" (230mm)
Overhang 18mm
Power consumption 2W
Outboard power supply 16V/500mA AC, suitable for your country's mains supply
Dimensions (W x H x D) / Acryl 460 x 133 x 360mm, dust cover open 460 x 390 x 460mm
Dimensions (W x H x D) / Classic 460 x 160 x 360mm, dust cover open 460 x 417 x 460mm
Weight 7,6kg
Technical specifications MM-Cartridge Ortofon 2M Red
Frequency range 20-22.000Hz
Channel separation 22dB/1kHz
Output voltage 5,5mV
Recommended load resistance 47kohms/amplifier connection – MM-input
Compliance/stylus type 20μm/mN – elliptical
Recommended tracking force 18mN
Weight 7,2g
Potential incorrect use and fault conditions
PRO-JECT turntables are manufactured to the highest standards and undergo strict quality controls before leaving the factory. Faults that may possibly occur are not necessarily due to material or production faults but can sometimes be caused by incorrect use or unfortunate circumstances. Therefore the following list of common fault symptoms is included.
The platter doesn't turn although the unit is switched on:
The unit is not connected to the mains power supply.
No mains at the socket.
Drive belt is not fitted or has slipped off.
No signal through one or other channel or both channels:
No signal contact from the cartridge to the internal tonearm wiring or from that to the arm lead or from that to the phono box or between that and the amplifier. This could be due to a faulty plug, broken wire or solder joint or simply loose plug/socket connection.
Phono input not selected at amplifier.
Amplifier not switched on.
Amplifier or speakers defective or muted.
No connection to the loudspeakers.
Strong hum on phono input:
No earth connection from cartridge or arm or arm cable to amplifier, or earth loop.
Distorted or inconsistent sound from one or both channels:
Record player is connected to wrong input of amplifier, or MM/MC switch incorrectly set.
Needle or cantilever damaged.
Wrong r.p.m., drive belt overstretched or dirty, platter bearing without oil, dirty or damaged.
Service
Should you encounter a problem which you are not able to alleviate or identify despite the above information, please contact your dealer for further advice. Only when the problem cannot be resolved there should the unit be sent to the responsible distributor in your country.
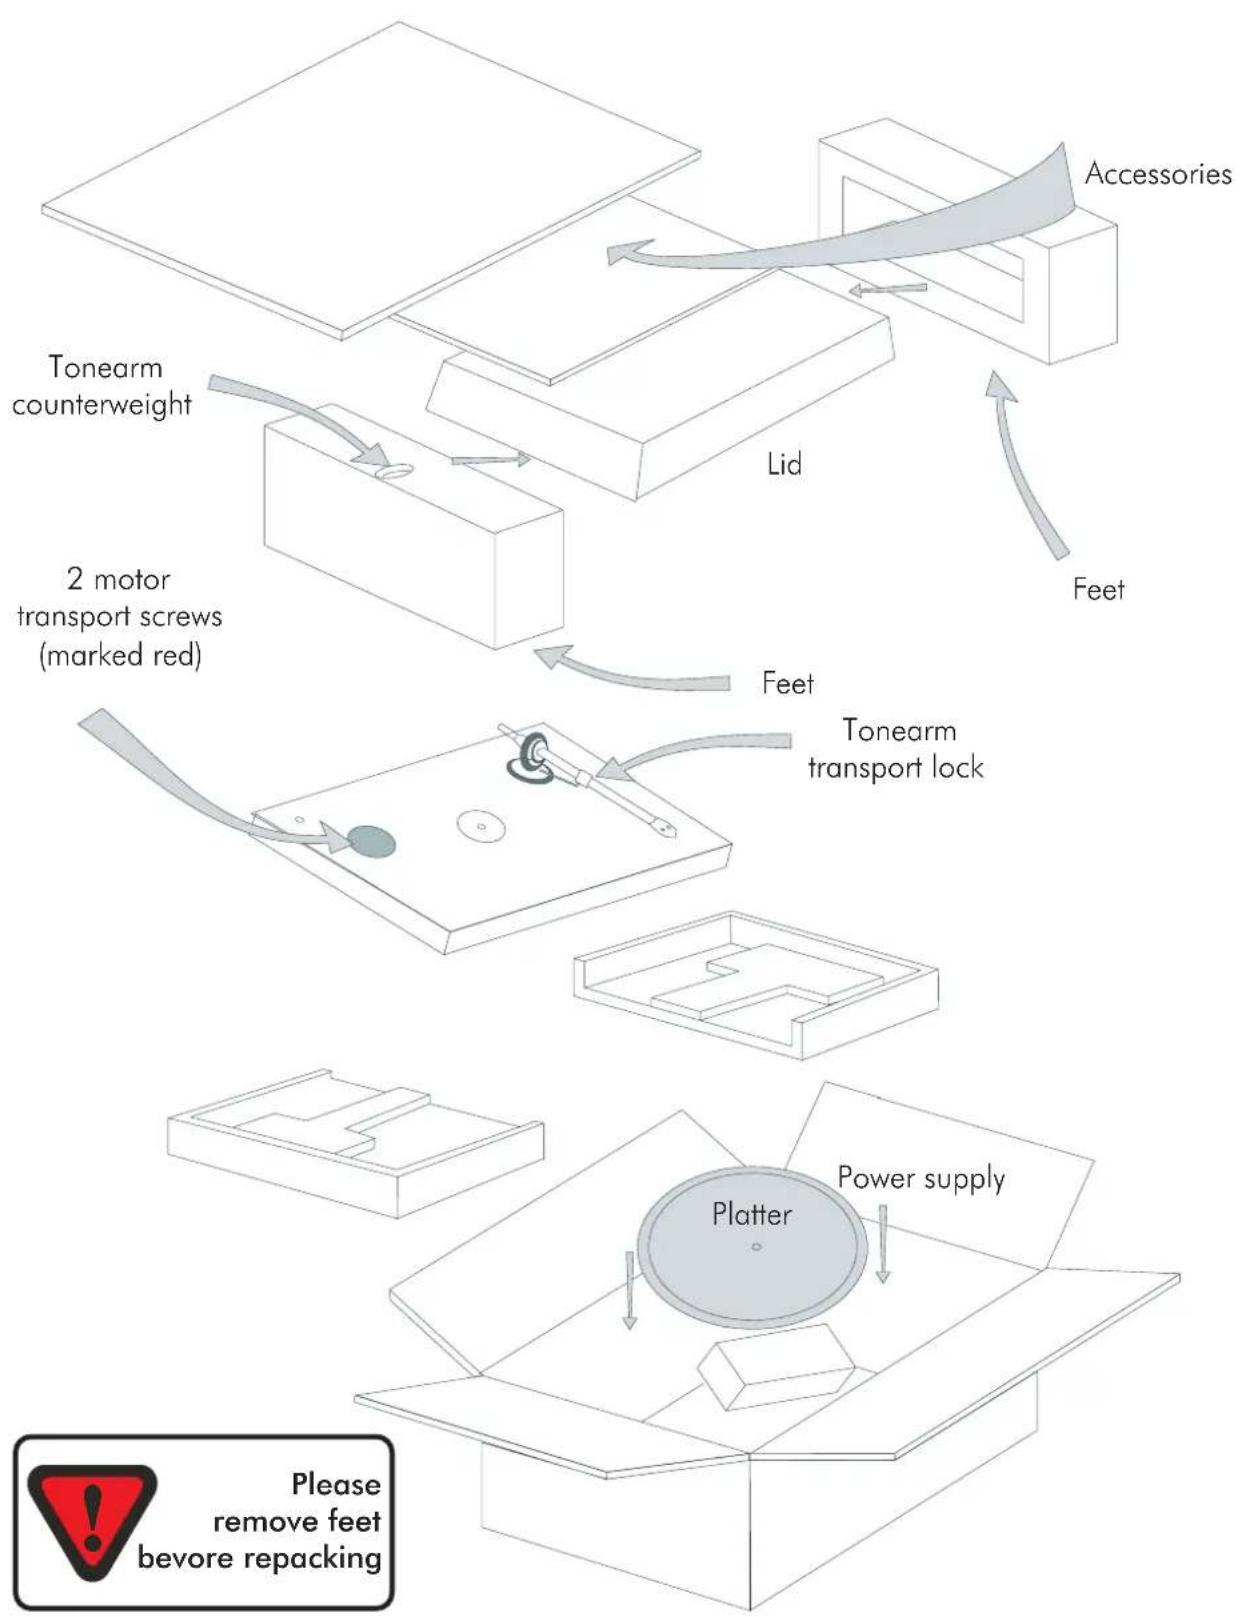
Guarantee repairs will only be effected if the unit is returned correctly packaged. For this reason we recommend keeping the original packaging.
Never return a record player without making sure that is it safely disassembled and correctly packaged in the original packaging according to the diagrams on the last page of this user guide. Please remove these parts and pack them separately: lid (10), counterweight (6), anti-skating weight (16) platter (5), cartridge and belt (3). Fit the cartridge protection cap. Insert the transport locks for the motor (1) and the transport lock for the tonearm (18) prior to carefully packaging the record player.
Warranty

The manufacturer accepts no responsibility for damage caused by not adhering to these instructions for use and/or by transportation without the original packaging. Modification or change to any part of the product by unauthorized persons release the manufacturer from any liability over and above the lawful rights of the customer.
PRO-JECT is a Registered Trademark of H. Lichtenegger.
This guide was produced by: Audio Trade GmbH Copyright © 2009. All rights reserved.
The information was correct at the time of going to press. The manufacturer reserves the right to make changes to the technical specification without prior notice as deemed necessary to uphold the ongoing process of technical development.
flowchart
graph TD
    A["Accessories"] --> B["Lid"]
    B --> C["Feet"]
    C --> D["Tonearm counterweight"]
    D --> E["2 motor transport screws (marked red)"]
    E --> F["Feet"]
    F --> G["Tonearm transport lock"]
    G --> H["Platter"]
    H --> I["Power supply"]
    I --> J["Please remove feet before repacking"]
- Pro-Ject AUDIO SYSTEMS
- PRO-JECT 2 Xperience Acryl / Classic
- Controls, features and connections
- Set-up
- Cartridge downforce adjustment
- Adjusting the vertical tracking angle (vta)
- Adjusting the azimuth
- Anti-skating force adjustment
- Connection to the amplifier
- Mains power connection
- Fitting the lid
- Switching on and off
- Changing replay speed
- Maintenance and cleaning
- Fitting and connecting the cartridge
- Useful tips
- Technical specifications PRO-JECT 2 Xperience Acryl / Classic
- Technical specifications MM-Cartridge Ortofon 2M Red
- Potential incorrect use and fault conditions
- The platter doesn't turn although the unit is switched on:
- No signal through one or other channel or both channels:
- Strong hum on phono input:
- Distorted or inconsistent sound from one or both channels:
- Service
- Warranty
Brand : PRO-JECT
Model : 2 Xperience Acryl 2M
Category : DJ Equipment