RB1 - Home trainer Horizon Fitness - Free user manual and instructions
Find the device manual for free RB1 Horizon Fitness in PDF.


| Product Type | Recumbent Exercise Bike |
| Assembled Dimensions | 50 x 25 x 45 inches (L x W x H) |
| Assembled Weight | 100 lbs |
| Maximum User Weight | 300 lbs |
| Power Source | 2 AA batteries (console) / Optional AC adapter (6V DC) |
| Resistance System | Magnetic, 16 levels |
| Programs | 9 preset programs (Manual, Fat Burn, Cardio, Hill, etc.) |
| Display Features | Time, Distance, Speed, Calories, Pulse, RPM |
| Heart Rate Monitoring | Built-in hand pulse sensors |
| Seat Adjustment | Adjustable fore-aft; padded seat with lumbar support |
| Pedal Type | Oversized with adjustable straps |
| Transport Wheels | Yes, front-mounted |
| Water Bottle Holder | Included |
| Maintenance | Wipe with damp cloth; periodically check pedal and seat bolts |
| Safety Features | Stabilizer feet; emergency stop (pull pin on resistance knob) |
| Spare Parts Availability | Contact Horizon Fitness or authorized dealers for service parts |
| Warranty | Lifetime frame, 2 years mechanical, 1 year electronics |
| Product Manual | Free download on notice-facile.com |
Frequently Asked Questions - RB1 Horizon Fitness
User questions about RB1 Horizon Fitness
0 question about this device. Answer the ones you know or ask your own.
Ask a new question about this device
Download the instructions for your Home trainer in PDF format for free! Find your manual RB1 - Horizon Fitness and take your electronic device back in hand. On this page are published all the documents necessary for the use of your device. RB1 by Horizon Fitness.
USER MANUAL RB1 Horizon Fitness
381 owner's guide1.0.qxd 7/3/2009 5:35 PM Page 1
Get it fixed, at your home or ours!
Your Home
For repair-in your home-of all major brand appliances, lawn and garden equipment, or heating and cooling systems, no matter who made it, no matter who sold it!
For the replacement parts, accessories and
owner's manuals that you need to do-it-yourself
For Sears professional installation of home appliances
and items like garage door openers and water heaters.
1-800-4-MY-HOME 20 (1-800-489-4663)
Call anytime, day or night[U.S.A. and Canada]
www.sears.com WWW.sears.ca
Our Home
For repair of carry-in items like vacuums, lawn equipment,
and electronics, call or go on-line for the location of your nearest
Sears Parts & Repair Center.
1-800-488-1222
Call anytime, day or night (U.S.A. only)
www.sears.com
To purchase a protection agreement (U.S.A.)
or maintenance agreement (Canada) on a product serviced by Sears:
1-800-827-6655 (U.S.A.)
1-800-361-6665 (Canada)
natural_image
Line drawing of a stationary exercise bike with adjustable arms and legs (no text or symbols)OWNER'S GUIDE
3B1 owner's guide1.0.qxd 7/3/2003 5:35 PM Page 2


361 owner's guide1.0.qxd 7/3/2009 5:15 PM Page 0
MONTHLY LOG SHEET
| MONTH _ MONTHLY GOAL: _ | |||
| WEEK # | DISTANCE | CALORIES | TIME |
| MONTHLY TOTALS | |||
| MONTH _ MONTHLY GOAL: _ | |||
| WEEK # | DISTANCE | CALORIES | TIME |
| MONTHLY TOTALS | |||
TABLE OF CONTENTS
| SAFETY INSTRUCTIONS & WARRANTY | 3 |
| GETTING STARTED/POWER | 7 |
| MOVING | 8 |
| KNOW YOUR BIKE | 9 |
| QUICK START UP | 10 |
| PROGRAMMING | 11 |
| DISPLAY | 12 |
| USING YOUR ADVENTURE PROGRAM | 14 |
| USING YOUR RACE PROGRAM | 15 |
| CHOOSING A PROGRAM, RESISTANCE, TIME,WEIGHT & FINISH A WORKOUT | 16 |
| PROGRAM PROFILES | 17 |
| PROGRAM CHARTS | 19 |
| MONITORING YOUR HEART RATE | 22 |
| PULSE Zone* CHART & | |
| USING YOUR PULSE ZoneTM PROGRAM | 23 |
| TROUBLESHOOTING | 24 |
| COMMON PRODUCT QUESTIONS | 26 |
| EXERCISE GUIDELINES | 27 |
| ROUTINE MAINTENANCE | 28 |
| DEVELOPING A FITNESS PROGRAM & WARM UP & COOL DOWN | 30 |
| ACHIEVING YOUR FITNESS GOALS | 31 |
| WEEKLY LOG SHEET | 32 |
| MONTHLY LOG SHEET | 33 |

CAUTION
Read all precautions and instructions in this manual before using this equipment. Save this manual for future reference.
361 yoner's guide1.0.qkd 7/3/2009 5:15 PH Page 4
IMPORTANT SAFETY INSTRUCTIONS
SAVE THESE INSTRUCTIONS
When using an electrical product, basic precautions should always be followed. Send all instructions.
before using this exercise product.

WARNING!
To reduce the risk of bums, fire, electrical shock or injury to persons:
• Use this exercise product for its intended use as described in this owner's
guo.
Do not use amendments not recommended by the manufacturer.
+ Never crop or insert any object into any opening
* Do not remove the bike's side covers. Service should be per
formed only by an authorized service provider.
- Never operate the side if it has a damaged cord or plug, it is
Is not working properly, if it has been damaged, or immersed in water.
• Kamp the euro euro, from Hamman surplus.
• Do not use condors
* Only use the power cord provided with your bike.
- Never place the power cord under carpeting or place any object on top of the
power core, which may pinch or damage.
• Unplug your bike before moving it
WEEKLY LOG SHEET
| WEEK #____ WEEKLY GOAL:____ | |||||
| DAY | DATE | DISTANCE | CALORIES | TIME | COMMENTS |
| SUN | |||||
| MON | |||||
| TURS | |||||
| WED | |||||
| THUR | |||||
| FRI | |||||
| SAT | |||||
| WEEKLY TOTALS | |||||
| WEEK #____ WEEKLY GOAL:____ | |||||
| DAY | DATE | DISTANCE | CALORIES | TIME | COMMENTS |
| SUN | |||||
| MON | |||||
| TUES | |||||
| WED | |||||
| THUR | |||||
| FRI | |||||
| SAT | |||||
| WEEKLY TOTALS | |||||
3
Core Series
Core Series
32
361 owner's guide1.0.qxd 7/3/2009 5:30 PM Page 5
ACHIEVING YOUR FITNESS GOALS
An important step in developing a long term Finance program is to determine your goals. Is your primary goal for exercising on your side to lose weight. Improve muscle? Born Stress? Prepare for the spring riding schedule? Knowing what your goals are will help you develop a more successful exercise program. Below are some common exercise goals:
- Weight Loss
- Improve Body Shape and Tone
- Increased Energy Level
- Improved Sport Performance
-
Improved Cardiovascular Endurance
-
Weight Maintenance
- Strengthen Leg Muscles
- Improved Sleep Patterns
- Strua Reduction
If possible try to define your personal goals in practice, measurable terms, and then put your goals in writing. The more specific you can be, the easier it will be to track your progress if your goals are long-term, divide them up into monthly and weekly segments. Longer term goals can lose some of the immediate motivation benefits. Short term goals are easier to achieve. Your bite conceive provides you with several readouts that can be used to record your progress. You can track Distance, Calories or Time. Time is the most important and useful of test functions.
KEEPING AN EXERCISE DIARY
Photopy the weekly and monthly log sheets on the following pages to make your personal exercise log book. As time goes by you'll be able to look back with pride at the work you've done. As your fitness improves, you can look back and see how far you've come.
OTHER SAFETY TIPS FOR YOUR BIKE

CAUTION!
• If you experience Chad pains, noons, dizziness or shortness of breath, stop
exercising immediately and consult your physician before continuing.
* Do not turn padel orna by hand.
- Do not wear clothing that might catch on any part of the bike.
• Make sure horolators are secure before each use.
- Read the owner's guide before operating this bike.
- Maintain a comfortable poor. Do not 'spint' above 125 rows on this machine.
* To maintain balance it is recommended to keep a grip on the
bendebars while exercising, mounting or dismounting the machine.
OPERATION
It is essential that your blue is used only indoors, in a climate controlled room. If your blue has been
exposed to colder temperatures or high moisture climates, it is strongly recommended that the bike-
is wanted up to room temperature before first time was. Failure to do so may cause premature slus-
tronic failure.
CHILDREN
- Keep children off of your bike at all times.
- When the bise is in use, young children and pets should be kept at least 10 feet away.
CLEANING
* Clean with soap and slightly damp cloth only. Never use solvents.
3B1 owner's guide=1.0.qsd 7/3/2009 5:05 PM Page 6
CONGRATULATIONS! en choosing a CFS bike.
You've taken an important step in developing and sustaining on exercise program. Your bike is a tremendously effective tool for achieving your personal fitness goals. Regular use of your bike can improve the quality of your life in so many ways.
Here are just a few of the health benefits of aerobic exercise.
• Weight Loss
• A Healthier Heart
* Improved Muscle Tons
• Increased Daily Energy Levels
+ Reduced Stress
• Help In Countering Anxiety
and Depression
* An Improved Self Image
The key to reaping these benefits is to develop the exercise habit. Your new bike will help you eliminate the obstacles that prevent you from getting in your exercise time. Indement weather and dorminess won't interfere with your workout when you use your bike in the comfort of your home. This manual provides you with basic information for using and enjoying your new bike. A more complete knowledge of your new bike will make you in running your goal of a healthy lifestyle.

CAUTION: BEFORE BEGINNING ANY EXERCISE PROGRAM, ALWAYS CONSULT YOUR PHYSICIAN. IF YOU EXPERIENCE CHEST PAINS, NAUSEA, DIZZINESS OR SHORTNESS OF BREATH, STOP EXERCISING AND CONSULT YOUR PHYSICIAN BEFORE CONTINUING.
IMPORTANT: PLEASE READ BEFORE USE!
ASSEMBLY
CAUTION! There are several acres during the assembly process of a bike that special attention must be paid. It is very important to follow the assembly instructions correctly and to make sure all parts are firmly tightened. If the assembly instructions are not followed correctly, the bike could have frame parts that are not tightened and will soon loose and may cause limiting notices. To prevent damage to the bike, the assembly instructions must be reviewed and corrective actions should be taken.
DEVELOPING A FITNESS PROGRAM
STRETCH FIRST
Before using your product, it is best to take a few minutes doing a few gentle stretching exercises. Stretching prior to exercise will improve flexibility and reduce changes of exercise related injury. Base into each of these stretches with a few gentle motion. Do not stretch to the point of pain. Make sure not to bounce while doing these stretches.
WALL PUSH
Stand near a wall with the toes of one foot about 18" from the wall, and the other foot about 12 behind the other foot. Learn forward, pushing against the wall with your palms. Keep your back flat and hold this position for a count of 15 seconds. Make sure that you do not bounce while stretching. Alternate positions of your feet and repeats for a total of 8 repetitions.
STANDING QUADRICEPS STRETCH
Using a wall to provide balance, grasp your left ankle with your left hand and hold your feet against the back of your thigh for a count of 1.5 seconds. Respect with your right ankle and hand, and continue alternating for a total of 8 repetitions.
SEATED TOE TOUCH
Sit on the floor with your legs together and straight out in front of you. Do not lock your knees. Extend your fingers: rewards your toes and hold for a count of 15 seconds, make sure that you do not bounce while stretching. So upright again. Repeat for a total of 8 repetitions.
THE IMPORTANCE OF WARM UP AND COOL DOWN
WARM UP
The first 2 to 5 minutes of a workout should be devoted to warming up. The warm-up will limber your muscles and prepare them for more strenuous exercise. Make sure that you warm-up on your product at a slow pace.
COOL DOWN
Never stop exercising suddenly. A cool-down period allows your heart to receive to the decreased demand. Make sure that your cool down period consists of a very slow pace to allow your heart rate to leave. After the cool-down, repeat the stretching exercises to become and raise your muscles.
5
Core Series
Core Series
30
381 owner's guide1.0.qxd 7/3/2001 5:35 PM Page 1
HOW HARD?
How hard you workout is also determined by your goals. If you use your bike to prepare for a SK room, you will probably work out on a higher intensity than if your goal is general fitness. Regardless of your long term goals, always begin an exercise program at low intensity. Amblot exercise does not have to be painful to be beneficial. There are two ways to prepare your exercise intensity. The first is by maintaining your heart rate (see page 22), and the second is by evaluating your perceived exercise level (this is simpler than it soundful). Notes: Always consult your physician before beginning an exercise program.
PERCEIVED EXERTION LEVEL
The second end expier way to gauge your exercise intensity is to evaluate your perceived exertion level. While exceding if you are too winded to maintain a conversation without gasping, you are working out too hard. A good rule of thumb is to work to the point of exhaustion, not exhaustion. If you cannot catch your breath, it's too to slow down. Always be aware of other warning signs of overextraction.
Before proceeding, find your bike's serial number and model name located on the front support tube below the power jack.
SERIAL NUMBER AND MODEL NAME LOCATION:
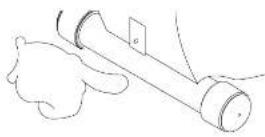
ENTER YOUR SERIAL NUMBER IN BOX BELOW:
Refer to this number when calling for service, and also enter this serial number on your Warranty Card and in your own records. Be sure to read the Safety Instructions and complete Owner's Guide before using your new bike.
WARRANTY REGISTRATION
Your warranty card must be completed and sent to Sears within thirty days of purchase or registered on line at www.sears.com, before a warranty claim can be processed. Please keep receipt with owners' guide as it may be required for a warranty claim. Make sure to send in warranty registration card to valuate your warranty.
ONE YEAR FULL WARRANTY ON PARTS AND LABOR
Contact Sears at 1-800+MY-HOMEN to arrange to how it repainted free of charge.
Sears, Roebuck and Co., Dept. 817WA, Hoffman Estates, IL 60179
29
Core Series
Core Series
6
361 owner's guide1.0.qxd 7/3/2009 5:15 PM Page 0
GETTING STARTED
POWER
Your programmable bike is powered by a power supply. The power supply must be plugged into the power jack, which is located in the front of the machine near the front foot tube.

ROUTINE MAINTENANCE

WHAT KIND OF ROUTINE MAINTENANCE IS REQUIRED?
We use sealed bearings throughout our bikes so lubrication is not needed. The most important maintenance step is to simply wipe your perspiration off the bike after each time.
HOW DO I CLEAN MY BIKE?
Clean with soap and water cleaners only. Never use solvents on plastic parts.
Clearliness of your bike and its operating environment will keep maintenance problems and services calls to a minimum. For this sector, it is recommended that the following preventive maintenance schedule be followed.
Unplug the power cord from the wall outlet.

WARNING!
To remove power from the bike, the power cord must be disconnected from the wall outlet.
• Never use screens, so they can cause damage to the lake.
• Impact the power burn. If the power burn is unreged, certain semi-
* Make sure the power cord is not underneath the bike or in any other area where it can become pinched or cut.
EVERY WEEK
Clean underneath the bike, following these steps
* Unplug the power cord of the wall outlet.
* Move the line to a remote location.
- Wise or vacuum any dust particles or other objects that may have accumulated underneath the
bku.
- Return the blue to its previous position.
EVERY MONTH
* Inspect all assembly belts of the machine for proper rigidity.
7
Core Series
Core Series
28
361 yoner's guide1.0.qkd 7/3/2009 5:15 PH Page 9
EXERCISE GUIDELINES
Always consult your physician before beginning an exercise program.
HOW OFTEN?
The American Heart Association recommends that you exercise at least 3 to 4 days per week to maintain cardiovascular fitness. If you have other goals such as weight or fat loss, you will achieve your goal faster with more frequent exercise. Whether it's 3 days on 6 days, remantern that your ultimate goal should be to make exercise a lifetime habit. Many people are successful staying with a fitness program if they sat said a specific time of day to exercise. It doesn't matter whether it's in the morning before your lesson, during lunch hour or while watching the evening news. What's more important is that it's a time that allows you to keep a schedule, and at time when you won't be interrupted. If you are to be successful with your fitness program, you have to make it a priority in your life. Do decide on a time, pull out your day planer and pencil in your exercise times for the next month!
HOW LONG?
For aerobic exercise benefits, it's recommended that you exercise from between 24 and 32 minutes per session. But short slowly and gradually increase your exercise times, if you've been secretary during the past year, it may be a good idea to keep your exercise times to do little as five minutes initially. Your body will need time to adjust to the new activity. If your goal is weight loss, a longer exercise session at lower intensities has been found to be most effective. A workout time of 48 minutes or more is recommended for best weight loss results.
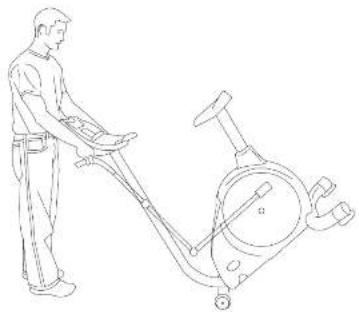
MOVING
Your blue has a pair of transport wheels built into the front of the frame. To move, firmly grasp the vertical seat post and one of the handshare. Carefully lift and roll.
natural_image
Line drawing of a person using an outdoor exercise bike (no text or symbols)
CAUTION! Our blue are well built and heavy, weighing up to 150lbs! Use core and additional help if necessary when moving.
27
Core Series
Core Series
8
381 yoner's guide1.0.qxd 7/3/2009 5:35 PH Page 10
KNOW YOUR CORE BIKE

COMMON PRODUCT QUESTIONS
ARE THE SOUNDS MY BIKE MAKES NORMAL?
Our bikes are some of the quasi-stellar obstacles because they use belt colors and friction-free magnetic resistance. We are the highest grace bearings and belts to minimize noise. However, because the resistance system itself is so quiet, you will occasionally hear after slight mechanical noises. Unlike older, colder technologies, there are no tons, friction belts, or other rotators noise to mock these sounds on our bikes. These mechanical noises, which may or may not be intermittent, are normal and one caused by the transfer of significant amounts of energy to a rapidly spinning flywheel. All bearings, belts and other rotating parts will generate some noise which will transmit through the curing and frame. It is also normal for those sources to change slightly during a workout and over time because of thermal expansion of the parts.
WHY IS THE BIKE I HAD DELIVERED LOUDER THAN THE ONE AT THE STORE?
All Fitness products seem quicker in a large store showroom because there is generally more background noise than in your home. Also, there will be less reverberation on a targeted concrete floor than on a wood overlay floor. Sometimes a heavy rubber net will help reduce reverberation through the floor if a fitness product is placed close to a wall, there will be more reflected noise.
HOW LONG WILL THE DRIVE BELT LAST?
The computer meeting we have done indicated virtually thousands of maintenance free hours. Belts are now commonly used in for more demanding application such as motorcycle drives.
CAN I MOVE THE BIKE EASILY ONCE IT IS ASSEMBLED?
Your bike has a pair of transport wheels built into the front foot, it is easy to move your bike by rolling it on the front transport wheels. It is important that you please your bike in a comfortable and mining room. Your bike is designed to use minimal floor space. Many people will place their bikes facing the TV or a picture window. It is all possible, avoid putting your bike in a unfinished basement. To make exercise a desirable daily activity for you, the bike should be in a attractive setting.
9
Core Series
Core Series
26
381 owner's guide1.0.qxd 7/3/2009 5:30 PM Page 11
PROBLEM: Erotic or Insaturated heart rate Readout.
SOLUTION: Check your exercise environment for sources of interference such as high power lines.
large melon, etc.
You may experience an erroneous readout under the following conditions:
- Gripping the heart rate handles too tight. Try to maintain moderate pressure while holding
into the heart rate handshakers.
- Constant movement and vibration due to constantly holding the heart rate grip while exerting.
- When you are breathing heavily during a workout.
- When your hands are constricted by wearing a ring.
- When your hands are dry or cold. Try increasing your points or crowing them
together to worry.
- Anyone with heavy arrhythmia.
- Anyone with arterioclerosis or peripheral circulation disorder.
- Anyone whose skin on the measuring point is especially thick.
Note: Outside interference sources such as computers, motors and fluorescent lights may cause the heart
Rare floating to be bright.
1-800-4-MY-HOME ® (1-800-469-4663)
Call anytime, day or night(U.S.A. and Canada)
www.sears.com www.sears.ca
Sears Parts & Repair Center.
1-800-488-1222
Call anytime, day or night (U.S.A. only)
Core Series
QUICK START UP
Simply press the "Star" button to begin exercising. The program will automatically default to the Manual program unless another program is selected.
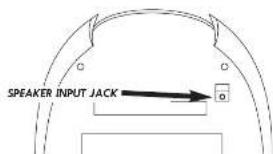
CD/MP3 PLAYER HOLDER

RESET
Press and hold the Stop button to reset the elliptical trainer.
Compatible with AM/FM and cassette, etc.
Core Series
361 yvner's guide1.0.qxd 7/3/2009 5:30 PH Page 12
PROGRAMMING
SELECTING OPTIONAL FEEDBACK
Press the ENTER button on the console to scroll through and view your speed, rpm, or watts and calories.
Remember to gradually slow down your pace before stopping your workout. After you have finished your workout, the console will 'heep' several times to let you know your workout is finished.
TROUBLESHOOTING YOUR BIKE
Your bike is designed to be reliable and maintenance free. However, if you do experience problems with your bike, please reference the troubleshooting guide listed below.
PROBLEM: There is no display on the console.
SOLUTION: Remove the console and verify that the console active is attached properly, making sure that the active is securely inserted into the console.
PROBLEM: The bike makes a squatting or chirping noise.
SOLUTION: Locen oil bolts attached during the assembly process, grease the freeze and fight an again.
PROBLEM: The resistance levels seem to be incorrect, seeming too hard or too easy.
SOLUTION: Reset the console and allow the resistance to reset to the default position. Restart the console and retry the resistance level.
71
Core Series
Core Series
24
381 owner's guide1.0.qxd 7/3/2009 5:30 PM Page 11
PULSE Zone™ CHART
TARGET HEART RATE ZONE
Your 'Target Heart Rate Zone' is a percentage of your maximum heart rate. Target Zones will vary for each individual, depending on age, current level of conditioning, and personal fitness goals. The American Heart Association recommends working out of a 'Target Heart Rate Zone' between 60% and 75% of your maximum heart rate. See the chart below for convenient references. EXAMPLE for a 42-year old user: Find AGE along the bottom of the chart (round to 40), follow AGE column up to the TARGET ZONE BAR. RESULTS: 60% of maximum Heart Rate = 108 Beats Per Minute, 75% of maximum Heart Zone = 135 Beats Per Minute.

USING YOUR PULSE Zone™ PROGRAM
Once the Pulse Zone program is selected, press 'Select'. Using the chart on page 21, determine your target heart rate. Your target heart rate should be out at a number that you will be able to exercise or throughout the majority of your workout. To adjust your target heart rate, press the plus (1) or minus (-) Speed button.
Once you have chosen your target heart rate, press 'Select'. Press the plus (+), or minus (-), speed button to adjust your time. Once you choose your time, press the 'Smart' button and begin your workout. After the 5 minutes warm up period, the elevation level will increase gradually to get the user to the entered target heart rate case. Once the user is at the target heart rate case, plus or minus 5 beats, the elevation level will remain at the current residence level.
If the user is more than 25 beats per minute above the target heart rate zone, the console will shut down for safety reasons.
The last five minutes of the program will begin the cool down period. At this time, the program will gradually decrease the resistance level to give the user a smooth cool down.
23
Core Series
DISPLAY
TIME
Shown on MinutesSeconds. View the time remaining or the time elapsed in your workout.

DISTANCE
Shown as Miles. View the saturated distance during your workout.

CALORIES
Shown as total accumulated calories burned during your workout.

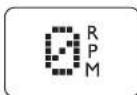
RPM
Shown as Revolutions per Minute. Improve stricing technique while reducing lag muscle fatigue by striting between 60 & 70 RPM.
Core Series
12
381 yoner's guide1.0.qxd 7/3/2003 5:35 PH Page 14
DISPLAY
RESISTANCE
During a workout, the amount of resistance can be adjusted by pressing the plus 'Up' or Down' buttons or the quick resistance keys on the console. The resistance levels very from level 1 to 20 resistance [level 1 being the contact and level 20 being the most difficult].
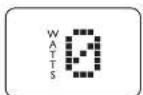
WATTS
A measurement of your expanding energy. May be used to evaluate and quantify your fitness progress over time.
HEART RATE
Shown as Banks per Minute. You can monitor your heart rate on any time during your workout by holding the heart rate grips.
PROFILE
Allows you to show your program intensity while you exercise. Each horizontal row of bars represents 2 resistances level.



MONITORING YOUR HEART RATE
HEART RATE HANDLEBAR
Please the pain of your hands directly on the heart rate handelbers. Both hands must grip the bars for your heart rate to register. When griping the handlebers, do not grip lightly, holding the gross slightly may alleviate your blood pressure. Try to maintain moderate pressure while holding onto the heart rate handlebers. It is recommended that you had the handlebars only long enough to see your heart rate tender on the console. You may experience an erratic readout if consistently holding the handlebers.
WARNING!
The heart rate function is not a medical device. Various factors may affect the accuracy of your heart rate reading. The heart rate reading is intended only as an exercise aid.
13
Core Series
Core Series
22
361 owner's guide1.0.qsd 7/3/2003 5:15 PM Page 15
| Rock CLMB: Time default to 30 minutes | ||||||||||||||||
| 1 | 2 | 3 | 4 | 5 | 6 | 7 | 8 | 9 | 10 | 11 | 12 | 13 | 14 | 15 | 16 | |
| mmol/l | 1 | 2 | 3 | 4 | 5 | 6 | 7 | 8 | 9 | 10 | 11 | 12 | 13 | 14 | 15 | 16 |
| mmol/L | 1 | 2 | 3 | 4 | 5 | 6 | 7 | 8 | 9 | 10 | 11 | 12 | 13 | 14 | 15 | 16 |
| mmHg/L | -1 | 2 | 3 | 4 | 5 | 6 | 7 | 8 | 9 | 10 | 11 | 12 | 13 | 14 | 15 | 16 |
| mmHg/L (mmol/l) | -2 | 2 | 3 | 4 | 5 | 6 | 7 | 8 | 9 | 10 | 11 | 12 | 13 | 14 | 15 | 16 |
| mmHg/L (mmol/L) (mmol/L) (mmol/L) (mmol/L) (mmol/L) (mmol/L) (mmol/L) (mmol/L) (mmol/L) (mmol/L) (mmol/L) (mmol/L) (mmol/L) (mmol/L) (mmol/L) (mmol/L) (mmol/L) (mmol/L) (mmol/L) (mmol/L) (mmol/L)(mmol/L) (mmol/L) (mmol/L) (mmol/L) (mmol/L) (mmol/L) (mmol/L) (mmol/L) (mmol/L) (mmol/L) (mmol/L) (mmol/L) (mmol/L) (mmol/L) (mmol/L) (mmol/L) (mmol/L) (mmol/L) (mmol/L) (mmol/L) | ||||||||||||||||
USING YOUR ADVENTURE PROGRAM
Your Adventure Program is designed to allow you to create your own programming, with the ability to save your program settings for future workouts. To use your Adventure Program, follow these instructions:
-
Once the Adventure Program has been selected, prea 'Enter'.
-
Chees your desired time using the 'Up' or 'Down' buttons and press Enter.
-
Choose your desired resistance using the 'Up' or 'Down' button and press Enter. You will need to select a resistance for all 15 segments, pressing Enter' after much segment.
-
Once you have chosen your desired resistance level for all 15 segments, press 'Start' to begin your program. At this time, your program has been successfully saved into memory, and can be used for future workouts.
-
To see your program information and delete it from memory, prove and hold the 'Enter' button for 5 seconds once you have selected the Adventure Program in the start menu.
-
While using your saved program in the Adventure Program, you are able to adjust the resistance, but any changes will not be saved.
381 owner's guide1.0.qsd 7/3/2003 5:15 PM Page 16
USING YOUR RACE PROGRAM
Your Race Program is designed to add motivations to a workout by allowing you to compete against a selected paper. To use your Race Program, follow these instructions:
-
Choose the Race program by either praising the 'Up' or 'Down' buttons. Press 'Enter'.
-
Choose the desired Pace (average speed) using the 'Up' or 'Down' buttons. There are a total of 16 Pace levels to choose from, ranging from 15mph to 30mph in increments of 1mph, with 15mph being the lowest and 30mph being the highest. Once the desired Pace is selected, press Enter:
-
Choose the desired Distance by pressing the 'Up' or 'Down' button. Press 'Bened'.
-
Choose your weight by pressing the 'Up' or 'Down' buttons. From a 'Enter'.
S. Press 'Short' and begin your Race Program
The time of the program will defeat accordingly to the power coverage speed and distance that you entered. After the Race Program has started, press the 'Up' or 'Down' button or the quick resistance keys to adjust your resistance levels 1-20'. Your goal in this program is to beat the power to the finish line by covering an equal distance at a faster pace.
The top row of bars shows the computer power position. The bottom row of bars indicates your position. If you trail the power, you should pedal at a faster speed to catch and pass the power.
If you beat the power to the finish line, the screen will finish "Line Over" and the program will end. Note: If you beat the power to the finish line, you will complete the program before the projected finish time. If the power beats you to the finish line, the entire program time will slope.
Core Series

Core Series
HILL CLIMB: Time defaults to 30 minutes

AFTER BURNER: Time defaults to 30 minutes

HILL RIDE: Time defaults to 50 minutes

Core Series
CHOOSING A PROGRAM
Press enter. With the program text scrolling, press the arrow keys to scroll through the different program. Press enter to choose your desired program. Once you choose your program, you will see the resistance level scrolling across the screen.
CHOOSING A RESISTANCE
With the resistance test scrolling, press the arrow keys to scroll through the different resistance levels. Press either to choose your desired resistance. Once you choose your resistance, you will use the time scrolling across the screen.
CHOOSING A TIME
With the time test scrolling, press the arrow keys to scroll through the different times. Press enter to choose your desired time. Once you choose your time, press the 'Enter' button to choose your desired weight.
CHOOSING YOUR WEIGHT
With the weight test scrolling, press the arrow keys to scroll through the different weights. Press order to choose your desired weight. Once you choose your weight, press the 'Star' button and begin your workout.
Press the "Stop" button to pause your workout, press and hold to reset your workout. Remember to gradually slow down your pace before stopping or pausing your workout. After you have finished your workout, the console will retain the data from your workout for 45 seconds before resetting.
Core Series
381 yoner's guide1.0.qxd 7/3/2003 5:35 PH Page 10
PROGRAM PROFILES
MANUAL
Customized worksuits, allowing the user to adjust resistance level to the user's preference.
CROSS COUNTRY
Improves your strength, speed, and endurance by raising and lowering the resistance levels throughout your workout to involve both your heart and muscles.
HILL RIDE
Maintains weight by gradually raising and lowering the resistance level to gradually raise and lower your heart rate.
AFTER BURNER
Promoter weight loss by mining and lowering the resistance level, while keeping you in your fat burning zone.
HILL CLIMB
Simulates a gradual hill climb to strengthen your leg muscles and improve your cardiovascular health.
PROGRAM PROFILES
ROCK CLIMB
Improves performance and starting by raising the resistance level to high peaks to simulate the most difficult outdoor terrain.
RACE
A great motivational program for competitive individuals that allows the user to compete with a computer power to the finish line.
PULSE Zone™
Benefits weight lost by maintaining an optimum exercise level to burn fat, while adjusting the exercise to keep you in your target heart rate zone.
ADVENTURE 1 (USER PROGRAM)
Customized workout, time defaults to 30 minutes
ADVENTURE 2 (USER PROGRAM)
Customized workout, time defaults to 30 minutes
17
Core Series
Core Series
18
- Get it fixed, at your home or ours!
- Your Home
- Our Home
- 1-800-488-1222
- www.sears.com
- CAUTION
- IMPORTANT SAFETY INSTRUCTIONS
- SAVE THESE INSTRUCTIONS
- WARNING!
- ACHIEVING YOUR FITNESS GOALS
- - Weight Loss
- KEEPING AN EXERCISE DIARY
- OTHER SAFETY TIPS FOR YOUR BIKE
- CAUTION!
- OPERATION
- CHILDREN
- CLEANING
- IMPORTANT: PLEASE READ BEFORE USE!
- ASSEMBLY
- DEVELOPING A FITNESS PROGRAM
- STRETCH FIRST
- WALL PUSH
- STANDING QUADRICEPS STRETCH
- SEATED TOE TOUCH
- THE IMPORTANCE OF WARM UP AND COOL DOWN
- WARM UP
- COOL DOWN
- HOW HARD?
- PERCEIVED EXERTION LEVEL
- SERIAL NUMBER AND MODEL NAME LOCATION:
- ENTER YOUR SERIAL NUMBER IN BOX BELOW:
- WARRANTY REGISTRATION
- ONE YEAR FULL WARRANTY ON PARTS AND LABOR
- GETTING STARTED
- POWER
- ROUTINE MAINTENANCE
- WHAT KIND OF ROUTINE MAINTENANCE IS REQUIRED?
- HOW DO I CLEAN MY BIKE?
- EVERY WEEK
- EVERY MONTH
- EXERCISE GUIDELINES
- Always consult your physician before beginning an exercise program.
- HOW OFTEN?
- HOW LONG?
- MOVING
- KNOW YOUR CORE BIKE
- COMMON PRODUCT QUESTIONS
- ARE THE SOUNDS MY BIKE MAKES NORMAL?
- WHY IS THE BIKE I HAD DELIVERED LOUDER THAN THE ONE AT THE STORE?
- HOW LONG WILL THE DRIVE BELT LAST?
- CAN I MOVE THE BIKE EASILY ONCE IT IS ASSEMBLED?
- PROGRAMMING
- SELECTING OPTIONAL FEEDBACK
- TROUBLESHOOTING YOUR BIKE
- PULSE Zone™ CHART
- TARGET HEART RATE ZONE
- USING YOUR PULSE Zone™ PROGRAM
- DISPLAY
- TIME
- DISTANCE
- CALORIES
- RPM
- RESISTANCE
- WATTS
- HEART RATE
- PROFILE
- MONITORING YOUR HEART RATE
- HEART RATE HANDLEBAR
- USING YOUR ADVENTURE PROGRAM
- USING YOUR RACE PROGRAM
- CHOOSING A PROGRAM
- CHOOSING A RESISTANCE
- CHOOSING A TIME
- CHOOSING YOUR WEIGHT
- PROGRAM PROFILES
- MANUAL
- CROSS COUNTRY
- HILL RIDE
- AFTER BURNER
- HILL CLIMB
- ROCK CLIMB
- RACE
- PULSE Zone™
- ADVENTURE 1 (USER PROGRAM)
- ADVENTURE 2 (USER PROGRAM)
Brand : Horizon Fitness
Model : RB1
Category : Home trainer