
ILWD37BVL - Wine cellar ILVE - Free user manual and instructions
Find the device manual for free ILWD37BVL ILVE in PDF.


| Product Type | Wine Cellar |
| Brand | Ilve |
| Model | ILWD37BVL |
| Installation Type | Freestanding |
| Bottle Capacity | 37 bottles |
| Number of Temperature Zones | 1 (Single Zone) |
| Temperature Range | 5°C – 18°C |
| Thermostat Control | Digital |
| Cooling System | Compressor |
| Noise Level | 42 dB |
| Dimensions (H x W x D) | 82 cm x 59 cm x 57 cm |
| Weight | 35 kg |
| Power Supply | 220-240 V / 50 Hz |
| Energy Consumption | 150 kWh/year |
| Interior Light | LED |
| Door Type | Glass door with UV protection |
| Shelf Material | Wooden |
| Number of Shelves | 5 |
| Adjustable Shelves | Yes |
| Lock | Yes |
| Reversible Door | Yes |
| Defrost Type | Automatic |
| Climate Class | SN-ST |
| Refrigerant | R600a |
| Compressor Warranty | 2 years |
| Cleaning and Maintenance | Clean interior with mild detergent; vacuum condenser coils regularly |
| Safety Precautions | Do not block ventilation openings; keep away from heat sources |
| Spare Parts Availability | Contact authorized Ilve dealers |
Frequently Asked Questions - ILWD37BVL ILVE
User questions about ILWD37BVL ILVE
0 question about this device. Answer the ones you know or ask your own.
Ask a new question about this device
Download the instructions for your Wine cellar in PDF format for free! Find your manual ILWD37BVL - ILVE and take your electronic device back in hand. On this page are published all the documents necessary for the use of your device. ILWD37BVL by ILVE.
USER MANUAL ILWD37BVL ILVE
To ensure proper use of this appliance and your safety, please read the following instructions completely before operating this appliance.
Version number : V20200615
WARNING
Before the appliance is used, it must be properly positioned and installed as described in this manual. So read the manual carefully. To reduce the risk of fire, electric shock or injury when using the appliance, follow basic precautions.
To avoid a hazard due to instability of the appliance, if must be fixed in accordance with the instructions.
SAFETY PRECAUTIONS
- Carefully inspect the appliance. If you discover any faults, stop the installation and contact the vendor.
- In the event that the appliance is damaged on delivery, contact the supplier immediately.
- The packaging material is recyclable and is marked with a recycling symbol. For disposal, follow the local regulations. Packaging materials (plastic bags, polystyrene parts, etc.) must be kept out of the reach of children, because they present a possible source of danger.
- When disconnecting the appliance, pull on the plug, not on the cable.
- Any repairs and work on the appliance should only be carried out by the customer service department, as unauthorized work could prove highly dangerous for the user. The same applies to changing the power cable. If the supply cord is damaged, it must be replaced by the manufacturer, its service agent or similarly qualified persons in order to avoid a hazard.
- Do not stand on the base, drawers or doors or use them to support anything else.
- Do not allow flames or sources of ignition to enter the appliance. When transporting and cleaning the appliance, ensure that the refrigerant circuit is not damaged. In the event of damage, make sure that there are no ignition sources nearby
- Keep the room well ventilated.
- This appliance is not intended for use by persons (including children) with reduced physical, sensory or mental capabilities or lack of experience and knowledge unless they have been given initial supervision or instruction concerning use of the appliance by a person responsible for their safety. Children should be supervised to ensure that they do not play with the appliance.
- Do not store explosives or sprays using combustible propellants such as butane, propane, pentane, etc., in the appliance.
- Electrical components might cause leaking gas to ignite. You may identify such sprays by the printed contents or a flame symbol.
- Do not use electrical devices inside the appliance.
- Before you throw away your old appliance: Take off the door. Leave the parts in place so that children may not easily climb inside.
- When disposing of your appliance, please choose an authorized disposal site.
- This appliance is equipped with a power cord having a grounding wire with a grounding plug. The plug must be plugged into an outlet that is properly installed and grounded
- Do not under any circumstances cut or remove the third (ground) prong from the power cord.
- Do not use an adapter plug with this appliance.
- If the supply cord is damaged, it must be replaced by the manufacturer, its service agent or similarly qualified persons in order to avoid a hazard.
- This appliance is intended to be used in household and similar applications such as:
-staff kitchen areas in shops, offices and other working environments;
-farm houses and by clients in hotels, motels and other residential type environments;
-bed and breakfast type environments;
-catering and similar non-retail applications. - WARNING: Keep ventilation openings, in the appliance enclosure or in the built-in structure, clear of obstruction.
- WARNING: Do not use mechanical devices or other means to accelerate the defrosting process, other than those recommended by the manufacturer.
- WARNING: Do not damage the refrigerant circuit.
- WARNING: Do not use electrical appliances inside the food storage compartments of the appliance, unless they are of the type recommended by the manufacturer.
ATTENTION
If the appliance is transported in a horizontal position, the oil from the compressor may leak into the cooling circuit. For this reason, allow the appliance to rest in a vertical position for 12 hours before turning it on, so that the oil flows back into the compressor.
Remove the external packaging, remove the protective plastic film from the surface of the appliance (if used) and clean the external parts of the appliance with a cleaner designed for this purpose. Do not use steel wool or any coarse agents, which could irreparably damage the surface of the appliance.
IMPORTANT
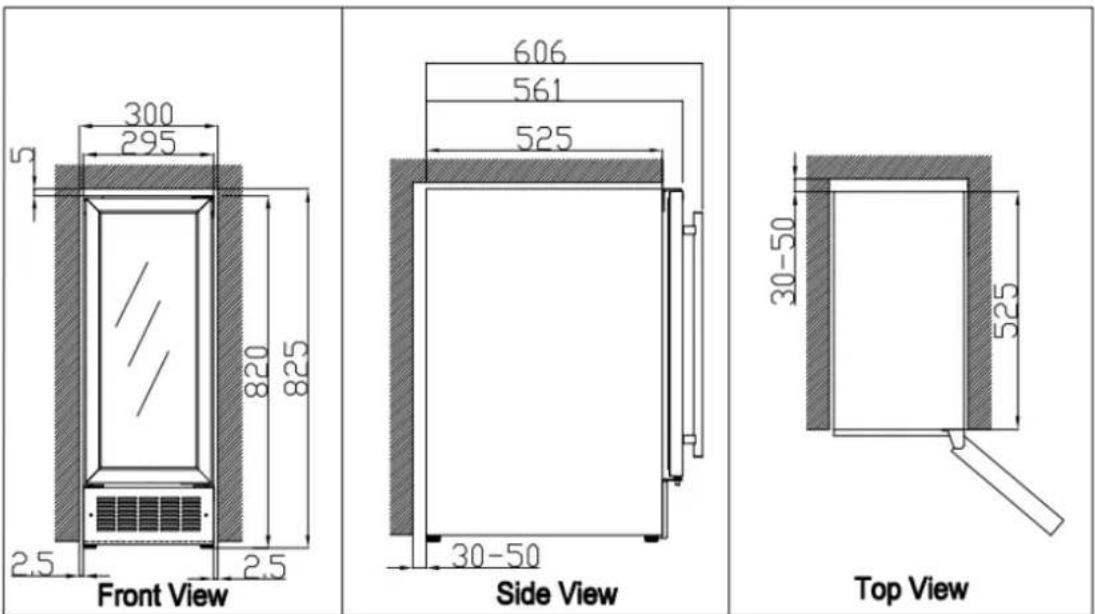
For built-in installation, certain clearances are necessary for optimal operation. In this case, allow 2.5mm(1/8") on left and right sides, 30-50mm(1"-2 1/8") at the rear and 5mm(1/6") at the top to ensure proper ventilation. Take care that the air vent at the front of the appliance is never covered or blocked in any way.
BEFORE INSTALLATING OF YOUR APPLIANCE
- The placement of the appliance must meet the requirements in the section operating conditions and must include a stable floor with a load-bearing capacity corresponding to the weight of the appliance.
- Level the appliance using the adjustable feet. Ensure there is a gap between the bottom edge of the appliance and the ground, so that there is sufficient circulation of air. This will ensure the optimal performance of the cooling system.
- Check whether any coolant circulation pipes have been damaged during the installation.
- Use the appliance only for the purposes for which it has been designed.
- The appliance must be located on a rigid and even surface. In this way you will ensure free circulation of the coolant and effective operation of your appliance.
- If possible, place the appliance in a cool, well ventilated and dry room.
- Do not locate the appliance in direct sunlight or in a room with a high ambient temperature, or in the vicinity of any sources of direct heat, such as a radiator or oven. This would cause the compressor to work harder, resulting in a substantially higher power consumption level.
OPERATING CONDITIONS
Proper operation of the appliance is guaranteed only if the following conditions are met:
- The temperature in the room where the appliance is located conforms to the climate class stated on the appliance's rating label.
• Maximum ambient relative humidity: RH75%. - The appliance must be placed at a sufficient distance from heat sources (e.g., ovens, central heating, direct sunlight, etc.).
- The appliance must be located in such a place that it is protected against the effects of weather.
- Regular maintenance is performed according to the instructions in this user's manual.
- The ventilation openings on the appliance must not be covered.
- Correct installation (e.g. leveling, the capacity of the system corresponds to the specifications on the rating label of the appliance).
COMMANDS
ILWS18BV、ILWD36BV

This wine cooler has a temperature range from 4°C to 18°C
- “ ⏻ 3s ”button to turn the unit ON and OFF,press and hold this button for approximately 3 seconds.
- “3S” button Energy conservation button: Pressing this button for 3 seconds will turn the energy conservation mode ON or OFF. In this mode, the LED light and display will turn off, and the °C/°F light will be on.
- “”Indicator light: shows that the compressor is in operation.
- “4” button: It is used to increase (warm) the temperature in steps of 1°C.
- “▽” button: It is used to decrease (cool) the temperature in steps of 1°C.
- “°C/°F” button: press this button to switch the indicator light between° C/°F.
- “☐” button: turns the interior light ON and OFF. If you use this button, the light is no longer controlled by the switch, and remains ON.(Light button is useless when Energy conservation button is on) LED display Display screen shows the temperature setting.
ILWD37BV
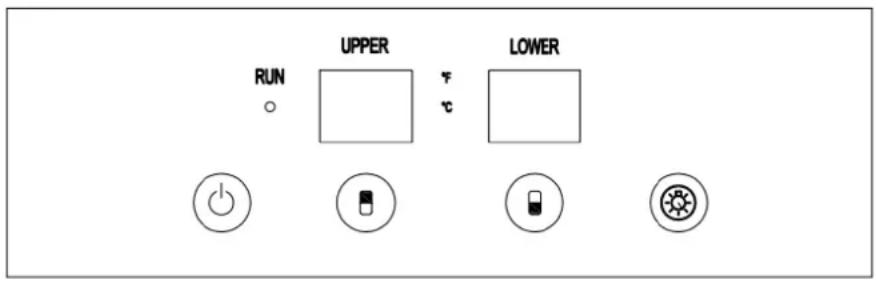
The upper zone has a temperature range of 5^ C to 12^ C, The lower zone has a temperature range of 12^ C to 18^ C.
SELECTOR BUTTONS

POWER BUTTON: Press and hold down for three seconds to power your unit on, once pressed the "Run" indicator light will illuminate to indicate the unit is on and running. Press and hold for three seconds again and the unit will power off and the "Run"
Indicator
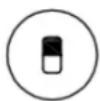
light will turn off.
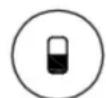
UPPER ZONE TEMPERATURE: It is used to decrease (cool) the temperature in steps of 1^ (or 1^ ) for upper department

LOWER ZONE TEMPERATURE: It is used to decrease (cool) the temperature in steps of 1^ F (or 1^ C) for lower department
RUN
INTERIOR LIGHT: Press this button to turn on the interior LED light. Press again to turn the light off.
When lit, the unit is in cooling mode.
This unit can be displayed in Fanrenheit or Celsius. To change between press and hold the upper and lower zone temperature buttons at the same time for five seconds.
A sound will then beep and the indicator light will illuminate next to desired temperature setting.
ILWD154BV、ILWDD154BV
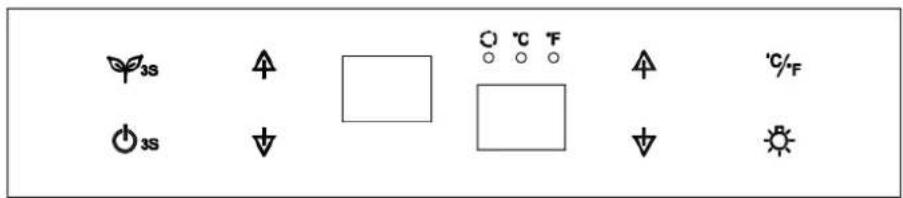
This wine cooler has a temperature range from 4°C to 18°C.
- “ ⏻ 3s ”button to turn the unit ON and OFF,press and hold this button for approximately 3 seconds.
- “3S” button Energy conservation button: Pressing this button for 3 seconds will turn the energy conservation mode ON or OFF. In this mode, the LED light and display will turn off, and the °C/°F light will be on.
- “”Indicator light: shows that the compressor is in operation
- “ ” button: It is used to increase (warm) the temperature in steps of 1°C.
- “▽” button: It is used to decrease (cool) the temperature in steps of 1°C.
- “°C/°F” button: press this button to switch the indicator light between° C/°F.
- “☀️” button: turns the interior light ON and OFF. If you use this button, the light is no longer controlled by the switch, and remains ON.(Light button is useless when Energy conservation button is on) LED display Display screen shows the temperature setting.
ILBC142BVL

This Beverage cooler has a temperature range from 2°C to 10°C.
- “ ⏻ 3s ”button to turn the unit ON and OFF,press and hold this button for approximately 3 seconds.
-
“3S” button Energy conservation button: Pressing this button for 3 seconds will turn the energy conservation mode ON or OFF. In this mode, the LED light and display will turn off, and the °C/°F light will be on.
• “”Indicator light: shows that the compressor is in operation -
“ ” button: It is used to increase (warm) the temperature in steps of 1°C.
- “▽” button: It is used to decrease (cool) the temperature in steps of 1°C.
- “°C/°F” button: press this button to switch the indicator light between° C/°F.
- “☀️” button: turns the interior light ON and OFF. If you use this button, the light is no longer controlled by the switch, and remains ON.(Light button is useless when Energy conservation button is on) LED display Display screen shows the temperature setting.
TEMPERATURE SETTINGS
The zone temperature may have a difference of +/- 5^ (+/- 3^) from the setting depending on loading and ambient conditions. For example, placing your unit in extreme cold or hot conditions may cause interior temperatures to fluctuate.
When you press the button once, the temperature will increase or decrease by 1^ F (or 1^ C). If you try to go beyond the minimum/maximum value that can be established, the display will jump to the lowest/highest adjustable temperature value automatically. If a button is not pressed for 5 seconds, the LED will stop flashing and the setting mode will be exited.
FUNCTIONS
TEMPERATURE MEMORY FUNCTION
If the power is suddenly lost, the set temperature will be saved by the unit. Once the power is back on, the unit will be at the same set temperature.
TEMPERATURE ALARM FUNCTION
If the interior temperature is higher than 73^ F ( 23^ C), “HI” is shown on the display panel and the buzzer alarm sounds continuously after one hour. This indicates that the inner temperature is too high, and you should look for the reason. If the inner temperature is lower than 32^ F ( 0^ C), ILBC142BV is lower than 26^ F ( -3^ C) “LO” is shown on the display panel; the alarm and the malfunction indicator light go on at the same time.
NOTES
If too many bottles are put in at once or the door has not been closed tightly, the unit will display the "HI" signal on the display panel. This is normal. Please wait 5 minutes after closing the door and "HI" will disappear.
It is normal that the cabinet shows "HI" or "LO" from time to time. If it occurs frequently or lasts for a long time, you can restart the unit by unplugging it, then re-plugging after 5 minutes. If the problem occurs again after restarting, please contact customer service.
Before reconnecting the power, wait 3 to 5 minutes. Otherwise you could damage your appliance. If you attempt to start the appliance before the end of this time delay, the appliance will not turn on.
If you turn on the appliance for the first time or after a restart, or after it has been out of operation for a long time, there may be a temperature difference between the temperature inside the appliance and that on the LED display. This is a normal event caused by the duration of the activation period. Leave the appliance turned on for several hours and the temperatures will stabilize during operation.
WINE STORAGE
If you are storing wine for long periods of time, it should be stored at a temperature of between 10^ C and 14^ C ( 50^ F and 57^ F). The following drinking temperatures are recommended for the various types of wine:
Red wines: 57°F to +64°F (+14°C to +18°C)
Rosé wines: 50°F to +54°F (+10°C to +12°C)
White wines: 46^ F to +54^ F ( +8^ C to +12^ C)
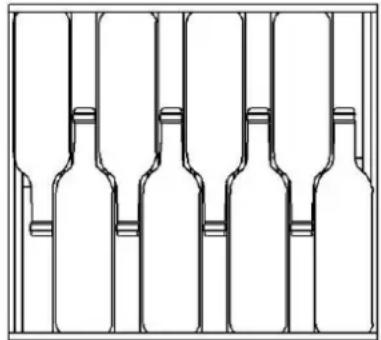
The wine cooler shelving suits Bordeaux Style Bottles (76.5mm diameter and 300.5mm Height).
natural_image
Line drawing of six identical bottles arranged in a row, no text or symbols present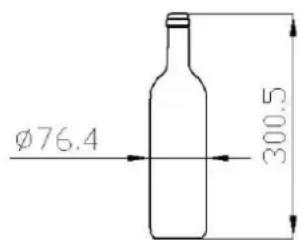
SHELVES
ILWS18BV、ILWD36BV、ILWD37BV、ILBC142BV
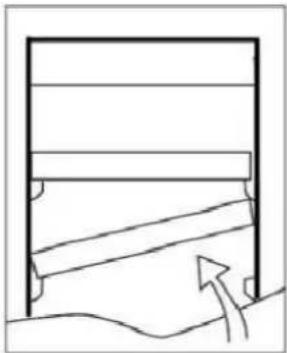
To prevent damaging the doors or gasket seals, open the doors wide when removing the shelves. When removing any of these shelves out of the rail compartment, you must lift (from the rear) and pull it towards you. To re-install, ensure the shelf is resting securely on the support brackets and push shelf inward until it locks into place.
IMPORTANT: Do not cover the gap of glass shelves with aluminum foil or any other TYPE OF material that will prevent adequate air circulation within the cabinet.
natural_image
Simple line drawing of a mechanical component or bracket with an arrow indicating upward motion (no text or symbols)ILWD154BV、ILWDD154BV
Open the door completely.
If necessary, make sure you remove all the contents sitting on the shelf.
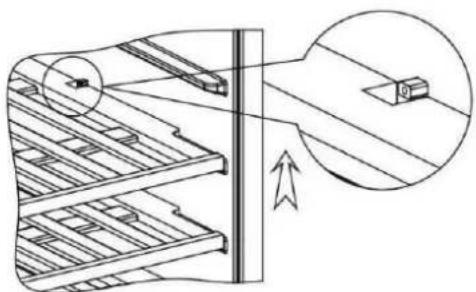
Pull the shelf forward until the notch aligns with the metal post on each side of the shelf track.
Lift the shelf until both notches pass through the posts.
Continue to pull the shelf forward until it is completely removed from the inner compartment.
natural_image
Technical line drawing of a mechanical assembly with layered components and an inset view showing a component (no text or symbols)Pull-out Roller Shelves
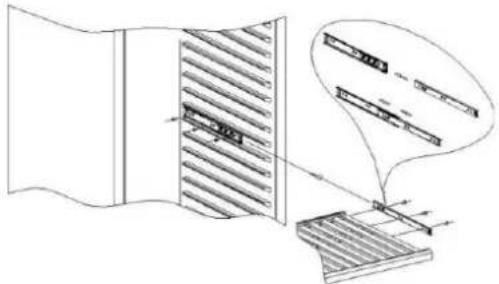
To prevent damaging the door gasket, make sure to have the door all the way opened when pulling shelves out of the rail compartment.
For easy access to the bottles, you must pull the shelves approximately 1/3 out of the rail compartment.
natural_image
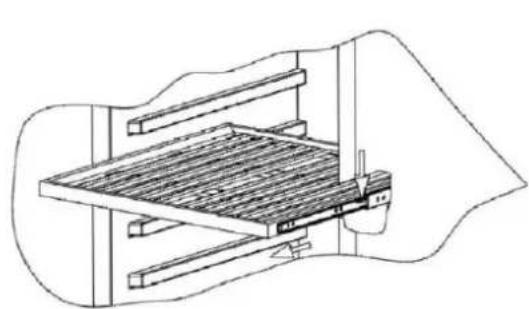
Technical line drawing of a mechanical assembly with hatched panels and a magnified inset showing internal components (no text or symbols)To remove the shelves out of the rail pull each shelf approximately 1/3 out. Use a long flat screwdriver to press down the right plastic notch as shown in Figure A and at the same time lift the left plastic notch as shown in Figure B. Then proceed to pull out the shelf slowly. Contact our service department if assistance is needed.
Figure A Figure B
natural_image
Technical line drawing of a mechanical assembly with no visible text or symbols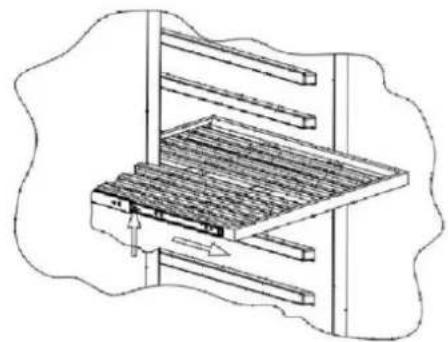
natural_image
Technical line drawing of a mechanical assembly with layered components and a directional arrow (no text or symbols)➢ Installation specifications for built-in purposes
ILWS18BV
ILWD36BV
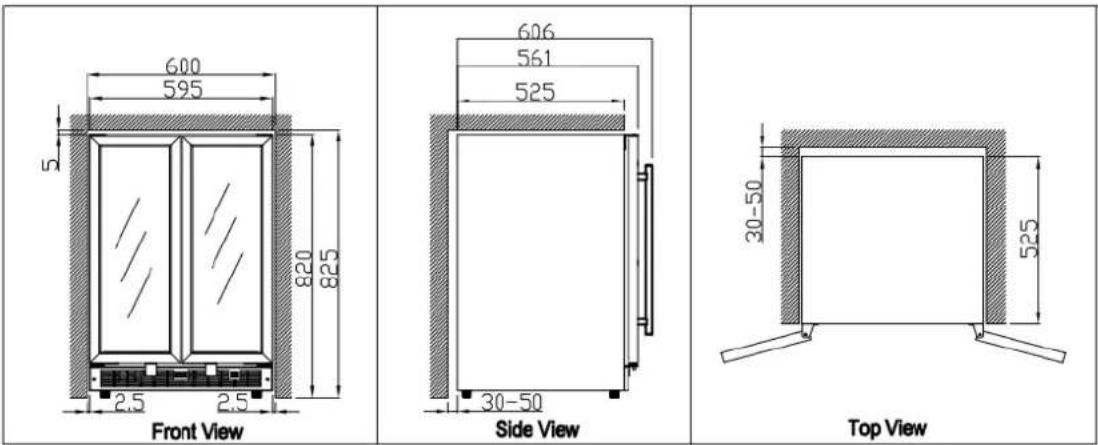
ILBC142BV、ILWD37BV
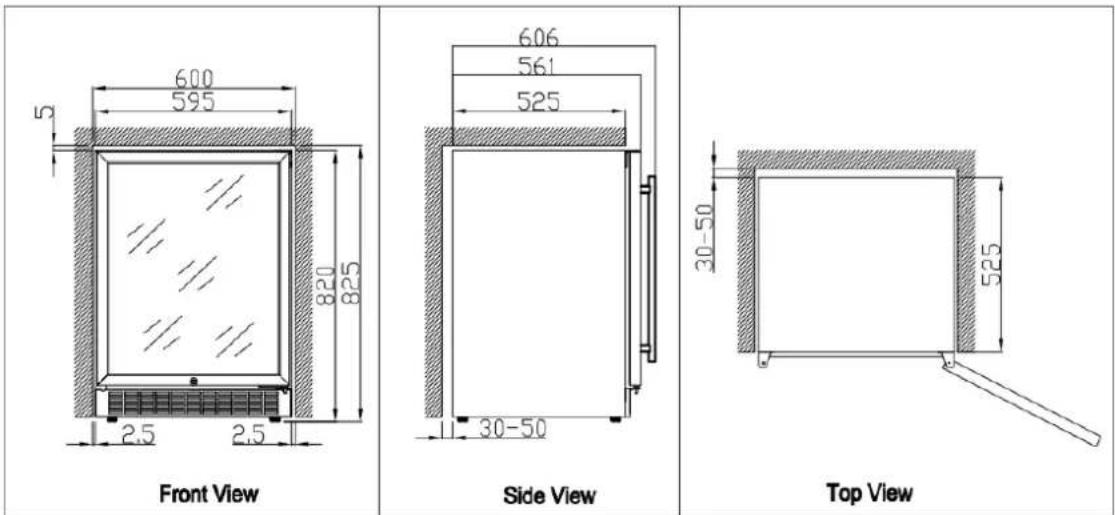
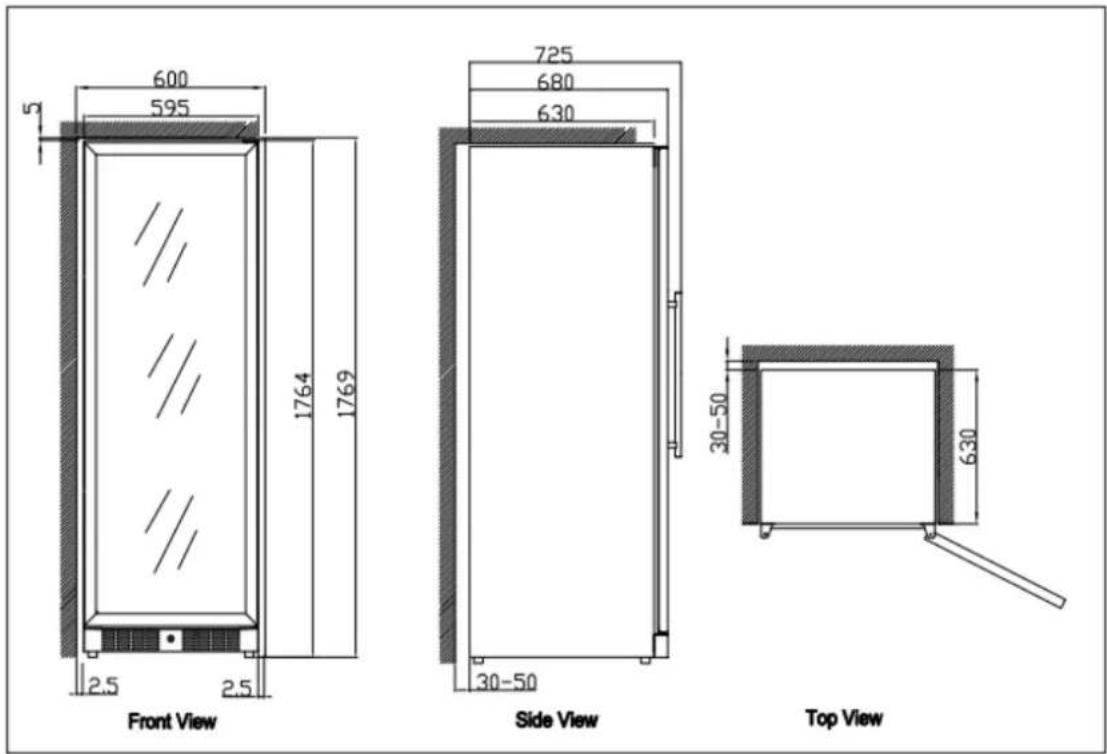
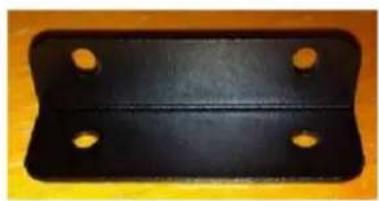
In order to guarantee the stability of the model ILWD36X, install and screw the fastening bracket correctly onto the kitchen furniture:
natural_image
Black metal bracket with four circular holes on a yellow background (no text or symbols)
natural_image
Close-up of a dark metallic object with a small protrusion, possibly part of a mechanical or industrial component (no visible text or symbols)Cabinet Leg
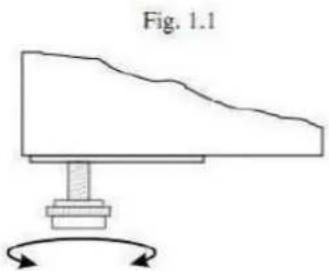
To ensure correct function it is important that the cabinet is level. The cabinet is supplied with legs,
Which can be adjusted by pliers or professional installer. See fig.1.1.
natural_image
Simple line drawing of a mechanical component with rotational arrows, no text or symbols presentCLEANING YOUR WINE CELLAR
- Turn off the power, unplug the appliance, and remove all items including shelves and rack.
- Wash the inside surfaces with warm water and baking soda solution. The solution should be about 2 tablespoons of baking soda with a quart of water.
- Wash the shelves with a mild detergent solution.
- Wring excess water out of the sponge or cloth when cleaning area of the controls, or any electrical parts.
- Wash the outside cabinet with warm water and mild liquid detergent. Rinse well and wipe dry with a clean soft cloth.
POWER FAILURE
Most power failures are corrected within a few hours and should not affect the temperature of your appliance if you minimize the number of times the door is opened. If the power is going to be off for a longer period of time, you need to take the proper steps to protect your contents.
VACATION TIME
- Short vacations: Leave the Wine Cellar operating during vacations of less than three weeks.
- Long vacations: If the appliance will not be used for several months, remove all items and turn off the appliance. Clean and dry the interior thoroughly. To prevent door and mold growth, leave the door open slightly: blocking it open if necessary.
MOVING YOUR WINE CELLAR
- Remove all items.
- Securely tape down all loose items (shelves) inside your appliance.
- Turn the adjustable leg up to the base to avoid damage.
- Tape the door shut.
- Be sure the appliance stays secure in the upright position during transportation. Also protect outside of appliance with a blanket, or similar item.
1. Troubleshooting guide
You can solve many common appliance problems easily, saving you the cost of a possible service call. Try the suggestions below to see if you can solve the problem before calling the servicer.
| Problem | Possible cause |
| Appliance does not operate. | Not plugged in.The appliance is turned off.Tripped circuit breaker or blown fuse. |
| Appliance is not cold enough. | Check the temperature control setting.External environment may require a higher setting.The door is opened too often.The door is not closed completely.The door gasket does not seal properly. |
| Turns on and off frequently. | The room temperature is higher than normal.A large amount of contents has been added to the appliance.The door is opened too often.The door is not closed completely.The temperature control is not set correctly.The door gasket does not seal properly. |
| The light does not work. | Not plugged in.Tripped circuit breaker or blown fuse.The bulb has burned out.The light button is OFF. Or Energy conservation button is on. |
| Vibrations. | Check to be sure the appliance is level. |
| The appliance seems to make too much noise. | The rattling noise may come from the flow of the refrigerant, which is normal.As each cycle ends, you may hear gurgling sounds caused by the flow of refrigerant in your appliance.Contraction and expansion of the inside walls may cause popping and crackling noises.The appliance is not level. |
| The door will not close properly. | The appliance is not level.The door was reversed and not properly re-installed.The gasket is dirty.The shelves are out of position. |
Eurolinx Pty Limited A.B.N. 50 001 473 347
trading as ILVE ("ILVE")
Office: 48-50 Moore Street, Leichhardt N.S.W 2040
Post: Locked Bag 3000, Annandale, N.S.W 2038
P: 1300 MY ILVE (694 583)
WARRANTY REGISTRATION
Your ongoing satisfaction with your ILVE product is important to us. We ask that you complete the enclosed Warranty Registration Card and return it to us so that we have a record of the ILVE products you purchased. Alternatively you can register on line (see registration card for details)
PRIVACY
ILVE respects your privacy and is committed to handling your personal information in accordance with the National Privacy Principles and the Privacy Act 1988 (Cth). A copy of the ILVE Privacy Policy is available at www.ilve.com.au. ILVE will not disclose any personal information set out in the Warranty Registration Card ("Personal Information") without your consent unless required by:
-
law;
-
any ILVE related company;
-
any service provider which provide services to ILVE or assist ILVE in providing services (including repair and warranty services) to customers. Our purpose in collecting the Personal Information is to keep a record of the ILVE product purchased by you, in order to provide a better warranty service to you in the unlikely event that there is a problem with your ILVE product. ILVE may contact you at any one or more of the address, email address or telephone numbers set out in the Warranty Registration Card. Please contact ILVE on 1300 694 583 should you not wish to be contacted by ILVE.
WARRANTY
1. Warranty
ILVE warrants that each ILVE product will remain, for a period of twenty four (24) months computed from the date of purchase of the ILVE product, free from defects arising in the manufacture of the ILVE product ("Warranty"). Except for consumer guarantees set out in the Competition and Consumer Act 2010 (Cth) ("Act"), ILVE does not make any further warranties or representations in relation to ILVE products.
2. What is not Covered by the Warranty.
The Warranty does not apply if an ILVE product is defective by a factor other than a defect arising in the manufacture of the ILVE product, including but not limited to:
(a) damage through misuse (including failure to maintain, service or use with proper care), neglect, accident or ordinary wear and tear (including deterioration of parts and accessories and glass breakage);
(b) use for purpose for which the ILVE product was not sold or designed;
(c) use or installation which is not in accordance with any specified instructions for use or installation; (d) use or operation after a defect has occurred or been discovered;
(e) damage through freight, transportation or handling in transit (other than when ILVE is responsible);(f) damage through exposure to chemicals, dusts, residues, excessive voltage, heat, atmospheric conditions or other forces or environmental factors outside the control or ILVE;
(g) repair, modification or tampering by the purchaser or any person other than ILVE, an employee of ILVE or an authorised ILVE service contractor;
(h) use of parts, components or accessories which have not been supplied or specifically approved by ILVE.
(i) damage to surface coatings caused by cleaning or maintenance using products not recommended in the ILVE product handbook provided to the purchaser upon purchase of the ILVE product;
(j) damage to the base of an electric oven due to items having been placed on the base of the oven cavity or covering the base, such as aluminium foil (this impedes the transfer of heat from the element to the oven cavity and can result in irreparable damage); or (k) damages, dents or other cosmetic imperfections not affecting the performance of the ILVE in respect of an ILVE product purchased as a "factory second" or from display. The Warranty does not extend to light globes used in ILVE products.3. Domestic Use Each ILVE product is made for domestic use. This Warranty may not extend to ILVE products used for commercial purposes; under those circumstances the warranty period is limited to 3 month.
- Time for Claim under the Warranty
You must make any claim under this Warranty within twenty eight (28) days after the occurrence of an event which gives rise to a claim pursuant to the Warranty, by booking a service call on the telephone number below. 5. Proof of Purchase
Customers must retain proof of purchase in order to be eligible to make a warranty claim in respect of an ILVE product.
ILVE LIMITED WARRANTY
6. Claiming under the Warranty
Customers will bear the cost of claiming under this Warranty unless ILVE determines the expenses are reasonable, in which case the customer must claim those expenses by providing written evidence of each expense to ILVE at the address on the Warranty Registration Card.
7. Statutory Rights
(a) These terms and conditions do not a ect your statutory rights.
(b) The limitations on the Warranty set out in this document do not exclude or limit the application of the consumer guarantees set out in the Act or any other equivalent or corresponding legislation in the relevant jurisdiction where to do so would:
(i) contravene the law of the relevant jurisdiction; or (ii) cause any part of the Warranty to be void.
(c) ILVE excludes indirect or consequential loss of any kind (including, without limitation, loss of use of the ILVE product) and (other than expressly provided for in these terms and conditions) subject to all terms, conditions and warranties implied by custom, the general law, the Act or other statute.
(d) The liability of ILVE to you for a breach of any express or non-excludable implied term, condition or warranty is limited at the option of ILVE to:
(i) replacing or repairing the defective part of the ILVE product;
(ii) paying the cost of replacing or repairing the defective part of the ILVE product;
(iii) replacing the ILVE product; or
(iv) paying the cost of replacing the ILVE product.
(e) Our goods come with guarantees that cannot be excluded under the Australian Consumer Law.
You are entitled to a replacement or refund for a major failure and for compensation for any other reasonably foreseeable loss or damage. You are also entitled to have the goods repaired or replaced if the goods fail to be of acceptable quality and the failure does not amount to a major failure.
8. Defects
Any part of an ILVE product deemed to be defective and replaced by ILVE is the property of ILVE. ILVE reserves the right to inspect and test ILVE products in order to determine the extent of any defect and the validity of a claim under the Warranty.
*To locate your closest ILVE authorised service agent please contact ILVE on 1300 694 583,
customercare@eurolinx.com.au or visit
http://ilve.com.au/support/service/
IMPORTANT!
All warranty service calls must be booked via the customer care department. The team can be contacted on 1 300 85 64 11 option 1 or customercare@eurolinx.com.au
Service is delivered through a network of Service
Agents. If the Appliance is located outside our normal Service Area of our agents you, t he
Customer will need to bear the cost of travel outside that area.
If you are unable to provide proof of purchase, the fault is not covered under warranty or the product is found to be working to specification you may be required to bear the full cost of the service visit
08042016
WARRANTY REGISTRATION
CARD 08042016
Please complete and send to ilve at: REPLY PAID 83617
LEICHHARDT NSW 2040
| Last Name: | First Name: | |
| Address: | ||
| State: | Postcode: | Email: |
| Home Phone: | Mobile: | |
| Purchase Date: / / (Please attach proof of purchase to validate warranty) | ||
| MODEL NUMBER | SERIAL NUMBER(if you cannot locate the serial number please call ILVE on 1300 85 64 11) |
| 1 | |
| 2 | |
| 3 | |
| 4 |
- WARNING
- SAFETY PRECAUTIONS
- ATTENTION
- IMPORTANT
- BEFORE INSTALLATING OF YOUR APPLIANCE
- OPERATING CONDITIONS
- COMMANDS
- ILWS18BV、ILWD36BV
- ILWD37BV
- SELECTOR BUTTONS
- RUN
- ILWD154BV、ILWDD154BV
- ILBC142BVL
- TEMPERATURE SETTINGS
- FUNCTIONS
- TEMPERATURE MEMORY FUNCTION
- TEMPERATURE ALARM FUNCTION
- NOTES
- WINE STORAGE
- SHELVES
- Pull-out Roller Shelves
- ➢ Installation specifications for built-in purposes
- Cabinet Leg
- CLEANING YOUR WINE CELLAR
- POWER FAILURE
- VACATION TIME
- MOVING YOUR WINE CELLAR
- Troubleshooting guide
- WARRANTY REGISTRATION
- PRIVACY
- WARRANTY
- Warranty
- What is not Covered by the Warranty.
- ILVE LIMITED WARRANTY
- Claiming under the Warranty
- Statutory Rights
- Defects
- IMPORTANT!
- CARD 08042016
Brand : ILVE
Model : ILWD37BVL
Category : Wine cellar