KRT361GU - Cooker Kucht - Free user manual and instructions
Find the device manual for free KRT361GU Kucht in PDF.


| Product Type | Professional Gas Rangetop |
| Brand | Kucht |
| Model | KRT361GU |
| Fuel Type | Natural Gas (convertible to Propane/LPG) |
| Number of Burners | 4 |
| Burner Output (Front Left) | 18,000 BTU |
| Burner Output (Rear Left) | 12,000 BTU |
| Burner Output (Front Right) | 18,000 BTU |
| Burner Output (Rear Right) | 12,000 BTU |
| Simmer Capability | Yes, minimum 620 BTU |
| Ignition Type | Electronic Spark (requires 110V) and manual match lighting |
| Control Panel | Front-mounted knobs |
| Material | Stainless Steel |
| Grate | Included, cast iron |
| Griddle | Optional (available on select models) |
| Safety | Thermocouple flame failure device |
| Gas Pressure (Natural Gas) | 4" WC |
| Gas Pressure (Propane) | 10" WC |
| Gas Connection | 1/2" NPT |
| Electrical Requirements | 110V/60Hz for ignition |
| Minimum Clearance to Combustibles (sides above counter) | 6" (15.2 cm) |
| Minimum Height to Overhead Cabinets (without hood) | 42" (106.7 cm) |
| Installation Type | Built-in, requires countertop cutout |
| Cleaning | Use mild detergent; burner caps removable for hand washing |
| Includes | Burner caps, grates, installation hardware |
Frequently Asked Questions - KRT361GU Kucht
User questions about KRT361GU Kucht
0 question about this device. Answer the ones you know or ask your own.
Ask a new question about this device
Download the instructions for your Cooker in PDF format for free! Find your manual KRT361GU - Kucht and take your electronic device back in hand. On this page are published all the documents necessary for the use of your device. KRT361GU by Kucht.
USER MANUAL KRT361GU Kucht
natural_image
Exterior view of a stainless steel Knochet gas stove with multiple heat sinks (no text or symbols visible)
natural_image
Exterior view of a stainless steel industrial gas stove with multiple fans and control knobs (no visible text or symbols)


GAS RANGE TOP
INSTALLATION GUIDE AND USER MANUAL
APPLICABLE MODEL: KRT3618U, KRT3003U.
PROFESSIONAL GASRANGE TOPNG&LPGCONVERTIBLE

natural_image
Line drawing of a three-tiered electric stove or oven with four rotary switches (no text or symbols)InstallationandOwner's Manual
Thismanualcontainfor:
ImportantSafeguards
Installation
UseandCare
Certainrangetopscomeequippedwithspecialfeatures.Determinefroma study of your range top which of the instructions given in this booklet pertain to your range top. This booklet is valuable instructions covering the installation andadjustmentanduseofyourrangetop.
HowtoObtainServiceand/orParts
When your rangetop does not operate in accordance with the instructions in the manual, you should contact the dealer in your immediate vicinity for service.
The purchaser may contact the service organization noted on the warranty.
Important
TOTHEOWNEROFTHERANGETOP:Retainthisowner'smanualfor futurereference.
TOTHEINSTALLER:Leavethisowner'smanualwiththerange.
ReadandSaveTheseInstructions
WARNING: If the information in this manual is not followed exactly, a fire or explosion may result causing property damage, personal injury or death.
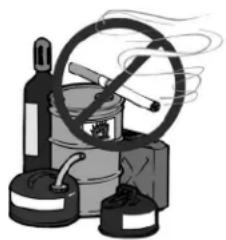
— Do not store or use gasoline or other flammable vapors and liquids in the vicinity of this or any other appliance.
— WHAT TO DO IF YOU SMELL GAS
- Do not try to light any appliance.
- Do not touch any electrical switch.
- Do not use any phone in your building.
- Immediately call your gas supplier from a neighbor's phone. Follow the gas supplier's instructions.
- If you cannot reach your gas supplier, call the fire department.
— Installation and service must be performed by a qualified installer, service agency or the gas supplier.
Table of Contents
Contents
| ImportantSafeguards | Page1-5 |
| InstallationInstructionsandClearances | Page6-14 |
| OperationofRangetop | Page15-21 |
| CleaningtheRangetop | Page22-23 |
| GasRangetopConversionandAdjustment Guide | Pages23-27 |
| Troubleshooting | Pages27-28 |
Note: For warranty and service information, please see attachments packaged with range top.
PLEASE READ AND SAVE THESEINSTRUCTIONS
This manual provides specific operation instructions for your model. Use your rangetop only as instructed in this manual. These instructions are not meant to cover every possible condition and situation that may occur. Common sense and caution must be practiced when installing, operating and maintaining the appliance
Reordinthespaceprovidedbelowthe Model No.and SerialNo.ofthisappliance. Thesenumbersare foundonthe serialplatelocated at back ofrangetop.
Model No. Type Number Serial No. Purchase Date Recordthesenumbers for future use.
IMPORTANT: Keepacopyofyourbillofsale. Thedateonthebill establishes the warrantyperiodshouldserviceberequired. If service is performed, it is in your best interest to obtain and keep all receipts.
PLEASE DOTHISNOW!
ThePRODUCTREGISTRATIONCARDshouldbe filled in completely, signed and returned. This information will register your product and help us to serve you quickly in the future if necessary.

READALLIMPORTANTSAFEGUARDSAND ALLINSTRUCTIONSBEFOREUSINGTHE APPLIANCE.
Ifyousmell gas
Openwindows
Don'ttouch electricalswitches
☒ Extinguishany openflame
☒ Immediatelyyourgas supplier
natural_image
Illustration of a mechanical device with a circular component and two cylindrical components, emitting smoke or steam (no text or symbols)ForyourSafety
Keep applianceisaclear and free from combustiblematerials, gasoline and other flammablevapors and liquids.
Warnings
Destroythecarton and plastic bags after therangetopis unpacked. Children should not use packaging material for play, cartons covered with rugs, bedspreads, or plastic sheets can become air-tight chambers. Remove all staples from the carton. Staples can cause severcuts and destroy finishes if they contact with other appliances or furniture.
Besafetyconscious. The preparation of foodona rangetoprequirestemperatures that could cause severe burns. Before using this new appliance, carefully read and follow all instructions.

The CaliforniaSafe Drinking Water and Toxic Enforcement Act of 1986 (Proposition65) requires the Governor of California to publish a listofsubstancesknowntotheStateof Californiatocausecanceror
reproductive harm. In addition, businesses must warn customers of potential exposure to such substances.
Usersofthisappliance are hereby warned that the burning of gas can result in low levelexposure to some of the listed substances, including formaldehyde, benzene, soot and carbon monoxide. This is caused primarily from the incomplete combustion of natural gas or LP fuel. Properly adjusted burners will minimize incomplete combustion.
Exposuretothese substances canalsobe minimized by properlyventing theburnersby opening a window or using a ventilatinghoodorfan.
Notice: Neverkeeppetbirds in the kitchen. Birdshaveaverysensitive respiratory system. Fumesreleased during the self-cleaning cycle, overheated cooking oil, fat, margarine or overheated non-stick cookware may be harmful or fatal tobirds.
PROPERINSTALLATION: Besureyourapplianceisproperlyinstalledand groundedby a qualifiedtechnician in accordancewith the NationalFuel GasCodeANSI Z223.1-latestedition, andtheNationalElectricalCodeANSI/NFPANo.70-latest edition.Installonly per installationinstructionsprovided inthe literaturepackage forthis rangetop.
Askyourdealer to recommend a qualified technician and an authorized repair service. Havethe technician familiarize you with the locations of the manual gasshutoff valve and gas meterinthe eventitis necessary to shutoff gassupply to the rangetop during an emergency.
USER SERVICING: Donot repair or replace any part of the appliance unless specifically recommended in this owner's guide. All other servicing should be done only by a qualified technician. This will reduce the risk of personal injury and damage to the rangetop.
Storage inoron appliance: Flammable materials should not bestored near surface burners. These include paper, plastic and cloth items (such as cookbooks, plastic ware and towels) as well as flammable liquids. Donotstore explosives, such as aero solcans, onorneartherangetop.

The following situations could cause bodily injury or property damage.
DONOTTOUCH SURFACE BURNERSOR AREAS NEAR THESE
BURNERS. Surface burners may beho teventhoughthe flame isnot visible. Areas near surface burners may becomchotenoughto cause burns. Duringandafteruse, donottouch,orlet clothing orother flammablematerials touchthese areas until they havehad sufficient timetocool.

WARNING
NEVER use this appliance as a space heater to heat or warm the room. Doing so may result in carbon monoxide poisoning and overheating of the oven.
NEVERusethisapplianceasaspace heater toheator warm theroom.Doing so mayresult incarbon monoxide poisoning.
Wearproperapparel. Loose fitting or hanginggarments shouldneverbeworn while using the appliance. Donotlet clothing or other flammable materials contact surface burners until they have had sufficient timetocool.
When heatingfa-torgrease, watchitcloselyanddonotleaveunattended.
Fa-tor greasemay catchfireif allowed tobecometoohot.
Donotuse water or flour ongreasefires. Smother thefirewithapan lid, baking sodaoruseadry chemical or foam-type extinguisher.
Operateofthe SurfaceBurners. Whentheburnersarcoperatedforthefirst time, a small amountof smokemay be generated duetotape residue or manufacturinglubrication. THISISNOTDANGEROUS.Operatetheburners forabout five minutestoridtheburnersofthis material beforecooking.
Useonly dry potholders. Wetordamppotholdersonhot surfaces can result in burns from steam. Donotlet thepotholdertouchhotheatingareas. Donotuseatowelor other bulkyclothingstead of apotholder.
Use proper flamesize. Adjustflamesize thatsoitdoesnotextendbeyondthe edge of the utensil. The use of undersizedcookware willexpose apportionoftheburner flame andmayresultinsevereburnsordirectcontactandignitionofclothing.Also,proper relationship of utensil toburner willimprove efficiency.
Knowwhichknobcontrolseach burner. Placeapanoffoodontheburner
beforeturnignition, and turn the burner off before removing the pan. Always turn to the ignite position when lighting top burners. Then adjust the flame size so it does not extend beyond the edge of the utensil.
Utensilhandlesshouldbeturnedinwardandnotextendoveradjacentsurface
burners. To reduce the risk of burns, ignition of flammable materials, and spillage due to unintentional contact with the utensil, the handle of a utensil should be positioned so that it is turned inward, and does not extend over adjacent surface burners.
Neverleavethe surfaceburners unattended. Boilovers can leave greasyspills that can create excess smoke or a firehazard, and cookware that has boiled dry may warp ormelt.
Allow parts tocooltoroom temperature before touching or removing them from therangetop. When asurface burner is first turned off, the burner and grate are hot enough to cause burns.
Cleanthe rangetop regularly tokeepallpartscleanofgreaseorresiduewhich couldcatch fire. Payparticular attentiontothe areaunderneatheachsurface burner. Do notallowfa-torgreaseto accumulate. Ifahoodhasbeeninstalledforusewiththe rangetop,ensurethatitiskept clean andingood working order. Greasy depositsinthe fan couldcatchfire.Refer tothehood manufacturer'sinstructions forcleaning.
Thesecooktopsmustbeinstalledinconjunctionwithasuitableoverheadvent hood.Duetothehighcapacityoftheseprofessionalcooktops,attentionshould bepaidtothehoodandductworkinstallationtoensureitmeetslocalbuilding codes.
Toeliminatoriskofburnsorfirebyreaching overheatedsurfaces,unitcabinet's storagelocatedabovethecooking surface shouldbeavoided
Donotusea“cyclonic”rangetophoodwiththisproduct.Somerangetop
hoods circulate air by blowing downward toward the rangetop then drawing the air back up into the hood. This creates a "cyclonic" airwash that is designed for electric rangetops only. A "cyclonic" hood may cause the burners of a gas range top to operate improperly.
Glazed cooking utensils: Only certain types of glass, glass/ceramic, ceramic, earthenware, or other glazed utensilsaresuitable for cooking dueto the sudden change in temperature. Check the manufacturer's recommendations for rangetop use.
Do not place plastic salt and pepper shakers, spoon holders or plastic wrappings ontopofthe rangetop. These itemscould meltor ignite.Pot holders,towels orwooden spoons couldcatchfireifplace too close tothe flame.
Do not use a wok equipped with a metal ring that extends beyond the burner. Because this ring traps heat, the burner and gratecould be damaged. Also, the burnermay not workproperly, creating a carbon monoxidelevelabove current health standards.
Flexible Connectors: Ifthegas range top isconnectedtoagassupply with a metal flexible connector, disconnect the range top with CAUTION forserviceor cleaning.
Flexibleconnectorsarenot intended for repeated bending. Donotallow cleaners to make contact with flexible connectors.
Theconnector and its fittings are designed for use only on the original installation andarenottobereused for another appliance or at another location. Connectors must comply with A NSIZ 21.24.
Itisgoodpractice for each householdtohavean appropriatefire extinguisherfor useintheeventofahousefire.
NOTE: The instructions appearing in this owner's guide are not meant to cover every possible condition and situation that may occur. Common sense and caution must be practiced when operating and maintaining any appliance.

On sealed burner models never attempt to operate the surface burners without the cooktop, burner caps, and ignition wires firmly in place. There is a risk of fire and/or explosion which could result in
personal injury or property loss.
InstallationInstructions
Besurethe rangetop is properly installed and grounded by a qualified technician. It is the responsibility of the technician to make certain that your rangetop is properly installed. Situations cause by improper installation are not covered under the warranty. Any expenses incurred duetos such situations will not be paid by the manufacturer of the range top.
Leaktestingoftheapplianceshallbeconductedaccordingto themanufacturer's instructions,or according to localbuildingcodes and gas regulationsin your area.
GAS CONNECTIONS (All Units)
NOTICE TO MASSACHUSETTS APPLIANCE DEALERS:
Be surethisdocument is included in all gas range top appliances sold to consumers in the State of Massachusetts.
NOTICE:Massachusettslaw requires the following:
☒ Appliances must be installed by a licensed plumber or gas fitter.
☒ Appliances must be connected with a three (3)foot(36"maximum length) Flexiblegas connect orand
☒ A“T” handle type manual gas valve in the gas supply line to the appliance.
Have the dealer where you purchase your new range top install it or have them recommend a qualified installer. Installation must conform with local codes. In the absence of local codes, the installation must conform with the National Fuel Gas Code, A NSIZ223.1-Latest Edition in the U.S.A. or the CAN/CGA B149.1 or.2 Installation Codes in Canada.
The rangetop should be connected to the supply line with 1/2-inch black iron pipe or a certified flexible type stoveconnector. Top revent gas leaks, put an approved sealing compound which is resistant to liquefied petroleum gases on all threaded connections.
Important: Do not apply pressure directly to therangetop manifold pipe when tightening supply connections. The manifold pipe should be held securely at the pressure regulator to prevent twisting. Hold the pressure regulator with awrench during the tightening of the connection, or the manifold pipe may be twisted and split and cause a dangerous leak.
The installation of range tops designed for manufactured(mobile)home installation must conformwiththe Manufactured Construction and Safety,Title 24 CFR,Part 3280,[formerly the Federal standard for Mobile Home Construction and Safety, Title 24,HUD(Part 280)]in the U.S.A.or C.S.A.StandardCAN/CGAZ240.4.2in Canada or,when such standards are not applicable,with local codes.
The installation of rangetops designed for recreational vehicle installation must conform with state or other codes, in the absence of such codes, with the Standard for recreational vehicles. ANSIA119.2.2–1982 in the U.S.A. or CAN/CGA Z240.4.2 in Canada.
The installation of appliances designed for recreational park trailers must conform with stateorothercodesor, in the absence of such codes, with the standard for recreational park trailers, ANSIA119.5.
Note: Checkall piping connections in the unit for leaks. Never use an open flame to check for gas leaks. Use asoap solution, 75% water, 25% dish washing soap. It is possible for connections made at the factory to leak, dueto vibration encountered in transportation. Make certain you have checked them all, and repair any connections that leak.
The appliance and its individual shut-off valve must be disconnected from the gas supplypipingsystemduringanypressuretesting of that system attest pressures in excess of 12 psig.
The appliance must be isolated from the gassupplypipingsystem by closing its individualmanual shut-off valveduringanypressuretesting of the gassupply piping system attest pressureequal toor less than1/2psig.
TOOLS YOU WILL NEED

MATERIALS YOU MAY NEED

Gaslineshut-off valve
To reduce the possibility of gasleaks, apply Teflontape orathreadcompoundapprovedforusewithLPor Natural gases to allthreaded connections.
Connectthe supplied 1/2 "threaded pipetotheunits regulatorlocated onthebackleftoftheunit.Wesuggest using a 1/2 " female to3/8" maleflare adaptorontheend ofthe 1/2 " threaded pipesupplied.
Usea5/8" flexible appliance connectortoconnect your gassupply to the appliance. A3footlength this recommended for ease of installation but other lengths are acceptable. Never use an old connector when installing anew range.
☑Check for leaksusing a leak detector or soapywater, 75% water, 25% dish washing soap.
CLEARANCES
All unitsmustbe installed in accordance to minimum rearand sidewall clearances and clearancesextendedvertically above cooking top which arestatedontheserial plate(the serial plateis located onthebackoftheunit.)
Make surethatthe wallcoverings, countertopsand cabinets aroundthe rangetop can withstandtemperatures ofupto 200ircF / 93ircC generated bytherangetop.
Itisthe responsibility of the installer to make certain that the rangetop is properly adjusted at the time of installation. Situations caused by improper adjustments or improper installation are not covered under the warranty. Any expenses incurred due to such situations will not be paid by the manufacturer of the appliance.
Note: Based on24"(61 cm)deepcabinet

CAUTION: Items of interest to children should not be placed in cabinets above the cooktop. - children climbing on the cooktop to reach items could be seriously injured.
This rangetopmay be installeddirectlyadjacent to existing 36"(91.4 cm) Highbasecabinets.
The rangetop CANNOT be installed directly adjacent to sidewalls, tall cabinets, tall appliances, or other side vertical surfaces above 36" (91.4 cm) high. Thremustbe a minimum of 6" (15.2 cm) side clearance from the
Rangetop tosuch combustiblesurfaces abovethe36" (91.4 cm)counter height.
☒ Within the6” (15.2 cm)sideclearance to combustiblevertical surfaces above 36”(91.4cm), the maximumwallcabinet depthmustbe13” (33.0 cm)and wallcabinetswithin this6” (15.2 cm)sideclearance mustbe18” (45.7 cm) abovethe36” (91.4 cm)highcountertop.
☒ Wallcabinets abovetherangetopmustbea minimum of42" (106.7 cm) abovetherangetop cookingsurface forthe full widthofthe range top.This minimum height requirement doesnot apply if a rangetop hood isinstalledoverthe cooking surface.
Wall Installation

Note: Minimum clearance for backwall is0" with backguard or highshelf.
If a range hood is installed above the rangetop, maintain a30" (76.2 cm) minimum clearance between therangetop and the bottom of the range hood. The range hood must exhaust outside. For best smokeelimination, the lowered edge of the hood
Shouldbe installed a minimum of30"toa maximum of36"abovethecooktop surface.Recommended CFMshouldbeg 450 cfmforthe30"rangetop.
Donot install withadowndraft ventilation system
Island Installation
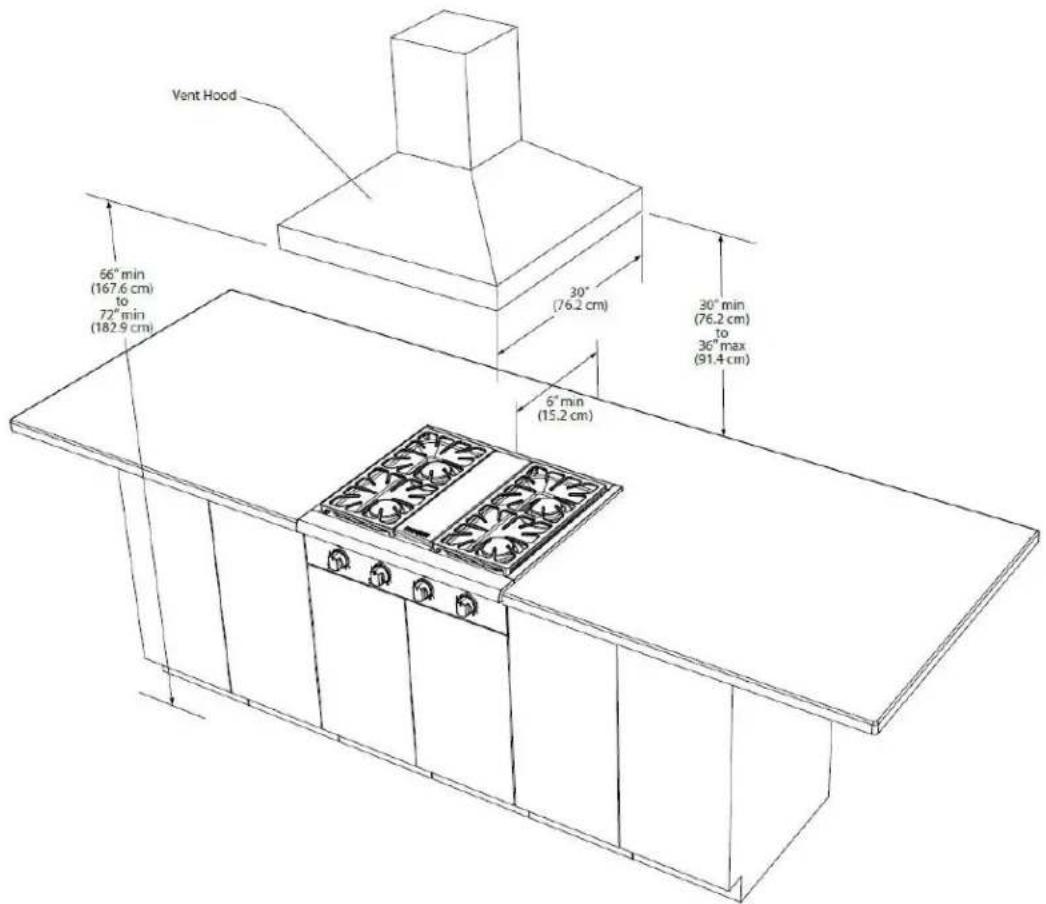
Note: Theremustbea minimum of6" (15.2 cm) clearance from rearofrangetoptoa
combustiblewall.Clearances from non-combustiblematerials arenotpartoftheANSIZ21.1
scopeandarenot certifiedbyCSA.Clearances to non-combustiblematerials mustbeapproved bythe authorityhaving jurisdiction.
This rangetopmay be installeddirectlyadjacent to existing 36"(91.4 cm) Highbasecabinets.
The rangetopCANNOTbe installeddirectlyadjacent tosidewalls, tall
cabinets, tallappliances, orother sidevertical surfaces above36" (91.4 cm)
high. Theremustbea minimum of6" (15.2 cm)sideclearance from the rangetop tosuch combustiblesurfaces abovethe36" (91.4 cm)counter height.
☒ Within the6" (15.2 cm)sideclearance to combustiblevertical surfaces above 36"(91.4cm), the maximumwallcabinet depthmustbe13" (33.0 cm)and wallcabinetswithin this6" (15.2 cm)sideclearance mustbe18" (45.7 cm) abovethe36" (91.4 cm)highcountertop.
☒ Wallcabinets abovetherangetopmustbea minimum of42" (106.7 cm) abovetherangetop cookingsurface forthe full widthofthe range top.This minimum height requirement doesnot apply if a rangetop hood isinstalledoverthe cooking surface.
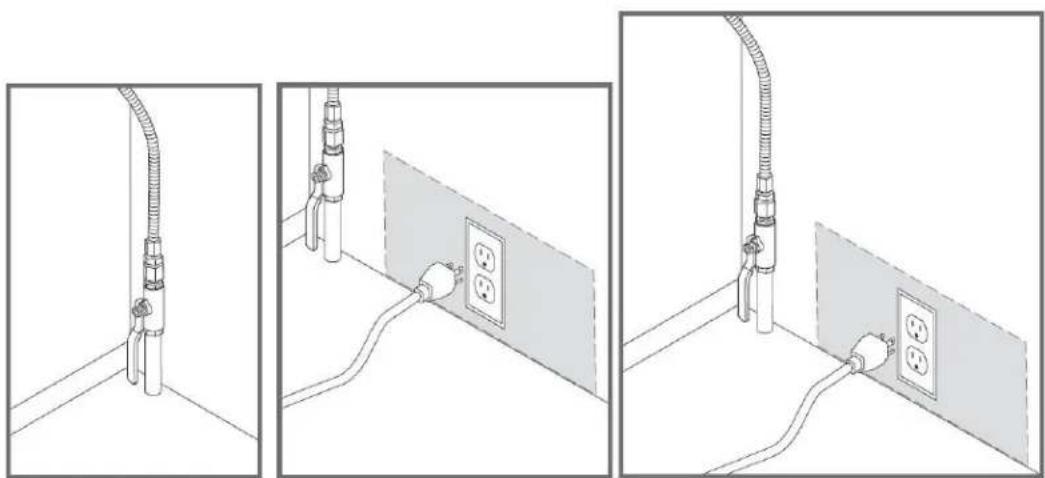
Make surethereisapoweroutlet within thereachofthe rangetop's power supply cable(within 36"/30cmfromtheright side ofthe rangetop). Theoutlet shouldbe accessible withthe rangetop installed.
natural_image
Three-panel diagram showing electrical connections: wall-mounted plug, electrical outlet with three switches, and electrical plug with four switches (no text or symbols)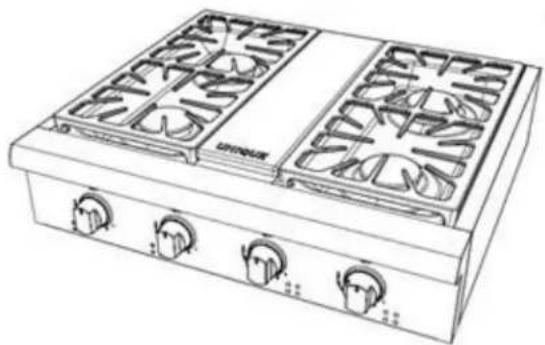
natural_image
Line drawing of a gas stove with three outlets and three side fans (no text or symbols)
Make thecountertopcut-out following the dimensionsgiven inthe illustration above. Basebelowrangetopmustbeofanon-combustible material.
natural_image
Line drawing of a kitchen appliance with four fans and a double boiler, showing no text or symbolsInstallingtheRangetop
Remove the rangetop from its package andset aside all burners, burnercaps and grates.
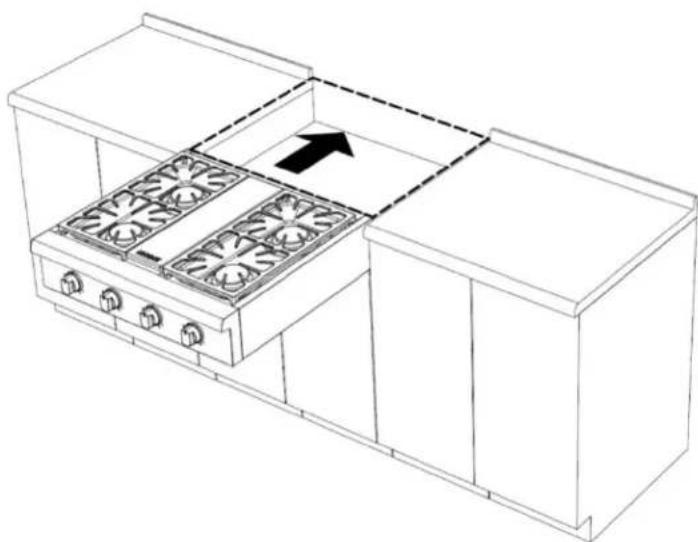
☑ Gentlyslidein thecooktopintothecut-out, make sureyourcut-outsare therefore the gas connection and electrical hookup(if youchoosetouscit).
☒Oncethisisdone you're now ready to slide the rangetopall the way back to the wall.
☒ Installall burnersandburnercaps
Installall grates.
Connectinggastorangetop
This rangetop is designed to operate a pressure of 4" of water column non natural gas or 10" of water column non propane gas (LPG).
Make sureyouare supplying your rangetop with the type of gas for which it is designed. It's shipped for use with NG. This rangetop is convertible for use on natural gas (LPG) also. When using this rangetop on LPG gas, conversion must be made by a qualified LPG installer before attempting to operate thereon an getop on that gas.
Forcorrect operation, the pressure of naturalgassupplied tothe regulator shouldbe between 4"and5"of watercolumn. ForLP gas, the pressuresupplied mustbe between 10"and12"of water column.
When checking forcorrectoperationofthe regulator,the inletpressure mustbeat least 1"morethanthe operatingmanifoldpressure as given above.
The pressureregulatorlocated atthe inlet ofthe rangetopmanifold must remain in the supplylineregardless ofwhetherNatural(NG)orPropane (LP)gas isbeing used.
A flexiblemetalappliance connectorusedtoconnectthe rangetop tothe gas supplyshouldbe3feet/91.4cm max.inlengthfor easyinstallation. In Canada, flexibleconnectorsshouldbe singlewallmetal connectors less than6 feet/182.9cminlength.
Shutoffthemain gassupplyvalve before removing theold cookingappliance (if applicable) and leave itoffuntilthenewhook-uphasbeen completed. Don't forget to relight thepilotsonother gasappliances whenyouturnthe gas backon.
Because hard piping restricts movement of the rangetop, the use of a CSA certified flexible metal appliance connector is recommended unless local codes require a hard-
Piped connection. Never reuse an oldconnector when installing anew rangetop. If thehard piping method is used, you must carefully align the pipe.
Toprevent gasleaks, usepipejointcompound resistant toNG gases on all male external pipethreads.
- In an easily accessible location, install a servicemanual gas shutoff valve. Be sure everyone operating the rangetop knows where and how toshutoff the gassupply to the cook top.
- Usea flexiblegasline toconnecttothe1/2" fitting, located onthebotto m righthandcornerunderneaththerangetop.
- When all connections have been made, besure allrangetop controls are in the off position and turn on themain gassupply valve. Check for gas leaks by using a 75% water, 25% dish washing soap solution. If a gas leak is present, shutoff gas immediately, tighten all connections, andretest for leaks.
- Any opening in the wall behind the appliance and in the floor under the Appliances shall be sealed.
#
OPERATIONOF RANGETOP

pie
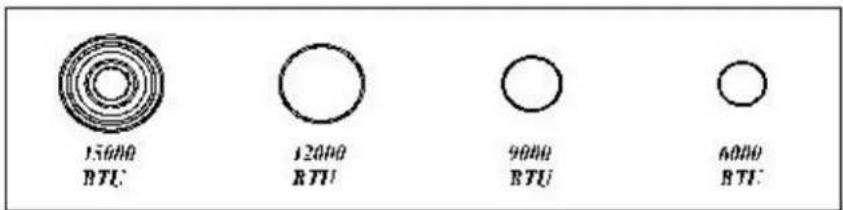
| Category | Value | |---|---| | 15000 RTU | 15000 | | 12000 RTU | 12000 | | 9000 RTU | 9000 | | 6000 RTU | 6000 |HRT3609U

natural_image
Technical line drawing of three identical fan-shaped structural components with radial and concentric patterns (no text or symbols)
HRT36"

natural_image
Technical line drawing of a dual-panel fan or vent structure with radial slots and central hub (no text or symbols)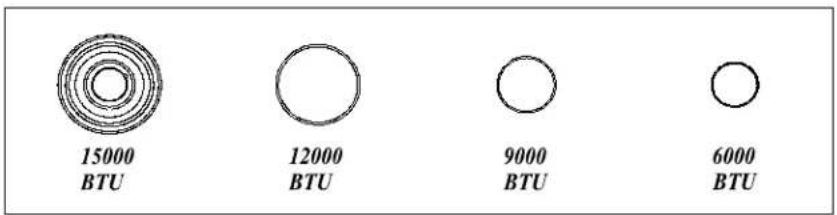
HRT30"
Guidelinesforusingrangetopburners
Therearedualburnershavethesamelowturn-downsetting(SIM)forgentlesimmering (620BTU/hr).UsetheSIMsettingformeltingchocolateandbutter,cookingrice and delicatesauces,simmeringsoupsandstews,andkeepingcookedfoodhot.
Neverleavethecooktopunattendedwheninuse.Boilovercausessmokingandgreasy spillsthatmayignite.
Never allow flames to extend beyond cookware or curl up its sides. This could discolor and damagetheutensilandyoumaygetburnedtouchingahothandle.
Keephandlesoutoftheway. Turnhandlessothattheydon'textendovertheedgeofthe rangeoranotherburnerthatison.
Takecarewhendeep-frying.Oilorfatcanoverheatveryquickly,particularlyonahigh setting.
Makesurethatallburnerpartsareproperlyinplace.Incorrectlyorincompletely assembledburnersmayproducedangerousflames.See‘Replacingtheburnerparts’in ‘Careandcleaning’.
Keeptheburnersclean.Especiallyafteraspillorboilover,makesureyoucleanthe affectedburnersbeforeusingthemagain.Foodresiduemayclogtheigniterandthe notchesoftheflamespreader,stoppingtheburnerfromfunctioningcorrectly.See‘Care andcleaning’forinstructions.
Check that the burner flames a regular. They should be blue with no yellow tipping, and burn without fluttering all around the burnercap. If not, see 'Troubleshooting' for advice.
SurfaceBurnerIgnition

Tolightthetopburners, pushandturntheappropriatecontrolknobcounterclockwiseto the "HI" position. You will hearaclickingnoise—thesoundoftheelectricspark ignitingtheburner. Once burnerignition has been achieved, thenturntheburnercontrol knobtoadjustthethedesiredheatsetting.
NOTE: Whenoneburneristurnedtothe“HI”position,theburnerigniterswillpark. Donotattempttodisassembleorcleanaroundanyburnerwhileanotherburnerison.Do nottouchanyburnercap,burnerbase,origniterwhiletheignitersaresparking.
SimmerandBoil
- As smaller flamewillgivethebestsimmer results. Small flames offer precise cooking performance for delicate foods, keeping food warm, melting chocolate or butter, and for cooking that need to cook over low heat for along time.
- The highest (larger) flamesettings providethemaximumheatthatisavailableonyour range. This settings should be used for heavy cooking load and chas waterboiling or pasta cooking.
FlameSize
When you select the flamesize, watch the flamewhen you turn the knob.
Anyflamelargerthanthebottomofthecookwareiswasted.
The flames should besteady and blue in color. Foreign material in the gas line may cause an orange flame during initial operation.

PowerFailure
Ifthegasdoesnotignitewithinfourseconds,turnoffthevalveandallowatleastfive minutesforanygastodissipate.Repeatthelightingprocedure.
Ifthepowerfails,itisnotcapableofbeingsafelyplacedinoperationanduserthatno attemptshouldbemadetooperateduringpowerfailure.
Cooktop
Topreventthecooktopfromdiscoloringorstaining,cleancooktopaftereachuse,and wipeupacidicorsugaryspillsassoonasthecooktophascooled.
Thesea ledburnersofyourrangearenotsealedtoyourcooktopandaredesignedtobe removed.Boiloversorspillswillnotseepunderneaththecooktop.Theburnersshould becleanedaftereachuse.
BurnerGrates
Thegratesmustbeproperlypositionedbeforecooking.Improperinstallationofthegratesmayresultinscratchingofthecooktopand/orpoorcombustion.

natural_image
Close-up of a gas stove burner with blue flame (no visible text or symbols)
natural_image
Close-up of a stainless steel pot on a gas stove with blue flames (no text or symbols visible)ForthemodelswithGriddle
BeforeUsingtheGriddle
- Cleanthegriddlethoroughlywithwarm,soapywatertoremovedustoranyprotective coating.
- Rinse with clean water and wipe off dry with soft, clean, lint-free cloth.
- Astainlesssteelcoverthatissizedtofitontopofthesurfacewhenthegriddleisnot beingusedisprovided.Pleasenotethatthecovermustberemovedbeforeturningthe griddleon.
- Makesurethegreasetrayisunderthefrontedgeofthegriddle .Positionthetrayunder thegriddleoverhangtocatchgreaseorfoodresidue.
Useofthegriddle
- Pushandturnthecontrolknobcounter-clockwisetothepreferredcookingtemperature.
- Preheatthegriddle for 10-12 minutes.
- Whenthegriddleispreheatedtothedesiredtemperature, theindicatorlightwillturn on.
- Butterorcookingoilcanbeaddedformoreflavor, thenplatethefoodtocook.
CAUTION
Thesurfaceofthegriddleishotafteruse.Pleaseallowsufficienttimeforthegriddleto coolpriortocleaning.
CLEANINGTHERANGETOP
Cleaningguidelines
Readthe“IMPORTANT SAFETY INSTRUCTIONS” on page 2 and these ‘CARE AND CLEANING” guidelines before you start cleaning your rangetop.
See the pages following for instructions on removing and replacing different part of therange for cleaning and maintenance. To help you identify parts, seethe cooktop Diagrams on pages 24-26.
☒ Beforecleaning or removing any part, make sure that all settings on therange top are set to "OFF". Makesure all part so the rangetoparecool to the touch.
If you need to handle awarmor hot part of the rangetop (e.g. arange grate) be sure to wear oven mitts and take extreme care to avoid burnsor injury.
Do not use aerosol cleaners until the range top has completely cooled. The propellantsubstance in thesecleanerscouldcatchfire inthe presence ofheat.
☑Donotlet grease or food residue accumulate anywhere in or on the rangetop. This will make future cleaning more difficult and may presenta fire hazard.
☑Donotuse anyabrasive orharsh cleaners, cloths, scouring padsor steelwool onthe exterior, these will scratch and damage the appearance.
☒Donotuseasteamclean er toclean anypart ofthe rangeor oven.
☑Donotperform anycleaning or maintenance onpartsnot specificallylisted in the chartbelow. Ifindoubt,contact Customer Care.
Burner and Burner Caps
Check that theburner isturnedOFF and allow ittocool.Lift off the burnercap.Use asonbrushor straight-ended papercliptoclearthenotchesoftheburner.Wash them with a milddetergent inhot water,rinse,and dry.Replace theburnercapcorrectly.
Rangetop Surface and Control Panel
☑ Clean the cooktop surface with a solution of mild detergent and warm water. Do not use harsh or abrasive cleaning agents, waxes, polishes, or commercial cooktop cleaners to clean the cooktop.
Treatstubborn, burnt-ongrease and residue with the same solution of mild detergent and hot water, let its it a few minutes and then wipe clean.
☑Toprotectthe appliance finish,onlyuseasponge,softcloth,fibrousorplastic brush,andpadforecleaning.
☒ Allowall componentsto drythoroughly before using therangetop.
GasRangetopConversionandAdjustmentGuide
The rangetop issetforusewithNaturalGas(NG).(The factorysetting is indicated on the serialplate. Whensetfor Natural Gas(NG)Gas operation, the pressure regulator will regulate the gas to4" incheswater column pressure. When setfor Liquefied PropaneGas(LPG) operation, the pressureregulator will regulate the pressure to11" incheswater column
NGtoLPGConversion
ConvertiblePressureRegulator
The rangetops areshippedtooperateonNaturalGas(NG).Propane(LPG) orificesareshippedwiththeunitina separateenvelope withthe manual.Save the NG orificesremoved fromthe appliance forfutureuse, make sureyounote which orifices arefor which burnerifyouplanon converting backto NG.
The inletpressure ofthe gassupplyshall bein accordance withthe nominal inlet pressure ofthe regulator usedontherangetopor1/2 psigmaximum. Therange topshouldbetestedby pressurizingtheregulatorwithaninletpressure atleast1 inch water columnabovethe manufacturer'sspecifiedmanifoldpressure shownonthe serial plate.
1.Shutoff gasleading to appliance.
2. Unpluganyelectrical connections if you are using the 110V option, usually located undertherangetop.
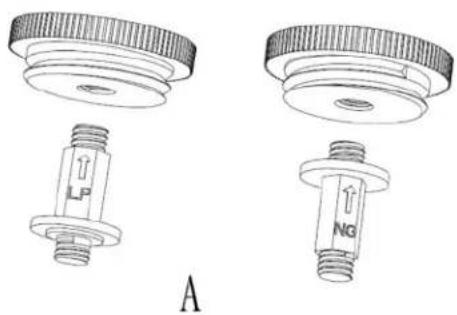
3. Locateconvertibleregulator atthebackofthe rangetop, removecap.

- Unscrew the plastic insert from the cap and turn it overs to others shorter stem is facing downwards for NG (Fig.A). Replace insertion the cap.
natural_image
Technical line drawings of mechanical components, including a threaded fastener and a flanged component (no text or symbols)-
Replace the capback ontheregulator.
-
Nextyou will remove the grates, burners and burnercaps from the angetop to access theorifices.
-
You will need a 7mm socket wrench to remove the orifices. Each orifice can be accessed easily.
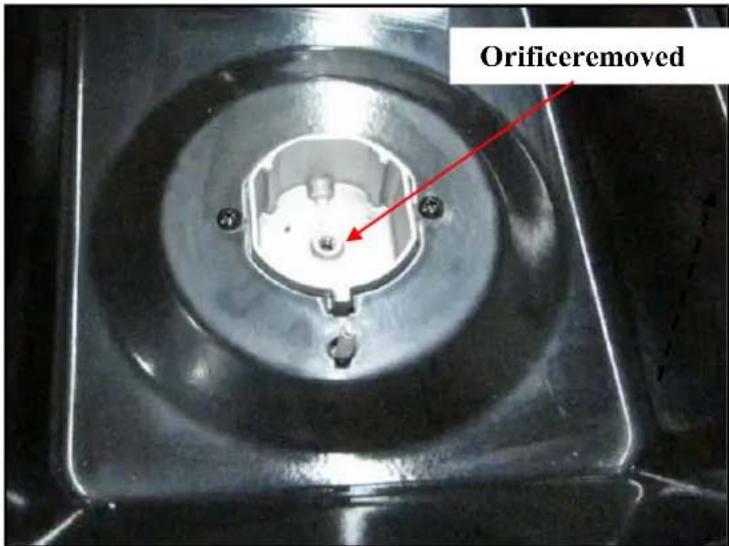
-
Remove all NG orifices and place in a separate bagandstorewithyour manualfor future use. Labelyourorifices asyou removefrom therange top.
-
TaketheLPG orifices provided and install asshownbelowinthechart—each orifice is stamped with the size. You may require a magnifying glass to see this stamping.
See below for rating of LPG orifices for each model
| LPG | LeftF ront | Left Rear | RightFront | Right Rear |
| 18,000btu | 12,000btu | 18,000btu | 12,000btu | |
| 1.24mm | 1.00mm | 1.24mm | 1.00mm |
-
Once all the orificesareinstalled, replaceall burnersandburner caps, then fire upthe burners to check the minimumflame height.
-
Minimum flame height should be approx. 1/4 " tall. You will want a small minimum flame for simmering. There is a small adjustments crew located on the valve itself, the front control panel must be removed in order to make the adjustment.
-
Toremovethecontrolpanelremovethetwobottom panels on. screws holding the panel

natural_image
Close-up of a hand using a tool to adjust or install a metal mechanical component, no visible text or symbols.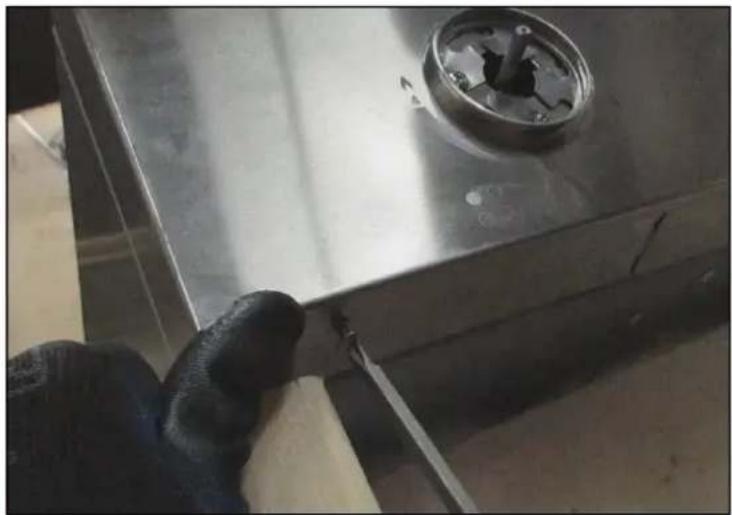
natural_image
Close-up of a hand holding a metal panel with a circular component and a small hole, no visible text or symbols.- Next slide out the panel, there are notchesatthetop positing the panel inplace.
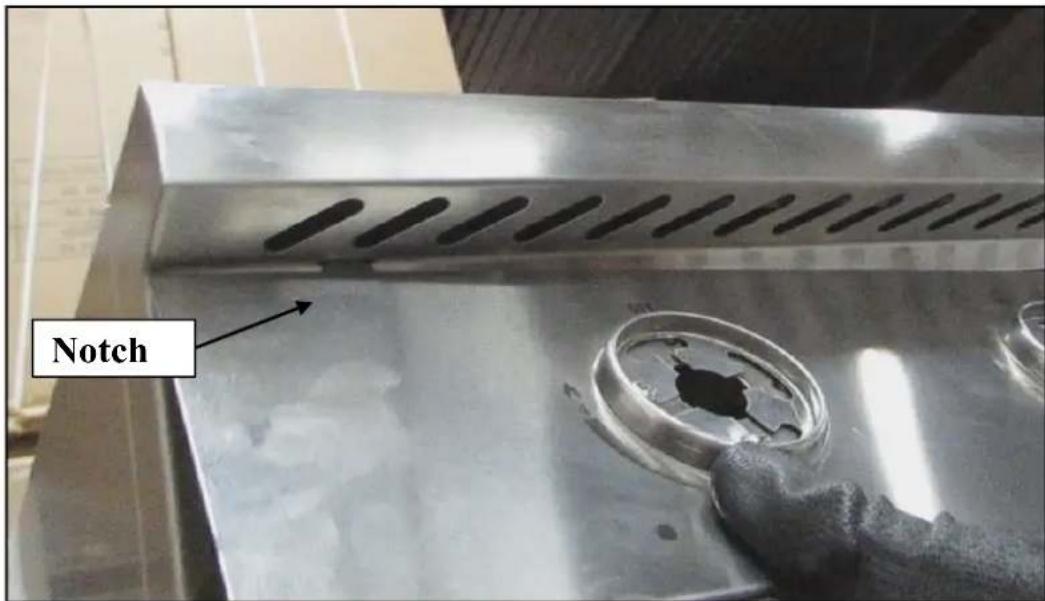
- Using a3/32"X3" screwdriver or similar you can make the adjustment. Turn to minimum flamethen adjust the crew counterclockwise for a smaller flame and clockwise for larger flame. Replace the id, burners, burnercaps and grates, adjust and recheck the flame.
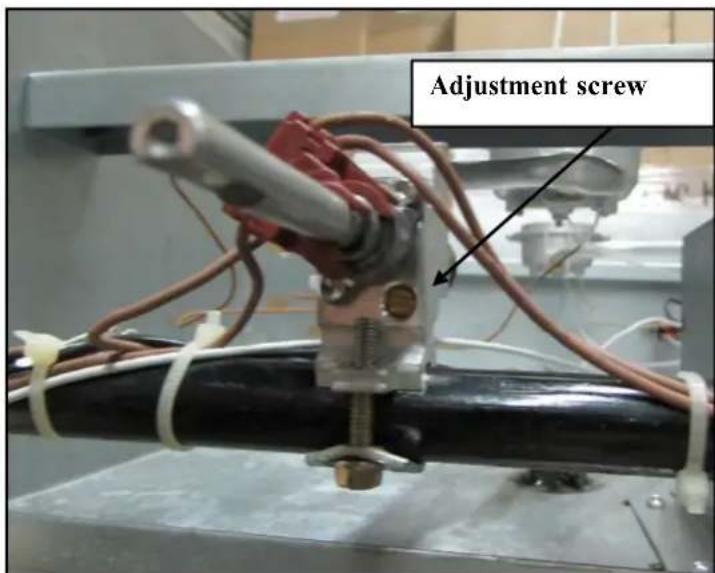
- Once your happy with the minimum flame height replace the front control panel with the two screwsearlier removed.
TroubleshootingTips
| Symptom | PossibleCause | Solution |
| BURNERSWILL NOT LIGHT. | Burnerpartsor Ignitersmaybe wet,dirty or misaligned. | Checkthattheburnerpartsareclean,dry Andcorrectlyassembled.Checkthatthe ignitersarecleananddry. |
| TOPBURNERWILL NOTSTAYLIT | Failed Thermonuclear | Replacethermocouple |
| FLAMESDONOT BURNALL AROUNDTHE BURNERCAP. | Burnerparts Maybedirty or misaligned. | See“CareandCleaning”instructions. |
| BURNERFLAMES AREVERY LARGE AND YELLOW. | Burnerbezel Ports are clogged.Burnerports or burner caps are not positioned properly.Range top is being operated withthewrong typeofgas.Regulator is not installed,is faulty,or is set for the wrong typeofgas. | Cleanburnerbezelringportswith Straightenedpaperclip,needle,orwire.Remove andcarefully re - installburner bezelandcaps.Ensure that the type of range top matches the gassupply.Check installation,replace regulator,or set regulatorforpropergas. |
| IGNITERSARE SPARKING BUT BURNERS ARE NOTIGNITING. | Gasshut - off Valveisinthe “OFF”position. | Turnshut - offvalvetothe“ON”position. |
| BURNERFLAME GOESOUTAT LOWSETTING. | Lowgas pressure.Airintake holesaround burnersare obstructed. | Contactgascompany.Removeobstructionfromairintakeholes.Simmersettingistolow |
| THEFLAME SHAVE SUDDENLY GONEOUT. | Adraftorspill Hasextinguished theflame. | Turntheburnersoff,cleaningtheburnersAndsumparea.See“CareandCleaning”for instructions.Oncecleanreignitetopburners. |
| NOIGNITION SPARK | Deadbatteries Or ignition modulefailed. CAUTION CAUTION | Replacebatteriesandattemptignition.If Thereisstillnosparkignition,therangetop burnerscanstillbeused.Tolightthem:1.) Holding a lit match to the flame spreader, pushing on the control knob and turn counterclockwisetoLIGHT.2.) When the flame is burning all the way around the burner,you may adjust the heat. |
| “CRACKING” OR “POPPING”SOUND IS HEARD COMING FROM RANGETOP | Thisisthesound Of metal heating andcooling. | Thisisnormal. |
- GAS RANGE TOP
- INSTALLATION GUIDE AND USER MANUAL
- PROFESSIONAL GASRANGE TOPNG&LPGCONVERTIBLE
- InstallationandOwner's Manual
- Thismanualcontainfor:
- HowtoObtainServiceand/orParts
- Important
- ReadandSaveTheseInstructions
- Table of Contents
- PLEASE READ AND SAVE THESEINSTRUCTIONS
- PLEASE DOTHISNOW!
- READALLIMPORTANTSAFEGUARDSAND ALLINSTRUCTIONSBEFOREUSINGTHE APPLIANCE.
- Ifyousmell gas
- ForyourSafety
- Warnings
- DONOTTOUCH SURFACE BURNERSOR AREAS NEAR THESE
- WARNING
- When heatingfa-torgrease, watchitcloselyanddonotleaveunattended.
- Knowwhichknobcontrolseach burner. Placeapanoffoodontheburner
- Utensilhandlesshouldbeturnedinwardandnotextendoveradjacentsurface
- InstallationInstructions
- GAS CONNECTIONS (All Units)
- NOTICE TO MASSACHUSETTS APPLIANCE DEALERS:
- NOTICE:Massachusettslaw requires the following:
- Gaslineshut-off valve
- CLEARANCES
- Wall Installation
- Island Installation
- InstallingtheRangetop
- Connectinggastorangetop
- Guidelinesforusingrangetopburners
- SurfaceBurnerIgnition
- SimmerandBoil
- FlameSize
- PowerFailure
- Cooktop
- BurnerGrates
- ForthemodelswithGriddle
- BeforeUsingtheGriddle
- Useofthegriddle
- CAUTION
- CLEANINGTHERANGETOP
- Cleaningguidelines
- Burner and Burner Caps
- Rangetop Surface and Control Panel
- GasRangetopConversionandAdjustmentGuide
- NGtoLPGConversion
- ConvertiblePressureRegulator
Brand : Kucht
Model : KRT361GU
Category : Cooker