
FZD 4020-E - Chopper Fieldmann - Free user manual and instructions
Find the device manual for free FZD 4020-E Fieldmann in PDF.


| Product Type | Electric Meat Mincer |
| Brand | Fieldmann |
| Model | FZD 4020-E |
| Power Consumption | 500 W |
| Voltage / Frequency | 220-240 V / 50 Hz |
| Dimensions (L x W x H) | 32 x 16 x 28 cm |
| Weight | 3.2 kg |
| Housing Material | ABS Plastic with Stainless Steel Insert |
| Blade Material | Stainless Steel |
| Mincing Plate Sizes | Fine (3 mm), Medium (5 mm), Coarse (7 mm) |
| Capacity (Meat) | Up to 1.2 kg per minute |
| Continuous Operation Time | 10 minutes (with cool-down) |
| Functions | Mincing, Sausage Making with Attachments |
| Reverse Function | Yes, to clear jams |
| Safety Features | Overload Protection, Non-Slip Feet, Locking Arm |
| Dishwasher Safe Parts | Mincing plates, blade, tray, and sausage attachments |
| Cleaning | Wipe motor unit with damp cloth; wash detachable parts in warm soapy water |
| Spare Parts Available | Blades, plates, pusher, and sausage attachments |
| Warranty | 2 years |
| Accessories Included | Pusher, 3 mincing plates, sausage filler, kubbe maker |
Frequently Asked Questions - FZD 4020-E Fieldmann
User questions about FZD 4020-E Fieldmann
0 question about this device. Answer the ones you know or ask your own.
Ask a new question about this device
Download the instructions for your Chopper in PDF format for free! Find your manual FZD 4020-E - Fieldmann and take your electronic device back in hand. On this page are published all the documents necessary for the use of your device. FZD 4020-E by Fieldmann.
USER MANUAL FZD 4020-E Fieldmann
natural_image
Abstract black and white spiral pattern with no text or symbolsFIELDMANN®
Home & Garden Performance
natural_image
Exterior view of a modern office building (no signage)FZD 4020-E
English 7
Čeština 21
Slovenčina 37
Magyarul 51
Polski 65
1
2
3-1 3-2
natural_image
Mechanical device with attached wires and connectors, no visible text or symbols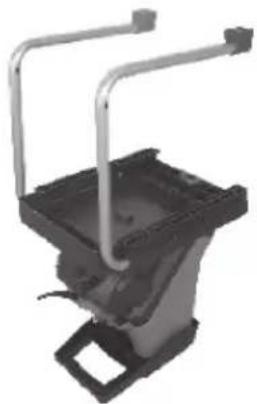
natural_image
Mechanical device with metal rods and a square base (no visible text or symbols)4
natural_image
Metal frame structure with two curved metal rods and directional arrows indicating movement or force (no text or symbols)5
natural_image
Close-up of a hand holding a metallic cable with a curved wire, partially inserted into a black plastic housing (no text or symbols visible)6
natural_image
Close-up of a mechanical component with a hand holding a tire, showing no visible text or symbols.7
natural_image
Close-up of a hand adjusting a tire with a tool, showing the tire being adjusted (no text or symbols visible)8
natural_image
Person using a wheeled cart with a pulley system (no text or symbols visible)9
natural_image
Close-up of a car wheel rim being adjusted by hand, with an arrow indicating the motion direction (no text or symbols visible)10
natural_image
Mechanical device with two labeled parts (① and ②) showing directional arrows, no readable text or symbols beyond labels.11
natural_image
Mechanical component with a rotating arrow indicating rotation (no text or symbols visible)12a
12b
natural_image
Cross-sectional view of a mechanical component with labeled section A (no text or symbols beyond label)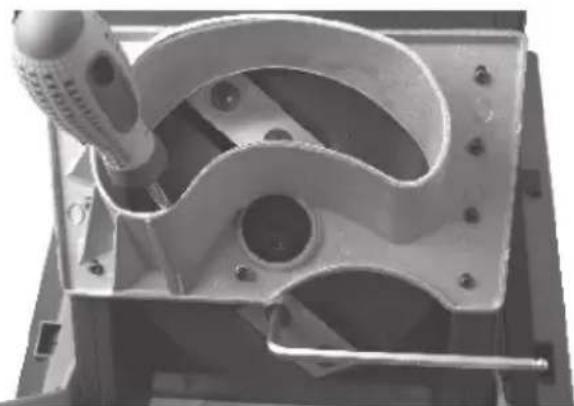
natural_image
Mechanical component with curved and rectangular parts, no visible text or symbols13
natural_image
Close-up of a mechanical component with a labeled feature 'F' pointing to a bolted joint (no other text or symbols visible)Electrical shredder
OPERATING INSTRUCTIONS
TABLE OF CONTENTS
PICTURE ANNEX 3
- GENERAL SAFETY REGULATIONS 8
Important safety notices
Packaging
Instructions for use
-
SYMBOLS 9
-
LAYOUT AND ITEMS SUPPLIED 10
-
SAFETY INSTRUCTIONS 10
-
PROPER USE 14
-
INSTALLATION 14
-
OPERATION 14
-
REPLACING THE POWER CABLE 16
-
CLEANING, MAINTENANCE AND ORDERING OF SPARE PARTS 16
-
TROUBLESHOOTING GUIDE 18
-
TECHNICAL DATA 18
-
DECLARATION OF CONFORMITY 19
-
DISPOSAL 20
WARRANTY CERTIFICATE, WARRANTY TERMS 80 - 81
1. GENERAL SAFETY REGULATIONS
Important safety notices
* Unpack the product carefully and be sure not to throw away any part of the package before having found all components of the product.
- Keep the product in a dry place out of reach of children.
Read all cautions and instructions. The failure to adhere to warning cautions and instructions may result in an accident, fire and/or a serious injury.
Packaging
The product is placed in a package preventing damage during transport. This package is a raw material therefore it can be handed-over for recycling.
Instructions for use
Before beginning to work with the machine, read the following safety rules and instructions for use. Familiarize with operating elements and the proper use of the device. Keep the manual in a safe place for future reference. We recommend keeping the original package including the inner packaging materials, cash voucher and guarantee card for a period of warranty at minimum. For a case of transportation, pack the machine into the original box from the manufacturer, thus ensuring a maximum protection of the product during a possible transport (e.g. moving or sending into a service station).

Note: If you hand the machine over to next persons, hand it over together with the manual. Adherence to the attached instructions for use is a precondition for the proper use of the machine. The operation manual includes also instructions for operation, maintenance and repairs.
The manufacturer does not take any responsibility for accidents or damages resulting from the failure to adhere to this manual.
2. SYMBOLS

Important! Read the operating instructions and follow the warnings and safety instructions
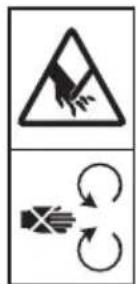
Take care when the blades are rotating. Do not put your hands or feet into openings when the machine is running.
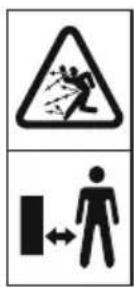
Important! Keep other persons and animals away from the danger zone.

Important! Protect the machine from the damp and never expose it to rain.

natural_image
Three circular icons representing safety symbols: helmet, hand gesture, and walking figure (no text or labels)Important! Always wear safety goggles, ear muffs, protective gloves and heavy-duty work clothes!
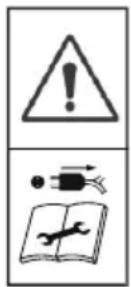
Always set the ON/OFF switch to OFF and pull the power plug out of the socket-outlet before doing any work on the shredder, e.g. cleaning the shredder and making adjustments, or if the power cable becomes damaged.
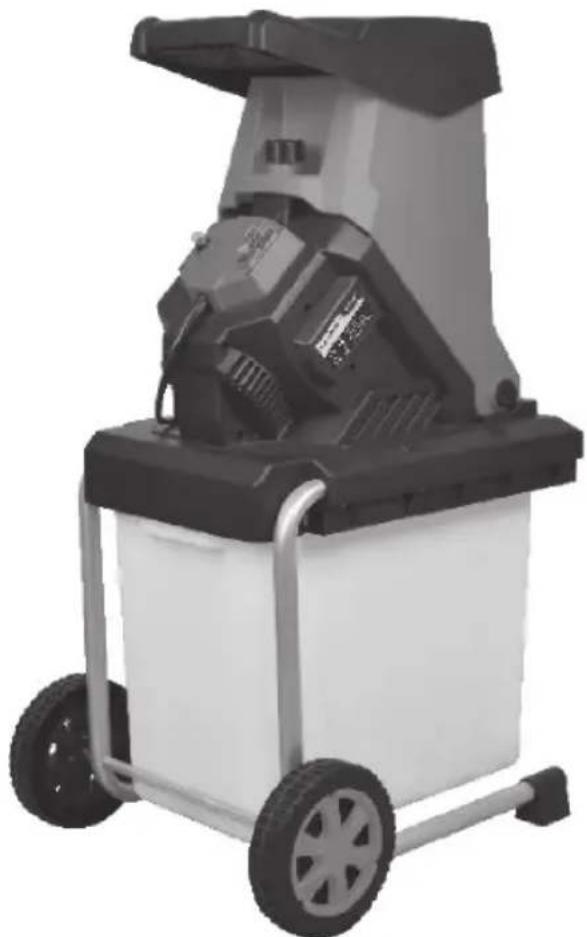
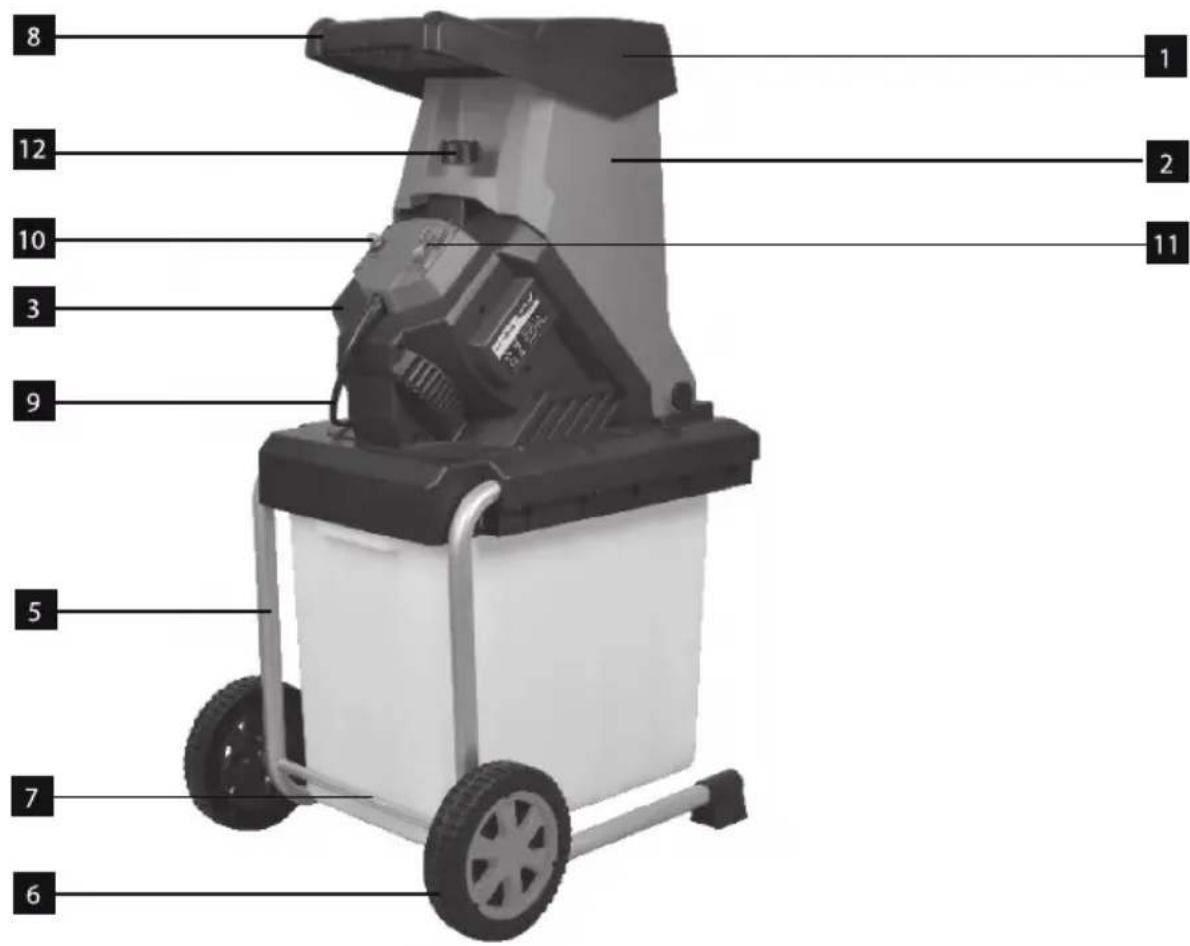
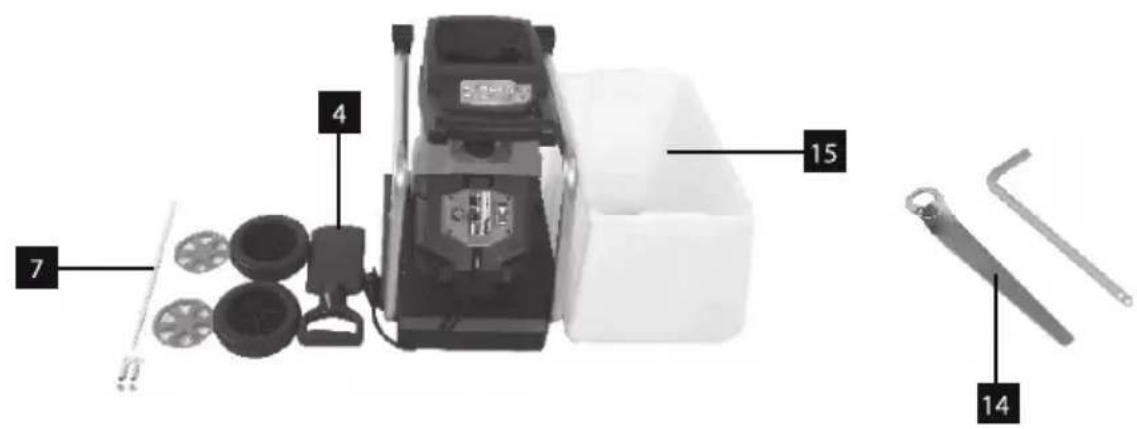
3. LAYOUT AND ITEMS SUPPLIED (see Fig. 1-2)
- Loading funnel inlet
- Loading funnel
- Motor housing with cutter plate
- Prodder
- Complete chassis
- Wheels
- Axle (complete with washers and nuts)
-
Transport handle
-
Mains plug
- Overload switch
- ON/OFF switch
- Safety screw
- Wheel hubs
- Ring wrench
- Shredded material debris box
4. SAFETY INSTRUCTIONS
ATTENTION! CAUTION!
Read all safety regulations and instructions. Any errors made in following the safety • regulations and instructions may result in an electric shock, fire and/or serious injury. Keep all safety regulations and instructions in a safe place for future use.
Read these operating instructions carefully before you use the machine.
- This equipment is not designed to be used by people (including children) with limited physical, sensory or mental capacities or those with no experience and/or knowledge unless they are supervised by a person who is responsible for their safety or they have received instructions from such a person in how to use the equipment safely. Children must always be supervised in order to ensure that they do not play with the equipment.
ATTENTION! The ON/OFF switch must be set to OFF and the power plug removed from the socketoutlet before cleaning or doing any other work on the shredder and whenever the cable becomes tangled. The shredder will continue to run briefly after it is switched off.
The shredder is not to be used by individuals under 16 years of age or any other persons who are not acquainted with these directions for use.
The operator is responsible for the safety of third parties within the working radius of the shredder.
Make sure that the shredder is properly closed (loading funnel and ejector) before you start up the motor.
The shredder must be placed on a flat and firm surface where it can stand securely.
* Always wear gloves and safety goggles when working with the shredder.
We recommend ear-muffs when working with shredders which have no noise-insulating features.
* Each time before you leave the shredder, switch off the motor and pull out the ignition key, spark plug connector or power plug.
Maintenance and cleaning work on the shredder as well as the removal or adjustment of any safety devices may only be performed when the motor is at a standstill and the ignition key, spark plug connector or power plug has been pulled out.
The safety devices supplied with the shredder (e.g. the ejector) must be used.
The shredder must be assembled correctly before it is put into operation.
Examine the shredder each time before you use it. Do not use the shredder if any safety devices are damaged or worn. Never put safety devices out of operation.
Use the shredder only for the purpose specified in these instructions.
* Work only in good visibility.
* Always make sure of your footing while working.
* Never leave the shredder unattended at your work place. Store the shredder in a safe place during interruptions.
If you interrupt your work to move to a different position it is imperative to switch off the shredder while you are moving there.
* Never use the shredder in the rain or in moist or wet conditions.
* Protect the shredder from the damp and rain.
* Always wear suitable clothing to protect your head, hands and feet from injury. Wear a helmet, goggles or visor, high boots or strong shoes, long trousers made of tough material, and work gloves.
* Keep the shredder away from other persons, particularly children and pets.
Do not use the shredder without protection device.
ATTENTION! The guard is vital for your safety and for the safety of others, and it is also essential for the grass trimmer to work correctly. Failure to observe this instruction will not only create a potential hazard, it will also result in the loss of your rights under the warranty.
- Keep the air vents clear of dirt.
After use, unplug the machine and check it for damage.
When you are not using the shredder, keep it in a dry place out of the reach of children.
* Check the screws regularly to see that they are properly tightened.
The mains voltage must be the same as the voltage specified on the rating plate.
Power cables used with the shredder must not be of a lighter duty class than HO7RN-F rubberinsulated flexible cables according to DIN 57282/ VDE 0282 with a minimum diameter of 1.5 mm2.
Plug connectors must be equipped with earthing contacts and the coupling must be rainwaterprotected.
* Use only original replacement parts for repair and maintenance purposes.
* Have repairs carried out only by a qualified electrician.
Examine the shredder for signs of wear or damage each time before you use it and after any collisions. Have essential repairs carried out without delay.
* Never use replacement parts or accessories which are not foreseen or recommended by the manufacturer.
Pull out the power plug before carrying out any inspection, cleaning or other work on the shredder and whenever it is not being used.
Before you begin your work, examine the material you want to shred. Remove any foreign bodies.
Continue to watch out for foreign bodies while you are working. If you come across any foreign bodies while shredding, shut down the machine and remove the items in question.
-
Keep the machine away from other persons, particularly children and pets.
Use the machine only in the way described in these operating instructions.
The electric circuit must be protected at least by a 16A fuse.
The efficiency of the machine will be greatly reduced if a connecting cable with too small a cross section is used. A conductor cross section of at least 3x1.5 mm2 is required for cables up to 25 m long, and one of at least 3x2.5 mm2 for cables longer than 25 m.
If the machine has to be lifted for transporting, be sure to switch off the motor first and wait for the cutter to come to a standstill. Each time before you leave the machine, switch off the motor and pull out the power plug. Before you connect the machine to the power supply, make sure that the loading funnel is properly connected to the motor housing and the release screw tightened.
If the garden refuse shredder vibrates excessively, turn off the motor, pull out the power plug, and find out immediately what is causing the vibrations. Intensive vibration is usually a sign that something is wrong.
Do not wear loose clothing or clothing with hanging belts or cords.
Do not use the machine on a paved area that has been graveled where discharged material may cause injuries. -
Ensure that the loading funnel inlet is empty before you start the machine.
- Keep your head and body away from the infeed opening.
Do not move your hands, other body parts or clothing into the infeed chamber, ejector chute or near other moving parts.
Make sure that you are balanced and standing on a firm surface at all times. Do not stretch forwards. Never stand higher than the machine when feeding material into it. - Keep away from the discharge zone when you start the machine.
If foreign bodies get into the cutting tool or the machine generates unusual noises or vibrates in a strange way, switch off the motor immediately and allow the machine to come to a standstill.
* Pull the plug and carry out the following work:
Check the machine for signs of damage •
Check that all the parts are secure and tighten them if necessary.
Have any damaged parts replaced or repaired, but use only spare parts of the same type and equivalent quality
If the machine is blocked switch off the motor and pull the plug before you start the cleaning procedure. Ensure that the motor is clear of waste and other accumulations to protect the motor from suffering damage or possibly catching fire.
- Ensure that all the covers and guards are in position and in good working order.
Do not tip the machine whilst the motor is running.
Switch off the machine before you fit or remove the collection container.
The tool may only be used outdoors (i.e. not in the vicinity of a wall or any other ridged object)
* Damaged or illegible labels must be replaced
Allow the tool to cool before carrying out any maintenance work, adjustments, etc.
* Never use the machine while other people are nearby.
When inserting material take special care to ensure that it does not contain any metal, stones, bottles, cans or other foreign bodies.
Do not allow processed material to accumulate within the discharge area; this could prevent the machine being able to discharge correctly and result in material recoiling through the infeed opening.
When servicing the cutting tool, remember that it may still be moving due to the starting mechanism, even if the motor is not running because of the cover interlock.
Children must not be permitted to use the machine.
* Wear ear protectors and safety goggles. Wear these throughout the time the machine is in operation.
Before starting the machine, check all screws, nuts, bolts and other fastening materials to ensure that they are secure and that all covers and guards are in position. Damaged or illegible labels must be replaced.
Connect the equipment to the power supply only via an earth-leakage circuit breaker with max. 30mA tripping current.
5. PROPER USE
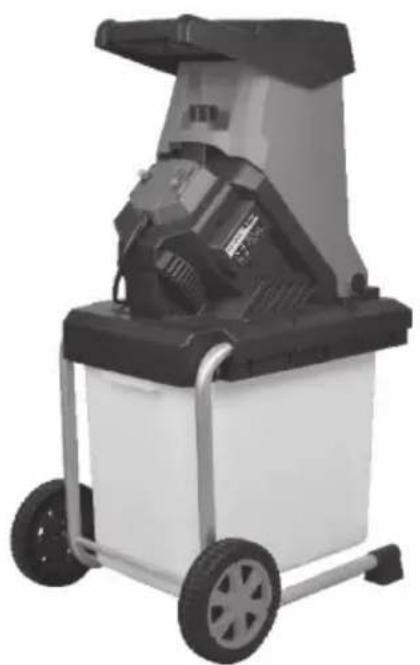
This electric garden refuse shredder is designed only for shredding organic garden waste. Place biologically degradable material, e.g. leaves, branches, dead flowers etc., into the loading funnel inlet.
The machine is to be used only for its prescribed purpose. Any other use is deemed to be a case of misuse. The user / operator and not the manufacturer will be liable for any damage or injuries of any kind caused as a result of this.
Please note that our equipment has not been designed for use in commercial, trade or industrial applications. Our warranty will be voided if the machine is used in commercial, trade or industrial businesses or for equivalent purposes.
6. INSTALLATION
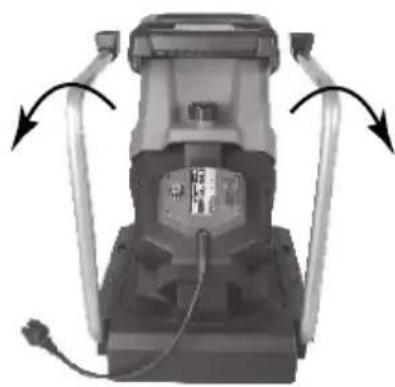
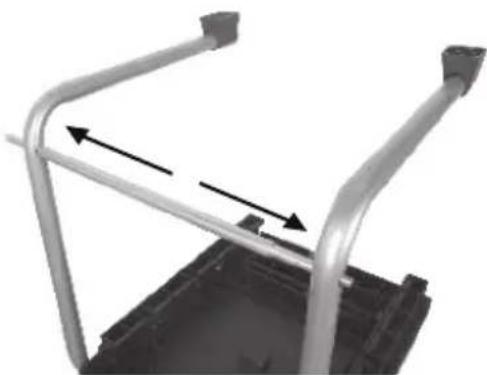
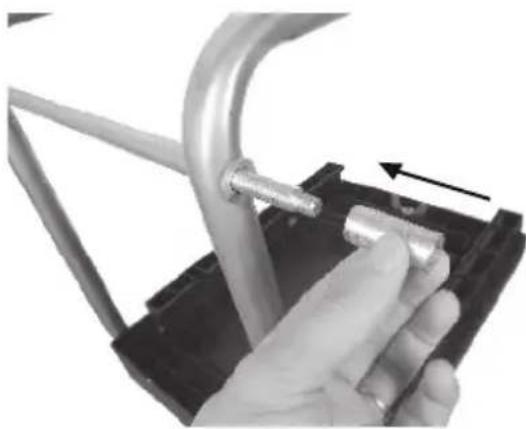
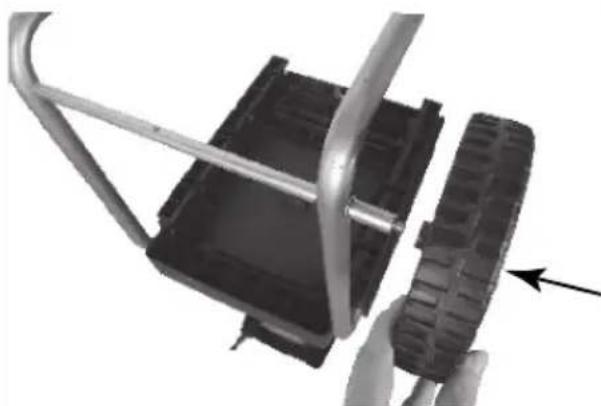
The garden shredder is delivered unassembled. The chassis and the wheels must be fitted before use.
Follow the operating instructions step-by-step and use the pictures provided as a visual guide to easily assemble the machine.
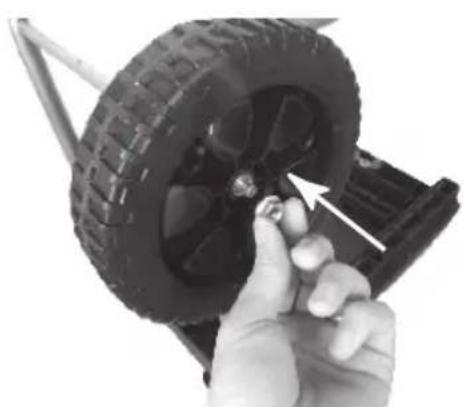
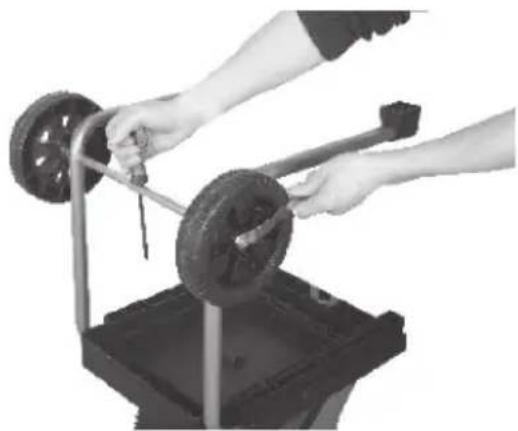
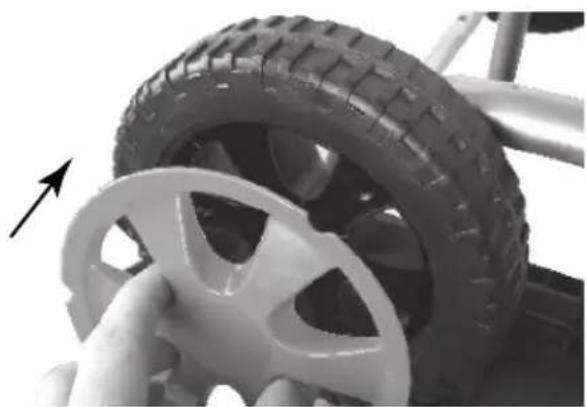
Assembling the axle and wheels (Figs. 3-10)
Remove the nuts and washers from the axle.
Mount the chassis as shown in Figs. 3-10.
7. OPERATION
Please observe the statutory regulations governing noise abatement during operating times, which may differ from town to town.
Connecting up the machine and switching it on
Connect the coupling on the machine connection cable (extension) to the power cable (Fig. 1/Item 9).
The machine can be switched ON (switch position "I") and OFF (switch position "O") using the ON/OFF switch (Figure 1/Item 11).

Note: The machine cannot be switched on if there is no voltage being supplied to it. If the power supply is interrupted, the machine will switch off automatically (switch position "O"). The machine cannot be switched on again until the voltage supply has been re-established and the ON/OFF switch has been moved to position "I".
Overload protection (motor circuitbreaker)
The motor is protected from overloads by an overload switch.
During operation the control pin projects out of the overload switch housing by around 4 mm. If the motor is overloaded for a lengthy period, the overload switch (Fig. 1/Item 10) will trip and switch off the machine. In this case the pin on the overload switch will project out of the housing by around 8 mm and the ON/OFF switch will automatically move to "0". After waiting for at least 1 minute the control pin in the overload switch can be pressed and the ON/OFF switch then switched on again (switch position "I").
If the motor fails to start, clean the ejector chute.
Practical tips
Be sure to observe the safety instructions (see supplied booklet).
Wear work gloves, goggles and ear protection.
The material is drawn into the shredder automatically.
ATTENTION! Long pieces of material projecting out of the funnel inlet may whiplash when it is drawn in – keep a safe distance between yourself and the machine.
Judge the quantity of material which you put into the funnel inlet so that the funnel does not clog.
If you want to shred withered, damp material that has been lying in the garden for several days, alternate between putting in this material and branches. This will help to prevent the loading funnel becoming clogged with material.
Do not shred soft waste (e.g. kitchen waste) – put it straight in the compost box.
* Entangled branches and leaves should be tho roughly shredded before loading any more material.
Do not allow the discharge opening to become clogged with shredded material – risk of pile ups.
Do not cover the ventilation slits.
Do not place heavy material or thick branches into the machine continuously. This may cause the blade to jam.
Use a plunger or hook to remove jammed objects from the funnel or discharge openings.
Cleaning the ejector chute
* Always wear heavy duty working gloves
* Ensure that the switch is set to the "0" position
* Disconnect the coupling on the machine connection cable (extension) from the machine plug.
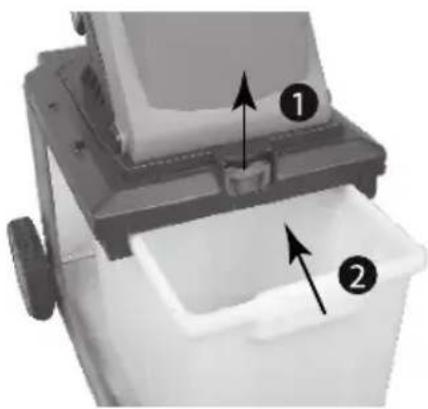
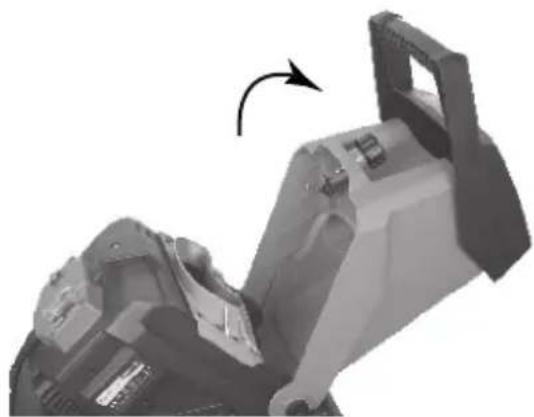
* Unscrew the safety screw (Figure 1/Item 12) and then pull up the loading funnel (Figure 11).
Clean the cutting surfaces of the blades, the blade plate and the ejector chute with a brush or paintbrush. Remove pieces of wood or other parts that may prevent the blade plate from turning.
Close the loading funnel again and tighten the safety screw.
Safety
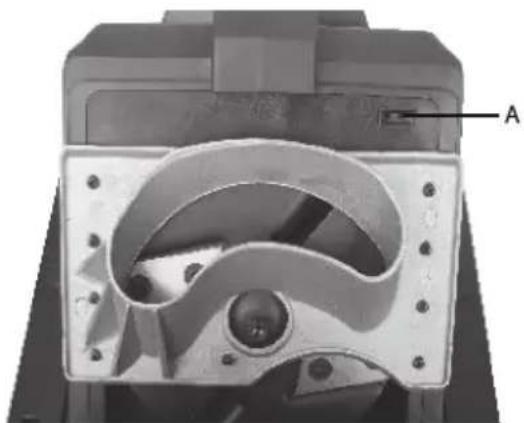
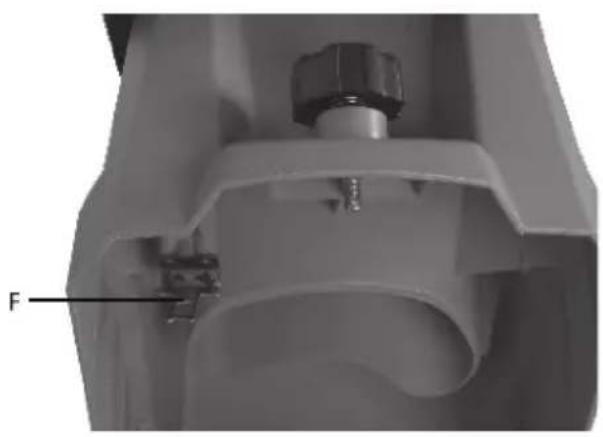
The shredder has a safety switch (Figure 12a/ Item A) in its interior on the motor housing. The control unit for it (Figure 13/Item F) is located on the loading funnel.
If the loading hopping is not perfectly position or if it is not pressed against the motor housing, the SAFETY SWITCH will trip and prevent the motor from working. If this situation occurs, open the loading funnel as described above. Carefully clean the interior. Close the loading funnel again as described above and ensure that when you switch on the machine again the loading funnel is correctly position and the safety screw is screwed right in.
⚠️ ATTENTION! NEVER undo the release screw (Figure 1/Item 12) without first switching off the machine at the ON/OFF switch (Figure 1/Item 11) and disconnecting the coupling on the machine connection cable (extension) from the machine plug.
8. REPLACING THE POWER CABLE
If the power cable for this equipment is damaged, it must be replaced by the manufacturer or its aftersales service or similarly trained personnel to avoid danger.
9. CLEANING, MAINTENANCE AND ORDERING OF SPARE PARTS
Always pull out the mains power plug before starting any cleaning work.
Maintenance and storage
Clean the machine regularly. This will help to keep the machine in good working order and is the basis for a long working life.
* Keep the vent slots clean while you work.
Clean the plastic body and other plastic parts with a mild household cleaning agent and a damp cloth. Do not use any aggressive agents or solvents for cleaning purposes.
* Never clean the shredder by spraying with water.
* Prevent water getting inside the machine at all cost.
* Check the chassis securing screws from time to time to ensure that they are tight.
If you do not intend to use the shredder for a lengthy period, protect it from corrosion using environmentally friendly oil.
Store the device in a dry room.
Store the device out of reach of children.
When you have finished your work, pull the loading funnel forwards and clean the inside. Use a brush to remove deposits from metal parts on the inside. Apply a thin coating of oil to the cleaned blade plate and blades.
When you close the loading funnel, make sure that the safety switch and the release screw are clean.
Replace, sharp and change blades
The blades on the blade plate are replaceable. If you have to replace any blade, you must only use genuine blades to ensure that they meet the relevant quality and safety criteria.
Please note: For safety reasons we recommend that you have all sharpening and blade replacement work carried out by a specialist workshop.
Always wear heavy duty working gloves
Secure the rotary disk so that it cannot rotate (for example by jamming it with a screwdriver, see Figure 12b)
* Undo the four blade screws and remove the blades
* Each of the blades can be turned once as they are ground sharp on both ends. Then they must be replaced by new blades.
To assemble, proceed in reverse order.
Ordering replacement parts
Please quote the following data when ordering replacement parts:
Type of machine
Article number of the machine
10. TROUBLESHOOTING GUIDE
| The machine does not work | a) No power at the plugb) Machine is switched offc) Overload switch has trippedd) Ejector chute is blockede) Loading funnel is not secureon the motor housing | a) Check the power cable and fuseb) Switch on machinec) Press control on overload switchb) Clean ejector chutee) Clean interior and tighten safety screw |
| Shredding performance unsatisfactory | a) Blades worn a) Turn, sharpen or replace blades | |
| Shredding performance falls in quality | a) Blades worn a) Turn, sharpen or replace blades | |
11. TECHNICAL DATA
| Mains voltage: 230-240 V~/50 Hz | |
| Power input: 2500 W(S6, 40%) | |
| Idle speed n0: 4050 rpm | |
| Branch diameter: max. 40 mm | |
| LpAsound pressure level: 88,3 dB(A), K=3 dB | |
| LwAsound power level: 108,3 dB(A), K=3 dB | |
| Weight: 14,1 kg |
The User's Manual is in a specific language version.
12. DECLARATION OF CONFORMITY
FAST®
FAST ČR, a.s.
U Sanitasu 1621, 251 01 Ríčany, Czech Republic
tel.: +420 323 204 111, fax: +420 323 204 110
EU DECLARATION OF CONFORMITY
Product / brand: Electric Shredder / FIELDMANN
Type / model: FZD 4020-E as factory model GY6000
AC 230 - 240 V; 50Hz; 2500W; diameter 40 mm; Class II, IPX4
L_PA = 98,7dB(A),L_WA = 109dB(A)
Manufacturer: FAST ČR, a.s.
U Sanitasu 1621, 251 01 Říčany, Czech Republic
VAT no: CZ24777749
This declaration of conformity is issued under the sole responsibility of the manufacturer.
Person in charge of completing the technical documentation: FAST ČR, a.s.
The object of the declaration described above is in conformity with the relevant Union harmonization legislation:
Directive MD 2006/42/EC Directive EMC 2014/30/EU
Directive NEOE 2000/14/EC Directive RoHS 2011/65/EU
The relevant harmonized standards and the other technical specifications:
EN 60335-1:2012+A11+A13+A1+A14+A2 EN IEC 55014-1:2021
EN 50434:2014 EN IEC 55014-2:2021
EN IEC 61000-3-2:2019+A1
EN IEC 61000-3-11:2019
CE
Place of issuance: Prague
Date of issuance: 25.08.2022
Name: Petr Uher - Responsible Person
Signature:
13. DISPOSAL
INSTRUCTIONS AND INFORMATION ON DISPOSAL OF USED PACKAGING.
Put any used package material to the place determined by the municipality for waste disposal.
DISPOSAL OF USED ELECTRIC AND ELECTRONIC EQUIPMENT
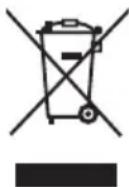
This symbol on products or accompanying documents means that used electric or electronic products must not be put to ordinary municipal waste. Hand over such products to determined collection points for proper disposal, restoration and recycling. Alternatively, in some countries of the European Union or other European countries you can return your products to your local dealer when you buy an equivalent new product. By dutiful disposal of this product you can preserve precious natural resources and you help prevent any potential adverse effects on the environment and human health which could be the results of wrong waste disposal. Ask your local authority or the nearest collection point for additional details. In case of improper disposal of this waste kind penalties can be imposed in accordance with national regulations.
For companies in the European Union countries
Should you want to dispose of electric and electronic devices, ask your dealer or vendor for necessary information.

Disposal in other countries outside the European Union
Should you want to dispose of this product, ask your local authorities or your dealer for necessary information about disposal method.
This product fulfils all basic requirements of the EU directives that apply to it.
Text, design and technical specifications can change without prior notice and we reserve the right for their change.

natural_image
Abstract black and white spiral pattern with no text or symbolsFIELDMANN®
Home & Garden Performance
Model /Modell /Modelis:
Conditions of guarantee
This product is warranted for the period of 24 months from the adate aof purchase to the end-user. Warranty is limited to the following conditions. Warranty is referred only to the customer goods using for common domestic use. The claim forservice can be applied either at dealer's shop where the product was bought, or at below mentioned authorized service shops. The end-user is obligated to set up a claim immediately when the defects appeared but only till the end of warranty period. The end-user is obligated to cooperate to certify the claiming defects. Only completed and clean (according to hygienic standards) product will be accepted. In case of eligible warranty claim the warranty period will be prolonged by the period from the date of claim application till the date of taking overthe product by end-user, or the date the end-user is obligated to take it over. To obtain the service under this warranty, end-user is obligated to certify his claim with duly completed following documents: receipt, certificate of warranty, certificate of installation ...
This warranty is avoid aespecially if aapply as follows: ■ Defects which were put on sale. ■ Wear-out aor adamage caused by acommon use. ■ The aproduct awas adamaged aby aunprofessional aor wrong installation, used in contrary to the applicable instruction manual, used in contrary to legal enactment and common process of use or used for another purpose which has been designed for. ■ The product was damaged by uncared-for or insufficient maintenance. ■ The product was damaged by dirt, accident of force majeure (natural disaster, fire, flood, ...). ■ Defects on functionality caused by low duality of signal, electromagnetic field interference etc. ■ The product was mechanically damaged (e.g. broken button, fall...). ■ Damage caused by use of unsuitable media, fillings, expendable supplies (batteries) or by unsuitable working conditions (e.g. high temperatures, high humidity, quakes,...). ■ Repair, modification or other failure action to the product by unauthorized person ■ End-user did not prove enough his right to claim (time and place of purchase). ■ Data on presented documents differs from data on products. ■ Cases when the claiming product can not be identified according to the presented documents (e.g. the serial number or the warranty seal has been damaged).
Fast Poland, Sp. z o.o. UI.
Kwietniowa 36
05-090 Wypędy
Poland
Tel.: +48 697 690 228
Mail: serwis@fastpoland.pl
www.fastpoland.pl
natural_image
Exterior view of a mechanical device with wheels and a transparent casing (no text or symbols visible)
FIELDMANN®
Home & Garden Performance
- FIELDMANN®
- Electrical shredder
- OPERATING INSTRUCTIONS
- TABLE OF CONTENTS
- GENERAL SAFETY REGULATIONS
- Important safety notices
- Packaging
- Instructions for use
- SYMBOLS
- LAYOUT AND ITEMS SUPPLIED (see Fig. 1-2)
- SAFETY INSTRUCTIONS
- ATTENTION! CAUTION!
- PROPER USE
- INSTALLATION
- Assembling the axle and wheels (Figs. 3-10)
- OPERATION
- Connecting up the machine and switching it on
- Overload protection (motor circuitbreaker)
- Practical tips
- Cleaning the ejector chute
- Safety
- REPLACING THE POWER CABLE
- CLEANING, MAINTENANCE AND ORDERING OF SPARE PARTS
- Maintenance and storage
- Replace, sharp and change blades
- Ordering replacement parts
- TROUBLESHOOTING GUIDE
- TECHNICAL DATA
- DECLARATION OF CONFORMITY
- FAST®
- EU DECLARATION OF CONFORMITY
- CE
- DISPOSAL
- INSTRUCTIONS AND INFORMATION ON DISPOSAL OF USED PACKAGING.
- DISPOSAL OF USED ELECTRIC AND ELECTRONIC EQUIPMENT
- For companies in the European Union countries
- Disposal in other countries outside the European Union
- Model /Modell /Modelis:
- Conditions of guarantee
Brand : Fieldmann
Model : FZD 4020-E
Category : Chopper