
CVR-1000 - Rotisserie CUISINART - Free user manual and instructions
Find the device manual for free CVR-1000 CUISINART in PDF.


| Product Type | Countertop Rotisserie |
| Brand | Cuisinart |
| Model | CVR-1000 |
| Dimensions (W x D x H) | 20.5 x 14.5 x 12.5 inches |
| Weight | 18.5 lbs |
| Power Supply | 120V, 60Hz, 1500W |
| Rotisserie Capacity | Up to 5 lbs |
| Main Functions | Rotisserie, bake, broil, convection |
| Temperature Range | 200°F to 450°F |
| Timer | Up to 180 minutes with auto shut-off |
| Interior Light | Yes |
| Viewing Window | Large tempered glass |
| Cleaning and Maintenance | Removable drip tray; non-stick interior; dishwasher-safe skewer and accessories |
| Safety Features | Automatic shut-off, cool-touch handle, overheat protection |
| Spare Parts Availability | Replacement skewer, motor, drip tray available via Cuisinart customer service |
| Warranty | 3-year limited warranty |
| Included Accessories | Rotisserie spit, roasting rack, drip tray, instruction manual |
| Certifications | UL listed, ETL approved |
Frequently Asked Questions - CVR-1000 CUISINART
User questions about CVR-1000 CUISINART
0 question about this device. Answer the ones you know or ask your own.
Ask a new question about this device
Download the instructions for your Rotisserie in PDF format for free! Find your manual CVR-1000 - CUISINART and take your electronic device back in hand. On this page are published all the documents necessary for the use of your device. CVR-1000 by CUISINART.
USER MANUAL CVR-1000 CUISINART
natural_image
Cuisine kitchen appliance with a roasted chicken inside, displayed next to a plate of roasted chicken and a digital timer (no visible text or symbols on the main device)Cuisinart® Vertical Rotisserie
CVR-1000
For your safety and continued enjoyment of this product, always read the instruction book carefully before using.
IMPORTANT SAFEGUARDS
When using an electrical appliance, basic safety precautions should always be followed to reduce the risk of fire, electric shock, and personal injury, including the following:
- Read all instructions.
- Do not touch hot surfaces. Use handles or knobs.
- Use this appliance only as described in this manual. Other uses not recommended may cause fire, electric shock or personal injury.
- This product is intended for household use only.
- To protect against electric shock, do not immerse unit, plug or cord in water or spray with liquids.
- Close supervision is necessary when any appliance is used by or near children.
- Unplug from the outlet when not in use, when moving from one location to another, and before cleaning. Allow to cool before putting on or taking off parts.
- To disconnect the appliance, grip the plug and pull it from the wall outlet. Never pull by the cord.
- Do not operate the appliance in the presence of explosives and/or flammable fumes.
- Do not place on or near a hot gas or electric burner, or in a heated oven.
- Do not operate the appliance with a damaged cord or plug, if the product malfunctions, or if it is dropped or damaged in any manner. Return appliance to the nearest authorized service facility for examination, repair or adjustment.
-
The use of attachments not recommended by the manufacturer may be hazardous.
-
Do not use outdoors.
- Do not let cord hang over edge of table or counter, or touch hot surfaces.
- Extreme caution must be used when moving appliance containing hot oil or other hot liquids.
- Use extreme caution when removing tray or disposing of hot grease.
- Do not clean with metal scouring pads. Pieces can break off the pad and touch electrical parts, creating a risk of electric shock.
- Place the unit on a dry level surface.
- Do not operate if the housing is removed or damaged.
- A loose fit between the AC outlet (receptacle) and plug may cause overheating and a distortion of the plug. Contact a qualified electrician to replace loose or worn outlet.
- This appliance is designed to be freestanding only, and should not be recessed or built in (fully recessed).
- Locate the unit away from direct sunlight and sources of heat (stove, heater, radiator, etc.). Direct sunlight will affect/alter the outside color of the appliance.
WARNING: To reduce the risk of fire, electric shock or personal injury, unplug or disconnect the appliance from the power supply before servicing.
SAVE THESE INSTRUCTIONS
A short power supply cord is provided to reduce the risks resulting from becoming entangled in or tripping over a longer cord. Longer extension cords may be used if care is exercised. If a long extension cord is used, the marked electrical rating of the extension cord must be at least as great as the electrical rating of the appliance, and the longer cord should be arranged so that it will not drape over the counter top or tabletop where it can be tripped over or pulled on by children.
NOTICE
This appliance has a polarized plug (one blade is wider than the other). To reduce the risk of electric shock, this plug will fit into a polarized outlet only one way. If the plug does not fit fully into the outlet, reverse the plug. If it still does not fit, contact a qualified electrician. Do not modify the plug in any way.
IMPORTANT
Never operate rotisserie without chrome insert in place.
CONTENTS
Important Safeguards....2
Special Cord Set Instructions ..... 3
Introduction 3
Features & Accessories 4
Control Panel 5
Assembling Your Rotisserie ..... 6
Operating Instructions 6
Cooking with Accessories 7
Cleaning 8
Warranty 9
INTRODUCTION
Cuisinart is about to change the way you cook some of your favorite foods. Once you vertically rotisserie your first chicken, you'll never go back! Juices get locked in and fat drains off. Designed to efficiently cook and evenly brown everything from roasts to vegetables to shish kebabs, this is a countertop cooker you are going to love.
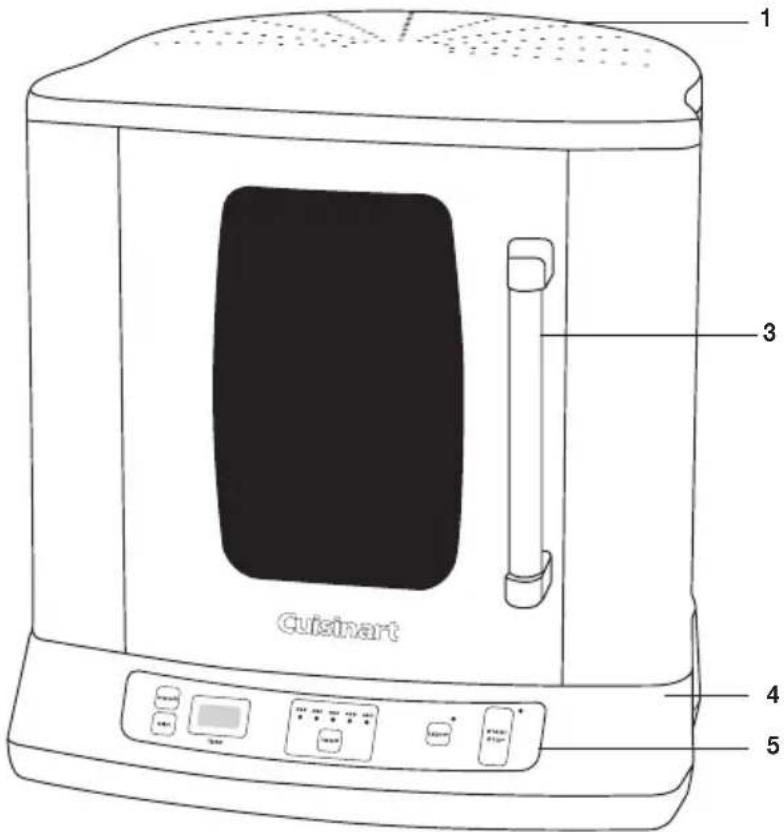
FEATURES & ACCESSORIES
1. Vented Top
Automatically releases heat and steam.
2. Heating Element (not shown)
Located on back wall of interior.
3. Door Handle
Stays cool to the touch.
4. Wide Base with Nonslip Feet
Keeps rotisserie balanced and securely in place.
5. Control Panel
See details and instructions on page 5.
6. Interior Light (not shown)
Allows you to view food as it cooks.
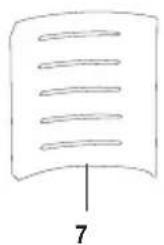
7. Chrome Insert
Reflects heat for more even cooking; remove to make interior of rotisserie easy to clean. Never operate rotisserie without chrome insert in place.
8. Versatile Rotisserie Accessories
All accessories are dishwasher safe.
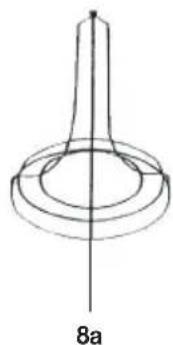
a. Vertical Poultry Tower
A healthy way to roast a whole chicken.
b. Skewer Set
Perfect for shish kebabs.
c. Multi Purpose Basket
Holds fish and vegetables firmly as they cook.
d. Roasting Rack
Keeps roasts moist and tender as they cook.
e. Rotating Tray Support Rack (not shown)
Supports the drip tray and cooking accessories. Rotates to ensure food cooks evenly.
f. Nonstick Drip Tray
Catches fat for healthier cooking and easy cleanup.
natural_image
Pure geometric diagram of a conical object with concentric rings and a vertical line, labeled '8a' at the bottom (no text or symbols within the diagram itself)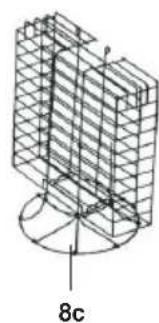
natural_image
3D wireframe diagram of a mechanical or structural component with labeled point '8c' (no readable text or symbols beyond label)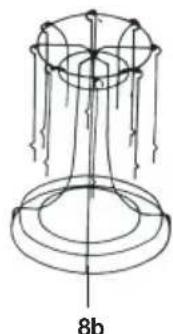
natural_image
Diagram of a mechanical or structural component with concentric rings and downward arrows, labeled '8b' at bottom (no text or symbols on diagram itself)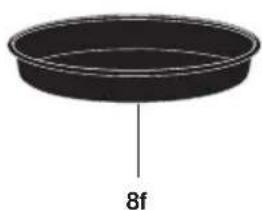
natural_image
Simple black circular object with a vertical line and label '8f' at the bottom (no other text or symbols)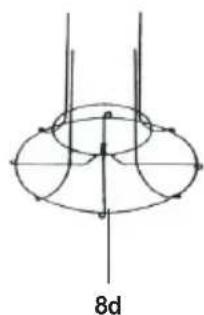
natural_image
Pure geometric diagram of an elliptical structure with intersecting lines and labeled '8d' (no text or symbols beyond label)GETTING TO KNOW YOUR CONTROL PANEL
Detailed programming and use instructions are on pages 6, 7 and 8.
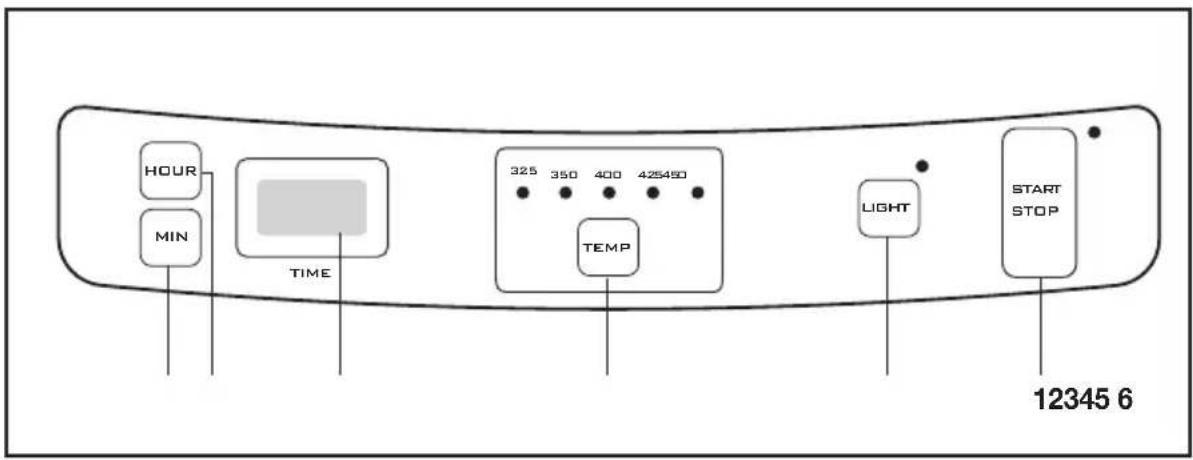
1. Start/Stop Button
Press to turn rotisserie on. Press and hold for 2 seconds to power off.
2. Interior Light Button
Press button to turn on light to view food while cooking. Press again to turn off. Light turns off automatically when rotisserie turns off.
3. Temperature Control Button
Press to select from 5 preset heat settings. LED indicators.
4. Hour Button
Use to set cooking time.
5. Minute Button
Use to set cooking time.
6. LCD Time Display
Displays 3-hour countdown timer.
NOTE: Rotisserie shuts off automatically when timer reaches 0:00.
ASSEMBLING YOUR ROTISSERIE
- Place your Cuisinart® Vertical Rotisserie on a flat surface that is not heat-sensitive.
- Be sure rotisserie is at least 2 to 4 inches away from the wall or any other object.
- Open the door and slide the chrome insert into the guides, located on the back wall of the rotisserie behind the heating element.
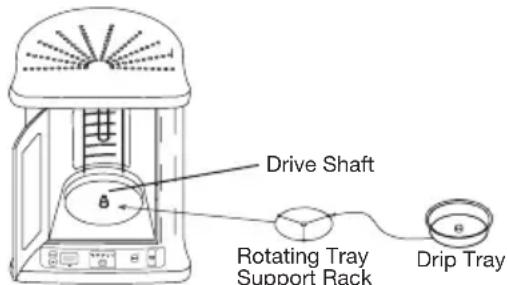
- Place the rotating tray support rack over the drive shaft, located on the rotisserie deck. See illustration below.
- Place food on proper cooking accessory, as directed in the “Cooking with Accessories” section starting on page 7.
- Center the assembled accessory rack on the drip tray.
- Carefully lift the drip tray and place it in the oven on the revolving tray support rack. NOTE: The drive shaft must be properly aligned with the impression on the underside of the drip tray or the tray will not rotate correctly. When the tray silps onto the shaft, it will sit evenly on the rack.
OPERATING INSTRUCTIONS
SETTING COOKING TEMPERATURE
- Check the cooking temperature recommended in your recipe.
- Gently touch the temp button until the LED illuminates under your preferred setting - 325°F, 350°F, 400°F, 425°F or 450°F.
NOTE: If no temperature is selected, rotisserie will not operate.
COOKING WITH COUNTDOWN TIMER
(maximum: 3 hours)
Set cooking time by gently pressing the Hour and Minute buttons. Hold the Minute button down to scroll through the digits, or press and release to advance one digit at a time. Selected time will appear in the LCD display.
COOKING IN MANUAL MODE (no time selected)
You can cook in your rotisserie without setting the timer. Simply select a temperature, as directed above, and press Start. Oven will automatically shut off after 4 hours.
ADJUSTING OR STARTING THE COUNTDOWN TIMER DURING THE COOKING CYCLE
You can adjust time during a timed cooking cycle, or set the timer during a manual cooking cycle. Simply press Hour and Minute buttons until the desired time appears in the LCD display. Oven will automatically shut off when time has elapsed.
TO BEGIN COOKING
Touch the Start/Stop control. LED will illuminate to indicate power is on and cooking has begun. The electronic countdown timer will immediately begin to count down cooking time in the LCD window.
A convenient “memory” feature allows unit to automatically resume cooking at the time and temperature selected if power is interrupted for 30 seconds or less.
PAUSE FEATURE
Press Start/Stop button to pause the countdown timer. Both heater and motor will turn off, and the remaining time will flash in the LCD display. To resume cooking at the temperature selected and continue countdown, press Start/Stop button again. If button is not pushed within 30 minutes, selected settings will be canceled and the timer will display 0:00.
TO END COOKING
1. Automatic Shutoff
When selected time has elapsed, the LCD will display "0:00" and the heating element and motor will turn off.
NOTE: Five short beeps will sound when rotisserie turns off.
2. Manual Shutoff
To turn the oven off anytime during the cooking cycle, press and hold Stop button for two seconds. The heating element and motor will turn off.
COOKING WITH ACCESSORIES
Treating accessories with a nonstick cooking spray before use will make cleanup easier.
Cooking with the Poultry Tower
-
Prepare a whole chicken with marinade or other flavorings.
-
Truss the chicken:
To ensure roasts and poultry cook evenly, firmly tie with butcher's twine or string before cooking. To tie (truss) your chicken, follow instructions below:
a. Cut a piece of string about 4 to 5 times the length of the chicken.
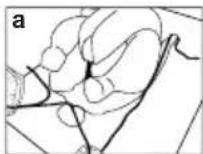
b. Place the middle of the string under the tail.
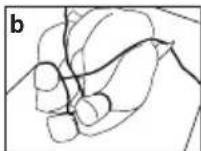
c. Wrap the string around the end of each drumstick and pull the legs together, crossing strings over each other. Be sure to leave the lower cavity open.
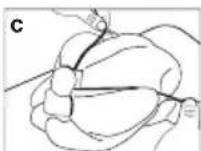
d. Turn the chicken ove and tie the string across the wings to hold them in place.
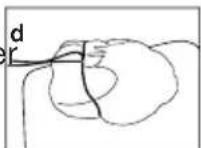
e. Trim string if necessary.
-
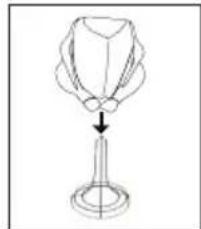
Place the prepared bird on the poultry tower, with the neck at the top.
-
Place the poultry tower onto the drip tray and into the Vertical Rotisserie. Do not add water to the drip tray!
natural_image
Simple line drawing of a trophy with an arrow pointing to it (no text or symbols)Cooking with the Multipurpose Basket
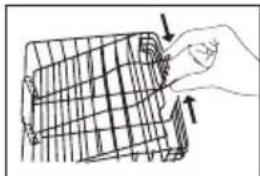
- Lay the basket flat on a tray or countertop, and gently press the
clasps together that extend from the top of the basket door. Remove the door and set it aside.
natural_image
Hand holding a wire mesh device with arrows indicating force or movement (no text or symbols)-
Place food in the basket.
-
Set the door in the basket guides at
the base of the basket. Choose the bracket position that will hold the food firmly in place without crushing it.
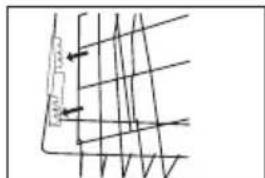
-
Squeeze the clasps to lock the door into place.
-
Place the roasting rack, which will hold the basket, on the drip tray.
-
Put the basket with food onto the roasting rack, as directed below:
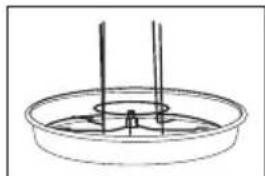
natural_image
Simple line drawing of a circular container with two vertical rods inserted into the middle (no text or symbols)a. Stand basket up, with clasps on top.
b. Center the basket over the rack, in
between the rack's four vertical prongs.
c. Lower the basket onto the rack, guiding two of the prongs through the two rings on the back of the basket.
d. Slip the other two prongs into the small, square slotted
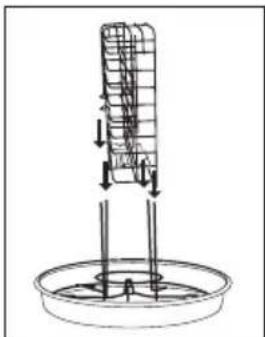
natural_image
Diagram of a mechanical assembly with a vertical grid structure and supporting legs, no text or symbols present- Lift the drip tray carefully and place it, the roasting rack and the filled basket into the Vertical Rotisserie.
Cooking with the Skewers
-
Put the poultry tower onto the drip tray.
-
Take the roasting rack and place it upside down on the poultry tower.
-
Put any combination of meats, vegetables or fruits onto the skewers.
-
Hook the loaded skewers onto the rings, evenly distributing the weight.
-
Lift the drip tray carefully, and place the assembled skewers into the Vertical Rotisserie.
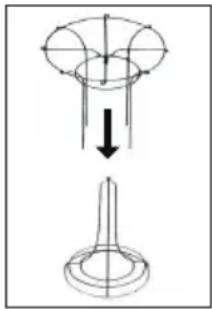
natural_image
Diagram showing a mechanical component with a downward arrow and a top view, no text or symbols present.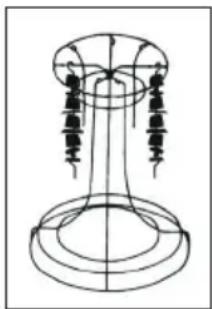
natural_image
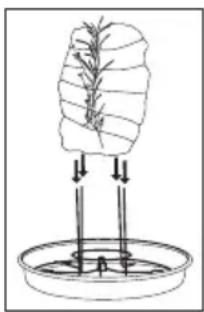
Pure technical line drawing of a mechanical component with no text or symbolsCooking with the Roasting Rack
-
Place the roasting rack on the drip tray.
-
Center the meat vertically over the rack, with the thickest part on top, and slide it down until it rests firmly on the stand.
-
Place the assembly into the Vertical Rotisserie.
natural_image
Diagram of a plant with roots and leaves being inserted into a petri dish (no text or labels)NOTE: When the meat is removed from the rotisserie, allow it to sit for 5 to 10 minutes before carving. This allows juices to settle into the meat and produces a more moist roast.
INTERIOR LIGHT
The interior display light can be turned on to allow you to keep an eye on food as it's cooking. Press the Light button on the control panel to turn light on, and press again to turn the light off. Light will go off automatically when cooking cycle is complete.
CLEANING
- Unplug your Cuisinart® Vertical Rotisserie and let it cool.
- Wash all accessories in hot soapy water with a mild detergent and towel dry, or place them in the dishwasher to clean.
- Never use abrasive or strong household cleaners that will damage the finish of the accessories.
- To clean "chrome insert", use a non-abrasive cleaner such as Bon Ami® Polishing Cleaner to remove baked on stains.
- To clean the base, inside and outside, and interior oven walls, use a damp cloth or sponge.
- Any other servicing should be performed by an authorized service representative.
WARRANTY
LIMITED THREE-YEAR WARRANTY
This warranty is available to consumers only. You are a consumer if you own a Cuisinart® Vertical Rotisserie that was purchased at retail for personal, family or household use. Except as otherwise required under applicable law, this warranty is not available to retailers or other commercial purchasers or owners.
We warrant that your Cuisinart® Vertical Rotisserie will be free of defects in materials and workmanship under normal home use for 3 years from the date of original purchase.
We suggest you complete and return the enclosed product registration card promptly to facilitate verification of the date of original purchase. However, return of the product registration card does not eliminate the need for the consumer to maintain the original proof of purchase in order to obtain the warranty benefits. In the event that you do not have proof of purchase date, the purchase date for purposes of this warranty will be the date of manufacture.
If your Cuisinart® Vertical Rotisserie should prove to be defective within the warranty period, we will repair it, or if we think necessary, replace it. To obtain warranty service, simply call our toll-free number 1-800-726-0190 for additional information from our Customer Service Representatives, or send the defective product to Customer Service at Cuisinart, 150 Milford Road, East Windsor, NJ 08520.
To facilitate the speed and accuracy of your return, please enclose \$10.00 for shipping and handling of the product.
Please pay by check or money order (California residents need only supply proof of purchase and should call 1-800-726-0190 for shipping instructions).
NOTE: For added protection and secure handling of any Cuisinart® product that is being returned, we recommend you use a traceable, insured delivery service. Cuisinart cannot be held responsible for in-transit damage or for packages that are not delivered to us. Lost and/or damaged products are not covered under warranty. Please be sure to include your return address, daytime phone number, description of the product defect, product model number (located on bottom of product), original date of purchase, and any other information pertinent to the product's return.
Your Cuisinart® Vertical Rotisserie has been manufactured to the strictest specifications and has been designed for use with the authorized accessories and replacement parts.
This warranty expressly excludes any defects or damages caused by accessories, replacement parts, or repair service other than those that have been authorized by Cuisinart.
This warranty does not cover any damage caused by accident, misuse, shipment or other ordinary household use.
This warranty excludes all incidental or consequential damages. Some states do not allow the exclusion or limitation of these damages, so this limitation may not apply to you.
CALIFORNIA RESIDENTS ONLY:
California law provides that for In-Warranty Service, California residents have the option of returning a nonconforming product (A) to the store where it was purchased or (B) to another retail store that sells Cuisinart® products of the same type.
The retail store shall then, at its discretion, either repair the product, refer the consumer to an independent repair facility, replace the product, or refund the purchase price less the amount directly attributable to the consumer's prior usage of the product. If the above two options do not result in the appropriate relief to the consumer, the consumer may then take the product to an independent repair facility if service or repair can be economically accomplished. Cuisinart and not the consumer will be responsible for the reasonable cost of such service, repair, replacement, or refund for nonconforming products under warranty.
California residents may also, according to their preference, return nonconforming products directly to Cuisinart for repair, or if necessary, replacement, by calling our Consumer Service Center toll-free at 1-800-726-0190.
Cuisinart will be responsible for the cost of the repair, replacement, and shipping and handling for such products under warranty.
BEFORE RETURNING YOUR CUISINART® PRODUCT
If you are experiencing problems with your Cuisinart® product, we suggest that you call our Cuisinart® Service Center at 1-800-726-0190 before returning the product to be serviced. If servicing is needed, a Representative can confirm whether the product is under warranty and direct you to the nearest service location.
IMPORTANT: If the nonconforming product is to be serviced by someone other than Cuisinart's Authorized Service Center, please remind the servicer to call our Consumer Service Center at 1-800-726-0190 to ensure that the problem is properly diagnosed, the product is serviced with the correct parts, and the product is still under warranty.
©2009 Conair Corporation
Cuisinart ^® is a registered
trademark of the Conair Corporation
Cuisinart
150 Milford Road
East Windsor, NJ 08520
Printed in China
09CE14625
- Cuisinart® Vertical Rotisserie
- CVR-1000
- IMPORTANT SAFEGUARDS
- SAVE THESE INSTRUCTIONS
- NOTICE
- IMPORTANT
- CONTENTS
- INTRODUCTION
- FEATURES & ACCESSORIES
- Vented Top
- Heating Element (not shown)
- Door Handle
- Wide Base with Nonslip Feet
- Control Panel
- Interior Light (not shown)
- Chrome Insert
- Versatile Rotisserie Accessories
- a. Vertical Poultry Tower
- b. Skewer Set
- c. Multi Purpose Basket
- d. Roasting Rack
- e. Rotating Tray Support Rack (not shown)
- f. Nonstick Drip Tray
- GETTING TO KNOW YOUR CONTROL PANEL
- Start/Stop Button
- Interior Light Button
- Temperature Control Button
- Hour Button
- Minute Button
- LCD Time Display
- ASSEMBLING YOUR ROTISSERIE
- OPERATING INSTRUCTIONS
- SETTING COOKING TEMPERATURE
- COOKING WITH COUNTDOWN TIMER
- (maximum: 3 hours)
- COOKING IN MANUAL MODE (no time selected)
- ADJUSTING OR STARTING THE COUNTDOWN TIMER DURING THE COOKING CYCLE
- TO BEGIN COOKING
- PAUSE FEATURE
- TO END COOKING
- Automatic Shutoff
- Manual Shutoff
- COOKING WITH ACCESSORIES
- Cooking with the Poultry Tower
- Cooking with the Multipurpose Basket
- Cooking with the Skewers
- Cooking with the Roasting Rack
- INTERIOR LIGHT
- CLEANING
- WARRANTY
- LIMITED THREE-YEAR WARRANTY
- CALIFORNIA RESIDENTS ONLY:
- BEFORE RETURNING YOUR CUISINART® PRODUCT
Brand : CUISINART
Model : CVR-1000
Category : Rotisserie