
Ease P2020 - Smartphone PANTECH - Free user manual and instructions
Find the device manual for free Ease P2020 PANTECH in PDF.


| Type de produit | Smartphone |
| Dimensions | 145 x 70 x 8 mm |
| Poids | 150 g |
| Alimentation | Battery 2500 mAh Li-Ion, rechargeable via micro USB |
| Fonctions principales | Calling, texting, internet browsing, 5MP camera, GPS, Bluetooth 4.0 |
| Entretien et nettoyage | Clean with soft dry cloth; avoid liquids and abrasive cleaners |
| Sécurité | Use original charger; avoid overheating; keep away from water |
| Pièces détachées et réparabilité | Battery replaceable by authorized service; screen repair available |
| Informations générales | Pantech Ease P2020, Android 4.4, 4G LTE, 512 MB RAM, 4 GB storage |
Frequently Asked Questions - Ease P2020 PANTECH
User questions about Ease P2020 PANTECH
0 question about this device. Answer the ones you know or ask your own.
Ask a new question about this device
Download the instructions for your Smartphone in PDF format for free! Find your manual Ease P2020 - PANTECH and take your electronic device back in hand. On this page are published all the documents necessary for the use of your device. Ease P2020 by PANTECH.
USER MANUAL Ease P2020 PANTECH
Thank you for choosing the Pantech EASE, our latest 3G mobile phone.
The Pantech EASE has many features designed to enhance your mobile experience. From its unique, stylish design and QWERTY keypad, we know you will enjoy the entire EASE experience.
This User Guide contains important and useful information that will maximize your familiarity with all that the Pantech EASE has to offer.
Specifications
Design
Touch QWERTY Slider
Displays
- 260k Colors TFT LCD with 3.2" display
- 240X400 resolution
Melodies
MP3, MIDI, iMelody, WAV, QCP, M4A, AAC, 3GP
Camera
Integrated 2M CMOS Camera
• Resolution up to 1600 x 1200 (1,920,000 pixels)
- Mpeg4 Video recording/playing up to 15f/s(QVGA size)
• Self-timer function (5 seconds or 10 seconds)
• Photo album and video album
Dimensions & Weight
Weight: 137g/4.86oz (with standard battery)
Dimensions: 114 mm x 58mm x 14.25 mm
4.48" x 2.28" x 0.56"
Power Management (Performance)
| Battery Type Capacity Standby Time Talk Time | |||
| Standard Lithium-Ion (Li-ion) | 1000 mAh | Minimum 10days (250hrs) | Minimum 3hours |
Operating Frequency
- GSM 850Mhz, GSM 900Mhz, GSM 1800Mhz, GSM 1900Mhz, UMTS 850Mhz and UMTS 1900Mhz networks in North America, South America, Europe, Africa, and Asia-Pacific where these networks are supported.
• Automatic band switching.
Specifications....2
Memo....7
Phone overview 8
Quick & Easy 9
Menu overview 13
SIM card and battery 22
Memory card 25
Turning the phone on/off 29
Screen unlock 29
Essential display indications 29
Language 33
Missed events 34
Setting the phone mode 34
Dynamic Noise Suppression from
Audience 35
Screen navigation 36
Using the multitask menu 40
PC Suite 41
Updating software 42
Easy Mode
1. Calls and address book
Making, receiving and ending calls ..... 46
Using Video Share 48
Options during a call 50
Checking all calls 54
Speed dialing 55
Using the address book 55
Address book settings 58
Using your headset 58
Fixed dialing 59
2. Messaging
Entering text 62
Messaging....64
Receiving messages 65
Creating and sending text messages ..... 66
Creating multimedia messages ...... 67
3. Multimedia
Camera....72
Photo album 78
Video album 79
4. Useful Features
Alarm 84
Calendar 85
Calculator and Tip Calculator .... 86
Pill Reminder 86
Pedometer 88
5. Connectivity
Bluetooth 92
Accessing AT&T Services 94
6. Settings
Sound Profile 98
Display....98
Readout mode 100
Advanced Mode
1. Calls and address book
Call settings 102
- contents
Settings for Video Share 102
Checking all calls 104
Using the address book 106
Address book settings 108
Caller identification 109
Using your headset 109
Service numbers and fixed dialing ..... 109
2. Messaging
Entering text 112
Messaging....114
Receiving messages 116
Creating and sending text messages ... 117
Message templates 118
Message settings 119
Email 121
Using instant messenger 121
3. Multimedia
Camera 124
Photo album 129
Video album 131
Audio album 132
Music player 133
Music player settings 136
Audio player 138
Media player 139
Other files 141
Managing memory 142
Playing games 142
4. Useful Features
Notepad and voice memo 144
World time 145
Converter 146
Stop watch and timer 146
Sketch pad....147
Memory information 148
5. Connectivity
Bluetooth 152
AppCenter 154
Accessing the AT&T Services 155
Accessing and Using Mobile Web ..... 157
Profile settings 160
6. Settings
Phone 164
Setting sound profile 164
Display....164
Touch Settings.... 166
Locking Your Phone 166
Reset 168
TTY 169
8. Appendix
Alert message 172
Troubleshooting checklist 173
Safety information 174
Safety precautions 175
About the battery usage 177
FCC Hearing-Aid Compatibility (HAC)
regulations for wireless devices ..... 179
FCC Regulatory Compliance 181
Warranty 184
Memo
Phone overview
Touch mode view
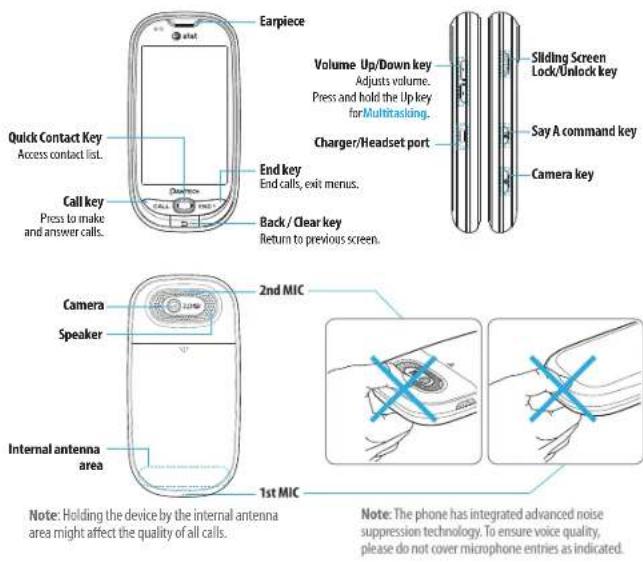
Quick & Easy
Keys Functions
| Slide down to lock. Slide down and hold to unlock. | |
| Delete characters from the display, or return to previous menu. | |
| Access Quick Contacts. | |
| CALL | Place a call after dialed. AccessRecent Callsor dial the last number if pressed and held. |
| Complete the current call. Turn on/off the phone if pressed and held.Cancel user input and return to main screen. | |
| Adjust the earpiece volume while making a call.Control the Ringtone volume, vibrate mode and silent all mode in standby.Mute the ringtone of an incoming call. | |
| Access theSay a Commandfeature. | |
| Turn camera on.Take picture when camera is on. |
QWERTY mode view
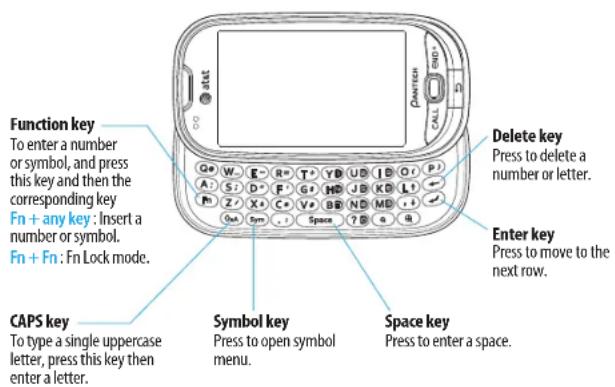
Your phone has a QWERTY keypad which provides a superior typing experience on a small handheld for easy and comfortable texting. You can use all of the phone functions with the QWERTY keypad.
Keys Functions
| Press to change entry mode at the text editing screen. (Abc / ABC / abc / T9Ab / T9AB / T9ab) | |
| Press to enter a special character or number. To enter symbols and numbers continually, press twice until Ed displays in top right of screen. | |
| Enter the space character in text input mode. | |
| Insert a hard return in text input mode. | |
| Delete a character to the left of the text cursor in text editing screen. | |
| Press to view to type a special character that is not placed on the keypad. | |
| Access voice mail if pressed in standby mode. | |
| Enter numbers, letters or special characters. Opens dialer if numbers are pressed standby mode. |
Keys Functions
| T+ | Enter an international dialing prefix if pressed in standby mode. |
| Zooms in when in text entry or viewer mode. | |
| Zooms out when in text entry or viewer mode. | |
| Scrolls up in text viewer mode only. | |
| Scrolls down in text viewer mode only. |
Menu overview
The steps may vary by mode and this manual provides instructions for both Easy Mode and Advanced Mode respectively.
Easy mode menu

Address Book
All Contacts
Favorites
Groups
My Settings

Messaging
Inbox
Create Message
Drafts
Sent Messages
Voice Mail
Mobile Email

Camera
Take Photo
Take Video
My Pictures
My Videos
Downloaded Picture
Downloaded Audio

AT&T Services
Say a Command
AT&T Navigator
My Cast Weather
Mobile Web
Games & Apps
My Account

Tools
Calendar
Alarm Clock
Pill Reminder
Calculator
Tip Calculator
Pedometer

Settings
Phone Status
Sounds & Alerts
Bluetooth
Display
Readout Mode
Phone Mode
^s SIM dependent ^n Network dependent
Advanced mode menu

AT&T Navigator YPmobile Mobile Web Messaging


Inbox
Create Message
Mobile Email
IN
Outbox
Drafts
Voice Mail
Settings
Templates
Used Space


Mobile Email AT&T Social Net Address Book

All Contacts
Favorites
Groups
My Settings

AppCenter

IM Games

Shop Games
Bejeweled
Midnight Bowling 2
Ms. PAC-MAN by Namco
The Sims 3
World Series of Poker HL

Apps
Shop Applications
Shop GPS
AllSport GPS
AT&T Social Net
Maps
Mobile Banking
Mobile Web
MobiTV
My-Cast Weather
Pocket Express
WikiMobile
Browser

AT&T Music
Music Player
Shop Music
AT&T Radio
Shazam
Music Videos
Community
Music Apps


Loopt Where AT&T FamilyMap Mobile Video

Facebook MySpace My Stuff


Applications
Audio
Games
Picture
Video
Tools
Other Files
Used Space

Tools
Recent Calls
Camera
Video Camera
Media Player
Alarm Clock
Calendar
Notepad
Sketch Pad
Voice Memo
World Time
Calculator
Tip Calculator
Converter
Stop Watch
Timer
Say a Command

Settings
Phone Mode
Profiles
Display
Call
Phone
Touch
Connectivity
Security
AT&T Software Update
Reset
TTY
Readout Mode
Phone Information

Camera Picture

Shop Wallpapers
Images
Camera
Sketch Pad
Face Tagging

Video
Shop Videos

Bluetooth
Settings
Search
My Info

Alarm Simple Alarm

My Account
Memo
SIM card and battery
About your SIM card
When you subscribe to your network operator, you receive a SIM (Subscriber Identity Module) card containing your registration information, PIN code, etc.
Like a credit card, it should be kept secure and handled carefully. Do not bend, scratch or expose it to moisture. Avoid static electricity.
To avoid corrupting your SIM card's memory, always switch off your phone before removing or inserting your SIM card.
About your battery
Your phone uses a Li-lon battery. Make sure to use an authorized battery and charger only.
For more details, please inquire at your nearest dealer.
Note: Your phone is powered by a Lithium Ion (Li-Ion) battery. Unlike other forms of battery technology, you can recharge your battery while some charge remains without reducing your phone's autonomy due to the "battery memory effect" inherent in those technologies.
Installing/removing SIM card and battery
-
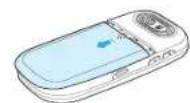
Remove the battery cover from the unit.
-
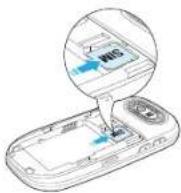
Insert the SIM card into the slot. The gold contacts of the SIM card should go against the metal contacts of the phone. Put the connector of the battery into the hole located at the top of the unit and then insert and press the lower side of the battery until you hear the light click. Make sure you align the gold contacts at the battery end with contacts on the phone. If the contacts at the battery are not properly aligned, damage could occur to the phone and the battery.
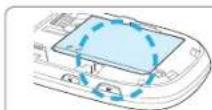
Correct
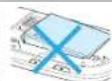

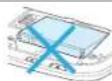
Incorrect
-
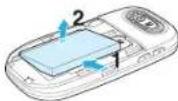
To remove the battery push the bottom of the battery to upwards (1) and remove (2) the battery. Push the SIM card in the direction of the arrow as shown.
-
To fit the battery cover, put it on the guide rail and push up.
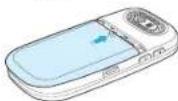
Instructions for Optimal Performance
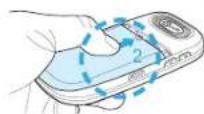
Put the cover align with the phone(1) and push up(2) as the arrow until you hear the light 'click'.
Make sure you align the battery cover as shown below. If not, the battery cover will be damaged.
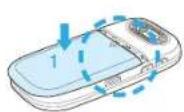
Correct
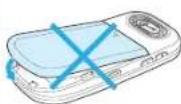
Incorrect
To charge your battery
- To charge, connect the charger adapter. Make sure you align the connector as the image(1). If not, it will damage the charging connector on the phone and will not charge.
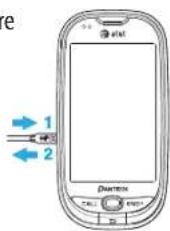
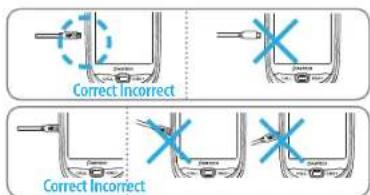
- To remove pull the adapter away (2).
Memory card
You can use a microSD card as a memory card. It gives you more space to save pictures, videos, music, etc.
Inserting and removing a memory card
- Open the memory card slot.
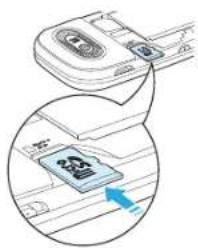
- Insert the card. The icon will be displayed.
- Press the card to remove.
Using a memory card
You can save, move and delete the files between your phone and external memory card. You can also move and copy the files to computer from your phone.
To copy or move a file to the card
In easy mode:
- Tap Menu > Camera > My Pictures, My Videos, Downloaded Picture or Downloaded Audio.
- Tap to select the folder or file.
- Tap > of selected file > Copy.
- Tap □ > Memory Card.
- Tap to select the folder or Options > Create New Folder.
- Tap Copy Here.
In advanced mode:
- Tap Menu 📋 > My Stuff > Audio, Picture, Video or Other Files.
- Tap to select the folder or file.
- Tap > of selected file > Copy.
-
Tap □ ▼ > Memory Card.
-
Tap to select the folder or Options > Create New Folder.
- Tap Copy Here.
To copy or move a file back to phone
In easy mode:
- Tap Menu > Camera > My Pictures, My Videos, Downloaded Picture or Downloaded Audio.
- Tap to select the folder or file.
- Tap □ > Memory Card.
- Tap to select the folder or file.
- Tap > of selected file > Copy.
- Tap □ > Phone.
- Tap to select the folder or Options > Create New Folder.
- Tap Copy Here.
In advanced mode:
- Tap Menu 📋 > My Stuff.
- Tap □ > Memory Card.
- Tap to select the folder or file.
- Tap > of selected file > Copy.
- Tap □ > Phone.
- Tap to select the folder or Options > Create New Folder.
7. Tap Copy Here.
To delete a file from the memory card
In easy mode:
- Select the file from the card > Options > Delete.
In advanced mode:
- Select the file from the card > Options > Delete.
To move the file from the card to the computer Connect the data cable with mobile and the computer.
In easy mode:
-
Select Music Player or Mass Storage.
-
Follow the instructions on your computer screen.
In advanced mode:
-
Tap Menu > Settings > Connectivity.
-
Tap Select USB Mode.
-
Select Music Player, Mass Storage or Ask on Connection.
-
Follow the instructions on your computer screen.
Note: Select Music Player when you want to add music to the playlist in your device. When you select Ask on Connection, it will ask you to select either the Music Player or Mass Storage every time you connect your device with your computer.
Resetting a memory card
-
Tap Menu > Settings > Reset.
-
Enter the password > External Memory Reset.
Note: The default password is '1234'.
Turning the phone on/off
To turn on
- Press and hold END®
To turn off
- Press and hold END*
Screen unlock
Unlocking the screen
-
Press any hard keys to turn on the display.
-
Tap and hold 🔒 to unlock the screen.
Or
- Slide down the sliding lock/unlock key to unlock the screen.
Essential display indications (Easy Mode only)

A 3G signal is available. It is displayed when there is an active 3G session. ^n
| An EDGE signal is available. It is displayed when there is an active EDGE session. | |
| A GPRS signal is available. It is displayed when there is an active GPRS session. | |
| Signal strength. The greater the number of bars, the stronger the signal. When network is in searching mode is displayed. | |
| Flight Mode is active. | |
| Bluetooth hands-free headset is connected. | |
| Bluetooth A2DP headset is connected. | |
| Bluetooth hands-free + A2DP headset is connected. | |
| Bluetooth is active. | |
| Data transfer via Bluetooth. | |
| A call is being made. When you are in no service area is displayed. | |
| Call forwarding ^® is active. | |
| An alarm is set. | |
| Schedule Alarm is set. | |
| Pill Reminder is set. | |
| Received one or more text messages. | |
| Received one or more multimedia messages. | |
| Received one or more voice messages |
getting started
| Received one or more WAP push messages. | |
| A message is being sent. | |
| A message is being received. | |
| A message is full. | |
| Received one or more configuration messages. | |
| Battery strength. When the battery charge is low, displayed . |
Network dependent
Essential display indications
| A 3G signal is available. It is displayed when there is an active 3G session. ^n | |
| An EDGE signal is available. It is displayed when there is an active EDGE session. | |
| A GPRS signal is available. It is displayed when there is an active GPRS session. | |
| Signal strength. The greater the number of bars, the stronger the signal. When network is in searching mode is displayed. | |
| Flight Mode is active. | |
| Headset is connected. | |
| Bluetooth hands-free headset is connected. |
Bluetooth A2DP headset is connected.
Bluetooth hands-free + A2DP headset is connected.
Browser is Active, Secured and being downloaded.
Bluetooth is active.
Data transfer via Bluetooth.
USB is connected.
A call is being made. When you are in no service area is displayed.
Call forwarding ^n is active.
An alarm is set.
Schedule Alarm is set.
Available, Away, Invisible Status of AIM.
Online, Away, Busy, Offline Status of MSN.
Available, Busy, Invisible Status of YAHOO
You have received YAHOO, AIM and YAHOO new messages
Received one or more text messages.
Received one or more multimedia messages.
Received one or more voice messages
Received one or more WAP push messages.
A message is being sent.
A message is being received.
A message is full.
Received one or more configuration messages.
Java
Incoming calls set to ring only (Normal).
Incoming calls set to Vibrate and Ring.
Incoming calls set to Vibrate only.
Incoming calls set to Silent.
Battery strength. When the battery charge is low, displayed.
TTY is active.
microSD card is inserted.
BGM is play, pause and being stopped.
Network dependent
Language
Setting up easy mode
-
Tap Menu > Settings > Display.
-
Tap Language.
-
Tap/ to set the language type of Screen Text and Predictive text > Save.
Setting up advanced mode
- Tap Menu 📋 >Settings >Phone >Language.
- Select Screen Text or Predictive.
- Select the language > Save.
Missed events
Easy Mode / Advanced Mode
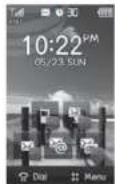
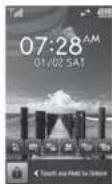
When you miss calls, messages, email, instant messages, JAVA or voice messages, the icons will pop up and let you know you have missed events. The icon will show at the Missed Events Area, tap the each icon to check the details. To make it disappear even you didn't check the events, simply press CALL
Setting the phone mode
Your phone has two customized modes, Easy and Advanced. The default is set to Easy mode which provides easy access to the functions used most frequently. In the Easy mode, you can view an easy to read, easy to access, abbreviated menu: Address Book, Messaging, Camera, AT&T Services, Tools and Settings. The Advanced Mode allows access to all menu items.
getting started
Easy Mode Advanced Mode
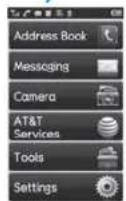
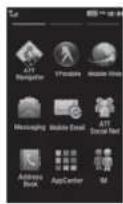
To change the mode from Easy Mode to Advanced Mode
- Press Menu > Settings > Phone Mode.
- Select Advanced Mode.
Dynamic Noise Suppression from Audience
Your phone is equipped with an advanced voice processing chip that delivers clear mobile calls by suppressing background noise, intermittent sounds (like a siren or nearby conversation), and echoes, allowing you to hear and be heard nearly anywhere.
How Does It Work?
Based on the intelligence of the human hearing system, the technology:
- Captures, evaluates and distinguishes all the sound signals surrounding your phone, and the person you're speaking with.
- Then isolates the primary voice in conversation and filters out the background noise – so the person you're calling hears only your voice, without disturbing background noise.
- Dynamically equalizes and adjusts voice volume to optimize your calling experience, so you can hear clearly and don't need to speak louder to overcome surrounding noise.
The noise suppression technology is built-in and already enabled in your new mobile phone. So it's ready to provide unsurpassed voice clarity with every call. For information on how to turn off and on noise suppression, see Making, receiving and ending calls or Sound Profile.
Screen navigation (Advanced Mode only)
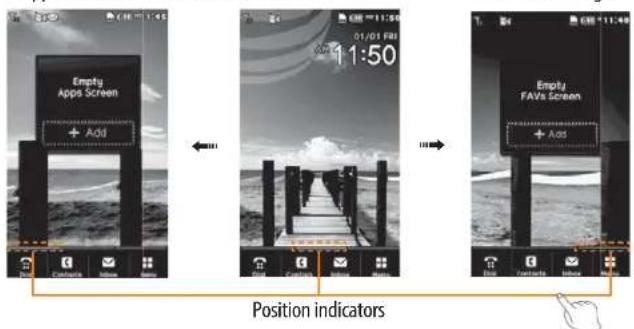
The home screen is your starting point for using the applications on your phone. You can customize the home screen to display application icons, shortcuts, folders, and widgets according to your preference.
About your home screen
- Main screen: The phone's main home screen.
- Apps screen: Provide operators and users Shortcuts menu that you want to register. Max 24 icons can be added.
- FAVs screen: Widget content is stored on the screen as items. Max 15 icons can be added.
Apps Screen : Left Main Screen : Center
getting started
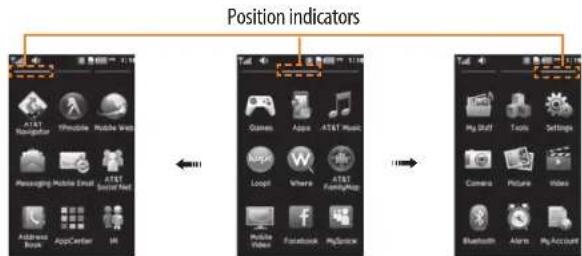
Note: You can access 3 different types of home screen by flicking one way. However, the position indicators are always displayed for the corresponding home screen (i.e. Left — Apps, Center — Main, Right — FAVs).
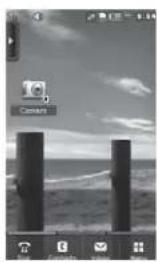
Adding a home screen item
Shortcuts and floor screens allow you to assign items to the screen.
- Tap Add + Add
- Tap a desired menu.
- Once you have added one or more items to the screen, or is displayed to customize the home screen.
natural_image
Black-and-white photo of two vertical cylindrical objects on a beach with waves in the background (no visible text or symbols)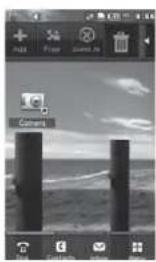
Deleting a home screen item
- Tap the or
- Select and hold until + appears.
- Drag to the trash can 📄.
Note: This action is only applied to the home screen. To delete all the items on the screen, tap or ▶> Delete All
Repositioning a home screen item
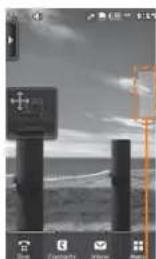
Once the items are assigned to the home screen, you can reposition the items for your convenience.
- Select and hold until + appears.
- Drag to the desired position.
natural_image
Black-and-white photo of two vertical cylindrical objects on a beach with waves in the background (no visible text or symbols)Mini Map
- Position the item, then release it.
Navigating through menus
EASE has 3 different menu screens to provide quick access to menus.
- Tap Menu
- Flick the screen from left to right or right to left to navigate.
flowchart
graph LR
    A["Position indicators"] --> B["Home Screen"]
    B --> C["Game"]
    B --> D["App"]
    B --> E["AT&T Music"]
    B --> F["Loop"]
    B --> G["Where"]
    B --> H["AT&T Fashion/Shop"]
    B --> I["Mobile Video"]
    B --> J["Facebook"]
    B --> K["MyBlock"]
    C --> L["My Staff"]
    D --> M["Tools"]
    E --> N["Settings"]
    F --> O["Camera"]
    G --> P["Picture"]
    H --> Q["Video"]
    I --> R["Bluetooth"]
    J --> S["Alarm"]
    K --> T["MyAccount"]
Extended Menu: Left Extended Menu: Right Extended Menu: Center
Note: The position indicators are always displayed for the corresponding menu screen.
Using the multitask menu
Easy Mode Advanced Mode
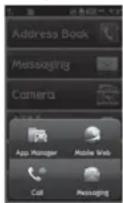
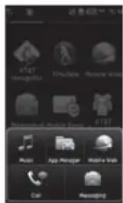
Press and hold to launch the Multitask menu that can be accessed from any active window or page on the phone. This function allows you to temporarily exit your current location to access a group of common functions such as: Call, Messaging, Mobile Web, App Manager or Music. With the multitask key, you can quickly navigate to other menus without quitting current task or active window such as creating a message, making a call, or browsing a web page.
Multitask functions
To use multitask function, tap and hold. You can choose from one of the following functions:
getting started
- Call: Make a voice call while using the handset for other tasks. If Music Player is active, it is muted during the call.
- Messaging: Send a text or multimedia message while using the handset for other tasks.
- Mobile Web: Launch the browser while using the handset for other tasks.
- App Manager: Access other applications while using the handset for other tasks.
- Music: Launch the Music Player while using the handset for other tasks. If an incoming call is received or you try to make a call, the Music Player is muted.
PC Suite
PC suite is a Windows-based PC program that allows you to easily manage personal data and multimedia files by connecting your Phone to a PC. The PC suite application can be downloaded at http://www.pantechusa.com/.
System requirements
- Microsoft Windows 2000 or XP family, Windows7 and Vista 32 bit
- At least 300MB of free disk space
- Interface devices such as USB or Bluetooth for the connection with the phone
PC Suite features
• PC Suite launcher
- Contact Manager
• PC Sync
- Message Manager
- File Manager
• MMS PC Composer
- Internet Access
Updating software (Advanced Mode only)
You can update your software without visiting your nearest dealer.
To update the software
- Tap Menu > Settings > AT&T Software Update.
- Tap Check for Update > Yes to check whether or not you need to update the software.
Note: After downloading the software, the device will ask you whether to update the software now or later. If you choose to update the software now, it will restart the handset. If you postpone updating the software, you can select between 30 mins, 1 hour or 4 hours in the Options. After selecting
the updating time, you will be sent back to standby mode. If you go to Software Update while you are in postponing, tap Continue Update.
To view the version of software
- Tap Menu > Settings > Phone Information.
- Scroll down to Software Version.
Memo
ease™
1
Calls and address book
Making, receiving and ending calls
Using Video Share
Options during a call
Checking all calls
Speed dialing
Using the address book
Address book settings
Using your headset
Fixed dialing
Making, receiving and ending calls
Making a call
- Enter the area code and phone number.
- Press CALL.
Answering a call
- Press CALL
Ending a call
- Press END
Once the call is complete, a call summary is displayed.
Rejecting a call
- Press or Ignore.
Making a call using the call list
- Your phone logs up to 20 dialed, received and missed call numbers.
- Press CALL to display the Recent Calls list.
- Select a number.
- Press CALL to dial the selected number.
Note: To redial the last number in the Recent Calls list, press CALL.
Making a call during a call
- Enter the phone number or look it up in Address Book.
easy mode - calls and address book
- Press CALL to dial the second call. The first call is automatically put on hold.
Switching between two calls
- Tap Swap.
Making an international call
- Tap Dial and press and hold 0 + key for the international prefix until the '+' character appears.
Press key for the international prefix until the '+' character appears. - Type the country code, area code, and phone number.
- Tap CALL
Making an emergency call
- You can make emergency calls even if your phone does not have a SIM card.
- Tap Emergency Number, or tap SOS if your phone does not have a SIM card.
- Tap CALL
Replying to a missed call
-
Tap View in the Missed Call notification to display the list of missed calls.
-
Select a number to call by scrolling the screen.
- Press CALL.
Answering a second call ^n
- Press the first call is automatically put on hold.
- Tap END to end the second call. The call on hold is automatically reconnected.
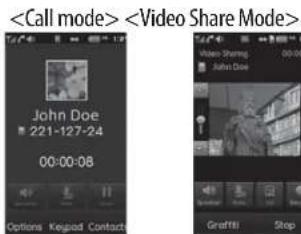
Using Video Share
You can share live or recorded video while on a call.
Note: Video Share is not available in all markets. Both parties must be in a 3G service area—a 3G icon must appear by the signal bars prior to a call being placed, and both parties must remain in the 3G coverage area for the duration of the Video Share.
easy mode - calls and address book
Making video share call
- Enter the area code and phone number > CALL
- Tap Options > Video Share.
- Select Live or Recorded.
Note: To use video share in the Recent Calls, tap Options > Video Share.
Turning off the speakerphone
- Tap Speaker during video share mode.
- Tap Mute 🖱️ to mute the sound.
Increasing or decreasing the brightness
- Tap Set
- Adjust the brightness by scrolling left or right.
Zoom in and out
- Tap Set ☐. It ranges from 1x to 3x.
- Adjust the zoom by scrolling up or down.
Stopping the recording
- Tap Record
Stopping or ending video share
- Tap Stop to end the video share.
- It will ask you whether you will stop video share > Yes to stop.
Note: Even you end video share or close the slider, the call will not be ended.
Press END to end the call. The recorded video will be saved in My Stuff > Video.
Receiving video share
- After receiving video share, it will ask you whether to accept or reject the video share > Yes to accept and No for reject.
- Tap Full or Landscape to enlarge the video to fill the entire screen.
Options during a call
Microphone off and on
Switching your phone's microphone off
1. Tap Mute
Switching your phone's microphone back on
1. Tap Mute
Turning on speakerphone
- Tap Speaker
Turning off speakerphone
- Tap Speaker
Putting a call on hold and returning ^®
Putting a call on hold
- Tap Hold or press CALL
easy mode - calls and address book
Returning to a held call
- Tap Unhold □ or press again.
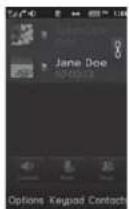
Multi-party calls ^n
You can talk with more than one person or have conference call.
Making a multi-party call
- Call the first participant.
- Call the second participant. The first call is automatically put on hold.
- Tap the second participant phone number > Join.
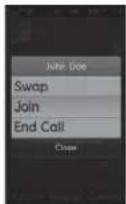
Having a private conversation with one participant
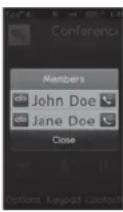
- Tap the participant to hold.
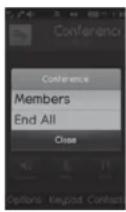
- Tap Members.
- Tap
Note: All of the multi-party call participants can now hear each other.
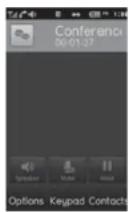
Removing one participant from a multi-party call
- Tap the participant to end.
- Tap Members.
- Tap
The call ends with that participant, but you can continue to talk to the other participants.
Searching for a number in the address book during a call
- Tap Contacts.
- Select a contact by scrolling up or down the alphabet bar until you see the first letter of the contact.
- Scroll to the contact and tap the name.
- Tap Info to see phone numbers or Call to call a number.
Searching for a name or group in the address book
Enter the first letters of the name for Name Search. The entries are displayed starting with the first entry matching your input.
Finding a name manually in the address book
- Scroll up or down the alphabet bar until you see the first letter of the contact.
- Scroll to the contact and tap the name.
Viewing the details of the highlighted entry in the address book
- Tap Info.
For details on address book, see page 55.
Reading a message during a call
- Press and hold and tap Messaging.
- Tap Inbox then select a message.
Sending a message during a call
- Press and hold and tap Messaging.
For details on creating a text message, see page 66.
Saving contacts during a Call
- Tap Options > Save > New Contact or Update Existing.
For details on address book, see page 55.
Noise suppression
- Tap Options > Noise Suppression.
- Tab On or Off.
Checking all calls
You can check all call history by press CALL
Viewing call history
- Press CALL
- You can view all Recent Calls.
Viewing call time
- Press Call Time.
- You can view Last Call, Received Calls, Dialed Calls and Total Calls.
Resetting all call times
- Press Call Time.
- Tap Reset > Yes.
- Enter password > OK.
Note: The default password is '1234'.
Speed dialing
You can dial quickly using speed dialing. Up to 8 phone numbers can be programmed using numbers 2 to 9.
Setting speed dial
- Tap Dial > Speed Dial.
- Tap an empty entry.
- Select a person in your address book and tap to add.
Changing speed dial contact
- Tap Dial > Speed Dial.
- Select a number > Change.
- Select a person and tap.
Removing from speed dial
- Tap Dial > Speed Dial.
- Select a number > Remove > Yes.
Using the address book
You can save names, phone numbers, and information on the SIM or phone. Number of entries can depend on the capacity of the SIM card.
Viewing the contact list
- Tap Menu > Address Book.
Searching for a phone number
- Tap Menu > Address Book.
- Scroll up or down the alphabet bar until you see the contact or tap Search and enter the name to find the contact.
- Tap the contact > Info to view the detailed information.
- To update information, tapEdit.
Calling from the contact list
- Tap Menu > Address Book.
- Scroll up or down the alphabet bar until you see the contact or tap Search and enter the name to find the contact.
- Press CALL.
Forwarding contact details
- Tap Menu > Address Book.
- Scroll up or down the alphabet bar until you see the contact or tap Search and enter the name to find the contact.
- Tap the contact > Info > Options > Send Contact.
- You can send the information using Multimedia Message or Bluetooth.
Deleting a contact
-
Tap Menu > Address Book.
-
Scroll up or down the alphabet bar until you see the contact or tap Search and enter the name to find the contact.
- Tap the contact > Info > Delete > Yes.
Adding a contact
- Tap Menu > Address Book > Add.
- Input contact information by tapping the desired field and sliding open the keyboard to type.
- Tap Save.
Note: You can enter phone numbers, email addresses, company name and more. To change phone number type, touch ▶ and select from the Number Type list. To add an address, birthday, or anniversary to a contact or assign a specific ringtone, touch the More button to open additional information tabs.
Making groups
- Tap Menu > Address Book > Groups
- To add new group, tap Add.
- Input the group name > OK.
- To add members to group, tap Yes.
- Select the members > Add.
Editing groups
-
Tap Menu > Address Book > Groups
-
To edit group, tap the group >Edit >Rename Group, Add Members, Remove Members or Edit Members.
- To send message to group members, tap Send Message.
- To delete group, tap Delete.
Address book settings
Managing my info
- Tap Menu > Address Book > My Settings 📋 > My Phone Number.
Or - In My Contacts, enter name and phone numbers in My Info: contact record.
Setting Sync settings
- Tap Menu > Address Book > My Settings 📋 > AT&T Address Book.
- Select Auto Sync On or Auto Sync Off.
Using your headset
You can make or receive a call using your headset.
When you connect your headset to the port, the button on the headset works as follows.
easy mode - calls and address book
Note: You must to use a headset designed for this device. It is optional accessory. Not all headsets will have a button.
While in standby mode
- Tap the button once to list recent calls.
- Tap the button twice to redial the last call.
Fixed dialing
Viewing the fixed dialing list
Fixed dialing is a service that limits your access to specific numbers in the address book list recorded on the SIM. Input the PIN2 to set up or cancel this service.
- Tap Menu > Address Book > My Settings 📁 > FDN List.
- Select a number > press CALL.
Note: PIN2 must be correctly entered within 3 attempts. If you input the incorrect code three times in a row the PIN2 code will be blocked. If the PIN2 code is blocked please contact your service provider. Your PIN2 code is supplied with the SIM card.
Memo
ease™
2
Messaging
Entering text
Messaging
Receiving messages
Creating and sending text messages
Creating multimedia messages
Entering text
You can enter text with multi-tap, predictive, numeric or symbol.
Useful keys
| Touch QWERTY Function | ||
| Sym | Sym | Display symbols |
| Delete the letter | ||
| Space | Adding space | |
| Tap to change capital modeTap to change ab Ab ABMulti-tap (first letter caps / all caps / lower case)Predictive (first letter caps / all caps / lower case) | ||
For details on using QWERTY keypad, see page 10.
Predictive mode (T9)
The predictive mode automatically compares your keystrokes with an internal linguistic dictionary to determine the correct word. It will display the most commonly used word first. To save a word not listed in phone's dictionary,
- From the text entry screen, open the slide to input the text and tap
abc to change the mode to T9.
- Start typing to input text.
For example, to write 'Hello'.
In QWERTY keyboard, press HD E and tap 5 times > OK.
When you see the desired word in the predictive text bar, tap it for entry.
Alphabet input mode
-
Tap abc to change the mode as multi-tap.
-
[ ] Press A: to Z/ to input text repeatedly.
Numeric mode
You can input numbers in this mode.
-
Tap abc to change the mode to 123.
-
[ ] Press YD to MD and ?D to input numbers.
Symbol mode
You can input symbols.
-
Tap Sym or press \$0 view the symbols list.
-
Tap to select symbol.
-
Tap Sym to close the symbols list.
Messaging
You can send, receive and save the text messages and multimedia messages.
Managing memory
Up to 200 messages can be stored in the phone memory, additional messages will be saved to the SIM card. When the message box is full, the message full icon will appear. All messages share memory.
When It means
| Text message is full ( SIM and Phone messages ) |
Deleting a message in the inbox
- Tap Menu > Messaging > Inbox.
- Select a message > Options > Delete.
Deleting multiple messages
- Tap Menu > Messaging > Inbox.
- Tap Delete.
- Select the message to delete by tapping.
- Tap Delete > Yes.
- To select all messages, tap All.
- To cancel deleting action press ↩.
Replying to a message
- Select a message > Reply.
Receiving messages
Viewing a new message
- Tap View in the New Message notification.
Reading a message from the inbox
-
Tap Menu > Messaging > Inbox.
-
Select a received message.
Saving the contact information from a received message
- Select a received message.
- Tap Options > Save to Contact.
- Select New Contact or Update Existing.
Saving the object in a received multimedia message
- Open the multimedia message.
- Tab Options > Use > Save to internal or external.
It will be saved in Camera > My Pictures.
For details on photo album, see page 78.
Listening to voice message
- Press the Quick Contacts key > Voice Mail or [☐] tap Dial and hold
1 or tap Menu > Messaging > Voice Mail.
[ ] Press and hold YD
It will automatically be connected to voice mail.
Loading URL using Push message
- Tap Menu > Messaging > Inbox.
- Select the message.
- Tap Options > Load URL.
Saving connection settings using configuration message
- Tap Menu > Messaging > Inbox.
- Select the message.
- Tap Options > Install.
Creating and sending text messages
Sending a new text message
- Tap Menu > Messaging > Create Message.
- Tap the address field and then scroll to the desired contact.
Tap the contact then tap the desired phone number from the pop-up window.
easy mode - messaging
- Tap the text window to add text. Slide open the keyboard to type.
- Tap OK.
- Tap Send.
- To view sent message, tap Menu > Messaging > Sent Messages. Note: All successfully sent messages will be saved in Sent Messages.
Finding all sent messages
- Tap Menu > Messaging > Sent Messages.
Creating multimedia messages
You can create and send new multimedia messages. Capacity is 600Kb. An error message will alert you once you exceed the capacity.
Adding a saved picture to the message
- Tap Menu > Messaging > Create Message.
- Tap the address field and then scroll to the desired contact. Tap the contact then tap the desired phone number from the pop-up window.
- Tap the text window to add text. Slide open the keyboard to type.
- Tap OK.
- Tap Insert > Picture > Add Existing.
- Tap the desired picture to insert and tap Select.
-
To edit the text message, tap the text box.
-
Tap Send.
Adding a new picture to the message
- Tap Menu > Messaging > Create Message.
- Tap the address field and then scroll to the desired contact.
Tap the contact then tap the desired phone number from the pop-up window. - Tap the text window to add text. Slide open the keyboard to type.
- Tap OK.
- Tap Insert > Picture > Take New.
- Focus on the object and tap 📂.
- To edit the text message, tap the text box.
- Tap Send.
For the taking a picture, see page 72.
Adding a saved video to the message
- Tap Menu > Messaging > Create Message.
- Tap the address field and then scroll to the desired contact.
Tap the contact then tap the desired phone number from the pop-up window. - Tap the text window to add text. Slide open the keyboard to type.
- Tap OK.
easy mode - messaging
- Tap Insert > Video > Add Existing.
- Tap the desired video clip to insert and tapSelect.
- Tap Send.
Adding a new video to the message
- Tap Menu > Messaging > Create Message.
- Tap the address field and then scroll to the desired contact.
Tap the contact then tap the desired phone number from the pop-up window. - Tap the text window to add text. Slide open the keyboard to type.
- Tap OK.
- Tap Insert > Video > Record New.
- Focus on the object and tap ☐ to start recording.
- To stop recording and save video, tap Stop.
- To edit the text message, tap the text box.
- Tap Send.
For the recording a video, see page 76.
Adding a recorded voice memo to the message
- Tap Menu > Messaging > Create Message.
- Tap the address field and then scroll to the desired contact.
Tap the contact then tap the desired phone number from the pop-up
window.
- Tap the text window to add text. Slide open the keyboard to type.
- Tap OK.
- Tap Insert > Sound > Add Existing.
- Select My Voice.
- Tap the desired audio clip to insert and tap Select.
- To edit the text message, tap the text box.
- Tap Send.
Adding a new voice memo to the message
- Tap Menu > Messaging > Create Message.
- Tap the address field and then scroll to the desired contact. Tap the contact then tap the desired phone number from the pop-up window.
- Tap the text window to add text. Slide open the keyboard to type.
- Tap OK.
- Tap Insert > Sound > Record New.
- Tap REC to record the sound.
- To stop and save recording, tap Stop.
- To edit the text message, tap the text box.
- Tap Send.
ease™
3
Multimedia
Camera Photo album Video album
Camera
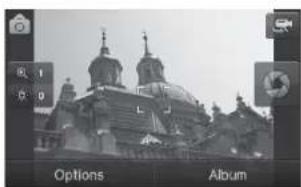
You can take pictures and record movies using the built-in camera. The photos and video clips can be saved and sent via multimedia messages.
natural_image
Black-and-white photo of a historic cathedral with twin domes, displayed within a camera interface (no readable text or symbols on the image itself)Taking a picture
- Press in standby mode or tap Menu > Camera > Take Photo.
- Focus on the object and press 📄 or tap 🌐.
Note: Your photo will be saved automatically to Menu > Camera > My Pictures.
Setting camera settings
- Press in standby mode or tap Menu > Camera > Take Photo.
- Tap Options > Settings to change settings prior to taking a picture.
easy mode - multimedia
In the options menu for camera
| Icons Name Description | |
| GEO Tagging Off, On | |
| AT | White BalanceAuto(1) Day Light( ), Cloudy( ), Fluorescent( ), Incandescent( ) |
| EffectNormal( ), Sepia( ), Negative( ), B&W( ) | |
| Self Timer Off( ), 5 sees( ), 10 sees( ) | |
| Picture Size1600x1200( ), 1280x1024( ), 640x480( ), 400x240( ), 320x240( ) | |
| Advanced SettingsPicture Quality, Save Location, Shutter Sound, Timer Sound, Default File Name | |
Note: GEO Tagging will work only outside. When GEO Tagging activates, it will search for the GPS for 1 minute and will ask weather go proceed or not.
In the options menu for video camera
| Icons Name Description | ||
| AT | White Balance | Auto(###Day Light( ), Cloudy( ), Fluorescent( ), Incandescent( ) |
| ### | Effect | Normal( ), Sepia( ), Negative( ), B&W( ) |
| Self Timer Off( ), 5 secs( ), 10 secs( ) | ||
| Resolution | 176x144(MMS)(3)176x144( ),320x240 (4)Video Share( ) | |
| Advanced Settings | Video Quality, Save Location, Sound Recording, Timer Sound, Default File Name | |
Note: If you installed a memory card, you can change the save location. Tap Options > Settings > Advanced Settings. Scroll to Save Location and slide button to the left.
Zoom in and out
- Tap 🔒 then tap 🔒 or 🔒. It ranges from 1x to 7x.
Note: When you set maximum size, you cannot zoom in with highest resolution.
Increasing or decreasing the brightness
- Tap ☐ then tap ☐ or ☐ . It ranges from -3 to +3.
Changing to video camera mode
- Press in standby mode or tap Menu > Camera > Take Photo.
- Tap Options and then Video Camera Mode while camera mode is activated or simply just tap 📄.
- Focus on the object and tap ☐ to start recording.
- When finished recording, tap > Stop.
Easy Mode - Multimedia
Note: Your video will be saved automatically to Menu > Camera > My Videos.
Viewing the taken picture on phone memory
- Tap Menu > Camera > My Pictures or press 📷 in standby mode > Album.
- Select the picture by tapping.
Viewing the taken picture on memory card
- Tap Menu > Camera > My Pictures or press 📷 in standby mode > Album.
- Select □ > Memory Card.
- Tap My Pictures.
- Select the picture by tapping.
After taking pictures
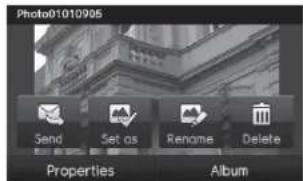
To Tap
Send to contact

Set as wallpaper
Wallpaper
Set as address book
Caller ID
Rename

Delete

View the information Properties
View photo album Album
Recording a video
- Tap Menu > Camera > Take Video.
- Focus on the object and tap ☐.
- Tap Stop to stop.
- Tap Play to play the video clip.
- Press → to go back to preview mode.
Changing to camera mode
- Tap Menu > Camera > Take Video.
- Tap Options and select Camera Mode while video camera mode is activated or simply just tap 📄.
For details on taking a picture, see page 72.
easy mode - multimedia
Viewing the recorded video clip
- Tap Menu > Camera > My Videos.
- Select the video clip by tapping.
Viewing the taken picture on memory card
- Tap Menu > Camera > My Videos.
- Select □ > Memory Card.
- Tap My Videos.
- Select the video by tapping.
After saving recorded video clips
ToTap
Send a multimedia message > as Multimedia Message
Send using Bluetooth > via Bluetooth
Set as online locker > to Online Locker
View recorded video clip
Rename
Delete
View the information Properties
View video album Album
During recording a video
| To Tap |
| Receive an incoming call CALL |
| Stop recording Stop |
| Pause the recording Pause |
Photo album
You can save photos to your phone or an external memory card and view, send or delete them in the photo album. JPEG format is supported, and other formats are saved in the Picture folder. Note: To access Picture, tap Menu > Camera > My Pictures.
Viewing the saved pictures
- Tap Menu > Camera > My Pictures.
- Select a picture.
Setting as wallpaper in the display
- Tap Menu > Camera > My Pictures.
- Tap ▶ of the picture > Set as > Wallpaper.
Setting as caller identification
- Tap Menu > Camera > My Pictures.
- Tap > of the selected picture > Set as > Caller ID.
easy mode - multimedia
Sending pictures using multimedia message
- Tap Menu > Camera > My Pictures.
- Tap ▶ of the selected picture > Send > as Multimedia Message. For details on creating a multimedia message, see page 66.
Deleting multiple pictures
- Tap Menu > Camera > My Pictures.
- Tap Options > Delete.
- Tap to mark desired files or tap All to mark all files.
- Tap Delete > Yes.
- To cancel deleting action press ↩.
Viewing file information
- Tap Menu > Camera > My Pictures
- Tap ▶ of the selected picture > Properties.
Video album
You can view, send, save and delete videos. The supported formats are MP4, WMA, 3GP and 3G2.
Playing the saved video clips
- Tap Menu > Camera > My Videos.
- Tap the video clip to play.
Copy to the saved video clips
- Tap Menu > Camera > My Videos.
- Tap > of the selected video > Copy.
- Copy to other folder or external memory card > Copy here?
Move to the saved video clips
- Tap Menu > Camera > My Videos.
- Tap > of the selected video > Move.
- Move to other folder or external memory card > Move here?.
Using video player controls
| To Tap |
| Pause II |
| Play ▶ |
| Previous track ◀ |
| Next track ➞ |
| Fast rewind Tap and hold ◀ |
| Fast forward Tap and hold ➞ |
| Control volume on press side volume keys |
Sending video clip using multimedia message
- Tap Menu > Camera > My Videos.
- Tap ▷ of the selected video > Send > as Multimedia Message.
For details on creating a multimedia message, see page 66.
Deleting multiple video clips
- Tap Menu > Camera > My Videos.
- Tap Options > Delete.
- Tap to mark desired files or tap All to mark all files.
- Tap Delete > Yes.
- To cancel deleting action press
Memo
ease™
4
Useful Features
Alarm
Calendar
Calculator and Tip Calculator
Pill Reminder
Pedometer
Alarm
Setting an alarm
- Tap Menu > Tools > Alarm Clock.
- Tap Create.
- Set the Enter alarm name, Frequency, Time, Alarm Sound, Alert Type, Volume, Snooze and Power Alarm.
- Tap Save.
Note: The alarm will not ring if you set the phone to Vibrate only. To set the alarm to ring even though the phone is turned off, activate the Power Alarm by dragging the bar to on.
Viewing the saved alarms
- Tap Menu > Tools > Alarm Clock.
- Scroll and tap an alarm to view the detail.
Editing existing alarms
- Tap Menu > Tools > Alarm Clock.
- Scroll and tap to select an alarm.
- Edit the alarm as you create an alarm
- Tap Save.
Setting simply alarm
- Tap Menu > Tools > Alarm Clock.
- Tap Simple Alarm.
- Scroll and set the time.
- Tap Save.
Calendar
Calendar helps you manage your schedule including your time for calls or special days. You can set a reminder on any given date with this function.
Viewing calendar
- Tap Menu > Tools > Calendar. Note: Monthly view is displayed as default.
In the monthly views
ToTap
| Move to another month |
| < for Previous |
| > for Next |
Creating a new event and edit
- Tap Menu > Tools > Calendar.
-
Tap to select a day > Create.
-
Tap to select Appointment, Task or Note.
- Input the events > Save.
Note: You can create events for dates from 01/01/2000 to 12/31/2099
Calculator and TIP Calculator
Using calculator
- Tap Menu > Tools > Calculator.
- Tap the numbers and [+,-,X,÷] to calculate.
- Tap [C] to erase one digit.
- Tap [AC] to reset.
- Tap [.] to use the decimal point.
Using tip calculator
- Tap Menu > Tools > Tip Calculator.
- Tap to enter values for all variable fields (Bill(\), Tip(%), Split) and the corresponding calculation fields (Total (\), Tip(\), You Pay(\)) are updated automatically.
- Tap Reset to reset.
- Tap [.] to use the decimal point.
Pill Reminder
Use this feature to help remind you to take your daily, weekly or
monthly medications.
Creating a new pill reminder
- Tap Menu > Tools > Pill Reminder.
- Tap Create New.
- Tap Take > take a picture.
- Enter the Name, Dosage, Time and Period to calculate.
- Tap Save.
Note:
- Pill Reminder is only available in Easy Mode.
- For Pill Reminder TIME setting, you have to input 01 instead of 1. And time input is possible from 01:00 to 12:59.
- If medication times are missed, you should follow the directions from your physician or pharmacist before taking any medication out of sequence.
Viewing a pill reminder
- Tap Menu > Tools > Pill Reminder > Today.
- Scroll and tap a Reminder entry to view the detail.
Note: When you indicate that you have taken a medicine, the pill symbol will be orange. If you do not indicate that you have taken the medicine, then it will be gray. You can change the status of the symbols by tapping them in the reminder details.
Snoozing a pill reminder
If you miss a pill reminder or can't take the pill at that time, the reminder can be snoozed for 15 minutes.
- When you recieved a reminder, slide the Wait 15 minutes button to the right.
Note: You can snooze a reminder for a maximum of 4 times.
Pedometer
Pedometer helps you measure your walks and distance.
Using pedometer
- Tap Menu > Tools > Pedometer.
- Tap Start to start walks measure.
- Tap Stop to stop.
Note:
- Pedometer is only available in Easy Mode.
- Place the phone in the upper front pocket of your jacket, in a bag you hold tightly, or attach to your pants or belt.
- This function does not begin recording until you have walked for eight continuous steps.
- The numerical value of Mile field differs from actual distance, because it is calculated as the standard pace.
easy mode - useful features
- The maximum count value is 32,000 steps. This function will be reset after that.
Viewing history
- Tap Menu > Tools > Pedometer.
- Tap History.
- You can view up to 7 days of history (including current day.).
Memo
ease™
5
Connectivity
Bluetooth
Accessing AT&T Services
Bluetooth
Bluetooth technology enables free wireless connections between electronic devices within a maximum range of 33 feet (10 meters). Bluetooth connections can be used to send images, text, business cards, calendar events and notes or to connect to computers using Bluetooth technology.
Your mobile phone supports:
- Connect to PC to access internet.
- Connect to Hands-Free.
- Connect to electronic devices.
Icons for Bluetooth
| Bluetooth is active. | |
| Bluetooth hands-free headset is connected. | |
| Bluetooth A2DP headset is connected. | |
| Bluetooth hands-free + A2DP headset is connected. | |
| Data transfer via Bluetooth. |
Note: Advance Audio Distribution Profile (A2DP) is a Bluetooth profile (mode) which is designed to transfer a uni-directional 2-channel stereo audio stream to a headset or car audio.
easy mode - connectivity
Activating Bluetooth
- Tap Menu > Settings > Bluetooth.
- Either "Touch center image for activation" or tap Settings > Drag the Activation bar to On.
- Tap Save.
Adding a device
- Tap Menu > Settings > Bluetooth > Search.
- The available devices will display.
- Tap to select the desired device.
- Tap Pair to pair the device.
- Enter password > OK.
- Tap View Detail to view the details of the device.
Note: The other device must be in pairing mode.
Sending an object
- Select the file from Menu > Camera > My Pictures or My Videos.
- Tap Options > via Bluetooth.
- Tap to select already paired device.
Note: If the other Bluetooth device requests pairing, the object is sent after pairing is completed. Locked object or ones containing original rights may not be forwarded.
Receiving an object
The receiving of an object starts only when the receipt has been approved. The received file will be saved in each place. For example, if you received contacts information from the sender, it will be saved in your phone's memory.
Setting the visibility
- Tap Menu > Settings > Bluetooth.
- Tap Settings > Drag the Visibility bar to On or Off.
- Tap Save.
Naming the phone
- Tap Menu > Settings > Bluetooth > My Info.
- Tap Name filed to edit the name > OK.
Note: The device name is what identifies your phone to Bluetooth network.
Accessing AT&T Services
Accessing AT&T navigator
- Tap Menu > AT&T Services > AT&T navigator.
Accessing My cast weather
- Tap Menu > AT&T Services > My Cast Weather.
Accessing Mobile Web
- Tap Menu > AT&T Services > Mobile Web.
Accessing AppCenter
- Tap Menu > AT&T Services > Games & Apps > AppCenter.
Accessing my account
- Tap Menu > AT&T Services > My Account.
Memo
ease™
6
Settings
Sound Profile
Display
Readout mode
Sound Profile
Setting sound profile
- Tap Menu > Settings > Sounds & Alerts.
- Select Normal, Outdoor, Vibrate only, Silent or Flight Mode.
Note: Tap ▶ to change Call, Message and General settings. Each category has options to change. Change the options and tap Save.
Display
Setting font size
- Tap Menu > Settings > Display > Font Size.
- Select Medium, Large or Very Large > Save.
Setting the home screen
Setting wallpaper
- Tap Menu > Settings > Display.
- Tap Wallpaper.
- To set other images, tap Wallpaper.
- Tap Images to see preloaded and downloaded wallpapers or tap Camera to see your pictures.
- Scroll and tap to select the file >Select.
easy mode - settings
Setting clock
- Tap Menu > Settings > Display.
- Tap Wallpaper.
- Tap Clock Type.
- Flick to view the clock types > Select.
Setting Locked Screen Image
- Tap Menu > Settings > Display.
- Tap Lock Screen.
- To set to a scrolling slideshow, tap Random.
- To set a personal picture, tap My Pictures > scroll and tap to select the file > Select.
Setting the menu theme
- Tap Menu > Settings > Display.
- Tap Menu Theme.
- Select Onyx, Gold or Platinum.
Setting the screen brightness
- Tap Menu > Settings > Display.
- Tap Backlighting > Screen Brightness.
- Drag the bar left or right > Save.
Note: Modifying brightness may affect battery life.
Setting time for backlight
- Tap Menu > Settings > Display.
- Tap Backlighting.
- Tap ✕ / ↗ to set the time of Screen Backlight and Keypad Backlight > Save.
Note: Modifying backlight time may affect battery life.
Readout mode
Setting readout mode
- Tap Menu > Settings > Readout Mode.
- Drag the Incoming Call, New Message, New Voice Mail and Read Message Text bar to On or Off.
- Tap Save.
ease™
1
Calls and address book
with Advanced Mode
Call settings
Settings for video share
Checking all calls
Using the address book
Address book settings
Caller identification
Using your headset
Service numbers and fixed dialing
Call settings
Setting call forwarding
- Tap Menu > Settings > Call > Call Forwarding.
- Select Forwarding Always, When Busy, Not Reachable or No Reply.
- Select Activate, Deactivate or Status.
- If you do not want call forwarding under any circumstances, select Deactivate All > Request.
Setting call waiting
- Tap Menu > Settings > Call > Call Waiting.
- Select Activate, Deactivate or Status.
Setting auto redial
- Tap Menu 📋 > Settings > Call > Auto Redial.
- Drag the bar On or Off.
Checking the packet
- Tap Menu > Settings > Call > Packet Counter.
- Select Total, Current or Last.
Settings for Video Share
Turning the alert on/off
- Advanced mode - calls and address book
- Tap Menu 📋> Settings > Call > Video Share.
- Press Alerts.
- Drag the bar On or Off.
Setting for automatic recording
- Tap Menu 📋> Settings > Call > Video Share.
- Press Auto Record.
- Drag the bar On or Off.
Setting for service
- Tap Menu > Settings > Call > Video Share.
- Press Service.
- Drag the bar On or Off.
Setting for profile
- Tap Menu ☐> Settings > Call > Video Share.
- Press Profile.
- Select AT&T IMS or Mobile Web.
Note: Mobile Web is not available in all circumstances. If you change from the default AT&T IMS, you may not be able to use video share.
Setting recording location
- Tap Menu 📋> Settings > Call > Video Share.
-
Press Recording Location.
-
Select Phone Memory or External Memory.
Checking all calls
You can view information about all Recent Calls. For more options for all, missed, received and dialed calls, tap Options.
You can also view the call history simply by tapping CALL.
Viewing missed calls
- Press ▶Missed Calls
or tap Menu > My Stuff > Tools.
- Press Recent Calls > Missed Calls.
Viewing received calls
- Press CALL Received Calls
or tap Menu > My Stuff > Tools.
- Tap Recent Calls > Received Calls.
Viewing dialed calls
- Press 📄Dialed Calls
or tap Menu > My Stuff > Tools.
- Tap Recent Calls > Dialed Calls.
Viewing call rankings
- Press Call Ranking
or tap Menu > My Stuff > Tools.
- Tap Recent Calls > Call Ranking.
Deleting call logs
- Tap Menu > My Stuff > Tools.
• Advanced mode - calls and address book
-
Tap Recent Calls > Delete Call Logs.
-
Select All Calls, Missed Calls, Received Calls or Dialed Calls > Yes.
Viewing call time
-
press CALL > Call Time or tap Menu > My Stuff > Tools.
-
Tap Recent Calls > Call Time.
-
You can view Last Call, Received Calls, Dialed Calls and Total Calls.
Resetting all call times
-
Press CALL > Call Time or tap Menu > My Stuff > Tools.
-
Tap Recent Calls > Call Time.
-
Tap Reset > Yes.
-
Enter password > OK.
Note: The default password is '1234'.
Viewing data transmitted information
-
Press CALL > Packet Counter or tap Menu > Settings.
-
Call > Packet Counter.
- Total: You can view all the Sent, Received, Total and Duration transmitted data in Kilobytes.
- Current: You can view transmitted data in the current session, in Kilobytes. Sent, Received and Total information are also available.
- Last: You can view Sent, Received, Total and Duration information of the previous session's transmitted in Kilobytes.
- Tap Clear to clear the information.
Using the address book
You can save names, phone numbers, and information on the SIM or phone. Number of entries can depend on the capacity of the SIM card.
Viewing the contact list
- Tap Contacts >All Contacts
Searching for a phone number
-
Tap Contacts >All Contacts
-
Scroll the screen up or down or tap Search and enter the name to find the contact.
-
Tap the contact > ☐ to view the detailed information.
-
To update information, tap Edit.
Calling from the contact list
- Tap Contacts >All Contacts
- Scroll the screen up or down or tap Search and enter the name to find the contact.
- Tap
• Advanced mode - calls and address book
Forwarding contact details
- Tap Contacts >All Contacts
- Scroll the screen up or down or tap Search and enter the name to find the contact
- Tap the contact > □ > Options > Send Contact.
- You can send the information using Multimedia Message or Bluetooth.
Deleting a contact
- Tap Contacts 📄 >All Contacts 📋.
- Scroll the screen up or down or tap Search and enter the name to find the contact
- Tap the contact > Delete > Yes.
Adding a contact
- Tap Contacts > Add.
- Input the fields by tapping the desired filed.
- Tap Save.
Making groups
- Tap Contacts > Groups
- To add new group, tap Add.
-
Input the group name > OK.
-
To add members to group, tap Yes.
-
Select the members > Add.
Editing groups
-
Tap Contacts > Groups
-
To edit group, tap the group > Edit > Rename Group, Add Members, Remove Members or Edit Members.
-
To send message to group members, tap Send Message.
-
To delete group, tap Delete.
Address book settings
Managing my info
- Tap Contacts > My Settings > My Info.
Setting the sort order
-
Tap Contacts 📄 > My Settings 🙏 > Sort Contacts.
-
Select First Name or Last Name >Save.
Setting address book
- Tap Contacts 📄 > My Settings 🏠 > AT&T Address Book.
Setting SIM management
- Tap Contacts 📞 > My Settings 📁 > SIM Management.
advanced mode - calls and address book
Caller identification
Caller identification ^®
-
Tap Menu > Settings > Call > Display My Number.
-
Select Network Default, Show or Hide.
Using your headset
You can make or receive a call using your headset.
When you connect your headset to the jack the button on the headset works as follows.
Note: You must use the headset designed for this device. It is optional accessory. Not all headsets will have a button.
While in standby mode
-
Tap the button once to list recent calls.
-
Tap the button twice to redial the last call.
Service numbers and fixed dialing
Calling your service numbers\$
You can see the service number to reach the service provider.
-
Tap Contacts > My Settings > Service Numbers.
-
Select a number.
Viewing the fixed dialing list
Fixed dialing is a service that limits your access to specific numbers in the address book list recorded on the SIM. Input the PIN2 to set up or cancel this service.
- Tap Contacts 📄 > My Settings 🙏 > FDN List.
- Select a number.
Note: PIN2 must be correctly entered within 3 attempts. If you input the incorrect code three times in a row the PIN2 code will be blocked. If the PIN2 code is blocked please contact your service provider. Your PIN2 code is supplied with the SIM card.
ease™
2
Messaging
with Advanced Mode
Entering text
Messaging
Receiving messages
Creating and sending text messages
Message templates
Message settings
Using instant messenger
Entering text
You can enter text with multi-tap, predictive, numeric or symbol.
Useful keys
Touch QWERTY Function
| Sym | Sym | Display symbols |
| Delete the letter | ||
| Space | Adding space | |
| Tap to change capital modeTap to change ab Ab ABMulti-tap (first letter caps/all caps/lower caps)Predictive (first letter caps/all caps/lower caps) |
For details on using QWERTY keypad, see page 10.
Key characters by language
Each of the following keys will scroll through these sequential options listed by language.
| Key English French Spanish | ||
| 1. , - ? | /' @ : | ||
| 2 a b c |ç à ä á ä ç | ||
Advanced mode - messaging
| Key English French Spanish | |||
| 3 d e f | é è | é | |
| 4 g h i | í | ||
| 5 | j k l | ||
| 6 | m n o | ö ñ | ó ñ |
| 7 | p q r s | β | |
| 8 t u v | ù ü | ú | ü |
| 9 | w x y z | ||
Predictive mode
The predictive mode automatically compares your keystrokes with an internal linguistic dictionary to determine the correct word. It will display the most commonly used word first. To save a word not listed in phone's dictionary,
- Tap abc to change the mode to predictive.
- [☐] Tap ABC to wxyz to input text.
[ ] Press A: to Z/ to input text.
For example, to write 'hello' in touch keypad, tap GHI DEF JKL
JKL MNO
In QWERTY keyboard, press HD E-L↑L↑O
Alphabet input mode
Tap the key labeled with the target letter once for the first letter; tap it twice for the second letter, and so on.
- Tap abc to change the mode as multi-tap.
2.[☐] Tap ABC to wxyz to input text repeatedly. To enter the letter
"C", Tap ABC 3 times. To enter number 2, tap ABC 4 times.
[ ] Press to: to input text repeatedly.
Numeric mode
You can input numbers in this mode.
- Tap abc to change the mode to 123.
2.[☐] Tap 1 to 9 and 0 to input numbers.
[ ] Press TO and ME input numbers.
Symbol mode
You can input symbols.
-
Tap abc to view the symbols.
-
Tap to select symbol.
Messaging
You can send, receive and save the text messages and multimedia messages.
Managing memory
Up to 200 messages can be stored in the phone memory, additional messages will be saved to the SIM card. When the message box is full
the messages full icon will appear. All messages share memory.
When It means

Text message is full ( SIM and Phone messages )
Moving a message to SIM
- Tap Inbox
- Select a message > Options > Move to SIM.
Deleting a message in the inbox
- Tap Inbox
- Tap Delete or tap to select a message > Options > Delete.
Deleting multiple messages
- Tap Inbox
- Tap Delete.
- Select the message to delete by tapping.
- Tap Delete > Yes.
- To select all messages, tap All.
- To cancel deleting action press ↩
Replying to a message
- Select a message > Reply.
Viewing memory space information
-
Tap Menu 📋 > Messaging > Used Space.
-
Tap □ > USIM.
Receiving messages
Viewing a new message
- Tap View.
Reading a message from the inbox
-
Tap Menu 📋 > Messaging > Inbox.
-
Select a received message > View.
Saving the contact information from a received message
-
Select a received message > Tap message.
-
Tap Options > Save to Contacts.
-
Select New Contact or Update Existing.
Saving the object in a received multimedia message
-
Open the multimedia message.
-
Select an object.
-
Tap Use > Save.
It will be saved in one of the categories in the My Stuff folder.
For details on photo album, see page 129.
advanced mode - messaging
Listening to voice message
- Tap Dial and hold 1 or tap Menu > Messaging > Voice Mail. Press and hold YD
It will automatically call the voice mail center.
Loading URL using Push message
-
Tap Menu 📊> Messaging > Inbox > Select a message > Tap message.
-
Tap Options > Load URL.
Saving connection settings using configuration message
-
Tap Menu 📋 > Messaging > Inbox > Select a message > Tap message.
-
Tap Options > Install.
Creating and sending text messages
Sending a new text message
-
Tap Menu 📋 > Messaging > Create Message.
-
Enter the message > OK.
-
To save the message as draft, tap More > Save to Drafts.
-
Tap the recipient filed to add a recipient(s) and select the contact > OK.
-
Tap Send.
-
To view sent message, tap Menu > Messaging > Inbox.
Note: All successfully sent messages will be saved in Inbox.
Finding all sending messages
- Menu > Messaging > Outbox.
Message templates
When you often use the same phrases, you can save the message under message templates.
Adding the message as a template
- Menu > Messaging > Templates.
- Tap Add.
- Enter the frequently used message > OK > More > Save.
Sending a message with template
- Menu > Messaging > Templates.
- Select the message to send.
- Tap the text box and add more messages.
- Tap the recipient filed to add a recipient(s) and select the contact > OK.
- Tap Send.
Message settings
Setting message center
- Menu 📋 > Messaging > Settings.
- Tap Text Message.
- Enter new Center Address.
- Tap Save.
Setting e-mail gateway
- Menu > Messaging > Settings.
- Tap Text Message.
- Enter new Email Gateway for sending text message by email address.
- Tap Save.
Setting profiles for multimedia message
- Menu 📋 > Messaging > Settings.
- Tap Multimedia Message > MMS Profiles.
- Select a profile.
- To add a profile, tap Create > set the options > Save.
Setting for sending multimedia message
- Menu > Messaging > Settings.
-
Tap Multimedia Message > Sending Settings.
-
You can set the Validity Period, Delivery Time, Priority, Creation Mode and Max Message Size.
- Tap Save.
Setting for receiving multimedia message
- Menu 📋 > Messaging > Settings.
- Tap Multimedia Message > Receiving Settings.
- You can set the Automatic Download, Allow Delivery Reply and Allow Read Reply.
- Tap Save.
Setting for receiving voice message
- Menu > Messaging > Settings.
- Tap Voice Mail.
- Enter the number of the voice mail center > Save.
Note: This number may be pre-configured by the service provider upon activation.
Setting for auto delete oldest message
- Menu 📋 > Messaging > Settings.
- Tap Auto Delete.
- Drag the bar to On or Off.
- Tap Save.
advanced mode - messaging
You can receive emails from your service provider.
Receiving an email
- Menu 📋 > Messaging > Mobile Email.
- Select an email.
Using instant messenger
Use Instant Messenger (IM) to send and receive short, simple messages that are delivered immediately.
Starting an instant messenger
- Menu 📋 > Messaging > IM.
- Select the IM application > OK.
- Enter login and password > Sign In.
Viewing the conversation log
You can view the conversations log in the Instant Messenger Saved History.
Memo
ease™
3
Multimedia
with Advanced Mode
Camera
Photo album
Video album
Audio album
Music Player
Music player settings
Audio player
Media player
Other files
Managing memory
Playing games
Camera
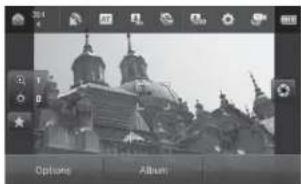
You can take pictures and record movies using the built-in camera. The photos and video clips can be saved and sent via multimedia messages and Bluetooth.
natural_image
Black-and-white photo of a historic cathedral with twin domes, displayed in an image editing interface (no readable text or symbols on the building itself)Setting camera settings
- Press 📄 in standby mode or tap Menu 🕒> Camera.
- Tap Options > Settings to change settings prior to taking a picture.
Taking a picture
- Press 📄 in standby mode or tap Menu 🕐 > Camera.
- Focus on the object and tap 📄.
Note: Your photo will be saved automatically to Menu 📊 > My Stuff > Picture > Camera or Menu 📊 > Picture > Camera.
advanced mode - multimedia
Changing to video camera mode
- Press 📄 in standby mode or tap Menu 📋 > Camera.
- Tap Options while camera mode is activated or simply just tap
- Tap Video Camera Mode.
- Focus on the object and tap ☐.
- Record the motion > Stop.
Note: Your video will be saved automatically to Menu □ > My Stuff > Video.
Viewing the taken picture
- Press 📄 in standby mode or tap Menu 🕒> Camera.
- Tap Album.
- Select the picture by tapping.
After taking pictures
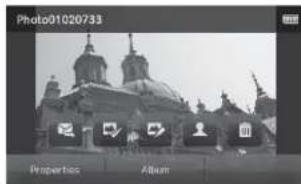
ToTap
Send a multimedia message > as Multimedia Message
To Tap
Send using Bluetooth
Set as online locker
Set as wallpaper
Set as address book
Rename
Face Recognition
Delete
Send > via Bluetooth
to Online Locker
Wallpaper
Caller ID
Rename


View the information Properties
View the GPS information GPS Info
Using special effects
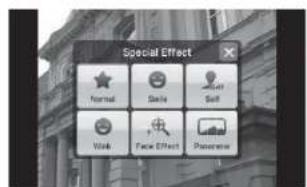
Smile effect
- Press ☐ in standby mode or tap Menu ☒ > Camera.
- Tap > Smile
advanced mode - multimedia
- Tap and focus on person's face. When the person smiles, it will capture the person automatically.
Self effect
- Press 📄 in standby mode or tap Menu 📋 > Camera.
- Tap > Self
- Focus on myself and press 📄 to capture.
Note: You will hear the beep sound when you try to focus on person. The beep sound will depend on number of people. If focus on one person, it will beep one time and if there are two people, it will beep twice and so on.
Wink effect
- Press 📄 in standby mode or tap Menu 🕒 > Camera.
- Tap > Wink
- Tap ✅ and focus on person's face. When the person winks it will capture the person automatically after 3 seconds.
Face effect
- Press 📄 in standby mode or tap Menu 🌐 > Camera.
- Tap > Face Effect
- Tap ◀/ ▶ to select the effect > Save.
- Focus on the object or person and tap 📋.
Note: The Face effect will only support on size 320x240 and 640x480.
Panorama effect
- Press 📄 in standby mode or tap Menu 📋 > Camera.
- Tap > Panorama
- Focus on the object or person and tap 📋. After the beep, move the phone to left or right to capture. It will capture 4 picture automatically.
Recording a video
- Tap Menu 📋 > Tools > Video Camera.
- Focus on the object and tap ☐.
- Tap Stop to stop.
- Tap to play the video clip.
- Press → to go back to preview mode.
Changing to camera mode
- Tap Menu 📋 > Tools > Video Camera.
- Tap Options while video camera mode is activated or simply just tap
#
- Tap Camera Mode.
For details on taking a picture, see page 124.
Viewing the recorded video clip
- Tap Menu 📋 > Tools > Video Camera.
Advanced mode - multimedia
- Tap Album.
- Select the video clip by tapping.
Photo album
You can save photos to your phone or an external memory card and view, send or delete them in the photo album. JPEG format is supported, and other formats are saved in the Picture folder.
Note: To access Picture, tap Menu 📋> Picture.
Viewing the saved pictures
- Tap Menu > Picture > Camera.
- Select a picture.
Setting as wallpaper in the display
- Tap Menu 📋 > Picture > Camera.
- Tap ▶ of the picture > Set as > Wallpaper.
Setting as caller identification
- Tap Menu > Picture > Camera.
- Tap > of the selected picture > Set as > Caller ID.
Sending pictures using multimedia message
- Tap Menu > Picture > Camera.
- Tap ▶ of the selected picture > Send > as Multimedia Message.
For details on creating a multimedia message, see page 117.
Deleting multiple pictures
- Tap Menu > Picture > Camera.
- Tap Options > Delete.
- Tap to mark desired files or tap All to mark all files.
- Tap Delete > Yes.
- To cancel deleting action press ↩.
Recognizing face
- Tap Menu 📋 > Picture > Camera.
- Tap ▶ of the selected picture > Face Recognition.
- Tap Add tag and input the name and phone number.
- Tap Save to save as contact.
Viewing file information
- Tap Menu > Picture > Camera.
- Tap ▶ of the selected picture > Properties.
Video album
You can view, send, save and delete videos. The supported formats are MP4, WMA, 3GP and 3G2.
Advanced mode - multimedia
Playing the saved video clips
- Tap Menu 📋 > Video.
- Tap the video clip to play.
Sending video clip using multimedia message
- Tap Menu 📋 > Video.
- Tap ▶ of the selected video > Send > as Multimedia Message. For details on creating a multimedia message, see page 117.
Deleting multiple video clips
- Tap Menu > Video.
- Tap Options > Delete.
- Tap to mark desired files or tap All to mark all files.
- Tap Delete > Yes.
- To cancel deleting action press ↩
Audio album
You can play, send, delete, move or copy the saved sound to external memory or to phone. The supported formats are MP3, AAC, AAC+, and WMA.
Listening to the recorded sound
-
Tap Menu > My Stuff > Audio.
-
Tap My Voice.
-
Tap the file to play.
Setting as a ring tone
-
Tap Menu > My Stuff > Audio.
-
Tap ▶ of the selected file > Set as Ring Tone.
Note: The maximum ringtone file size is 300KB.
Moving or copying multiple sound to external memory
-
Tap Menu > My Stuff > Audio.
-
Tap Options > Copy or Move.
-
Select the file to move > Move.
-
Select the folder > Move here?
The selected sound will be copied or moved to Audio folder in external memory card.
Sending sound file using multimedia message
-
Tap Menu > My Stuff > Audio.
-
Tap ▶ of the selected file > Send > as Multimedia Message.
Music player
You can listen to music on your phone through the Music Player. The Music Player is only compatible with and can play the following audio
advanced mode - multimedia
types saved in MP3, .AAC, .AAC+, and .WMA.
Note: microSD card must be inserted to transfer music to your device.
Adding music from Windows Media Player™
-
Connect the USB cable to the device and the computer.
-
Select Music Player > Yes.
-
Open the Sync Tap in Windows Media Player™ in your computer.
-
Select the music from the list and drag and drop to your device.
Note: Windows Media Player™ 10, 11 and Window XP version is required.
Playing the music
-
Tap Menu > AT&T Music > Music Player.
-
Scroll to select a category to play the music.
-
Scroll to select the file and tap.
-
Tap Add to Playlist to add to the playlist.
Note: Music will pause when you receive an incoming call and Music will resume when the call ends.
Making playlist
-
Tap Menu 📋 > AT&T Music > Music Player.
-
Tap Playlists > New Playlist.
-
Enter playlist name > Save.
-
Tap All Music, Albums, Artists or Genres.
-
Scroll and tap to select the music file and tap Done to add to playlist.
Add music to playlist
- Tap Menu > AT&T Music > Music Player.
- Tap Playlists.
- Tap > of the selected playlist > Add Tracks.
- Tap All Music, Albums, Artists or Genres.
- Tap to mark desired files or tap Select All > Done.
- To remove tracks tap > Remove Tracks > scroll and tap to select the music and tap Done.
- To rename the playlist tap >> > Rename Playlist.
- To delete the playlist tap >> Delete.
Viewing the information
- Tap Menu 📋 > AT&T Music > Music Player.
- Scroll and tap to select a category to play the music.
- Scroll and select the file.
- Tap > Properties.
- Scrolling up or down to view Track Number, Title, Artist, Album, Genre, Play Counter, Duration, File Name, File Size, Location, Format, Bit Rate, Created, License and Sharing.
Deleting music
- Tap Menu > AT&T Music > Music Player.
- Scroll and tap to select category.
- Scroll and select the file.
- Tap ▶ > Delete. Or tap Delete and tap to mark desired files or tap Select All to mark all files.
- Tap Delete.
Note: If the music is playing you cannot delete.
Shopping music
- Tap Menu > AT&T Music.
- Tap Shop Music.
- To go to previous page tap ↻.
Listening the radio
- Tap Menu > AT&T Music.
- Tap AT&T Radio.
Using music identification
- Tap Menu > AT&T Music.
- Tap Shazam.
- Hold the phone close to the music. Your phone will analyze the music and display the artist, title and album.
Note: For the cost plan contact your nearest service provider.
Watching the music video
- Tap Menu > AT&T Music.
- Tap Music Videos.
Launching to community
- Tap Menu > AT&T Music.
- Tap Community.
Shopping music applications
- Tap Menu > AT&T Music.
- Tap Music Apps.
Music player settings
Shuffling music
- Tap Menu > AT&T Music > Music Player.
- Tap Settings > Shuffle.
- Tap Shuffle On or Shuffle Off.
- Tap Save.
Repeating the music
- Tap Menu > AT&T Music > Music Player.
-
Tap Settings > Repeat.
-
Tap Repeat All Tracks, Repeat Single Track or Repeat Off.
- Tap Save.
Setting equalizer
- Tap Menu > AT&T Music > Music Player.
- Tap Settings > Equalizer.
- Tap 📄/▶ to select Normal, Pop, Jazz, Classic, Rock, Dance, User Configured1, User Configured2 or User Configured3.
- To set user equalizer, tap User Configured1, User Configured2 or User Configured3.
- Tap Save.
Removing
- Tap Menu > AT&T Music > Music Player.
- Tap Settings > Remove.
Audio player
You can play, send, delete, move or copy the saved sound to external memory or to phone. The supported formats are MP3, AAC, AAC+, and WMA.
Listening to the recorded sound
-
Tap Menu 📋 > My Stuff > Audio.
-
Tap My Voice.
-
Tap the file to play
Using sound controls
| To Tap | |
| Pause | II |
| Play | ▶ |
| Rewind | ◀◀ |
| Fast forward | ▶▶ |
| Control volume | on press side volume keys |
Setting as a ring tone
-
Tap Menu > My Stuff > Audio.
-
Tap ▶ of the selected file > Set as Ring Tone.
Note: The maximum ringtone file size is 300KB.
Moving or copying multiple sound to external memory
-
Tap Menu > My Stuff > Audio.
-
Tap Options > Copy or Move.
-
Select the file to move > Move.
-
Move to other folder or external memory card > Move here?
The selected sound will be copied or moved to Audio folder in external memory card.
Sending sound file using multimedia message
-
Tap Menu 📋 > My Stuff > Audio.
-
Tap ▶ of the selected file > Send > as Multimedia Message.
Media player
You can play video clips with the media player.
Note: Do not use this feature illegally. Sound and video can be protected by copyright. It is illegal to copy such sound / video tracks for the purpose of selling or distribution. Pantech does not in any way support the unauthorized use of content on your phone media player.
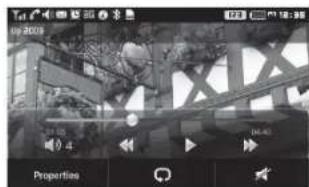
- Specifications
- Design
- Displays
- Melodies
- Camera
- Dimensions & Weight
- Operating Frequency
- Easy Mode
- Calls and address book
- Messaging
- Multimedia
- Useful Features
- Connectivity
- Settings
- Advanced Mode
- - contents
- Appendix
- Memo
- Phone overview
- Quick & Easy
- QWERTY mode view
- Menu overview
- Easy mode menu
- Address Book
- Messaging
- AT&T Services
- Tools
- Settings
- Advanced mode menu
- IM Games
- Apps
- AT&T Music
- SIM card and battery
- About your SIM card
- About your battery
- Installing/removing SIM card and battery
- Instructions for Optimal Performance
- To charge your battery
- Memory card
- Using a memory card
- Tap Copy Here.
- Resetting a memory card
- Turning the phone on/off
- Screen unlock
- Essential display indications (Easy Mode only)
- getting started
- Language
- Setting up easy mode
- Setting up advanced mode
- Missed events
- Easy Mode / Advanced Mode
- Setting the phone mode
- Dynamic Noise Suppression from Audience
- How Does It Work?
- Screen navigation (Advanced Mode only)
- About your home screen
- Adding a home screen item
- Deleting a home screen item
- Repositioning a home screen item
- Navigating through menus
- Using the multitask menu
- Multitask functions
- PC Suite
- System requirements
- PC Suite features
- Updating software (Advanced Mode only)
- To update the software
- To view the version of software
- Calls and address book
- Making, receiving and ending calls
- Making a call
- Answering a call
- Ending a call
- Rejecting a call
- Making a call using the call list
- Making a call during a call
- easy mode - calls and address book
- Switching between two calls
- Making an international call
- Making an emergency call
- Replying to a missed call
- Answering a second call n
- Using Video Share
- You can share live or recorded video while on a call.
- Making video share call
- Turning off the speakerphone
- Zoom in and out
- Stopping the recording
- Stopping or ending video share
- Receiving video share
- Options during a call
- Microphone off and on
- Turning on speakerphone
- Turning off speakerphone
- Putting a call on hold and returning ®
- Multi-party calls n
- Making a multi-party call
- Noise suppression
- Checking all calls
- Viewing call history
- Viewing call time
- Resetting all call times
- Speed dialing
- Setting speed dial
- Changing speed dial contact
- Removing from speed dial
- Using the address book
- Viewing the contact list
- Searching for a phone number
- Calling from the contact list
- Forwarding contact details
- Deleting a contact
- Adding a contact
- Making groups
- Editing groups
- Address book settings
- Managing my info
- Setting Sync settings
- Using your headset
- While in standby mode
- Fixed dialing
- Viewing the fixed dialing list
- 2
- Entering text
- Predictive mode (T9)
- Alphabet input mode
- Numeric mode
- Symbol mode
- Managing memory
- Deleting a message in the inbox
- Deleting multiple messages
- Replying to a message
- Receiving messages
- Viewing a new message
- Reading a message from the inbox
- Saving the contact information from a received message
- Saving the object in a received multimedia message
- Listening to voice message
- Loading URL using Push message
- Creating and sending text messages
- Sending a new text message
- easy mode - messaging
- Finding all sent messages
- Creating multimedia messages
- Adding a saved picture to the message
- Adding a new picture to the message
- Adding a saved video to the message
- Adding a new video to the message
- Adding a recorded voice memo to the message
- Adding a new voice memo to the message
- 3
- Multimedia
- Taking a picture
- Setting camera settings
- To Tap
- Recording a video
- Changing to camera mode
- easy mode - multimedia
- Viewing the recorded video clip
- Viewing the taken picture on memory card
- After saving recorded video clips
- ToTap
- Photo album
- Viewing the saved pictures
- Sending pictures using multimedia message
- Deleting multiple pictures
- Viewing file information
- Video album
- Playing the saved video clips
- Copy to the saved video clips
- Move to the saved video clips
- Sending video clip using multimedia message
- Deleting multiple video clips
- 4
- Useful Features
- Alarm
- Setting an alarm
- Viewing the saved alarms
- Editing existing alarms
- Setting simply alarm
- Calendar
- Viewing calendar
- In the monthly views
- Creating a new event and edit
- Calculator and TIP Calculator
- Using calculator
- Using tip calculator
- Pill Reminder
- Creating a new pill reminder
- Note:
- Viewing a pill reminder
- Snoozing a pill reminder
- Pedometer
- Using pedometer
- easy mode - useful features
- Viewing history
- 5
- Connectivity
- Bluetooth
- Activating Bluetooth
- Adding a device
- Sending an object
- Receiving an object
- Setting the visibility
- Naming the phone
- Accessing AT&T Services
- Accessing AT&T navigator
- Accessing My cast weather
- Accessing Mobile Web
- Accessing AppCenter
- Accessing my account
- Sound Profile
- Setting sound profile
- Display
- Setting font size
- Setting the home screen
- Setting wallpaper
- Setting clock
- Setting Locked Screen Image
- Setting the menu theme
- Setting the screen brightness
- Setting time for backlight
- Readout mode
- Setting readout mode
- with Advanced Mode
- Call settings
- Setting call forwarding
- Setting call waiting
- Setting auto redial
- Checking the packet
- Settings for Video Share
- - Advanced mode - calls and address book
- Setting for automatic recording
- Setting for service
- Setting for profile
- Setting recording location
- Viewing missed calls
- Viewing received calls
- Viewing dialed calls
- Viewing call rankings
- Deleting call logs
- • Advanced mode - calls and address book
- Viewing data transmitted information
- Setting the sort order
- Setting address book
- Setting SIM management
- advanced mode - calls and address book
- Caller identification
- Caller identification ®
- Service numbers and fixed dialing
- Calling your service numbers\$
- Predictive mode
- When It means
- Moving a message to SIM
- advanced mode - messaging
- Finding all sending messages
- Message templates
- Adding the message as a template
- Sending a message with template
- Message settings
- Setting message center
- Setting e-mail gateway
- Setting profiles for multimedia message
- Setting for sending multimedia message
- Setting for receiving multimedia message
- Setting for receiving voice message
- Setting for auto delete oldest message
- Receiving an email
- Using instant messenger
- Starting an instant messenger
- Viewing the conversation log
- advanced mode - multimedia
- Changing to video camera mode
- Viewing the taken picture
- Using special effects
- Smile effect
- Self effect
- Wink effect
- Face effect
- Panorama effect
- Setting as wallpaper in the display
- Setting as caller identification
- Recognizing face
- Audio album
- Listening to the recorded sound
- Setting as a ring tone
- Moving or copying multiple sound to external memory
- Sending sound file using multimedia message
- Music player
- Adding music from Windows Media Player™
- Playing the music
- Making playlist
- Add music to playlist
- Viewing the information
- Deleting music
- Shopping music
- Listening the radio
- Using music identification
- Watching the music video
- Launching to community
- Shopping music applications
- Music player settings
- Shuffling music
- Repeating the music
- Setting equalizer
- Removing
- Audio player
- Media player
- Playing the video clip
- Playing the audio file
- Other files
- Viewing the list of the files
- Viewing memory status
- Playing games
- Play games
- Shop games
- Notepad and voice memo
- Using notepad
- Recording voice memo
- Listening the recorded sound
- World time
- Using world time
- Converter
- Using the converter
- Stop watch and timer
- Using stop watch
- Using timer
- Sketch pad
- Using Sketch pad
- Setting the background
- Setting as wallpaper
- Sending the drawing
- Memory information
- AppCenter
- Shopping Applications
- advanced mode - connectivity
- Shopping Tones
- Shopping Games
- Shopping Wallpapers
- Shopping Videos
- Accessing YPmobile
- Accessing Mobile Email
- Accessing AT&T Social Net
- Accessing IM
- Accessing Apps
- Accessing Loopt
- Accessing Where
- Accessing AT&T Family Map
- Accessing Mobile Video
- Accessing Facebook
- Accessing MySpace
- Accessing and Using Mobile Web
- Accessing browser
- Viewing bookmarks
- Setting new bookmarks
- Viewing download status
- Profile settings
- Viewing default profile
- Adding new profile
- Editing profile
- Deleting profile
- Phone
- Setting time & date
- Shopping home screen
- Setting the font
- Setting the brightness
- Touch Settings
- Setting touch feedback
- Setting touch lock automatically
- Locking Your Phone
- Locking the phone
- Locking the PIN
- Locking the FDN
- Changing PIN 2
- Changing hidden key
- Reset
- Resetting the phone
- External Memory Reset
- TTY
- Setting teletypewriter
- 7
- Appendix
- Alert message
- Troubleshooting checklist
- Safety information
- Safety precautions
- About the battery usage
- FCC Hearing-Aid Compatibility (HAC) regulations for wireless devices
- FCC Regulatory Compliance
- Statement according to FCC part 15.21
- RF exposure FCC
- appendik
- Health and Safety Information FCC
- Warranty
- Protect Your Warranty
- Month Limited Warranty
- This Warranty does not apply to:
- PANTECH WIRELESS, INC.
Brand : PANTECH
Model : Ease P2020
Category : Smartphone