
MDSC-2226 - Monitor Barco - Free user manual and instructions
Find the device manual for free MDSC-2226 Barco in PDF.


| Type | Professional LCD Monitor |
| Screen Size | 22 inches (diagonal) |
| Resolution | 1920 x 1080 (Full HD) |
| Display Technology | IPS (In-Plane Switching) |
| Brightness | 300 cd/m² |
| Contrast Ratio | 1000:1 (typical) |
| Viewing Angle | 178° horizontal / 178° vertical |
| Dimensions (with stand) | 510 x 380 x 200 mm (W x H x D) |
| Weight (with stand) | 5.5 kg |
| Power Supply | 100-240 V AC, 50/60 Hz |
| Power Consumption | 35 W (typical), <0.5 W standby |
| Video Inputs | 1x DVI-D, 1x DisplayPort, 1x VGA |
| Additional Ports | 2x USB 2.0 downstream, 1x USB-B upstream |
| VESA Mount | 100 x 100 mm |
| Cleaning Instructions | Use a soft, lint-free cloth lightly dampened with water or mild detergent. Do not spray directly onto the screen. |
| Safety Compliance | CE, FCC, UL, RoHS |
| Spare Parts Availability | Contact Barco customer service or authorized resellers for replacement parts. |
| Intended Use | Professional and industrial environments |
Frequently Asked Questions - MDSC-2226 Barco
User questions about MDSC-2226 Barco
0 question about this device. Answer the ones you know or ask your own.
Ask a new question about this device
Download the instructions for your Monitor in PDF format for free! Find your manual MDSC-2226 - Barco and take your electronic device back in hand. On this page are published all the documents necessary for the use of your device. MDSC-2226 by Barco.
USER MANUAL MDSC-2226 Barco
natural_image
Blank tablet screen with no visible text, symbols, or graphics
natural_image
Front view of a white tablet device with a black screen, placed on a plain gray background (no text or symbols visible)UserGuide
Barco nv
President Kennedypark 35, 8500 Kortrijk, Belgium
Phone: +32 56.23.32.11
Fax: +32 56.26.22.62
Support: www.barco.com/esupport
Visit us at the web: www.barco.com
TABLEOFCONTENTS
1. Welcome!......3
1.1 About the product 3
1.2 Symbols....4
1.3 What's in the box....4
1.4 About this userguide....4
2. Parts, controls and connectors .... 5
2.1 Frontview....5
2.2 Rearview....6
2.3 Connectorview....6
2.3.1 MDSC-2226 LED version.... 6
2.3.2 MDSC-2226 DDI version 7
2.3.3 MDSC-2226 MNA version 8
2.4 Connector pin assignments 9
2.4.1 Input power connector 9
2.4.2 DVI-1 connector....9
2.4.3 DVI-2 connector 10
2.4.4 DVI out connector 11
2.4.5RS232connector....11
2.4.6 USB connector....12
2.4.7 Mini USB connector 12
2.4.8 DisplayPort connector 12
2.4.9 S-Video and S-Video-out connector....13
3. Display installation 15
3.1 VESA mount installation....15
3.2 Cover removal....16
3.3 Video input connection 16
3.3.1 MDSC-2226 LED version....16
3.3.2 MDSC-2226 DDI version 17
3.3.3 MDSC-2226 MNA version 17
3.4 Video output connection....18
3.4.1 MDSC-2226 LED version....18
3.4.2 MDSC-2226 DDI version 19
3.4.3 MDSC-2226 MNA version 20
3.5 Nexxis OR 20
3.6 Power supply connection....20
3.7 Cable routing 21
4. Daily operation ...... 23
4.1 Keyboard backlight 23
4.2 On/Offswitching....23
4.3 OSD menu activation....23
4.4 OSD menu navigation....24
4.5 Shortkey functions 25
4.5.1 Main source selection....26
4.5.2 Multi-image configuration....26
4.5.3 Zoom factor selection 26
4.5.4 Brightness adjustment 26
4.6 Extended keyboard functions....27
4.6.1 Main source selection....28
4.6.2 Second source selection....28
4.6.3 Multi-image configuration....29
4.6.4 Transfer function selection 29
4.6.5 Image size selection 29
4.6.6 Zoom factor selection 30
4.7 Keyboardlocking/unlocking....30
5. Advanced operation....33
5.1 OSD picture menu 33
5.1.1 Profile....33
5.1.2 Brightness....33
5.1.3 Contrast 34
5.1.4 Saturation 34
5.1.5 Color temperature 34
5.1.6 Gamma 35
5.1.7 Sharpness....35
5.2 Picture Advanced menu....36
5.2.1 Black Level....36
5.2.2 SmartVideo....36
5.2.3 Image Position....36
5.2.4 Auto Adjustment 37
5.2.5 Phase....37
5.2.6 Clock/Line....37
5.3 Display Format menu....38
5.3.1 Main Source (Primary Source)....38
5.3.2 ComponentMode....38
5.3.3 Zoom....39
5.3.4 Image Size 39
5.3.52 nd Picture Mode 40
5.3.62 ^nd Picture Source....40
5.3.72 ^nd Picture Position....41
5.3.8 Picture Swap....41
5.4 Configuration menu 42
5.4.1 Information....42
5.4.2 Language....42
5.4.3 Failover mode....43
5.4.4 Extended keyboard....43
5.4.5 OSD setting 43
5.4.5.1 OSD Horizontal Position 43
5.4.5.2 OSD Vertical Position 44
5.4.5.3 OSD Time-out....44
5.4.6 Recall Profile....44
5.4.7 Save Profile 45
5.5 System menu....45
5.5.1 PoweronDVI1....45
5.5.2 Poweron DVI2....46
5.5.3 DVI Output 46
5.5.4 Keyboardlock....46
5.5.5 Keyboardbacklight....47
5.5.6 Power Saving....47
6.Importantinformation....49
6.1 Safety information....49
6.2 Environmental information 51
6.3 Biological hazard and returns....53
6.4 Regulatory compliance information 54
6.5 Cleaning and disinfection 54
6.6 Explanation of symbols....55
6.7 Legal disclaimer....56
6.8 Technical specifications 56
6.9 Warranty statement....59
6.10 Open source license information 63
1.WELCOME!
1.1 About the product
Overview
Barco'sMDSC-2226isa26-inchsurgicaldisplay.Purpose-builtfortheoperatingroom,theMDSC-2226 offersaneasy-cleandesign,smartmechanicsandthemostdetailedimagesintheoperatingroomtoday.
Easeofmind
Perfecthand-eyecoordination: Thedisplay'shighbrightness, highcontrastandfullHDresol utionprovide surgeonswithexcellentdepthperceptionandthemostaccurateimages. TheMDSC-2226presentsimageswithunrivaledcolorandgrayscaleaccuracyandwithnear-zerolatency,makingitperfectlysuited forusewittoday'sstate-of-the-artendoscopycamerasystems.
Multi-source, multi-display imaging: With its broad input connectivity, the MDSC-2226 also offers flexible multi-modalityimaging(PiP&PaP)innewintegratedoperatingrooms. Thankstoithigh-brightLED backlight,thesurgicaldisplayalsoensuresalonglifetimeandlowpowerconsumption.
Easeofinstallation
The MDSC-2226 comes with a smart cable managements system that histid the cables for a clutter-free set-up. Its lightweight design allows easy mounting on surgical booms and spring arms. Available in three models, this surgical display also features a host of connectivity options and remote control.
Easeofuse
Barco'sMDSC-2226allowseasycleaningandcompletedisinfectionthankstoitssmoothsurface,sealed housing,andprotectivescreencover.Thefanlessdesignavoidsthespreadofcontaminants.
Features
- 26-inchwide-screenLCDwithfullHDresolutionand10-bitpercolor
- Wideviewingangle
•High-brightnessLEDbacklight - BacklightOutputStabilization(BLOS)
- Advanced, full10-bit image processing algorithm with 12-bit LUT
- WidestrangeofSDandHDinputsignals, including3G-SDIandDisplayPort
•Lightweighttoeasilymountontoaboom
Innovative features are also available to give maximum flexibility when installing the display as: ConfigurableDVI-outandFailoverMode
1.2Symbols
Overview
The followingiconsareusedinthemanual:
 | Caution |
 | Warning |
 | Info,termdefinition.Generalinfoabouttheterm |
 | Note:givesextrainformationaboutthedescribedsubject |
 | Tip:givesextraadviceaboutthedescribedsubject |
1.3 What'sinthebox
Overview
YourMDSC-2226displaycomeswith:
•MDSC-2226userguide
• D V I c a b l e
•ACpowercords
•externalpowersupply
•4screwsandAllenkey

Keepyouroriginalpackaging.Itisdesignedforthisdisplayandistheidealprotection duringtransport.
1.4 About this user guide
Overview
This manual provides a support to the user during the installation, set up and utilization of the MDSC-2226 display. Depending on the specific version that has been purchased, some of the features and options described in this document may not apply to the display in user's hands.
2.PARTS,CONTROLSAND CONNECTORS
2.1Frontview
Overview
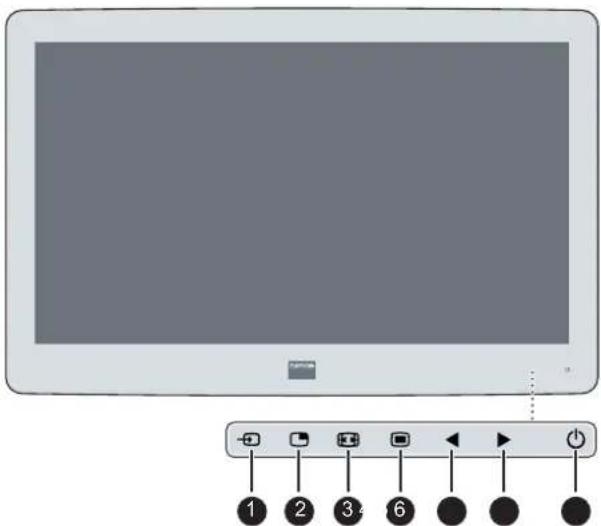
Image2-1
| 1 | InputSelectionkey |
| 2 | Multi-imageselectionkey/Downkey |
| 3 | Imagezoomkey/Upkey |
| 4 | OSDMenukey/Enterkey |
| 5 | Brightnessdecrease/Leftkey |
| 6 | Brightnessincrease/Rightkey |
| 7 | Stand-bykey |
A7-keycapacitivekeypadislocatedonthefrontofthedisplay.Bydefaultonlythestand-bykeyisvisible.
When you touch any of the keys shortly, the front illumination of all other keys is switched on for a few seconds. When you touch any of these other keys again while the illumination is on, the function of the key is executed. If no further action is taken within the time-out, the front key illumination is switched off again.

Theauto-dimfunctionofthefrontkeyilluminationcanbedisabledintheOSDmenu.
2.2Rearview
Overview
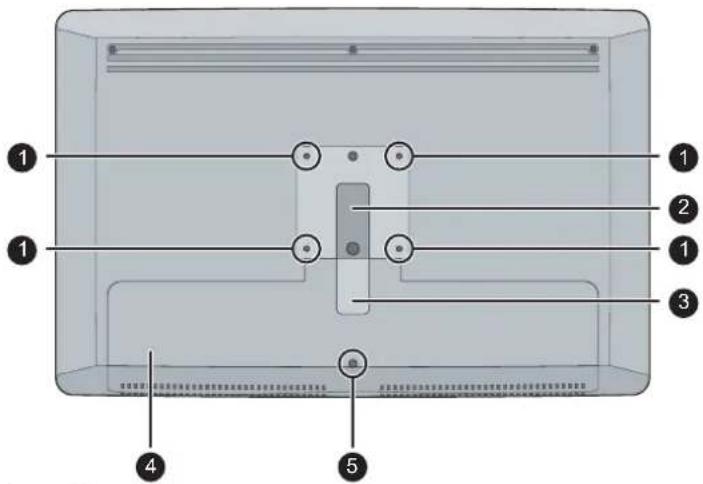
Image2-2
| 1 | VESAmountscrewholes |
| 2 | Cableroutingchannel |
| 3 | Cableroutingchannelexpansionclip |
| 4 | Connectorcompartmentcover |
| 5 | Connectorcompartmentcoverfixationscrew |
2.3 Connectorview
2.3.1 MDSC-2226LEDversion
Overview
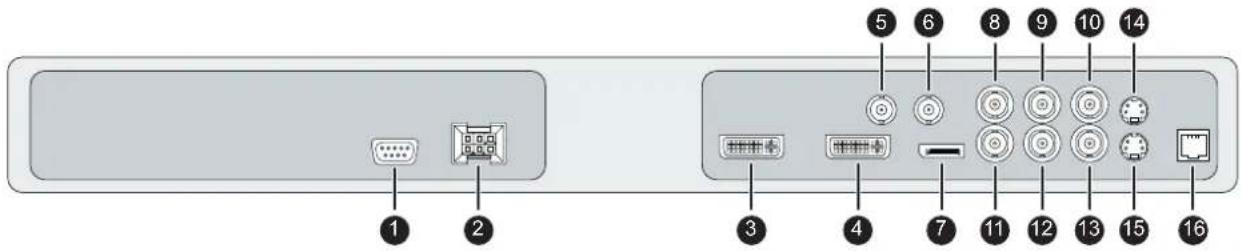
Image2-3
| 1 | RS232 |
| 2 | Inputpowerconnector |
| 3 | DVIout |
| 4 | DVI-1(digital&analog-HDMIvideosupportwithHDCP) |
| 5 | SDI-1out |
| 6 | SDI-1 |
| 7 | DisplayPort(VESAstd1.1a) |
| 8 | Sync |
| 9 | CVBS |
| 10 | CVBSout |
| 11 | R/Pr |
| 12 | G/Y |
| 13 | B/Pb |
| 14 | S-Videoout |
| 15 | S-Video |
| 16 | Service |
2.3.2MDSC-2226DDIversion
Overview
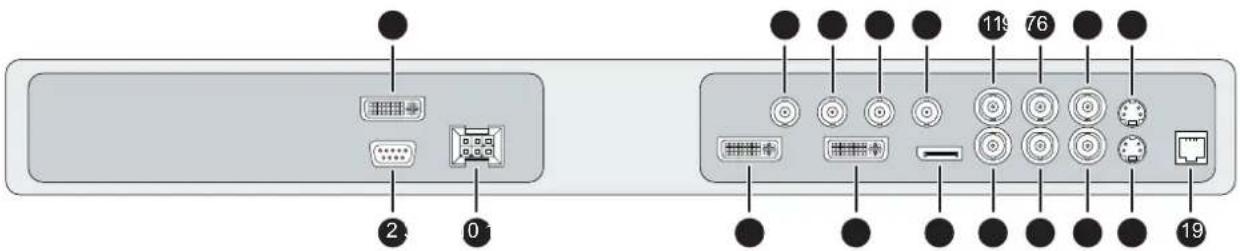
Image 2-4
| 1 | DVI-2 |
| 2 | RS232 |
| 3 | Inputpowerconnector |
| 4 | DVIout |
| 5 | DVI-1 (digital & analog – HDMI video support with HDCP) |
| 6 | SDI-2out |
| 7 | SDI-2 |
| 8 | SDI-1out |
| 9 | SDI-1 |
| 10 | DisplayPort (VESA std 1.1a) |
| 11 | Sync |
| 12 | CVBS |
| 13 | CVBSout |
| 14 | R/Pr |
| 15 | G/Y |
| 16 | B/Pb |
| 17 | S-Video out |
| 18 | S-Video |
| 19 | Service |
2.3.3MDSC-2226MNAversion
Overview
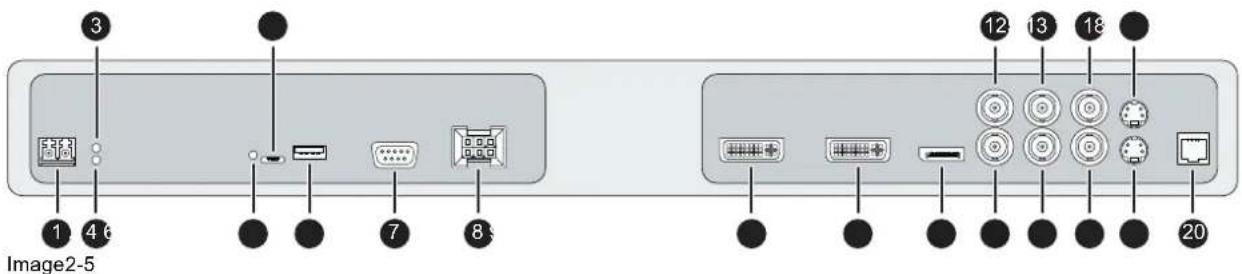
| 1 | Optical 10Gb EthernetSFP+ interface* |
| 2 | LED2*Orange blinking: Activity = (Tx) or (Rx)Off: No network activity |
| 3 | LED1*Green: Link is activeOff: No active network connection |
| 4 | LED3*Green: Power on, normal operationOff: System not poweredOrange blinking: Error |
| 5 | Micro USB interface* |
| 6 | USB 2.0 type A interface* |
| 7 | RS232 |
| 8 | Input power connector |
| 9 | DVI out |
| 10 | DVI-1 (digital & analog – HDMI video support with HDCP) |
| 11 | DisplayPort (VESA std 1.1a) |
| 12 | Sync |
| 13 | CVBS |
| 14 | CVBS out |
| 15 | R/Pr |
| 16 | G/Y |
| 17 | B/Pb |
| 18 | S-Video out |
| 19 | S-Video |
| 20 | Service |
(*) Nexxis OR functionality: for more detailed information please refer to the dedicated user guides. Please visit my.barco.com to obtain these user guides.
2.4 Connectorpinassignments
2.4.1 Inputpowerconnector
Overview
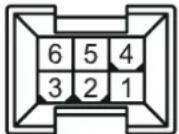
Image2-6
| PinFunction | |
| 1 | GND |
| 2Notconnected | |
| 3 | +24VDC |
| 4 | GND |
| 5 | Shield |
| 6 | +24VDC |

ThegroundandtheshieldconnectionsonthepowerinputconnectorhavenoProtective Earthfunction.AProtectiveEarthconnectionisprovidedviaadedicatedpin(seeimage 3-10).
2.4.2DVI-1connector
Overview
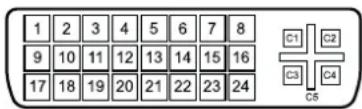
Image2-7
| PinFunction | |
| 1D2_Rx-(T.M.D.S.) | |
| 2D2_Rx+(T.M.D.S.) | |
| 3GND(data2shield) | |
| 4Notconnected | |
| 5 | Notconnected |
| 6SCL(forDDC) | |
| 7 | SDA(forDDC) |
| 8Analogverticalsync | |
| 9 | D1_Rx-(T.M.D.S.) |
| 10 | D1_Rx+(T.M.D.S.) |
| 11 | GND(data1shield) |
| 12 | Notconnected |
| 13 | Notconnected |
| 14 | +5Vinput(DDCsupply)(*) |
| 15 | GND(cablesense) |
| 16 | Hotplugdetect(*) |
| 17 | D0_Rx-(T.M.D.S.) |
| 18 | D0_Rx+(T.M.D.S.) |
| 19 | GND(data0shield) |
| 20Notconnected | |
| 21Notconnected | |
| 22 | GND(clockshield) |
| 23 | CK_Rx+(T.M.D.S.) |
| 24 | CK_Rx-(T.M.D.S.) |
| C1 | AnalogRed |
| C2AnalogGreen | |
| C3 | AnalogBlue |
| C4 | Analoghorizontalsync |
| C5AnalogGNDreturn(analogR,G,B) | |
(*)+5VDCoutputselectableoneitherpin14or16viatheOSDmenu.
2.4.3DVI-2connector
Overview
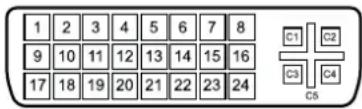
Image2-8
| PinFunction | |
| 1 | D2_Rx-(T.M.D.S.) |
| 2 | D2_Rx+(T.M.D.S.) |
| 3 | GND(data2shield) |
| 4Notconnected | |
| 5 | Notconnected |
| 6 | SCL(forDDC) |
| 7 | SDA(forDDC) |
| 8Notconnected | |
| 9 | D1_Rx-(T.M.D.S.) |
| 10 | D1_Rx+(T.M.D.S.) |
| 11 | GND(data1shield) |
| 12Notconnected | |
| 13Notconnected | |
| 14 | +5Vinput(DDCsupply)(*) |
| 15 | GND(cablesense) |
| 16 | Hotplugdetect(*) |
| 17 | D0_Rx-(T.M.D.S.) |
| 18 | D0_Rx+(T.M.D.S.) |
| 19 | GND(data0shield) |
| 20Notconnected | |
| 21Notconnected | |
| 22 | GND(clockshield) |
| 23 | CK_Rx+(T.M.D.S.) |
| 24 | CK_Rx-(T.M.D.S.) |
(*)+5VDCoutputselectableoneitherpin14or16viatheOSDmenu.
2.4.4Dvloutconnector
Overview
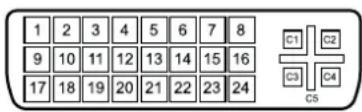
Image2-9
| PinFunction | |
| 1 | D2_Rx-(T.M.D.S.) |
| 2 | D2_Rx+(T.M.D.S.) |
| 3 | GND(data2shield) |
| 4Notconnected | |
| 5 | Notconnected |
| 6 | SCL(forDDC) |
| 7 | SDA(forDDC) |
| 8Notconnected | |
| 9 | D1_Rx-(T.M.D.S.) |
| 10 | D1_Rx+(T.M.D.S.) |
| 11 | GND(data1shield) |
| 12Notconnected | |
| 13Notconnected | |
| 14+5Voutput | |
| 15 | GND(cablesense) |
| 16Hotplugdetect | |
| 17 | D0_Rx-(T.M.D.S.) |
| 18 | D0_Rx+(T.M.D.S.) |
| 19 | GND(data0shield) |
| 20Notconnected | |
| 21Notconnected | |
| 22 | GND(clockshield) |
| 23 | CK_Rx+(T.M.D.S.) |
| 24 | CK_Rx-(T.M.D.S.) |
2.4.5RS232connector
Overview
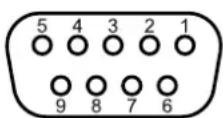
Image2-10
| PinFunction | |
| 1Notconnected | |
| 2 | Rx(drivenbyhost) |
| 3 | Tx(drivenbydisplay) |
| 4Notconnected | |
| 5 | Ground |
| 6Notconnected | |
| 7 | Notconnected |
| 8Notconnected | |
| 9Notconnected | |
2.4.6USBconnector
Overview
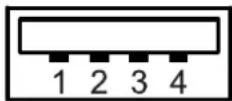
Image2-11
| PinFunction | |||||
| 1 | +5VDC | ||||
| 2 | D | a | t | a | — |
| 3 | D | a | t | a | + |
| 4 | GND | ||||
2.4.7 MiniUSBconnector
Overview
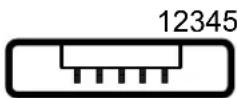
Image2-12
| PinFunction | |||||
| 1 | + | 5 | V | D | C |
| 2 | D | a | t | a | — |
| 3 | D | a | t | a | + |
| XNotconnected | |||||
| 4 | GND | ||||
2.4.8 DisplayPortconnector
Overview
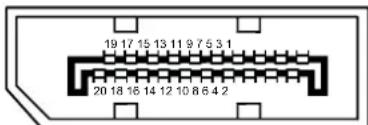
Image2-13
| PinFunction | |
| 1 | ML_Lane0(p) |
| 2 | GND |
| 3 | ML_Lane0(n) |
| 4 | ML_Lane1(p) |
| 5 | GND |
| 6 | ML_Lane1(n) |
| 7 | ML_Lane2(p) |
| 8 | GND |
| 9 | ML_Lane2(n) |
| 10 | ML_Lane3(p) |
| 11 | GND |
| 12 | ML_Lane3(n) |
| 13 | CONFIG1 |
| 14 | CONFIG2 |
| 15 | AUXCH(p) |
| 16 | GND |
| 17 | AUXCH(n) |
| 18HotPlug | |
| 19Return | |
| 20 | DP_PWR(+3.3VDC) |
2.4.9S-VideoandS-Video-outconnector
Overview
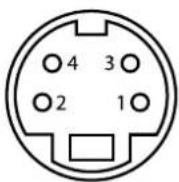
Image2-14
| PinFunction | |
| 1 | Ground(Y) |
| 2 | Ground(C) |
| 3 | Luminance(Y) |
| 4 | Chroma(C) |
| SGShielded | Ground |
3.DISPLAYINSTALLATION
3.1 VESA mountinstallation
Overview
ThedisplaysupportsarmstandsaccordingtotheVESA100mmstandard.

CAUTION: UseanarmthatisapprovedbyVESA.

CAUTION: Use an arm that can support a weight of least 10 kg (22,05 lbs).
ThemonitorVESAinterfacehasbeendesignedforasafetyfactor6(tosupport6times themonitorweight).Inthemedicalsystem,useanarmwithsuitablesafetyfactor (IEC60601-1).
To mount the display to an arm stand
- Attach the arm stand firmly to the panel using the included 4 hexagonal screws (M4 x 25 mm) and the dented washers. Use the included Allen key to fix the screws.
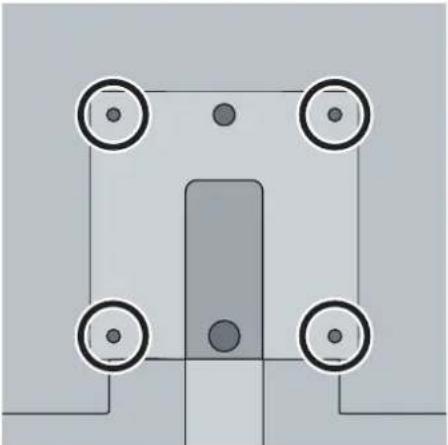
natural_image
Pure electrical circuit lines without any symbolsImage3-1

CAUTION: The 4 screws included with this display (M4 x 25 mm) can be used for an external VESAarminterface with a thickness of upto 5mm.
If, due to the thickness of the external VESA arm interface (=V), the length of the provided screws(=L)isnotsuitable,considerthefollowingrule:
$$ L _ {\min} = V + 2 0 \mathrm{mm} $$
$$ \mathrm{L} _ {\max} = \mathrm{V} + 3 0 \mathrm{mm} $$
3.2 Coverremoval
Toremovetheconnectorcompartmentcover
- Loosenthescrewfixingtheconnectorcompartmentcover.
2.Slidethecoverdownwardstoremoveitfromthedisplay.
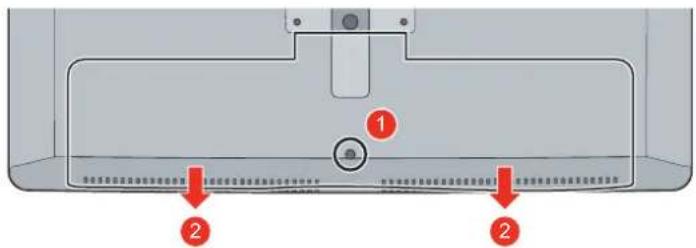
Image3-2
3.3 Videoinputconnection
Aboutvideoinputconnections
TheMDSC-2226canhavemultipledifferentvideoinputsconnected(dependingonthedisplayversion). Switchingbetweenthedifferentinputscanbeeasilydonebypassingthedirectaccesskeyforthis.See thededicatedsectionformoreinfo.
Furthermore, if more than one video source is connected, the Picture in Picture (PiP) and Side-by-Side (SbS) functionality becomes available, allowing you to view two different video inputs at once. Please refertothed dedicated chapter form more information how to activate and use the PiP and SbS features on your MDSC-2226.
ThischapterdescribeshowtoconnectthedifferentvideoinputtypesforeachversionoftheMDSC-2226.
3.3.1 MDSC-2226LEDversion
Toconnectthevideoinputs
- Connectoneormoreoftheavailablevideosource(s)tothecorrespondingvideoinputsusingtheappropriatevideocable(s).
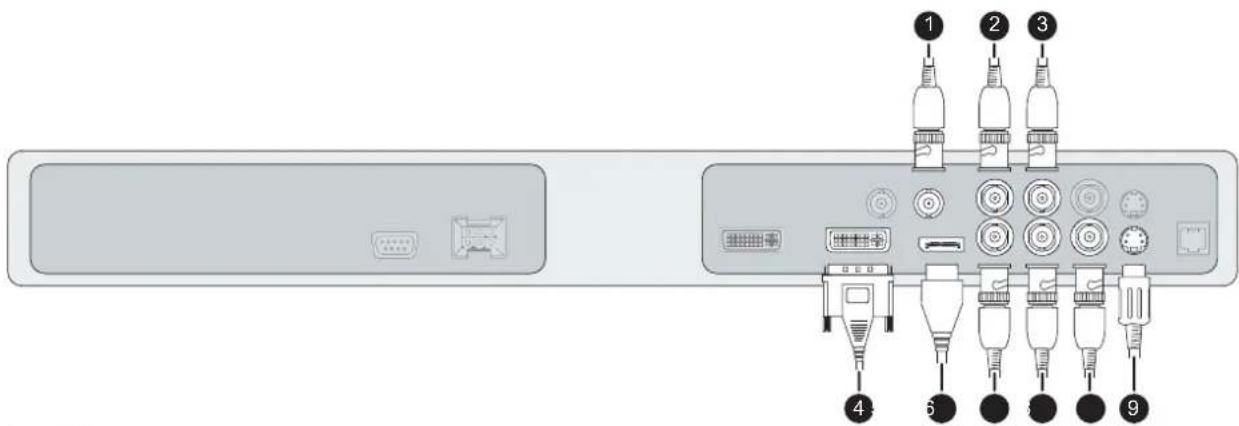
Image3-3
| DVlorVGA(*) | 4 |
| DisplayPort | 5 |
| SDI | 1 |
| R/G/B/S | 6 / 7 / 8 / 2 |
| R/G/B(SOG) | 6 / 7 / 8 |
| Y/Pb/Pr | 7 / 8 / 6 |
| CVBS | 3 |
| S-Video | 9 |
(*)PCanalog(VGA)inputsourcecanbeconnectedtotheDVI-inputconnectorusingaDVI-ItoVGA adapter. Theuseofanadaptercableofatleast0.15mlongwillallowaneasyplacementinsidethecable cover.
3.3.2MDSC-2226DDIversion
Toconnectthevideoinputs
- Connectoneormoreoftheavailablevideosource(s)tothecorrespondingvideoinputsusingtheappropriatevideocable(s).
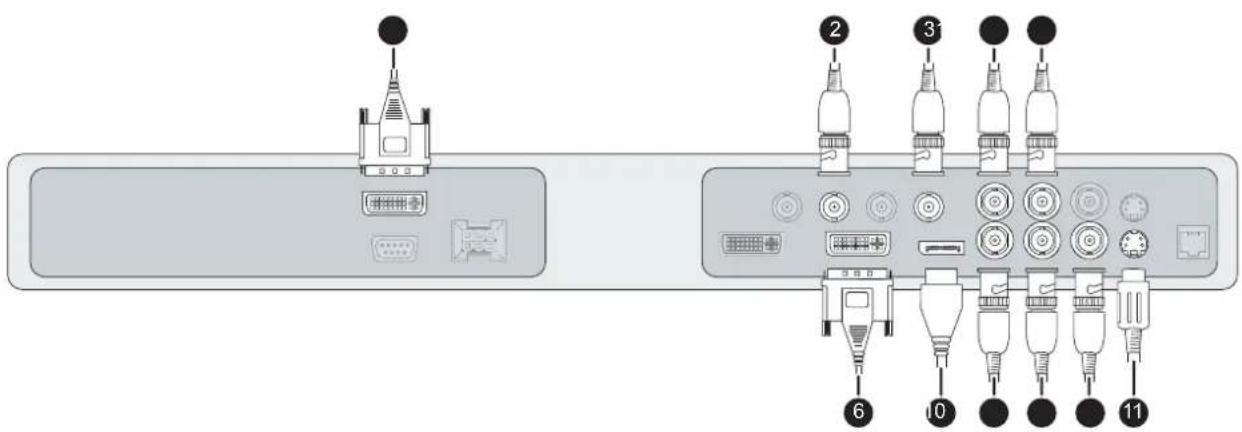
Image3-4
| DVI1orVGA(*) | 6 |
| DVI2 | 1 |
| DisplayPort | 7 |
| SDI1 | 3 |
| SDI2 | 2 |
| R/G/B/S | 8 / 9 / 10 / 4 |
| R/G/B(SOG) | 8 / 9 / 10 |
| Y/Pb/Pr | 9 / 10 / 8 |
| CVBS | 5 |
| S-Video | 11 |
(*)PCanalog(VGA)inputsourcecanbeconnectedtotheDVI-inputconnectorusingaDVI-ItoVGA adapter. Theuseofanadaptercableofatleast0.15mlongwillallowaneasyplacementinsidethecable cover.
3.3.3MDSC-2226MNAversion
Toconnectthevideoinputs
- Connectoneormoreoftheavailablevideosource(s)tothecorrespondingvideoinputsusingtheappropriatevideocable(s).
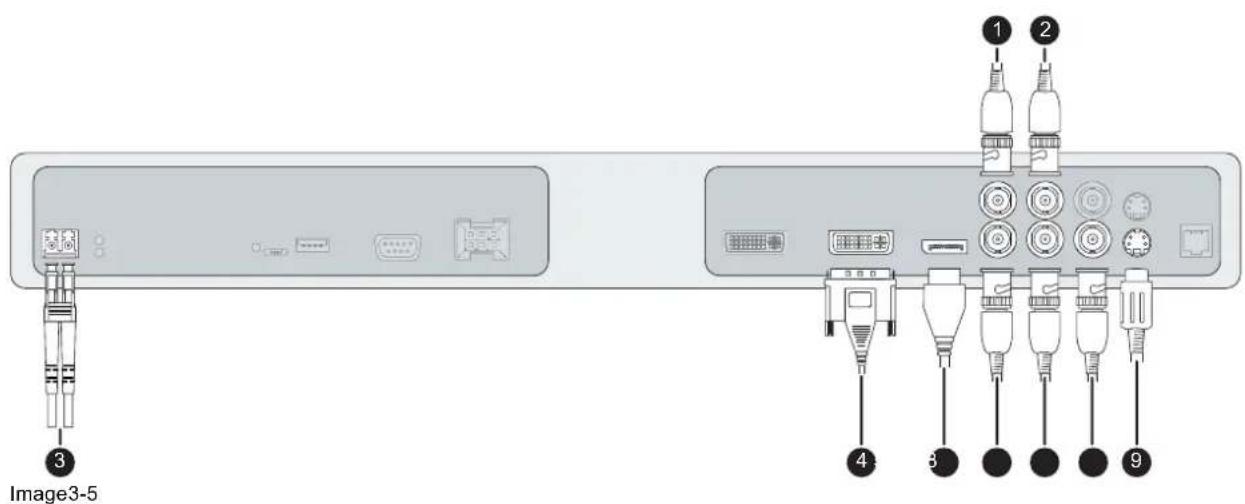
| Nexxis | 3 |
| DVlorVGA(*) | 4 |
| DisplayPort | 5 |
| R/G/B/S | 6 / 7 / 8 / 1 |
| Y/Pb/Pr | 7 / 8 / 6 |
| CVBS | 2 |
| S-Video | 9 |
(*)PCanalog(VGA)inputsourcecanbeconnectedtotheDVI -inputconnectorusingaDVI-ItoVGA adapter. Theuseofanadaptercableofatleast0.15mlongwillallowaneasyplacementinsidethecable cover.
3.4Videooutputconnection
Aboutvideooutputconnections
Besidethevideoinputconnections,theMDSC-2226alsohasvideooutputcapabilitiesallowingyouto loop-through certain video inputs connected with the MDSC-2226 to another display, projector, video recorder,...
Thischapterdescribeshowtomakeuseofthevideooutputconnectionsavailableforeachversionofthe MDSC-2226.
3.4.1 MDSC-2226LEDversion
Toconnectthevideooutputs
- Connectoneormoreoftheavailablevideosink(s)tothecorrespondingvideooutputsusingtheappropriatevideocable(s).
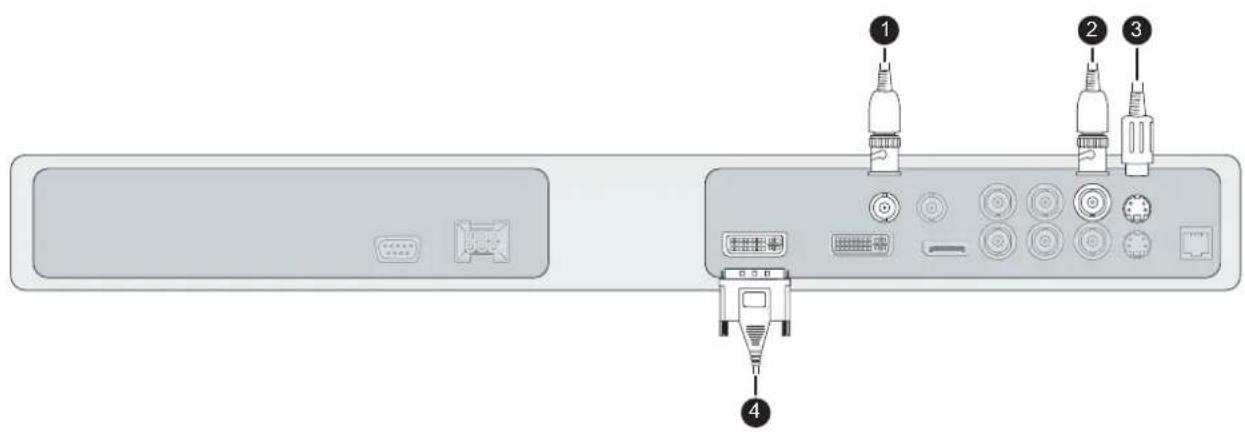
Image3-6
| SDI | 1 |
| CVBS | 2 |
| S-Video | 3 |
| DVI | 4 (tobe configured in OSD menu) |
3.4.2MDSC-2226DDIversion
Toconnectthevideooutputs
- Connectoneormoreoftheavailablevideosink(s)tothecorrespondingvideooutputsusingtheappropriatevideocable(s).
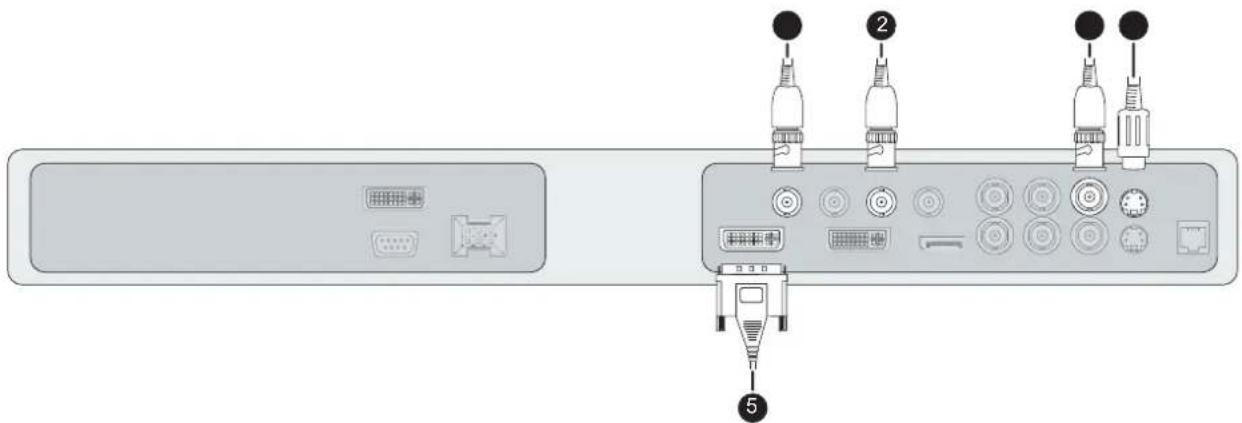
Image3-7
| SDI1 | 2 |
| SDI2 | 1 |
| CVBS | 3 |
| S-Video | 4 |
| DVI1 orDVI 2 | 5 (t o b e c o n f i g u r e d i n O S D m e n u) |
3.4.3MDSC-2226MNAversion
Toconnectthevideooutputs
- Connectoneormoreoftheavailablevideosink(s)tothecorrespondingvideooutputsusingtheappropriatevideocable(s).
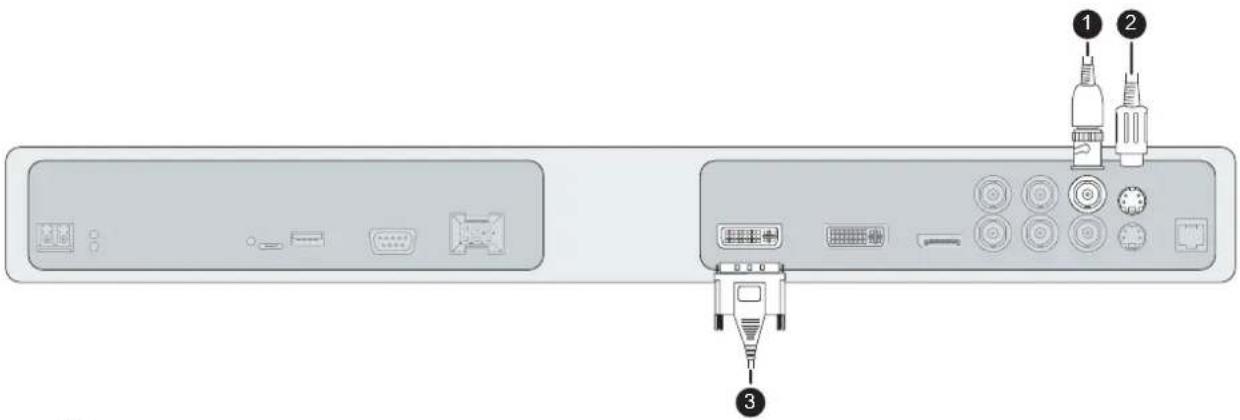
Image3-8
| CVBS | 1 |
| S-Video | 2 |
| DVI | 3 (tobe configured in OSD menu) |
| Nexxis | 3 (tobe configured in OSD menu) |
3.5NexxisOR
Overview
ConnectingyourMDSC-2226toBarco'sNexxisORsystemallowsyoutodistributevideo,graphics,audio andcomputerdataoverthelPnetwork,inrawuncompressedformat,insidetheoperatingroomandeven betweensurgicalssuites.
ToconnectyourMDSC-2226toBarco'sNexxisORsystem,connectthe10GbEthernetinterfacetoyour Nexxis switch. More info about Nexxis OR and how to configure the MDSC-2226 in your network is availableinthededicateduserguides.Pleasevisitm y.barco.comtoobtaintheseuserguides.

NexxisORisonlyavailableontheMDSC-2226MNAversion.
3.6 Power supply connection
Toconnectthepowersupply
-
Connect the supplied external DC power supply unit to the +24 VDC power input of your MDSC-2226 display.
-
Plug the other end of the external DC power supply into a grounded power outlet by means of the properpowercorddeliveredinthepackaging.
Note: The ground and the shield connections on the power input connector have no Protective Earth function.AProtectiveEarthconnectionisprovidedviaadedicatedpin(seeimage3-10).

natural_image
Front view of a computer interface panel with ports and connectors, no visible text or symbolsImage3-9
Protectiveearthpin
- EarththeMDSC-2226byconnectingtheprotectiveearthpintoagroundedoutletbymeansofan AWG18(max.6ft/1,8mlong)wire.
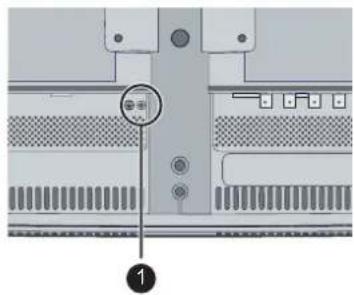
Image3-10
3.7Cablerouting
Toroutethecables
- ForddisplaysmountedtoaVESAarmwithinternalcableroutingprovisions,routeallcablesthroughthe cableroutingchannel,thenreinstalltheconnectorcompartmentcover.
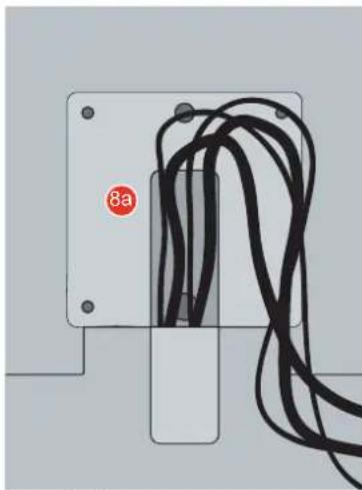
natural_image
Pure electrical circuit lines without any symbolsImage3-11
Or, Forallothermountingoptions,removethecableroutingchannelexpansionclipfromtheconnector compartmentcoverandrouteallcablesthroughitwhilereinstallingthecover.
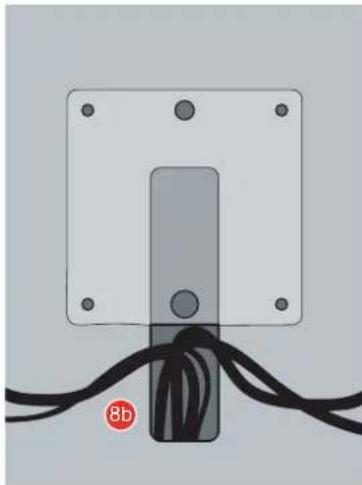
natural_image
Simple diagram of a rectangular component with black wires and a labeled section marked '8b' (no text or symbols on the main structure)Image3-12

WARNING: When the display is assembled in the medical system, take care of the anchorageofallcables,toavoidunwantedddetachment.
4. DAILY OPERATION
4.1 Keyboardbacklight
Aboutthekeyboardbacklight
Bydefaultonlythestand-bykeyisvisible.Whenyoutouchanyofthekeysshortly,thebacklightofall otherkeysisswitchedonforafewseconds.Whenyoutouchanyofthesekeysagainwhilethebacklightison,thefunctionofthekeyisexecuted.Ifnofurtheractionistakenwithinthetime-out,thekeyboard backlightisswitchedoffagain.

Thekeyboardbacklightauto-dimfunctioncanbedisabledintheOSDmenusothatthekeyboardbacklightisalwayson(KeyboardBacklight).
4.2On/Offswitching
Toswitchonyourdisplay:
- Activatethepowersupplythroughtheswitchlocatedontheexternalpowersupply.
- While your display is off, press and hold the stand-by key ⏻ for approximately 3 seconds.

To minimize the power consumption, also the external power supply has to be switched off.
Toswitchoffyourdisplay:
- While your display is switched on, press and hold the stand-by key ⏻ for approximately 3 seconds.

Whilepressingthestand-bykeytoswitchoffthedisplay, thefrontkeyilluminationwill blink.
4.3OSDmenuactivation
ToactivatetheOSDmenu
- If not already done so, switch on the display by pressing and holding the stand-by key ⏻for approximately3seconds.
-
Switchonthefrontkeyillumination.
-
TouchtheMenu/Enterkey ☐.
As a result, the OSD main menu comes up in the bottom right corner of the screen. If no further actions are taken within the following 30 seconds, the OSD menu will disappear again.

Thetime-outoftheOSDmenuautomaticclosefunctioncanbeadjustedordisabledin theOSDmenu(OSDTime-out).

The OSD menu position can be adjusted in the OSD menu (OSD Hor. Pos. and OSD Vert. Pos.).
4.4OSDmenunavigation
OSDmenustructureexplained
BelowisonexampleofhowtheOSDmenustructurelookslike:
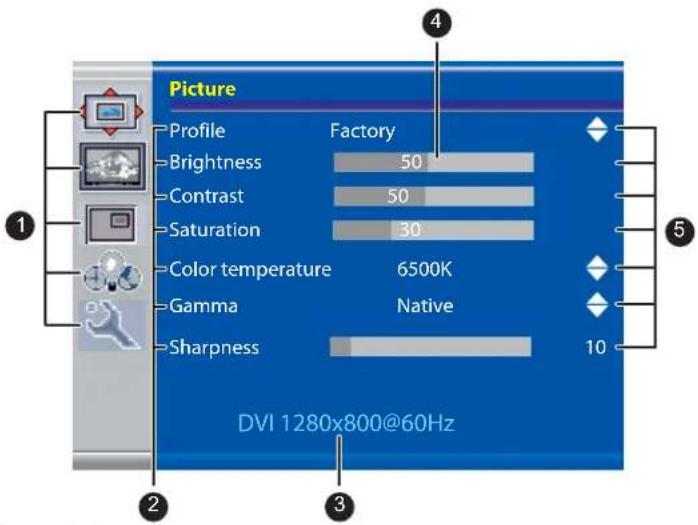
Image4-1
| 1 | Menu |
| 2 | Sub-menu |
| 3 | StatusBar |
| 4 | Selector/Slider |
| 5 | Item |
TonavigatethroughtheOSDmenu

Image4-2
- Preessthe keytoopentheOSDmenu.
• U s e orteytbscrelltothedesiredmenupage. - WhenthesiredMenupageishhighlighted, pressthe highlighted.
▶ keytoselectthetopmenuitemthatwillbe - U s orkeystomovetootherMenultems,thenpressthekeytoseletit.
- If these selected menu item is controlled by aslider us the pressthe - keyto confirm.
◀ or keystoadjusttheitemvalue, then - If these selected menu item is multiple choices menu us the then press the - keyto confirm.
orkeystoselectthedesiredoption - Pressagain ☐ or ☑ key to select other Menu items or exit from the Menu page by pressing the ☐ key.
4.5 Shortkey functions
Aboutshortkeyfunctions
The concept of short key functions is present as a selection of commonly used functions immediately available without the need to navigate through the OSDMenu.
Thedifferentavailableshortkeyfunctionsare:
•Mainsourceselection
• Multi-image configuration
- Zoom factor selection
•Brightnessadjustment

Unliketheextendedkeyboardfunctions(describedinnextchapter),theshortkeyfunctionality is immediately available without the need to first enable this in the OSD menu.

When the extended keyboard functionality is enabled, all the shortkey functions described below (except for the brightness adjustment), will no longer be available and will be replaced by the corresponding extended keyboard functions described in the nextchapter.
Overview of shortkeys
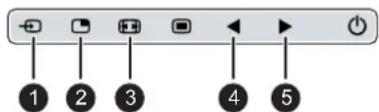
Image4-3
| 1 | Mainsourceselection |
| 2 | Multi-imageconfiguration |
| 3 | Zoomfactorselection |
| 4 | Brightnessdecrease |
| 5 | Brightnessincrease |
4.5.1 Mainsourceselection
Toquicklyselectthemainsource
- Use the Input selection key (☐) to scroll through all the possible input signals to select the main input source.

Availablemainsourceoptionsdependentondisplaymodel.

Whentheextendedkeyboardfunctionalityisenabled,thisshortkeyfunctionswillno longerbeavailableandwillbereplacedbythecorrespondingextendedkeyboardfunctionsdescribedinthenextchapter.
4.5.2 Multi-image configuration
Toquicklyselectthemulti-imageconfiguration
- Use the PiP selection key (☐) to scroll through all possible configurations of Picture-in-Picture (PiP) and Side-by-Side(SbS).
ThedifferentPiP/SbSoptionsare:
-SmallPiP:30%ofPrimaryheightintop-rightcorner
-LargePiP:50%ofPrimaryheightintop-rightcorner
-Side-by-Side:PrimaryandSecondaryinputofequalheight

Only a subset of multi-image configuration settings is available via this shortkey function. More multi-image configuration settings can be selected in the OSD menus.

Whentheextendedkeyboardfunctionalityisenabled,thisshortkeyfunctionswillno longerbeavailableandwillbereplacedbythecorrespondingextendedkeyboardfunctionsdescribedinthenextchapter.
4.5.3 Zoomfactorselection
Toquicklyselectthezoomfactor
- Usethelmagezoomkey() to select one of the available zoom factors.

Whentheextendedkeyboardfunctionalityisenabled,thisshortkeyfunctionswillno longerbeavailableandwillbereplacedbythecorrespondingextendedkeyboardfunctionsdescribedinthenextchapter.
4.5.4 Brightness adjustment
Toquicklyadjustthebrightness
- While no OSD Menu is on the screen, press the Brightness decrease (◀) or Brightness increase (▶) keystoadjustthebrightnessasdesired.
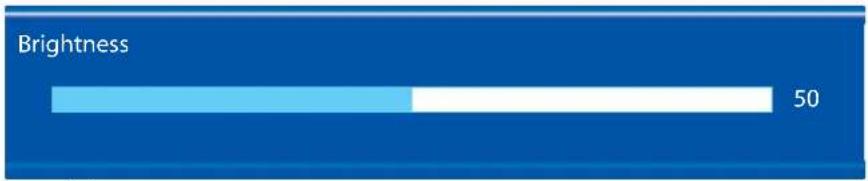
bar
Brightness | Category | Value | |---|---| | Light Blue Bar | 50 | | White Bar | 50 |Image4-4

Whentheextendedkeyboardfunctionalityisenabled,thisshortkeyfunctionswillremainavailable.
4.6 Extendedkeyboard functions
Aboutextendedkeyboardfunctions
The concept of the extended keyboardist present allargeselection functions immediately available to the user without the need to navigate through the OSDMenu.
Once enabled, by simply pressing one of the first 3 keys on the left the user is presented with a list of new selectionsdisplayedonscreen;thenewchoicescanbeselectedbyusingeachofthekeyjustbelowthe OSDtext.
If two options are available for one key, the first key press will select the upper option, a second press selectstheloweroption.
Thedifferentavailableextendedkeyboardfunctionsare:
•Mainsourceselection
•Secondsourceselection
- Multi-image configuration
•Colortemperatureselection
- Imagesizeselection
- Zoomfactorselection

Unliketheshortkeyfunctions(describedbefore),theextendedkeyboardfunctionality must be first enabled in the OSD menu before you can make use of it. Please refer to the dedicatedsectioninthismanualformoredetailsonhowtoenable/disabletheextended keyboardfunctions.

When the extended keyboard functionality is enabled, all the shortkey functions described in previous chapter (except for the brightness adjustment), will no longer be available and will bere placed by the corresponding extended keyboard functions described below.
Overviewofextendedkeyboard
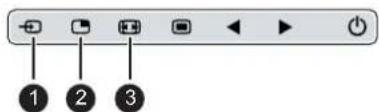
Image4-5
| 1 | Mainsourceselection |
| Secondsourceselection | |
| 2 | Multi-imageconfiguration |
| 3 | Colortemperatureselection |
| Imagesizeselection | |
| Zoomfactorselection |
4.6.1 Mainsourceselection
Toquicklyselectthemainsource
- While no OSD Menu is on the screen, press the Input selection key (☐) to bring up the main source quickselectionmenu.
- Toggle the available main source options by pressing the key corresponding to the desired option.
If two options are available for one key, the first key press will select the upper option, a second press select the lower option.
The current selection is marked in red.
3.Pressthestand-bykey( ⏻ ) to con firmyourchoiceandexithemainsourcequic kselectionmenu.
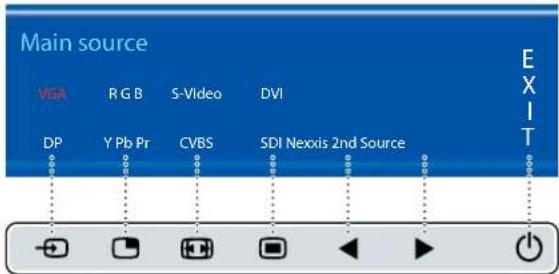
Image4-6
Note: Available mainsourceoptions dependent on display model.
4.6.2 Secondsource selection
Toquicklyselectthesecondsource
- While no OSD Menu is on the screen, press the Input selection key (☐) to bring up the second source quickselectionmenu.
2.Pressthe ▶ keytoswitchtothe2ndsourcequickselectionmenu. - Toggle the available second source options by pressing the key corresponding to the desired option.
If two options are available for one key, the first key press will select the upper option, a second press select the lower option.
The current selection is marked in red.
4.Pressthestand-bykey( ⏻ ) to confirm your choice and exit the second source quick selection menu.
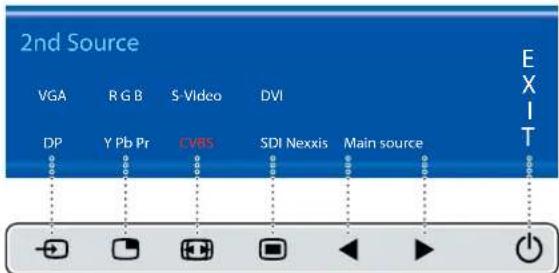
Image4-7
Note: Available second source options dependent on display model.
4.6.3 Multi-image configuration
Toquicklyselectthemulti-imageconfiguration
- While no OSD Menu is on the screen, press the PiP selection key (☐) to bring up the multi-image configuration quickselectionmenu.
- Toggle the available multi-image configurations by pressing the key corresponding to the desired option. The current selection is marked in red.
3.Pressthestand-bykey( ⏻ ) to confirm your choice and exit the multi-image configuration quick selection menu.
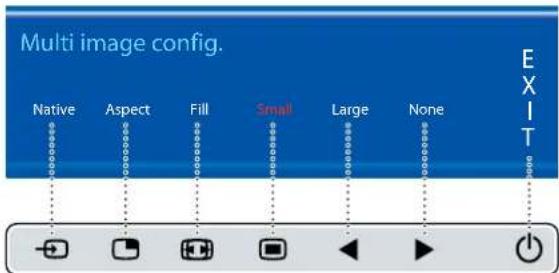
Image 4-8
4.6.4 Transferfunctionselection
Toquicklyselectthetransferfunction
- While no OSD Menu is on the screen, press the Image zoom key (☐) to bring up the common functions quickselectionmenu.
- Toggle the available transfer function settings by pressing the key corresponding to the desired option. The current selection is marked in red.
- Press thestand-bykey( ⏻ ) to confirm your choice and exit the common functions quick selection menu.
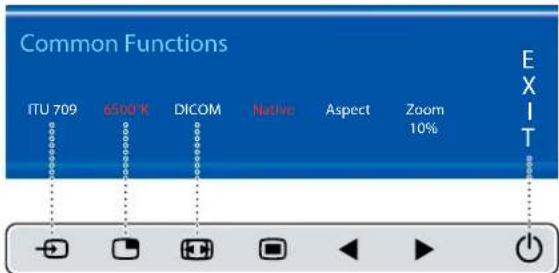
Image 4-9
Note: Only a subset of transfer function settings is available via this quick selection menu. More transfer functionsettingscanbeselectedintheOSDmenus.
4.6.5 Imagesizeselection
Toquicklyselecttheimagesize
- While no OSD Menu is on the screen, press the Image zoom key (☐) to bring up the common functions quickselectionmenu.
- Toggle the available image size settings by pressing the key corresponding to the desired option. The current selection is marked in red.
- Press thestand-bykey( ⏻ ) to confirm your choice and exit the common functions quick selection menu.
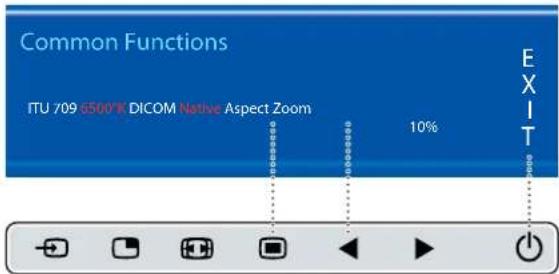
Image4-10
Note: Only a subset of image size settings is available via this quick selection menu. More image size settingscanbeselectedintheOSDmenus.
4.6.6 Zoomfactorselection
Toquicklyselectthezoomfactor
- While no OSD Menu is on the screen, press the Image zoom key (☐) to bring up the common functions quickselectionmenu.
- Toggle the available zoom factors by repeatedly pressing the shown.
▶ key until the desired zoom factor is
3.Pressthestand-bykey( ⏻ ) to confirm your choice and exit the common functions quick selection menu.
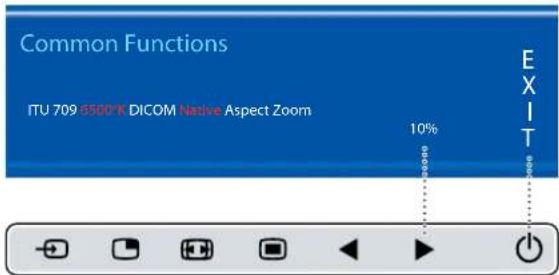
Image4-11
4.7 Keyboard locking/unlocking
Tolock/unlockthekeyboard
ThekeyboardcanbelockedfromtheMenutoavoidunwantedaccesstoOSDfunctions.WhenthekeyboardisLOCKEDonlytheOSDMenukey( □)andtheStand-bykey( )areactive.WhentheMenuOSD key is pressed the Keyboard Locked window appears.
- Tounlockthekeyboardthefollowingsequenceofkeysneedtobepressed:

Eachtimeakeyispressedanasteriskisshowninthesquareboxes.
Afterpressingthefourthkey,ifthese quenceiscorrect,themainOSDmenuisactivated.Tounlockthe keyboardpermanentlythespecificOSDfunctionisrequired.
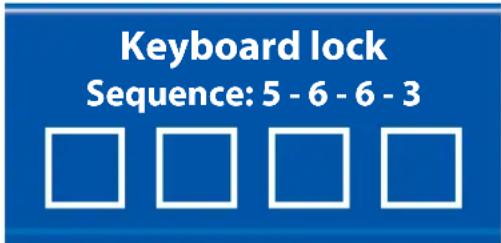
Image4-12
- P r o file
•Brightness - Contrast
•Saturation
•Colortemperature
• Gamma m a - Sharpness
5.1.1 Profile
Aboutprofiles
To select a profile means to load a set of predefined video parameters like Brightness, Contrast, Saturati- tion, Input selection (Primary & Secondary), Multi-image layout selection, etc.
The user can modify the default video parameters associated to each profile and save the new parameters setting under the User 1, User 2 or User 3 profile. The Factory and X Ray profiles can be temporary modified, but the factory default can't be overwritten and can always be recalled through the recall profile menuitem.
The available profiles for your display are:
- Factory
- X R a y
• U s e r 1
• U s e r2
• U s e r 3
To select a profile
- Bring up the OSD main menu.
- Navigate to the Picture menu.
- Enter the Profile submenu.
- Select one of the available profiles and confirm.
5.1.2Brightness
Toadjust the brightnesslevel
- Bring up the OSD main menu.
- Navigate to the Picture menu.
- Enter the Brightness submenu.
The command bar Brightness is highlighted.
- Set the brightness level as desired and confirm.

Theselectedbrightnessismaintainedataconstantlevelbytheautomaticbacklight stabilizationfunction.

The brightness level can also be adjusted through hash key function.
5.1.3 Contrast
Toadjustthecontrastlevel
- BringuptheOSDmainmenu.
- NavigatetothePicturemenu.
- EntertheContrastsubmenu. ThecommandbarContrastishhighlighted.
- Setthecontrastlevelasdesiredandconfirm.
5.1.4 Saturation
Toadjustthesaturationlevel
- BringuptheOSDmainmenu.
- NavigatetothePicturemenu.
- Enterthe Saturationsubmenu. The commandbar Saturationishhighlighted.
- Setthesaturationlevelasdesiredandconfirm.
5.1.5 Colortemperature
Aboutcolortemperaturepresets
The available colortemperature presets for your display are:
•5600K
•6500K
•7600K
•9300K
•ITU709
- Native
- User

Factorycalibration-Whitepoint:
The WhiteColorpoints associated with the Color Temperature: 5600K, 6500K, 7600K or 9300K are factory calibrated with a consequent reduction of the maximum luminance compared to Native Color Temperature.

Factorycalibration-Colorspace:
WhenITU709isselected,theWhiteColorpointandtheRGBcolorprimariesareadjusted according to the target HDTV / sRGB color space defined in the ITU-709 recommendation.RGBprimarycalibrationisperformedwithinthephysicallimitationofthe LCDpanelused.

OnlyincasetheUserpresethasbeenselecteditispossibletogetaccesstothecolor regulationcommandsdescribedhereafter.
Toselectacolortemperaturepreset
- BringuptheOSDmainmenu.
- NavigatetothePicturemenu.
3.EntertheColorTemperaturesubmenu. - Select one of the available color temperature presets and confirm.
Note: If you selected the User color temperature preset, a new menu will be displayed allowing you to manuallyadjustthegainandoffsetofred,greenandblue.
5.1.6Gamma
Aboutgammapresets
Theavailablegammamapresetsforyourdisplayare:
•CRT(Gamma2.2)
•Native(nocorrectioncurveisapplied)
• DICOM(grayscale levels are following closely the DICOM curve)

Factorycalibration–Grayscaletracking:
WhenGammaissetto“CRT”orColorTemperaturepresetissetto“ITU709”mode,a GrayscaleColorTrackingisimplementedaccordingtothefactorycalibrationondifferentgraylevel.
Toselectagammapreset
- BringuptheOSDmainmenu.
- NavigatetothePicturemenu.
3.EntertheGammasubmenu. - Selectoneoftheavailablegammamapresetsandconfirm.
5.1.7 Sharpness
Toadjustthesharpnesslevel
- BringuptheOSDmainmenu.
- NavigatetothePicturemenu.
- EntertheSharpnesssubmenu. The commandbar Sharpnessishhighlighted.
- Set the sharpness level as desired and confirm.
5.2PictureAdvancedmenu
Overview
- Black Level
- Smart Video
- Image Position
•AutoAdjustment
- Phase
- C l o c k / L i n e
5.2.1 BlackLevel
Toadjusttheblacklevel
- BringuptheOSDmainmenu.
- NavigatetothePictureadvancedmenu.
3.EntertheBlackLevelsubmenu.
ThecommandbarBlackLevelishhighlighted. - Settheblacklevelasdesiredandconfirm.
5.2.2SmartVideo
AboutSmartVideo
ToselectaSmartVideopresetmeanstoselecttheprocessingspeedofvideosignals.
TheavailableSmartVideopresetsforyourdisplayare:
•Diagnostic(bestpicturequality)
•Surgical(lowlatency)
•Surgical1(lowlatency, optimized for fastmoving images)
ToselectaSmartVideopreset
- BringuptheOSDmainmenu.
- NavigatetothePictureadvancedmenu.
3.EntertheSmartVideosubmenu. - SelectoneoftheavailableSmartVideopresetsandconfirm.
5.2.3ImagePosition
Toadjusttheimageposition
- BringuptheOSDmainmenu.
- NavigatetothePictureadvancedmenu.
3.EntertheImagePositionsubmenu.
AsmallOSDmenuwillbeactivatedindicatingthehorizontalandverticalimagepositionoffset. - Usethe 📄 and keystomovethepictureupanddown.
- Usethe ◀ and keystomovethepictureleftandright.
6.Whenfinished,usethe □ keytoexitfromthesmallOSDmenu.
5.2.4 AutoAdjustment

ThismenuitemisonlyavailablewhenVGAinputisconnected.
Aboutautoadjustment
When autoadjustment is activated, the phase and clock per line parameters are automatically adjusted.
Toactivateautoadjustment
- BringuptheOSDmainmenu.
- NavigatetothePictureadvancedmenu.
3.EntertheAutoAdjustmentsubmenu.
The automatic picture adjustment is activated: the phase and clock per line parameters are automatically adjusted.
5.2.5Phase
Aboutphase
If the result of the Auto Adjustment procedure described above isn't satisfactory, the Phase can be manually adjusted by following this procedure.
Tomanuallyadjustthephase
- BringuptheOSDmainmenu.
- NavigatetothePictureadvancedmenu.
3.EnterthePhasesubmenu.
The commandbar Phase is highlighted. - Set the phase as desired and confirm.
5.2.6Clock/Line
Aboutclock/line
If the result of the Auto Adjustment procedure described above isn't satisfactory, the Clock/Line can be manually adjusted by following this procedure.
Tomanuallyadjustthephase
- BringuptheOSDmainmenu.
- NavigatetothePictureadvancedmenu.
3.EntertheClock/Linesubmenu.
ThecommandbarClock/Lineishhighlighted. - Settheclock/lineasdesiredandconfirm.
5.3DisplayFormatmenu
Overview
• MainSource(PrimarySource)
- ComponentMode
- Zoom
- Image Size
- 2ndPictureMode
- 2^nd PictureSource
- 2^nd PicturePosition
- Picture Swap
5.3.1 MainSource(PrimarySource)
Aboutmainsources
Theavailablemainsourcesforyourdisplayare:
• Auto Search
- Composite
• S - V i d e o
- Component
•PCAnalog
• D V I 1
• D V I 2
• S D I 1
• S D I 2
•Nexxis
• D i s p l a y P o r t

Availablemainsourcesdependentondisplaymodel.

Themainsourcecanalsobeselectedthroughhashortkeyfunctionorviatheextended keyboardfunctionality.
Toselectthemainsource
- BringuptheOSDmainmenu.
- NavigatetotheDisplayFormatmenu.
3.EntertheMainSourcesubmenu. - Selectoneoftheavailablemainsourceandconfirm.
Note: If you selected the Auto Search preset, the display will automatically detect the connected signal.
5.3.2 ComponentMode
Aboutcomponentmodes
The available component modes for your display are:
•YPbPr
- RGB
Toselectthecomponentmode
- BringuptheOSDmainmenu.
- NavigatetotheDisplayFormatmenu.
3.EntertheComponentModesubmenu. - Selectoneoftheavailablecomponentmodesandconfirm.
5.3.3Zoom
Aboutzoom
The available zoom factors for your display are:
- None
• 10%
• 20%
• 30%
• 40%
50%

Thezoomfactorcanalsobeselectedthroughhashortkeyfunctionorviatheextended keyboardfunctionality.
Toselectazoomfactor
- BringuptheOSDmainmenu.
- NavigatetotheDisplayFormatmenu.
3.EntertheZoomsubmenu. - Selectoneoftheavailablezoomfactorsandconfirm.
5.3.4ImageSize
Aboutimagesize
The available imagesizes for your display are:
• FullScreen(fillthescreen, imageaspect-ratiocanbealtered)
- Aspect (fill the screen on largest dimension, no modification in image aspect-ratio)
- Native(inputpixeltoLCDpixelmapping,noscaling)

InAspectandNative, theimagemaybedisplayedwithblackbarsontop/bottomor left/right.

Theimagesizecanalsobeselectedviatheextendedkeyboardfuncti onality.
Toselecttheimagesize
- BringuptheOSDmainmenu.
- NavigatetotheDisplayFormatmenu.
3.Enterthe/ImageSizesubmenu. - Selectoneoftheavailableimagesizesandconfirm.
5.3.52 nd PictureMode
About2 ^nd picturemodes
The available picturemodesforyourdisplayare:
- Off
•SmallPiP:30%ofPrimaryheightintop-rightcorner
•LargePiP:50%ofPrimaryheightintop-rightcorner - Side-by-Side: Primary and Secondary input of equal height
•S.b.S.Native:The2imagesaredisplayedwithinputixeltoLCDpixelmapping,withimagecropif necessary
• S.b.S. Fill: Both images scaled to fill half of the screen, with image crop if necessary

The2 ^nd picture mode (multi-image configuration) can also be selected via the extended keyboardfunctionality.
To select the 2^nd picturemode
- BringuptheOSDmainmenu.
- NavigatetotheDisplayFormatmenu.
3.Enterthe2 ^nd PictureModesubmenu. - Selectoneoftheavailable2 ^nd picturemodesandconfirm.

MultiimageinFullHDavailablewithanycombinationofinputsources.
Multi image in SD video available with any combination of input source except Composite&S-video.
5.3.62 nd PictureSource
About2 ^nd picturesources
The available pictures for your display are:
• Auto Search
•Composite
• S - V i d eo
- Component
•PCAnalog
• D V I 1
• D V 12
• S DI 1
• S DI 2
•Nexxis
• D i s p l a y P o r t

The2 ^nd picture source can also be selected via the extended keyboard functionality.

IndependentTransferFunction:
GammaandColortemperatureforthe2ndPictureSoucearealwayssettoNativeand6500KindependentlyfromtheTransferFunctionappliedtotheMainPictureSource.ThisallowsaperfectvisualizationofaDICOMimageasMainpictureandaVideoimageas2ndpicture.
Toselectthe2 nd picturesource
- BringuptheOSDmainmenu.
- NavigatetotheDisplayFormatmenu.
3.Enterthe2 ^nd PictureSourcesubmenu. - Selectoneoftheavailable2 ^nd picturesourcesandconfirm.
5.3.72 nd PicturePosition
About2 ^nd picturepositions
Theavailable2 ^nd picturepositionsforyourdisplayare:
• Top Right
- TopLeft
- BottomRight
- BottomLeft
Toselectthe2 nd pictureposition
- BringuptheOSDmainmenu.
- NavigatetotheDisplayFormatmenu.
3.Enterthe2 ^nd PicturePositionsubmenu. - Selectoneoftheavailable2 ^nd picturepositionsandconfirm.
5.3.8PictureSwap
Aboutpictureswapping
Toswappicturesmeanstoexchange(swap)mainand2 nd picture.
Toswappictures
- BringuptheOSDmainmenu.
- NavigatetotheDisplayFormatmenu.
3.EnterthePictureSwapsubmenu. - Select the desired setting and confirm.
5.4Configurationmenu
Overview
•Information
•Language
- Failovermode
- Extendedkeyboard
- OSDsetting
- RecallProfile
- Save Pro file
5.4.1 Information
Aboutinformation
The available information items for your display are:
•Model(commercialtypeidentification)
- OperatingHours(backlightoperationhours)
• Firmware Release (firmware identification)
•HardwareVersion(mainboardidentification)
•OptionSDI(SDImoduleidentification)
-SerialNumber:ANxxxxxxxxxxxxx
Toaccessinformation
- BringuptheOSDmainmenu.
- Navigate to the Configuration menu.
3.EntertheInformationsubmenu.
Thedifferentinformationitemsareshown.
5.4.2 Language
Aboutlanguages
Theavailablelanguagesforyourdisplayare:
- English
•Français
• D e u t s c h - Español
•Italiano
Toselectthelanguage
- BringuptheOSDmainmenu.
- Navigate to the Configuration menu.
3.EntertheLanguagesubmenu. - Selectoneoftheavailablelanguagesandconfirm.
5.4.3 Failovermode
Aboutfailovermode
This functions allows the fast switch to a defined backup source when the Main input signal is missing.
The Backup source activated the one defined as Secondary input.
ThedisplaywillautomaticallyrestoretheMaininputassoonasthesignalisback
Toenable/disablefailovermode
- BringuptheOSDmainmenu.
- Navigate to the Configuration menu.
3.EntertheFailovermodesubmenu. - Enable/Disablefailovermodeasdesiredandconfirm.
5.4.4 Extended keyboard
Abouttheextendedkeyboard
The concept of the extended keyboardist present all a large selection of functions immediately available to the user without the need to navigate through the OSDMenu.
Once enabled, by simply pressing one of the first 3 keys on the left the user is presented with a list of new selectionsdisplayedonscreen;thenewchoicescanbeselectedbyusingeachofthekeyjustbelowthe OSDtext.
If two options are available for one key, the first key press will select the upper option, a second press selectstheloweroption.
Thedifferentavailableextendedkeyboardfunctionsare:
- Mainsourceselection
•Secondsourceselection - Multi-im a g e c o n figuration
•Colortemperatureselection - Imagesizeselection
- Zoomfactorselection
Toenable/disabletheextendedkeyboard
- BringuptheOSDmainmenu.
- Navigate to the Configuration menu.
3.EntertheExtendedkeyboardsubmenu. - Enable/Disabletheextendedkeyboardasdesiredandconfirm.
5.4.5OSDsetting
5.4.5.1 OSDHorizontalPosition
ToadjusttheOSDhorizontalposition
- BringuptheOSDmainmenu.
- Navigate to the Configuration menu.
- EntertheOSDsettingsubmenu.
-
SelectOSDHor. Pos. The command bar OSD Hor. Pos. is highlighted.
-
SettheOSDhorizontalpositionasdesiredandconfirm.
5.4.5.2OSDVerticalPosition
ToadjusttheOSDverticalposition
- BringuptheOSDmainmenu.
- Navigate to the Configuration menu.
- EntertheOSDsettingsubmenu.
- SelectOSDVer.Pos.
ThecommandbarOSDVer.Pos.ishhighlighted. - SettheOSD vertical position as desired and confirm.
5.4.5.3OSDTime-out
AboutOSDtime-out
TheavailableOSDtime-outvaluesforyourdisplayare:
- 1 0 S e c .
- 2 0 S e c .
- 3 0 S e c .
- 6 0 S e c .
- D i s a b l e d ( = 5 m i n u t e s )
ToadjusttheOSDtime-out
- BringuptheOSDmainmenu.
- Navigate to the Configuration menu.
3.EntertheOSDsettingsubmenu. - Select OSD Time-out
- SelectoneoftheavailableOSDtime-outvaluesandconfirm.
5.4.6 RecallProfile
Aboutrecallingprofiles
To recall a profile means to restore the default factory settings (Factory and X Ray profiles) or recall the usedefinedprofiles.
The available profiles to recall from your display are:
- F a c t o r y
- X R a y
- U s e r 1
- U s e r 2
- U s e r 3
Torecallaprofile
- BringuptheOSDmainmenu.
-
Navigate to the Configuration menu.
3.EntertheRecallProfilesubmenu. -
Select one of the available profiles to recall and confirm.
5.4.7 SaveProfile
Aboutsavingprofiles
The user can modify the default video parameters associated to each profile and save the new parameters setting under the User 1, User 2 or User 3 profile. The Factory and X Ray profiles can be modified, but the factory default can't be overwritten and can always be recalled through the recall profile menu item.
The available profilestosaveinyourdisplayare:
• U s e r 1
• U s e r 2
• U s e r 3
Tosaveaprofile
- BringuptheOSDmainmenu.
- Navigate to the Configuration menu.
3.EntertheSaveProfilesubmenu. - Select one of the available profiles to save and confirm.
5.5System menu
Overview
- PoweronDVI1
- PoweronDVI2
• D V I O u t p u t - Keyboardlock
- Keyboardbacklight
- PowerSaving
5.5.1 PoweronDVI1
AboutpoweronDVI1
ThissettingallowsyoutoselectthepinofDVIport1connectoronwhichthe+5VDCsupplyisapplied.
Theavailableoptionsare:
- D i s a b l e d
• +5VonPin14
• +5VonPin16
ToselectthepoweronDVI1
- BringuptheOSDmainmenu.
- NavigatetotheSystemmenu.
3.EnterthePoweronDVI1submenu. - Selectoneoftheavailableoptionsandconfirm.
5.5.2 PoweronDVI2
AboutpoweronDVI2
ThissettingallowsyoutoselectthepinofDVIport2connectoronwhichthe+5VDCsupplyisapplied.
Theavailableoptionsare:
- D i s a b l e d
•+5VonPin14
•+5VonPin16
ToselectthepoweronDVI2
- BringuptheOSDmainmenu.
- NavigatetotheSystemmenu.
3.EnterthePoweronDVI2submenu. - Selectoneoftheavailableoptionsandconfirm.
5.5.3DVIOutput
AboutDVIoutput
ThissettingallowsyoutoselectwhichdigitalinputtoreplicateonDVIout.
The available options are (depending on display version):
• D V I 1
• D V I 2
•Nexxis

ThisfeatureissubjecttorestrictionsincaseofMulti-image(PiP,SbS).
ToselecttheDVIoutput
- BringuptheOSDmainmenu.
- NavigatetotheSystemmenu.
3.EntertheDVIoutputsubmenu. - Selectoneoftheavailableoptionsandconfirm.
5.5.4 Keyboardlock
Aboutkeyboardlocking
ThissettingallowsyoutodisablethekeyboardfunctionalityandavoidunwantedaccesstotheOSDfunctions.
AccessingtheOSDmenuisonlypossibleafterpressingasequenceofkeys.Pleaserefertothededicated sectionformoredetails(Keyboardlocking/unlocking).
Toenable/disablekeyboardlocking
- BringuptheOSDmainmenu.
-
NavigatetotheSystemmenu.
3.EntertheKeyboardLocksubmenu. -
Enable/Disablekeyboardlockingasdesiredandconfirm.
5.5.5 Keyboardbacklight
Aboutthekeyboardbacklight
Bydefault, afterlightingup, thekeyboardbacklightwilldimagainifnofurtheractionsaretakenwithinthe following5seconds. However, thisbehaviorcanbechangedsothatthekeyboardbacklightisalwayson.
Toadjustthekeyboardbacklight
- BringuptheOSDmainmenu.
- NavigatetotheSystemmenu.
3.EntertheKeyboardBacklightsubmenu. - Selectoneoftheavailableoptionsandconfirm.
5.5.6 Power Saving
Aboutpowersaving
When the active input(s) is (are) missing, this setting allows the display to switch the backlight and enter low power mode. In this status the availability of these selected input is checked periodically.
Toenable/disablepowersaving
- BringuptheOSDmainmenu.
- NavigatetotheSystemmenu.
- EnterthePowerSavingsubmenu.
- Enable/Disablepowersavingasdesiredandconfirm.
6.IMPORTANTINFORMATION
6.1 Safetyinformation
General recommendations
Readthesafetyandoperatinginstructionsbeforeoperatingtheequipment.
Retainsafety and operating instructions for further reference.
Adheretoallwarningsontheequipmentandintheoperatinginstructionsmanual.
Followwallinstructionsforoperationanduse.
Electricalshock

Image6-1
Typeofprotection(Electrical)
Equipmentwithexternalpowersupply:Classlequipment
Degreeofsafety(Flammableanestheticmixture)
Equipment not suitable for use in the presence of a flammable anesthetic mixture with air or with oxygen ornitrousoxide.
Non-patientcareequipment
Equipmentprimarilyforuseinahealthcarefacilitythatisintendedforusewherecontactwithapatient isunlikely.
The equipment may not be used with lifesupport equipment.
Missioncriticalapplications
Westronglyrecommendthereisareplacementdisplayimmediatelyavailableinmissioncriticalapplications.
Powerconnection
- Powerrequirements: The equipment must be powered using the delivered medical approved 24VDC powersupply.
- ThemedicalapprovedDCpowersupplymustbepoweredbytheACmainsvoltage(protectiveearth terminal).
•The equipment compliestothementioned standardsonlywhenusedwiththesuppliedmedicalpower supply. - The equipment must be powered from a center-tapped electrical circuit when used in the USA at voltagesabove120Volts.
•Theequipmentisintendedforcontinuousoperation. - The equipment is powered from an external powers supply for classlequipment. The installer responsible for testing the equipment's earthground to verify that it meets the impedancerequirements for the given country regulatory requirements.
•The equipment must be earthed by a minimum 18 AWG, maximum 6 foot (1,8m) long wire connected to the ground connection at therear.
• The compliance of this monitor with Medical Safety and EMC requirements has been evaluated using the external (optional) Skynet medical powersupply model BAR-A159. If different powers supply will be used, further investigation for Safety and EMC requirements, havetobe performed at system level.
Powercords:
- UtilizeaUL-listeddetachablepowercord,3-wire,typeSJorequivalent,18AWGmin.,rated300V min., provided with a hospital-grade type plug 5-15P configuration for 120V application, or 6-15P for 240Vapplication.
- Do not overload wall outlets and extension cords as this may result in fire or electric shock.
- Mainsleadprotection(U.S.:Powercord):Powercordsshouldberoutedsothattheyarenotlikelyto bewalkeduponorpinchedbyitemsplaceduponoragainstthem,payingparticularattentiontocords atplugsandreceptacles.
Connections
Anyexternalconnectionwithotherperipheralsmustfollowtherequirementsofclause16ofIEC60601-13rded.orTableBBB.201ofIEC60601-1-1forthemedicalelectricalsystems.
Waterandmoisture
TheequipmentisIP21compliant(IPx5frontsideonly).

ThepowersupplyisnotapprovedforIP21.Thepowersupplymustbemountedinaflat positionforbestresistancetofluids.
Ventilation
- Donotcoverorblocktheventilationopeningsinequipment.
- Heed the necessary free space around the equipment to allow enough air flow for cooling of the equipment.
Installation
- Place the equipment on a flat, solid and stable surface that can support the weight of at least 3 equipments. If you use an unstable cartor stand, the equipment may fall, causing serious injury toachild or adult, and serious damage to the equipment.
- Donotallowtoclimborrestontheequipment.
- When adjusting the angle of the equipment, move its slowly so as to prevent the equipment from moving or slipping off from its standorarm.
- Whentheequipmentisattachedtoanarm, donotusetheequipmentasahandleorgripinorderto movetheequipment. Pleaserefertotheinstructionmanual of thearmforinstructionsonhowtomove thearmwiththeequipment.
- Provide full attention to safety during installation, periodic maintenance and examination of this equipment.
- Sufficient expertise is required for installing this equipment, especially to determine the strength of the wallforwithstandingthedisplay'sweight.Besuretoentrusttheattachmentofthisequipmenttothe walltolicensedcontractorsofBarcoandpayadequateattentiontosafetyduringtheinstallationand usage.
- Barcoisnotliableforanydamageorinjurycausedbymishandlingorimproperinstallation.
Generalwarnings
- Alldevicesandcompletesetupmustbetestedandvalidatedbeforetakingintooperation.
•Theinstallerneedstoforeseeabackupsystemincasethevideofallsaway.
Technicaldata
•Themonitorisintendedforindooruse
- Themonitorhasbeendesignedtobeusedinlandscapepositionwithatiltof-10°(backward)and +10°(forward)
•Powerconsumption:24VDC2.5A
- Operating Temperature: 10-35°C for performance/0-40°C for safety
•OperatingHumidity:10%-90%RH
- OperatingAltitude:3000mmax.
•Storage:-20÷+60°C;10÷90%RH
- IPProtection:IP21(IPx5frontsideonly),maximumtilt±10degree
- ClassIEquipment, accordingtothetypeofprotectionagainstelectricshock
•Themonitorisnotintendedtobesterilized
- Themonitor has not applied parts, but the front side of the LCD panel and the plastic enclosure have been treated as applied part because considered accidentally touchable by the patient for time < 1 minute
Thisapparatusconformsto:
MedicalEquipment:
3rdedition:
ANSI/AAMIES60601-1,3rdedition:2005EN606013rdedition:2006IEC60601-1,3rdedition(2005)
CE(MDD)Classl,essentialrequirementsofMDD93/42/EEC,version2007(ineffectasofMarch2010)
CAN/CSA-C22.2No60601.1-08
EMC:
IEC/EN60601-1-2:2007
EN55011/CISPR11(MDSC-2226-MNA:ClassA;MDSC-2226LEDandMDSC-2226DDI:ClassB)
NationalScandinavianDeviationsforCI.1.7.2:
6.2 Environmental information
Disposalinformation(WasteElectricalandElectronicEquipment)

Thissymbolontheproductindicatesthat,underEuropeanDirective2002/96/ECgoverningwaste from electrical and electronic equipment, this product must not be disposed of with other municipal waste. Pleasedisposeofyourwasteequipmentbyhandingitovertoa designatedcollectionpointfortherecycling of waste electrical and electronic equipment. To prevent possible harm to the environment or human healthfromuncontrolledwastedisposal,pleaseseparatetheseitemsfromothertypesofwasteandre-cyclethemresponsiblytopromotethesustainablereuseofmaterialresources.
For more information about recycling of this product, please contact your local city office, your municipal wasted disposalserviceortheshopwhereyoupurchasedtheproduct.
TurkeyRoHScompliance

RepublicofTurkey:InconformitywiththeEEERegulation
According to the "China Administration on Control of Pollution Caused by Electronic Information Products" (Alsocalled RoHSof Chinese Mainland), the table below lists these names and content so toxic and/or hazardous substances that Barco's product may contain. The RoHSof Chinese Mainland is included in the MCV standard of the Ministry of Information Industry of China, in these section "Limit Requirements of toxic substances in Electronic Information Products".
| 零件项目(名称)Componentname | 有毒有害物质或元素Hazardoussubstancesandelements | |||||
| 铅Pb | 汞Hg | 镉Cd | 六价铬Cr6+ | 多溴联苯PBB | 多溴二苯醚PBDE | |
| 印制电路配件PrintedCircuitAssemblies | X | O | O | O | O | |
| 液晶面板LCDpanel | X | O | O | O | O | |
| 外接电(线)缆ExternalCables | X | O | O | O | O | |
| 内部线路Internalwiring | O | O | O | O | ||
| 金属外壳Metalenclosure | O | O | O | O | ||
| 塑胶外壳Plasticenclosure | O | O | O | O | ||
| 散热片(器)Heatsinks | O | O | O | O | ||
| 风扇Fan | O | O | O | O | ||
| 电源供应器PowerSupplyUnit | X | O | O | O | O | |
| 文件说明书PaperManuals | O | O | O | O | ||
| 光盘说明书CDmanual | O | O | O | O | ||
| O:表示该有毒有害物质在该部件所有均质材料中的含量均在 SJ/T 11363-2006 标准规定的限量要求以下.O:IndicatesthatthistoxicorhazardoussubstancecontainedinallofthehomogeneousmaterialsforthispartisbelowthelimitrequirementinSJ/T11363-2006. | ||||||
| X:表示该有毒有害物质至少在该部件的某一均质材料中的含量超出 SJ/T 11363-2006 标准规定的限量要求.X:IndicatesthatthistoxicorhazardoussubstancecontainedinatleastoneofthehomogeneousmaterialsusedforthispartisabovethelimitrequirementinSJ/T11363-2006 | ||||||
AllElectronicInformationProducts(EIP)thataresoldwithinChineseMainlandmustcomplywiththe "ElectronicInformationProductsPollutionControlLabelingStandard"ofChineseMainland,markedwith theEnvironmentalFriendlyUsePeriod(EFUP)logo.ThenumberinsidetheEFUPlogothatBarcouses (pleaserefertothephoto)isbasedonthe"StandardofElectronicInformationProductsEnvironmental FriendlyUsePeriod"ofChineseMainland.

Image6-2
RoHS
Directive2011/65/EContherestrictionofcertainhazardoussubstancesinelectricalandelectronicequipment.
According to what declared by our component suppliers, this product is RoHS compliant.
6.3 Biological hazard and returns
Overview
The structure and the specifications of this device as well as the materials used for manufacturing makes it easy to wipe and clean and therefore suitable to be used for various applications in hospitals and other medical environments, where procedures for frequent cleaning are specified.
However, normal uses hallexclude biological contaminated environments, toprevent spread of infections.
ThereforeuseofthisdeviceinsuchenvironmentsisattheexclusiveriskofCustomer.Incasethisdevice isusedwherepotentialbiologicalcontaminationcannotbeexcluded.
Customer shall implement the decontamination process as defined in the latest edition of the ANSI/AAMI ST35standardoneachsinglefailedProductthatisreturnedforservicing,repair,reworkingorfailure investigationtoSeller(ortotheAuthorizedServiceProvider).Atleastoneadhesiveyellowlabelshallbe attachedonthetopsiteofthepackageofreturnedProductandaccompaniedbyadeclarationstatement provingtheProducthasbeensuccessfullydecontaminated.
ReturnedProductsthatarenotprovidedwithsuchexternaldecontaminationlabel,and/orwhenever such declarationismissing,canberejectedbySeller(orbytheAuthorizedServiceProvider)andshippedback atCustomerexpenses.
6.4 Regulatory compliance information
Indicationsforuse
This device is intended to be used in operation rooms, to display images from endoscopic cameras, room and boom cameras, ultrasound, cardiology, PACS, anesthesiology and patient information. It is not intended for diagnosis.
FCCClassB(validforMDSC-2226LEDandMDSC-2226DDIversion)
This device complies with Part 15 of the FCC Rules. Operation is subject to the following two conditions: (1) this device may not cause harmful interference, and (2) this device must accept any interference received, including interference that may cause undesired operation.
This equipment has been tested and found to comply with the limits for a Class B digital device, pursuant to Part 15 of the FCC Rules. These limits are designed to provide reasonable protection against harmful interference in a residential installation. This equipment generates, uses and can radiate radio frequency energy and, if not installed and used in accordance with the instructions, may cause harmful interference or radiocommunication. However, there is no guarantee that interference will not occur in particular installation. If this equipment does cause harmful interference or radio television reception, which can be determined by turning the equipment off and on, the user is encouraged to try to correct the interference by one or more of the following measures:
•Reorientorrelocatethereceivingantenna.
- Increase these separation between the equipment and receiver.
- Connecttheequipmentintoanoutletonacircuitdifferentfromthattowhichthereceiverisconnected.
- Consultthedealeroranexperiencedradio/TVtechnicianforhelp.
FCCClassA(validforMDSC-2226MNAversion)
This equipment has been tested and found to comply with the limit of a class Adigital device, pursuant to Part 15 of the FCC rules. These limits are designed to provide reasonable protection against harmful interference when the equipment is operated in a commercial environment. This equipment generates, uses and can radiate radio frequency energy and, if not installed and used in accordance with the instruction manual, may cause harmful interferencetoradiocommunications. Operation of this equipment in residential areas is likely to cause harmful interference in which case the user will berequired to correct the interference at this own expense.
Canadiannotice
ThisISMdevicecomplieswithCanadianICES-001.
CetappareillSMestconformeàlanormeNMB-001duCanada.
6.5 Cleaninganddisinfection
Instructions
- BesuretounplugthepowercordfromthemainswhencleaningyourLCDmonitor.
•Takecarenottoscratchthefrontsurfacewithanyhardorabrasivematerial.
- Dust, finger marks, grease etc. can be removed with a soft damp cloth (a small amount of mild detergent can be used on the damp cloth).
• Wipe off water drop immediately.
Possiblecleaningsolutions
•70percentisopropylalcohol
•1.6 percentaqueousammonia
•Cidex®(2.4percentglutaraldehydesolution)
•Sodiumhypochlorite(bleach)10percent
• "Greensoap"(USP)
•0.5percentChiorhexidinein70percentisopropylalcohol.
•LikeCleansafe®opticalcleaningliquid
6.6 Explanationofsymbols
Overview
On the equipment or power supply, you may find the following symbols (nonrestrictive list):
 | Indicatescompliancetheessentialrequirements oftheDirective93/42/EEC | |
 or or  | ||
 | IndicatescompliancewithPart15oftheFCCrules (ClassAorClassB) | |
 US US | Indicatestheequipmentisapprovedaccordingto theULRecognitionregulations | |
 | Indicatestheequipmentisapprovedaccordingto theULDemkoregulations | |
 | Indicatestheequipmentisapprovedaccording totheCCCregulations | |
 | Indicatestheequipmentisapprovedaccording totheVCCIregulations | |
 | IndicatestheUSBconnectorsontheequipment | |
 | IndicatestheDisplayPortconnectorsonthe equipment | |
 | Indicatesthemanufacturingdate | |
 | Indicatesthetemperaturelimitationsforthe equipmenttooperatewithinspecs | |
 | Indicatestheequipmentserialno. | |

6.7 Legaldisclaimer
Disclaimernotice
Although every attempt has been made to achieve technical accuracy in this document, we assume responsibility for error that may be found. Our goalist is provided by with the most accurate and usable documentation possible; if you discover errors, please let us know.
BarcosoftwareproductsarethepropertyofBarco. TheyaredistributedundercopyrightbyBarcoN.V.or Barco, Inc., for use only under the specific terms of a software license agreement between Barco N.V. or Barcolnc.andthelicensee.Nootheruse,duplication,ordisclosureofaBarcosoftwareproduct,inany form,isauthorized.
Thespecifications of Barcoproducts aresubjecttochangewithout notice.
Trademarks
Alltrademarksandregisteredtrademarksarepropertyoftheirrespectiveowners.
Copyrightnotice
Thisdocumentiscopyrighted.Allrightsarereserved.Neitherthisdocument,noranypartofit,may bereproducedorcopiedinanyformorbyanymeans-graphical,electronic,ormechanicalincluding photocopying,tapingorinformationstorageandretrievalsystems-withoutwrittenpermissionofBarco.
©2013BarcoN.V.Allrightsreserved.
6.8 Technical specifications
Overview
| ScreentechnologyTFTAMLCD | |
| Activescreensize(diagonal)660mm(26.0") | |
| Activescreensize(HxV)576x324mm(22.6x12.8") | |
| Aspectratio(H:V) | 16:9 |
| Resolution | 2MP(1920x1080) |
| Pixelpitch | 0.300mm |
| Colorimaging | Yes |
| Colorsupport | 1073million |
| Viewingangle(H,V) | 178° |
| Maximumluminance | 450cd/m2(typical) |
| Contrastratio | 1400:1 |
| Responsetime(Tr+Tf) | 18ms |
| Housingcolor | White |
| Videoinputsignals | DVI-ISingleLink(digital&analog-HDMIvideosupportwithHDCP) |
| DisplayPort(VESAstd1.1a) | |
| RGBS | |
| S-video | |
| Compositevideo | |
| Componentvideo | |
| SDI/HD-SDI/3GSDI | |
| Nexxisfiberopticinput | |
| Videooutputsignals | DVI |
| CVBS | |
| S-video | |
| SDI | |
| Powersourcerequirementsforexternalpowersupply(nominal) | 100-250V |
| Powersourcerequirementsfordisplaypowerinput(nominal) | 24VDC2.5A |
| Powerconsumption(nominal) | LEDandDDlversion:50W |
| MNAversion:75W | |
| PowersavemodeYes | |
| Dotclock | 165MHzmax.(DVI) |
| OSDlanguagesEnglish,French, | German,Spanish,Italian |
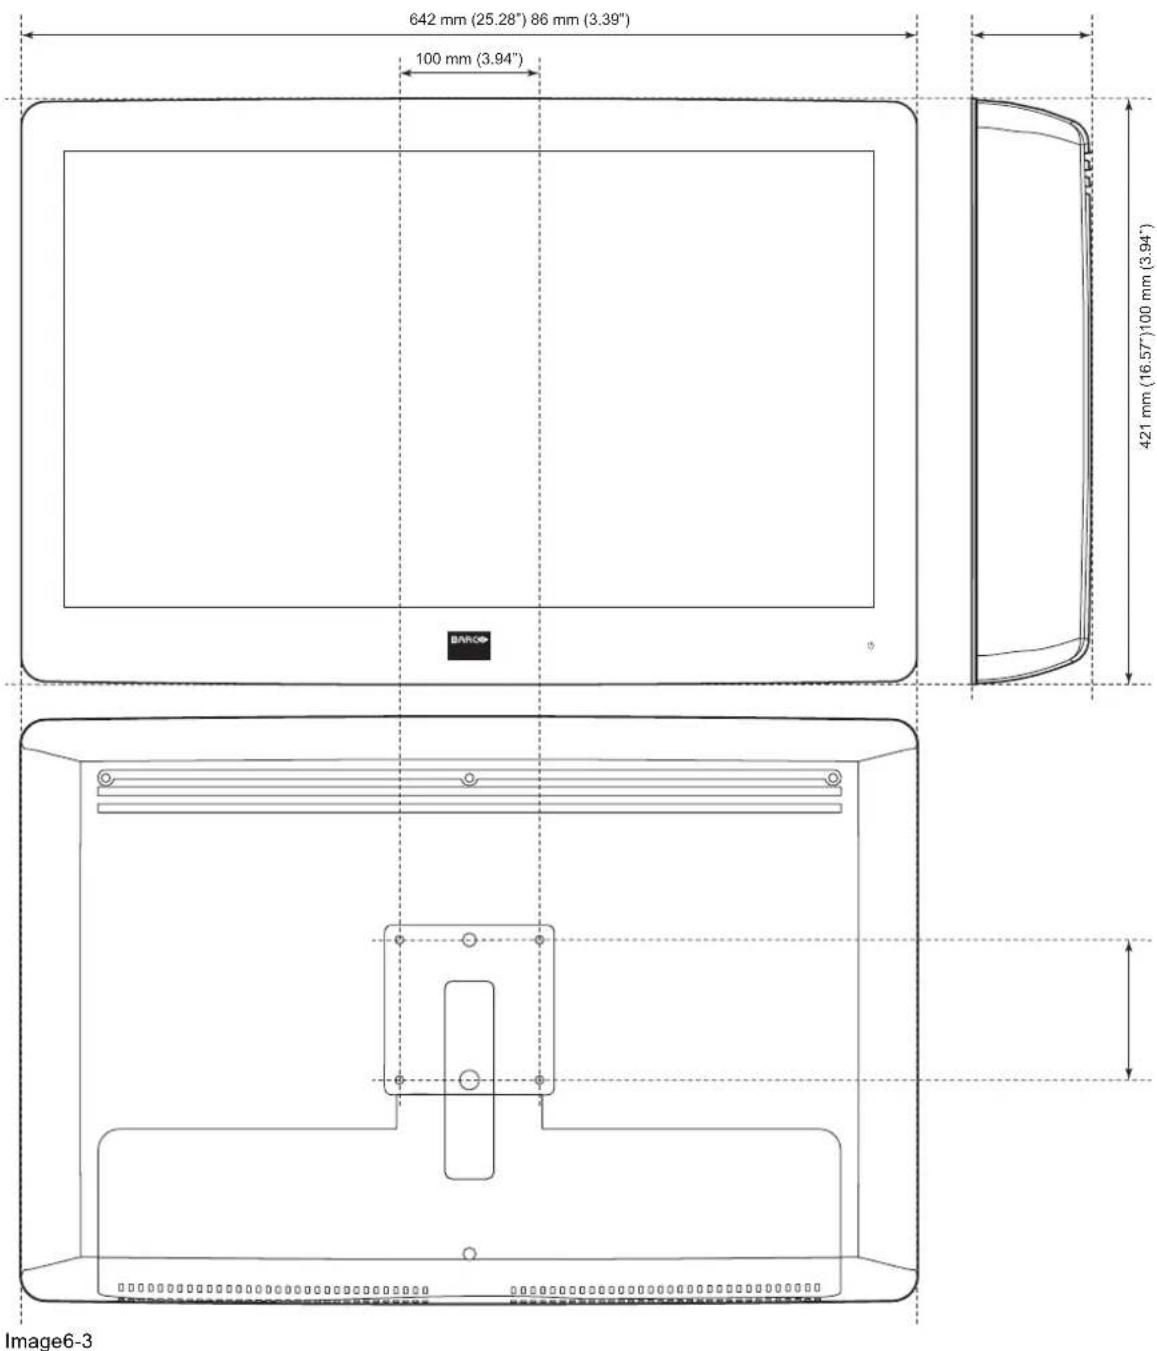
| Displaydimensionsw/ostand(W x H x D ) | 6 4 2 x 4 2 1 x 8 6 m m |
| PowerSupplydimensions(Wx H x D ) | 2 1 0 x 1 0 3 x 5 2 m m |
| Dimensionspackaged(WxHx D) | 730x560x170mm |
| Netweightdisplayw/ostand9.8kg | (11.4kgincl.powersupplyandaccessories) |
| Netweightpowersupply 1.5kg | |
| Netweightpackagedw/o stand | 13.0kg |
| PowersupplyDCoutputcable length | 2.5m |
| Mountingstandard | VESA(100mm) |
| Screen protection | Protective, non-reflective PMMA cover |
| Recommendedmodalities | Endoscopy, Laparoscopy, PACS, PM, US, CT, MR |
| Certifications | ANSI/AAMI ES 60601-1, 3rd edition: 2005 EN 60601 3rd edition:2006IEC60601-1,3rdedition(2005)CE(MDD)Classl,essentialrequirementsofMDD93/42/EEC,version2007(ineffectasofMarch2010)CAN/CSA-C22.2No60601.1-08,IEC/EN60601-1-2:2007,EN55011/CISPR11(MDSC-2226-MNA:ClassA;MDSC-2226LEDandMDSC-2226DDI:ClassB),FCC(AorBdependingonmodel),RoHs compliant,IP21(IPx5frontsideonly) |
| Suppliedaccessories | UserGuide |
| Videocable(DVIDualLink) | |
| Mainscables(European(CEBEC/KEMA),USA(UL/CSA)) | |
| Externalpowersupply | |
| Optionalaccessories | Barcostand(K9302032A) |
| Warranty | 3years |
| Operatingtemperature | 10-35°Cforperformance/0-40°Cforsafety |
| Storagetemperature-20÷+60°C | |
| Operatinghumidity10÷90%(non-condensing) | |
| Storagehumidity10÷90%(non-condensing) | |
| Operatingaltitude | 3000mmax. |
| Storagealtitude | 12000mmax. |
Dimensions
6.9Warrantystatement
BarcoHCGeneralWarrantyTermsandConditions
ApplicablefromJan1st2008
Article1: Productwarranty
Barconv, MedicalImagingDivisionwarrantsthattheequipmentwillbefreeofdefectsinworkmanshipor material for the warranty period or the specific period of a warranty extension program.
Hardware: Barco warrants that upon delivery hereunder the Products shall (i) conform to its specifications in effect at the date of delivery and (ii) be free from defects in material and workmanship (the "Warranties").
Software:BarcowarrantsthatsoftwarewrittenbyBarcoshallperformsubstantiallyinaccordancewith the specifications in effect at the date of delivery. Software is inherently susceptible to bugs and errors. BarcomakesnowarrantieswithrespecttothesoftwarewhichisprovidedtoCustomeronan"as-is"basis anddoesnotwarrantuninterruptedorerror-freeoperationoftheProducts.
Unless otherwise indicated in Barco's Product manual or in the agreement between Barco and Customer, the Warranty Period shall be
(a)Hardware:12monthscommencingontheBarcodateofinvoice.
(b) Software: 3 months commencing on the Barcodate of invoice.
Notwithstanding the provisions of clause 2, repair and replacement of defects in material and/or workmanship under this warranty shall be accomplished in our works according to the terms and conditions asset forth hereafter:
1.1 Any claim under the Warranties must be notified to Barco in writing within 8 days from the date the defect or failure has been discovered or noticed the first time. The Customer, upon the occurrence of any equipmentfailure, shallcontactBarconv, HCcustomersupportcentre (oranauthorisedservicecentre) bytelephone, faxore-mailandshallprovidetheapplicablecustomersupportpersonwithacomplete descriptionoftheproblembeingencountered, includingthemodelandserialnumberoftheequipmentin whichtheproblemhasarisen.
1.2 The customer support person shall diagnose the problem experienced by the Customer and shall advise the Customer on how to proceed. Customer support may ask to return the faulty equipment or faultysubassembliestotheBarconv,oraHCcustomersupportcentre(oranauthorisedservicecentre) forrepairactivities.InnoeventshallCustomerreturnadefectiveProductorpartthereoftoBarcowhout Barco'spriorwrittenapproval.
In the event the return to Barco of the defective Product is authorized by Barco, Barco shall issue to CustomeranRMA(ReturnMaterialAuthorization).
The CustomershallapplyforanRMAnumbertotheclosestBarconv,HCCustomersupportcentre(or anauthorisedservicecentre)aslistedatwww.barcomedical.com,unlessotherwiseindicated.
Theone-waycostofpacking, transportandinsurancerelatedtoshippingtheallegeddefectiveProduct orparttoBarcoforrepairorreplacementshallbebornebyCustomer. Theone-waycostofpacking, transportandinsurancerelatedtoshippingoftherepairedorreplacementProductorparttoCustomer shallbebornebyBarco.
1.3TheCustomershallreturn,freightprepaid,thedefectiveequipmentorsubassembliesinitsoriginal packagingwiththeassignedRMAnumberfor repairtotheBarconv,HCCustomersupportcentre(oran authorisedservicecentre).
1.4 Replacement parts used shall be new equivalent tonew parts for therevision level of the equipment. Areplacement LCD panel will be new similar runtime. The warranty period for the replacement parts will expire at the same moment as the original warranty period of the equipment. All parts replaced here under and returned to Barconv, HC (or an authorised service centre) shall become the property of Barconv, HC (or the authorised service centre).
1.5 Therepaired equipment shall be returned to the Customer, by regular freight, at Barconv, HC's charge.
1.6Barconv, HCwillreplaceaproductthatfailswithin90daysaftershipmentfromBarcowithanewone, ensuring color matching in the event of a diagnostic multi head display configuration.
Barcoaimstoshipthenewreplacementproductwithin2businessdaysafterreceiptoftheCustomers notificationinwriting.
Article2: Conditions precedent for warranty and item sexcluded from warranty
A. The Warranties shall apply only to the extent the Products or any part thereof have
(i) been transported and stored at all times in the original packaging in the conditions as specified by Barco (suchascoveredandsecurelocation,minimumandmaximumtemperature,maximumhumidity,...)or,in absencethereof,atleastinconditionsconsistentwithgenerallyacceptedpracticeforthistypeofproducts;
(ii)beenhandledatalltimesinaccordancewithBarco'sinstructionsor,inabsencethereof,atleastwith thecareandcautionconsistentwithgenerallyacceptedpracticeforthistypeofproducts;
(iii)beeninstalledstrictlyinaccordancewiththeinstructionsanddirectionsgivenbyBarco(ifandtothe extenttheProductshavenotbeeninstalledbyBarcooritsauthorizedsubcontractors);
(iv) not been subject to any unauthorized access, alteration, modification or repair or attempts thereto;
(v)beenatalltimes"normallyused"fortheintendedpurposeandoperatedinstrictaccordancewiththe operatinginstructionsetforthintheoperatingmanualoftheProductinquestionandshallnothaveb een otherwisemisused,abused,damaged.Forthepurposehereof,"normallyused"shallmeanaregular, ordinaryandroutineusageoftheProductinquestionasintendedand/orrecommendedbyBarco;
(vi)beenmaintainedatalltimesinaccordancewithBarco'sinstructionsor,inabsencethereof,atleast withintervalsandinamannerconsistentwithgenerallyacceptedpracticeforthistypeofproducts;
B. Thewarranty described herein shall not include the following:
2.1 Any hardware or software item procured from a source other than Barco nv, HC or their official agent ordistributorandintegratedbyCustomerorathirdpartyintoBarconv,HCsuppliedequipment.
2.2 Any host configuration not explicitly supported by Barco nv, HC.
2.3 All software installed on the system, whether they are acquired from Barconv, HC third party. An exception is made for soft waredelivered by Barconv, HC that would provetobe because forthemal functioning of the hardware recovered under this Agreement.
2.4 Normal wear and tear, use under circumstances exceeding specifications, such as use in dusty environmentorunderexcessivetemperatureconditions,abuse,unauthorisedrepairoralternation,lackof proper configuration or maintenance, damaged or modified or removed serial number, cosmetic refurbishment.
2.5Repairorreplacementofconsumables ^1 or specific parts that by definition are subject to wear and tear, including but not limited to:
a.CRT's,LCDpanels
b.BacklightsindiagnosticLCDdisplays,whenthebacklightruntime ^2 isbeyondtheGuaranteedBacklight Lifetime ^3 ofthatmodel,whenusedattheFactoryCalibratedLuminance ^4
Eg1
- Adisplayisusedat8hours/day;ie.+/-2.920hours/year
• Thedisplaysystemiscoveredwithawarrantyperiodof5year
•TheGuaranteedBacklightLifetimeofthatmodelis17.000hours.
•TheFactoryCalibratedLuminancecannotbeachieved anymoreafter4year,thuscorrespondingto +/-11.680hours
•Result: thebacklightreplacementisperformedunderwarranty
Eg2
- Adisplayisusedat24hours/day;ie.8.760hours/year
- Thedisplaysystemiscoveredwithawarrantyprogramof5year
•TheGuaranteedBacklightLifetimeofthatmodelis17.000hours.
•TheFactoryCalibratedLuminancecannotbeachievedanymoreafter2.5years,thuscorresponding to+/-21.900hours - Result: the backlight replacement does not make part of the warranty coverage.
(1): 'Consumable' is apart that can be replaced by the user
(2): 'Backlightruntime' isthetotaltimethatanimage(includinguseofascreensaver) has been applied to the screen; this value can be consulted via the OSD buttons (OnScreenDisplay).
(3): 'Guaranteed Backlight Lifetime' is the number of backlight hours during which a predefined luminance value, ie. the Factory Calibrated Luminance, will be provided by a specific diagnostic display model. This figure is printed on the Warranty certificate of each display or can be requested at your local Barco office.
(4): 'Factory Calibrated Luminance': is the typical luminance value that a specific diagnostic display model is calibrated at during the production process. This figure is printed on the Warranty certificate of each displayorcanberequestedatyourlocalBarcooffice.
c. Lamps, optical components in projectors
d.Replacementbecauseof:
i.imageretentionasaresultof:
- notcorrectlyusingscreensaverand/orDisplayPowerManagementSystem(DPMS)asexplainedin theusermanual
•prolongedoperationofthedisplaywithastaticimageonthesamescreenarea
ii.anumberofmissingpixelsthatislowerthanthetotalallowablenumberasmentionedintheproduct specifications.
iii.differenceincolortemperaturethatislowerthanthetotalallowabledifferenceasmentionedinthe productspecifications
iv. difference in color temperature as a result of not using all displays of a multi-head configuration at the samerate.
v. LCD luminance uniformity that is in within the product specifications or luminance uniformity performancethatisinherenttoLCDtechnology.
Barconv, HC does not warrant a minimum lifetimes performance of any of the consumables.
2.6 Replacement of moveable part such as powerercords, remote controls, ...
2.7 Anyproductdisassemblyandinstallationcostsattheoperationsite,traveexpensesandtraveltime toandfromtheoperationsiteforthepersonnelinchargeoftherepairworksandtransportcharges.
2.8 Any failures resulting from an accident, negligence (such as but not limited to removing or deleting system files & licensed software product files), misuse, circuit failure or any change, damage due to fire, water, thunder or lightning, power failure or fluctuation, disruption of communication lines or due to force majeure, or any reason for foreign to the equipment.
2.9 Any specific services or procedures, asked for by Customer, related to verification of repaired equipment.
2.10 The evaluation cost incase of a returned product deemed functional is not covered under warranty and will be charged to the Customer, at Barco's solediscretion, based on a case-by-case evaluation.
Article3: Obligationsofthecustomer
CustomerherebyassumesthefollowingobligationsaspartialconsiderationforBarconv,HCperformance ofitsrequirementsunderthewarrantycondition;failurebyCustomertomeetitsobligationsunderthis paragraphshallexcuseBarconv,HC'sperformancehereunder:
3.1 CustomershallnotexposeBarconv, HCpersonneltoanyunsafeworkingconditions.
3.2 Repairstoequipment under warranty resulting from improper maintenance or repair performed by the Customer, or its officers, agents, employees, or representatives, shall be borne by the Customer at its additional cost and expense.
3.3TheCustomerisresponsibleforinstallingtheBarconv,HCequipmentinanenvironmentforwhichit wasintended.Ifthereisanindicationthattheequipmentwasused-eventemporary-outsideitsspecifications, Barco nv, HC is entitled not to perform warranty repairs and terminate the warranty agreement. AnyactionsthathavebeentakenbyBarconv,HCinthisrespect,maybeinvoicedtotheCustomerat normalpricing.
Article4:Remediesunderwarranty
(a)Hardware:IfduringtheWarrantyPeriodaProductoranypartthereof,failstomeetanyoftheWarrantiesthen,uponCustomer'srequest,Barcoshall,atitssoleoptionandcost,promptlyandwithin20 workingdays,either:(i)repairorcorrecttheProductorpartinquestion;or(ii)replacetheProduct supplypart(s)orcomponent(s)accordingtothetermsandconditionscontainedinarticle1.Areplacementpartshallbeatleastfunctionallyequivalenttotheoriginalpart.ThereplacedProduct,partsand/orcomponentsshallbecomethepropertyofBarcoandshall,atBarco'srequest,bereturnedbyCustomer toBarcoatBarco'scost.
(b) Software: Barco's sole obligations shall be rectify substantial malfunctions of the software (to the extent technically reasonably possible) by amending the software or supplying an alternative version of the software.
(c) TherepairorreplacementundertheWarrantiescoversthecostofmaterialandlabor.
Article5: Disclaimerofwarranties
BARCONV, HCDISCLAIMSALLWARRANTIES, EXPRESSEDORIMPLIED, INCLUDINGALLIMPLIED WARRANTIES OF MERCHANTABILITY AND FITNESS FOR APARTICULAR PURPOSE.
Article6: Limitation of liability
The remedies specified in these Terms and Conditions shall constitute Customer's sole and exclusive remedyandBarco'ssoleandexclusiveliabilityforBarco'sbreachoftheWarrantieshereunder.
BARCONV,HCSHALLNOTUNDERANYCIRCUMSTANCESBELIABLETOCUSTOMERORANYTHIRDPARTYFORDIRECT,INDIRECT,INCIDENTAL,SPECIALORCONSEQUENTIALDAMAGES,SUCHASBUTNOTLIMITEDTO,DAMAGETOORLOSSOFTANGIBLEORINTANGIBLEPROP-ERTYOREQUIPMENT,LOSSOFPROFITSORREVENUES,COSTOFCAPITAL,COSTOFPURCHASEOFREPLACEMENTGOODS,ORCLAIMSOFUSERFORSERVICEINTERRUPTIONS.THELIABILITYOFBARCONV,HCFORMANUFACTURING,SALE,DELIVERY,RESALE,INSTALLATION,OPERATIONORSUITABILITYFORUSEOFANYPRODUCTSORSERVICESCOVEREDBYORFUR-NISHEDUNDERTHISWARRANTYCONDITION,WHETHERARISINGOUTOFCONTRACT,NEGLIGENCE,STRICTTORT,WARRANTYOROTHERWISE,SHALLNOTEXCEEDTHEPRICEOFTHEITEMORITEMSOFGOODSORSERVICESUPONWHICH SUCHLIABILITYISBASED.
Eitherpartyshallbereleasedfromperformanceofitsobligationsunderthisagreementtotheextent,and forsolongas,theperformanceofthisagreementisimpededbyreasonofforcemajeure.Forthepurposes of this clause the expression "force majeure" means, but shall not be limited to, industrial dispute, fire, mobilisation,requisition,embargo,currencytransferprohibitions,insurrection,lackofmeansoftransport, restrictionsoftheuseofenergy,andgenerallyancircumstanceswhicharebeyondthecontrolofthe partiesandhinderperformanc ebyonepartyofhisobligations.
Article8: General
8.1 Customer acknowledges its understanding that all software and electronic devices, including Barconv, HC products are subject to possible error, mechanical electrical failure, and should not be relied upon in inappropriate applications or without proper backup and or others safety precautions whenever personal injury or property damage may result from failure or error of the product.
8.2Barconv, HC shall not be responsible for machine failure and/or its failure to renders service or maintaineduetocauses beyond its reasonable control.
6.10 Opensourcelicenseinformation
Opensourcelicenseinformation
Opensourcelicense
ThisproductcontainssoftwarecomponentsreleasedunderanOpenSourcelicense.Acopyofthe sourcecodeisavailableonrequestbycontactingyourHCcustomersupportrepresentativeatimage.care-GLOB@barco.com. ThelicensesareonlyprovidedinEnglishbecausetranslationsdonotlegallystate thedistributiontermsforsoftwarethatusestheselicenses-onlytheoriginalEnglishtextdoesthat.However,translationsinyourlocallanguageareavailableatwww.gnu.org.Thesoftwarerunningint heinternal processorusesthefollowinglicenses:
GPL2.1 and GPL3.1:
LinuxKernel/Libvncserver/Busybox/U-bootaswellassomeothercomponents.
Thisprogramisfreesoftware;youcanredistributeitand/ormodifyitunderthetermsoftheGNUGeneral Public License (http://www.gnu.org/licenses) as published by the Free Software Foundation. This program is distributed in the hope that it will be useful, but WITHOUT ANY WARRANTY; without even the implied warranty of MERCHANTABILITY or FITNESS FOR A PARTICULAR PURPOSE. See the GNU General PublicLicenseformoredetails.
LGPL2.1 and GPL3.1:
Qtaswellassomeothercomponents.
Thisprogramisfreesoftware;youcanredistributeitand/ormodifyitunderthetermsoftheGNULessor GeneralPublicLicense(http://www.gnu.org/licenses)aspublishedbytheFreeSoftwareFoundation.This program is distributed in the hope that it will be useful, but WITHOUT ANY WARRANTY; without even the impliedwarrantyofMERCHANTABILITYorFITNESSFORAPARTICULARP URPOSE.SeetheGNU LessorGeneralPublicLicenseformoredetails.
K5903021-02
(451920610993)
March 2013
- TABLEOFCONTENTS
- Welcome!......3
- Parts, controls and connectors .... 5
- Display installation 15
- Daily operation ...... 23
- Advanced operation....33
- 6.Importantinformation....49
- 1.WELCOME!
- About the product
- Overview
- Easeofmind
- Easeofinstallation
- Easeofuse
- Features
- 1.2Symbols
- What'sinthebox
- About this user guide
- 2.PARTS,CONTROLSAND CONNECTORS
- 2.1Frontview
- 2.2Rearview
- Connectorview
- MDSC-2226LEDversion
- 2.3.2MDSC-2226DDIversion
- 2.3.3MDSC-2226MNAversion
- Connectorpinassignments
- Inputpowerconnector
- 2.4.2DVI-1connector
- 2.4.3DVI-2connector
- 2.4.4Dvloutconnector
- 2.4.5RS232connector
- 2.4.6USBconnector
- MiniUSBconnector
- DisplayPortconnector
- 2.4.9S-VideoandS-Video-outconnector
- 3.DISPLAYINSTALLATION
- VESA mountinstallation
- To mount the display to an arm stand
- Coverremoval
- Toremovetheconnectorcompartmentcover
- Videoinputconnection
- Aboutvideoinputconnections
- MDSC-2226LEDversion
- Toconnectthevideoinputs
- 3.3.2MDSC-2226DDIversion
- 3.3.3MDSC-2226MNAversion
- 3.4Videooutputconnection
- Aboutvideooutputconnections
- MDSC-2226LEDversion
- Toconnectthevideooutputs
- 3.4.2MDSC-2226DDIversion
- 3.4.3MDSC-2226MNAversion
- 3.5NexxisOR
- Power supply connection
- Toconnectthepowersupply
- Protectiveearthpin
- 3.7Cablerouting
- Toroutethecables
- DAILY OPERATION
- Keyboardbacklight
- Aboutthekeyboardbacklight
- 4.2On/Offswitching
- Toswitchonyourdisplay:
- Toswitchoffyourdisplay:
- 4.3OSDmenuactivation
- ToactivatetheOSDmenu
- 4.4OSDmenunavigation
- OSDmenustructureexplained
- TonavigatethroughtheOSDmenu
- Shortkey functions
- Aboutshortkeyfunctions
- Overview of shortkeys
- Mainsourceselection
- Toquicklyselectthemainsource
- Multi-image configuration
- Toquicklyselectthemulti-imageconfiguration
- Zoomfactorselection
- Toquicklyselectthezoomfactor
- Brightness adjustment
- Toquicklyadjustthebrightness
- Extendedkeyboard functions
- Aboutextendedkeyboardfunctions
- Overviewofextendedkeyboard
- Mainsourceselection
- Secondsource selection
- Toquicklyselectthesecondsource
- Multi-image configuration
- Transferfunctionselection
- Toquicklyselectthetransferfunction
- Imagesizeselection
- Toquicklyselecttheimagesize
- Zoomfactorselection
- Keyboard locking/unlocking
- Tolock/unlockthekeyboard
- Profile
- Aboutprofiles
- To select a profile
- 5.1.2Brightness
- Toadjust the brightnesslevel
- Contrast
- Toadjustthecontrastlevel
- Saturation
- Toadjustthesaturationlevel
- Colortemperature
- Aboutcolortemperaturepresets
- Factorycalibration-Colorspace:
- Toselectacolortemperaturepreset
- 5.1.6Gamma
- Aboutgammapresets
- Factorycalibration–Grayscaletracking:
- Toselectagammapreset
- Sharpness
- Toadjustthesharpnesslevel
- 5.2PictureAdvancedmenu
- BlackLevel
- Toadjusttheblacklevel
- 5.2.2SmartVideo
- AboutSmartVideo
- ToselectaSmartVideopreset
- 5.2.3ImagePosition
- Toadjusttheimageposition
- AutoAdjustment
- Aboutautoadjustment
- Toactivateautoadjustment
- 5.2.5Phase
- Aboutphase
- Tomanuallyadjustthephase
- 5.2.6Clock/Line
- Aboutclock/line
- 5.3DisplayFormatmenu
- MainSource(PrimarySource)
- Aboutmainsources
- Toselectthemainsource
- ComponentMode
- Aboutcomponentmodes
- Toselectthecomponentmode
- 5.3.3Zoom
- Aboutzoom
- Toselectazoomfactor
- 5.3.4ImageSize
- Aboutimagesize
- Toselecttheimagesize
- nd PictureMode
- About2 nd picturemodes
- To select the 2nd picturemode
- nd PictureSource
- About2 nd picturesources
- Toselectthe2 nd picturesource
- nd PicturePosition
- About2 nd picturepositions
- Toselectthe2 nd pictureposition
- 5.3.8PictureSwap
- Aboutpictureswapping
- Toswappictures
- 5.4Configurationmenu
- Information
- Aboutinformation
- Toaccessinformation
- Language
- Aboutlanguages
- Toselectthelanguage
- Failovermode
- Aboutfailovermode
- Toenable/disablefailovermode
- Extended keyboard
- Abouttheextendedkeyboard
- Toenable/disabletheextendedkeyboard
- 5.4.5OSDsetting
- OSDHorizontalPosition
- ToadjusttheOSDhorizontalposition
- 5.4.5.2OSDVerticalPosition
- ToadjusttheOSDverticalposition
- 5.4.5.3OSDTime-out
- AboutOSDtime-out
- ToadjusttheOSDtime-out
- RecallProfile
- Aboutrecallingprofiles
- Torecallaprofile
- SaveProfile
- Aboutsavingprofiles
- Tosaveaprofile
- 5.5System menu
- PoweronDVI1
- AboutpoweronDVI1
- ToselectthepoweronDVI1
- PoweronDVI2
- AboutpoweronDVI2
- ToselectthepoweronDVI2
- 5.5.3DVIOutput
- AboutDVIoutput
- ToselecttheDVIoutput
- Keyboardlock
- Aboutkeyboardlocking
- Toenable/disablekeyboardlocking
- Keyboardbacklight
- Toadjustthekeyboardbacklight
- Power Saving
- Aboutpowersaving
- Toenable/disablepowersaving
- 6.IMPORTANTINFORMATION
- Safetyinformation
- General recommendations
- Electricalshock
- Typeofprotection(Electrical)
- Degreeofsafety(Flammableanestheticmixture)
- Non-patientcareequipment
- Missioncriticalapplications
- Powerconnection
- Powercords:
- Connections
- Waterandmoisture
- ThepowersupplyisnotapprovedforIP21.Thepowersupplymustbemountedinaflat positionforbestresistancetofluids.
- Ventilation
- Installation
- Generalwarnings
- Technicaldata
- Thisapparatusconformsto:
- MedicalEquipment:
- NationalScandinavianDeviationsforCI.1.7.2:
- Environmental information
- Disposalinformation(WasteElectricalandElectronicEquipment)
- TurkeyRoHScompliance
- RoHS
- Biological hazard and returns
- Regulatory compliance information
- Indicationsforuse
- FCCClassB(validforMDSC-2226LEDandMDSC-2226DDIversion)
- FCCClassA(validforMDSC-2226MNAversion)
- Canadiannotice
- Cleaninganddisinfection
- Instructions
- Possiblecleaningsolutions
- Explanationofsymbols
- Legaldisclaimer
- Disclaimernotice
- Trademarks
- Copyrightnotice
- Technical specifications
- 6.9Warrantystatement
- BarcoHCGeneralWarrantyTermsandConditions
- Article1: Productwarranty
- Article2: Conditions precedent for warranty and item sexcluded from warranty
- Eg1
- Eg2
- Article3: Obligationsofthecustomer
- Article4:Remediesunderwarranty
- Article5: Disclaimerofwarranties
- Article6: Limitation of liability
- Article8: General
- Opensourcelicenseinformation
- Opensourcelicenseinformation
- GPL2.1 and GPL3.1:
- LGPL2.1 and GPL3.1:
Brand : Barco
Model : MDSC-2226
Category : Monitor