
USB HUB4 MAAP - USB Hub Extron - Free user manual and instructions
Find the device manual for free USB HUB4 MAAP Extron in PDF.


| Product Type | USB Hub |
| Model | USB HUB4 MAAP |
| Brand | Extron |
| USB Standard | USB 2.0 |
| Data Transfer Rate | Up to 480 Mbps |
| Number of Ports | 4 (USB Type A) |
| Power per Port | 5 V, 500 mA (with external power supply) |
| Host Inputs | USB Type B (mini-B) and captive screw (5-pole 3.5 mm) |
| Mounting Options | Wall, furniture, rack, or Extron architectural products (AAP/MAAP frames) |
| Power Input | USB bus-powered (100 mA per port) or optional Extron PS 1215 12 VDC, 1.5 A external supply |
| Dimensions (approx.) | Fits double-sized MAAP frame (typical 2.75 x 4.5 in faceplate) |
| Weight (approx.) | 0.5 lb (0.23 kg) |
| Front Panel LEDs | Power LED (green), Activity LED (green) |
| Operating Temperature | Up to +122°F (+50°C) |
| Compliance | FCC Class A, VCCI-A |
| Warranty | 3 years |
| External Power Supply Model | Extron PS 1215 (1.5 A, 12 VDC) |
| Typical Applications | Corporate, education, government AV systems |
Frequently Asked Questions - USB HUB4 MAAP Extron
User questions about USB HUB4 MAAP Extron
0 question about this device. Answer the ones you know or ask your own.
Ask a new question about this device
Download the instructions for your USB Hub in PDF format for free! Find your manual USB HUB4 MAAP - Extron and take your electronic device back in hand. On this page are published all the documents necessary for the use of your device. USB HUB4 MAAP by Extron.
USER MANUAL USB HUB4 MAAP Extron
AAP and MAAP USB Hubs
Safety Instructions
Safety Instructions • English

WARNING: This symbol, when used on the product, is intended to alert the user of the presence of uninsulated dangerous voltage within the product's enclosure that may present a risk of electric shock.
ATTENTION:
This symbol, when used on the product, is intended user of important operating and maintenance (servicing) in the literature provided with the equipment.
For information on safety guidelines, regulatory compliances, EMI/EMF compatibility, accessibility, and related topics, see the Extron Safety and Regulatory Compliance Guide, part number 68-290-01, on the Extron website, www.extron.com.
All trademarks mentioned in this guide are the properties of their respective owners. The following registered trademarks (®), registered service marks (SM), and trademarks (TM) are the property of RGB Systems, Inc. or Extron (see the current list of trademarks on the Terms of Use page at www.extron.com):
| Registered Trademarks(®) |
| Extron, Cable Cubby, ControlScript, CrossPoint, DTP, eBUS, EDID Manager, EDID Minder, eLink, Flat Field, FlexOS, Glitch Free, Global Configurator, Global Scripter, GlobalViewer, Hideaway, HyperLane, IP Intercom, IP Link, Key Minder, LinkLicense, LockIt, MediaLink, MediaPort, NAV, NetPA, PlenumVault, PoleVault, PowerCage, PURE3, Quantum, ShareLink, Show Me, SoundField, SpeedMount, SpeedSwitch, StudioStation, System INTEGRATOR, TeamWork, TouchLink, V-Lock, VN-Matrix, VoiceLift, WallVault, WindoWall, XPA, XTP, XTP Systems, and ZipClip |
| Registered Service Mark(SM): S3 Service Support Solutions |
| Trademarks(TM) |
| AAP, AFL (Accu-RATE Frame Lock), ADSP (Advanced Digital Sync Processing), AVEdge, CableCover, CDRS (Class D Ripple Suppression), Codec Connect, DDSP (Digital Display Sync Processing), DMI (Dynamic Motion Interpolation), Driver Configurator, DSP Configurator, DSVP (Digital Sync Validation Processing), EQIP, Everlast, FastBite, Flex55, FOX, FOXBOX, IP Intercom HelpDesk, MAAP, MicroDigital, Opti-Torque, PendantConnect, ProDSP, QS-FPC (QuickSwitch Front Panel Controller), Room Agent, Scope-Trigger, SIS, Simple Instruction Set, Skew-Free, SpeedNav, Triple-Action Switching, True4K, True8K, VectorTM 4K, WebShare, XTRA, and ZipCaddy |
FCC Class A Notice
This equipment has been tested and found to comply with the limits for a Class A digital device, pursuant to part 15 of the FCC rules. The Class A limits provide reasonable protection against harmful interference when the equipment is operated in a commercial environment. This equipment generates, uses, and can radiate radio frequency energy and, if not installed and used in accordance with the instruction manual, may cause harmful interference to radio communications. Operation of this equipment in a residential area is likely to cause interference. This interference must be corrected at the expense of the user.
NOTES: For more information on safety guidelines, regulatory compliances, EMI/EMF compatibility, accessibility, and related topics, see the “Extron Safety and Regulatory Compliance Guide” on the Extron website.
VCCI-A Notice
Conventions Used in this Guide
Notifications
The following notifications are used in this guide:
CAUTION: Risk of minor personal injury.
NOTE: A note draws attention to important information.
Specifications Availability
Product specifications are available on the Extron website, www.extron.com.
Extron Glossary of Terms
A glossary of terms is available at http://www.extron.com/technology/glossary.aspx.
Contents
Introduction ....1
About this Guide....1
About the USB HUB4....1
Features .... 1
Application Diagram 2
Installation....3
Installation Overview 3
Rear Panel Features 4
Connecting to the Captive Screw USB Port.....5
Connecting the External Power Supply......6
Front Panel Features....9
Mounting....10
Mounting the USB HUB4....10
Wall or Furniture Mounting 10
Rack Mounting 14
UL Guidelines for Rack Mounting....14
Extron Warranty....16
Introduction
- About this Guide
• About the USB HUB4 - Features
• Application Diagram
About this Guide
This guide contains information about the installation and operation of the Extron USB HUB4 AAP and the USB HUB4 MAAP. The terms “hub” and “HUB4” refer to both models interchangeably when instructions apply to both.
About the USB HUB4
The USB HUB4 AAP and USB HUB4 MAAP are compact, four-port USB hubs designed to mount within a double-sized Extron AAP or MAAP frame. They enable multiple USB devices to be connected to a single USB port on a host computer and can be mounted in a variety of locations. The MAAP models are available in a black or white finish. The AAP models are available in black and white.
Features
- USB 2.0 compatibility — The HUB4 is compatible with USB 2.0, enabling communication with a variety of USB peripheral devices.
- Supports data transfer rates up to 480 Mbps — Allows high speed transfer from thumb drives and other mass storage devices.
- Four port output hub with 5 V, 500 mA available on each port — Allows simultaneous connection to multiple peripheral devices such as mass storage devices, keyboards, mice, or other HID – Human Interface Devices. When used with an energy-efficient external universal power supply, the USB HUB4 can provide 5 V, 500 mA on each port for attached peripheral devices.
- Choice of USB Type B and captive screw host inputs — A captive screw input option and overall shallow depth allows installation in junction boxes, behind whiteboards, in lecterns, and other space-constrained environments.
- Mounting options — The HUB4 faceplate can be mounted on a wall, furniture, or in Extron architectural products (such as HSA Hideaway Surface Access enclosures) that accept double-sized MAAP or AAP connector panels.
- Power — The USB HUB4 can be powered directly from a computer via the USB connection, or with an optional Extron PS 1215 external 1.5 A, 12 VDC power supply (see www.extron.com for more information).
- Front panel LEDs — The Activity LED lights when a peripheral device has been recognized by the host and is in communication with it. The Power LED lights with the USB HUB4 is receiving power.
Application Diagram
The following diagram shows an example of a USB HUB4 AAP mounted to an MLM wallplate and installed in a podium.
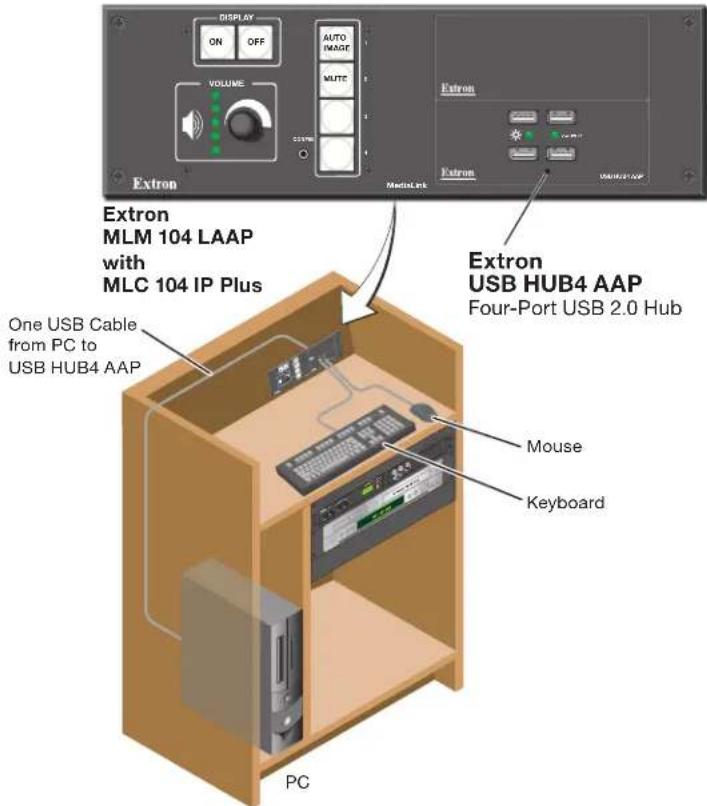
Figure 1. Application Diagram for a USB HUB4 AAP
Installation
• Installation Overview
• Rear Panel Features
• Front Panel Features
Installation Overview
- If using an electrical junction box or a mounting bracket, install it in the wall or furniture (see Wall or Furniture Mounting on page 10).
- Mount the USB HUB4 into an appropriate sized AAP or MAAP mounting frame, rack space frame, or other Extron listed product (see Mounting the hub to a mounting frame on page 12).
NOTES:
- The equipment is to be installed in Extron UL Listed products, which accept Architectural Adapter Plates (AAPs) or Mini Architectural Adapter Plates (MAAPs) or installed in a Listed two-gang junction box with provided faceplate.
-
Use an AAP or MAAP blank for any unused faceplate openings.
-
Connect the USB HUB4 to the host computer in either of the following ways:
-
Using the USB mini B connector: Connect a USB A to USB mini-B cable (provided) to the USB mini-B port on the HUB4 rear panel.
- Using the green captive screw USB In port: Remove the Type B or Type mini-B terminator from a USB A to B or A to USB mini-B cable and insert the wires from the cable into the 5-pole USB In port. This method may be necessary if space is limited (see Connecting to the Captive Screw USB Port on page 5).
NOTE: Choose one of these two methods to connect the HUB4 to the host computer. Do not connect the host computer to both HUB4 connectors at the same time.
- (Optional) If the USB peripheral devices that are connected to the HUB4 require more power than the hub can provide, wire an optional Extron PS 1215 external 1.5 A, 12 VDC power supply to the Power In port on the rear panel (see Connecting the External Power Supply on page 6).
- (Optional) If using an electrical junction box, mount the HUB4 and mounting frame to it (see Mounting the hub to a wall box on page 12). If using a mounting bracket, this step is not needed.
- Connect the peripheral USB devices to the front panel USB A ports.
- Power on the host PC and, if applicable, the desktop power supply.
- Check the front panel power indicator LED to verify that the HUB4 is receiving power.
Rear Panel Features
The rear panels of the USB HUB4 AAP and USB HUB4 MAAP models contain two types of USB In ports, either of which can be used for the USB cable that connects the computer to the HUB4.
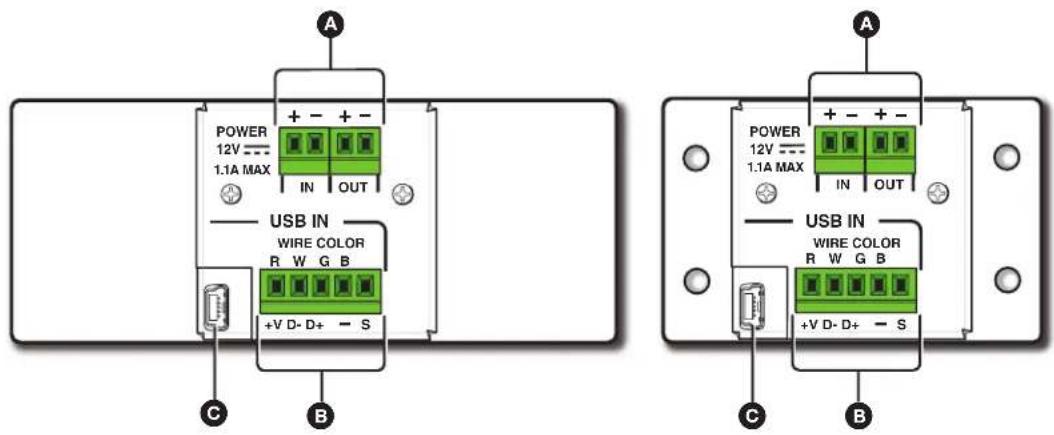
Figure 2. USB HUB4 AAP and MAAP Rear Panels
Power input — If using an Extron external 12 VDC power supply to power the HUB4, connect it to the first two pins (labeled In) of this 4-pole, 3.5 mm direct insertion captive screw port (see Connecting the External Power Supply on page 6).
If desired, connect another Extron wall mounted device (for example, an MLC 104 IP Plus AAP mounted with the HUB4) to the third and fourth pins (labeled out). Both devices can then be powered from the single connected power supply (power loop out).
If the HUB4 is powered from the computer via the USB connection, this port is not used.
NOTE: Ensure that your system power requirements do not exceed the capacity of the Extron 12 VDC power supply. The current is limited to 100 mA per port when the devices are powered via the USB port; 500 mA per port when they are powered via the power supply.
B Captive screw USB In port — Connect a USB A to unterminated USB B or USB mini-B cable from the computer to this 5-pole 3.5 mm captive screw port (see Connecting to the Captive Screw USB Port on page 5).
Mini-B USB In port — Connect a USB A to USB mini-B cable from the computer to this USB mini-B port.
NOTE: Only one host can be connected to the USB In ports at a time. If two hosts are connected, the HUB4 defaults to the host attached to the USB mini-B port.
Connecting to the Captive Screw USB Port
It is recommended to connect a computer to the HUB4 by plugging the mini-B end of the provided USB cable into the USB port on the rear panel. If space is limited, use the captive screw USB In port instead, prepare and connect the cable as follows:
-
Cut off the B end of a USB A to USB B or USB A to USB mini-B cable. Do not remove the USB A connector.
-
Strip away the exterior jacket and the foil insulation from the unterminated end of the cable to expose 1 to 2 inches (2.5 to 5 cm) of the wires and shield.
ATTENTION:
Figure 3. USB A to B (or mini-B) Cable with the USB B Connector Removed
- Twist the exposed shield strands together.
- Strip 1/8 inch (4.5 mm) of the insulation from the end of each colored wire of the cable.
- Connect the colored wires and the twisted shield to the HUB4 as described below. Note that each pin of the port is labeled above with the color of the wire that should be connected to it (R, W, G, and B), based on the USB standard for wiring color schemes.
• V+/R — +5 VDC. Connect the red wire to this port.
• D-/W — Data –. Connect the white wire to this port.
• D+/G — Data +. Connect the green wire to this port.
- /B — Ground. Connect the black wire to this port.
- S — Shield. Connect the braided shield to this port.
- Plug the A end of the USB cable into a USB port on the computer (see figure 4 on page 6).
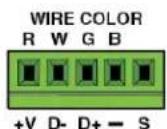
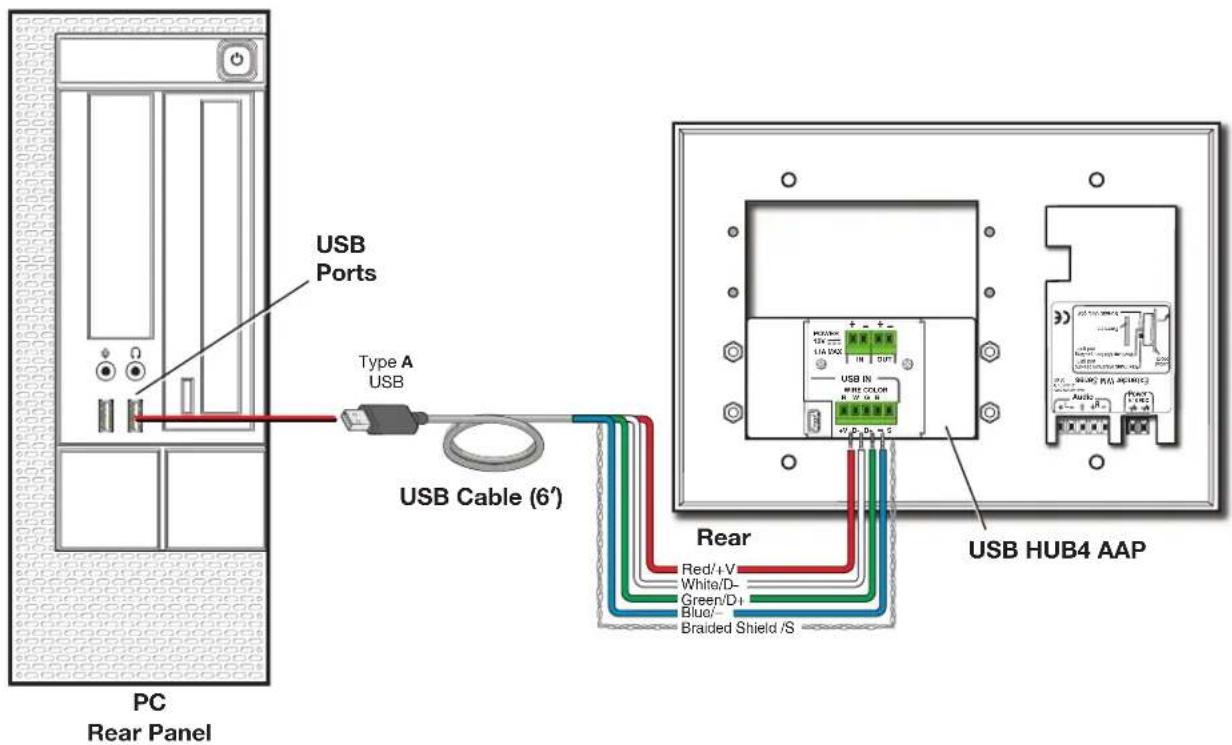
Figure 4. Connecting the PC to the USB Captive Screw Port
Connecting the External Power Supply
If the peripheral devices connected to the HUB4 require more power per port than the 100 mA that is provided through the computer or if you want to drive an additional device from the same power source, attach an Extron PS 1215 external 1.5 A, 12 VDC power supply to the hub to increase the power to 500 mA per port.
NOTES:
- It is recommended to use a 12 VDC external power supply if planning to use flash drives or web cams, because those devices typically require greater than 100 mA.
- If only a keyboard and mouse are being powered, 100mA is usually sufficient.
• Use only the Extron PS 1215 power supply with the USB HUB4.
ATTENTION:
- The power supply shall not be permanently fixed to building structure or similar structure.
- The installation must always be in accordance with the applicable provisions of National Electrical Code ANSI/NFPA 70, article 725 and the Canadian Electrical Code part 1, section 16.
- Do not place the power supply within environmental air handling spaces or the wall cavity.
- If not provided with a power supply, this product is intended to be supplied by a UL Listed power source marked "Class 2" or "LPS" and rated at 12 VDC and a minimum of 1.1 A and suitable for an ambient temperature of 50^ .
Wiring the power connector
Follow these steps to wire the Extron external power supply:
- Connect the power supply to the In pins (first and second) of the Power direct insertion captive screw port as illustrated in figure 5.
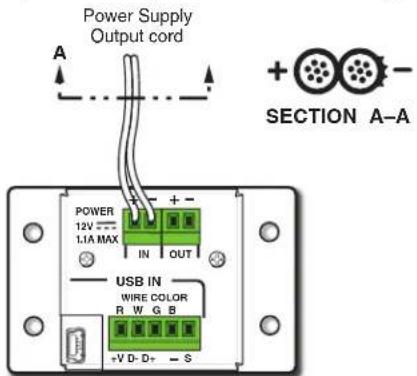
Figure 5. Wiring the Power Connector
- (Optional) To power an additional wall-mounted Extron device via the USB HUB4, wire the additional device to the Out pins (third and fourth) of the Power direct insertion captive screw port.
Figure 6 shows the HUB4 connected to a WM Series Extender, which is mounted in the wallplate next to the HUB4.
NOTE: Always take into consideration the total power consumption of the system.
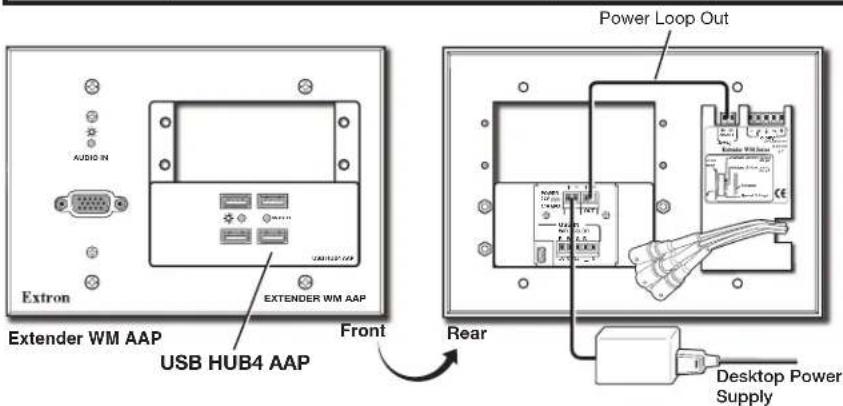
Figure 6. Providing Power to an External Device via the USB HUB4
- Plug the external power supply IEC connector into an AC power source.
Front Panel Features
flowchart
graph TD
    A["Node A"] --> B["Node B"]
    B --> C["Node C"]
    C --> D["Node A"]
    D --> E["Node A"]
    E --> F["Node B"]
    F --> G["Node A"]
    G --> H["Node B"]
    H --> I["Node C"]
    I --> J["Node A"]
    J --> K["Node B"]
    K --> L["Node C"]
    L --> M["Node A"]
    M --> N["Node B"]
    N --> O["Node C"]
    O --> P["Node A"]
    P --> Q["Node B"]
    Q --> R["Node C"]
    R --> S["Node A"]
    S --> T["Node B"]
    T --> U["Node C"]
    U --> V["Node A"]
    V --> W["Node B"]
    W --> X["Node C"]
    X --> Y["Node A"]
    Y --> Z["Node B"]
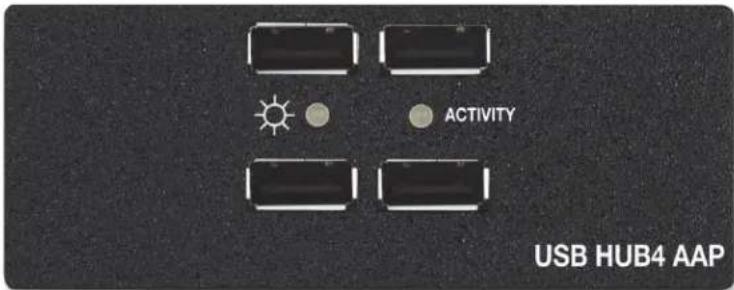
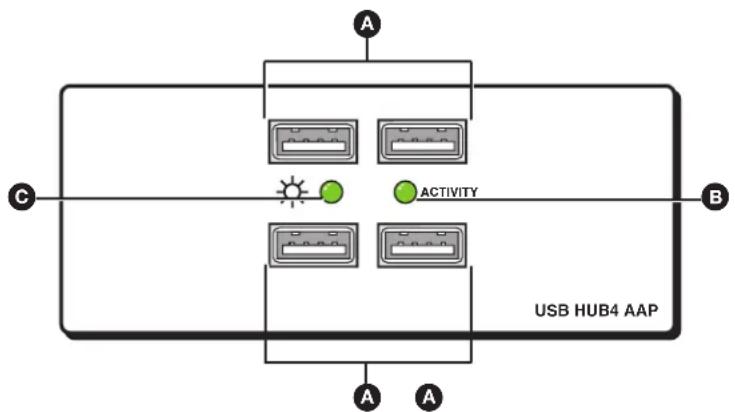
Figure 7. USB HUB4 AAP Front Panel
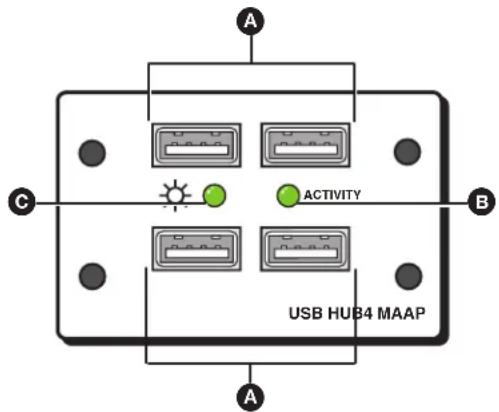
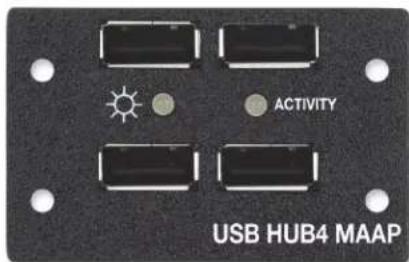
Figure 8. USB HUB4 MAAP Front Panel
A USB hub ports — Connect up to four USB peripheral devices (for example, a keyboard, mouse, or web cam) to these female USB A ports. Each USB port provides 100 mA of power when the HUB4 is powered via the host computer or 500 mA when it is powered by an Extron PS 1215 1.5 A, 12 VDC external power supply (see figure 6 on page 8).
Activity LED — This LED lights when any peripheral device is enumerated (has been recognized and has had communication established) by the USB host and is currently communicating with it.
Power LED — This LED lights if the HUB4 is receiving power through either an external power supply through the Power In port or the rear panel USB host port.
NOTES:
- If the host computer is providing power to the HUB4, the power LED on the front panel illuminates only if the host PC is powered on.
- If the HUB4 is powered by the optional Extron PS 1215 1.5 A, 12 VDC power supply, the LED illuminates regardless of whether or not the host computer is on.
Mounting
Mounting the USB HUB4
The USB HUB4 can be mounted to a wall, on a rack, in furniture, or in an Extron architectural product, such as a cable cubby or HSA. Recommended mount kits and architectural product for the USB HUB4 are listed on the Extron website.
NOTES:
- The equipment is to be installed in Extron Listed products, which accept Architectural Adapter Plates (AAPs) or Mini Architectural Adapter Plates (MAAPs) or installed in a Listed two-gang junction box with provided faceplate.
- Use an AAP or MAAP blank for any unused faceplate openings.
Wall or Furniture Mounting
The HUB4 can be attached to a wall, podium, or other flat surface with either a stud-mounted wall box or with a wall mounting bracket (such as the Extron MR or MR D Series). Both types of installations require a double-spaced AAP or MAAP mounting frame (such as the AAP 102 or the CPM101).
Installing the wall box or mounting bracket
Use a UL Listed one-gang sized wall box or mounting bracket for the HUB4 MAAP or a UL Listed two-gang box or bracket for the AAP model. Install cables into the wall, furniture, or conduits before installing the wall box or bracket.
NOTE: The illustrations in this section show examples of a one-gang box mounting. The procedures for mounting to a two-gang box are the same.
If using a wall box, the mounting site must be deep enough for both the box and the cables. The box should be at least 2.5 inches (6.4 cm) deep.
- Place the wall box or mounting bracket against the installation surface and mark guidelines for the opening on the wall or furniture.
- Cut out the material from within the marked area.
- Insert the wall box or bracket to check the size and fit of the opening. Enlarge or smooth the edges of the opening as needed.
- If using a wall box, feed the cables through the punched out holes in the box and secure the cable clamps to provide strain relief.
- Exposed cable shields (braids or foil) are potential sources of short circuits. Trim back or insulate shields with heat shrink (see figure 9 on page 11).
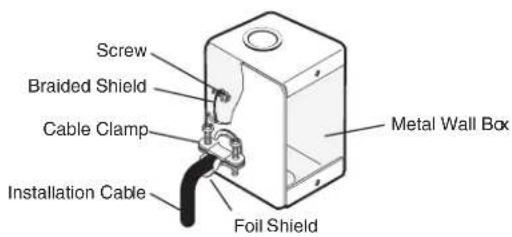
Figure 9. Grounding the Outer Braided and Foil Shields for a Wall Box Installation
CAUTION: To prevent short circuits, cut back the outer foil shield to the point where the cable exits the cable clamp. Both braided and foil shields should be connected to an equipment ground at the other end of the cable.
Insert the wall box or mounting bracket into the opening, and attach it to the wall, stud, or furniture, leaving the front edge flush with the outer wall or furniture surface (see figure 10).
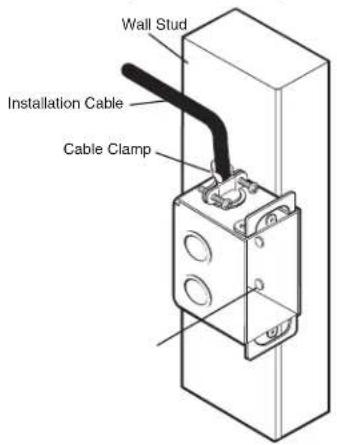
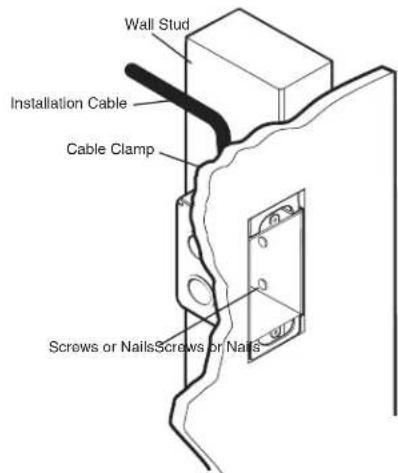
Figure 10. Attaching a Wall Box to a Wall Stud
- To attach a wall box to wood, use four #8 or #10 screws or 10-penny nails. A minimum of 12 inch (1.3 cm) of screw threads must penetrate the wood.
- To attach a wall box to metal, use four #8 or #10 self-tapping sheet metal screws or machine bolts with matching nuts.
- If using a mounting bracket, follow the directions included with the bracket to attach the clips that fasten the bracket to the wall or furniture.
NOTE: Cable and test the HUB4 before mounting it to the wall box, mounting bracket, or furniture.
Mounting the hub to a mounting frame
If the HUB4 is mounted to a wall box or mounting bracket, it must first be mounted into an AAP or MAAP mounting frame, such as the Extron AAP 102 or CPM101 listed at www.extron.com.
Follow the steps below to mount the HUB4 into the appropriate size mounting frame.
USB HUB4 AAP
- Insert the four threaded studs on the back of the front panel through the holes in an AAP mounting frame and seat the HUB4 in the two-gang opening of the frame.
- Attach the provided hex nuts to the studs on the back side of the frame (see figure 11).
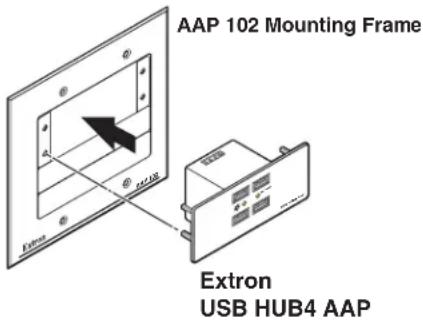
Figure 11. Mounting a USB HUB4 AAP to a Two-gang Mounting Frame
USB HUB4 MAAP
- Place the HUB4 MAAP in the one-gang opening in the mounting frame.
- Insert the included hex screws through the HUB4 front panel mounting holes and the holes in the MAAP mounting frame.
- Attach the provided hex nuts to the screws on the back of the frame.
Mounting the hub to a wall box
To mount the HUB4 to an electrical junction box in a wall or furniture:
- Mount the HUB4 into a mounting frame as described in Mounting the hub to a mounting frame.
- Attach all power and USB cables to the HUB4 rear panel ports and test the system.
- Attach the mounting frame with the attached HUB4 to the wall box, using the two included mounting screws (see figure 12 on page 13).
NOTE: Use an AAP or MAAP blank for any unused faceplate openings.
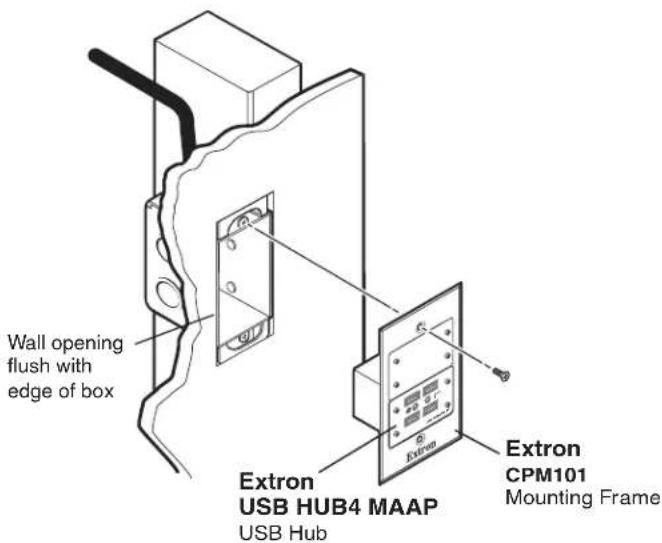
Figure 12. Installing a USB HUB4 MAAP in a One-gang Wall Box
Mounting the hub to a mounting bracket
- Mount the HUB4 to an AAP or MAAP mounting frame (see Mounting the hub to a mounting frame on page 12).
- Attach all required cables to the rear panel ports of the HUB4 and test the system.
- Attach the AAP or MAAP mounting frame with the attached HUB4 to the mounting bracket using the two included mounting screws (see figure 13).
NOTE: Use an AAP or MAAP blank for any unused faceplate openings.
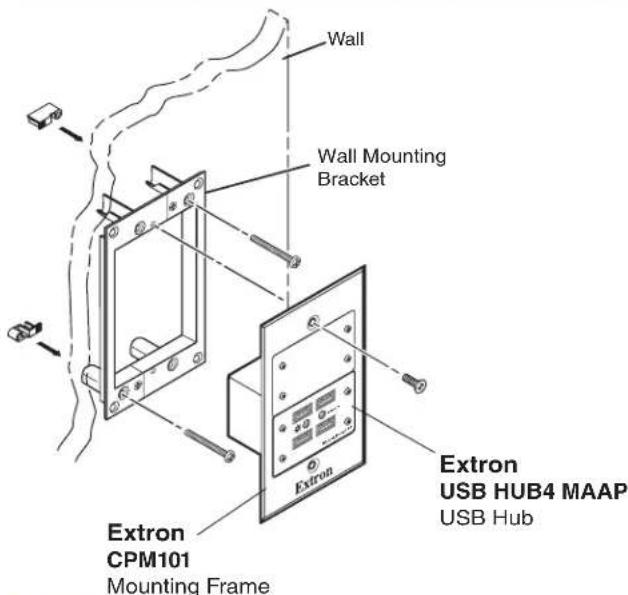
Figure 13. Mounting a USB HUB4 MAAP to a Mounting Bracket
Rack Mounting
You can mount the HUB4 to an optional rack shelf or directly onto a rack using an Extron rack space frame, such as the CPM112R (for the MAAP model) or the AAP 301/302 (for the AAP model) listed on the Extron website.
UL Guidelines for Rack Mounting
The following Underwriters Laboratories (UL) guidelines are relevant to the safe installation of the HUB4 in a rack:
CAUTION:
- Elevated operating ambient temperature — If the unit is installed in a closed or multi-unit rack assembly, the operating ambient temperature of the rack environment may be greater than room ambient temperature. Therefore, install the equipment in an environment compatible with the maximum ambient temperature (Tma: +122°F, +50°C) specified by Extron.
- Reduced air flow — Install the equipment in the rack so that the equipment gets adequate air flow for safe operation.
- Mechanical loading — Mount the equipment in the rack so that uneven mechanical loading does not create a hazardous condition.
- Circuit overloading — Connect the equipment to the supply circuit and consider the effect that circuit overloading might have on overcurrent protection and supply wiring. Consider the equipment nameplate ratings when addressing this concern.
- Reliable earthing (grounding) — Maintain reliable grounding of rack-mounted equipment. Pay particular attention to supply connections other than direct connections to the branch circuit (such as the use of power strips).
Rack mounting procedure
To mount the USB HUB4 directly to a rack or to a rack shelf:
- Connect all cables to the rear panel of the HUB4.
- Insert the HUB4 in one of the spaces in a rack architectural frame and attach it to the frame using the provided hex screws and nuts (see figure 14 and figure 15).
- Attach any desired additional AAP or MAAP devices to the rack space frame.
- Attach the rack architectural frame to the rack shelf, using the provided screws.
- If using a rack shelf, mount the shelf with the HUB4 attached, to the rack.
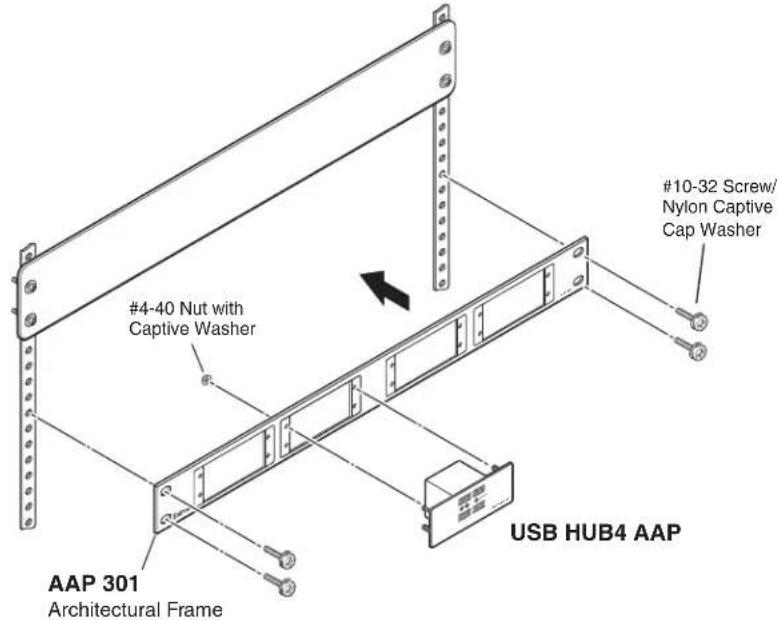
Figure 14. Mounting a USB HUB4 AAP Directly to a Rack Using an AAP 301 Frame
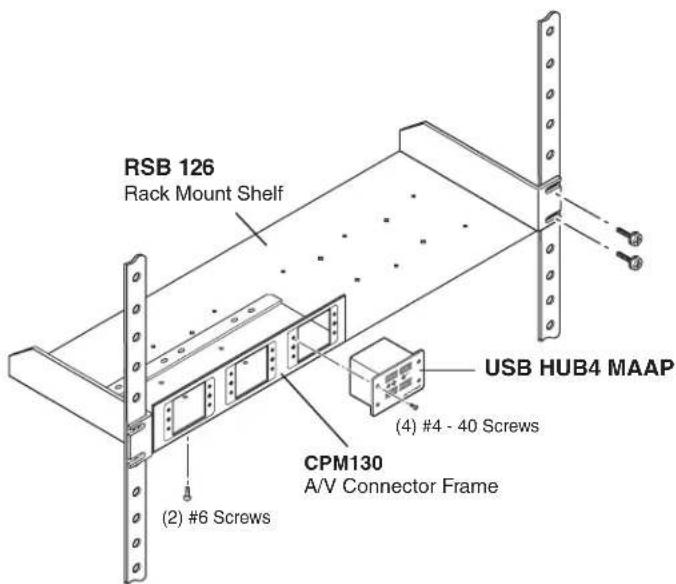
Figure 15. Mounting a USB HUB4 MAAP on a Rack Shelf Using a CPM133 Frame
Extron Warranty
Extron warrants this product against defects in materials and workmanship for a period of three years from the date of purchase. In the event of malfunction during the warranty period attributable directly to faulty workmanship and/or materials, Extron will, at its option, repair or replace said products or components, to whatever extent it shall deem necessary to restore said product to proper operating condition, provided that it is returned within the warranty period, with proof of purchase and description of malfunction to:
USA, Canada, South America, and Central America:
Extron
1230 South Lewis Street
Anaheim, CA 92805
U.S.A.
Asia:
Extron Asia Pte Ltd
135 Joo Seng Road, #04-01
PM Industrial Bldg.
Singapore 368363
Singapore
Japan:
Extron Japan
Kyodo Building, 16
Ichibancho
Chiyoda-ku, Tokyo 102-0082
Japan
Europe:
Extron Europe
Hanzeboulevard 10
3825 PH Amersfoort
The Netherlands
China:
Extron China
686 Ronghua Road
Songjiang District
Shanghai 201611
China
Middle East:
Extron Middle East
Dubai Airport Free Zone
F13, PO Box 293666
United Arab Emirates, Dubai
Africa:
Extron South Africa
3rd Floor, South Tower
160 Jan Smuts Avenue
Rosebank 2196, South Africa
This Limited Warranty does not apply if the fault has been caused by misuse, improper handling care, electrical or mechanical abuse, abnormal operating conditions, or if modifications were made to the product that were not authorized by Extron.
NOTE: If a product is defective, please call Extron and ask for an Application Engineer to receive an RA (Return Authorization) number. This will begin the repair process.
USA: 714.491.1500 or 800.633.9876
Europe: 31.33.453.4040 or 800.3987.6673
Africa: 27.11.447.6162
Asia: 65.6383.4400
Japan: 81.3.3511.7655
Middle East: 971.4.299.1800
Units must be returned insured, with shipping charges prepaid. If not insured, you assume the risk of loss or damage during shipment. Returned units must include the serial number and a description of the problem, as well as the name of the person to contact in case there are any questions.
Extron Electronics makes no further warranties either expressed or implied with respect to the product and its quality, performance, merchantability, or fitness for any particular use. In no event will Extron Electronics be liable for direct, indirect, or consequential damages resulting from any defect in this product even if Extron Electronics has been advised of such damage.
Please note that laws vary from state to state and country to country, and that some provisions of this warranty may not apply to you.
- Safety Instructions
- Safety Instructions • English
- FCC Class A Notice
- VCCI-A Notice
- Conventions Used in this Guide
- Notifications
- Specifications Availability
- Extron Glossary of Terms
- Contents
- Introduction ....1
- Installation....3
- Mounting....10
- Extron Warranty....16
- Introduction
- About this Guide
- About the USB HUB4
- Features
- Application Diagram
- Installation
- Installation Overview
- NOTES:
- Rear Panel Features
- Connecting to the Captive Screw USB Port
- ATTENTION:
- Connecting the External Power Supply
- Wiring the power connector
- Front Panel Features
- Mounting
- Mounting the USB HUB4
- Wall or Furniture Mounting
- Installing the wall box or mounting bracket
- Mounting the hub to a mounting frame
- USB HUB4 AAP
- USB HUB4 MAAP
- Mounting the hub to a wall box
- Mounting the hub to a mounting bracket
- Rack Mounting
- UL Guidelines for Rack Mounting
- CAUTION:
- Rack mounting procedure
- Extron Warranty
- USA, Canada, South America, and Central America:
- Asia:
- Japan:
- Europe:
- China:
- Middle East:
- Africa:
Brand : Extron
Model : USB HUB4 MAAP
Category : USB Hub