
Eagle I NXT - Alarm system Godrej - Free user manual and instructions
Find the device manual for free Eagle I NXT Godrej in PDF.


| Brand | Godrej |
| Model | Eagle I NXT |
| Product Type | Wireless Alarm System |
| Control Panel Dimensions | Approx. 200 x 140 x 40 mm |
| Control Panel Weight | Approx. 0.5 kg |
| Power Supply | 100-240V AC, 50/60 Hz via adapter |
| Battery Backup | Rechargeable battery (e.g., 7.4V Li-ion), up to 8 hours |
| Number of Zones | 8-16 wireless zones |
| Communication | GSM / GPRS and/or Wi-Fi (varies by region) |
| Included Sensors | Magnetic door/window sensors, PIR motion detector |
| Siren | Indoor siren (90+ dB) |
| Remote Control | 2-4 wireless keyfobs included |
| Smartphone App | Compatible with Godrej Smart Home app (Android/iOS) |
| Installation | DIY or professional, wireless sensors |
| Maintenance | Test monthly, replace batteries in sensors annually |
| Security Features | Tamper protection, panic alarm, entry/exit delay |
| Warranty | 1 year standard |
Frequently Asked Questions - Eagle I NXT Godrej
User questions about Eagle I NXT Godrej
0 question about this device. Answer the ones you know or ask your own.
Ask a new question about this device
Download the instructions for your Alarm system in PDF format for free! Find your manual Eagle I NXT - Godrej and take your electronic device back in hand. On this page are published all the documents necessary for the use of your device. Eagle I NXT by Godrej.
USER MANUAL Eagle I NXT Godrej
natural_image
White rectangular device with 'Garry' branding and four control buttons, no visible text or symbols on the main body.
LAN + WiFi + Cellular
Smart Home Alarm System
User Manual
Table of Content
Introduction P3
Notice P3
FCC Statement P3
Safety P4
Requirements P4
System Status & User Authorities P5
Appearance P6
Setup P8
App operation introduction P11
FAQ P17
Specifications P18
Introduction
- Thank you for purchasing the Eagle-I NXT. Eagle-I NXT offers you a complete control over your home security and automation via your smartphone. This manual will guide you through the setup procedures and highlight some key features.
• The system operates on smartphones. - Please note that all contents listed here might be slightly different from the contents of the package or the App. Please check the latest version of the user manual.
- Version: V1.0
Important Instructions
- All sensors and devices in the package have already been paired with the panel before shipping. Users can start using the whole system after setting up the network. Accessories purchased separately (like sensors or smart devices) need to be paired with the system for proper use.
- The system is designed for easy setup. If there is any problem with the setting please, stop and contact Godrej call center "1800 209 9955" or email on: "secare@godrej.com". Please store all manuals, nameplates and stickers with QR codes or barcodes for further use.

natural_image
White rectangular device with 'giray' branding and a black control panel, no visible text or symbols on the device itself.Safety
- This system is designed to minimize majority of risks and to ensure the safety of your home, however it does not guarantee protection against burglary, robbery, theft, or any type of emergencies. Users should continue to act prudently to protect the security of their lives and property.
- Any alarm system is subject to compromise or failure for a variety of reasons as follows:
- An intruder may gain access through unprotected openings.
- An intruder may have the technical sophistication to bypass a sensor or the whole system.
- Signals sent by the panel or sensors may be blocked or reflected without being received, and a block may occur if metal objects are placed into the path of the signal.
- Motion sensors can only detect the intrusion within the specified ranges and unobstructed areas.
- Malfunction of routers, limited services by wireless phone carriers or internet service providers, limited service such as text messages or push notification provided by smartphone makers.
- Component failures or some other faults happen in the electrical system.
Requirements
- Wired/Wireless Router Compatible with 2.4Ghz / Wi-Fi802.11b/g/n. This product will not support 5Ghz routers.
• Provision of Internet Service - Mobile phone SIM card (Use postpaid SIM card. This product will not support Jio sim card.)
- iPhone or Android smartphone
- iOS version 7.0 or higher
• Android version 4.3 or higher - Bluetooth 4.2 or higher
System Status & User Authorities
- The Eagle-I NXT system does not support any wired sensors. The panel communicates with all sensors via wireless RF signals. Most of the sensors have low battery warning features. In the event of low battery, notifications will be sent to the APP. Smoke detector and CO sensor work at full time.
- The system can set its security status according to the commands given by users or the signals sent from the triggered sensors.
- ARM:
All working sensors can be triggered. The system will generate alarms when receiving alert signals sent from sensors.
- DISARM:
This mode will de-activate all sensors. This mode will also turn off the siren and stop the alarm process.
- HOME ARM:
This mode will allow some selected sensors to remain working while others are deactivated. These sensors can be selected in App.
- SOS:
This mode will trigger built-in siren and send alarm messages to emergency contacts. It also triggers external sirens.
- There are there levels of user authorities, shown as below.
- ADMINISTRATOR:
Who can fully control the system and invite other users with assigned authorities.

- USER:
Who can operate ARM/DISARM/HOME ARM/SOS, and can also invite other people as USER or GUEST.

- GUEST:
Who can only operate ARM / DISARM / HOME ARM.

Appearance
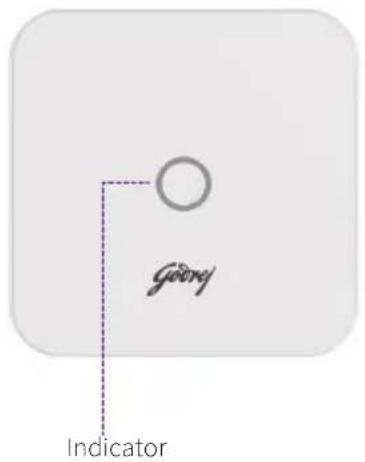
- Top View
- Rear View

| STATUS LED INDICATION | ||
| Operation Light ON ARM/DISARM/HOME ARM/SOS. | ||
| Setting Fast Blinking | Network Configuration | |
| Reseting | ||
| Updating | ||
| Faults Slow Blinking | Low Battery | |
| Network Fault | ||
| Other Faults | ||
- Bottom View
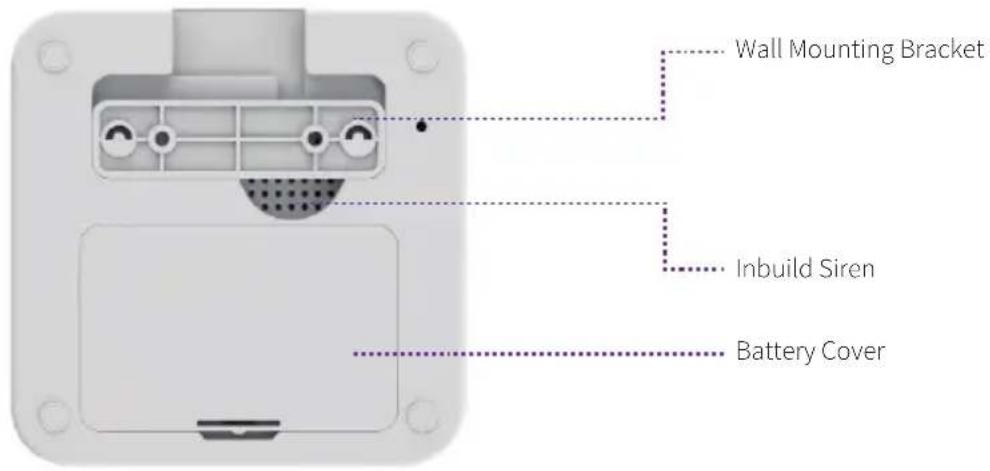
Network Configuration Button
Reset Button
Power Switch

natural_image
3D rendering of a white plastic enclosure with internal compartments and mounting holes (no text or symbols)Setup
- Internet Connection Requirements
- Please ensure the router you are using has already been connected to the Internet with DHCP mode enabled. Eagle-I NXT supports IPV4 protocol only.
- The system supports the following types of connection:
LAN: 10/100M Ethernet.
- Wi-Fi: 2.4GHz, WEP/WPA/WPA2 encrypted.
- Place the Panel at a Suitable Place
- If Wi-Fi is used to connect the panel to internet, please make sure the panel is placed under Wi-Fi coverage before installation. (It is recommended to use your phone to help verify the Wi-Fi coverage at the spot.
• Install the SIM Card
- Insert a standard SIM card. Please place the Nano-SIM or Micro-SIM to a card adapter for installation.

Note: It is mendetory to always use post-paid SIM card. SIM card is used to send alert messages only and not for calling.
- Get Ready for Setup

- Download the "Eagle-I NXT" APP from either iOS APP Store or Google Play by searching "Eagle-I NXT".
- Please open the lid on the back of the device, and turn on the power button. The indicator on the panel will flash and after approximately 45 seconds a beep sound should occur indicating the device being activated.
Make sure the Bluetooth is activated on your phone and place the panel close to 2.4GHz Wi-Fi signal.


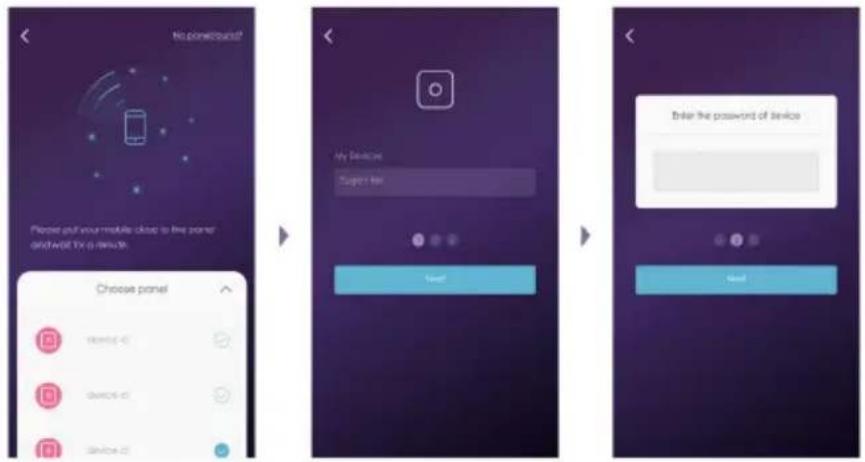
- Add the Panel
- Make sure your mobile bluetooth is on and your phone is connected to the Internet.
- Open the APP, click on "Add a new device"
- Set Up Password
- APP will automatically scan for panels available nearby and display their names for which you can choose to connect. After successfully connecting the panel, please rename the device and setup a password for future configuration purpose.
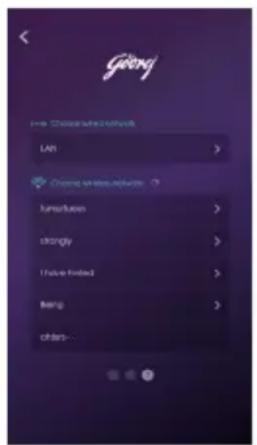
- Configure the Wi-Fi Setting of the Panel
- Select the Wi-Fi you want the panel to connect with and input the password to finish setup.

- Check Setting
- Make sure your mobile phone has been connected to the Internet via cellular or Wi-Fi.
- Try pressing ARM/DISARM button in the App, to see if the status icon would be changed accordingly.
- Ensure your mobile bluetooth is ON while pairing the main panel with Wi-Fi network.
- Try using remote control, pressing ARM / DISARM button to see if the status icon in the App would be changed accordingly.
- Installation
- Close the battery cover.
- Place the panel on a desktop or using the bracket to mount it on the wall.
APP Operation Introduction
• Home Page
User Settings
The entry to create a login account.
- Device List.
- Account Information: Phone, Email and Password.
Real-time Status Diagram
It shows a real-time system status and the quality of network connection.
Any change of system status is indicated in the diagram.
Colors and icons are used here for better illustration.
Security Status Control
Change the system status between
Arm-Disarm-Home Arm.
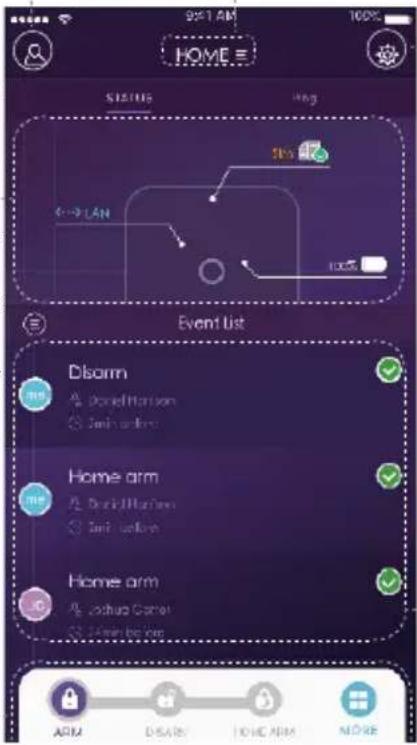
Device List
Select the panel to be managed from drop-down list.
- Add/Remove panels.
System & App Settings
The entry for system settings and App settings.
- Add/remove accessories.
- Configure system settings, cg: Exit Delay, Entry Delay, Duress Alarm and etc.,
- Firmware update, network settings and device advanced settings.
Event List
An event is an operation conducted by users or a status change triggered by accessories.
The events are sorted by time, the latest event is shown on the top.
- Dashboard
- Press Dashboard to switch to the dashboard page.
- You can press SOS to trigger alarm or enter device control page.
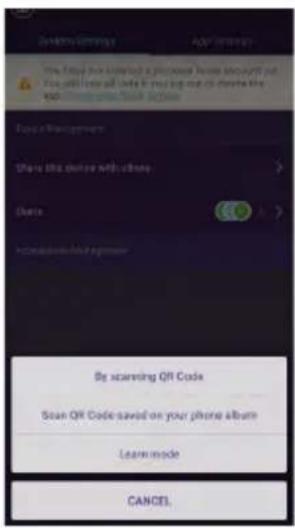
• Pairing New Accessories
Scan QR Code
Recommended
Tap [Scan QR Code] Code is printed on every accessory.

Name


- Delete an Accessory
- Choose the accessory to be removed from the system, and slide the column to the left until a "Delete" button appears.
- Click the "Delete" button and confirm to finalize the removal.
- Share with Others
- The owners can easily share their devices with the family members or friends.
- Select [System Settings] - [Share this device with others] should generate a unique QR code which contains the identification of shared panel and the assigned authority.
- Users can send this QR code to others by Facebook or WhatsApp. By launch the Eagle-I NXT APP, others can click [Device List] - [System - Management], click the "+" icon on the top right corner and select [Add a new device] to add the shared panel to their APP.

• Emergency Contacts Settings
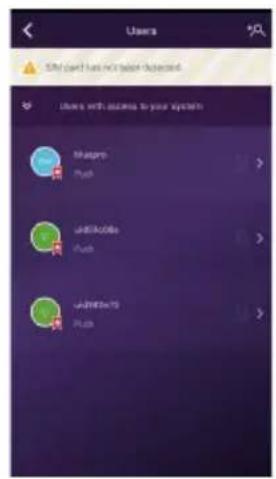
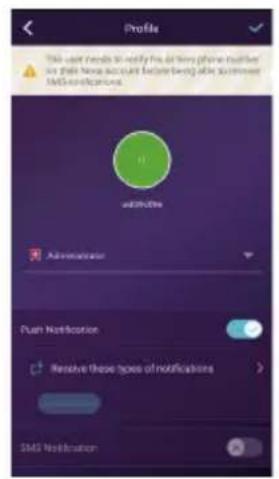

- All App users are listed in Emergency Contact list automatically.
- Users can add mobile phone numbers in [Other Contacts] list.
- For the App users, the [Push Notification] option is enabled by default, while the [SMS Notification] is disabled by default. (SIM card required)
- For other contacts, the [SMS Notification] is enabled by default.
- When an emergency occurs, the App users should get push notifications, while other users get alert SMS message sent from the panel.

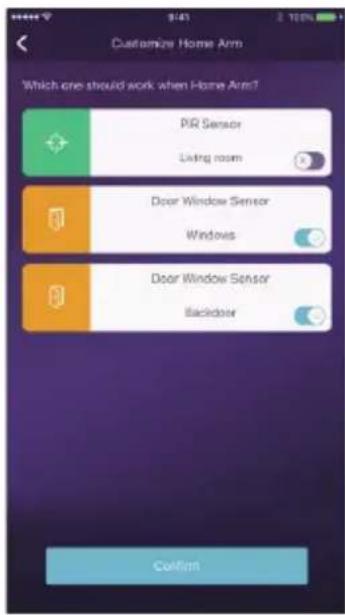
• Home Arm Settings
- By configuring Home Arm status in the APP, users can activate certain sensors while at home.
- When [Home Arm] button is activated for the first time, the setup procedure should commence.
- Only those sensors support Home Arm feature will be listed here.
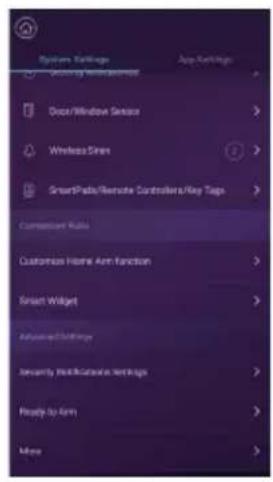
• Accessories Management
- All accessories are listed in [Device Setting]-[Accessories
Management], and are sorted by their types. - Users can add, remove, and modify their settings here.
- Users can also control their cameras and plugs in the App.
- Smart Widgets
-Anti-interference: by enable this, it will trigger alarm when system receive interfering signals. Disable anti-interference and the system will ignore interfering signal. (Anti-interference will not function when the system is in disarm status.)
Timed Tasks: it allows to schedule a task or a daily task. For instance, set up a daily task of home arm the for supervised premises at 10 PM.
Smart Following: when the system is switched to certain status, the pre-setup instructions for chosen accessories will be executed accordingly. Users can add accessories and configure their status when instructions are executed.

- Advanced Settings
In this section, the following settings can be executed:
- Security Notifications Settings: it allows to setup notification language and duress alarm, which allows users to input pre-set duress code on the keypad to stop alarm and meanwhile send pre-set emergency messages to other designated contacts.
- Ready to Arm: if this feature is enabled, when arm or home arm the premises, the system will notify if there is a contact sensor is in open status.
- Entry Delay: users can select which sensors should be held for transmitting alarm signals for preset time.
- Exit Delay: by enabling this, the system will wait for the preset time before responding to ARM or HOME ARM instructions.
- Siren Duration: it defines how long the built-in siren should sound in event of alarm activation.
- Network & Password Settings: it allows to reset the network parameters and the system password.
- Arm/Disarm Indication: it allows to turn on/off the sound of indication
- Select Time zone: manually select appropriate time zone.

- App Settings
In this section, the following settings can be executed:
- Change App Language: it supports multi-languages which can be easily switched in App.
- Passcode Lock: by enabling this feature, you will be asked to enter the passcode every time when App is activated from the background. For iPhone, the Touch-ID feature is also supported.
- Help & Feedbacks: users can watch some tutorials online and send feedbacks to customer service directly in App.
FAQ
Q: When the Internet connection is down, can the system still protect me?
A: LAN/Wi-Fi/Cellular are used for communication. As recommended, LAN provides the most reliable Internet connection. In case that LAN and Wi-Fi both fail, the cellular network will work as a backup.
In most cases, the disconnection of Internet is caused by electricity failure, which means the system might have to run with the backup battery. In this case, we would suggest that you set the cellular network mode only for emergency use to save power.
With backup battery, this system can work perfectly to protect your home even if Internet connection is not available.
Q: Sim card cannot be recognized.
A: The panel only supports GSM SIM card. For LTE SIM card, please contact your carrier to ensure the support of GSM phone call and SMS message.
Q: How to reset the system? Would all my data be erased?
A: To reset the system, please remove the battery cover and press the reset button for 5 seconds. The system will erase all data and restarts. In order to restore the data, please create your own account in the APP, before reset the system. After the reset, login to your account in the APP to recover your data.
Q: When operating in the App, it is slow/lag/always waiting for reactions.
A: To better solving your problem, please follow the instructions below before request help from distributor:
- Use LAN cable instead of Wi-Fi for the panel.
- Try restart the router connected to the panel or your phone.
- Disable any VPN connection from your phone or router, for directly connecting to the Internet.
- In the home page of the App, tap the [Net Status] to see if the connection of the panel works properly.
If there is any problems or questions, please send emails to secure@godrej.com or customer care: 1800 209 9955
Specifications
| Capability | Working Environment | ||
| CPU ARM Cortex-A7 | Working Temp. -10°C-60°C | ||
| Power Supply | Installation & Materials | ||
| Auxiliary power DC 5V 2A | Installation Desktop, Wall | Mounted | |
| Backup batteries Rechargeable Lithium Polymer battery 2300mAh | Shell Material ABS/PC | ||
| Stand-by time 12 hours (fully charged) | Key Features | ||
| RF Capability | Total input accessories Unlimited | ||
| Frequency 433.92MHz | Keypad Supported | Works with wireless keypad | |
| Distance 300 m. / 1000 ft. | Smart Devices Works with networking camera and smart plug | ||
| Connectivity | Tamper Alarm Supported | ||
| LAN 1 X RJ45 10/100M ethernet interface | Panic Alarm | Supported | |
| Wi-Fi Standard Support 802.11b/g/n | Low Battery Warning | Supported | |
| GSM Band GSM850/900/1800/1900MHz | Notifications | Push Notification (App) / SMS Messages (Mobile Phone) | |
| Siren | Quick Pairing Pre-pairing & QR Code pairing | ||
| Build-in siren 100dB /30cm | Updatable Firmware | Supported | |
Wireless Door/Window Sensor
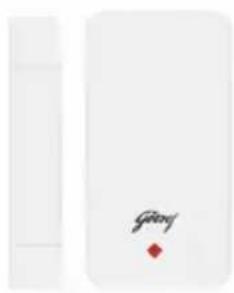
- The wireless contact sensor is an accessory of smart alarm system.
- It's fashion design, energy saving, and low battery warning supported. The system would inform users to replace the battery by App when needed. It's easy to setup and works well with most doors and windows. When transmitter and magnet are apart, the sensor triggers alarm.
- Transmitter can be put on either of magnet's left or right side.
Key Features
| Working Voltage: | DC 3V |
| Battery: | 1 x CR2032 button battery (3V) |
| Working Current: | 20mA |
| Standby Current: | 2uA |
| Transmission Distance: | Without obstacle 200m |
| Transmission Frequency: | 433.92 MHz |
| Working Temperature: | -10°C ~ 40°C |
| Humidity : | <90%rh (non-condensing) |
| Weight: | 35.5g (battery not included) 40g (battery included) |
| Dimension(LXWXH): | 80.00mmx38.2mmx13.3mm (Transmitter),80.0mmx14.8x12.99mm(Magnet) |
Remote Controller
The remote controller is an accessory of series smart alarm system. It helps you quickly arm/disarm/home arm/trigger SOS the system.
Key Features
| Working Voltage: | DC 3V |
| Battery: | 1 x CR2032 button battery (3V) |
| Working Current: | <7.5mA |
| Standby Current: | 0.4uA |
| Transmission Distance: | Without obstacle 200m |
| Transmission Frequency: | 433.92 MHz |
| Working Temperature: | -20°C ~ 50°C |
| Humidity : | <90%rh (non-condensing) |
| Weight: | 16.4 (battery included |
| Dimension(LXWXH): | 58.00mmx33.1mmx11.0mm |

natural_image
Black remote control key with four function buttons (lock, lock, alarm, bell) and a key icon on the right (no text or symbols)Information of E-Waste Handling and Management
Dear Customer,
The Ministry of Environment and Forests have published The E-waste (Management and Handling) Rules 2010 which came into effect from 1st May 2012.
E-waste is defined as any electrical or electronic component of products in whole or in part, or rejects from their manufacturing or repair process which are intended to be discarded.
These rules apply to every producer, consumer or bulk consumer involved in the manufacture, sale, and purchase and processing of electrical and electronic equipment or components as specified in Schedule 1 (please refer to our website www.godrej.com in the 'Good & Green' section of CSR module for more details).
Under these rules, specific roles and responsibilities are defined for producers, consumers and recyclers handling and managing e-waste.
E-waste is to be managed in an environmentally sound manner which means, taking steps to ensure that health and environment are protected from adverse effects of hazardous substance contained in such wastes.
Rule 6 of The E-waste (Management and Handling) Rules 2010 states that bulk consumers of electrical and electronic equipment shall be responsible for recycling of the e-waste generated by them. Bulk consumer means bulk users of electronic and electrical equipment such as Central Government or State Government Departments, public sector undertakings, banks, educational institutions, multinational organisations, international agencies, private companies that are registered under the Factories Act 1948 and Companies Act 1956. The bulk consumers have to ensure that the e-waste generated by them is channelised to authorised collection centers or is taken back by the producers. They shall maintain records of e-waste generated by them in Form 2 and make such records available for scrutiny by the State Pollution Control or the Pollution Control Committee concerned.
All consumers of electrical and electronic equipment irrespective of their status as bulk consumers or not, shall ensure that e-waste generated by them is channelised to authorised collection center(s) or registered dismantler(s), or recycler(s) or is returned to the pick-up/take back services provided by the producers (please refer to our website www.godrej.com in the 'Good & Green' section of CSR module for more details).
All our products intended to be recycled under the category of e-waste (as defined above) carry a label or stamp of the WEEE symbol (A wheelie bin with a cross), which states that it falls under the hazardous waste category and is not to be disposed along with normal garbage.
We seek your support in ensuring environmentally sound management of e-waste and aid us in sustaining our earth's natural resources and maintaining the earth's green cover intact for the benefit of our future generations.

Record of Purchase
Please fill your details below for future reference.
Date of Purchase: ____
Product Model:
Name and Address of Distributor/Dealer: ____
Distributor/Dealer Phone Number: ____


SECURITY SOLUTIONS
Godrej & Boyce Mfg. Co. Ltd. Godrej Security Solutions
Regd. Office: Plant No. 17, Pirojshanagar, Vikhroli, Mumbai 400 079
Toll-free: 1800 209 9955 | Email: secare@godrej.com | Visit: www.godrejsecure.com
In view of the Godrej Policy of continuous development and improvement, the dimensions of the products as seen on the catalogue may not match with the actual product. The colour combinations of the products as seen on the catalogue may vary and not match with the actual colour of the product due to printing limitations.
An ISO 9001:2015/ISO 14001:2015/BS OHSAS 18001:2015
Products Marketed and Serviced By Godrej & Boyce Mfg. Co. Ltd.
- Table of Content
- Introduction
- Important Instructions
- Safety
- Requirements
- System Status & User Authorities
- - ARM:
- - DISARM:
- - HOME ARM:
- - SOS:
- - ADMINISTRATOR:
- - USER:
- - GUEST:
- Appearance
- Setup
- - Internet Connection Requirements
- - Place the Panel at a Suitable Place
- • Install the SIM Card
- - Get Ready for Setup
- - Add the Panel
- - Set Up Password
- - Configure the Wi-Fi Setting of the Panel
- - Check Setting
- - Installation
- APP Operation Introduction
- • Home Page
- User Settings
- Real-time Status Diagram
- Security Status Control
- Device List
- System & App Settings
- Event List
- - Dashboard
- • Pairing New Accessories
- - Delete an Accessory
- - Share with Others
- • Home Arm Settings
- • Accessories Management
- - Smart Widgets
- - Advanced Settings
- - App Settings
- FAQ
- Wireless Door/Window Sensor
- Remote Controller
- Information of E-Waste Handling and Management
- Record of Purchase
- SECURITY SOLUTIONS
Brand : Godrej
Model : Eagle I NXT
Category : Alarm system