
ET91000SM20 - Audio/video converter StarTech.com - Free user manual and instructions
Find the device manual for free ET91000SM20 StarTech.com in PDF.


| Product Type | Audio/Video Converter |
| Model | ET91000SM20 |
| Brand | StarTech.com |
| Dimensions (W x D x H) | Approx. 100 x 70 x 25 mm |
| Weight | Approx. 200 g |
| Power Supply | 5V DC, 2A |
| Input Interface | HDMI, VGA, or Composite (depending on model variant) |
| Output Interface | Ethernet (RJ45) for transmission |
| Maximum Resolution | 1920 x 1080 (1080p) |
| Supported Audio Formats | Stereo PCM, Dolby Digital |
| Transmission Distance | Up to 100 meters (328 feet) over CAT5e/6 |
| Housing Material | Metal |
| Operating Temperature | 0°C to 45°C (32°F to 113°F) |
| Storage Temperature | -20°C to 60°C (-4°F to 140°F) |
| Humidity Range | 20% to 80% RH (non-condensing) |
| LED Indicators | Power, Link/Activity |
| Cable Included | Power adapter, user manual |
| Mounting Options | Desktop or wall-mountable (brackets not included) |
| Compliance | CE, FCC, RoHS |
| Maintenance | Clean with a soft, dry cloth. Do not use liquids. |
| Safety Warnings | Keep away from moisture and extreme temperatures. Use only provided power adapter. |
| Spare Parts / Repairability | No user-serviceable parts inside. Contact support for repairs. |
Frequently Asked Questions - ET91000SM20 StarTech.com
User questions about ET91000SM20 StarTech.com
0 question about this device. Answer the ones you know or ask your own.
Ask a new question about this device
Download the instructions for your Audio/video converter in PDF format for free! Find your manual ET91000SM20 - StarTech.com and take your electronic device back in hand. On this page are published all the documents necessary for the use of your device. ET91000SM20 by StarTech.com.
USER MANUAL ET91000SM20 StarTech.com
Gigabit Ethernet Fiber Media Converter - SM LC - 20km
ET91000SM20
natural_image
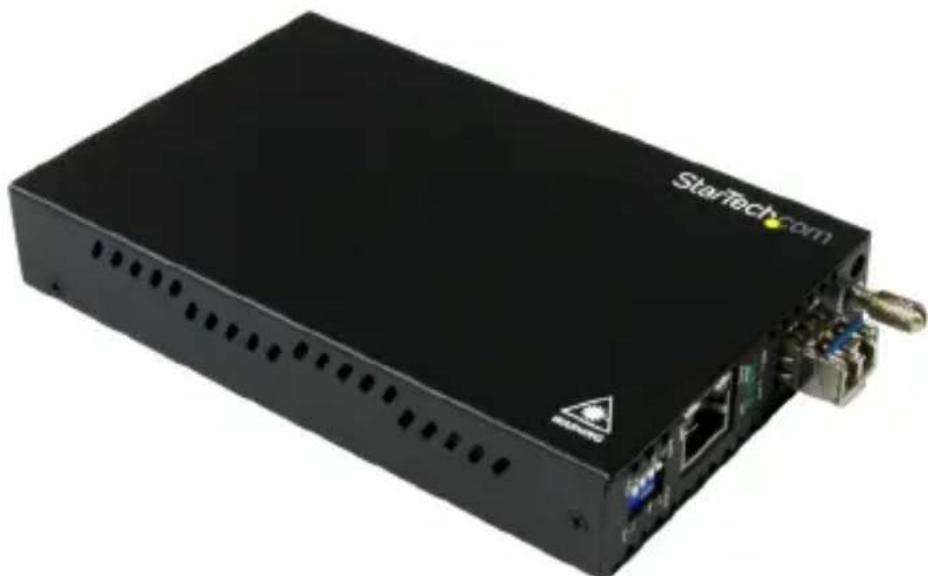
Black StarTech.com network device with ports and connectors (no visible text or symbols on body)*actual product may vary from photos
For the latest information, technical specifications, and support for this product, please visit www.startech.com/ET91000SM20.
FCC Compliance Statement
This equipment has been tested and found to comply with the limits for a Class A digital device, pursuant to Part 15 of the FCC rules. These limits are designed to provide reasonable protection against harmful interference when the equipment is operated in a commercial environment. This equipment generates, uses and can radiate radio frequency energy and, if not installed and used in accordance with the instruction manual, may cause harmful interference to radio communications. Operation of this equipment in a residential area is likely to cause harmful interference in which case the user will be required to correct the interference at his own expense.
This device complies with part 15 of the FCC Rules. Operation is subject to the following two conditions: (1) This device may not cause harmful interference, and (2) this device must accept any interference received, including interference that may cause undesired operation.
Changes or modifications not expressly approved by StarTech.com could void the user's authority to operate the equipment.
Industry Canada Statement
This Class A digital apparatus complies with Canadian ICES-003.
Use of Trademarks, Registered Trademarks, and other Protected Names and Symbols
This manual may make reference to trademarks, registered trademarks, and other protected names and/or symbols of third-party companies not related in any way to StarTech.com. Where they occur these references are for illustrative purposes only and do not represent an endorsement of a product or service by StarTech.com, or an endorsement of the product(s) to which this manual applies by the third-party company in question. Regardless of any direct acknowledgement elsewhere in the body of this document, StarTech.com hereby acknowledges that all trademarks, registered trademarks, service marks, and other protected names and/or symbols contained in this manual and related documents are the property of their respective holders.
Table of Contents
Introduction......1
Packaging contents....1
System requirements....1
Product diagram ......2
Front view 2
Rear view....2
Install the media converter ....3
LED indicators......4
DIP switch settings....5
Link fault pass-through (LFP)....6
Enable LFP 6
Disable LFP 6
Troubleshoot....6
Troubleshoot the RJ45 copper UTP link 6
Troubleshoot the Fiber link 7
Technical support....8
Warranty information......8
Introduction
The ET91000SM20 converts a traditional copper Gigabit Ethernet connection (RJ45), into a Gigabit fiber connection. The media converter can then extend your network up to 20 km (12.4mi.) using single-mode LC fiber-optic cable. If needed, the included SFP module (LC fiber connector) can be removed from the media converter and be replaced with a transceiver module with different specifications.
Packaging contents
• 1x Gigabit Ethernet fiber media converter
• 1x universal power adapter (NA/EU/UK/AU)
- 1x grounding screw
• 1x instruction manual
System requirements
- Gigabit (1000Base-T) network equipment (For example, a copper network switch)
- Gigabit (1000Base-LX) fiber-optic network equipment (For example, a fiber network switch)
- Terminated RJ45 UTP Cat5e or better Ethernet cable
- Terminated fiber-optic cable (Single-mode, LC duplex connectors)
- AC electrical outlet
Product diagram
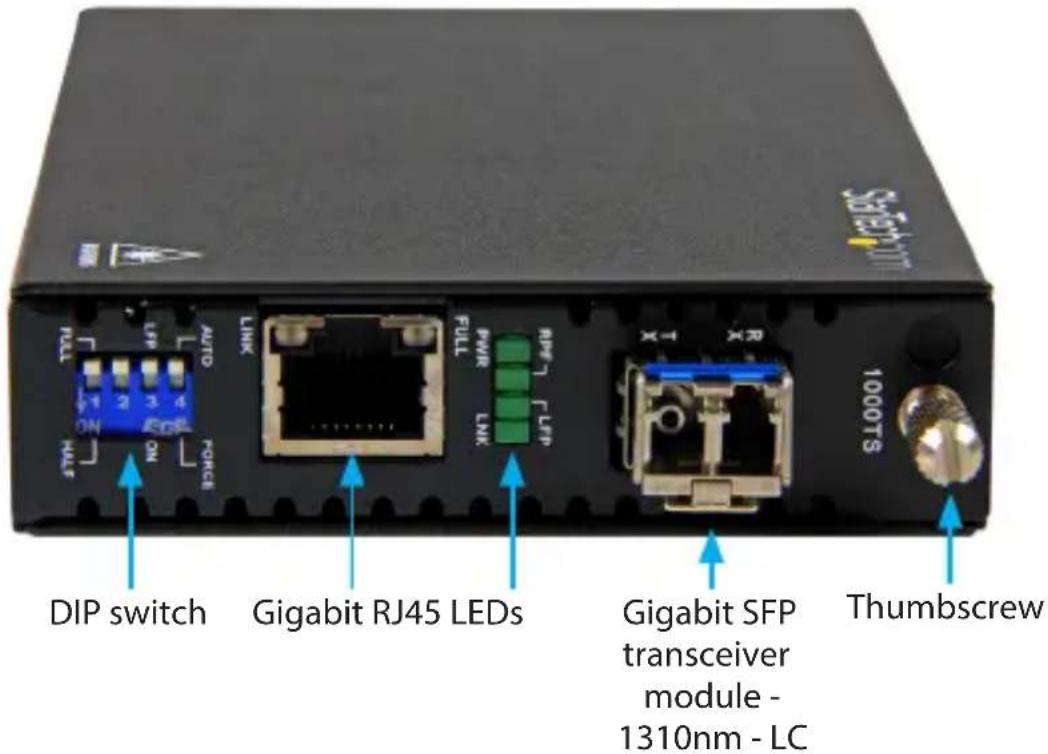
Front view
Rear view
Install the media converter
The media converter features a pre-installed 1000Base-LX (transparent conversion) (1310 nm) Gigabit SFP transceiver module with LC connectors. This module transmits signals up to 20 km (12.4 mi.).
Ensure the DIP switches are set appropriately to match your network infrastructure. Check with your network administrator, or your network documentation, as well as the DIP switch settings topic for details.
Warning: Fiber optic equipment can emit laser or infrared light that can injure your eyes. Never look into a fiber-optical cable or connector while it's connected to your equipment. Always assume that fiber optic cables are connected to an active laser light source.
- Turn off any networking equipment that will be connected to the media converter.
- Connect a duplex LC fiber-optic cable from the media converter's TX and RX connectors to your fiber network device. The cable must be paired at both ends of the connection (for example, TX to RX, and RX to TX).
Note: In addition to the pre-installed SFP module, the media converter can also be used with any MSA-compliant Gigabit (1000Mbps) SFP module. It does not support 10/100Mbps modules. - Connect an RJ45 Cat5e (or better) Ethernet cable from the media converter's RJ45 port to your Gigabit network device.
- Select the appropriate power clip for your region and connect it to the power adapter.
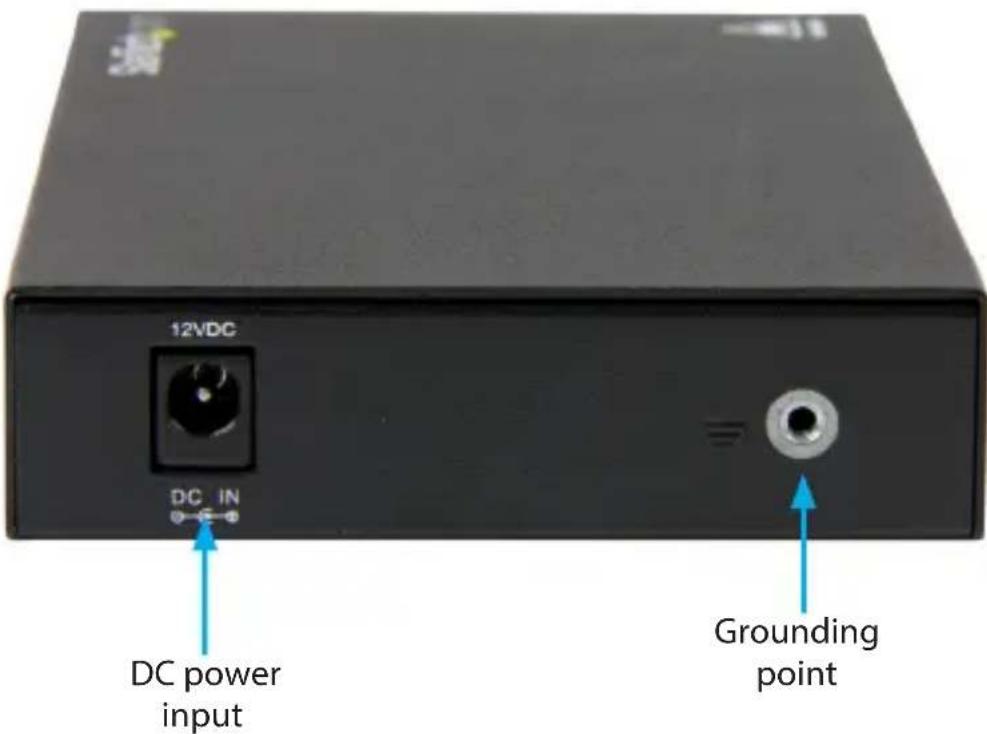
- Connect the power adapter to an AC electrical outlet and then to the media converter's DC power input port. The PWR LED (power) lights up and remains solid to indicate that the media converter is powered.
- Turn on the networking equipment that you turned off in step 1.
The LNK (fiber link) LED lights up and remains solid when a fiber link has been established, and the RJ45 Link (copper link) LED lights up and remains solid when a copper Ethernet link has been established.
Notes:
- Fiber transceiver modules are designed to transmit signals over long distances. If the physical wiring distance is too short, the transmitting optical signal (laser) may be too strong and damage the receiving fiber transceiver module. In this situation, an in-line optical attenuator may be required to protect the transceiver modules from damage.
- The media converter accepts any MSA-compliant SFP transceiver modules (Gigabit only) with a data rate of up to 1.25Gbps. Follow all ESD precautions when handling the media converter and the SFP transceiver module. Fiber optic components and cables are sensitive to dirt, dust, and mishandling. Dirty or mistreated fiber might
cause errors and signal degradation.
LED indicators
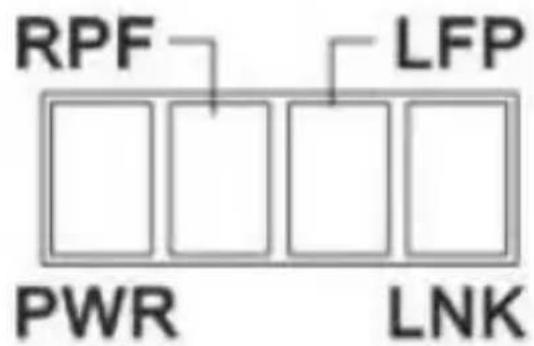
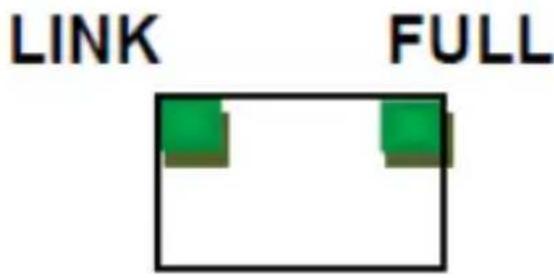
LED Status Indication
| PWR (Green) | Solid The media converter is powered on | |
| Blinking | The media converter is upgrading (rapid blinking) | |
| Off The media converter is not powered on | ||
| RPF (Green) | Solid Remote power failure | |
| Off Remote power is normal | ||
| LFP (Green) | Solid Link fault pass-through is turned on | |
| Off Link fault pass-through is turned off | ||
| LNK (Green) | Solid | A fiber link between the media converter and fiber network equipment is established |
| Off A fiber link has not been established | ||
| LINK - RJ45 (Green) | Solid | A UTP copper link between the media converter and RJ45 network equipment is established |
| Off A UTP copper link has not been established | ||
| FULL - RJ45 (Green) | Solid UTP copper link is set to full duplex | |
| Off | UTP copper link is not set to full duplex (half duplex) | |
DIP switch settings
The media converter features a four-position DIP switch that can be used to configure the ports for standalone operation.
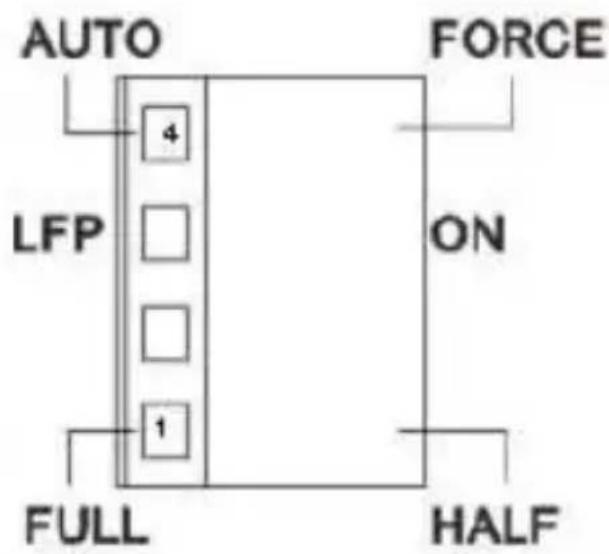
| DIP Switch Number | Position Parameter |
| 1 | Off Force full duplex (if forced mode is enabled) |
| On Force half duplex (if forced mode is enabled) | |
| 2 | Off Reserved |
| On Reserved | |
| 3 | Off LFP (link fault pass-through) is disabled |
| On LFP (link fault pass-through) is enabled | |
| 4 | Off RJ45 UTP is set to auto-negotiate |
| On RJ45 UTP forced mode is enabled |
Note: DIP switch 2 is reserved, as it isn't used on the ET91000SM20 media converter. It does not matter which setting (upward or downward) DIP switch 2 is set to.
Link fault pass-through (LFP)
Link fault pass-through can notify you of link problems and provides an efficient solution for monitoring your network. The LFP DIP switch is set to OFF by default, and you can use the DIP switch to enable (ON) or disable (OFF) the LFP function.
If you are familiar with your network infrastructure and proper diagnostic procedures, you can leave the LFP DIP switch in the OFF position. Otherwise, it is recommended to set the LFP DIP switch to the downward ON position.
Enable LFP
When the DIP switch is set to ON, LFP is enabled. When a device is connected to the media converter, and the copper line or fiber line drops the link, then the media converter will disconnect the transmission link on the opposite interface.
- Slide the LFP DIP switch (DIP switch 3) to the downward ON position to enable LFP.
Disable LFP
When the DIP switch is set to OFF, LFP is disabled (default).
- Slide the LFP DIP switch (DIP switch 3) to the upward OFF position to disable LFP.
Troubleshoot
Always check to ensure the duplex setting of the connected fiber equipment matches the duplex setting of the media converter.
Troubleshoot the RJ45 copper UTP link
The RJ45 port supports Gigabit (1000Base-T) network devices and cables only. It does not support 10/100Mbps copper (RJ45) network devices.
The ET91000SM20 is a transparent media converter (it is not a switch). Therefore, the duplex setting of your fiber network equipment must match that of the media converter's RJ45 copper UTP port.
- For example, if your connected fiber device is full duplex, set the duplex DIP switch (DIP switch 1) on the media converter to the upward OFF (FULL) position.
Note: In most copper to fiber network infrastructures, your connected devices should be set to full duplex. In most networks, a copper link won't be established if you set DIP switch 1 to the downward ON (half duplex) position.
Always check your fiber network equipment to ensure it hasn't mistakenly been set to half duplex.
Troubleshoot the Fiber link
The media converter supports Gigabit fiber devices and cables only. It does not support 10/100Mbps fiber network devices or SFPs.
- The fiber port supports an auto-negotiate (default) or FORCE (forced) mode setting. When connected to third-party equipment (for example, a Cisco switch) you might encounter fiber link problems. In this scenario, try setting the DIP switch positions to the FORCE (forced) mode setting, as well as the FULL (full duplex) setting. Many switches do not support auto-negotiation on the fiber port(s).
Technical support
StarTech.com's lifetime technical support is an integral part of our commitment to provide industry-leading solutions. If you ever need help with your product, visit www.startech.com/support and access our comprehensive selection of online tools, documentation, and downloads.
For the latest drivers/software, please visit www.startech.com/downloads
Warranty information
This product is backed by a two-year warranty.
StarTech.com warrants its products against defects in materials and workmanship for the periods noted, following the initial date of purchase. During this period, the products may be returned for repair, or replacement with equivalent products at our discretion. The warranty covers parts and labor costs only. StarTech.com does not warrant its products from defects or damages arising from misuse, abuse, alteration, or normal wear and tear.
Limitation of Liability
In no event shall the liability of StarTech.com Ltd. and StarTech.com USA LLP (or their officers, directors, employees or agents) for any damages (whether direct or indirect, special, punitive, incidental, consequential, or otherwise), loss of profits, loss of business, or any pecuniary loss, arising out of or related to the use of the product exceed the actual price paid for the product. Some states do not allow the exclusion or limitation of incidental or consequential damages. If such laws apply, the limitations or exclusions contained in this statement may not apply to you.
Hard-to-find made easy. At StarTech.com, that isn't a slogan. It's a promise.
StarTech.com is your one-stop source for every connectivity part you need. From the latest technology to legacy products — and all the parts that bridge the old and new — we can help you find the parts that connect your solutions.
We make it easy to locate the parts, and we quickly deliver them wherever they need to go. Just talk to one of our tech advisors or visit our website. You'll be connected to the products you need in no time.
Visit www.startech.com for complete information on all StarTech.com products and to access exclusive resources and time-saving tools.
StarTech.com is an ISO 9001 Registered manufacturer of connectivity and technology parts. StarTech.com was founded in 1985 and has operations in the United States, Canada, the United Kingdom and Taiwan servicing a worldwide market.
- Gigabit Ethernet Fiber Media Converter - SM LC - 20km
- FCC Compliance Statement
- Industry Canada Statement
- Use of Trademarks, Registered Trademarks, and other Protected Names and Symbols
- Table of Contents
- Introduction......1
- Product diagram ......2
- Install the media converter ....3
- LED indicators......4
- DIP switch settings....5
- Link fault pass-through (LFP)....6
- Troubleshoot....6
- Technical support....8
- Warranty information......8
- Introduction
- Packaging contents
- System requirements
- Product diagram
- Front view
- Rear view
- Install the media converter
- Notes:
- LED indicators
- DIP switch settings
- Link fault pass-through (LFP)
- Enable LFP
- Disable LFP
- Troubleshoot
- Troubleshoot the RJ45 copper UTP link
- Troubleshoot the Fiber link
- Technical support
- Warranty information
- Limitation of Liability
Brand : StarTech.com
Model : ET91000SM20
Category : Audio/video converter