
XOU24ORSR - Refrigerator XO - Free user manual and instructions
Find the device manual for free XOU24ORSR XO in PDF.


| Product Type | Freestanding Fridge |
| Brand | XO |
| Model | XOU24ORSR |
| Total Capacity | Approximately 100-120 liters |
| Dimensions (Height x Width x Depth) | 85 x 60 x 60 cm (estimated) |
| Weight | Approximately 30-35 kg |
| Energy Voltage / Frequency | 220-240 V / 50 Hz |
| Energy Consumption | Approximately 150-200 kWh/year |
| Climate Class | N-ST (16°C to 38°C) |
| Noise Level | Approximately 40 dB |
| Refrigerant | R600a (isobutane) |
| Adjustable Thermostat | Yes |
| Number of Shelves | 3 adjustable glass shelves |
| Crisper Drawer | 1 for fruits and vegetables |
| Door Storage | 3 door balconies |
| Reversible Door | Yes |
| Defrost | Manual (defrost drain included) |
| Interior Light | LED |
| Leveling Legs | 2 front adjustable feet |
| Spare Parts Available | Shelves, door balconies, thermostat, light bulb |
Frequently Asked Questions - XOU24ORSR XO
User questions about XOU24ORSR XO
0 question about this device. Answer the ones you know or ask your own.
Ask a new question about this device
Download the instructions for your Refrigerator in PDF format for free! Find your manual XOU24ORSR - XO and take your electronic device back in hand. On this page are published all the documents necessary for the use of your device. XOU24ORSR by XO.
USER MANUAL XOU24ORSR XO
EVERY THING YOU NEED TO KNOW ABOUT YOUR
Xo
OUTDOOR REFRIGERATOR
MODEL XOU24ORS_
I worked really hard on this manual - so please read it...
XO

UNDERCOUNTER
When buying any XO appliance you can be confident you have chosen a high quality, innovative and stylish product from a company that cares about you!
If you require service
or have questions,
Help is only a phone call away -
call: 973-403-8900
Talk to one of our undercounter experts.
WHERE THINGS ARE
Before You Get Started 4 - 7
Installer Checklist
Safety Instructions
Electrical and Grounding Instructions
Installation Instructions 8 - 10
Sizes and Installation Dimensions
Leveling Your XO / Installing Casters
Door Handle Installation
Operating Instructions 11 - 14
Overview/Shelf Instructions
Control System
Setting the Temperature
Functions
Care and Cleaning 15 - 17
Helpful Hints
Cleaning the Interior / Exterior
Changing the Carbon Air Purification Filter
Winterizing
FAQs 18 - 19
Before You Call For Service
Warranty
PLEASE READ AND FOLLOW ALL SAFETY INSTRUCTIONS
It's for your own good... Honest.
XO
DEAR INSTALLER THE JOB ISN'T DONE UNTIL
To ensure that the installation process is successfully completed, here are few things to review...
○ Is the unit plugged in?
○ Are the controls on? (Panel will illuminate.)
○ Are the controls operating correctly?
○ Has the unit been properly leveled - both side to side and front to back - with all 4 leveling feet securely making contact with the floor?
○ Is the unit plugged into a properly functioning GFI (Ground Fault Interrupter) outlet?
○ After installation, does the door open sufficiently to extend the shelves?
○ Is the door sealing properly?
○ Is the handle secure?
○ Have you thoroughly inspected the stainless steel surfaces for any imperfections?
○ Have you reviewed this manual with the customer and explained the unit's operation and care?
○ Has the customer received copies of the literature and keys?
○ Have you properly disposed of all packing materials properly (recycle, please)?
○ Is the customer satisfied?
DANGER
RISK OF CHILD ENTRAPMENT!
An empty refrigerator is a very dangerous attraction to children.
Remove door gaskets, latches, lids, lock and/or doors from unused or discarded appliances, or take other actions to guarantee them harmless.
Always dispose of old appliances in accordance with local laws and regulations.
THE MODEL COVERED IN THIS BOOK IS
XOU24ORS__

natural_image
Front view of a white rectangular electronic device with ventilation grilles and a vertical panel (no text or symbols)Please note the doors are not field reversible. On the unit shown above, the door hinge is on the RIGHT HAND SIDE and the handle is on the left, so the model number would be followed by the letter "R".
If the door hinge was on the left hand side and the handle was on the right - the model number would be followed by the letter "L".
TAKE JUST A MINUTE TO RECORD YOUR SERIAL NUMBER HERE INCASE YOU NEED IT LATER

YOUR SAFETY MATTERS
Please read through completely before using your XO Unit
To prevent damage to the door gasket, the door must be opened all the way before pulling shelves out.
The appliance must be positioned so that the plug is accessible.
Empty your XO unit before attempting to move the appliance. Moving while loaded may damage or distort the frame.
The compressor will get HOT during operation / touching it may cause injury.
During installation follow all safety tips provided in this manual / appropriate safety equipment such as safety glasses and work gloves should be worn.
Two people should move or lift your XO unit to prevent injury or damage.
Remove all interior and exterior packing materials prior to installation and dispose of properly.
Never obstruct open areas around shelves which will impede internal air circulation.
For maximum efficiency, keep the door tightly shut unless loading or unloading and never overload your XO unit.
Before installing, allow your XO unit to sit upright for 2 hours at the install site. This will allow the cooling system to stabilize after transportation. Failure to follow this step may cause problems.
Store perishable food products properly.
Location
Your XO unit should be located away from direct sunlight and heat sources (stove, heaters, etc.) which may increase electrical consumption. High or low ambient temperature may cause units to work improperly.
The floor must be strong enough to support your XO unit fully loaded.
Your XO unit must not be installed in areas of where water or excessive moisture are present.
Your XO unit must not be installed near where flammable, corrosive or hazardous materials are present.
Your XO unit's final installation must observe the correct minimum air clearances around and behind the unit to ensure adequate ventilation. In addition, all ventilation openings must be kept clear and free of obstructions, failure to do so will result in damage to the unit.
WARNING
NEVER use external heat sources to accelerate defrosting.
NEVER permit unauthorized service or modifications to your XO unit.
NEVER tamper with the sealed refrigerant system - this unit uses R600A Refrigerant which is flammable.
It should never be used in the vicinity of any flammable or explosive ignition sources.
ALWAYS FOLLOW THE ELECTRICAL SAFETY INSTRUCTIONS OUTLINED IN THIS MANUAL.
ELECTRICITY - THIS IS SERIOUS
Failure To Follow All Electrical Safety Measures May Result in Serious Injury, Fire Or Death
All electrical work should only be performed by an experienced, licensed electrician.
All XO units MUST be grounded for safe operation and come equipped with a 3 Prong molded cord/plug for that purpose.
NEVER remove or disable the 3rd prong with an adapter.

NEVER use an extension cord to operate your XO unit.

natural_image
Coiled black cable with a red prohibition symbol (no text or labels)Your XO unit is built to operate on 115V 60Hz and should be plugged directly into a dedicated 15 amp 3 prong outlet. If you are uncertain as to the voltage, amperage capacity or if the 3rd prong is properly grounded - consult a licensed electrician.
To maximize the depth of the installation recess - your outlet should be mounted flush with the wall.
Your XO unit should not share the circuit with any other electrical devices as this may cause overloading, overheating, blown fuses or tripping circuit breakers. In a worst case this can pose a fire hazard.
NEVER handle your XO unit in wet conditions as this can pose a severe danger of electric shock.
Exercise care when moving your XO unit to avoid damage to the electrical cord. If the electrical cord of your XO unit becomes worn or damaged it must be replaced immediately by a qualified technician.
NEVER unplug your unit by pulling on the cord. Unplug by gripping the plug firmly and pull out straight from the outlet.
OUTDOOR USE:
XO Outdoor Refrigerators are designed to handle a broader range of conditions than indoor refrigerators, However
they are still susceptible to damage from the elements, such as flooding or extreme temperatures.
To help ensure long life and proper operation the unit should be installed in a location where it is protected from precipitation or surface water, away from direct sunlight and in a working ambient temperature range between 41°F and 90°F.
Use in any uncontrolled area or otherwise directly exposed to the elements is hazardous and voids the warranty.
THE CHANGE OF SEASONS:
When the ambient temperature drops below 41°F steps must be taken to winterize the unit.
See page 17
In regions where high humidity exists condensation may appear.
For best operation, keeping the unit fully stocked with product will reduce this.
SERVICE 115V - 60 Hz - 1 phase
AMPS 15 Amp Circuit Breaker
Requires a Dedicated Outlet
GFI required for Outdoor Installations
All electrical work must be performed by a licensed electrician.

Serious injury, fire or death...
Okay -
You've got my attention!
A PERFECT FIT
USE FREE STANDING - OR - INSTALL UNDER COUNTER

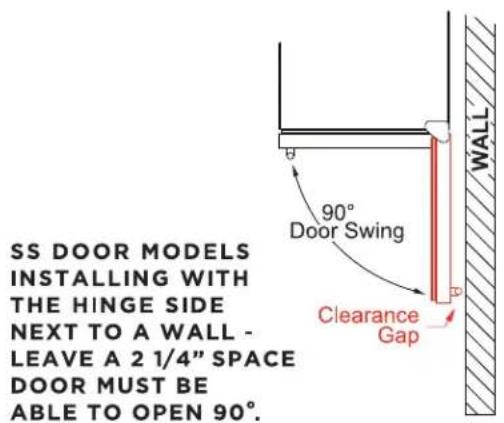
IF THE DOOR CAN'T OPEN FULLY - YOU CAN'T PULL THE SHELVES OUT AND RISK DAMAGE TO THE DOOR GASKET.
IF YOU ARE RUNNING THE CORD THROUGH AN OPENING TO REACH AN OUTLET, MAKE CERTAIN THERE ARE NO ROUGH OR SHARP EDGES WHICH MAY DAMAGE THE POWER CORD.

ON THE LEVEL - OR -
DO NOT NEGLECT THIS IMPORTANT STEP!
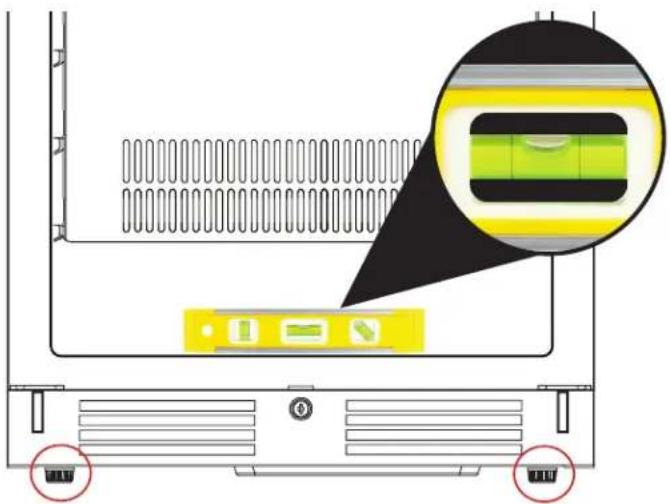
When installing in a fixed location:
Raise or lower the leveling legs to ensure the appliance is level both side to side and front to back.
When done all four legs must be firmly contacting the floor.
Failure to perform this important step may cause problems with proper door operation, excessive condensation, vibration and noise.
GET MOVIN'
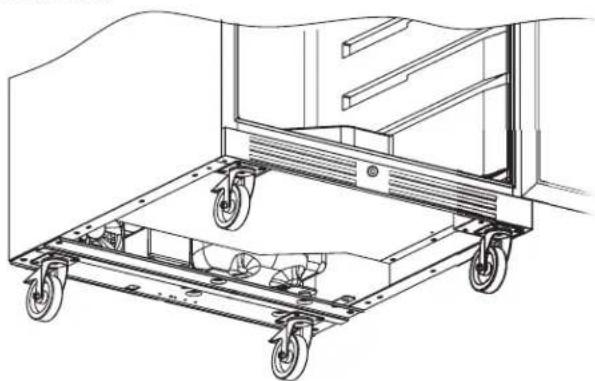
OPTIONAL CASTER INSTALLATION
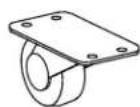
2 Casters

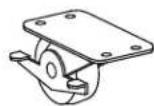
2 Locking Casters

To install your optional casters, follow these simple steps.
To reduce the risk of personal in jury or property damage, unplug the appliance and use two people to complete the caster installation.
-
Carefully place the appliance on its back - Protecting the floor and back of the appliance from damage by laying the appliance on a towel or blanket.
-
Remove the existing feet and keep in a safe place for future use.
-
Install the non-locking casters on the back of the appliance.
-
Install the locking casters on the front of the unit.
natural_image
Technical line drawing of a mechanical cart with wheels and structural supports (no text or symbols)NOTE: Once caster installation is complete, the appliance must be allowed to stand upright for 6 hours before plugging in to avoid damage to internal components.
GET A GRIP
IN FACT - PICK THE STYLE YOU LIKE
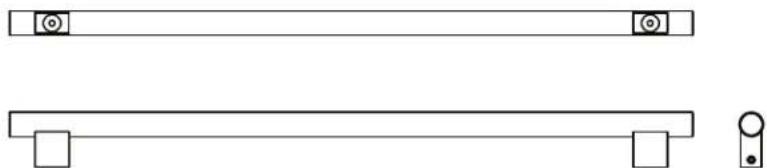
Place the handle (B) over the 2 mounting studs (A) on the door frame with the set screws (C) pointing down.

Push the handle tightly against the door and tighten both of the 2 set screws (C) with the hex key (D).
Keep the hex key in a safe place for future use. Two extra set screws are included in the hardware bag.
Handle Option
Your XO comes with two handle options:
natural_image
Pure diagram of two horizontal bars with circular and square markers, no text or symbols presentChoose the Stainless Designer Handle or the Stainless Pro Style.

natural_image
Pure electrical circuit lines without any symbolsMEET YOUR XO
SHOWN WITH DOOR REMOVED

WHAT'S THAT NOISE...
You new XO is designed for quiet operation but you may hear some sounds your old unit didn't make. Because they are new you might be concerned, but they are usually normal. Sounds can also be amplified by hard surfaces like flooring or tiles. Here is a description of the types of sounds you might hear and what might be causing them.
You unit is designed to minimize energy use. To do that the high efficiency compressor and fans may run longer than your old unit. You might also hear a pulsating or high pitched sound as the compressor and fans adjust to improve performance. During defrosting cycles you may hear some water running into the drip pan. The refrigerant may sometimes cause a rattling or gurgling sound as it flows through the system and the you might hear clicking sounds as the unit starts and stops.
CONTROL PANEL
OUTDOOR REFRIGERATOR

flowchart
graph TD
    A["ON/OFF Button\nPress & Hold for 1 Second to turn ON\nPress & Hold for 3 Seconds to turn OFF\nPress to Silence Alarm"] --> B["Light Function Button\nToggle Between 3 Light Functions\nL1, L2, L3"]
    B --> C["TEMPERATURE DISPLAY"]
    C --> D["Indicator Light\nCooling Mode ON"]
    D --> E["+ Press to raise temperature\n- Press to lower temperature"]
    E --> F["Changes interior light color"]
    F --> G["Switches between different operating modes (see page 14)."]
The temperature setting can be adjusted from 34-50°F.
Your controls are simple and intuitive to operate.
TAKE CONTROL
TEMPERATURE

Your XO Outdoor Refrigerator has an easy to use digital touch control panel.
Refrigerator Temp. Settings
Factory Preset: 43^ F
Adjustable Range: 34°F to 50°F
Your XO Refrigerator remembers your temperature setting in case of a power failure and automatically adjusts to the previous setting when power is restored.
When the +/- button is pressed, your refrigerator automatically enters set up mode.
The LED Display will begin flashing and display the temperature setting.
Each time you press the + button, the temperature setting will increase 1 Degree.
Each time you press the - button, the temperature setting will decrease 1 Degree.
Once you have reached the desired temperature setting, the display will continue to flash for 5 seconds, then revert to showing the compartment temperature.
To view the real time temperature, press and hold the +/- button for 5 seconds.
The interior temperature will flash in the LED Display for 5 seconds.
If you wish to change the display from Fahrenheit to Celsius (or vice versa) press and hold both "+" and "-" simultaneously for 5 seconds.
LED LIGHTS

L1: When you turn on your refrigerator, the internal light will switch on when the door is opened, and off when the door is closed.
L2: Press ⚙️, the internal light will remain on continuously and dim after 3 minutes.
L3: Press ☐ twice, the internal light will remain on for 10 minutes and then shut off.
TAKE CONTROL
CONTINUED
COLORS!
When you turn your outdoor refrigerator on, the interior light is white: press and the light will change to blue.
Press 📞 again and the light will change to amber.
SWITCHING MODES

When you turn your XO Unit on, it is set to work in standard mode.
Press ⚙️ ECO mode is turned on. ECO Mode is an energy saver function.
Press 🌿 again, ECO mode is turned off and it returns to standard mode.
ECO Mode also serves as SABBATH Mode.
The Sabbath Mode was designed for use on the Jewish Sabbath and Holidays.
The Sabbath Mode feature makes it possible for observant Jews to use the beverage center during the duration of the holiday. The Sabbath Mode feature can be set to override typical reactions caused by your interaction with the unit. While in the Sabbath Mode, your appliance will still operate. However, it will not respond to your actions.
While in the Sabbath Mode, you may notice the fan running when the door is opened, however, this is not a result of your actions. The compressor and fan will operate at predetermined times.
Press 📋 for 5 seconds, DEMO mode is turned on.
Press 📋 for 5 seconds again, DEMO mode is turned off and it returns to standard mode.
Your controls are simple and intuitive to operate.

A LITTLE TLC
GOES A LONG WAY
Cleaning the Inside:
Walls, floor, and shelves - Some water deposits and dust can be removed with a dry paper towel - others may require a damp cloth. Remember to clean the door gasket as well.
Cleaning the Outside:
Outer case - It is important to keep the area clean where the door seals against the cabinet. Clean this area with stainless steel cleaner.
Control Panel and Door - Wipe with a damp cloth and dry thoroughly. Do not use cleaning sprays, large amounts of soap and water, abrasive, or sharp objects on the panel, they can damage it.
CAUTION: Some paper towels may also scratch the control panel.
Door Surface - Use only mild, non-abrasive detergents applied with a clean sponge or soft cloth. Rinse well with damp cloth.
NOTE: Do not use cleaners containing ammonia or alcohol on your XO unit. Ammonia or alcohol can damage the appearance of the appliance.
NOTE: Never use any commercial/abrasive cleaners or sharp objects on any part of the unit.
POWER FAILURE
Most power failures are corrected within a few hours and should not affect the temperature of your appliance if you minimize the number of times the door is opened.
If the power is off for a longer period of time, you need to take the proper steps to protect your contents.
VACATION
Short vacations: Leave the XO unit operating during vacations of less than three (3) weeks.
Long vacations: If the appliance will not be used for an extended period, remove all items and turn off the appliance.
Clean and dry the interior thoroughly. To prevent odor and mold growth, leave the door open slightly, blocking it open if necessary.
ENERGY SAVING TIP
The unit should be located in the coolest area of the room, away from heat producing appliances, and out of direct sunlight.
MOVING
Remove all items and securely tape down all loose items (shelves) inside your appliance.
Turn the adjustable leveling legs all the way into the base to avoid damage.
Tape the door shut and transport the XO unit securely in the upright position.
Blanket wrap the exterior to help protect against scratches and other damage.
A BREATH OF FRESH AIR
FOR BEST RESULTS CHANGE EVERY 3 TO 6 MONTHS

Rotate the filter 1/4 turn to unlock

natural_image
Two circular diagrams showing a patterned inner circle and a rotating arrow, no text or symbols present.Pull straight out to remove
Align the tabs and insert the new filter

natural_image
Technical line drawing of a mechanical assembly with circular components and a central meshed component (no text or symbols)Rotate filter 1/4 turn to lock in place

natural_image
Two circular diagrams showing a grid-patterned circular structure with side handles, one with an arrow indicating rotation (no text or symbols)WINTERIZING
BAH - HUMBUG
Turn unit off by pressing and holding the "ON/OFF" button.
Remove all contents.
Move the unit so you can gain access to the back.
Unplug the unit from the power outlet.
Turn off the power to the outlet.
CLEANING: (Note - Do not use any abrasive cleaners or scouring pads.)
Inspect and replace any worn or corroded hardware such a hinges or fasteners.
Clean the interior of the unit thoroughly paying attention to areas that accumulate dirt and debris. A solution of 2 tablespoons of baking soda dissolved in one quart of water works well for this.
Remove the front toe kick to clean dirt and debris from beneath the unit using a brush and vacuum. Clean and re-install the toe kick.
Remove the rear access cover to clean dirt and debris from the machine compartment using a brush and vacuum. Exercise care not to damage.
Clean and re-install the rear access cover.
Wipe down all interior surfaces and the door gasket with antibacterial cleaner, followed by a damp, clean cloth to remove any residual chemicals which could stain.
Leave the door open and allow the interior to dry completely.
Clean the exterior with a stainless steel cleaner and wipe free of any residue.
Cover and wait for Spring.

FAQs
Q. There doesn't appear to be any power to the unit.
A. There are 3 easy to check common causes:
(1) Check to see if a fuse has blown or circuit breaker has tripped & replace or reset.
(2) Check to ensure the plug is fully inserted into the outlet.
(3) A power surge may have caused the unit to shut down to protect itself - Unplug the unit, wait 5 seconds and plug it back in.
Q. The cabinet temperature is too high.
A. Check these 5 things:
(1) Check the temperature setting and adjust as needed.
(2) Make certain the door is completely closed and the door gasket is sealing properly.
(3) Avoid opening the door frequently and/or leaving the door open for extended periods.
(4) Did you load a large quantity of warm bottles at once? It is better to add smaller quantities in several loads.
(5) Make certain nothing is blocking the toe kick vents (including dust behind the vents).
Q. The alarm is beeping and "HI" is displayed on the control panel.
A. See the question and answers above - if the door has been tightly closed and you have not recently added a large quantity of warm bottles, it may be a mechanical issue. Unplug the unit and call for service.
Q. The alarm is beeping and "LO" is displayed on the control panel.
A. This may be a sensor malfunction. Unplug the unit and call for service.
MORE "Q & A"
Q. Why does condensation form on the inside or outside of my XO unit?
A. It may be that the door is either opened repeatedly or not closed completely. It may also be due to an excessive ambient humidity, in which case it will clear when the humidity drops.
Q. There is warm air coming from the bottom of my unit.
A. This is normal. Cooling systems must vent the heat they remove from inside the cabinet.
Q. Why does the fan run all the time?
A. It continually recirculates air to ensure cabinet temperatures are consistent.
Q. How do I adjust temperature?
A. Refer to Pages 12 & 13.
Q. How do I adjust shelf height?
A. Refer to Page 11.
Q. When does the high temperature alarm sound?
A. If internal temperature exceeds 70^ F for more than 60 minutes.
Q. If the door hinge is next to a wall, how much clearance do I need to open the door?
A. The unit should be at least 2" from the wall to allow the door to open at least 90°.
WE'VE GOT YOUR BACK
90 DAY LOVE IT or LEAVE IT. For 90 Days all our products are backed by our unique Love it or Leave it Guarantee.
TWO-YEAR PARTS & LABOR LIMITED WARRANTY. XO warrants to the original purchaser of every new XO refrigerated unit, the cabinet and all parts thereof, to be free from defects in material or workmanship under normal and proper use and maintenance as specified by XO and upon proper installation and start-up in accordance with the instruction packet supplied with each XO unit. XO's obligation under this warranty is limited to a period of two (2) years from the date of original purchase.
FIVE-YEAR COMPRESSOR LIMITED WARRANTY. XO warrants its compressor to be free from defects in both material and workmanship under normal and proper use and maintenance service for a period of five (5) years from the date of original purchase. If the compressor fails during that time period due to a defect in material or workmanship, XO will supply a replacement compressor free of charge. The consumer will be responsible for all related transportation and labor costs. Product must be registered with XO to qualify for this warranty.
TERMS APPLICABLE TO EACH WARRANTY. Any part covered under the above warranties that is determined by XO to have been defective within the time frame is limited to the repair or replacement, including labor charges, of defective parts or assemblies. The labor warranty shall include standard straight time labor charges only and reasonable travel time, as determined by XO.
WARRANTY CLAIMS. All claims for labor or parts must be made directly through XO. All claims should include: model number and serial number of cabinet, proof of purchase, and date of installation. In case of warranted compressor, the compressor model tag must be returned to XO along with the above listed information.
WHAT IS NOT COVERED BY THIS WARRANTY. XO's sole obligation under this warranty is limited to either repair or replacement of parts, subject to the additional limitations below. This warranty neither assumes nor authorizes any person to assume obligations other than those expressly covered by this warranty. Open box, factory seconds, scratch and dent, floor models and commercial applications are excluded from these warranties. Consumer shall be responsible for labor and transportation costs where noted above.
NO CONSEQUENTIAL DAMAGES. XO is not responsible for economic loss, profit loss; or special, indirect or consequential damages, including without limitation, losses or damages arising from food or product spoilage claims whether or not on account or refrigeration failure.
WARRANTY IS NOT TRANSFERABLE. This warranty is not assignable and applies only in favor of the original purchaser/user at the original installation location. Any such assignment or transfer shall void the warranties herein made and shall void all warranties, express or implied, including any warranty or merchantability or fitness for a particular purpose.
IMPROPER USAGE. XO assumes no liability for parts or labor coverage for component failure or other damages resulting from improper usage or installation or failure to clean and/or maintain product as set forth in the warranty packet provided with the unit.
ALTERATION OR NEGLECT. XO is not responsible for the repair or replacement of any parts that XO determines have been subjected after the date of manufacture to alteration, neglect, abuse, misuse, accident, damage during transit or installation, fire, flood, or act of God.
IMPROPER ELECTRICAL CONNECTIONS. XO is not responsible for the repair or replacement of failed or damaged components resulting from electrical power failure, high or low voltage, use of extension cords, or improper grounding of the unit.
YOUR RIGHTS UNDER STATE LAW. This warranty gives you specific legal rights and you may have other rights that vary from state to state. Some states do not allow the exclusion or limitation of consequential damages or a limitation on how long an implied warranty lasts, so the above exclusion or limitation may not apply to you.
OUTSIDE U.S. This warranty does not apply to, and XO is not responsible for, any warranty claims made on products sold or used outside the 48 continental United States.
To obtain service:
Call 973-403-8900 | email service@xoappliance.com | or submit a request on our website www.xoappliance.com

100% GUARANTEED
LOVE IT OR LEAVE IT


XO APPLIANCE
24 EISENHOWER PARKWAY ROSELAND, NJ 07068
P. 973.403.8900 WWW.XOAPPLIANCE.COM
- EVERY THING YOU NEED TO KNOW ABOUT YOUR
- WHERE THINGS ARE
- DEAR INSTALLER THE JOB ISN'T DONE UNTIL
- DANGER
- THE MODEL COVERED IN THIS BOOK IS
- YOUR SAFETY MATTERS
- Please read through completely before using your XO Unit
- Location
- WARNING
- ELECTRICITY - THIS IS SERIOUS
- Failure To Follow All Electrical Safety Measures May Result in Serious Injury, Fire Or Death
- OUTDOOR USE:
- A PERFECT FIT
- USE FREE STANDING - OR - INSTALL UNDER COUNTER
- ON THE LEVEL - OR -
- DO NOT NEGLECT THIS IMPORTANT STEP!
- GET MOVIN'
- OPTIONAL CASTER INSTALLATION
- GET A GRIP
- IN FACT - PICK THE STYLE YOU LIKE
- Handle Option
- MEET YOUR XO
- WHAT'S THAT NOISE...
- CONTROL PANEL
- OUTDOOR REFRIGERATOR
- TAKE CONTROL
- TEMPERATURE
- LED LIGHTS
- COLORS!
- SWITCHING MODES
- A LITTLE TLC
- GOES A LONG WAY
- Cleaning the Inside:
- Cleaning the Outside:
- POWER FAILURE
- VACATION
- ENERGY SAVING TIP
- MOVING
- A BREATH OF FRESH AIR
- FOR BEST RESULTS CHANGE EVERY 3 TO 6 MONTHS
- WINTERIZING
- BAH - HUMBUG
- CLEANING: (Note - Do not use any abrasive cleaners or scouring pads.)
- FAQs
- MORE "Q & A"
- WE'VE GOT YOUR BACK
- To obtain service:
Brand : XO
Model : XOU24ORSR
Category : Refrigerator