BC241 - Hedge Trimmer Maruyama - Free user manual and instructions
Find the device manual for free BC241 Maruyama in PDF.


| Product Type | Hedge Trimmer |
| Brand | Maruyama |
| Model | BC241 |
| Engine Type | 2-Stroke Gasoline |
| Displacement | 24 cc |
| Blade Length | 24 inches (610 mm) |
| Tooth Spacing | 1 inch (25 mm) |
| Cutting Diameter | Up to 1 inch (25 mm) |
| Weight | 5.5 kg (12.1 lbs) |
| Fuel Tank Capacity | 0.5 L |
| Ignition | Electronic (CDI) |
| Starter | Recoil Start |
| Handle Type | Rear Handle with Throttle |
| Safety Features | Hand Guard, Throttle Lockout, Stop Switch |
| Vibration Dampening | Built-in Anti-Vibration System |
| Carburetor Type | Diaphragm |
| Air Filter | Foam Element |
| Spark Plug | NGK BPMR7A |
| Fuel Mix Ratio | 50:1 (Gasoline:2-Cycle Oil) |
| Noise Level | 96 dB(A) (at operator ear) |
| Vibration Level | 8.0 m/s² |
| Maintenance | Clean air filter, sharpen blade, inspect spark plug |
Frequently Asked Questions - BC241 Maruyama
User questions about BC241 Maruyama
0 question about this device. Answer the ones you know or ask your own.
Ask a new question about this device
Download the instructions for your Hedge Trimmer in PDF format for free! Find your manual BC241 - Maruyama and take your electronic device back in hand. On this page are published all the documents necessary for the use of your device. BC241 by Maruyama.
USER MANUAL BC241 Maruyama
natural_image
Line drawing of a manual tool with a lever and base mount (no text or symbols)IMPORTANT SAFETY INSTRUCTIONS
Safe Operation Practices for Brush Cutter
TRAINING
- Read the Operating and Service Instruction Manual carefully. Be thoroughly familiar with the controls and proper use of the equipment.
- Never allow children to operate trimmer.
- Keep area of operation clear of all persons, particularly small children and pets.
- Regard your unit as a piece of power equipment and teach this regard to all who operate the equipment.
PREPARATION
- Throughly inspect the area where trimmer is to be used, and remove all stones, sticks, wire, bones and other foreign objects which might be picked up and thrown.
- Do Not operate trimmer when barefoot or wearing open sandals. Always wear substantial foot wear, ear guards, safety glasses, and pants or slacks that cover your legs when operating trimmer.
- Check the fuel before starting the engine. Do Not fill the fuel tank indoors, when the engine is running, while smoking, or while the engine is still hot. Replace fuel cap securely and wipe up spilled fuel. Dispose of gas saturated rags properly, in a well ventilated area to avoid possibility of spontaneous combustion. Never use fuel as a cleaner.
- Do Not use trimmer unless line guard is properly in place.
- Use only in daylight or in good artificial light.
- Never operate equipment in wet grass. Always be sure of your footing: keep a firm hold on the handle and walk, never run.
- Do Not attempt to fill fuel tank from fuel container unless the container spout or funnel fits INSIDE the fuel tank filler neck. The use of too large a spout or funnel, or no funnel, may result in spilled fuel, creating highly flammable vapors. This could result in fire and/or explosion, causing severe bodily injury.
OPERATION
-
Start the engine carefully. Keep hands and feet well away from cutting line.
-
Do Not change engine governor setting or overspeed engine.
- Never direct discharge of any material toward bystanders, nor allow anyone near machine while it is in operation.
- After striking a foreign object, stop the engine and inspect trimmer for damage; repair damage before starting engine.
- If trimmer should start to vibrate abnormally, stop the engine and check for the cause. Vibration is generally a warning of trouble.
- Stop the engine whenever you leave the trimmer, and when making repairs or inspections.
- When repairing or inspecting, make certain all moving parts have stopped. Disconnect spark plug wire and keep wire away from plug to prevent accidental starting.
- Do Not run engine indoors.
- Shut engine off and wait until line comes to a complete stop before removing grass that may clog guard.
- Watch out for traffic when working near roadways.
- Stay alert for uneven sidewalks holes in terrain or other hidden hazards when operating.
MAINTENANCE AND STORAGE
- Keep all nuts, bolts and screws tight to be sure equipment is in safe working condition.
- Never store trimmer with fuel in the tank in a building where fumes may reach an open flame or spark. Be sure engine has cooled before storing in any enclosure.
- To reduce fire hazard, keep engine free of grass, leaves or excessive grease.
- After operating engine, never touch exhaust muffler until it has cooled completely.
- Keep trimmer in good operating condition and keep safety devices in place.
1. FEATURES:
- The repulser, a simple device to prevent the cut material from becoming entangled in the gear case, assures the operator of safe and uninterrupted operation.
- The standard safety blades cut so cleanly that the cut material is not scattered.
- Our direct coupling system results in a minimum loss of power.
- The safety cover attached to the blade protects the operator and bystanders from debris.
- The anti-vibration device ensures an operator a comfortable work.
MAIN PARTS
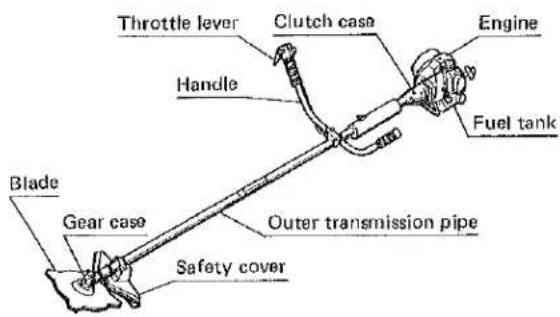
2. SPECIFICATIONS
| MODEL NAME | BC241 | BC326 |
| Length (in./cm) | 72.4/184 | 72.8/185 |
| Width (in./cm) | 10.2/26 | 23.6/60 |
| Dry Weight (lbs.) | 13.9 | 16.1/7.3 |
| Engine Type-2 stroke/air cooled | T130 | T170 |
| Displacement (c.c.) | 24.1 | 32.6 |
| Electronic Ignition | Standard | Standard |
| Diaphragm Carburetor | Standard | Standard |
| Fuel Tank Capacity (oz./l.) | 17.4/0.5 | 26.2/0.75 |
| Anti-vibration Mounts | Standard | Standard |
| Handle Design | J-Type | Twin-grip |
| Easy Access Kill Switch | Standard | Standard |
3. ACCESSORIES
| MODEL NAME | BC241 | BC326 |
| Nylon cutter ass'y | 1 | 1 |
| Mowing blade (φ255x4) | 1 | 1 |
| Tool bag | 1 | 1 |
| Box spanner (13x19xφ) | 1 | 1 |
| Double ended wrench (8x10) | 1 | 1 |
| Handle (φ3.5x170L) | 1 | 1 |
| Instruction manual | 1 | 1 |
* Subject to change without notice.
4. HOW TO OPERATE
4-1 How to Assemble
1) Main Body
a) Couple the clutch case with the engine by tightening 4 pcs. of bolts securely.
In doing so, be sure to put the washer end of the wire on the bolt.
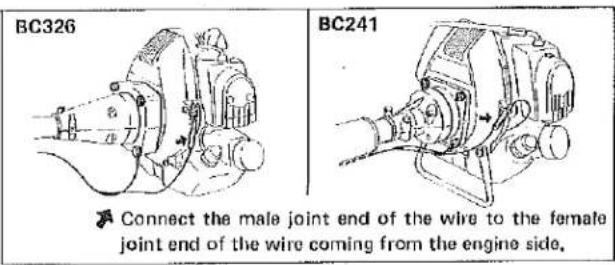
Connect the male joint end of the wire to the female joint end of the wire coming from the engine side.
b) Insert each handle, right (with the throttle lever) and left, into the handle bracket, and tighten securely. (BC326) Insert the J-type handle into the handle bracket, and tighten securely. (BC241)
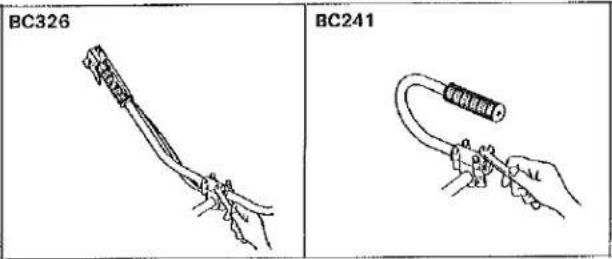
c) Assemble the throttle wire.
BC326
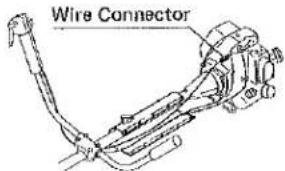
- Open the connector case,
- Engage the wire connector with the wire end of throttle lever side.
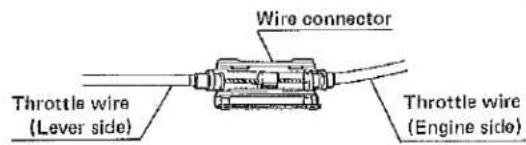
- Snap the connector case and fix it to the illustrated position with a band.
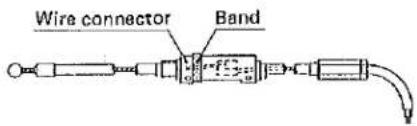
BC241
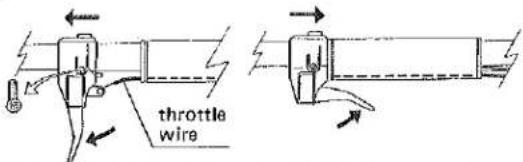
- Loosen the bolt and move the throttle lever away from the grip.
- Remove the bolt.
- Move the lever down so as to let the hook appear.
- Hang the throttle wire on the hook and replace the lever.
- Move the throttle lever to the grip.
- Tighten the bolt.
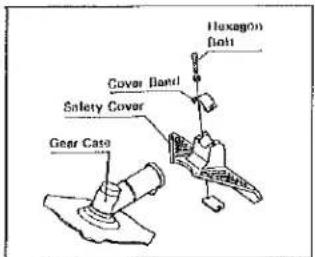
d) Fit the safety cover to the shaft tightly.
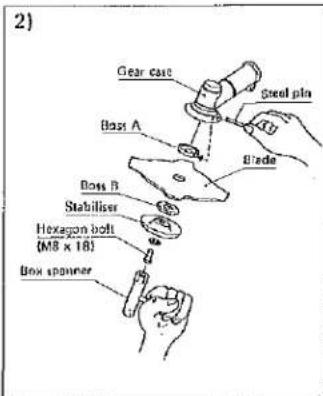
2) How to fit up the blade
a) Be sure to wear a pair of gloves when fitting the blade.
b) Take out the hexagon bolt (counterclockwise), spring washer, plain washer and Boss B, using the box spanner attached.
c) Insert the blade between Bosses (A) and (B), ensuring that the spline grooves of the Boss and blade shaft fit each other. Then set the stabilizer if attached and tighten the hexagon bolt securely counterclockwise.
d) The blade's surface where a pattern or figure printed should be faced to Boss A.
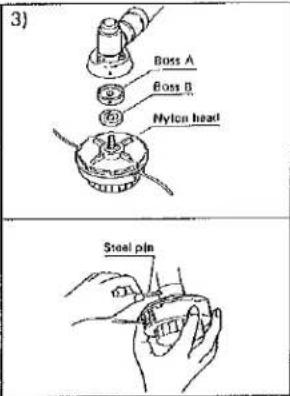
3) How to fit up the nylon head.
Now with Boss A and Boss B located on shaft, screw on nylon head assembly. Use steel pin as described to finally tighten.
4) How to wear the hanging strap
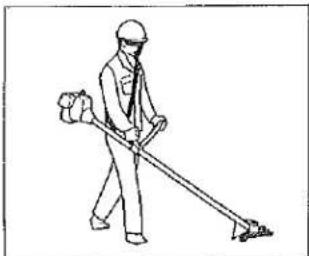
a) Position the hanging strap from your left shoulder to your right waist.
b) If there is a waist belt attached, wear the belt securely around your waist.
c) The position of hanging strap may affect the ease of operation. For safety and efficiency, adjust the position of hanging strap according to your physique.
natural_image
Line drawing of a person in uniform and hard hat using a manual lever (no text or symbols)4-2 Preliminaries before operation
1) Garments:
a) To protect your head, ears and eyes wear a protective cap, ear guards and safety glasses which can protect you from branches, pebbles, stones, fallen rocks, noise, etc.
b) To protect your feet, wear shoes which can protect you from slipping in the field.
c) Wear close fitting clothes with no loose sleeves and cufts.
2) Inspection of machine (preparation for starting engine)
a) Check that every screw is securely tightened and enough oil and grease is applied.
b) Examine the blade for damage or cracking,
c) Fit the blade securely, using a spanner.
d) Be sure to fit the safety cover.
e) Do not run the engine before it is coupled to the main body.
f) Always use a sharp blade.
3) Other Safety Hints:
a) Do not smoke when you add fuel or oil.
b) Use genuine parts such as blade, plug, etc. If incorrect parts are used they may shorten the life of the machine and cause accidents.
c) Do not modify the machine.
4) During the job:
a) Start the engine in a stable place to prevent it from turning over.
b) When you start the engine on the ground, be sure to face the blade upward or not allow the blade to touch the ground. If the blade touches the ground, it could blow up pebbles or sand, or the blade could break -- which is very dangerous.
c) Watch your step before starting. Look out for by-standers.
d) When you move the machine from one working area to another, stop the engine completely.
(e) In raising the speed of the engine, gradually open the throttle. If opened briskly the machine will be swung in the direction of the blades rotation which may cause an accident.
f) Removing the grass with the engine running could suddenly engage the clutch and motor.
4-3 Operation
1) Hang the main body onto the hanging strap.
2) The length of the hanging strap may affect the ease of operation. Adjust it according to your physique or the job.
3) Adjust the speed of the engine with the throttle lever.
4) Make sure that the blade will stop when the engine speed is reduced.
5) The technique of operation is to control your direction by your waist, not by your hands. The hands are only holding the handles.
6) Do not use the blade roughly to chop down objects as it is very dangerous.
7) To cut vines effectively, push the blade into them.
8) To cut down a small tree, try one cut with the engine running at high speed.
9) The blade must be run at a normal speed. Too much low speed or excessive loading in cutting the tree by force will stop the blade frequently. Such frequent stoppage of the blade will cause the clutch to overheat.
NOTE: Non-fog goggles are recommended for use at all times during cutter operation.
5. MAINTENANCE AND CHECK
1) Daily care
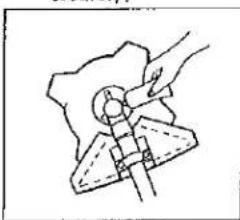
a) Examine the blade for cracks, flaws, eccentricity, etc.
b) Sharpen the blade before operation.
c) Examine every bolt, screw and nut to ensure they are tightened securely;
natural_image
Simple line drawing of a hand holding a tool over a mechanical component (no text or symbols)2) Monthly care
a) Wash and clean the air cleaner
b) Grease the gear case every 50 hours of operation. Use a lithium base grease.
ENGINE
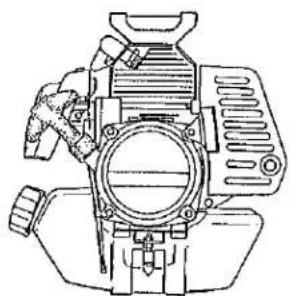
natural_image
Technical line drawing of a mechanical device with no visible text or symbolsT 130 T 170
1. PRECAUTIONS FOR SAFE OPERATION
- For preventing a fire, stop the engine before replenishing fuel and keep the engine away from fire.
- For preventing poisoning, be sure to lead the exhaust gas out of the room, tunnel or any other confined space where the engine is used.
- Do not fail to protect the starting pulley, belt, drive pulley and other movable parts with cover for safety work.
- Do not touch the muffler and engine body during operation and immediately after the engine stops.
- To avoid electric shock, do not touch the spark plug cap and power cable, e.t.c.
- Whenever the work is done, wear clothes as instructed and do not allow children or not concerned persons to gain access to the engine.
- To protect the engine with cover after the end of daily work, make sure that the muffler and engine body have become cold.
The description in this booklet is subject to change without previous notice.
This engine has manufactured under strict quality control and it is certificated to have passed our inspection.
The following items 1 and 2 are of importance that must be prepared before starting the engine.
- Supply fuel to the fuel tank
- Use mixture gasoline and 2-cycle engine oil in ratio 20\~26:1 (2-cycle engine oil-hereinafter called "OIL")
- Inspect and clean the air cleaner
- The inside of air cleaner must always be clean. Dirty air cleaner will decrease the output capacity. If fouled with dirt, take out the element; clean it in gasoline; clean the inside of cleaner and replace the cleaned element to its position. The cleaned element must be dipped in oil and oil must be squeezed out before replacing to position.
3. STARTING
- Stop switch ON. (Fig. 1)
- Priming:
Push the tickler button fully and while pushing it, push the primer pump several times until fuel flows out of the overflow pipe. (Fig. 2)
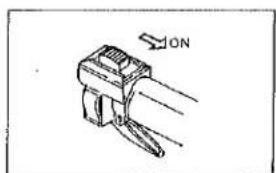
natural_image
Simple line drawing of a handheld device with two blades and an ON button (no text or symbols)Fig. 1
CAUTION:
When the tickler button push imper-
fectly, the fuel flow in to the cylinder richly it cause often start missing. Then, you may push the tickler button perfectly.
- Close the choke lever fully
• In summer season and engine is still warm (restart right after stoppage), turn the choke lever fully open.
- When restarting the engine (Which is still warm after refilling fuel), open the choke lever fully. (Fig. 3)
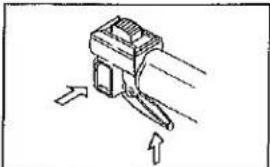
- Open throttle halfway and lock it by the button. (Fig. 4)
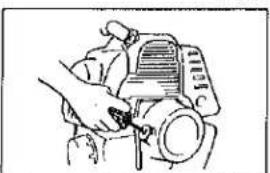
- Pull the recoil starter vigorously. (Fig. 6)
CAUTION:
Excessive fuel is a cause of start failure. If it happens, remove the spark plug, close the fuel cock, fully open the choke, fully open the throttle lever and repeat pulling the recoil starter several times, then the engine should start. After confirming successful starting, open the choke fully.
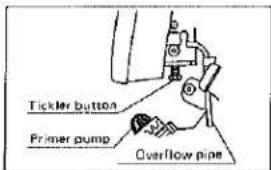
Fig. 2
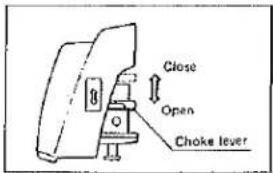
Fig. 3
natural_image
Simple line drawing of a mechanical component with arrows indicating motion or force (no text or symbols)Fig.4
natural_image
Line drawing of a person using a handheld device to interact with a mechanical device (no text or symbols visible)Fig. 5
4. OPERATION
- After the engine has started as explained in the preceding paragraph, keep warming up drive for a little while.
- When the engine is warmed up enough, set the throttle lever or a required speed and clutch in to load the engine.
- Check the fuel level in the tank now and then, and replenish it with fresh before exhausting. Too low fuel level in the tank will be a cause of next start failure.
CAUTION:
- Don't accelerate the engine rapidly just after starting, as the engine can't be well lubricated yet.
- If the throttle valve is fully opened, the engine rotates excessively and will cause not only the shortening of the engine life time but also the engine troubles.
Avoid the unloaded operation at high speed (racing) and also never operate the engine in excess of its rated revolution.
5. STOPPAGE
- Pull down the engine revolution to the lowest revolution.
- Stop switch OFF. (Fig. 6)
- Close the fuel cock.
(The item 3 is applicable for the engine with a float carburetor.)
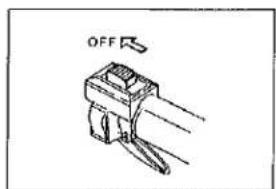
Fig. 6
CAUTION:
In summer, when brush cutter engine is stopped temporarily at a break etc. during operation, place the engine in the position shown in Fig. 7 so that the inner packing of the fuel cap is not dipped in fuel, other wise the fuel may leak from the cap due to the increasing of the inner pressure of the tank.
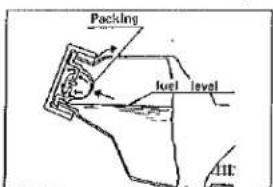
Fig. 7
Adjustment of carburetor
- Adjust the slow speed by the idle adjusting screw. Clockwise turn will make the slow speed higher and counter-clockwise turn will make it lower. (Fig. 8) - In the case of fuel flow, adjustment is made by the high speed fuel adjusting screw. Turn the adjusting screw 2\~3 anticlockwise turns from the tightened position and it is on the normal position.
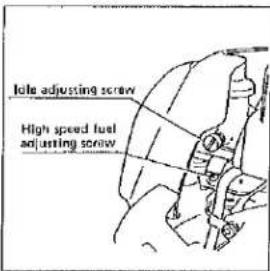
Fig. 8
6. PERIODICAL MAINTENANCE
- Daily inspection
- Check all the bolts and nuts for looseness,
- Check for fuel or gas leak.
- Inspection at every 20 hours' operation,
- Clean the air cleaner element.
- Inspection at every 50 hours' operation
- Retighten the cylinder head bolts and nuts.
- Clean the spark plug and adjust the firing gap to 0.7mm.
- Clean the inside of the fuel tank by flushing gasoline.
- Inspection at every 100 hours' operation
- Remove carbon layer from the cylinder combustion chamber,
the exhaust port and the outlet/inlet of muffler.
- Adjust the clearance of the contact breaker point,
Adjustment of ignition timing
- Dismount the recoil starter, adjust the clearance of the contact breaker point to 0.35mm, then the timing should be normalized to proper timing that is before TDC 26°. - The MTI engine has a non-contact type ignition system. So, it is not necessary to maintenance for ignition timing.
7. LONG TERM STORAGE
When shutting down the engine for long period of time during season-off, the following maintenance procedures are necessary for the smooth restarting in the next use.
-
Drain all the fuel from the fuel tank and the float chamber of carburetor and pull the recoil starter vigorously two or three times with closing the choke lever fully.
-
Remove the spark plug and feed a sponful engine oil from the plug fitting hole into the engine and stroke the recoil starter (or the start rope) 2 or 3 times and keep the cylinder head at compressed position. Be sure to replace the spark plug to its position,
-
Clean the outside surface with an oil soaked cloth and keep the engine in a moisture free place until next use.
-
Clean the fuel filter and suction pipe by gasoline,
8. TROUBLE SHOOTING
- Start failure
• Did you open the fuel cock?
- Isn't water mixed in fuel?
- Isn't the engine sucking excessive fuel?
- Is the stop switch turned "on"?
- Engine starts but fails to run at high speed.
• Is the choke opened fully?
• Is the mixture in normal ratio?
• Water may be mixed in fuel.
- Engine runs but fails to display full output.
- The air cleaner element may be foul, it might be trapping too much dirt.
• The exhaust hole and the muffler may be choked with carbon layer.
- Engine slows gradually and stops finally
• The air vent hole of fuel tank cap may be clogged with dirt.
- Fuel flow may be stagnating due to sludged or foreign matter which may be choking the fuel system.
• Water may be mixed in fuel.
- IMPORTANT SAFETY INSTRUCTIONS
- Safe Operation Practices for Brush Cutter
- TRAINING
- PREPARATION
- OPERATION
- MAINTENANCE AND STORAGE
- FEATURES:
- MAIN PARTS
- SPECIFICATIONS
- ACCESSORIES
- HOW TO OPERATE
- 4-1 How to Assemble
- 1) Main Body
- 4-2 Preliminaries before operation
- 4-3 Operation
- MAINTENANCE AND CHECK
- PRECAUTIONS FOR SAFE OPERATION
- STARTING
- CAUTION:
- OPERATION
- STOPPAGE
- Adjustment of carburetor
- PERIODICAL MAINTENANCE
- Adjustment of ignition timing
- LONG TERM STORAGE
- TROUBLE SHOOTING
Brand : Maruyama
Model : BC241
Category : Hedge Trimmer