smart:limit - Audio software Sonible - Free user manual and instructions
Find the device manual for free smart:limit Sonible in PDF.


| Product Type | Audio Software (Limiter Plugin) |
| Version | 1.0 |
| Plugin Formats | AAX, AU, VST3, VST2 |
| Supported Operating Systems | macOS 10.12 or later, Windows 10 or later |
| Bit Depth | 64-bit |
| Sample Rates | Up to 192 kHz |
| License Type | Perpetual |
| Copy Protection | Serial number |
| Main Function | Intelligent limiting with adaptive threshold |
| Key Features | Real-time analysis, transient preservation, automatic release, look-ahead |
| Latency | Low latency for real-time use |
| DAW Compatibility | Pro Tools, Logic Pro, Ableton Live, Cubase, FL Studio |
| Installation | Download installer from Sonible website, activate with serial |
| Updates | Free updates within major version |
| Support | Email support, online knowledge base |
| User Manual | PDF manual available for download |
Frequently Asked Questions - smart:limit Sonible
User questions about smart:limit Sonible
0 question about this device. Answer the ones you know or ask your own.
Ask a new question about this device
Download the instructions for your Audio software in PDF format for free! Find your manual smart:limit - Sonible and take your electronic device back in hand. On this page are published all the documents necessary for the use of your device. smart:limit by Sonible.
USER MANUAL smart:limit Sonible
Working with the limiter controls 7
Sound-shaping Panel 9
Distortion Monitoring 10
Metering 11
Intelligent Limiter Parameters 12
Loudness Monitoring & Quality Check 13
Loudness Measurement 14
Monitoring Readouts 15
Loudness and Dynamics Grid 16
Publishing Target 18
Instant Impact Prediction 19
Quality Check 20
States and Presets 21
Settings and Licensing 22

natural_image
Abstract teal geometric shape resembling a stylized letter or symbol (no text or symbols present)
Welcome to smart:limit
smart:limit is an intelligent true peak limiter. It offers automatic parametrization, extensive loudness monitoring and a unique set of sound-shaping tools. Additionally, the plug-in interactively guides users in finding the right loudness and dynamics for publishing. smart:limit is an AI-powered tool that actually makes "set - check - publish" as straightforward as it sounds.
smart:limit is all about worry-free limiting: while analyzing the signal's characteristics and the various influences limiting can have on the sound, the plug-in gives users real-time access to all the information about loudness and dynamics they need.
A newly designed processing and genre-based profiles, suggest limiter settings that preserve detail and result in a mix that can breathe. We also equipped smart:limit with a comprehensive loudness monitoring section visually guides users in finding the sonic sweet spot and meeting safe zone requirements for any streaming service or loudness standard.
Get started with smart:limit and enjoy getting your track ready for its big release.
Install
System requirements
| CPU | Intel Core i5 |
| RAM | 4GB |
| Operating systems | Windows 10 (64 bit) |
| Mac OSX 10.9or higher |

You will need admin privileges to successfully install the smart:limit plug-in.
Windows
To start the installation process, extract the downloaded zip-file sonible_smartlimit_1.0.0.zip onto your hard disk and run the installer.
The installer will now guide you through the necessary steps to install smart:limit on your computer.
During installation, you can select which version(s) of smart:limit you want installed. You can also select custom installation folders for the VST version or simply use the default folder suggested by the installer.
The VST3 and AAX versions of the plug-in will be automatically installed in their respective default folders.
Default folders:
VST3
C:\Program Files\Common Files\VST3\
VST
C:\Program Files\Common Files\VST\
AAX
C:\Program Files\Common Files\Avid\Audio\ Plug-Ins
Mac OSX
To start the installation process, please open the disk image sonible_smartlimit_mac_1.0.0.dmg. This will mount the image and open a finder window showing the content of the installation package.
To install smart:limit on your system, run the installation file smartlimit.pkg.
The installer will now guide you through the necessary steps to install smart:limit on your computer. smart:limit will automatically be installed in the default locations for audio plug-ins.
Default folders:
Audio Unit
/Library/Audio/Plug-Ins/Components/
VST
/Library/Audio/Plug-Ins/VST/
VST3
/Library/Audio/Plug-Ins/VST3/
AAX
/Library/Application Support/Avid/Audio/Plug-Ins/
Authorization
Licensing system
You can select between two licensing systems: machine-based or iLok (USB dongle).
By creating a user account on www.sonible.com and registering your products – if they are not already visible in your Dashboard – you can manage your plug-in activations.
Machine-based
Each license key allows you to install smart:limit on two computers with unique system IDs. These system IDs are registered during license activation.
The same license can be used by multiple users, but each user has to individually unlock the full version of smart:limit under their account.
In the case of a system-ID being changed (e.g. replacement of the hard drive), you can revoke/activate the plug-in next to the respective system-ID in the Dashboard of your sonible user account.
iLok
If you want to transfer one activation to your iLok, first make sure the plug-in is registered in your sonible user account. Click on the button "transfer to iLok" next to the plug-in in your Dashboard and follow the instructions.
Note: 1st gen iLok dongles and the iLok Cloud are currently not supported.
Unlocking
If you purchased a license for smart:limit online, you will receive your license key via email.
Machine-based unlocking
When opening smart:limit for the first time, a notification window will be displayed asking you to unlock smart:limit with a valid license key.
Please make sure that your computer is connected to the internet before starting the registration process.
Enter your license key and click "register." The plug-in will now communicate with our server to check if the license is valid. If it is – enjoy!
iLok
If you transferred your license to an iLok, simply attach the iLok to your computer. The plug-in will then be automatically registered – enjoy!
Trial version
To run smart::limit in demo-mode, simply click "try" in the menu that pops up when you first open the plug-in. You will then be able to use smart::limit for a couple of days days without any limitations. (Please refer to our website to find out more about the current demo period of smart::limit)
When the demo period expires, you will need to purchase a full license in order to continue using the plug-in.
Internet connection requirements
sonible plug-ins only needs an internet connection during the trial period and for initial license activation. During the trial period, the plug-in needs to go online every time it is used. Once the license of your plug-in has successfully been activated, an internet connection is no longer needed.

User Interface
Learning section
Initiate the learning process, select a genre profile or load a reference track.
States
Use up to 8 different states to easily compare settings or prepare multiple versions of your track.
Loudness and Dynamics Monitoring Section
Monitor the loudness and dynamics of your signal and use the monitoring guidance to meet safe zone requirements of publishing targets.

Output Section
Monitor the gain reduction and level of your output signal and set a negative output gain.
Distortion Monitoring
Observe the level of distortion in different frequency ranges caused by the limiting process.
Sound Shaping Tools
Tweak your track with four unique sound shaping tools.
Quality Check
Get interactive hints about any need of action regarding loudness, dynamics and true peak value.
Working with the limiter controls
Although smart:limit is characterized by its AI-powered processing, we also equipped the plug-in with every control crucial element you would expect from a pro-grade limiter. Tweak the results suggested by the intelligent processing (see page 12 for more info) or set all parameters from scratch.
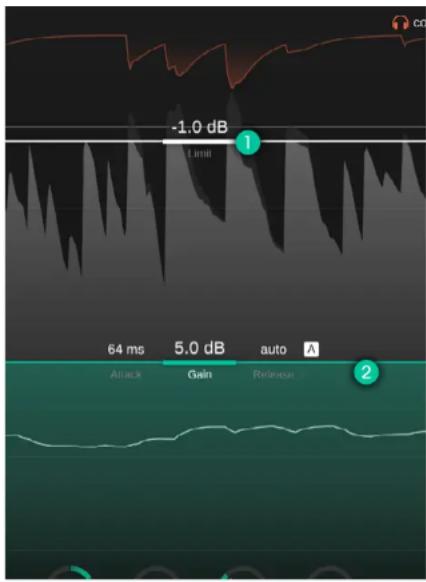
1 Limit line
You can drag the limit line up and down to set the maximum allowed true peak level for the processed output signal. Setting the limit to e.g. -2dBFS means that the loudest peak of the output signal will never go above this limit.
While smart:limit already uses true peak limiting to make sure that no inter-sample peaks occur when the signal is played back on different devices, setting a limit below 0dBFS will give your peaks some headroom. This headroom helps to make sure that a signal will not clip even if it runs through an audio codec (e.g. AAC,MP3, Ogg/Vorbis). We suggest a limit of at least -1dBFS when bouncing a signal for streaming platforms.
2 Gain line
You can drag the gain line up and down to set the input gain. The gain is the most crucial limiter parameter since it allows you to control the overall level of your processed signal.
Increasing the gain will make your signal louder but will also reduce the dynamics as soon as your peaks start hitting the limit. While a certain amount of gain reduction is intended when using a limiter, you should always try to go for a good balance between taming your peaks while letting the signal breath. The Loudness & Dynamics grid of smart:limit can help you to find the right dynamic balance for your signal (see page 16).

3 Attack
The attack time represents the time after which the smooth release of the gain reduction sets in. A longer attack time preserves more transients but may cause audible distortion. A short attack time makes sure that the limiting process is very smooth, but the overall loudness of the signal and presence of transients may decrease.
4 Release
The release time controls how quickly the gain reduction returns to zero after the signal was limited. A long release time ensures a smooth limiting process but can lead to pumping effects, since the short-term loudness changes may become audible. A short release time helps to preserve transients and to increase the overall loudness of the signal, but it might cause audible distortion at extreme settings.
5 Auto Release
To enable intelligent auto release, click the "A" button next to the release time value. If auto release is enabled, the release time adapts itself to the characteristics of the input signal and automatically changes if other parameters (e.g. input gain) are modified. This adaptive release time ensures a smooth limiting process even when you go for more extreme gain settings.

6 Constant Gain
Enable "constant gain" to make accurate A/B comparisons. It will level-match the dry input signal with the processed signal. Since louder signals are often perceived as "better" (more present and dense), enabling constant gain helps to avoid a loudness bias towards the limited signal. Comparing the dry input and processed output signal with constant gain mode enabled allows you to focus on changes in the signal characteristics (e.g. dynamics, transients, saturation) rather than on the effect of an increased playback loudness.
7 Delta
Enable "Delta", to listen to the signal components removed by the limiting process. Listening to the delta signal helps to better understand which (transient) signal components are currently being limited.
Sound-shaping Panel
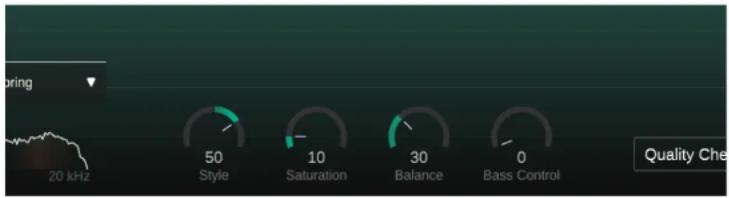
Style
The Style dial determines how aggressively the limiter hits the audio material. This parameter can be compared to different “processing modes” or “engines” in other limiters, but smart:limit allows you to set this feature gradually.
A soft limiting style ensures a smooth and transparent limiting process. It is suggested for content that should sound natural but this style generally delivers clean limiting results for a wide range of material.
A hard limiting style helps to add some extra punch to your track. While keeping an eye on the limit, the hard style allows to really squash your material and let your tracks sound aggressive and dense.
Since no two tracks are the same, any setting in-between is up to your personal taste.
Saturation
The saturation dial allows boosting the perceived loudness of your track without increasing the peak level. While lower saturation values help to add some subtle warmth and color to your track, high values allow to really inflate the whole signal and make it extremely dense.
Balance
The Balance control helps to give your track the right spectral polish prior to publishing. Particularly for non-extreme settings this effect is typically rather subtle, but can make a big difference when it comes to the perceived homogeneity of a final mix.
Bass Control
The bass control enhances the low end of your signal in order to create a rich sound. It's a great tool to create a strong low-frequency fundament for your track and can work wonders in tightening up kicks or bass heavy instruments.
Note: Since all sound shaping tools adapt to the characteristics of your input signal, you have to complete the learning process to unlock them.
Distortion Monitoring

Click on the arrow in the lower left corner to expand the Distortion Monitoring display. The spectral representation indicates the amount of distortion in bright red for different frequency regions.
For genres like rock or pop, a certain amount of distortion is expected when using a limiter. Still, high distortion values may become audible as detrimental artifacts and should be avoided. If the distortion meter is red all the time, you can try to reduce the amount of limiting, increase the release time and reduce the attack time (or use auto release) or turn down the saturation dial. Please remember that increasing the saturation deliberately induces distortion as a creative effect.
Oversampling
smart:limit is based on a quite complex (and unique) multi-stage limiting process. Different stages are running at different resolutions - so listing a single oversampling factor simply doesn't really make sense for this new design. So while there's no single reference value to calm your mind, rest assured that smart:limit is using high-resolution oversampling throughout the whole limiting chain where necessary.
Metering
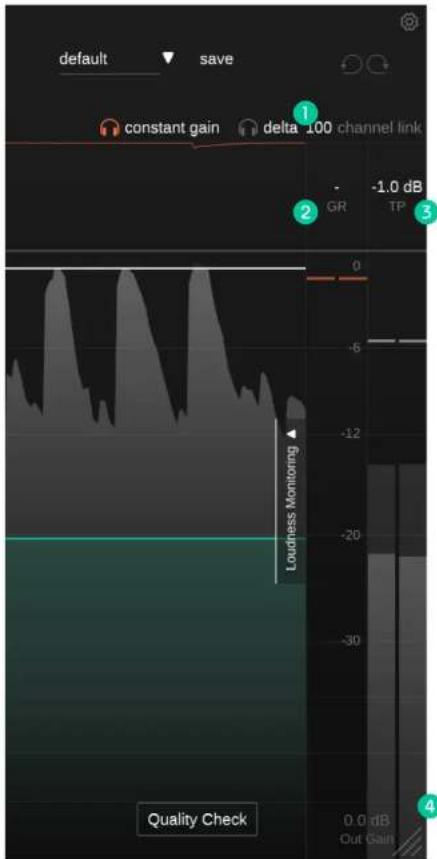
For quick monitoring, smart:limit provides a classical gain reduction meter and a true peak output meter on the right-hand side of the interface. Expand the Loudness Monitoring section for extensive insights into the loudness and dynamics of your track (see page 13)
1 Channel link
Channel links controls the amount of linking between channels when working on stereo or multichannel signals. When set to 100, the maximum gain reduction value computed for any channel will be applied to all channels. By reducing the value, all channels will gradually be processed independently.
Unlinking channels can help, if for example the left and right channel of a stereo signal carry signals with different characteristics. Be careful though, as processing channels individually may modify the stereo image due to the destruction of binaural cues.
2 Gain Reduction (GR)
The gain reduction meter displays the real-time negative gain applied by the limiter. The GR value (= gain reduction) shows the current maximum gain reduction value for all channels.
3 True Peak (TP)
The True Peak output meter shows the true peak (background) and RMS value (foreground) for the output signal. The TP value (= true peak) shows the maximum observed true peak value for all channels. Click the value to reset.
4 Out Gain
The output gain allows setting a negative linear gain to reduce the loudness of your limited signal.
Intelligent Limiter Parameters
smart:limit is equipped with a unique learning feature that analyzes the incoming signal and automatically finds limiting settings that preserve details of the track, while taming the dynamics (if needed). The learning process also unlocks the sound shaping tools (see page 9).

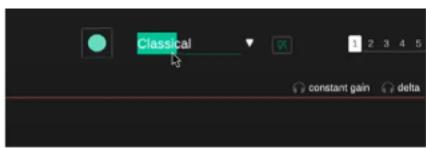

Step 1
Select a profile or reference track
A profile calibrates the processing of smart:limit to a specific sound source. smart:limit's profiles are based on genres and their respective dynamics. You can always start the learning process with the "Universal" genre profile and switch to a more specific profile later.
If you want smart:limit to align its processing to the characteristics of a reference track, click "Load reference..." in the profile dropdown and select a track of choice. You can also drag-and-drop a track onto the plug-in window. This will automatically set the track as the current profile.
Selecting a profile also sets the recommended dynamics area inside the Loudness and Dynamics Grid (see page 16).
Step 2
Start the audio playback & initiate learning
smart:limit needs an incoming audio signal for the learning process. Once the playback has started, click the green record button. The pulsating record icon and a progress bar inside the profile down indicate that smart:limit is actively learning from your signal.
Always let smart:limit learn from relatively loud sections of your track (e.g. the refrain). This gives smart:limit a better idea of the most critical dynamic section of the track.
Step 3
Done!
Once the learning process is finished, smart:limit automatically applies parameters like the input gain, limit, attack and all sound shaping parameters.
You can go back to the smart state (the parameter settings computed by smart:limit) after making manual changes by clicking on the smart:limit logo right next to the profile dropdown.
Loudness & Dynamics Monitoring
smart:limit is a one-stop-shop when it comes to limiting and loudness monitoring.
Click the arrow next to "Loudness Monitoring" on the right side of the interface to expand the full section.
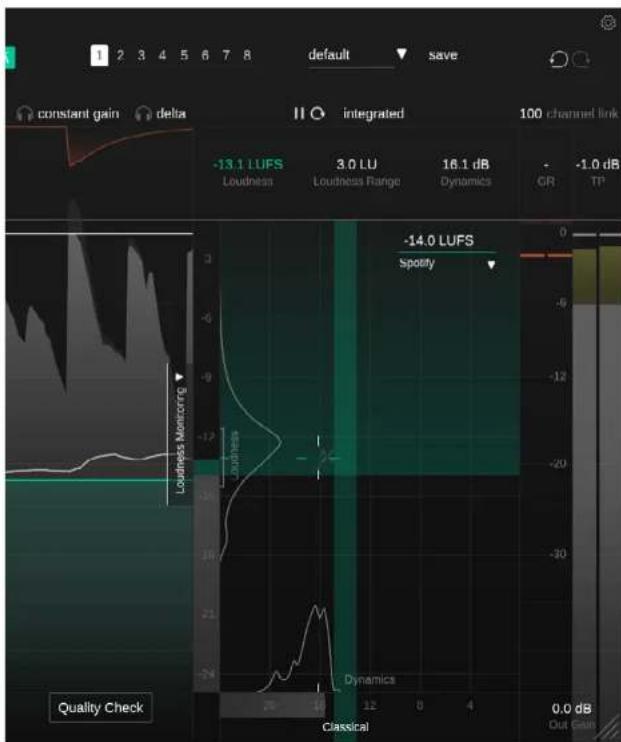
i What is loudness?
The perceived loudness of a piece of audio is commonly measured in LUFS (Loudness Units relative to Full Scale) according to the EBU 128 standard. Technically speaking, LUFS are the unit of measurement used in the process of quantifying the loudness of audio material. To compute the LUFS value of some piece of music (often referred to as Program Loudness), the average level of the audio material combined with perceptual filters are analyzed over time.
i What is Loudness Normalization?
Streaming platforms want their listeners to have a smooth and consistent listening experience when browsing through their music – even when they are constantly switching between different artists, albums and genres. One crucial factor that makes for a smooth listening experience is a similar loudness of consecutive tracks. That way, listeners don't have to fiddle with the volume and can simply enjoy the music.
Two pieces of music with the same LUFS level are be perceived as equally loud. That's why most streaming platforms nowadays normalize all audio material to a certain LUFS level - to guarantee a consistent perceived loudness among consecutive tracks.
Loudness Measurement
Depending on the measurement period, different loudness values can be computed for a piece of audio. Click the loudness selector above the displayed loudness values to toggle between three different loudness measurement types: integrated, short-term and momentary.
You can also pause or reset the loudness measurement by clicking the play/pause and the reset icon next to the selected loudness type.

Integrated
The integrated loudness represents the average loudness over a long observation period - if measured over the entire audio track it's the so called Program Loudness. The integrated loudness is also the value streaming platforms are referring to when talking about the loudness of a track. Please note that only long observation periods (>60s) allow to show valid integrated loudness measurement according to the EBU 128 standard.
Although smart:limit comes with the unique Instant Impact Prediction feature (see page 19), make sure to reset the integrated loudness measurement if the input signal (e.g. the arrangement of your mix) changes.
Short-term
The short-term loudness value is computed over sliding blocks of 3 seconds. It typically changes over time and provides valuable information regarding the loudness of different sections of a track. The current short-term loudness is also displayed inside the loudness meter and a histogram of all measured short-term loudness values is shown next to the meter.
Momentary
The momentary loudness value is computed over sliding blocks of 400ms and helps to identify overly dynamic loudness peaks. If momentary loudness is selected, the loudness meter will display the maximum momentary loudness value (peak hold) and the current momentary loudness in addition to the short-term loudness value.
Monitoring Readouts
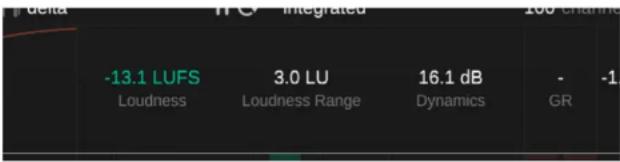
Loudness (LUFS)
The loudness display shows the current integrated, short-term or momentary loudness of your track. You can switch the displayed value by clicking the loudness selector above the readout section.
Loudness Range (LRA)
The loudness range measures the loudness variation of an audio signal based on the loudest and quietest non-silent sections within the measurement period. The larger the value, the larger the loudness variation between different sections of a track.
Dynamics (dB)
The dynamics value is based on the peak to loudness ratio of a track. It is computed based on the average difference between the peak level and short-term loudness and is a good indicator for the short-term dynamis. The current dynamics value as well as a history of all observed dynamics values are displayed at the bottom of the Loudness and Dynamics grid.
Note: smart:limit is using the median of all measured PSR values (PSR = peak to short-term loudness ratio) for measuring the dynamics of a track. Compared to the well known PLR value used by other tools (peak to long-term loudness ratio), our experiments showed that our PSR based descriptor better traces the actual - also short term - dynamics of a track.
Loudness and Dynamics Grid
line
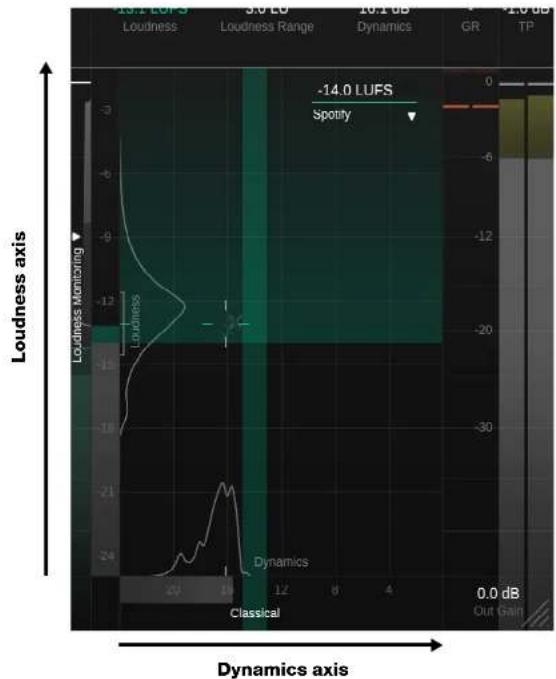
| Frequency (GHz) | Loudness Monitoring | | --------------- | ------------------- | | 0 | -3 | | 20 | -12 | | 40 | -24 | | 60 | -21 | | 80 | -18 | | 100 | -15 | | 120 | -12 | | 140 | -9 | | 160 | -6 | | 180 | -3 | | 200 | 0 | | 220 | -3 | | 240 | -6 | | 260 | -9 | | 280 | -12 | | 300 | -15 | | 320 | -18 | | 340 | -21 | | 360 | -24 | | 380 | -27 | | 400 | -30 | | 420 | -33 | | 440 | -36 | | 460 | -39 | | 480 | -42 | | 500 | -45 | | 520 | -48 | | 540 | -51 | | 560 | -54 | | 580 | -57 | | 600 | -60 | | 620 | -63 | | 640 | -66 | | 660 | -69 | | 680 | -72 | | 700 | -75 | | 720 | -78 | | 740 | -81 | | 760 | -84 | | 780 | -87 | | 800 | -90 | | 820 | -93 | | 840 | -96 | | 860 | -99 | | 880 | -102 | | 900 | -105 | | 920 | -108 | | 940 | -111 | | 960 | -114 | | 980 | -117 | | 1000 | -120 |When using a limiter, the loudness and the dynamics of a track are highly interconnected. Increasing the input gain increases the loudness of the signal, but also reduces the dynamics as soon as the signal hits the limit. The Loudness and Dynamics Grid helps to find the right trade-off between the current loudness of a track and its dynamics.
The vertical axis of the grid represents the loudness of the track in LUFS while the horizontal axis represents the dynamics in dB. The grid will also show a reference Loudness area as specified by your chosen Publishing Target, as well as a suggested dynamics depending on your chosen genre.
Loudness and Dynamics Grid
line
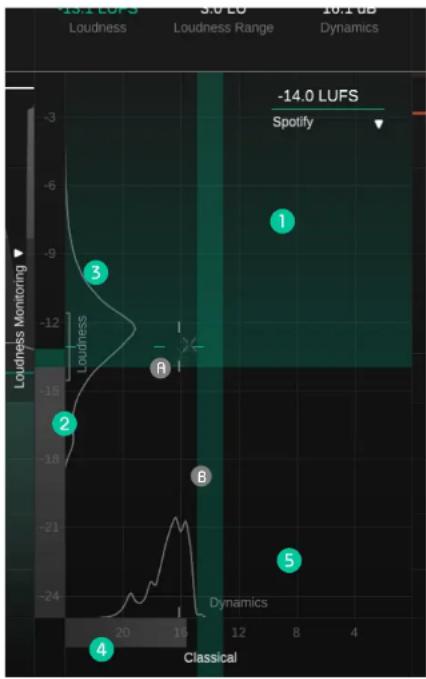
| Label | Classical | Loudness | |-------|-----------|----------| | 1 | 8 | -14.0 | | 2 | 16 | -19.0 | | 3 | 16 | -12.0 | | 4 | 16 | -24.0 | | 5 | 8 | -24.0 | | R | 16 | -19.0 | | 8 | 16 | -21.0 |The green horizontal area indicates loudness values that are good for delivery.
B The green vertical area indicates the dynamics area suggested for the selected genre profile.
1 Loudness & Dynamics Crosshairs
The position of the crosshairs represents the integrated loudness (vertical position) and dynamics (horizontal position) of your track. The smaller gray crosshairs in the background represent a trail of short-term values.
Color
The lines of the crosshairs are initially yellow and turn green once your track lies within the area of the recommended loudness or dynamics.
Confidence Area
The further apart the lines of the crosshairs are, the less confident is the current loudness measurement. Please note that every time you restart a measurement or change a parameter, the confidence area will diffuse.
2 Loudness Meter
The loudness meter displays the current short-term loudness value. The color of the meter is gray for values below the reference loudness, green for loudness values falling into the recommended loudness area and yellow or red for values exceeding the recommended loudness.
The current loudness range (LRA) is indicated by a gray brace next to the meter and the current integrated loudness is denoted by a small tick mark at the same vertical position as the crosshairs.
3 Loudness Histogram
The histogram next to the loudness meter indicates how often a certain loudness value was observed. The shape of the histogram tells you if the observed signal has a more or less constant loudness over the whole observation period (one small peak), a slightly varying loudness over time (one broad peak) or two (or more) significantly differing sections (two or more peaks).
4 Dynamics Meter
The dynamics meter displays the current dynamics of your signal. The color of the meter is gray for values below the reference dynamics, green for values falling into the recommended dynamics and yellow for values exceeding the recommended range.
The current overall dynamics is denoted by a small tick mark at the same horizontal position as the crosshairs.
5 Dynamics Histogram
The histogram above the dynamics meter indicates how often a certain dynamics value was observed. The shape of the histogram tells you if the observed signal has more or less constant dynamics over the whole observation period (one small peak), slightly varying dynamics over time (one broad peak) or two (or more) significantly differing sections (two or more peaks).
Publishing Target

i What are Publishing Targets?
Different Publishing Targets may have different loudness requirements for a track. While there are no limitations when publishing for CDs or for downloads, streaming platforms or broadcasting standards, however, typically require a certain (minimum) loudness.
As outlined on page 13, most streaming platforms and broadcasting stations normalize all material to certain loudness levels: They turn down tracks louder than a certain reference loudness and most of them also turn up tracks that are quieter than this reference.
There are three things to consider when preparing a track for publishing for streaming platforms or broadcasting:
Don't sacrifice dynamics and make tracks unnecessarily loud since they will be turned down to a reference loudness anyway.
The loudness of a track should not fall below the reference loudness of a platform. Unwanted limiting can occur when platforms increase the level in a track or – if the track is not turned up – the track will be quieter than all other competing tracks.
It is not an issue if the loudness of a track is above the reference loudness of a platform. The track will simply be turned down – and so is every other track.
Selecting a Publishing Target
You can select different types of Publishing Targets or you can set a custom reference loudness value.
You can use the dropdown to select a Publishing Target. Each target covers information regarding the reference loudness and recommended true peak value of the target.
Most streaming platforms only require a certain minimum loudness. All loudness values above this loudness are fine as indicated by a green area inside the Loudness and Dynamics grid.
Loudness standards or reference tracks suggest actual loudness target values. In this case, only the target value (plus a tolerance area) represents a good loudness value, indicated by a green horizontal bar inside the Loudness and Dynamics grid.
Custom Reference Loudness
You can set the reference loudness parameter to a custom value, by entering a value or by dragging the number.
Why does smart:limit ignore my loudness publishing target during learning?
smart:limit always tries to find the right dynamics for a track, since the targeted dynamics are defining the amount and style of limiting. When smart:limit learns new limiter settings, it looks at the chosen genre profile as well as the input signal and tries to find settings that lead to good dynamics for this specific track.
The loudness is a direct result of the targeted dynamics. So smart:limit is using the dynamics value and not the loudness value as a learning target. It doesn't make sense to aim for a certain loudness if it doesn't fit the style of your track (e.g. make a pop track overly-dynamic simply not to become too loud). Therefore, the selected publishing target will be ignored during learning.
Instant Impact Prediction

line
| Time (ms) | Amplitude (dB) | | --------- | -------------- | | 0 | -1.0 | | 64 | 3.4 | | 128 | -14.0 |smart:limit provides a unique instant impact prediction feature for an optimized workflow. While loudness monitoring tools typically require you to restart the loudness measurement from scratch after changing parameters, smart:limit's loudness metering (Loudness Meter, Dynamics Meter, readouts and histograms) reflects every parameter change in real-time without having to repeatedly playback the entire input signal.
Quality Check
The Quality Check guides you in tweaking parameters to get your track ready for publishing. While enabled, the Quality Check continuously analyzes the dynamics and loudness of your signal and compares the values with the ranges suggested by the Publishing Target (loudness) and genre profile (dynamics).
Based on the analysis, smart:limit displays interactive hints regarding the current settings of input and output gain as well as the limit control.
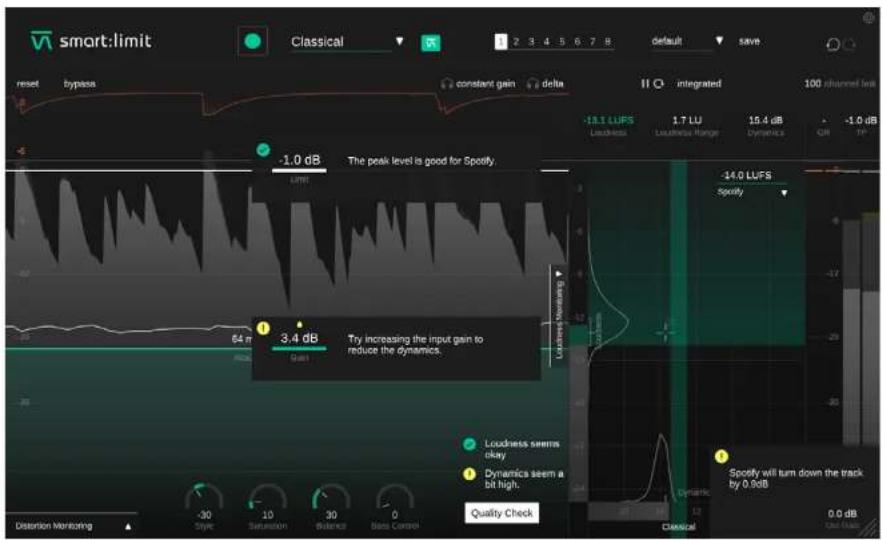

There's a potential issue with this parameter that should be fixed.

All good!

Arrows indicate the suggested parameter changes.
States and Presets


States
You can use states to store multiple parameter settings. States allow for easy comparing between different settings (similar to the A/B feature of most plug-ins)
Working with states
- Each state is initially empty (default parameters settings of smart:limit).
- Select a state by clicking the respective state button.
- You can easily copy one state to another state via drag and drop. This may be useful if you want to compare different changes to a certain setting.
- To clear a state, hover over the number and click the trash can icon that will appear below.

Presets
A preset saves all parameter settings and can be accessed from all plug-in instances.
- To save your parameter settings as a preset, click "save" next to the preset drop-down.
- To load a saved preset, choose the respective preset name from the dropdown.
- To delete a preset or change its name, go to the preset folder in your local file explorer.
You can easily share your presets among different workstations. All presets are saved with the file extension ".spr" in the following folders:
Preset Folders
OSX: -/Library/Audio/Presets/sonicle/smartLimit
Windows: My Documents\Presets\sonibles\smartLimit
Settings and Licensing

To visit the settings page, click the little cogwheel in the upper right corner.
Show loudness monitoring on start up
Enable to show the extended Loudness Monitoring Section by default at start-up.
Show tooltips
Enable/Disable tooltips on hover.
Use OpenGL
OpenGL might cause rendering issues on certain computer hardware. Use this option to disable OpenGL.
Share anonymous user data with sonible
Enable to share fully anonymous user data with sonible and help us improve smart:limit.
Plug-in Information
Here you can find the name and version of your plug-in. Start the welcome tour - a quick overview of the plug-in - features by click on "show tutorial".
License Information
This will display your license state and number (when not licensed via iLok)
Update notice
When a new version of the plug-in is available, you'll receive a notification here and it's also indicated by a little dot on the cogwheel in the main view of smart:limit. Click on the green text to download the latest version.

smart:limit
www.sonible.com/smartlimit
sonible GmbH
Haydngasse 10/1
8010 Graz
Austria
phone: +43 316 912288
contact@sonible.com
All specifications are subject to change without notice.
©2021, sonible GmbH. All rights reserved.
Engineered & designed by sonible in Austria.
www.sonible.com

- Welcome to smart:limit
- Install
- System requirements
- Windows
- Default folders:
- VST3
- VST
- AAX
- Mac OSX
- Audio Unit
- Authorization
- Licensing system
- Machine-based
- iLok
- Unlocking
- Machine-based unlocking
- Trial version
- Internet connection requirements
- User Interface
- Learning section
- States
- Loudness and Dynamics Monitoring Section
- Output Section
- Distortion Monitoring
- Sound Shaping Tools
- Quality Check
- Working with the limiter controls
- Limit line
- Gain line
- Attack
- Release
- Auto Release
- Constant Gain
- Delta
- Sound-shaping Panel
- Style
- Saturation
- Balance
- Bass Control
- Oversampling
- Metering
- Channel link
- Gain Reduction (GR)
- True Peak (TP)
- Out Gain
- Intelligent Limiter Parameters
- Step 1
- Select a profile or reference track
- Step 2
- Start the audio playback & initiate learning
- Step 3
- Done!
- Loudness & Dynamics Monitoring
- i What is loudness?
- i What is Loudness Normalization?
- Loudness Measurement
- Integrated
- Short-term
- Momentary
- Monitoring Readouts
- Loudness (LUFS)
- Loudness Range (LRA)
- Dynamics (dB)
- Loudness and Dynamics Grid
- Loudness & Dynamics Crosshairs
- Color
- Confidence Area
- Loudness Meter
- Loudness Histogram
- Dynamics Meter
- Dynamics Histogram
- Publishing Target
- i What are Publishing Targets?
- Selecting a Publishing Target
- Custom Reference Loudness
- Why does smart:limit ignore my loudness publishing target during learning?
- Instant Impact Prediction
- States and Presets
- Working with states
- Presets
- Preset Folders
- Settings and Licensing
- Show loudness monitoring on start up
- Show tooltips
- Use OpenGL
- Share anonymous user data with sonible
- Plug-in Information
- License Information
- Update notice
- smart:limit
- sonible GmbH
Brand : Sonible
Model : smart:limit
Category : Audio software