FRS-12 - Subwoofer Proficient - Free user manual and instructions
Find the device manual for free FRS-12 Proficient in PDF.


| Type | Powered subwoofer |
| Driver Size | 12 inches (300 mm) |
| Amplifier Power (RMS) | 250 watts |
| Frequency Response | 25 Hz - 150 Hz |
| Impedance | 8 ohms (line level input) |
| Dimensions (H x W x D) | 15 x 14.5 x 16 inches (381 x 368 x 406 mm) |
| Weight | 35 lbs (15.9 kg) |
| Enclosure Type | Sealed (acoustic suspension) |
| Input Connectors | RCA line level, speaker level binding posts |
| Output Connectors | RCA line level pass-through |
| Controls | Volume, crossover frequency (40-150 Hz), phase switch (0/180°), auto-on/off |
| Materials | MDF cabinet with black vinyl finish, black cloth grille |
| Safety Features | Thermal protection, short circuit protection, limiter |
| Power Requirements | 120 V AC, 60 Hz (US model) |
| Power Consumption (max) | 500 watts |
| Standby Power | < 0.5 watts |
| Included Accessories | Power cord, user manual, rubber feet |
| Spare Parts Availability | Driver and amplifier module available through Proficient dealers |
| Repairability | Serviceable by qualified technician; driver can be replaced |
| Cleaning Instructions | Wipe cabinet with dry cloth; do not use liquid cleaners on grille |
Frequently Asked Questions - FRS-12 Proficient
User questions about FRS-12 Proficient
0 question about this device. Answer the ones you know or ask your own.
Ask a new question about this device
Download the instructions for your Subwoofer in PDF format for free! Find your manual FRS-12 - Proficient and take your electronic device back in hand. On this page are published all the documents necessary for the use of your device. FRS-12 by Proficient.
USER MANUAL FRS-12 Proficient
natural_image
Line drawing of a 3D cube with visible edges and a cut edge (no text or symbols)FRS FTEQ
natural_image
Line drawing of a 3D cube with visible edges and faces (no text or symbols)INSTALLATION GUIDE
Table of Contents
FCC Notice....2
Important Safety Information .... 3
Unpacking 4
Care 4
Amplifier Panel Features. 4
Subwoofer Placement 7
Connecting your Subwoofer (LFE) 8
Connecting your Subwoofer (Stereo)....9
Configuring your Subwoofer 10
Subwoofer Discovery 10
Volume 10
Crossover....11
Phase 11
Delay....12
Manual EQ 12
Using Auto EQ 13
Settings 13
Specifications....14
FRS-8 14
FRS-10 14
FRS-12 14
FTEQ-12 14
Limited 2-Year Warranty....15
2-Year Warranty 15
Attention: To Our Valued Customers 16
FCC Notice
This equipment has been tested and found to comply with the limits for a Class B digital device, pursuant to part 15 of the FCC Rules. These limits are designed to provide reasonable protection against harmful interference in a residential installation. This equipment generates, uses, and can radiate radio frequency energy and, if not installed and used in accordance with the instructions, may cause harmful interference to radio communications. However, there is no guarantee that interference will not occur in a particular installation. If this equipment does cause harmful interference to radio or television reception, which can be determined by turning the equipment off and on, the user is encouraged to try to correct the interference by one or more of the following measures:
- Reorient or relocate the receiving antenna.
- Increase the separation between the equipment and receiver.
- Connect the equipment into an outlet on a circuit different from that to which the receiver is connected.
- Consult the dealer or an experienced radio/TV technician for help.
Caution - changes or modifications not expressly approved by the party responsible for compliance could void the user's authority to operate the equipment.
Canada
FCC and IC Radiation Exposure Statement
This equipment complies with FCC radiation exposure limits set forth for an uncontrolled environment and meets the exemption from the routine evaluation limits in section 2.5 of RSS 102.
- This Transmitter must not be co-located or operating in conjunction with any other antenna or transmitter.
- This equipment complies with FCC RF radiation exposure limits set forth for an uncontrolled environment. This equipment should be installed and operated with a minimum distance of 20 centimeters from user and bystanders.
Warning: The device meets the exemption from the routine evaluation limits in section 2.5 of RSS 102, and users can obtain Canadian information on RF exposure and compliance from the Canadian Representative Product Solutions Group at Tel: (519) 763-4538.
IMPORTANT SAFETY INFORMATION
- Read these instructions
- Keep these instructions
- Heed all warnings
- Follow all instructions
- Do not use this apparatus near water
- Clean only with dry cloth.
- Do not block any ventilation openings. Install in accordance with the manufacturer's instructions.
- Do not install near any heat sources such as radiators, heat registers, stoves, or other apparatus (including amplifiers) that produce heat.
- Do not defeat the safety purpose of the polarized or grounding plug. A polarized plug has two blades with one wider than the other. A grounding plug has two blades and a third grounding prong. The wide blade or the third prong is provided for your safety. If the provided plug does not fit into your outlet, consult an electrician for replacement of the obsolete outlet.
- Protect the power cord from being walked on or pinched particularly at the plugs, convenience receptacles, and at the point where they exit from the apparatus.
- Only use attachments/accessories specified by the manufacturer.
- Use only with the cart, stand, tripod, bracket, or table specified by the manufacturer, or sold with the apparatus. When a cart or rack is used, use caution when moving the cart/apparatus combination to avoid injury from tip-over.
- Unplug this apparatus during lightning storms or when unused for long periods of time.
- Refer all servicing to qualified personnel. Servicing is required when the apparatus has been damaged in any way, such as power supply cord or plug is damaged, liquid has been spilled or objects have fallen into the apparatus, the apparatus has been exposed to rain or moisture, does not operate normally, or has been dropped.
- No naked flame sources, such as lighted candles, should be placed on the apparatus
- WARNING: To reduce the risk of fire or electric shock, do not expose this apparatus to rain or moisture. The apparatus shall not be exposed to dripping or splashing and objects filled with liquids, such as vases, shall not be placed on apparatus.
- WARNING: The mains plug/appliance coupler is used as disconnect device, the disconnect device shall remain readily operable.
- WARNING: An apparatus with Class I construction (a three wire AC Mains cord) shall be connected to a mains socket outlet with a protective earthing connection.
- Correct disposal of this product. This marking indicates that this product should not be disposed with other household wastes throughout the EU. To prevent possible harm to the environment or human health from uncontrolled waste disposal, recycle it responsibly to promote the sustainable reuse of material resources. To return your used device, please use the return and collection systems or contact the retailer where the product was purchased. They can take this product for environmentally safe recycling.
The lightning flash with arrowhead symbol within an equilateral triangle is intended to alert the user to the presence of uninsulated “dangerous voltage” within the product’s enclosure, that may be insufficient magnitude to constitute a risk of electric shock to persons.
The exclamation point within an equilateral triangle is intended to alert the user of the presence of important operating and maintenance (servicing) instructions in the literature accompanying the appliance.


RENSEIGNEMENTS DE SÉCURITÉ IMPORTANTS
Your subwoofer should reach you in perfect condition. If you notice any shipping damage, please contact your Dealer immediately.
Gently lift the unit out, and remove all the packing material. It's important to save all the packing materials and the box in case your subwoofer ever needs to be moved or returned.
CARE
To maintain the speaker cabinet's finish, first unplug the power cord and then use a soft cloth to clean the surfaces. If your subwoofer needs servicing, please read the Warranty section, page 14. If a problem persists, contact your nearest authorized Dealer.
AMPLIFIER PANEL FEATURES
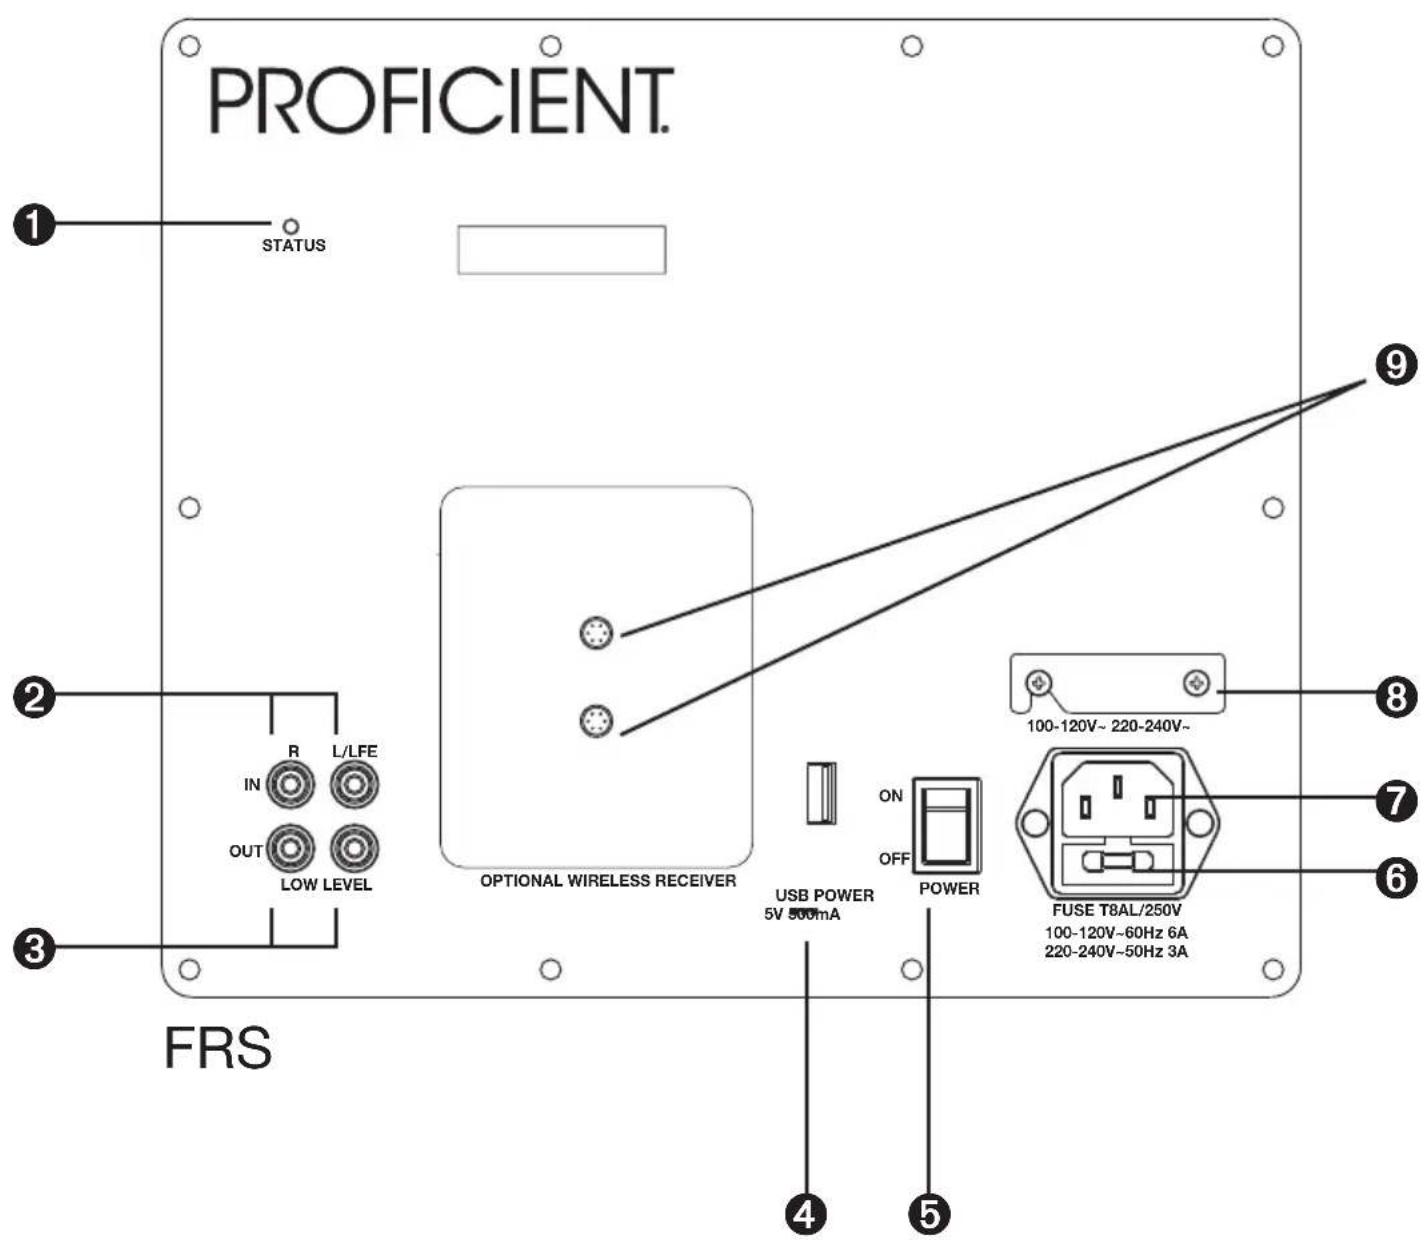
- Power Indicator. This light is illuminated blue when the subwoofer is turned on and playing. It illuminates red when the subwoofer is in on, but in Standby mode.
-
Low-Level Inputs. These connect with RCA type cables from the line-level outputs of your receiver or preamp. Here are two examples: If your processor or receiver has a single subwoofer output, connect it to the subwoofer's LFE input connector (see page 8). If your processor or receiver has stereo line-level output, connect it to the subwoofer's red and white Low Level "IN" connectors.
-
Low-Level Outputs. These connect with RCA type cables to daisy-chain additional subwoofers or powered speakers. These outputs are pass-thru, meaning they will pass through the same audio signal that is fed into the Low-Level inputs to the Low-Level outputs.
-
USB Connector. The USB connector is used to power the optional subwoofer wireless receiver. Do not plug in other USB devices into this port as it may damage the subwoofer or the device. Refer to the wireless receiver installation instructions for more details.
-
Power Rocker Switch. Press the top this rocker switch to turn the subwoofer's master power On. The subwoofer has an automatics signal-detection circuit. After approximately ten minutes with no signal, the subwoofer will go into its quiet standby mode.
The presence of an audio signal will turn it back on. The signal-detection timeout period can be adjusted in the companion smartphone app. Normally you can leave the switch on, and let the subwoofer turn on when a signal is present, or turn off when it's not. At night (or if you go out, or on vacation), you can press the bottom of the power switch to turn the subwoofer off.
-
AC Line Fuse. The subwoofer is supplied with a conservative slow-blow type fuse to protect the electronics. If this fuse fails, replace it with the exact same type and current rating for your local AC voltage, as marked on the control panel near the fuse holder.
-
IEC Power Connector. The subwoofer comes with a detachable line cord that attaches here. Make sure it is firmly pushed into place. Connect the other end to an AC outlet that is properly configured for the type of plug and has the correct voltage for your model.

NOTE: Always unplug the power cord from your AC outlet before removing the fuse. To replace or inspect the fuse, use a small flathead screwdriver to gently pry out the fuse carrier and fuse.
-
Voltage Selection Switch. This switch is used to select the compatible electrical voltage for the location in which you're installing the subwoofer. Please check with your local electrical requirements before making changes to this setting.
-
Mounting Standoffs. The mounting standoffs are used to mount the optional subwoofer wireless receiver. Refer to the wireless receiver installation instructions for more details.
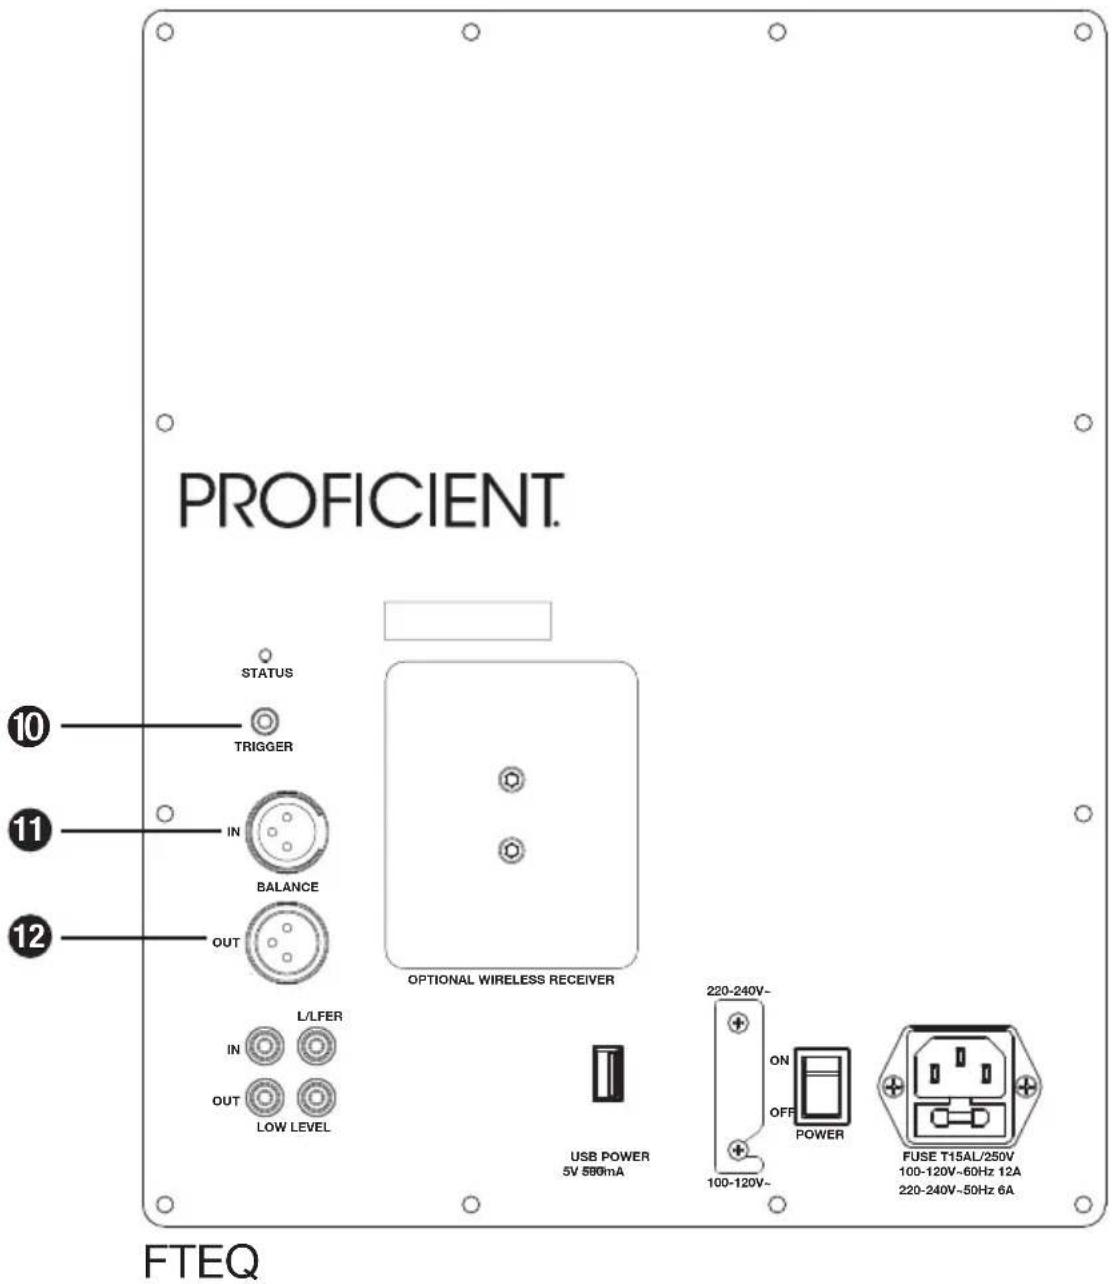
- Trigger (FTEQ-12 Only). 12V trigger input turns the amplifier On or Off and overrides the automatic signal detection circuit, reducing power consumption when not in use. When this input receives a 12V signal, the subwoofer will turn ON. When the signal goes away, the subwoofer will turn OFF.
- Balanced IN (FTEQ-12 only). Balanced connections allow the use of very long cables while reducing electrical interference. Connect a balanced output cable from your receiver or preamp to the subwoofers Balanced IN.
- Balanced OUT (FTEQ-12 only). These connect with Balanced type cables to daisy-chain additional subwoofers or powered speakers. These outputs are pass-thru, meaning they will pass through the same audio signal that is fed into the Balanced IN.
SUBWOOFER PLACEMENT
Subwoofer placement can greatly influence its performance. All rooms are different, but the loudest output will likely occur if the subwoofer is placed in a corner of the room on the same wall as the front channel speakers.
You may need to experiment with more than one location, always testing the sound from the primary listening position until you find the right balance and consistency in the bass performance.
You can also greatly improve subwoofer performance and eliminate many of these placement challenges by using the AUTO EQ function in the companion smartphone app.
CONNECTING YOUR SUBWOOFER (LFE)

FRS Subwoofer (back)
If your processor or receiver has a subwoofer output (Sub/LFE), it should be connected to the subwoofer's LFE input as shown. This is the simplest and recommended connection.
If you have a Home Theater processor or receiver, it probably has an independent subwoofer volume and crossover control. If so, you should set the subwoofer's volume control to 50, the crossover to LFE, and use the processor's subwoofer level and frequency controls for adjustments.
CONNECTING YOUR SUBWOOFER (STEREO)
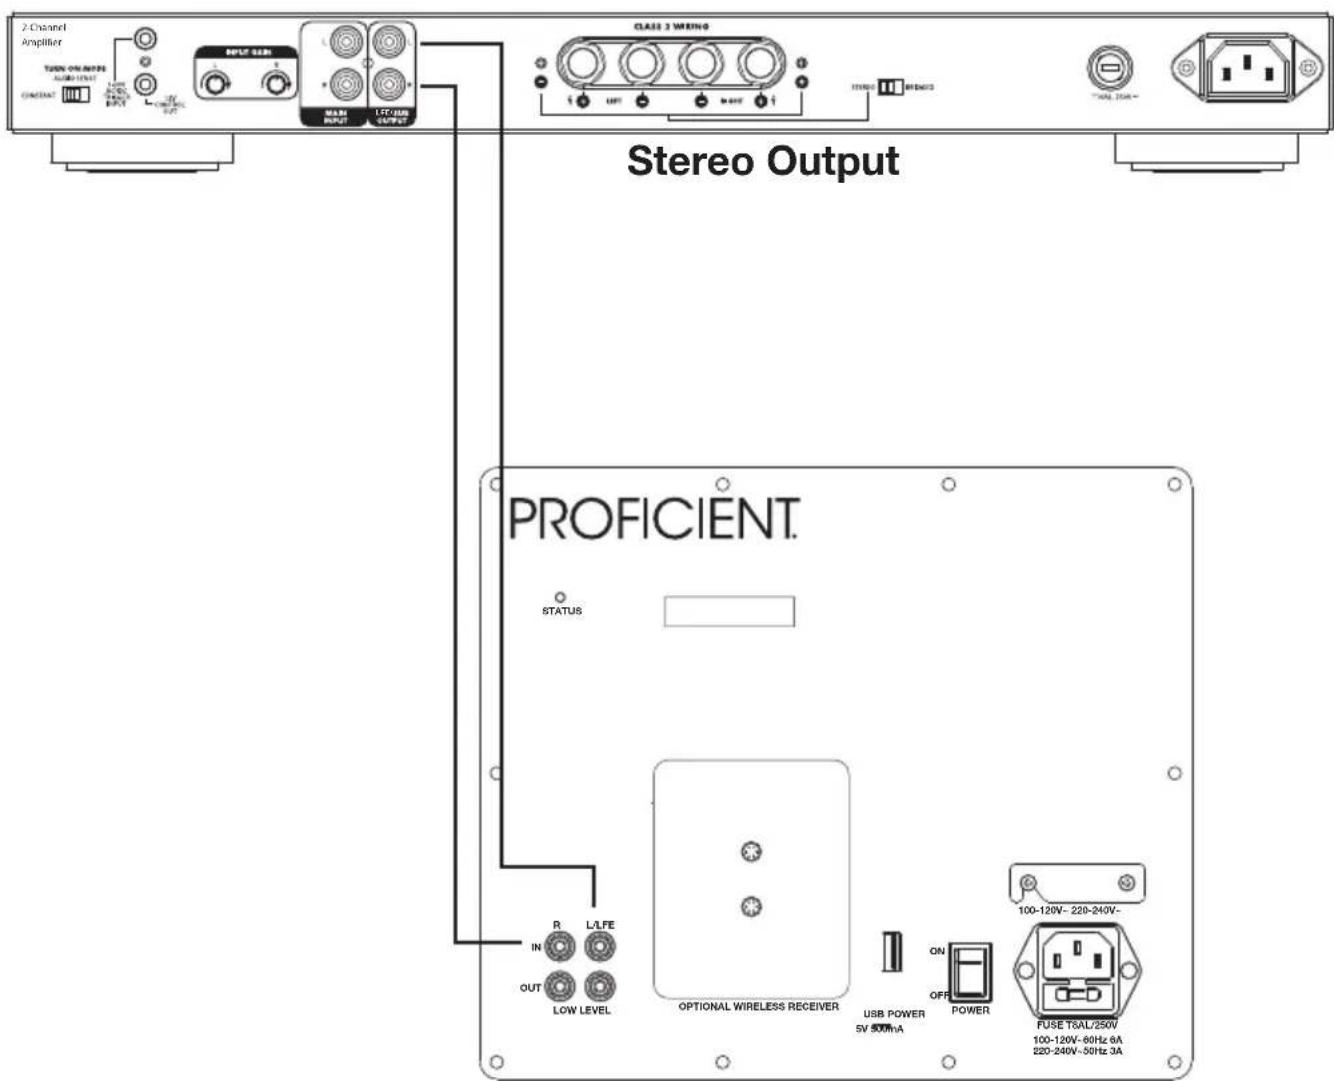
FRS Subwoofer (back)
If your processor or receiver does not have a Sub/LFE output, but has a stereo output, you can connect a stereo RCA type cable from the stereo output to the Low Level red and white inputs on the back on the subwoofer.
You can also use the optional subwoofer wireless receiver to send audio from your source to the subwoofer. Refer to the wireless receiver installation instructions for more details.
CONFIGURING YOUR SUBWOOFER
The companion smartphone app allows you to setup and configure your subwoofer from the comfort of your seating position. Download the app from the Apple App Store or Google Play Store. Adjustments like volume, x-over frequency, phase, etc., as well as the Auto EQ function, can be adjusted within the app.
Subwoofer Discovery
- Ensure that the power on the subwoofer is on and the status light is red or blue.
- Launch the smartphone companion app and on the home screen select peripherals.
- Select "Scan for devices" and hit "Connect" if prompted.
- Repeat steps 1-3 for additional subwoofers. It is highly recommended to rename each subwoofer so that it can be easily identified by its name when multiple subwoofers are installed.
- Your subwoofer(s) is now discovered and can be controlled from the companion smartphone app.
Volume
- Volume. Adjusts the volume output to the desired output level.
- Preset. Makes EQ adjustments based on the type of material you are playing. Music mode enhances performance while listening to music while Movie mode enhances performance while watching movies.
- Night Mode. Compresses the subwoofer output when watching a movie or playing music, so you don't disturb others.
- Peripherals- Turn on Bluetooth. Toggles Bluetooth on and off. Bluetooth must be turned on to configure the subwoofer with the smartphone companion app.
- Peripherals- Device name- Displays the current subwoofer name. Can also be used to set a new subwoofer name.
- Peripherals- Scan for devices. Scans for other subwoofers.

Crossover
- Crossover. Selects the low pass filter frequency and is adjustable from 42Hz to 500Hz.
- Variable/LFE toggle. Toggles between using the app to select the low pass filter frequency and the AV Receiver selecting the low pass filter frequency.
- Slope. Adjusts the slope of the crossover frequency. The higher the value, the steeper the cutoff.

Phase
- Phase. Adjusts the signal delay of the incoming audio signal and is used to better blend the audio from the subwoofer to other speakers in the installation.
- Variable/AVR Toggle. Toggles between using the app to select the phase frequency and the AV Receiver selecting the phase frequency.

Delay
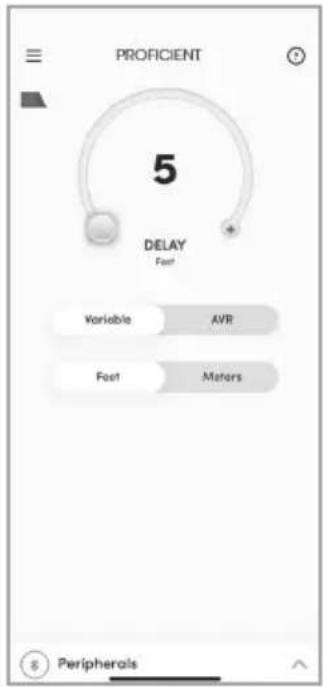
- Delay. Sets the distance that the subwoofer is located from the listening area and applies an acoustic delay to compensate for the time that the audio from the subwoofer takes to reach your ear. Adjustable from 5-80ft (1.5\~24M)
- Variable/AVR Toggle. Toggles between using the app to select the delay and the AV Receiver selecting the delay.
- Feet/Meters Toggle. Toggles between measurement in Feet and Meters.
Manual EQ
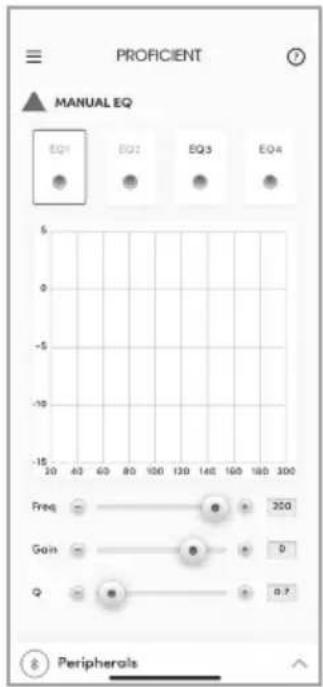
Manual EQ. Allows you to manually adjust the Frequency, Gain and Q of 4 independent EQs. Select the EQ you would like to adjust using the radio buttons labeled “EQ1, EQ2, EQ3, EQ4” then choose the frequency, amount of gain or cut and Q using the sliders.
Using Auto EQ
Auto EQ is used to compensate for and correct for acoustic room anomalies that can cause inferior bass performance. Auto EQ takes a series of measurements in and around your primary listening position, makes complex calculations and applies those acoustic corrections- all from the comfort of your listening area.

NOTE: Before you begin, be sure to shut off all sources of ambient noise before taking measurements. Failure to do so may cause undesired/sub-optimal effects.
- To begin Auto EQ, make sure that the Auto EQ toggle is turned on, then press the Start button.
- Choose up to 3 locations near your listening area and run each sweep.
-
Repeat steps 1-3 for each additional subwoofer in the system.
-
Once finished select "calculate" to apply the Auto EQ room correction to the subwoofer.

Settings
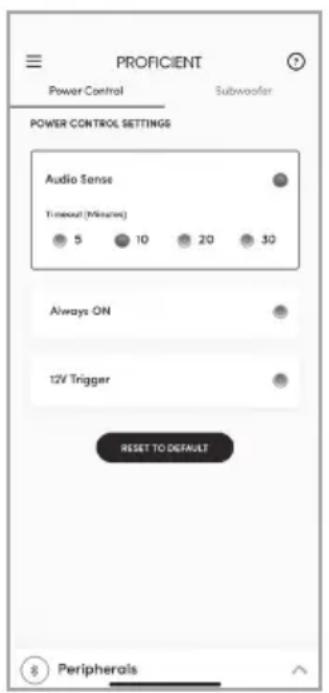
- Audio Sense. Sets the approximate time it takes before the subwoofer goes into Standby mode when no audio signal is present. You can select between 5, 10, 20, 30 minutes or always on
- Reset to Default. Puts the subwoofer back to its factory default settings.
SPECIFICATIONS
FRS-8
| Woofer 8" High-excursion Fiberglass Cone with Big-Roll Surround | |
| Frequency Response 24-200Hz | |
| Amplifier Power 1000 Watts Peak | |
| Communication Type Bluetooth Low Energy | |
| Crossover Frequency 40-500Hz | |
| Dimensions (L x W x H) mm / inches 10.3" x 10.7" x 11.1" (262mm x 272mm x 282mm) | |
| Voltage 100-120VAC or 220-240VAC Selectable | |
| Cabinet 1" High Gloss MDF | |
FRS-10
| Woofer 10" High-excursion Fiberglass Cone with Big-Roll SurroundFrequency Response 24-200HzAmplifier Power 1000 Watts PeakCommunication Type Bluetooth Low EnergyCrossover Frequency 40-500HzDimensions (L x W x H) mm / inches 12.2" x 12.6" x 13" (310mm x 320mm x 330mm)Voltage 100-120VAC or 220-240VAC SelectableCabinet 1" High Gloss MDF |
FRS-12
| Woofer 12" High-excursion Fiberglass Cone with Big-Roll Surround | |
| Frequency Response 20-200Hz | |
| Amplifier Power 1000 Watts Peak | |
| Communication Type Bluetooth Low Energy | |
| Crossover Frequency 40-500Hz | |
| Dimensions (L x W x H) mm / inches 13.8" x 14.2" x 14.6" (351mm x 361mm x 371mm) | |
| Voltage 100-120VAC or 220-240VAC Selectable | |
| Cabinet 1" High Gloss MDF | |
FTEQ-12
| Woofer Dual 12" High-excursion Kevlar Cone with Big-Roll Surround | |
| Frequency Response 17-200Hz | |
| Amplifier Power 1000 Watts x 2 Peak | |
| Communication Type Bluetooth Low Energy | |
| Crossover Frequency 40-500Hz | |
| Dimensions (L x W x H) mm / inches 19.2" x 18.1" x 17.7" (488mm x 460mm x 450mm) | |
| Voltage 100-120VAC or 220-240VAC Selectable | |
| Cabinet 1" High Gloss MDF | |
LIMITED 2-YEAR WARRANTY
Nortek Security & Control, LLC (“Nortek Security & Control”) warrants to the original retail purchaser only that this product will be free of manufacturing defects in material and workmanship for the following periods and subject to the limitations and exclusions set forth below:
2-Year Warranty
This warranty is not transferable to subsequent purchasers of the product. To obtain warranty service, contact the authorized dealer where you purchased your product or take the unit to the nearest authorized dealer (with proof of purchase – claims made without proof of purchase will be denied) who will test the product and if necessary, forward it to Nortek Security & Control for service. If there are no authorized Dealers in your area, please contact Nortek Security & Control to receive a factory Return Authorization Number. DO NOT RETURN ANY UNIT WITHOUT FIRST RECEIVING WRITTEN AUTHORIZATION AND SHIPPING INSTRUCTIONS FROM Nortek Security & Control.
Upon examination, Nortek Security & Control will, at its sole option and expense, repair or replace any product found to be defective. Nortek Security & Control will return the repaired or replaced unit to you via its usual shipping method from the factory or repair center to your address in the United States of America or Canada only. Any shipping costs for addresses outside of the United States or Canada shall be the responsibility of the purchaser. In the event that this model is no longer available and cannot be repaired effectively, Nortek Security & Control, at its sole option, may replace it with a different model of equal or greater value, or refund the original purchase price paid.
THE FOREGOING ARE YOUR EXCLUSIVE REMEDIES FOR BREACH OF WARRANTY.
This Warranty does not include service or parts to repair damage caused by improper use or handling, including but not limited to damage caused by accident, mishandling, improper installation, commercial use, abuse, negligence, or any defect caused by repair to the product by anyone other than Core Brands. This warranty does not cover reimbursement for your costs of removing and transporting the product for warranty service evaluation, or installation of any replacement product provided under this warranty.
This Warranty will be void if:
- The Serial Number on the product has been removed, tampered with or defaced.
- The product was not purchased from an authorized dealer or reseller.
THE FOREGOING WARRANTIES ARE EXCLUSIVE AND IN LIEU OF ALL OTHER EXPRESSED AND IMPLIED WARRANTIES.
NORTEK SECURITY & CONTROL EXPRESSLY DISCLAIMS ALL SUCH OTHER WARRANTIES, INCLUDING BUT NOT LIMITED TO IMPLIED WARRANTIES OF MERCHANTABILITY, FITNESS FOR A PARTICULAR PURPOSE AND NON-INFRINGEMENT, WITH RESPECT TO THE PRODUCT. TO THE MAXIMUM EXTENT PERMITTED BY LAW, NORTEK SECURITY & CONTROL SHALL NOT BE RESPONSIBLE FOR ANY INCIDENTAL OR CONSEQUENTIAL DAMAGES EXCEPT TO THE EXTENT PROVIDED (OR PROHIBITED) BY APPLICABLE LAW, EVEN IF NORTEK SECURITY & CONTROL HAS BEEN ADVISED OF THE POSSIBILITY OF SUCH DAMAGES.
Notwithstanding the above, if you qualify as a “consumer” under the Magnuson-Moss Warranty Act, or applicable state laws, then you may be entitled to any implied warranties allowed by law for the Warranty Period. Further, some states do not allow limitations on how long an implied warranty lasts or allow the exclusion or limitation of consequential damages, so such limitations may not apply to you. This warranty gives you specific legal rights, and you may also have other rights which vary from state to state.
For the name of your nearest authorized dealer, contact: Nortek Security & Control, 5919 Sea Otter Place, Suite 100 Carlsbad, CA 92010, or call (800) 472-5555 or (707) 778-5733.
With regard to sales over the Internet, please be advised that Nortek Security & Control only sells products through a select group of authorized Internet Resellers. Products offered on the Internet through unauthorized Internet dealers are not covered by Nortek Security & Control.
- Goods acquired on a secondary or gray market
- Counterfeit or stolen goods
- Damaged, or defective goods
Please fill in your product information and retain for your records.
Model
Serial # ____
Purchase Date ____
ATTENTION: TO OUR VALUED CUSTOMERS
To ensure that consumers obtain quality pre-sale and after-sale support and service, products are sold exclusively through authorized dealers. This warranty is VOID if the products have been purchased from an unauthorized dealer.
Nortek Security & Control offers a variety of accessories to make your installation of this and other products easy, economical, and professional. To learn more about our products, technologies and specifications, go to: www.nortekcontrol.com or contact your authorized Dealer for more information. For technical inquiries, please call 1-800-448-0976.
In our attempt to constantly improve our products, features and specifications are subject to change without notice.
PROFICIENT.
www.proficientaudio.com

NORTEK CONTROL
www.nortekcontrol.com
©2021 Nortek Security & Control LLC. All rights reserved. Proficient is a registered trademark of Nortek Security & Control LLC.


- Table of Contents
- FCC Notice
- Canada
- FCC and IC Radiation Exposure Statement
- IMPORTANT SAFETY INFORMATION
- RENSEIGNEMENTS DE SÉCURITÉ IMPORTANTS
- CARE
- SUBWOOFER PLACEMENT
- CONNECTING YOUR SUBWOOFER (LFE)
- CONNECTING YOUR SUBWOOFER (STEREO)
- CONFIGURING YOUR SUBWOOFER
- Subwoofer Discovery
- Volume
- Crossover
- Phase
- Delay
- Manual EQ
- Using Auto EQ
- Settings
- SPECIFICATIONS
- LIMITED 2-YEAR WARRANTY
- 2-Year Warranty
- This Warranty will be void if:
- ATTENTION: TO OUR VALUED CUSTOMERS
Brand : Proficient
Model : FRS-12
Category : Subwoofer