
75790WH - Security Camera Insteon - Free user manual and instructions
Find the device manual for free 75790WH Insteon in PDF.


| Product Type | Security Camera |
| Brand | Insteon |
| Model | 75790WH |
| Color | White |
| Dimensions | 3.5 x 2.5 x 2.0 inches |
| Weight | 0.5 lbs |
| Power Source | USB 5V DC adapter (included) |
| Connectivity | Wi-Fi 802.11 b/g/n (2.4 GHz) |
| Resolution | 1080p Full HD |
| Field of View | 120° diagonal |
| Night Vision | IR LEDs, up to 30 ft |
| Audio | Two-way audio with built-in microphone and speaker |
| Motion Detection | Yes, with adjustable sensitivity |
| Storage Options | Cloud subscription or microSD card (up to 128 GB, not included) |
| Hub Compatibility | Insteon Hub (required for full functionality) |
| Weather Resistance | Indoor use only |
| Operating Temperature | 0°C to 40°C (32°F to 104°F) |
| Mounting | Tabletop or wall-mountable (hardware included) |
| Warranty | 1 year limited |
| Maintenance | Clean lens with soft, dry cloth; avoid moisture |
| Security Features | Encrypted video stream, password-protected access |
Frequently Asked Questions - 75790WH Insteon
User questions about 75790WH Insteon
0 question about this device. Answer the ones you know or ask your own.
Ask a new question about this device
Download the instructions for your Security Camera in PDF format for free! Find your manual 75790WH - Insteon and take your electronic device back in hand. On this page are published all the documents necessary for the use of your device. 75790WH by Insteon.
USER MANUAL 75790WH Insteon
INSTEON® Wireless IP Camera

natural_image
White remote control camera with rotary dial and antenna (no visible text or symbols)
natural_image
Black remote control camera with rotary dial and antenna (no visible text or symbols)Owner's Manual
Model No. 75790WH (White) / 75790 (Black)
Rev. 08.27.12
CONTENTS
1.0 WELCOME ......2
1.1 Features....2
1.2 What's in the Box? 2
1.3 Product views .... 3
1.4 Before Camera Use 4
2.0 SOFTWARE OPERATION ....5
2.1 IP Camera Tool ....5
2.2 Camera Login....8
2.3 Device Status....12
2.5 For Operator....14
2.6 For Administrator 17
3.1 Alias Settings....18
3.2 Date and Time Settings 18
3.3 User Settings 19
3.4 Multi-Device Settings 20
3.5 Basic Network Settings 25
3.7 ADSL Settings 26
3.8 UPnP Settings 26
3.9 DDNS Service Settings 26
3.10 Mail Service Settings....26
3.12 FTP Service Settings 28
3.13 Alarm Service Settings 30
3.14 Pan/Tilt Settings 34
3.15 Upgrade Device Firmware 35
3.16 Backup and Restore Settings 35
3.17 Restore Factory Settings 35
3.18 Reboot Device 36
3.19 Log 36
3.20 Back 36
4.0 APPENDIX 37
4.1 Frequently Asked Questions....37
4.4 Specifications 43
5.0 OBTAINING TECHNICAL SUPPORT....44
1.0 WELCOME
INSTEON® Wireless IP Camera is a fully-integrated high-resolution digital video camera that's easy to set up and remotely control. Featuring both wired and wireless network connectivity, two-way audio, pan/tilt functions, night vision and motion sensor, INSTEON Wireless IP Camera is a complete video monitoring solution in a discrete package, making it perfect for home security, business surveillance, baby monitoring, pet watching and much more.
Remotely set up, access, control and manage the camera from anywhere via the embedded web page (supported by all versions of Internet Explorer, Safari, Firefox and Chrome) or home management software such as HouseLinc. Or, integrate it with the INSTEON SmartLinc Hub (sold separately) to use with the INSTEON iOS/Android smartphone and tablet app.
The camera transmits remote video on any IPV4 network; a high-quality video image can be transmitted at 30 FPS over LAN/WAN with MPEG hardware compression technology.
1.1 Features
• High-speed video processor
• 300 dpi high definition color CMOS sensor
• IR night vision with 26-foot range
• 300° pan and 120° tilt functions
- Microphone and speaker
• Motion sensor (supported by DDNS and UPnP)
- Email alerts
• Optimized MPEG video compression
• Multi-level user management and password control
- Embedded web server
• WiFi IEEE 802.11b/g/n with WEP/WPA/WPA2 encryption
• Still image snapshots
- HTTP/TCP/IP/UDP/STMP/DDNS/SNTP/DHCP/FTP supported
1.2 What's in the Box?
- INSTEON® Wireless IP Camera
- WiFi antenna
- DC power supply
- Quick Start Guides
- Setup CD (includes IP Camera Tool and Owner's Manual)
- Network cable
- Optional mounting bracket
1.3 Product views
1.3.1 Front View

1.3.2 Back View

1.3.3 Bottom View
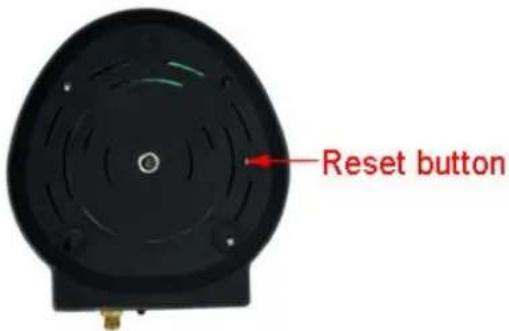
The reset button is on the bottom of the camera. To reset the camera to factory default settings, make sure that power is supplied to the camera, then press and hold reset button for 15 seconds. After reset, your username and password will return to the factory default administrator username and password.
1.4 Before Camera Use
1.4.1 Software Installation
1) Put the CD in the CD drive of your computer, then open CD
2) Double click IPCamSetup.exe. Follow the onscreen instructions to install camera software.
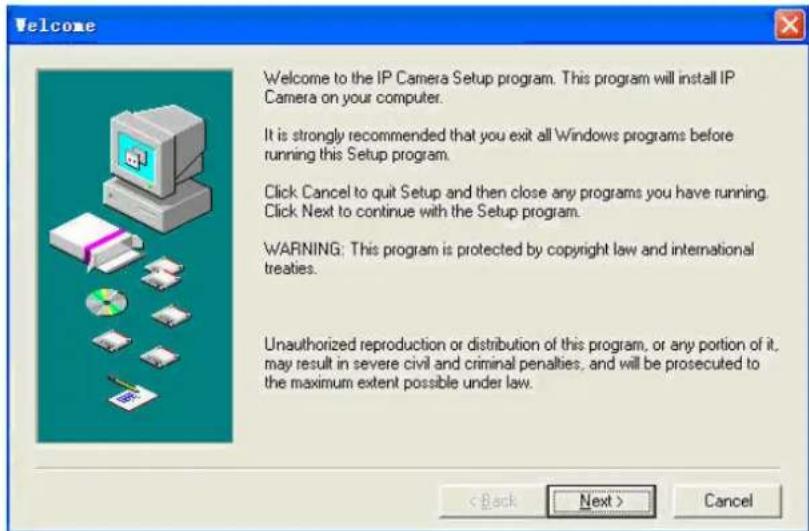
3) Click Next to complete the software installation


Upon installation completion, restart computer. The IP Camera Tool icon 📄 IP Camera Tool will appear on the desktop automatically.

NOTE: If you use Windows 7 and there is no icon on desktop after installation of the IP Camera Tool, check the camera software installation path. For example, if the path reads C:\Windows\System32\IPCamera.exe, then edit the shortcut to C:\Windows\SysWOW64\IPCamera.exe.
CAUTION: Use only the power adapter attached with the product. Using an unauthorized power adapter may cause damage to your Camera. The IP Camera should be installed indoors only.
1.4.2 Camera Installation
NOTE: The IP Camera should only be installed indoors.
1) Screw in WiFi antenna and adjust it so it points straight up
2) Plug network cable into camera and into your router
3) Plug power adapter into the camera and then into the power outlet.
CAUTION: Make sure to only use the power adapter supplied with the camera. Using a non-approved power adapter may damage the camera.
4) Camera takes approximately 30 seconds to start up. It will display an IP address on IP Camera Tool. When the camera is powered and the network cable is plugged in correctly, the small green network LED will turn on and the small yellow LAN port LED will flash. Network light will blink and power light will turn on.
2.0 SOFTWARE OPERATION
2.1 IP Camera Tool
When camera has been installed, open IP Camera Tool program on your computer. It will automatically begin searching for your camera over the LAN.

There are three possible scenarios:
1) If no camera is found on the LAN: after about one minute of searching, the field will display "IP Server not found" and automatically shut down IP Camera Tool program. Check if DHCP is enabled on your router, or disable MAC address filtering if on WiFi. Also, make sure that your firewall (if used) isn't blocking access to the camera.
2) If cameras are found on the LAN: all of the cameras will be listed and the total number will be displayed in the result field (as shown above).
3) If cameras found on the LAN do not share the same subnet with the computer: a prompt will be displayed. Click right mouse button to choose "Network Configuration." This will set the IP address of the camera to the same subnet as the LAN. You can also choose "Obtain IP from DHCP server" or "set a static IP for the camera."
NOTE: If you could not find the camera's IP on the IP Camera Tool, check that DHCP is enabled on your router, that your MAC address filter is disabled and that a firewall or antivirus software isn't blocking the camera.
Setup Options
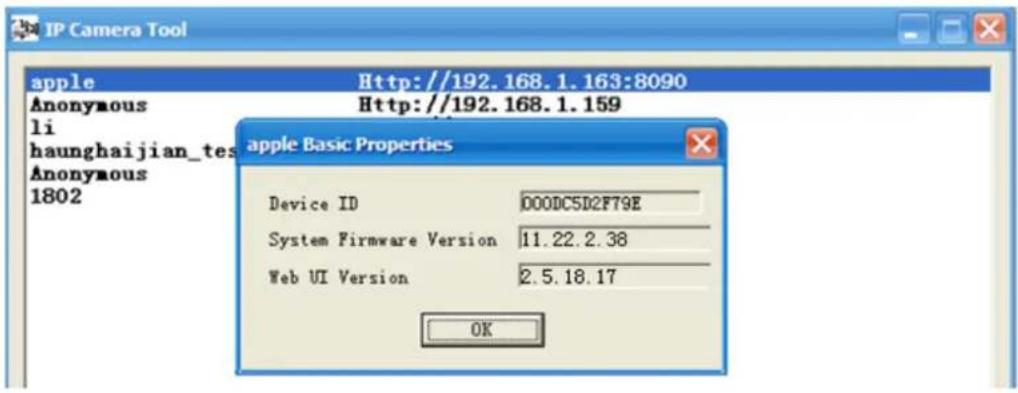
Right-click the IP camera to display six options: Basic Properties, Network Configuration, Upgrade Firmware, Refresh Camera List, Flush Arp Buffer and About IP Camera Tool:

- Basic Properties: Find device information such as device ID, the system firmware version and web UI version
If there are several cameras on the list, then choose Basic Properties to check the device ID and find that camera's specific IP address. For example, if device ID is 00606E8C5058, it will have the same MAC address as found on the sticker on the bottom/back of the camera.
Each camera has its own MAC address. Sometimes, if a camera's IP address is not found on the IP Camera Tool, the firewall may be blocking it. In that case, you can either add the MAC address to your router and give it a fixed IP, or add the MAC address as a trusted site. There are two MAC addresses:
one is a wired MAC, and the other is a WiFi MAC.
• Network Configuration: Configure network parameters

- Obtain IP from DHCP server: If checked, camera will obtain its IP address from your DHCP server
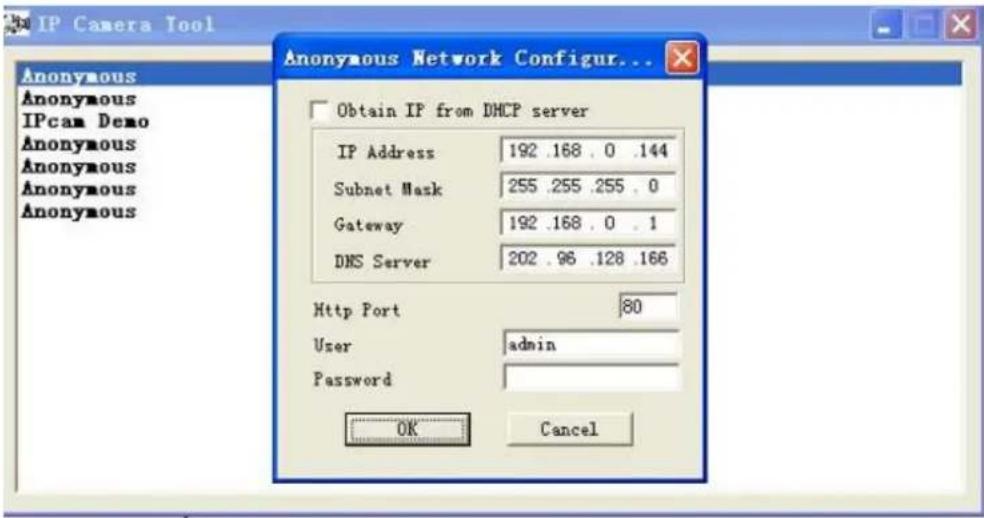
- IP Address: Fill in the assigned IP address. Make sure you are using an address that is on the same subnet as your PC.
- Subnet Mask: Use the subnet mask that matches your LAN
• Gateway: This is your internet gateway and usually the address of your router
- DNS Servers: Either use the DNS server address assigned by your ISP or one from a third party like Google (8.8.8.8) or OpenDNS (x.x.x.x)
- HTTP Port: The default port is 80. You can set another port number, such as port 8005, 85, 8100, etc. for port forwarding.
- User: Default administrator user name is "admin"
• Password: There is no default password
NOTE: If the prompt "Subnet doesn't match, dbclick to change!" appears, enable DHCP and choose obtain IP from DHCP server, or set camera's IP address and gateway once again.
- Upgrade Firmware: for latest firmware updates, visit the Wireless IP Camera product page on INSTEON.com
2.2 Camera Login
Access the camera through the IP Camera Tool, Internet Explorer (IE), Firefox, Chrome, Safari or the INSTEON iOS/Android smartphone and tablet app (requires SmartLinc Hub, sold separately).
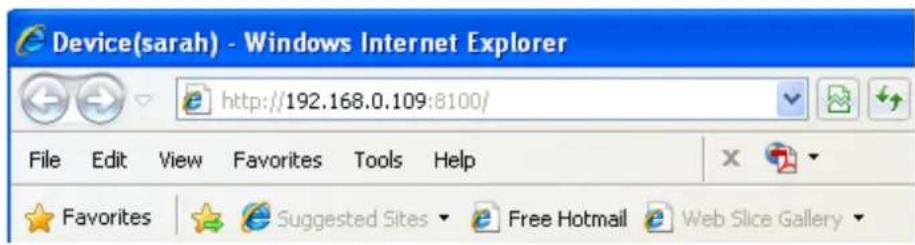
1) Double-click the camera's IP address. Your default browser will be automatically open and display the camera login page. You can also access the camera by directly by typing in the camera's IP address:
2) The default user is admin. Leave the password field blank.
3) There are two login modes depending on your browser: ActiveX (IE) and Server Push Mode (Safari, Firefox, Chrome)

Internet Explorer Setup:
Fill in the "admin" user name and click the first login button.

The first time you log into the UI, you will receive an ActiveX prompt (as shown above). Right click on the active prompt and choose Run Add-on.

Select Run on the next prompt. You will return to the login screen.
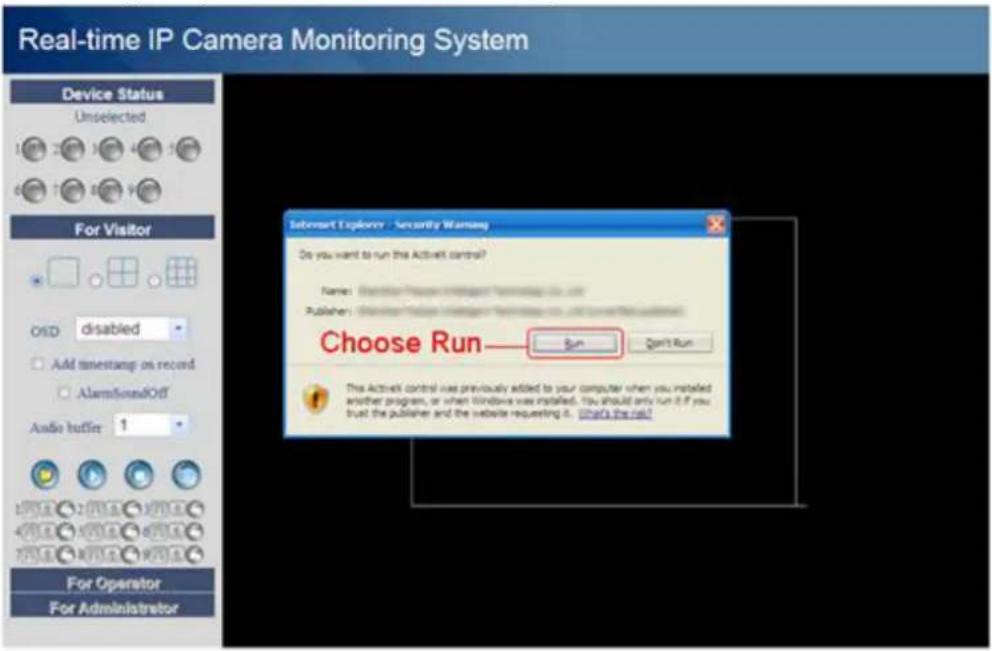
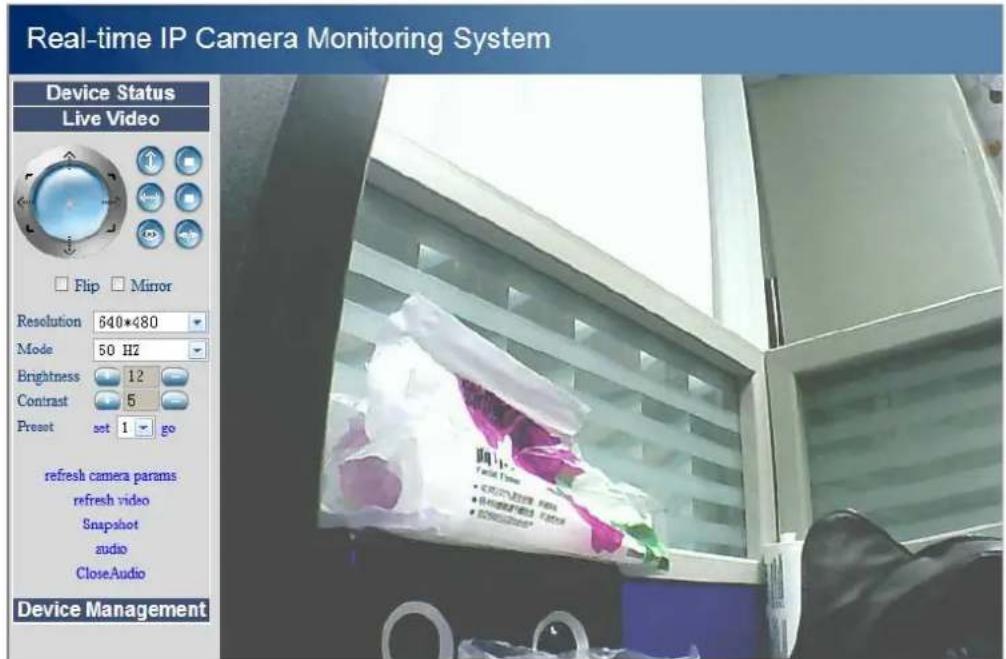
Fill in the "admin" user name and click login again. You will see a live video feed.

NOTE: If you cannot view live video after running ActiveX, change the port number to a number other than 80 and try again.
Make sure all firewall or antivirus software on your computer is not set to block your camera. If you are unable to run the ActiveX control, try disabling your firewall or antivirus program.
Safari, Firefox, Chrome and Other Browser Setup:
Fill in the "admin" user name and click the second login button.
You may be asked for your username and password again prior to login. After you enter your user name, you will see the camera's device status.
Real-time IP Camera Monitoring System
| Device Status | |
| Live Video | |
| Device Management | |
| Device ID 000DC5D29D64 | |
| Device Firmware Version 11.22.2.38 | |
| Device Embedded Web UI Version 2.5.18.17 | |
| Alias apple | |
| Alarm Status None | |
| DDNS Status 3322 Succeed http://software6.3322.org:8006 | |
| UPnP Status UPnP Succeed | |
| MSN Status No Action | |
Click Live Video to see the camera's live video feed.
2.3 Device Status
Internet Explorer:
If camera is connected properly, device status LED will be green. If LED is yellow, check that ActiveX is enabled, or change the port and try again.
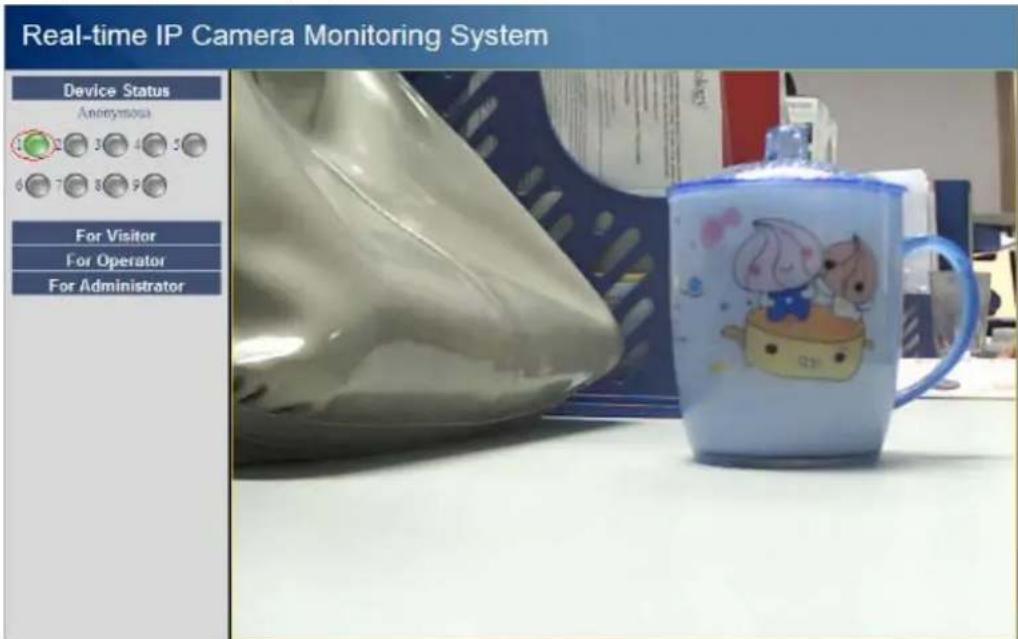
If you want to view the device information, choose For Administrator, then click Device Info.
Real-time IP Camera Monitoring System
| Device Info |
| Alias Settings |
| Date&Time Settings |
| Users Settings |
| Multi-Device Settings |
| Basic Network Settings |
| Wireless LAN Settings |
| ADSL Settings |
| UPnP Settings |
| DDNS Service Settings |
| Mail Service Settings |
| MSN Settings |
| FTP Service Settings |
| Alarm Service Settings |
| PTZ Settings |
| Upgrade Device Firmware |
| Backup & Restore Settings |
| Restore Factory Settings |
| Reboot Device |
| log |
| Back |
| Device Status | |
| Device ID | 000DC5D29D64 |
| Device Firmware Version | 11.22.2.38 |
| Device Embedded Web UI Version | 2.5.18.17 |
| Alias | apple |
| Alarm Status | None |
| DDNS Status | 3322 Succeed http://software6.3322.org:8006 |
| UPnP Status | UPnP Succeed |
| MSN Status | No Action |
Firefox, Chrome and Safari:
When you login to the UI, you will see Device Status which is the same as Device Info in Internet Explorer.
2.4 For Visitor
Internet Explorer:

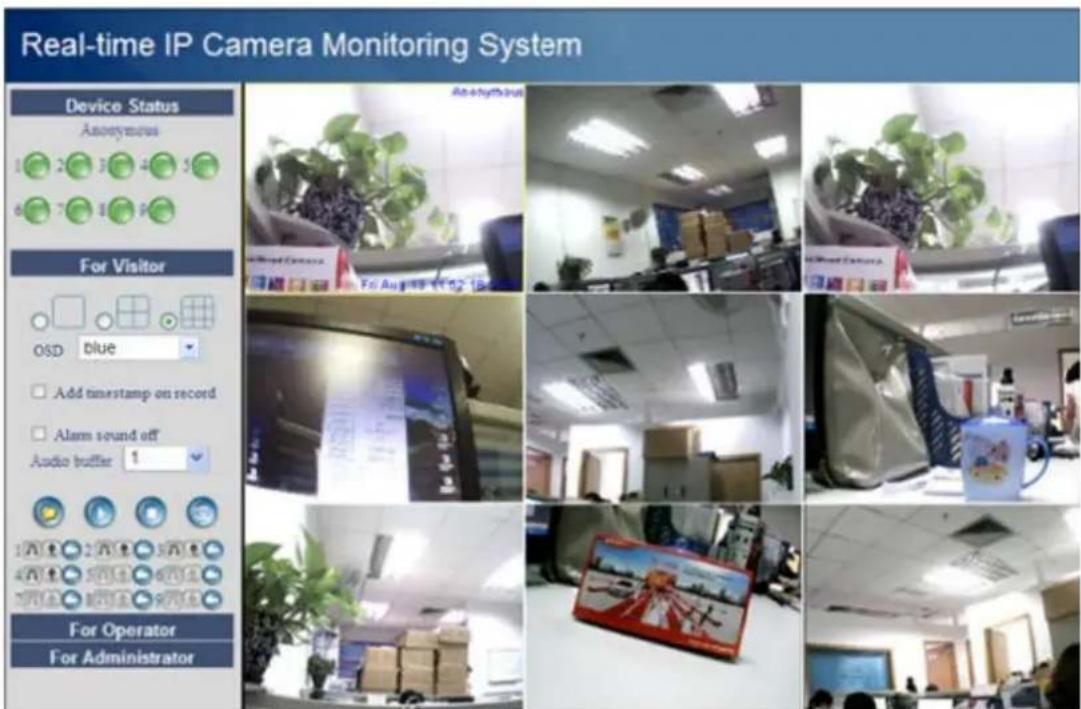
Multi-device window: The firmware inside the camera can support a maximum of nine simultaneous cameras. Add cameras in multi-device settings.
OSD: Add a timestamp to the video with five character colors
Add timestamp on record: Add a timestamp to a prerecorded video
Alarm sound off: Mute alarm sound when motion has been detected
Audio buffer: Buffer audio for a set number of seconds

(folder): When you enable motion alarm, the camera will automatically record and store the file
to a predefined folder. This icon controls the folder pop-up.

(headphones): Hear the sound captured by the camera's built-in microphone. You may need to
plug in headphones or enable computer speakers to hear the audio.

(microphone): Talk through your computer's microphone which will transmit your voice to the
camera's speaker. You will be heard through the camera.
Record: Begin recording video. Click again to stop recording and save the .avi file to the folder you previously selected.
Firefox, Chrome and Safari:
You will see the picture above when you log into the camera as a visitor.
2.5 For Operator
Internet Explorer:
Click For Operator. The following screen will appear:
Real-time IP Camera Monitoring System


(vertical arrow): Rotate camera up and down. Click ☐ to stop.

(horizontal arrow): Rotate camera left and right. Click 📄 to stop.

(eye): Turn on IR lights. Click to turn off IR.
Flip and Mirror: Camera will reverse image/video feed.
Mode: Select lighting mode: 50HZ, 60HZ and outdoor (Note: it is not recommended to use this item outdoors.)
Brightness and Contrast: Adjust video quality.
Preset: Create a pre-defined location setting with this control. Once you have edited your settings, click "set." This location can now be retrieved by selecting the number assigned and clicking "go."
Firefox, Chrome and Safari:
Click Live Video. The snapshot button is under For Operator. Other functions under Live Video include refresh video, refresh parameters, audio and close audio.

Audio: Listen to the IP Camera's built-in microphone. We recommend connecting headphones or speakers to your computer.
CloseAudio: Turn off camera audio.
NOTE: If you receive a message stating you require a plugin, install VLC Media Player before using this function. Download and install the plug-in from http://www.videolan.org.
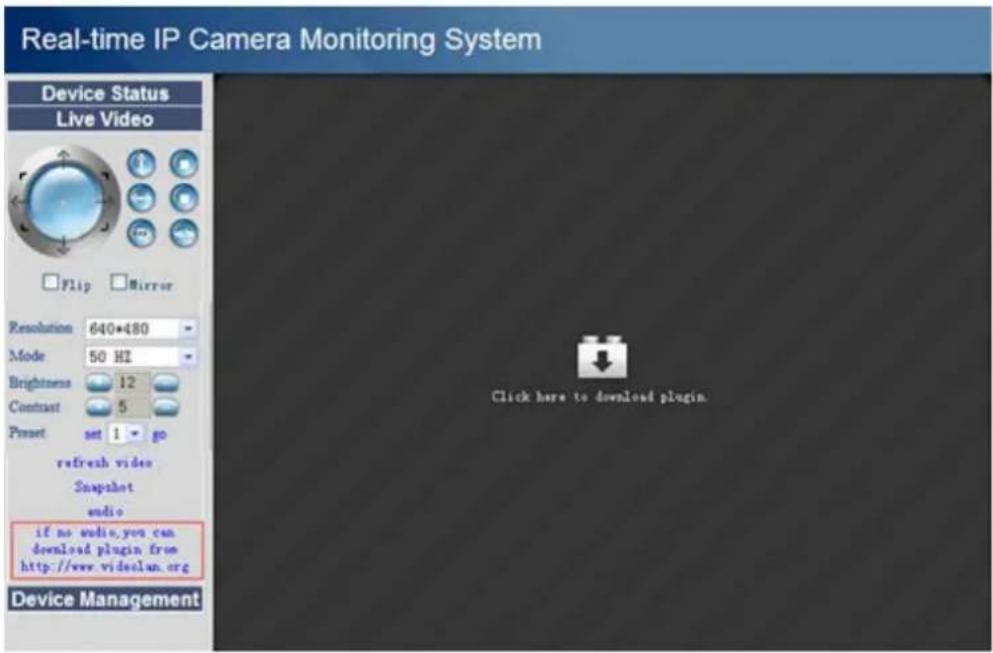
During installation, select the Mozilla plug-in.

2.6 For Administrator
Internet Explorer:
Click For Administrator. The Device Status will appear with the device ID, firmware version and other information about the camera.
Real-time IP Camera Monitoring System
| Device Info |
| Alias Settings |
| Date&Time Settings |
| Users Settings |
| Multi-Device Settings |
| Basic Network Settings |
| Wireless LAN Settings |
| ADSL Settings |
| UPnP Settings |
| DDNS Service Settings |
| Mail Service Settings |
| MSN Settings |
| FTP Service Settings |
| Alarm Service Settings |
| PTZ Settings |
| Upgrade Device Firmware |
| Backup & Restore Settings |
| Restore Factory Settings |
| Reboot Device |
| log |
| Back |
| Device Status | |
| Device ID | 000DC5D29D64 |
| Device Firmware Version | 11.22.2.38 |
| Device Embedded Web UI Version | 2.5.18.17 |
| Alias | apple |
| Alarm Status | None |
| DDNS Status | 3322 Succeed http://software6.3322.org:8006 |
| UPnP Status | UPnP Succeed |
| MSN Status | No Action |
Firefox, Chrome and Safari:
Click Device Management to enter the administrator settings page.

Device Info: This is similar to Device Status which will have the same information as IE.
Multi-Device Settings: Since this function is controlled by ActiveX, it is not available in Firefox or Chrome.
Back: In Firefox or Chrome browser, you must click Live Video or Device Status to go back.
NOTE: The record and multi-device functions are controlled by ActiveX controller, so Firefox and Chrome will not allow these functions.
3.0 CONFIGURE ADMINISTRATOR SETTINGS
3.1 Alias Settings
The default alias is anonymous. Set a name for your camera, then click Submit to save your change.

3.2 Date and Time Settings
Choose the time zone for your country. You can choose Sync with NTP Server or Sync with PC Time. If your time zone uses Daylight Saving Time, enable it here.


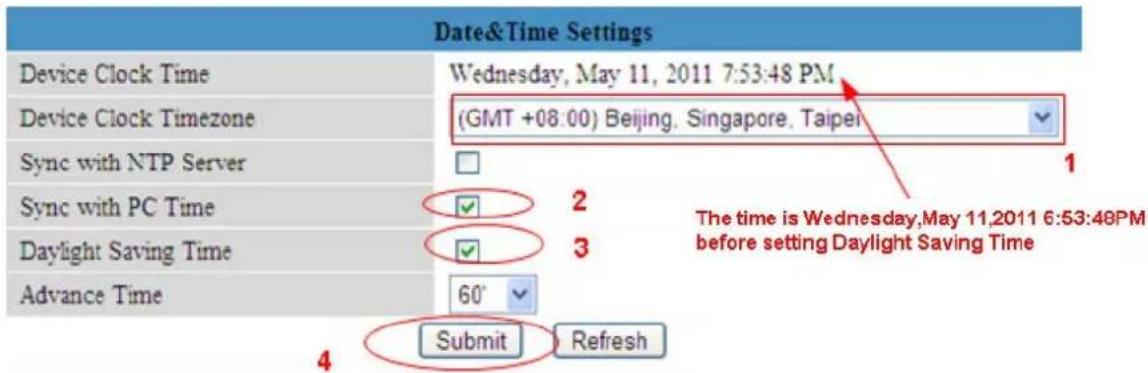
Figure 3.2c
3.3 User Settings
Set permissions for a visitor, operator and administrator, then click Submit. The camera will reboot.

Here you can set the record file path and the alarm record file path for the camera. Record Path will store the file of a manual recording. Alarm record path will store the file of the recording when it is activated by motion (you must set motion alarm first).
Click Browse to choose the path. The default path for both is C:\Documents and Settings\All Users\Documents.
NOTE: If you are using Windows 7 or Vista, you cannot change the record path. Set it following the instructions:
Windows 7 or Vista's security level is higher than Windows XP/2000. For "set record path" function, add the Device IP address to the IE's "Trusted sites": IE→Tools→Internet Options→Security→Trusted sites→Sites→Add
3.4 Multi-Device Settings
IP Camera Tool can support up to nine cameras simultaneously.
3.4.1 Add Cameras in LAN
In Multi-Device Settings, you can see all of the devices that were found on the LAN. The first device listed is the default. You can add more cameras in the list for monitoring.
To add an additional camera to monitor, click the selected camera in LAN device list; the alias, host, and HTTP port boxes will automatically be filled in. Enter the correct username and password, then click Add. After all cameras have been added, choose Submit.


To test, choose For Visitor and then click the button that corresponds with however many cameras you added. You will see the simultaneous live feeds from all the cameras.

3.4.2 Add Cameras in WAN
If you want to view all cameras remotely, you will need to add them to use DDNS domain name. First, make sure all the cameras you added can be accessed over the Internet. (See Set DDNS settings in the Quick Start Guide.)
Log into the first camera using a DDNS domain name and port.

If you have several cameras, you can use the same DDNS domain name; you only need to set a different port number for each camera.
Click Multi-Device Settings. Choose the additional camera and fill in its name, DDNS domain name and port number. Enter user name and password, then choose Add.
NOTE: Fill in the second camera's DDNS domain name for its host, not its LAN IP.
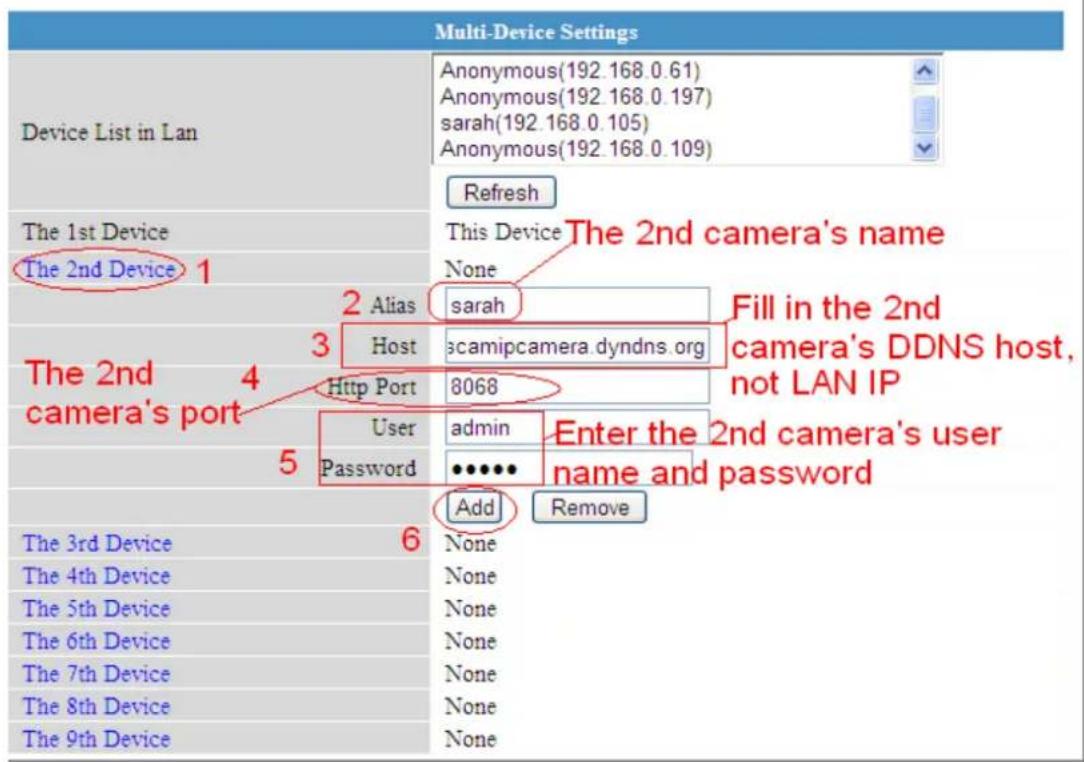
Add more cameras the same way. Click Submit to save.

Go back to video window. You will see all of the cameras accessible through the Internet. When you are away from home, you can use the first camera's DDNS domain name and port to view all the cameras via the Internet.

3.5 Basic Network Settings
Set a static IP for the camera by choosing Basic Network Settings and selecting an address within your LAN.
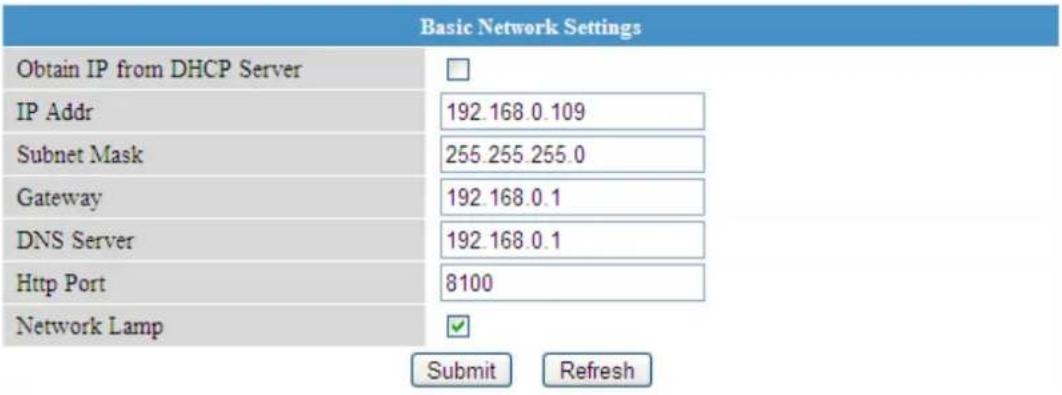
Follow the same procedure to access these settings in the IP Camera Tool.

3.6 Wireless LAN Settings
See Set Wireless LAN Settings in Quick Start Guide.
3.7 ADSL Settings
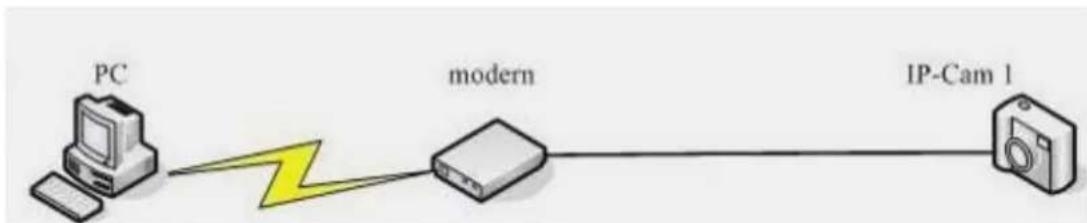
flowchart
graph LR
    PC["PC"] -->|black lightning bolt| Modern["modern"]
    Modern --> IP_Cam1["IP-Cam 1"]
When directly connected to the Internet through ADSL, you can enter the ADSL username and password obtained from your ISP.

3.8 UPnP Settings
Check Using UPnP to MAP Port, then click Submit.

The camera's software will be configured to port forwarding. We recommend you manually configure port forwarding on your router.
3.9 DDNS Service Settings
DDNS allows users with Dynamic IP addresses to remotely access the camera from external connections. See Set DDNS Service Settings in the Quick Start Guide.
3.10 Mail Service Settings
If you want the camera to send email notifications when motion has been detected, configure Mail Service Settings.

Make sure your sender address supports SMTP. Four recipients can be added to receive images. Use the correct SMTP port for your server; some SMTP servers require a specific port such as 587 or 465, so check with your ISP. Transport Layer Security usually is None, but check with your ISP to be sure. If you use Gmail, Transport Layer Security must be set to TLS or STARTTLS and SMTP Port must be set to 465, 25 or 587. Click Submit.
Click Test to see if SMTP has been successfully configured.
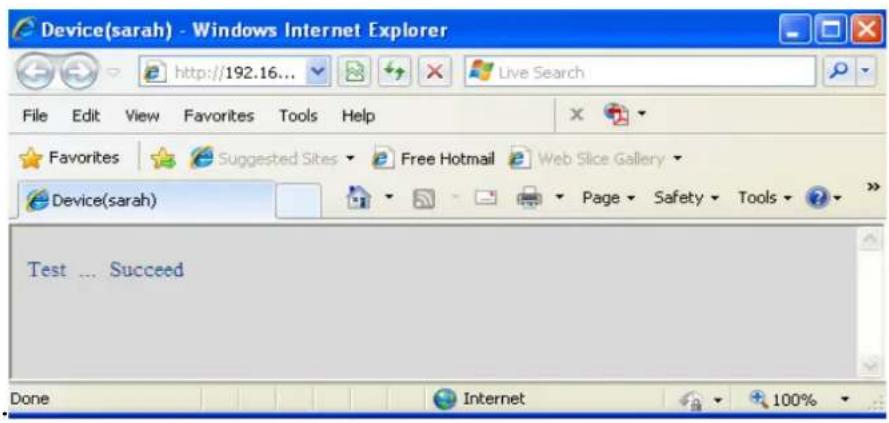
If one of the following errors occurs, check the information you entered, then click Test again:
1) Cannot connect to the server
2) Network Error. Please try later.
3) Server Error
4) Incorrect user or password
5) Sender denied by server. This may be because the server needed to authenticate the user, so check it and try again.
6) Receiver is denied by server. This may be due to the anti-spam privacy of the server.
7) Message is denied by server. This may be due to the anti-spam privacy of the server.
8) Server does not support the authentication mode used by the device
Report Internet IP by Mail: If selected, you will receive emails which contain internet IP information, such as when the camera is powered or the Internet IP has changed. Make sure the port is mapped to the router correctly.
Example of a Gmail Setup
Real-time IP Camera Monitoring System

3.12 FTP Service Settings
If you want to upload images to your FTP server, you can set FTP Service Settings.

Please click submit before test
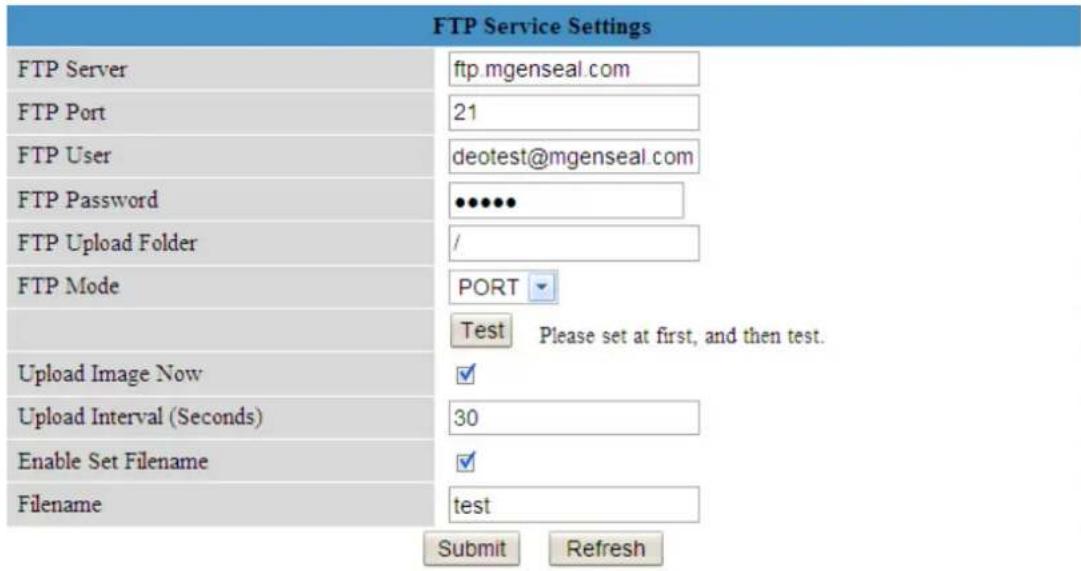
FTP server: Set up FTP Server to work with your camera (see topmost image). If you have a FTP server that can be accessed on the internet (see above image).
FTP Port: Usually port 21
FTP Upload Folder: Make sure the folder in which you plan to store images exists and is erasable. The camera will not automatically create a folder.
FTP Mode: Supports standard (POST) mode and passive (PASV) mode
Upload Image Now: Uploads images when you enable the checkbox
Upload Interval: Refers to the time between the current image and the next image
Enable Set Filename: Set a name for the uploaded image when you enable the checkbox. If you select it, the uploaded image will be named after the filename you set. The next image will cover the last image and the FTP upload folder will only have one uploaded image named after the filename you set.
Filename: Fill in a name for the uploaded image file. This name is different from the alarm image. You cannot change the name of the alarm image.
Click Submit, then click Test. The following screen will appear if successful:

The following errors may occur:
1) Cannot connect to the server. Check that the FTP server is correct.
2) Network error; try later.
3) Server error
4) Incorrect username or password. Check username and password.
5) Cannot access the folder. Verify the folder exists and your account is authorized.
6) Error in PASV mode. Verify the server supports PASV mode.
7) Error in PORT mode. PASV mode should be selected if the device is behind a NAT.
8) Cannot upload file. Verify your account. Check parameters. The saved image name will be similar to 00606E8C1930(sarah)_0_20100728114350_25.jpg; check that your FTP server supports this file name format.
3.13 Alarm Service Settings
If you enable Motion Detect Armed, you will receive email alerts and still images when motion is detected.

| Device Status | |
| Device ID | 000DC5D2F79E |
| Device Firmware Version | 11.22.2.38 |
| Device Embedded Web UI Version | 2.4.18.17 |
| Alias | apple |
| Alarm Status | Motion Detect Alarm Motion trigger |
| DDNS Status | No Action |
| UPnP Status | UPnP Succeed |
| MSN Status | Succeed |
If motion is detected after you enable Motion Detect Armed, the Alarm Status will update to Motion Detect Alarm.
There are five alarm indicators:
1) Button turns red when motion is detected:
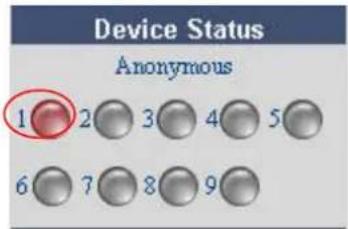
2) A beep will sound
3) The camera will automatically record for one minute after motion is detected and save the recording to your preset folder
4) The camera will send an email when motion is activated. If you want to receive images when motion is detected, set Mail Service Settings first. Then set motion alarm:

If you want the camera to send a motion detection email only during a specific time frame, use Scheduler to set the time range for motion alarm.
5) Upload images via FTP server when motion is detected. Set FTP Service Settings first and then set motion alarm:

There are two alarm options:
1) Alarm will activate any time motion is detected. If you wish to set this option, leave Scheduler unchecked. All time boxes will turn blue. Click Submit.

2) Set a daily alarm schedule. Activate the camera alarm by selecting the time range in Scheduler.
Click any hour between 00 and 23 in the Set row to highlight the row and activate a daily motion-detect alarm for that hour. In the example below, the camera will sound an alarm if motion is detected between 6 a.m. and 7 a.m. every day.
Deselect a highlighted hour by clicking the corresponding number in the Clear row.

If you want to set a motion-detect alarm for a specific day and time, click the box of the specified time/day. Click the box again to deselect.
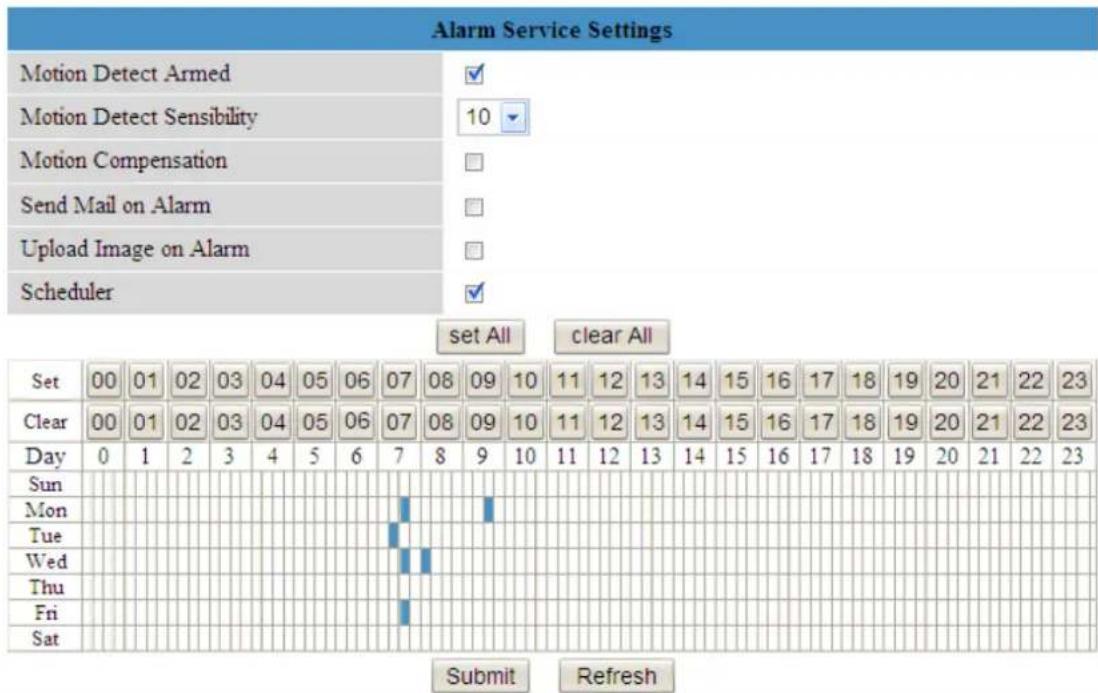
If you want the camera alarm activated most of the time, click Set All to highlight all boxes, then click the times you want the alarm deactivated. Click Submit.

3.14 Pan/Tilt Settings
The standard pan/tilt (PT) speed is 3, but is easily adjusted from 1 to 10 (the higher the number, the slower the PT speed).
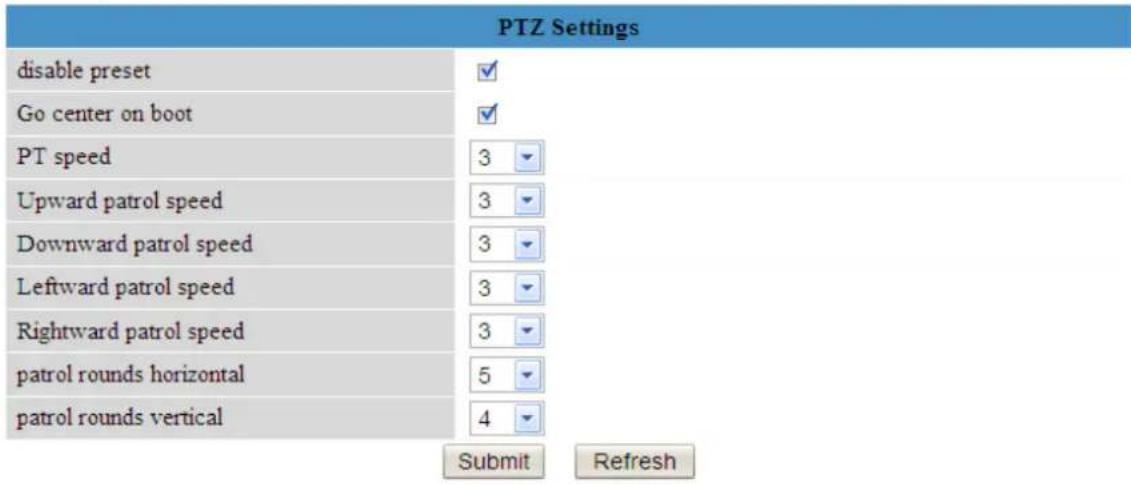
You can also set your camera's patrol speeds, or the speed at which it pans horizontally/vertically.
Patrol rounds horizontal: Set speed between 1 and 10 and click Submit, then go back to For Operator. Click the Horizon patrol button; the camera will horizontally pan the set number of times, then stop automatically. In the example above, the camera will horizontally pan for 5 rounds and then stop automatically. Select Stop horizontal patrol to deactivate this setting.
Patrol rounds vertical: Set speed between 1 and 10 and click Submit, then go back to For Operator. Click the Vertical patrol button; the camera will vertically pan the set number of times, then stop automatically. In the example above, the camera will vertically pan for 4 rounds. Select Stop vertical patrol to deactivate this setting.
Note: Patrol rounds horizontal/vertical has no relation to the rotation rounds when the camera reboots.
3.15 Upgrade Device Firmware
For latest firmware updates, visit INSTEON.com.
3.16 Backup and Restore Settings
Click Submit to save all the parameters you have set. These parameters will be stored in a .bin that can be restored to load the previously set parameters.

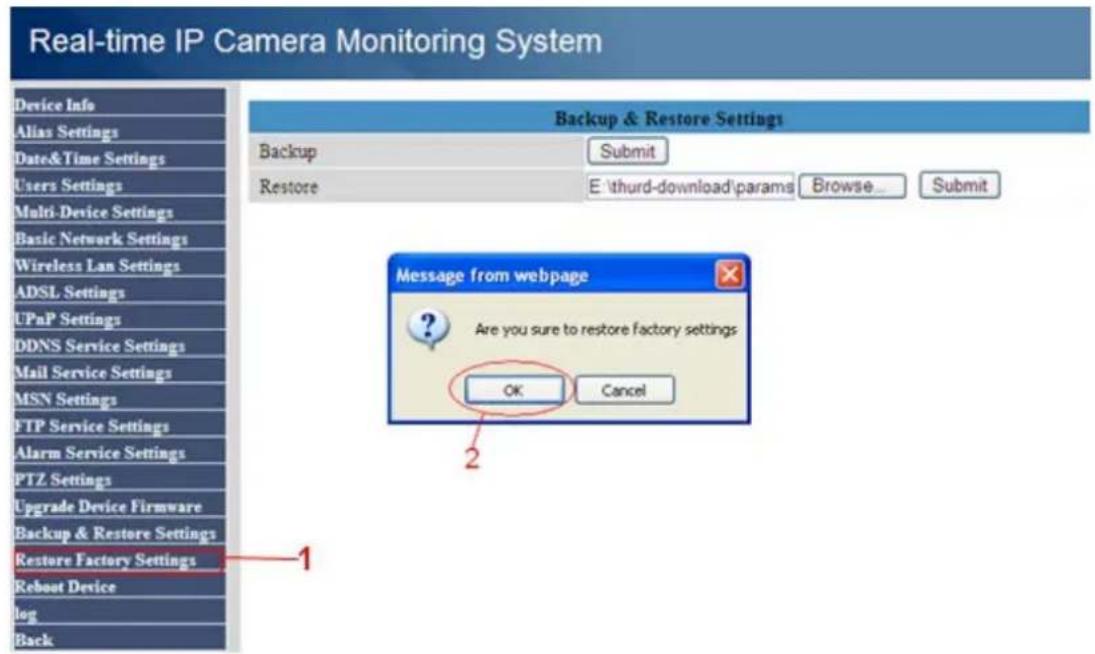
3.17 Restore Factory Settings
All parameters will return to factory default settings.
3.18 Reboot Device
Click Reboot Device to power cycle the camera. To manually reboot, unplug the camera and plug it back in.
3.19 Log
The log displays the users who have accessed the camera.
| log | ||||
| Fri, 2010-07-30 09:56:58 admin 192.168.0.26 access | ||||
| Fri, 2010-07-30 10:49:04 admin 192.168.0.50 access | ||||
| Fri, 2010-07-30 14:17:01 admin 192.168.0.50 access |
3.20 Back
This will take you back to the video window.
4.0 APPENDIX
4.1 Frequently Asked Questions
Always confirm connectivity with your LAN and the internet prior to testing your camera.
4.1.1 I forgot my username and/or password.
Reset the administrator username and password by making sure the camera is powered on, then pressing and holding the camera reset button for 15 seconds. This will factory restore the username and password to "admin" with no password.
4.1.2 Why do I keep seeing "Subnet doesn't match, dbclick to change"?
If IP Camera Tool shows this error, select Obtain IP from DHCP server. If this error still exists afterward, check your LAN connection and verify that the camera subnet and gateway are the same as your computer.
4.1.3 Why isn't my video streaming or showing images?
The video streaming is transmitted by the ActiveX controller. If ActiveX controller isn't installed correctly you will not see the video image. There are two ways to resolve this problem:
1) Reinstall IP Camera Tool and ActiveX control
2) Download ActiveX controller and set IE's security setting of IE: IE→Tool→Internet
Proper→Security→Custom Level→ActiveX control and Plug-ins. Enable the following:
- Download unsigned ActiveX controls
- Initialize and script ActiveX controls not marked as safe
• Run ActiveX controls and plug-ins

If ActiveX is running but you still cannot see live video, a red cross is displayed in the center of the video and a yellow light 🔍 appears in the device status, change the port number (do not use port number 80).
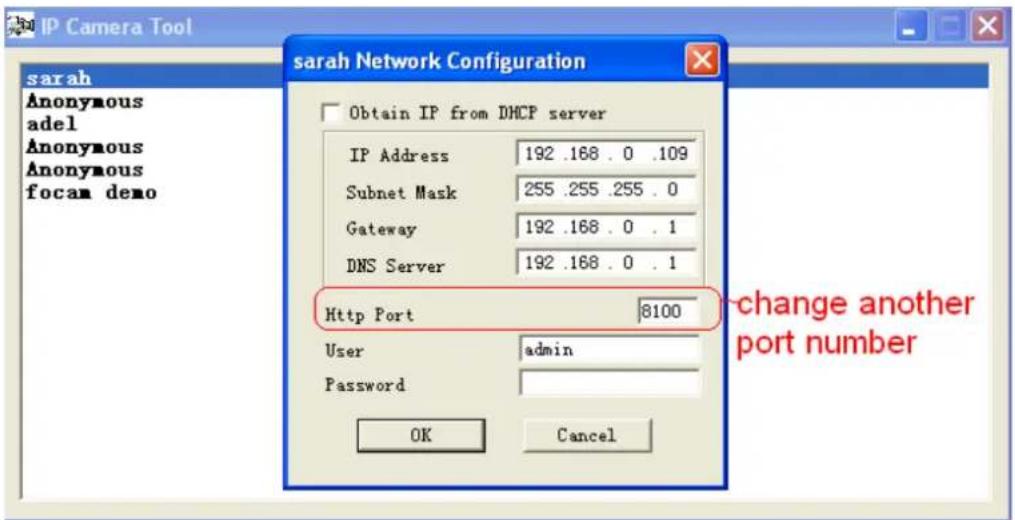
Note: Make sure that your firewall or anti-virus software does not block the camera or ActiveX. If you still cannot see live video, try shutting down the firewall or anti-virus software and try again.
4.1.4 Why isn't my camera accessible via the Internet?
- ActiveX controller is not installed correctly
-
The port that the camera is using is blocked by a firewall or anti-virus software. Try changing the port number.
-
Port forwarding is not successful (see How to Set DDN Service Settings in the Quick Start Guide).
4.1.5 IP Camera Tool can't find my camera's IP.
- Verify that the network cable is securely fastened to the camera
- Make sure DHCP is enabled and MAC address filter is disabled on your router
3, Make sure that a firewall or anti-virus software does not block the camera. You can add the camera as a trusted site through your firewall or anti-virus software.
4.1.6 Why has the UPnP failed?
The UPnP only contains port forwarding. Sometimes, port forwarding may fail automatically because of a firewall or anti-virus software. It may also be due to the router's security settings. Manually configure port forwarding so the camera can be viewed on the internet.
4.1.7 Why can't I find a desktop shortcut to IP Camera Tool?
If you use Windows 7 or Vista and the shortcut is missing after installing IP Camera Tool, check the program path. For example, if the path reads: C:\Windows\System32\IPCamera.exe, then change it to C:\Windows\SysWOW64\IPCamera.exe. After this you should be able to use the shortcut without any problems.
4.1.8 Why can't I change the record path?
If you use Windows 7 or Vista, you may be not able to change the record path due to your computer's security settings. Instead, add the camera as a trusted IE site.
4.1.9 Why can't I find the multi-device settings and record icons?
Record and multi-device functions are controlled by ActiveX. These functions are not available in Firefox, Chrome and Safari.
4.1.10 Why won't my camera connect wirelessly?
If your camera cannot connect wirelessly after you enable the wireless settings, power cycle the camera by unplugging the power cable and plugging it back in. Make sure your wireless settings are correct and match your wireless router or access point.
4.1.11 Why can't I see my other cameras in multi-device WAN?
If you want to view all the cameras on WAN, verify that each camera you added in the multi-device settings can be accessed using the DDNS name and port number. Make sure you use the DDNS domain name, not the camera's LAN IP. See How to Add Cameras in WAN.
4.1.12 I only see a black screen or undefined characters when using remote login.
If you can remotely access the login page, this indicates that your DDNS settings are correct. If you are unable to see live video and/or undefined characters, this may be due to Internet speed issues or the camera using WiFi.
4.2 Default Parameters
Default network Parameters
IP address: DHCP
Subnet mask: 255.255.255.0
Gateway: DHCP
DDNS: Disabled
Default administrator username: admin
Default administrator password: no password
4.3 Port Forwarding Basics
A software port is a numbered connection that your network uses to provide or deny access to your home LAN (local area network) from a remote location. Port forwarding allows you to access your home LAN from any Internet connection.
IMPORTANT! Port forwarding setup varies based on the make and model of your router. These examples are provided to help you understand the port forwarding process, but see your router's manual for device-specific port forwarding instructions.
Netgear
-
Type your router's address into an Internet browser. By default, this should be 192.168.0.1; the information should be provided in your router's instructions or on the router itself.
-
You will be prompted to enter a username and a password. For Netgear devices, the default username is "admin" and the password is either "password" or "1234" (unless you have already changed them).
-
Open "Advanced" and click "Port Forwarding." The Ports window will open with information on existing HTTP and FTP ports (these are used to connect your router to the Internet).
-
Click the "Add Custom Service" button and enter a new service name, such as INSTEONIPCamera1).
-
Enter the camera's IP address (found in the IP Camera Tool device list) into the Server IP Address field.
-
You will need to specify a port range to have open for your camera. 8000-8999 is a good range to work with, but make sure the port you open does not conflict with any ports you may already have open (from your list of Services on the "Port Forwarding" page). To enter a single port (ex. port 8030), use the same port for the "Start Port" and "End Port."
-
Click "Apply" and logout from the router settings page.
-
After making sure you are not connected to your local wireless connection, open your smartphone's Internet browser and enter your camera IP address followed immediately by a colon and the port you have opened (for example http://192.168.1.4:8030). You should see the camera login screen.
Linksys
-
Type your router's address into an Internet browser address bar. By default this should be 192.168.1.1; the information should be provided in your router's instructions or on the router itself.
-
You will be prompted to enter a username and a password. For Linksys devices, the default username is "admin" and the password is left blank unless you have changed them previously.
-
Once logged in, open "Applications and Gaming" on the left navigation and click on "Port Range Forwarding". The Ports window will open with information on existing HTTP and FTP ports (these are used to connect your router to the Internet).
-
In the "Application" field enter a new Service Name, such as INSTEONIPCamera1.
-
Enter the camera's IP address (found in the IP Camera Tool device list) into the Server IP Address field.
- In the "UPD/TCP" field select "Both."
- You will need to specify a port range to have open for your camera. 8000-8999 is a good range to work with, but make sure the port you open does not conflict with any ports you may already have open (from your list of Services on the "Port Forwarding" page). To enter a single port (ex. port 8030), use the same port for "Start" and "End."
- Click "Save Settings" and logout from the router settings page.
- After making sure you are not connected to your local wireless connection, open your smartphone's Internet browser and enter your camera IP address followed immediately by a colon and the port you have opened (for example http://192.168.1.4:8030). You should see the camera login screen.
D-Link
- Type your router's address into an Internet browser. By default, this should be 192.168.0.1; the information should be provided in your router's instructions or on the router itself.
- You will be prompted to enter a username and a password. For D-Link devices the default username is "admin" and the password is left blank unless you have changed them previously.
- Once logged in, open "Advanced" and click on "Port Forwarding" in the left navigation. The Ports window will open with information on existing HTTP and FTP ports (these are used to connect your router to the Internet).
- In the "Name" field enter a new Name, such as INSTEONIPCamera1.
- Enter the camera's IP address (found in the IP Camera Tool device list) into the Server IP Address field.
- In the "Traffic Type" drop-down menu select "Any."
- You will need to specify a port range to have open for your camera. 8000-8999 is a good range to work with, but make sure the port you open does not conflict with any ports you may already have open (from your list of Services on the "Port Forwarding" page). To enter a single port (ex. port 8030), use the same port for "Start" and "End."
- In the "Schedule" drop-down menu, select "Always."
-
Click "Save Settings" and logout from the router settings page.
-
After making sure you are not connected to your local wireless connection, open your smartphone's Internet browser and enter your camera IP address followed immediately by a colon and the port you have opened (for example http://192.168.1.4:8030). You should see the camera login screen.
4.4 Specifications
| Description | INSTEON® Wireless IP Camera | |
| Image Sensor | Image Sensor | High Definition Color CMOS Sensor |
| Display Resolution | 640 x 480 Pixels(300k Pixels) | |
| Lens f: 3.6 mm | ||
| Mini. Illumination 0.5 | Lux | |
| Lens | Lens Type Glass Lens | |
| Video | Image Compression MJPEG | |
| Image Frame Rate 15fps(VGA),30fps(QVGA) | ||
| Resolution | 640 x 480(VGA), 320 x 240(QVGA) | |
| Flip Mirror Images | Vertical / Horizontal | |
| Light Frequency | 50Hz, 60Hz or Outdoor | |
| Video Parameters | Brightness, Contrast | |
| Communication | Ethernet | One 10/100Mbps RJ-45 |
| Supported Protocol | HTTP,FTP,TCP/IP,UDP,SMTP,DHCP,PPPoE,DDNS,UPnP,GPRS | |
| Wireless Standard | IEEE 802.11b/g/n (n available on late 2012 models) | |
| Data Rate | 802.11b: 11Mbps(Max) 802.11g: 54Mbps(Max) 802.11n: 108Mbps(Max) | |
| Wireless Security | WEP and WPA and WPA2 Encryption | |
| Infrared Light | 11 IR LEDs, Night visibility up to 26 feet (8 meters) | |
| Dimension | 110(L) x100(W) x108mm(H) | |
| Gross Weight | 768g (Color Box Size:200X124X189mm) | |
| Net Weight | 418g (accessories included) | |
| Power | Power Supply | DC 5V/2.0A (EU,US,AU adapter or other types optional) |
| Power Consumption | 5.5 Watts (Max.) | |
| Environment | Operate Temperature | 0° ~ 55°C (32°F ~ 131°F) |
| Operating Humidity | 20% ~ 85% non-condensing | |
| Storage Temper. | -10°C ~ 60° (14°F ~ 140°F) | |
| Storage Humidity | 0% ~ 90% non-condensing | |
| PC Requirements | CPU | 2.0GHZ or above |
| Memory Size | 256MB or above | |
| Display Card | 64M or above | |
| Supported OS | Microsoft Windows 2000/XP/Vista/Windows7-32bit/ Windows7 -64 bit | |
| Browser | IE 6.0, IE7.0, IE8.0 Firefox2.0, Firefox3.0, Chrome, Safari or other standard browsers | |
| Certification | CE, FCC | |
5.0 OBTAINING TECHNICAL SUPPORT
If you have tried these suggested solutions, reviewed this Owner's Manual and still cannot resolve an issue you are having with INSTEON Wireless IP Camera, please call the INSTEON Support Line at 800-762-7845 or visit www.insteon.com/support.


- INSTEON® Wireless IP Camera
- Owner's Manual
- CONTENTS
- WELCOME ......2
- SOFTWARE OPERATION ....5
- APPENDIX 37
- WELCOME
- Features
- What's in the Box?
- Product views
- Front View
- Back View
- Bottom View
- Before Camera Use
- Software Installation
- Camera Installation
- SOFTWARE OPERATION
- IP Camera Tool
- Setup Options
- Camera Login
- Internet Explorer Setup:
- Safari, Firefox, Chrome and Other Browser Setup:
- Real-time IP Camera Monitoring System
- Device Status
- Internet Explorer:
- Firefox, Chrome and Safari:
- For Visitor
- For Operator
- For Administrator
- CONFIGURE ADMINISTRATOR SETTINGS
- Alias Settings
- Date and Time Settings
- User Settings
- NOTE: If you are using Windows 7 or Vista, you cannot change the record path. Set it following the instructions:
- Multi-Device Settings
- Add Cameras in LAN
- Add Cameras in WAN
- Basic Network Settings
- Wireless LAN Settings
- ADSL Settings
- UPnP Settings
- DDNS Service Settings
- Mail Service Settings
- FTP Service Settings
- Alarm Service Settings
- Pan/Tilt Settings
- Upgrade Device Firmware
- Backup and Restore Settings
- Restore Factory Settings
- Reboot Device
- Log
- Back
- APPENDIX
- Frequently Asked Questions
- I forgot my username and/or password.
- Why do I keep seeing "Subnet doesn't match, dbclick to change"?
- Why isn't my video streaming or showing images?
- Why isn't my camera accessible via the Internet?
- IP Camera Tool can't find my camera's IP.
- Why has the UPnP failed?
- Why can't I find a desktop shortcut to IP Camera Tool?
- Why can't I change the record path?
- Why can't I find the multi-device settings and record icons?
- Why won't my camera connect wirelessly?
- Why can't I see my other cameras in multi-device WAN?
- I only see a black screen or undefined characters when using remote login.
- Default Parameters
- Default network Parameters
- Port Forwarding Basics
- Netgear
- Linksys
- D-Link
- OBTAINING TECHNICAL SUPPORT
Brand : Insteon
Model : 75790WH
Category : Security Camera