MP215 - Digital audio player Emerson - Free user manual and instructions
Find the device manual for free MP215 Emerson in PDF.


| Product Type | Countertop Microwave Oven |
| Brand | Emerson |
| Model | MP215 |
| Capacity | 0.7 cu. ft. (approx. 20 liters) |
| Power Output | 700 Watts |
| Power Consumption | 1050 Watts |
| Dimensions (W x D x H) | 17.3 x 12.6 x 10.2 inches |
| Weight | 24.3 lbs (approx. 11 kg) |
| Control Type | Mechanical Dial & Push Button |
| Display | LED Digital Timer |
| Timer | Up to 30 minutes |
| Power Levels | 5 Levels (Low, Medium, High, etc.) |
| Defrost Function | Yes, by weight or time |
| Interior Light | Yes |
| Turntable | Yes, glass tray |
| Material | Stainless Steel / Painted Steel |
| Voltage | 120 V / 60 Hz |
| Safety Features | Child Lock, Automatic Shut-off |
| Cleaning | Wipe with damp cloth; mild detergent |
| Warranty | 1 Year Limited |
Frequently Asked Questions - MP215 Emerson
User questions about MP215 Emerson
0 question about this device. Answer the ones you know or ask your own.
Ask a new question about this device
Download the instructions for your Digital audio player in PDF format for free! Find your manual MP215 - Emerson and take your electronic device back in hand. On this page are published all the documents necessary for the use of your device. MP215 by Emerson.
USER MANUAL MP215 Emerson
digital audio player
MP215

Emerson®
Thank you...
for purchasing this Emerson Personal MP3/WMA™ Player. This MP3/WMA™ player offers easy to use plug & play features and has enough
memory so you can listen to hours of your favorite songs. Also, you can use the player as a storage device for your computer.
Please read the instruction manual completely and carefully to make sure you understand the proper operation of this product. This will enable
you to get the maximum enjoyment out of all the features within this state-of-the-art MP3/WMA™ player.
Once again, thanks for purchasing this Emerson product.
The serial number of your player can be found on the inside of the battery compartment.
We suggest that you record the serial number of your unit in the space below for future reference.
Model Number: MP215
Serial Number:
Care and Maintenance
Your MP3/WMA™ player is a precision electronic device and should not be subject to rough handling or exposed to high temperatures or
moisture.
Do not use chemical or liquid agent
Wipe off unit with soft cloth.
Be sure to remove battery, while cleaning the product.
Weak battery should be removed or they can leak and damage the player.
Product Specification
File Support
Bit Rate
FM
Battery
Battery Language
Ling USB
USB
Built-in Memory
Play Time Approx. 10 hours
Supported OS
Operating Range
System Requirements
MPEG 1/2/2.5 Layer 3. WMA™
8Kbps-320Kbps
87.5 MHz - 108 MHz
1.5V×1 (AAA Alkaline)
English
USD 0.1
USB2.0/1.1
128MB
Approx. 10 hours
Win® 98, ME, 2000, XP/Mac® OS 9.2.2 or higher
40-95 deg F (5-35 deg C)
Pentium MMX® 233MHz or higher with 54 MB minimum RAM and 10 MB free space minimum on hard drive
Warning
To reduce the risk of shock hazard, do not expose this product to rain or any type of moisture, as well as do not disassemble the player. There are no user-serviceable parts inside.
Coulon: Any changes or modifications not expressly approved by the party responsible for compliance could void the user's authority to operate this device.
Shield cables must be used with this unit to ensure compliance with the Class B FCC limits.
Risk of explosion, damage or battery leakage is possible if battery is replaced or inserted incorrectly, as well as an incorrect type. Never attempt to charge a non-rechargeable alkaline battery. Please dispose of used batteries according to local laws.
This device complies with Part 15 of the FCC Rules. Operation is subject to the following two conditions: (1) This device may not cause harmful interference, and (2) This device must accept any interference received, including interference that may cause undesired operation.
Note: This equipment has been tested and found to comply with the limits for a Class B digital device, pursuant to Part 15 of the FCC Rules. These limits are designed to provide reasonable protection against harmful interference in a residential installation. This equipment generates, uses, and can radiate radio frequency energy and, if not installed and used in accordance with the instructions, may cause harmful interference to radio communications. However, there is no guarantee that interference will not occur in a particular installation. If this equipment does cause harmful interference to radio or television reception, which can be determined by turning the equipment off and on, the user is encouraged to try to correct the interference by one or more of the following measures:
- Reorient or relocate the receiving antenna.
- Increase the separation between the equipment and receiver.
- Connect the equipment into an outlet on a circuit different from that to which the receiver is connected.
- Consult the dealer or an experienced radio/TV technician for help.
Copyright/Trademarks
Microsoft ^® , WMA ^™ , and the Windows ^® logo are trademarks or registered trademarks of Microsoft Corporation in the United States and/or other countries. Pentium ^® is a registered trademark of Intel in the United States and/or other countries.
All other product names may be trademarks of the companies with which they are associated.
Location of controls
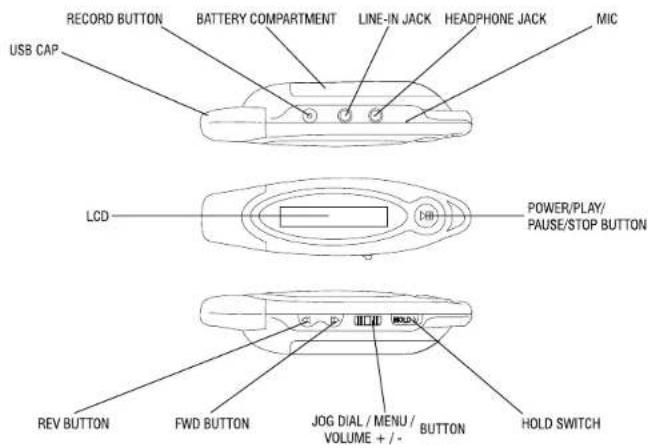
Installing the battery (not included)
-
Slide the battery compartment cover as shown.
-
Insert one fresh "AAA" alkaline battery in the battery compartment. Be sure to follow the polarity marking in the battery compartment. If the battery is inserted incorrectly the unit will not work.
-
Slide the battery compartment into place.
- When the battery is getting weak, the indicator changes from "☐" (full battery) to "☐" (replace battery) in the display, the batteries are almost exhausted and should be changed as soon as possible. Do not leave weak or exhausted batteries in the player as they will eventually leak and cause corrosion inside the battery compartment.

Connect player to your computer
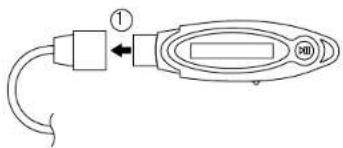
- Remove cap.
- Place USB connector of player into female side of the USB extension cord (A). Plug the other end of the extension cord (B) into an open USB port in computer.
NOTE: Player can be connected directly to computer if space permits.

flowchart
graph TD
    A["①"] --> B["Device ②"]
    B --> C["Device ②"]
    C --> D["Device ②"]
    D --> E["Device ②"]
    style A fill:#f9f,stroke:#333
    style B fill:#ccf,stroke:#333
    style C fill:#cfc,stroke:#333
    style D fill:#fcc,stroke:#333
    note right of C: TO COMPUTER'S USB PORT
Transferring music and data files
- Confirm player is powered up and connected to computer.
- On your Desktop, double-click the "My Computer" icon.
- Drag and drop files onto the MP215 drive ("Removable Disk").
NOTE: The player stores all types of formatted files. However, it will only play MP3 and WMA™ and WMA™ with DRM™ (copy protected) formatted files.
- Your player will have slightly less memory available than stated due to the necessary memory needed for its firmware.
NOTE: If you are using Windows® 98SE or below, you must first download and install the driver from our website, www.emersonradio.com.
②

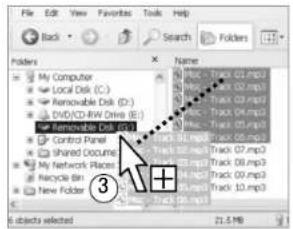
Transferring DRM protected music files
- DRM protected files must be downloaded to the player through a DRM compatible client program (eg. Windows Media Player). Although DRM protected files can be copied and transferred to the player like regular MP3 files, without the appropriate license and decoding, the DRM files cannot be played by the player. Using Windows Media Player, the protected DRM files can be downloaded to the player as follow:
- Connect the player to the computer through USB port.
- Open Windows Media Player on your computer and go to "Copy to CD or Device".
- Select the songs from the left window which you would like to put on the player. Press Copy icon (top right) to begin copying.
③

Transferring DRM protected music files (continued)
NOTE: The files that will appear in the left window are from the Media Library. If no files should appear, you will need to drag and drop files from stored location on computer into the Windows Media Player's Media Library.
- Files will be copied to the device if a valid license is obtained. If the file transfer fails, please check the status and the details of the license of the DRM protected file.
NOTE: The details of the license of the DRM protected file can be accessed by checking the property of the DRM protected file in WMA.
4


Operation
- Unplug player from the USB cord. Make sure you have at least one MP3 or WMA™ file already stored on the player.
- Make sure the HOLD switch is in the off position (A) and that the player is on (B).
natural_image
Pure electrical circuit lines without any symbols
Operation (continued)
- Connect the earbuds to the headphone jackΩ.
- Press the POWER/PLAY/PAUSE/STOP button to begin playing an MP3 audio track.
NOTE: You may need to press the MENU button repeatedly to access the MP3 music mode.


List of basic operations
Power on the unit: Press and hold the POWER/PLAY/PAUSE/STOP button for approximately 2 seconds.
To play track: Press the POWER/PLAY/PAUSE/STOP button ▷.
To select a different track: Press the FWD ▶ or REV ◀ buttons.
To search through a track: Press and hold the FWD or REV buttons.
To momentarily pause track: Press the POWER/PLAY/PAUSE/STOP button when track is playing. ■ Indicator appears.
To resume track: Press the POWER/PLAY/PAUSE/STOP button when track is paused.
To adjust volume: Flip the JOG DIAL- or +.
To stop track: Press and hold the POWER/PLAY/PAUSE/STOP button for approximately 2 seconds when track is playing.
Power off the unit: Press and hold the POWER/PLAY/PAUSE/STOP button for approximately 5 seconds when tracks are stopped.
To lock the buttons from accidentally being pressed: Slide the HOLD switch to the on position. □ indicator appears.
Listen to the FM radio
- Turn the power on by pressing the POWER/PLAY/ PAUSE/STOP button>
Press the MENU button until the player's display shows FM radio information.
-
Observe the display. If the channel indication is on, you are in the FM preset mode. Change to the FM search & scan mode by pressing the POWER/PLAY/ PAUSE/STOP button offset. Channel indication will disappear.
-
Press the FWD▶r REV ▶buttons to tune in a station.
Press and hold the FWD▶or REV◀buttons for approximately 2 seconds to automatically search for the next station.
To improve the radio reception, adjust the headphone cord.


Create a station preset
• You can store 20 preset radio stations.
1. Move to the empty/target preset location in preset mode. Press the POWER/PLAY/PAUSE/STOP button to switch to FM search & scan mode.
2. Tune to the station you would like to store in memory.
3. Press and hold the POWER/PLAY/PAUSE/STOP button ▷. The radio channel will be stored in the desired preset location.
4. To preset more radio channels, repeat 1 to 3.
NOTE: You can change the station assigned to an existing preset location: follow the above steps to re-assign a new station to the desired preset location.
- The radio station presets will be erased when the battery is drained or replaced.


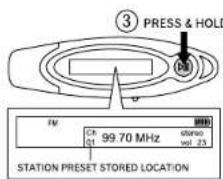
Listen to a station preset
- Press the POWER/PLAY/PAUSE/STOP button ▷■ momentarily to toggle between FM search & scan mode and FM preset mode.
- In the FM preset mode, press the FWD ▶ or REV ◀ button to select a preset radio station.


FM recording
- While in FM mode, press the RECORD button once to begin recording the current radio broadcast. File format depends on "MP3" or "ADPCM" setting. Please refer to "Settings Menu" in page 21.
- Press the RECORD button again to pause recording. Press the RECORD button again to resume recording.
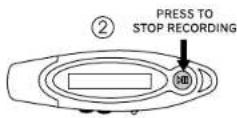
- Press the POWER/PLAY/PAUSE/STOP button ▷ to stop recording.
- You can store up to 99 radio recordings, depending on the amount of available internal memory.
- FM recordings will automatically be given a name such as "FM001.mp3".
- To playback an FM recording, go to Mic or Line Mode, select the FM recording file by using the FWD ▶ or REV ◀ button, and press the POWER/PLAY/PAUSE/STOP button once to play. You can pause or stop playing by pressing the POWER/PLAY/PAUSE/STOP button

PAUSE INDICATOR
Voice recording
- Press the MENU button until the player's display shows Mic recording information.
-
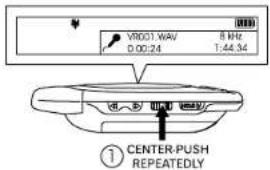
Press the RECORD button once and speak into the built-in mic. File format depends on "MP3" or "ADPCM" setting. Please refer to "Settings Menu" in page 21.
-
Press the RECORD button again to pause recording. Press the RECORD button again to resume recording.
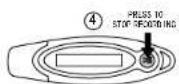
- Press the POWER/PLAY/PAUSE/STOP button ▷ to stop recording.
- You can store up to 99 voice recordings, depending on the amount of available internal memory.
• Voice recordings will automatically be given a name such as "VR001.WAV". - To playback a voice recording, press the POWER/PLAY/PAUSE/STOP button ▷ while in Mic or Line mode. Select voice recording files by using the FWD ▶ or REV ◀ button.


Line-in recording
- Press the MENU button until the player's display shows Line-in recording information.
- The line-in indicator will appear in the display. Connect an auxiliary source such as tape or CD player stereo output to the line in jack.
- Press the RECORD button once and begin playing the auxiliary source. Music will be converted to MP3 or WAV files automatically. File format depends on "MP3" or "ADPCM" setting. Please refer to "Settings Menu" in page 21.
- Press the RECORD button again to pause recording. Press the RECORD button again to resume recording.
- Press the POWER/PLAY/PAUSE/STOP button ▷ to stop recording.
- You can store up to 99 recordings, depending on the amount of available internal memory.
- Line-in recordings will automatically be given a name such as "LINE001.mp3".
- To play a line-in recording, press the POWER/PLAY/PAUSE/STOP button ▷ while in line-in recording mode. Use the FWD ▶ and REV ◀ buttons to select line-in recordings.

Delete a music or data file
- Confirm player is powered up and connected to computer.
- On your Desktop, double-click the "My Computer" icon.
- Select the desired files to delete located under "Removable Disk".
NOTE: Recordings will be located in the "Recording" folder within "Removable Disk".
- Press the "Delete" key on your computer's keyboard.


Delete a file directly from the player
• Make sure your player is disconnected from your computer.
- Press the FWD ▶ and REV ◀ buttons to select a track.
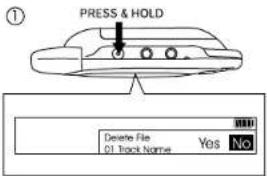
1. To delete a recorded file, press and hold the RECORD button while in the music, Mic or Line mode.
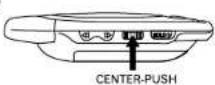
2. Flip the JOG DIAL button + or - to select "Yes" or "No". Center-push the JOG DIAL button once to confirm the deletion.

Hold
- Slide the HOLD switch to the on position to lock the buttons from accidentally being pressed. 🔒 indicator appears.
- Slide the HOLD switch to the off position to unlock the buttons. 🔒 indicator disappears.


Settings menu
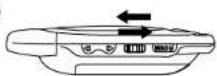
- Press and hold the MENU button.
- If you enter the settings menu from the music mode, the first two options will be: "Repeat" and "EQ".
- If you enter the settings menu from the recording mode, the first two options will be: "Rec. Format (MP3/ADPCM)" and "Rec. Bit-rate (MP3)" or "Sample Rate (ADPCM)".
- Flip the JOG DIAL button + or - to choose the desired setting.
- Center-push the JOG DIAL button to access additional options, or make your selection.
- Press the MENU button to return to the main settings menu screen.
NOTE: The settings menu options will reset to the factory defaults when the battery is drained or replaced.
For complete list of menu options, see page 26.
①

②
③
④

Repeat
Choose between the following options*:
- Choose "Repeat One" to repeat one track.
- Choose "Repeat All" to repeat all tracks.
- Choose "Repeat Shuffle" to repeat all tracks in random order.
- Choose "Repeat Off" to cancel the repeat feature.
* Only available when accessing the settings menu from the music mode.
Preset equalizer
Choose between: "Classic", "Rock", "Pop", "Jazz" and "Normal".*
* Only available when accessing the settings menu from the music mode.
Recording format
Choose between: "MP3" or "ADPCM" file types for FM recordings, voice recordings and line-in recordings.*
- Choose "MP3" for higher quality recordings.
- Choose "ADPCM" for smaller file sizes.
* Only available when accessing the settings menu from the FM, Mic or Line mode.
Bit rate
If you selected "ADPCM" above, choose between: 8, 16 and 32KHz.*
If you selected "MP3" above, choose between: 96, 112, 128, 160, 192, 256 and 320kbps.*
- Lower settings will produce smaller file sizes; higher settings will produce better quality recordings.
* Only available when accessing the settings menu from the FM, Mic or Line mode.
Contrast
You can adjust the display's contrast.
Choose between: "Level 1", "Level 2", "Level 3", "Level 4" and "Level 5".
Backlight
The backlight will automatically turn on when pressing a button, then turn off after the specified time.
Choose between: "After 5 Secs", "After 10 Secs", "After 30 Secs" and "Off" (disables the backlight feature).
Auto power off
If no buttons are pressed after a specified time, the auto power off feature will turn off the player.
Choose between: "Off" (disables auto power off feature), "After 15 Secs", and "After 30 Secs".
Player info
The player info shows how much memory is currently being used from the available amount.
Troubleshooting
Player is not recognized on my Windows® 98 computer. Download and install the MP215 driver from www.emersonradio.com. Connect the player to your computer and follow your operating system's instructions to finish installing the driver.
If player is still not recognized, locate the Universal Serial Bus (USB) devices in your operating system's device manager. If your MP215 driver displays a problem, follow your operating instruction's directions for updating the device driver and load the downloaded MP215 driver.
After transferring files to the player, music did not play or data was not present: Make sure music is in the MP3 or WMA™ format. Follow your operating system's instructions for safely disconnecting USB devices.
Buttons do not work/player does not power up: Make sure the HOLD switch is in the off position. Make sure the battery is in the correct position. Replace the battery with a new one if necessary.
No sound is heard through the headphones: Check the headphone connection and adjust the volume level.
▶ FM radio reception is poor; Extend and adjust the headphone cord.
For more information and latest firmware downloads, please visit www.emersonradio.com
Menu list (music mode)
- Push and hold MENU button. This will enter settings menu for the specific mode the player is in.
- Flip the JOG DIAL button + or - to get the desired setting.
- Momentarily press JOG DIAL button to access the desired setting.
- Flip JOG DIAL button + or - to get the option within that desired setting. Press and hold JOG DIAL button to confirm.
①
②
④
Music Mode

flowchart
graph TD
    A["Repeat"] --> B["Repeat One"]
    A --> C["Repeat All"]
    A --> D["Repeat Shuffle"]
    A --> E["Repeat Off"]

    F["Equalizer"] --> G["Classic"]
    F --> H["Rock"]
    F --> I["Pop"]
    F --> J["Jazz"]
    F --> K["Normal"]

    L["Contrast"] --> M["Level 1"]
    L --> N["Level 2"]
    L --> O["Level 3"]
    L --> P["Level 4"]
    L --> Q["Level 5"]

    R["Back light"] --> S["Off"]
    R --> T["After 5 Sec."]
    R --> U["After 15 Sec."]
    R --> V["After 30 Sec."]

    W["Auto Power Off"] --> X["Off"]
    W --> Y["After 15 Sec."]
    W --> Z["After 30 Sec."]

    AA["Player Into (i.e.) : Memory Used: V000 014 20.0/120MB"] --> AB
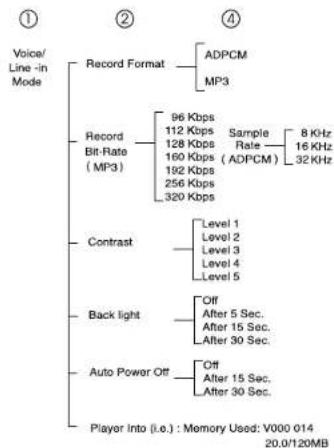
Menu list (voice / line-in mode)
- Push and hold MENU button. This will enter settings menu for the specific mode the player is in.
- Flip the JOG DIAL button + or - to get the desired setting.
- Momentarily press JOG DIAL button to access the desired setting.
- Flip JOG DIAL button + or - to get the option within that desired setting. Press and hold JOG DIAL button to confirm.
flowchart
graph TD
    A["Voice/Line-in Mode"] --> B["Record Format"]
    B --> C["ADPCM"]
    B --> D["MP3"]
    A --> E["Record Bit-Rate (MP3)"]
    E --> F["96 Kbps"]
    E --> G["112 Kbps"]
    E --> H["128 Kbps"]
    E --> I["160 Kbps"]
    E --> J["192 Kbps"]
    E --> K["256 Kbps"]
    E --> L["320 Kbps"]
    A --> M["Contrast"]
    M --> N["Level 1"]
    M --> O["Level 2"]
    M --> P["Level 3"]
    M --> Q["Level 4"]
    M --> R["Level 5"]
    A --> S["Back light"]
    S --> T["Off After 5 Sec. After 15 Sec. After 30 Sec."]
    A --> U["Auto Power Off"]
    U --> V["Off After 15 Sec. After 30 Sec."]
    A --> W["Player Into (i.e.) : Memory Used: V000 014 20.0/120MB"]
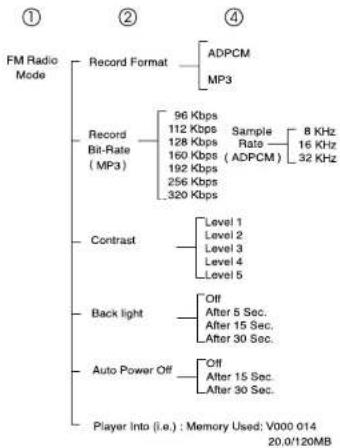
Menu list (FM radio mode)
- Push and hold MENU button. This will enter settings menu for the specific mode the player is in.
- Flip the JOG DIAL button + or - to get the desired setting.
- Momentarily press JOG DIAL button to access the desired setting.
- Flip JOG DIAL button + or - to get the option within that desired setting. Press and hold JOG DIAL button to confirm.
flowchart
graph TD
    A["FM Radio Mode"] --> B["Record Format"]
    B --> C["ADPCM"]
    B --> D["MP3"]
    A --> E["Record Bit-Rate (MP3)"]
    E --> F["96 Kbps"]
    E --> G["112 Kbps"]
    E --> H["128 Kbps"]
    E --> I["160 Kbps"]
    E --> J["192 Kbps"]
    E --> K["256 Kbps"]
    E --> L["320 Kbps"]
    A --> M["Contrast"]
    M --> N["Level 1"]
    M --> O["Level 2"]
    M --> P["Level 3"]
    M --> Q["Level 4"]
    M --> R["Level 5"]
    A --> S["Back light"]
    S --> T["Off After 5 Sec."]
    S --> U["After 15 Sec."]
    S --> V["After 30 Sec."]
    A --> W["Auto Power Off"]
    W --> X["Off After 15 Sec."]
    W --> Y["After 30 Sec."]
    A --> Z["Player Into (i.e.: Memory Used: V000 014 20.0/120MB)"]
LIMITED WARRANTY
Emerson Radio Corp. warrants manufacturing defects in original material, including original parts and workmanship, under normal use and conditions, for a period of ninety (90) days from the date of original purchase in the U.S. With your dated proof of purchase, we will provide repair service at no charge for labor and parts at an authorized Depot Repair Facility, or replace the product in our discretion. For repair or replacement, pack your unit in a padded box, enclose your check or money order payable to Emerson Radio Corp. in the amount of \$9.00 (not required by California residents) to cover shipping and handling costs, and enclose a copy of your proof of purchase. Send your unit to:
Emerson Radio Corp.
5101 Statesman Drive,
Irving, TX 75063
This warranty does not cover damage from negligence, misuse, abuse, accident, failure to follow operating instructions, commercial use, rental, repairs by an unauthorized facility, or products purchased, used, serviced or damaged outside of the United States.
THIS WARRANTY GIVES YOU SPECIFIC LEGAL RIGHTS, AND YOU MAY ALSO HAVE OTHER RIGHTS WHICH VARY FROM STATE TO STATE.
AU898M
FOR CUSTOMER SERVICE, PLEASE WRITE TO:
Emerson Radio Corp.
Consumer Affairs Dept
5101 Statesman Drive,
Irving, TX 75063
FOR ADDITIONAL SET-UP OR OPERATING ASSISTANCE
PLEASE CALL:
1-800-898-9020
Emerson®
EMERSON
Part No. 16-2965
506-04
Printed in China
- Emerson®
- Warning
- Copyright/Trademarks
- Location of controls
- Installing the battery (not included)
- Connect player to your computer
- Transferring music and data files
- Transferring DRM protected music files
- Transferring DRM protected music files (continued)
- Operation
- Operation (continued)
- List of basic operations
- Listen to the FM radio
- Create a station preset
- Listen to a station preset
- FM recording
- Voice recording
- Line-in recording
- Delete a music or data file
- Delete a file directly from the player
- Hold
- Settings menu
- Repeat
- Preset equalizer
- Recording format
- Bit rate
- Contrast
- Backlight
- Auto power off
- Player info
- Troubleshooting
- Menu list (music mode)
- Menu list (voice / line-in mode)
- Menu list (FM radio mode)
- LIMITED WARRANTY
Brand : Emerson
Model : MP215
Category : Digital audio player